Log in
Search
Latest topics
» Cox 020 PeeWee rebuild questions by balogh Today at 4:01 pm
» music vids.. some of your favorites
by Kim Today at 3:28 pm
» It's the X Wing that has a canard
by rsv1cox Today at 2:23 pm
» New Model Build
by bsadonkill Today at 1:19 pm
» My current avatar photo
by rsv1cox Today at 12:33 pm
» Kofuku Maru Fishing Boat Model
by Levent Suberk Today at 11:39 am
» Free Flight Radio Assist
by rdw777 Today at 11:24 am
» TEE DEE Having issues
by GallopingGhostler Yesterday at 11:38 pm
» Pathé Modeling Videos
by Levent Suberk Yesterday at 2:10 pm
» My latest doodle...
by layback209 Yesterday at 1:20 am
» Drones, pretty nifty...........
by rsv1cox Tue Nov 12, 2024 6:55 pm
» Project Cox .049 r/c & Citabrian Champion
by roddie Tue Nov 12, 2024 6:20 pm
Cox Engine of The Month
"Red Neck" .049 elec. starter
Page 2 of 3
Page 2 of 3 •  1, 2, 3
 Re: "Red Neck" .049 elec. starter
Some safety wire wrapped about 4~5 turns and some twists should do nicely. I would then put a small blob of shoe goo over the twisted ends, so it cant catch a finger.
 Re: "Red Neck" .049 elec. starter
Levent Suberk wrote:Once I made one inspired from your thread.
I attached hose with soft iron wire and twisted ends. A little contact cement is also good on gear. No vibrations any.
https://www.coxengineforum.com/t12008-making-a-starter-for-cox-engines?highlight=Starter
This gasket is helpful if spinner come loose:
https://www.coxengineforum.com/t12500-spinner-gasket-tip?highlight=Gasket
One gasket between spinner and propeller is enough. No need to place another gasket between propeller and drive plate.
I made several of them and I can send if any member want.
Hi Levent! I like your starter. Nice to be wireless. A companion glow-driver.. and you're travlin' light..

 Re: "Red Neck" .049 elec. starter
So......... over the last few weeks I've been sourcing parts to make a "duplicate" elec. starter like the one I made 30+ years ago.
It's a "wired" starter.... that requires a connection to a 6-12VDC battery to operate. The "cone" is meant to engage a Cox TeeDee .049/.051 style aluminum spinner.. and consists of a short piece of 5/16" ID automotive/gasoline-type rubber fuel tubing.
The motor consists of an "old-school" brushed 540 type can-motor. I found them on clearance at "Sig" for $2.40 ea. and bought a few. Then I searched/found 1/8" to 1/8" rod-couplings to fit the motors output-shaft to provide a mount for the tubing/cone.
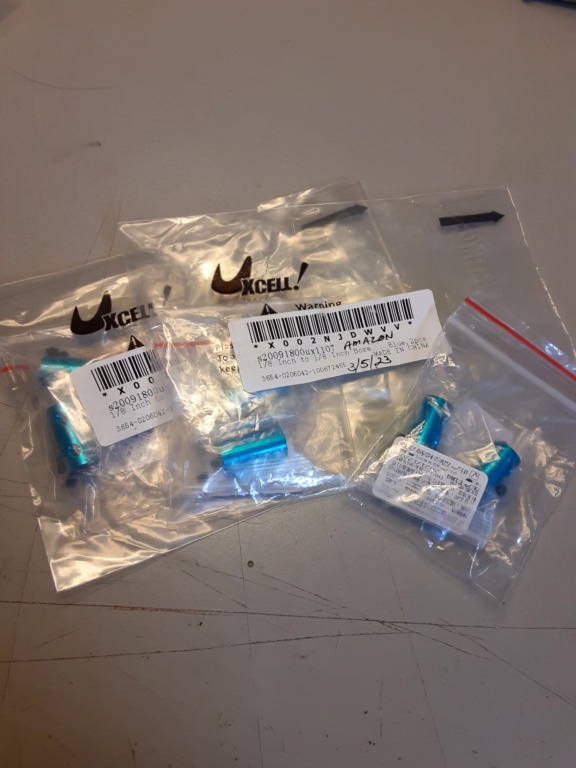
The coupling's OD is .390" so I had to enlarge the ID of the 5/16" (.312") tubing a little.. but it fits TIGHT when pressed-on.. and needs no further securing. Testing confirmed its suitability for the task.

I had some thin (.020"/.51mm) plastic sheet for the housing..

... which got rolled into a tube which is ultimately secured using two hose-clamps on ea. end. The standard 540 size can-motors have an OD of 1.5" (38mm).. so I found some 1.5" dia. round plastic plugs which helped me to form the "tube" which holds everything together.
A "momentary" (normally-open) switch is required.. so I sourced a few of them. The ones I bought are pretty small; having a smaller button than I'd like.. but they were inexpensive. I like to mount the switch inside of an inverted "cap" to prevent accidental actuation.
The switch is mounted 3" back from the front.. just behind the motor. It's best to make all the wiring connections including stress-reliefs before forming the housing/tube.
EDIT: I used X3 hose clamps to form the 1.5" ID tube. The "end-clamps" get tightened gradually..... around the motor in the front.. and then around the "cap" in the rear... whilst twisting the tube to make both end-seams even. Then I put a temporary 3rd hose-clamp in the center.. near the switch.. and tighten it until the body-tube looks uniform. I then TIGHTLY "wrap" the exposed areas of the body-tube with clear plastic packing-tape. This works really well to form the tube.. and because I used clear plastic for the tube, it's easier to see if a wire connection fails.
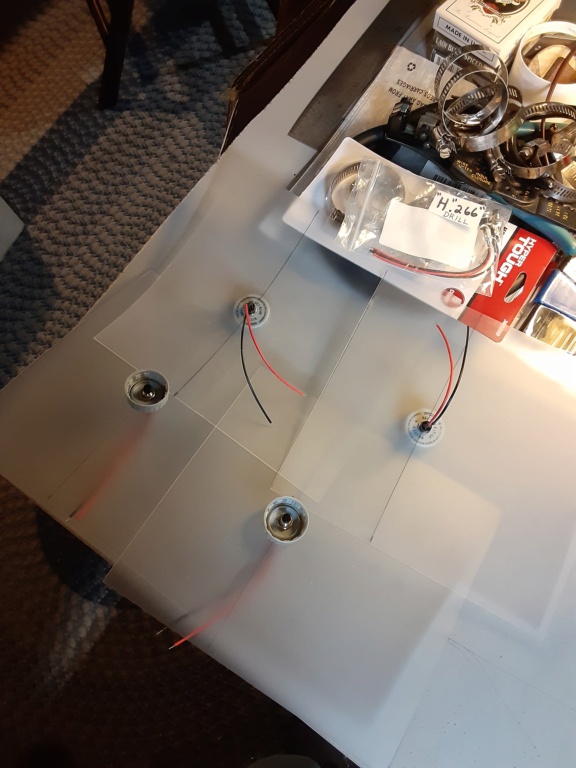
The plastic sheet for the "tube" measures 8.0" X 7.25" which gets rolled into an 8" long tube. This is where it takes a bit of finesse.. to form the tube around the assembly.
I used stainless steel hose-clamps to form the tube around my motor... and sourced some plastic "caps" of the same diameter... for the backside of the tube. The wires exit the tube through the rear cap. I had rubber grommets to spare.. so I incorporated one into the rear plug.
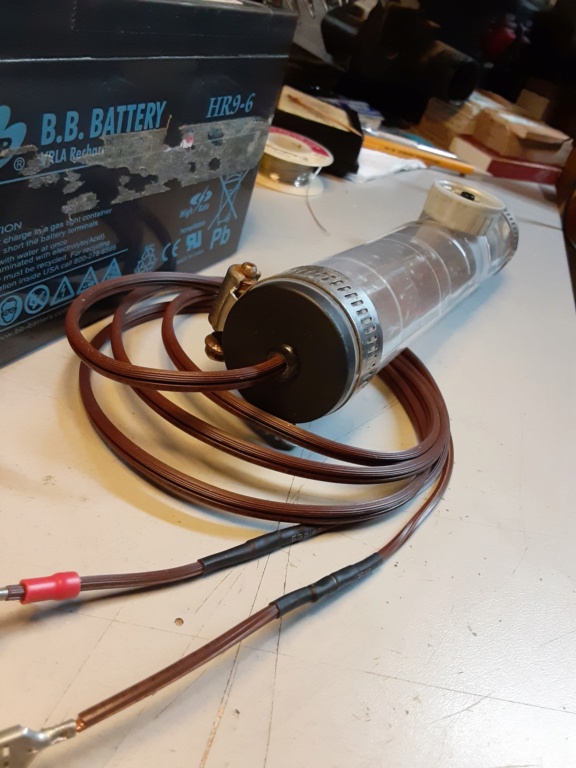
The more balanced cone assy. this time around; yields a much smoother starter-engagement with the engine.
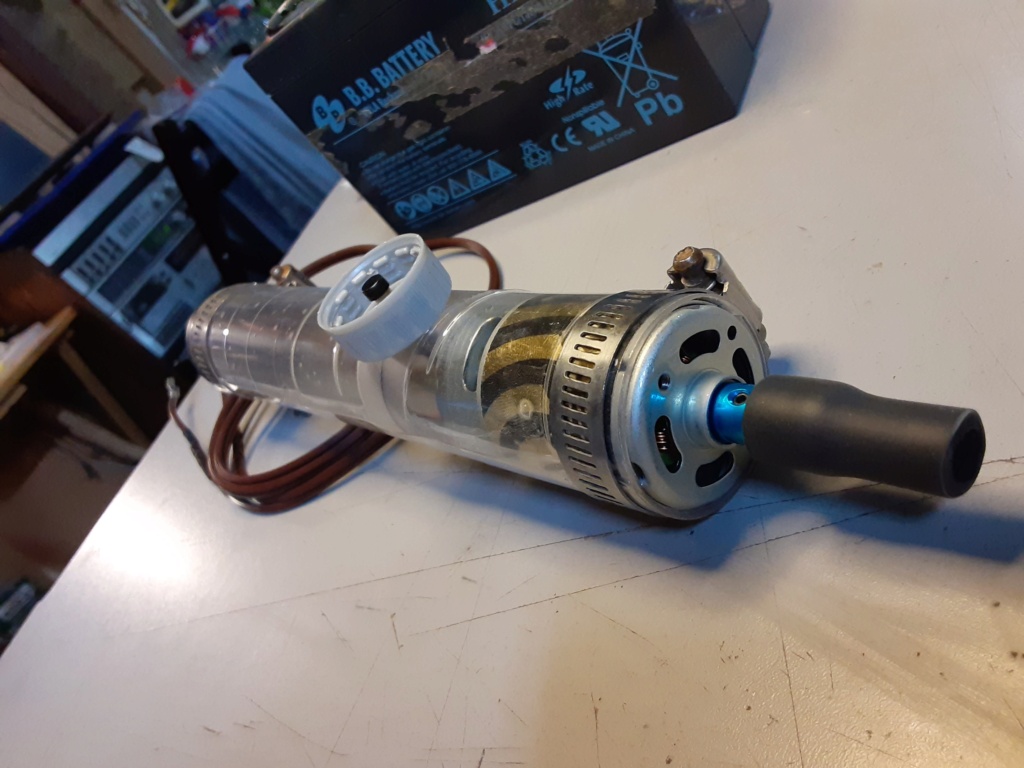
It will crank your Cox engine.. if your engine has a Tee Dee style aluminum spinner bearing on the crankshaft.
It's a "wired" starter.... that requires a connection to a 6-12VDC battery to operate. The "cone" is meant to engage a Cox TeeDee .049/.051 style aluminum spinner.. and consists of a short piece of 5/16" ID automotive/gasoline-type rubber fuel tubing.
The motor consists of an "old-school" brushed 540 type can-motor. I found them on clearance at "Sig" for $2.40 ea. and bought a few. Then I searched/found 1/8" to 1/8" rod-couplings to fit the motors output-shaft to provide a mount for the tubing/cone.

The coupling's OD is .390" so I had to enlarge the ID of the 5/16" (.312") tubing a little.. but it fits TIGHT when pressed-on.. and needs no further securing. Testing confirmed its suitability for the task.

I had some thin (.020"/.51mm) plastic sheet for the housing..

... which got rolled into a tube which is ultimately secured using two hose-clamps on ea. end. The standard 540 size can-motors have an OD of 1.5" (38mm).. so I found some 1.5" dia. round plastic plugs which helped me to form the "tube" which holds everything together.
A "momentary" (normally-open) switch is required.. so I sourced a few of them. The ones I bought are pretty small; having a smaller button than I'd like.. but they were inexpensive. I like to mount the switch inside of an inverted "cap" to prevent accidental actuation.
The switch is mounted 3" back from the front.. just behind the motor. It's best to make all the wiring connections including stress-reliefs before forming the housing/tube.
EDIT: I used X3 hose clamps to form the 1.5" ID tube. The "end-clamps" get tightened gradually..... around the motor in the front.. and then around the "cap" in the rear... whilst twisting the tube to make both end-seams even. Then I put a temporary 3rd hose-clamp in the center.. near the switch.. and tighten it until the body-tube looks uniform. I then TIGHTLY "wrap" the exposed areas of the body-tube with clear plastic packing-tape. This works really well to form the tube.. and because I used clear plastic for the tube, it's easier to see if a wire connection fails.

The plastic sheet for the "tube" measures 8.0" X 7.25" which gets rolled into an 8" long tube. This is where it takes a bit of finesse.. to form the tube around the assembly.
I used stainless steel hose-clamps to form the tube around my motor... and sourced some plastic "caps" of the same diameter... for the backside of the tube. The wires exit the tube through the rear cap. I had rubber grommets to spare.. so I incorporated one into the rear plug.

The more balanced cone assy. this time around; yields a much smoother starter-engagement with the engine.

It will crank your Cox engine.. if your engine has a Tee Dee style aluminum spinner bearing on the crankshaft.
Last edited by roddie on Sat Mar 11, 2023 8:16 pm; edited 1 time in total (Reason for editing : clarification on forming the body-tube)
 Re: "Red Neck" .049 elec. starter
Good work Roddie 
I remembered silk covered cables used for electrical appliances at the time when I see those brown cables
I remembered silk covered cables used for electrical appliances at the time when I see those brown cables

Levent Suberk- Diamond Member

- Posts : 2263
Join date : 2017-12-24
Location : Türkiye
 Alternate tube for Motor
An almost ready to use tube could be the brass tailpiece from a sink drain. Low price at your building supply store.
I use one that has lasted for more than a dozen years. Motor mounted inside. Secured with silicon seal.
I use one that has lasted for more than a dozen years. Motor mounted inside. Secured with silicon seal.

SABOO- Moderate Poster

- Posts : 10
Join date : 2019-10-03
Location : HALIFAX NS
 Re: "Red Neck" .049 elec. starter
Levent Suberk wrote:Good work Roddie
I remembered silk covered cables used for electrical appliances at the time when I see those brown cables
Thank you Levent!!
 The wire I used is common 18AWG 2C "lamp wire".
  Re: "Red Neck" .049 elec. starter
SABOO wrote:An almost ready to use tube could be the brass tailpiece from a sink drain. Low price at your building supply store.
I use one that has lasted for more than a dozen years. Motor mounted inside. Secured with silicon seal.
Yes.. I could have used a variety of materials for the body-tube... but wanted to use what I had on hand. Forming the tube from a piece of rigid plastic-sheet had its challenges.. but this hobby is FULL of those! I actually like the "see-thru" element. If I'd had some "clear" (non-tinted) 2L. soda-pop bottles.. it would have been easier to form the tube.
As it was; I had to wrap the tube with clear packing-tape after "cinching-up" the hose-clamps.. in order to make a uniform tube. I forgot to mention that in the build-thread. I need to edit that post.
Thanks for your comment.

 Re: "Red Neck" .049 elec. starter
Goodaye Roddie, Ive commenced building a starter based on your thread. I have obtained the motoor I thing its a CAN 540 6v-12v DC 11,000 rpm. I got a pinion gear to put on the shaft but have to file a flat onto the shaft for the grub screw. The other trick is going to be getting what looks like an Allan key small enough for the grub screw. I miight have to file something down to fit. Once I can get the pinion gear on securely Im sure the rest will be ok.
Soldering a momentary switch and making a body and leads for it seems not so bad. Evidently 10mm Electronic Fuel Injection hose with an EFI clamp works well and fits the pinion gear and fits the TD 049 spinner. Hopefully I can get all the parts sorted as being remote. 3 hours from any decent hardware store or hobby shop makes it tricky. I might have rubber hose/tube in my shed that will do the job. Hope so, as I dont want to do a city trip to try and get it. Thats the one drawback with being quite remote, little bits and pieces are not just down the road. I really want to get this Starter sorted as I think it will make life a lot easier. My TD 049 engines do start very easy using a spring, but I find I dont get huge life from a spring even if I only 3/4 turn them and for the longer term a starter is the best solution. Especially as seeing these days I am using All TD 049 engines (with non SPI cylinders - easy start, easy needle, better suction, huge fuel economy improvement, negligible rev loss) in my planes. They just go harder and that means I can fly longer lines and still have tension As you said, you only need to pulse the starter to mimick the spring action.
Hopefully tonight I will get the pinion gear onto the motor shaft. That will be step 1 achieved! Then a piece of tube clamped to the pinion gear, then the wiring and the body. What could possibly go wrong.
Thanks for the thread. I would have no hope of building one of these without this thread.
Soldering a momentary switch and making a body and leads for it seems not so bad. Evidently 10mm Electronic Fuel Injection hose with an EFI clamp works well and fits the pinion gear and fits the TD 049 spinner. Hopefully I can get all the parts sorted as being remote. 3 hours from any decent hardware store or hobby shop makes it tricky. I might have rubber hose/tube in my shed that will do the job. Hope so, as I dont want to do a city trip to try and get it. Thats the one drawback with being quite remote, little bits and pieces are not just down the road. I really want to get this Starter sorted as I think it will make life a lot easier. My TD 049 engines do start very easy using a spring, but I find I dont get huge life from a spring even if I only 3/4 turn them and for the longer term a starter is the best solution. Especially as seeing these days I am using All TD 049 engines (with non SPI cylinders - easy start, easy needle, better suction, huge fuel economy improvement, negligible rev loss) in my planes. They just go harder and that means I can fly longer lines and still have tension As you said, you only need to pulse the starter to mimick the spring action.
Hopefully tonight I will get the pinion gear onto the motor shaft. That will be step 1 achieved!

Thanks for the thread. I would have no hope of building one of these without this thread.


Yabby- Platinum Member


Posts : 712
Join date : 2021-06-08
Location : Yorke Peninsula South Australia
 Re: "Red Neck" .049 elec. starter
Darn i posted in the wrong spot lol anyway while I am here Thanks for posting this design , I walked by my elect. motor for this appl. and realized it has like a 5/8" gear on it and that's not going to work , the coupler is a good idea and i just may have one somewhere ?  Need to get the other stuff together

Last edited by getback on Sun Mar 12, 2023 7:08 am; edited 1 time in total (Reason for editing : change meaning)

getback- Top Poster


Posts : 10431
Join date : 2013-01-18
Age : 67
Location : julian , NC
 Re: "Red Neck" .049 elec. starter
Yabby wrote:Goodaye Roddie, Ive commenced building a starter based on your thread. I have obtained the motoor I thing its a CAN 540 6v-12v DC 11,000 rpm. I got a pinion gear to put on the shaft but have to file a flat onto the shaft for the grub screw. The other trick is going to be getting what looks like an Allan key small enough for the grub screw. I miight have to file something down to fit. Once I can get the pinion gear on securely Im sure the rest will be ok.
Soldering a momentary switch and making a body and leads for it seems not so bad. Evidently 10mm Electronic Fuel Injection hose with an EFI clamp works well and fits the pinion gear and fits the TD 049 spinner. Hopefully I can get all the parts sorted as being remote. 3 hours from any decent hardware store or hobby shop makes it tricky. I might have rubber hose/tube in my shed that will do the job. Hope so, as I dont want to do a city trip to try and get it. Thats the one drawback with being quite remote, little bits and pieces are not just down the road. I really want to get this Starter sorted as I think it will make life a lot easier. My TD 049 engines do start very easy using a spring, but I find I dont get huge life from a spring even if I only 3/4 turn them and for the longer term a starter is the best solution. Especially as seeing these days I am using All TD 049 engines (with non SPI cylinders - easy start, easy needle, better suction, huge fuel economy improvement, negligible rev loss) in my planes. They just go harder and that means I can fly longer lines and still have tension As you said, you only need to pulse the starter to mimick the spring action.
Hopefully tonight I will get the pinion gear onto the motor shaft. That will be step 1 achieved!Then a piece of tube clamped to the pinion gear, then the wiring and the body. What could possibly go wrong.

Thanks for the thread. I would have no hope of building one of these without this thread.
Gary! So good to have your interest in this starter design. Yes.. the 540 6-12VDC can motor is what you want. The pinion-gear will work. The grub-screw(s) likely require a tiny 1.5mm allen/hex-key to secure the gear to the motor-shaft. I sourced some .125" to .125" (1/8" to 1/8") rod-couplings for my latest builds.. which utilized X2 grub-screws (180 degrees apart) for attachment to the .125" dia. motor-shaft. The grub-screws required a 1.5mm hex-key/wrench. I did not file any "flats" on my motor shafts.. and hopefully won't need to.
My old starter had a pinion-gear that was "pressed-on" to the motor shaft.. so there wasn't any grub-screw involved.
Good luck.. and let us know how it works out!
 Re: "Red Neck" .049 elec. starter
Thanks Roddie! I wouldnt be able to make this starter were it not for your thread! 
the motor and pinion gear are done. I didnt file a flat and it seems quite secure. the grub screw was a mother! luckily I had an allen key that just fitted.

Now I just need to get the right sized tubing. didnt have anything that fits well in the shed. So will have to be a city trip. In the mean time I will make the case and do the wiring and switch as I have the switch and wire, just gotta make a case which will be a bit rougher than the nice case you have built. I need one of those Lithium based car starter packs for my boat to take out with me as an emergency. So I will get one of them as it comes with all sorts of connection types etc. It will be perfect for running the starter and I might wire a regulator into it to give me a 1.5v rail for my glow plugs whilst Im at it. The lithium car/boat/ etc.. starter packs are really good nowadays, small, light, high energy density, easy charge
I also think the coupler would be better than the pinion gear but couldnt get a coupler so will go with the pinion gear for now.

the motor and pinion gear are done. I didnt file a flat and it seems quite secure. the grub screw was a mother! luckily I had an allen key that just fitted.


Now I just need to get the right sized tubing. didnt have anything that fits well in the shed. So will have to be a city trip. In the mean time I will make the case and do the wiring and switch as I have the switch and wire, just gotta make a case which will be a bit rougher than the nice case you have built.
I also think the coupler would be better than the pinion gear but couldnt get a coupler so will go with the pinion gear for now.

Yabby- Platinum Member


Posts : 712
Join date : 2021-06-08
Location : Yorke Peninsula South Australia
 Re: "Red Neck" .049 elec. starter
getback wrote:Darn i posted in the wrong spot lol anyway while I am here Thanks for posting this design , I walked by my elect. motor for this appl. and realized it has like a 5/8" gear on it and that's not going to work , the coupler is a good idea and i just may have one somewhere ?Need to get the other stuff together

Hi Eric! You might be able to make that motor with the 5/8" dia. gear work.. by using two different size pieces of rubber hose. Do you have any hose with a 1/2" ID? Maybe some old 1/2" garden/soaker hose or PCV (crankcase ventilation) hose?
The 5/16" rubber fuel-line that I used.. has a 1/2" OD and could be cemented (glued) into the larger hose and then "pressed" onto that 5/8" OD gear. Maybe try soaking the hose(s) in hot water; making them more pliable for ease of assembly.
The hose-assembly only needs to be about 1.00" in length. Try a 1.00" length of the larger hose.. with a 0.50" length of the smaller hose inside of it.
 Re: "Red Neck" .049 elec. starter
A couple tips on using the 5/16" (.312" ID) rubber fuel-hose. I used a "conical rotary rasp" to slightly enlarge one end of the hose, to make it easier to press-onto the .396" (OD) shaft-coupling that I had obtained.
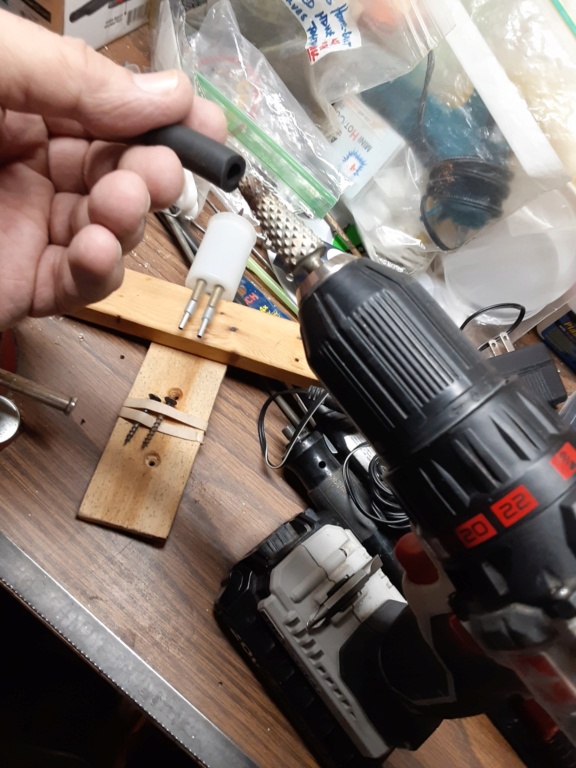
I then used my bench-vise to slowly press the hose onto the coupling. It's obviously important that the two parts assemble as straight as possible... to minimize imbalance/vibration when pulsing the starter. The hose should also be as short as possible to do the job. It only requires approx. 1/4" (6.35mm) of depth to engage the TeeDee .049/.051 alum. spinner.
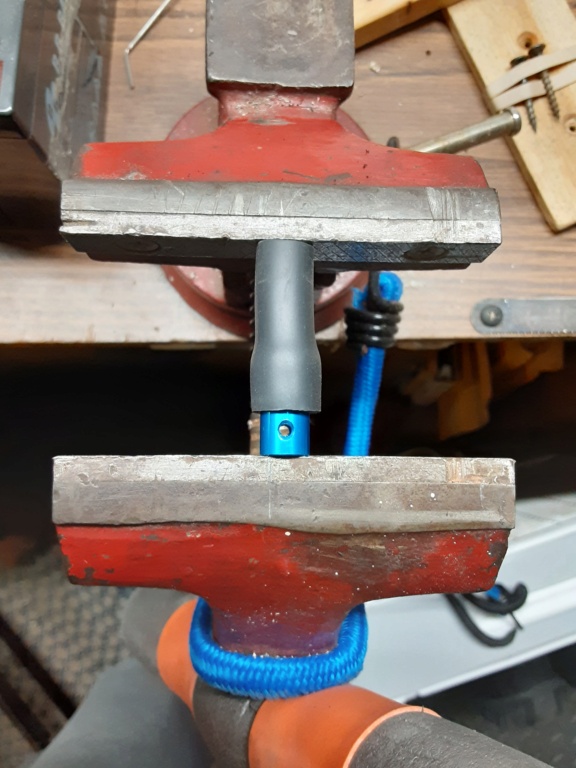

I then used my bench-vise to slowly press the hose onto the coupling. It's obviously important that the two parts assemble as straight as possible... to minimize imbalance/vibration when pulsing the starter. The hose should also be as short as possible to do the job. It only requires approx. 1/4" (6.35mm) of depth to engage the TeeDee .049/.051 alum. spinner.

 fuse-protect your panel
Many years ago, Ken Cook advised me to fuse-protect my hard-wired power-panel(s).... and today I decided to do that.. while taking care of some other hobby-related wiring.

The new 12VDC electric starters that I built, needed the option for connection to my power-panel; a Tower Hobbies (Hobbico) unit that I've had for 30+ years. The many batteries that would power it were never "hard-wired"... they just weren't... so I decided to wire a fuse-holder into the 12VDC mains. I installed a 7.5A blade-fuse which "popped-open" following a few pulses of my starter, under a normal-load. I replaced the fuse with a 10A one, which seems to be holding-up. I have spare fuses in my flight-prep gear.
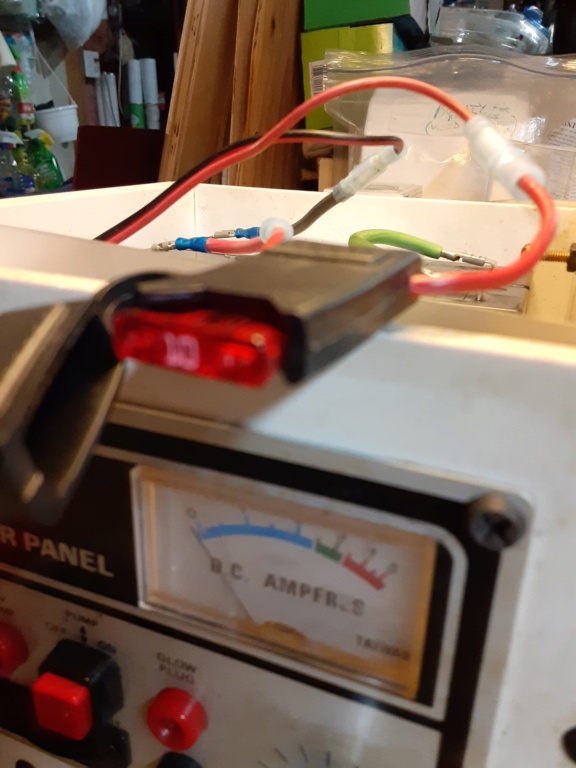


The new 12VDC electric starters that I built, needed the option for connection to my power-panel; a Tower Hobbies (Hobbico) unit that I've had for 30+ years. The many batteries that would power it were never "hard-wired"... they just weren't... so I decided to wire a fuse-holder into the 12VDC mains. I installed a 7.5A blade-fuse which "popped-open" following a few pulses of my starter, under a normal-load. I replaced the fuse with a 10A one, which seems to be holding-up. I have spare fuses in my flight-prep gear.


 Re: "Red Neck" .049 elec. starter
I had used one of my "new" starters recently and found that the shaft-coupling's set-screws did not hold tight; requiring a "flat" to be formed on the motor-shaft. At first I was apprehensive as I'd never tried to do this. A modeler friend recommended "filing" flats on the shaft while being held in a vise.
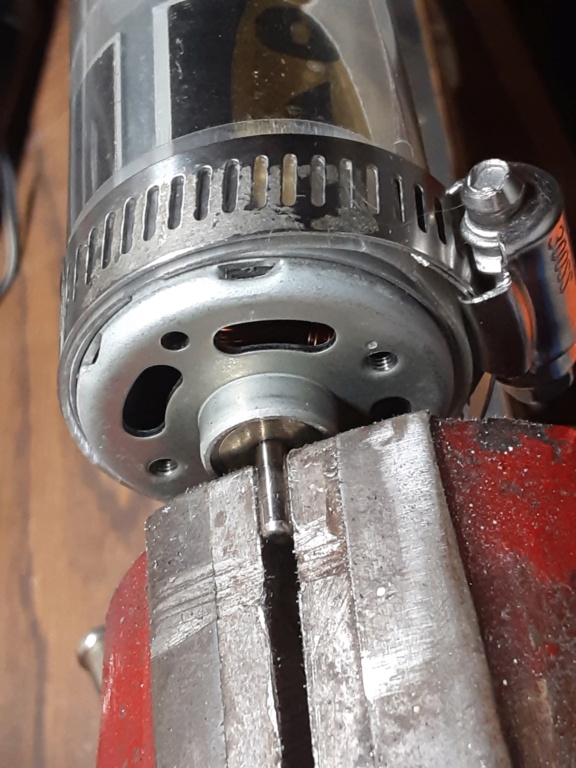
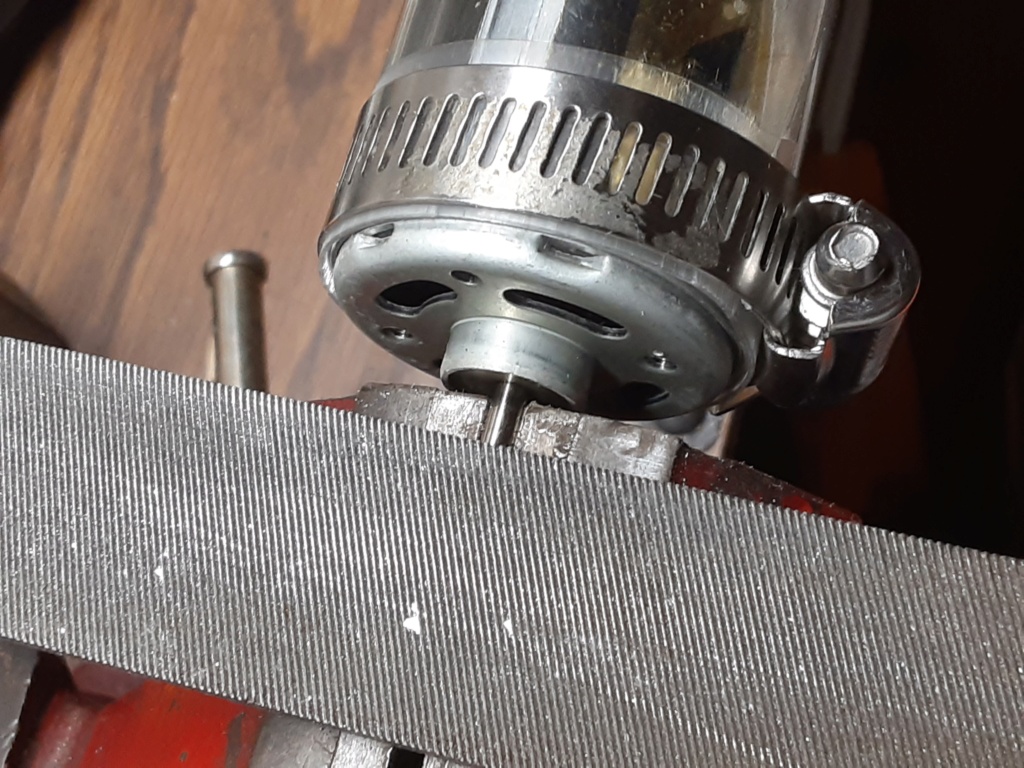
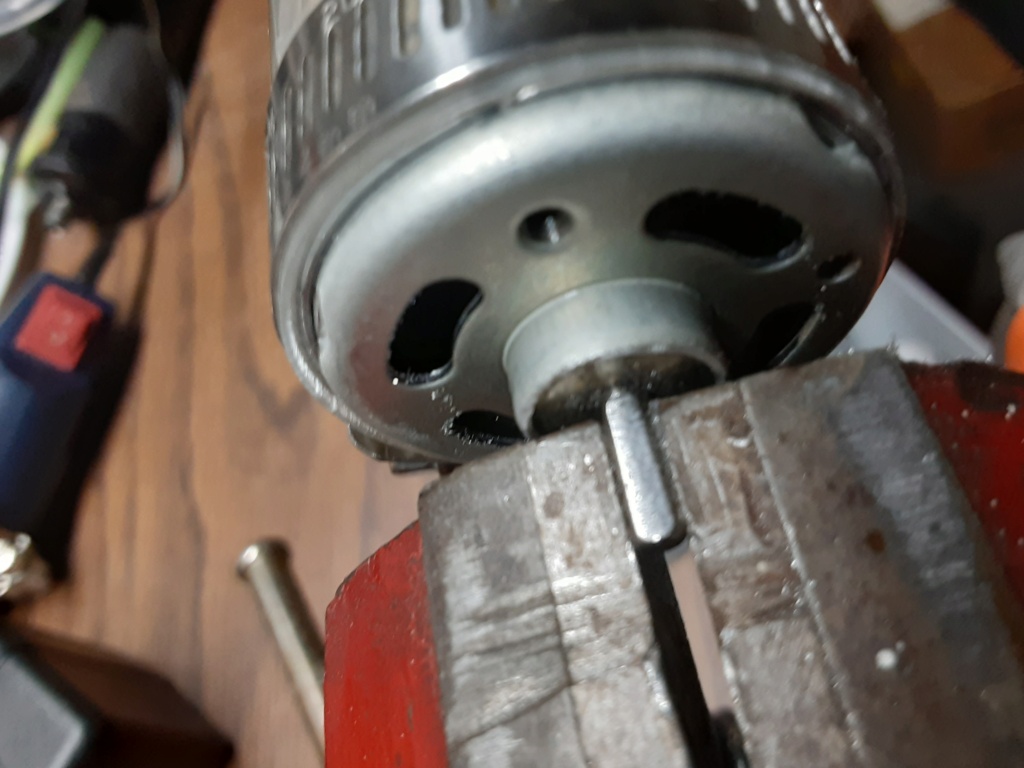
This was not difficult at all.. and the coupling's set-screws will now grip the shaft securely.


This was not difficult at all.. and the coupling's set-screws will now grip the shaft securely.
 Re: "Red Neck" .049 elec. starter
Good idea. Thanks 

Levent Suberk- Diamond Member

- Posts : 2263
Join date : 2017-12-24
Location : Türkiye
 Re: "Red Neck" .049 elec. starter
From an old thread:
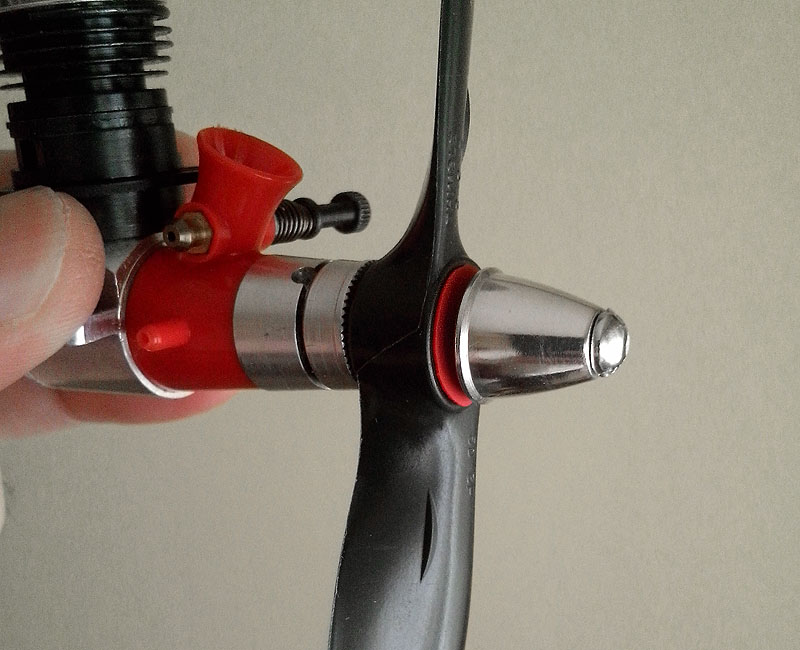
A gasket is useful to prevent loosing aluminum spinner when using electric starters. Cut a thin rubber gasket from a balloon. Place the gasket between spinner and propeller. Tighten the propeller screw. Friction of rubber gasket keeps the spinner in place.
Rubber balloon material is tricky with punches, so I attached a piece of 1/8 in. brass tubing on tip of soldering iron to open screw hole.
If you want I can send several by registered air mail at no cost.


Levent Suberk- Diamond Member

- Posts : 2263
Join date : 2017-12-24
Location : Türkiye
 Re: "Red Neck" .049 elec. starter
Now that's a nice idea too Levent! I have all those materials here, therefor I can make my own.. but thank you for offering. 
 Re: "Red Neck" .049 elec. starter
Great fix on the motor shaft roddie! …. For further security you might consider a little blue Loctite on the set screw…
Great idea too on the rubber spinner washer Levent!…Note taken
Robert
Great idea too on the rubber spinner washer Levent!…Note taken
Robert

rdw777- Diamond Member


Posts : 1697
Join date : 2021-03-11
Location : West Texas
 Re: "Red Neck" .049 elec. starter
rdw777 wrote:Great fix on the motor shaft roddie! …. For further security you might consider a little blue Loctite on the set screw…
Great idea too on the rubber spinner washer Levent!…Note taken
Robert
Thanks Robert! Yes.. the "blue" thread-locker is a good idea. I need to source a quality 1.5mm hex key for the tiny metric set-screws. I had to buy a cheap 16-piece set.. just to get that one size that I needed. I have a quality metric set.. but wouldn't you know; that size was missing..
Regarding Levent's "balloon-rubber" between the prop and drive-plate; I need to know how he cuts the "OD" so nice. I understand the part about the smaller 1/8" hole for the screw being heated with tubing/soldering iron. Levent.. can you explain? Thanks..
 Re: "Red Neck" .049 elec. starter
Hi Roddie, I use an appropriate size metal washer and used it as a template. Cut balloon lenghtwise and placed metal washer on balloon, then cut balloon washers with an X Acto knife around the edge of metal washer as a template.
If you want I can send quality 1.5 mm Allen key at no cost.
If you want I can send quality 1.5 mm Allen key at no cost.

Levent Suberk- Diamond Member

- Posts : 2263
Join date : 2017-12-24
Location : Türkiye

Levent Suberk- Diamond Member

- Posts : 2263
Join date : 2017-12-24
Location : Türkiye
 Re: "Red Neck" .049 elec. starter
Cool stuff going on over here m i am glad you brought up the need for a fuse in the battery box , I need to do that mine is in the house so i can keep up with it  I still need to make a starter i have the stuff just not the time .
 I still need to make a starter i have the stuff just not the time .

getback- Top Poster


Posts : 10431
Join date : 2013-01-18
Age : 67
Location : julian , NC
 another switch failure...
I had a 2nd switch fall apart on me last weekend when testing my water-cooled/bench-run/set-up. These little momentary push-button switches that I sourced; just aren't up to the task.

I installed them in three other starters.. and I might as well replace them all before they fail. I gave one of the starters to getback (Eric).. and I recommend that he put a better switch in his.
I found this heavier-duty switch in my switch-stock.. and replaced the failed part.


I installed them in three other starters.. and I might as well replace them all before they fail. I gave one of the starters to getback (Eric).. and I recommend that he put a better switch in his.
I found this heavier-duty switch in my switch-stock.. and replaced the failed part.


 Re: "Red Neck" .049 elec. starter
Roddie,
The Servalite switch looks like it has a heavier gauge wire. If so, that's a "tell" that the lighter-wired switches just aren't built for the current load.
I know my flight box battery really wears down faster when I'm using the Sullivan Green Hornet starter.
But all this is pretty much academic at this point. It might be interesting to see how much current your starter takes when cranking engines. Hmmm...I may add a current gauge to my flight box now.
_________________
Never enough time to build them all...always enough time to smash them all!
944_Jim- Diamond Member


Posts : 2021
Join date : 2017-02-08
Age : 59
Location : NE MS
Page 2 of 3 •  1, 2, 3
 Similar topics
» vid showing "finished" belt-start conversion for my "red-neck" electric starter
» Narrow neck nose / Enlarged neck nose
» TD .010 snap starter tip
» Workshop safety
» Herkimer Starter
» Narrow neck nose / Enlarged neck nose
» TD .010 snap starter tip
» Workshop safety
» Herkimer Starter
Page 2 of 3
Permissions in this forum:
You cannot reply to topics in this forum

 Rules
Rules


