Log in
Search
Latest topics
» Free Flight Radio Assist by GallopingGhostler Today at 12:54 pm
» My N-1R build log
by akjgardner Today at 12:39 pm
» Purchased the last of any bult engines from Ken Enya
by getback Today at 12:05 pm
» Funny what you find when you go looking
by rsv1cox Yesterday at 3:21 pm
» Landing-gear tips
by 1975 control line guy Yesterday at 8:17 am
» Cox NaBOO - Just in time for Halloween
by rsv1cox Tue Nov 19, 2024 6:35 pm
» Canada Post strike - We are still shipping :)
by Cox International Tue Nov 19, 2024 12:01 pm
» Duende V model from RC Model magazine 1983.
by getback Tue Nov 19, 2024 6:08 am
» My current avatar photo
by roddie Mon Nov 18, 2024 9:05 pm
» My latest doodle...
by TD ABUSER Mon Nov 18, 2024 11:30 am
» Brushless motors?
by rsv1cox Sun Nov 17, 2024 6:40 pm
» Tribute Shoestring build
by amurphy6812 Sun Nov 17, 2024 5:43 pm
Cox Engine of The Month
Skyray 35 Build - Faux Streak look
Page 6 of 9
Page 6 of 9 •  1, 2, 3, 4, 5, 6, 7, 8, 9
 Re: Skyray 35 Build - Faux Streak look
Well it's been a few days. Yesterday I had to put my 30th anniversary present together. How ya like that baby!

Then my first project on it was to get the red carb body off the BFS-I to send to Mark for his new eBay TD .051, since I'm converting mine to an .049.
So today I put the Skyray on it. I'm at the Devil's Details part of the build now now, so I added epoxy fillets to the wing and filled a small gap in the root with Microballoons. Wonderful stuff, makes anybody look like a pro. And the leadout guide has been hanging free until I got answers on where to secure it. It's in the Brett Buck position. I blocked it in in the front between where I had added a Lite Ply rib and the stub of an old broken soft balsa rib. I blocked it in with some overlapping balsa at the other end.
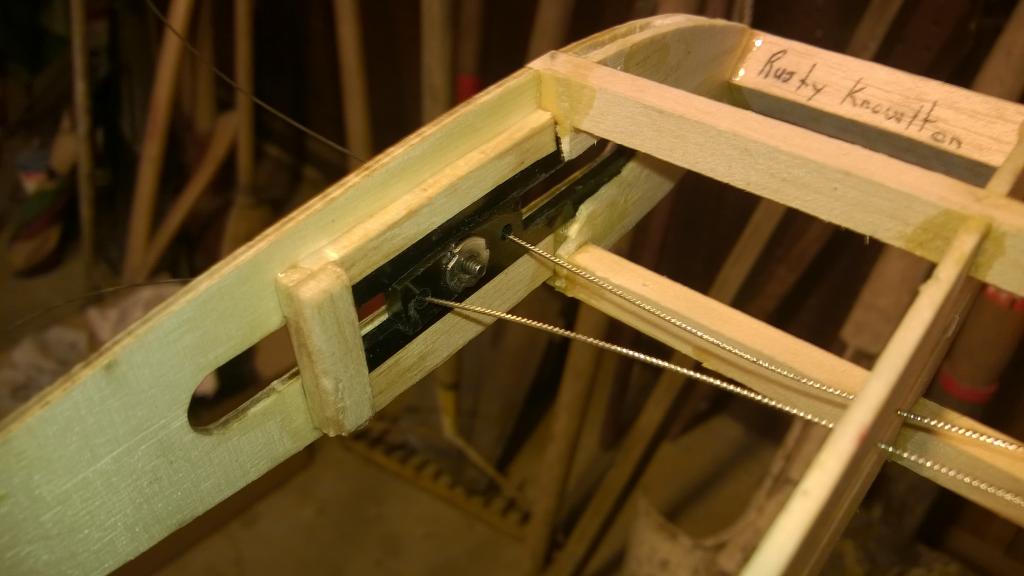
It's shown here centered at the Skyray plans position. The mark to the left is the Brett Buck center position. Somewhere in there will work.
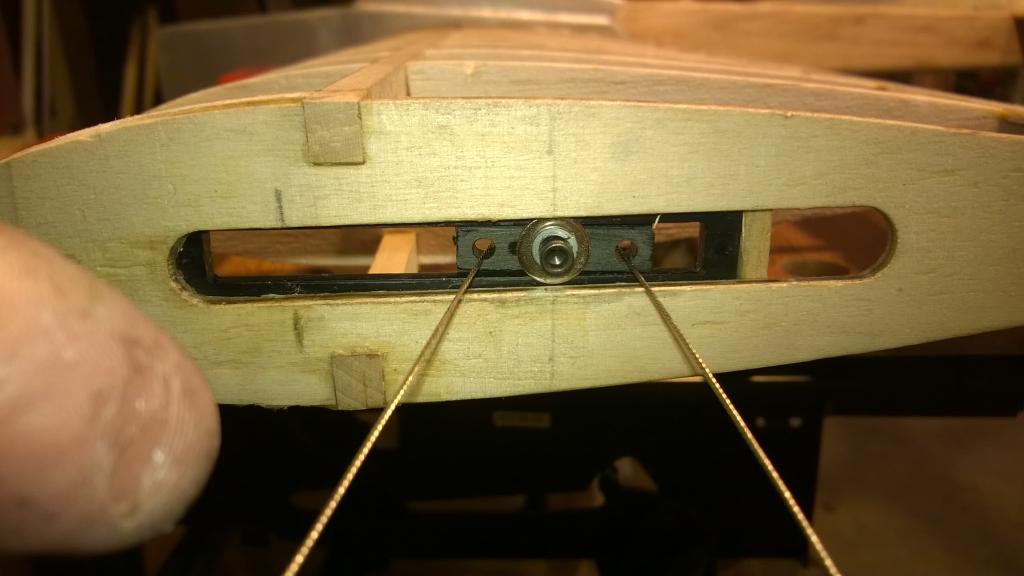
Next is to glue the wingtips on. After that a shot of paint on the tail fin and canopy, Monokote and decals, Lustrekote clear on the nose, bolt on the LG, hook up the control horn and she's pretty close to maiden.
Rusty

Then my first project on it was to get the red carb body off the BFS-I to send to Mark for his new eBay TD .051, since I'm converting mine to an .049.
So today I put the Skyray on it. I'm at the Devil's Details part of the build now now, so I added epoxy fillets to the wing and filled a small gap in the root with Microballoons. Wonderful stuff, makes anybody look like a pro. And the leadout guide has been hanging free until I got answers on where to secure it. It's in the Brett Buck position. I blocked it in in the front between where I had added a Lite Ply rib and the stub of an old broken soft balsa rib. I blocked it in with some overlapping balsa at the other end.

It's shown here centered at the Skyray plans position. The mark to the left is the Brett Buck center position. Somewhere in there will work.

Next is to glue the wingtips on. After that a shot of paint on the tail fin and canopy, Monokote and decals, Lustrekote clear on the nose, bolt on the LG, hook up the control horn and she's pretty close to maiden.
Rusty
_________________
Don't Panic!
...and never Ever think about how good you are at something...
while you're doing it!
My Hot Rock & Blues Playlist
...and never Ever think about how good you are at something...
while you're doing it!
My Hot Rock & Blues Playlist

RknRusty- Rest In Peace

- Posts : 10869
Join date : 2011-08-10
Age : 68
Location : South Carolina, USA
 Re: Skyray 35 Build - Faux Streak look
Black & Decker Workmates - I swear by them! I'm on my third one now - no criticism of them but I have literally worn them out through constant folding and unfolding together with general abuse!.
I like the adjustable lead outs - that looks neat but I do have a question (remember I am stealing your ideas!) -
Why did you chose a fixed spacing for the lead outs and what made you decide on that spacing? It looks narrower than the bellcrank.
I have tried epoxy and micro balloons but struggled. We probable don't get the same stuff here! I watched Windy using Brodak Aeropoxy lite but couldn't get that over here.
However, I found Superfil and a stockist in the UK. (Have to buy it in quarts though!)
http://www.polyfiber.com/epoxy/
It is light, strong and sands easily but takes at least 12 hours to be ready for sanding in warm surroundings. (Workable for one hour)

ian1954- Diamond Member

- Posts : 2688
Join date : 2011-11-16
Age : 70
Location : England
 Re: Skyray 35 Build - Faux Streak look
Steal away! ...Hey that just made me hear Robert Plant. Mostly because I had a pre-made leadout guide. But I don't think the spacing has critical effects unless it's too wide, then with full panic controls, you risk supporting the full weight of the plane on only one line. Jim Thomerson, an accomplished builder of all types from 1/2A on up, has frequently run both leadouts through one hole. That introduces the risk of snagging the connectors, so staggering the lengths is in order. I personally don't care for that idea. This might be a good discussion for the Stunthangar crowd. Maybe it already has been.ian1954 wrote:...I like the adjustable lead outs - that looks neat but I do have a question (remember I am stealing your ideas!)
Why did you chose a fixed spacing for the lead outs and what made you decide on that spacing? It looks narrower than the bellcrank.
I had to climb the learning curve with the Sig glass Microballoons, mixing with the 60 minute epoxy parts separately before combining and getting the consistency right. And I wasted epoxy when I found it sets way faster after mixing and I couldn't finish the job without starting over to continue. I was trying to make fillets too big. I successfully did make big curved fillets on the Yak-9, but for the Skyray, I mixed a small amount of 30 minute epoxy, then stirred in the balloons, not near as thick, and applied very small fillets, smoothing them with an alcohol wet finger.ian1954 wrote:I have tried epoxy and micro balloons but struggled. We probable don't get the same stuff here! I watched Windy using Brodak Aeropoxy lite but couldn't get that over here.
However, I found Superfil and a stockist in the UK. (Have to buy it in quarts though!)
http://www.polyfiber.com/epoxy/
It is light, strong and sands easily but takes at least 12 hours to be ready for sanding in warm surroundings. (Workable for one hour)
Rusty
_________________
Don't Panic!
...and never Ever think about how good you are at something...
while you're doing it!
My Hot Rock & Blues Playlist
...and never Ever think about how good you are at something...
while you're doing it!
My Hot Rock & Blues Playlist

RknRusty- Rest In Peace

- Posts : 10869
Join date : 2011-08-10
Age : 68
Location : South Carolina, USA
 Re: Skyray 35 Build - Faux Streak look
Thanks Rusty.
I will be starting a Super Dooper Gary Cooper Skyray in a few weeks.
I will be starting a Super Dooper Gary Cooper Skyray in a few weeks.

ian1954- Diamond Member

- Posts : 2688
Join date : 2011-11-16
Age : 70
Location : England
 Re: Skyray 35 Build - Faux Streak look
A tip for thickened epoxy:
Mortarboard
Spread the mess out after mixing so it does not build heat, which is both the enemy of working time and final strength as overheating causes a weaker bond.
Phil
Mortarboard
Spread the mess out after mixing so it does not build heat, which is both the enemy of working time and final strength as overheating causes a weaker bond.
Phil

pkrankow- Top Poster

- Posts : 3025
Join date : 2012-10-02
Location : Ohio
 Re: Skyray 35 Build - Faux Streak look
Phil you get a click of the "Thanks" button and a Greenie for that. So if I need a large quantity I can mix the balloons in the measuring cups with each part and then spread it out to fold it together. I feel a little dumb now not realizing why when I use cups it kicks so fast. For smaller amounts I always mix it on paper.pkrankow wrote:A tip for thickened epoxy:
Mortarboard
Spread the mess out after mixing so it does not build heat, which is both the enemy of working time and final strength as overheating causes a weaker bond.
Phil
Ah yes, as I recall your kit had crappy lite ply. I recommend balsa ribs as I have done. But if I had it to do again I would user light grade balsa rather than contest grade which is so very fragile. And remember I did use hard balsa for the three center ribs. You might even want to use your lite ply for these if it's not too cruddy. And the same with the outboard end rib if you don't use a spar mounted weight box. Same for the inboard side if using a leadout guide.ian1954 wrote:Thanks Rusty.
I will be starting a Super Dooper Gary Cooper Skyray in a few weeks.
Gary Cooper, eh. A movie theme like Aviojet's Skyfall Flite Streak?
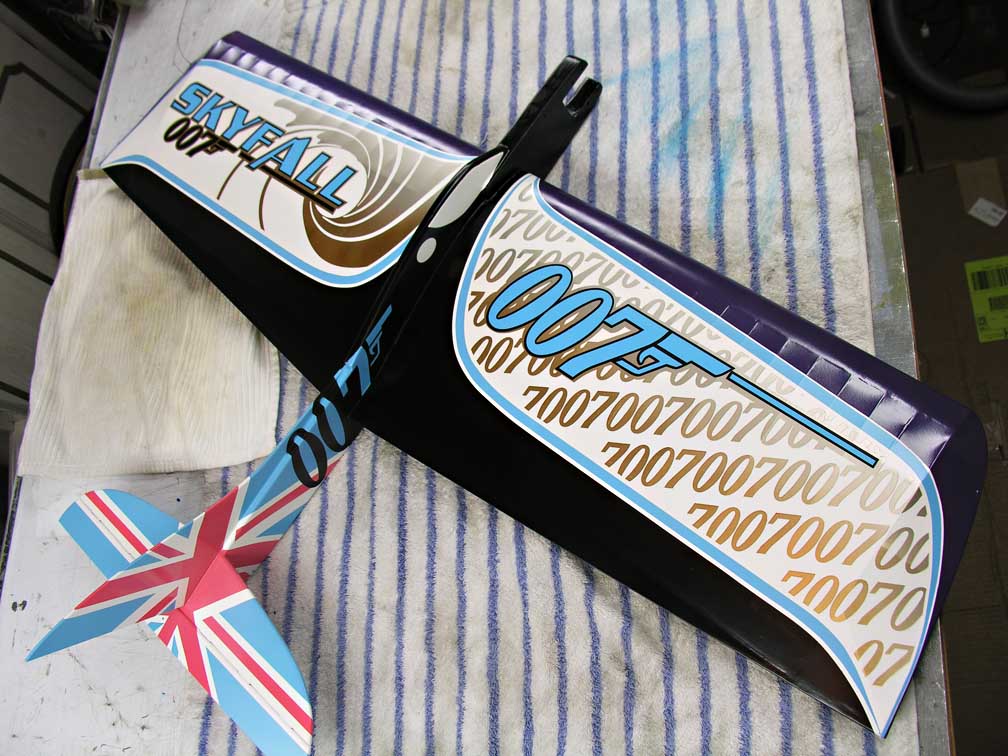
Rusty
_________________
Don't Panic!
...and never Ever think about how good you are at something...
while you're doing it!
My Hot Rock & Blues Playlist
...and never Ever think about how good you are at something...
while you're doing it!
My Hot Rock & Blues Playlist

RknRusty- Rest In Peace

- Posts : 10869
Join date : 2011-08-10
Age : 68
Location : South Carolina, USA
 Re: Skyray 35 Build - Faux Streak look
I've had the flaps tacked on for some time now. Those look simple but the slightest misalignment will make a plane that either rolls one way or the other or has lift or push that makes for a pretty poor stunt flight. Tonight was going to be the final alignment and epoxying permanently in place. What complicates it is that balsa is forever changing shape.
One of the flaps I cut a month ago wanted to curl up lengthwise. I noticed it early on, so I cut a quarter inch off the root and replaced that piece with a strip of hard balsa with its grain going in the opposite direction. CAd in place, that stopped the rollup. I think next time I'm going to do that with both of them whether they need it or not.
That cross grain end stub is the part that butts up to the fuselage. Now it was flat but didn't exactly follow the back side of the TE perfectly. Not bad but enough to make gluing and walking away impossible. So I applied 6 minute epoxy to the root that mates with the fuselage, and also spread the glue out for three ribs length. Then held it to the witness mark on the fuse and played human clamp for ten minutes while it set. Mixed a dab more 6 minute glue and continued to glue the next 6" length to the TE, and repeated until the whole thing was on straight. The other side was more cooperative, but I followed the same method to complete that one. They appear to be aligned nice and straight now.
So that's progress. Now for the wingtips. I figured 1/8" balsa for those and looked through my stock and all I had is soft balsa. Crap! I'll go to the store tomorrow and get some hard balsa for the tips and some decal paper. I rooted through my CF tubes and brass to make gluing anchors for the ends, aluminum collars to prevent splitting. Installed the control horn, tapped for a 4-40 screw to accept the ball link. I have everything on the table for that. I'll get some fresh JB Weld and put the control rod together tomorrow. Our Thursday flying is off for tomorrow, so I should have a completely functioning airframe for tomorrow night's report.
Nothing left but Monokote and decorations, a shot of clear coat on the nose and when I get my engine bearers I can bolt it together and fly. I suppose I should open up the .25fp engine and inspect it, but it feels just fine. I got this engine from Jason_WI back in the Spring and it looks sweet. I outfitted it with a CL venturi and NV. I bought some 9x4 Top Flite props, so I'm hoping that works right. I use a 10x4 on the .35.
Rusty
_________________
Don't Panic!
...and never Ever think about how good you are at something...
while you're doing it!
My Hot Rock & Blues Playlist
...and never Ever think about how good you are at something...
while you're doing it!
My Hot Rock & Blues Playlist

RknRusty- Rest In Peace

- Posts : 10869
Join date : 2011-08-10
Age : 68
Location : South Carolina, USA
 Re: Skyray 35 Build - Faux Streak look
Making the control linkage. I threaded the inside of that 4-40 solder coupler. I had originally intended to insert threaded rod into the CF tube to connect it to, but wasn't happy with how that was working out. But the threads will give the solder something to hold onto around that 3/32" music wire. The end of the wire to be JB Welded into the CF tube has brass collars soldered around it to hang onto the JB Weld.
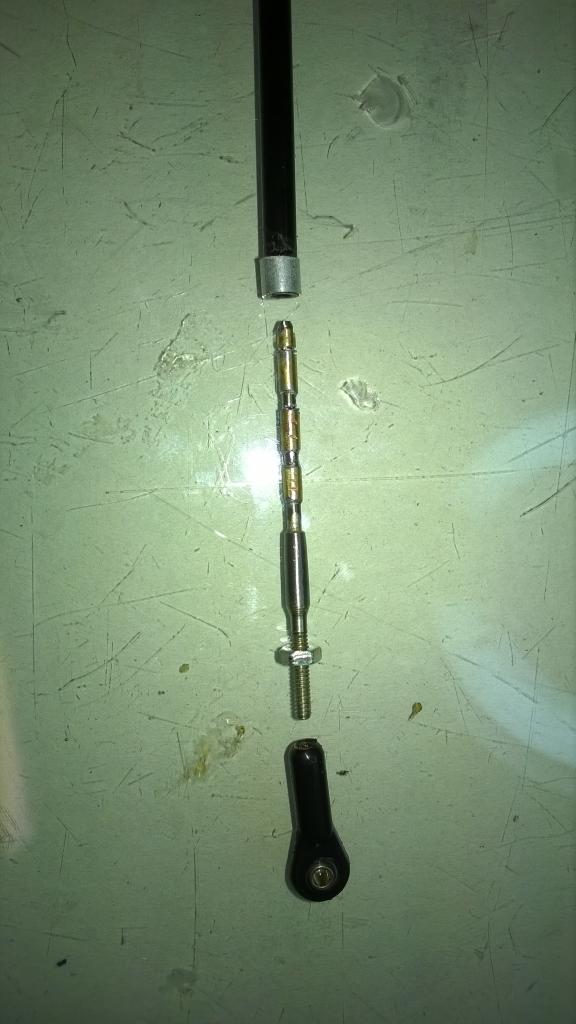
I don't know why I go to all this trouble. It isn't saving any weight with all my redneck methods of attachment. It will be assured of zero flex in inside maneuvers though.
Rusty

I don't know why I go to all this trouble. It isn't saving any weight with all my redneck methods of attachment. It will be assured of zero flex in inside maneuvers though.
Rusty
_________________
Don't Panic!
...and never Ever think about how good you are at something...
while you're doing it!
My Hot Rock & Blues Playlist
...and never Ever think about how good you are at something...
while you're doing it!
My Hot Rock & Blues Playlist

RknRusty- Rest In Peace

- Posts : 10869
Join date : 2011-08-10
Age : 68
Location : South Carolina, USA
 Re: Skyray 35 Build - Faux Streak look
I need some advice. I'm making the wingtips and need some help with the inboard one which has to be clear of any interference with the leadouts no matter where they are adjusted. The first pic is the outboard tip installed. Easy.
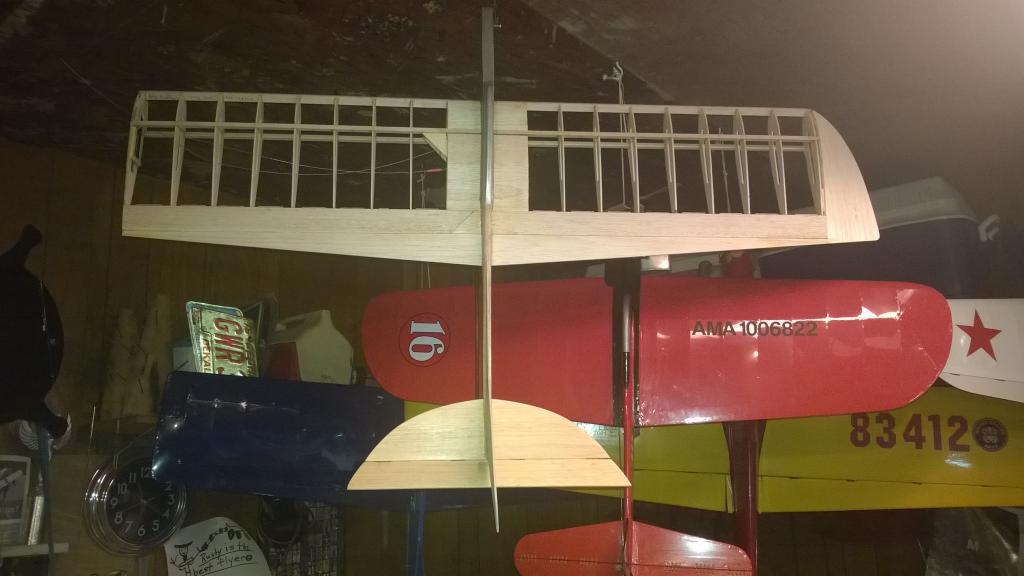
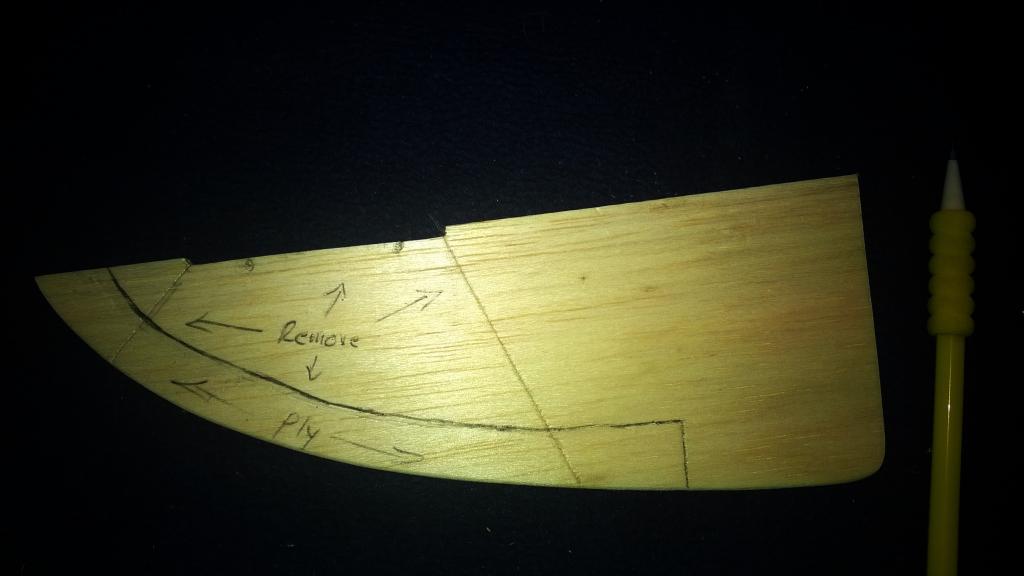
Now for the inboard. The two dots represent the position of the adjusting screw at each end of possible adjustment. The two angled lines mark the most extreme sweep I can imagine either line making during flight. If I remove all of the balsa in between those lines and laminate a piece of ply top and bottom along the outer edge that allows the lines to pass between them, is this the right way, or best way to assemble it?
Thanks.
Rusty
P.S. I'm also going to post this at SH. No offense intended, just lots of opinions.

Now for the inboard. The two dots represent the position of the adjusting screw at each end of possible adjustment. The two angled lines mark the most extreme sweep I can imagine either line making during flight. If I remove all of the balsa in between those lines and laminate a piece of ply top and bottom along the outer edge that allows the lines to pass between them, is this the right way, or best way to assemble it?
Thanks.
Rusty

P.S. I'm also going to post this at SH. No offense intended, just lots of opinions.
_________________
Don't Panic!
...and never Ever think about how good you are at something...
while you're doing it!
My Hot Rock & Blues Playlist
...and never Ever think about how good you are at something...
while you're doing it!
My Hot Rock & Blues Playlist

RknRusty- Rest In Peace

- Posts : 10869
Join date : 2011-08-10
Age : 68
Location : South Carolina, USA
 Re: Skyray 35 Build - Faux Streak look
I would have just used 3/8" tips and just carved a slot. I think what you propose will work just fine.

Cribbs74- Moderator


Posts : 11907
Join date : 2011-10-24
Age : 50
Location : Tuttle, OK
 Re: Skyray 35 Build - Faux Streak look
I haven't glued anything onto the inboard end yet, so 3/8" tips aren't out of the question. I didn't even think of that. I'd have to go buy a sheet of 3/8" wood.
_________________
Don't Panic!
...and never Ever think about how good you are at something...
while you're doing it!
My Hot Rock & Blues Playlist
...and never Ever think about how good you are at something...
while you're doing it!
My Hot Rock & Blues Playlist

RknRusty- Rest In Peace

- Posts : 10869
Join date : 2011-08-10
Age : 68
Location : South Carolina, USA
 Re: Skyray 35 Build - Faux Streak look
That's what I was eluding to over the phone, but the conversation went another direction and we never got back to it.

Cribbs74- Moderator


Posts : 11907
Join date : 2011-10-24
Age : 50
Location : Tuttle, OK
 Re: Skyray 35 Build - Faux Streak look
I answered on stunthanger... make a lite ply tip out of 3 pieces of 1/8 balsa. The center layer is mostly air for clearance, running along the spar, the outer layers are front-back, with a generous amount removed fro clearing the adjuster. After sanding and shaping it should look pretty similar to the outboard wingtip.
Phil
Phil

pkrankow- Top Poster

- Posts : 3025
Join date : 2012-10-02
Location : Ohio
 Re: Skyray 35 Build - Faux Streak look
Thanks Phil. I like that idea better than mine so far.
Rusty
Rusty
_________________
Don't Panic!
...and never Ever think about how good you are at something...
while you're doing it!
My Hot Rock & Blues Playlist
...and never Ever think about how good you are at something...
while you're doing it!
My Hot Rock & Blues Playlist

RknRusty- Rest In Peace

- Posts : 10869
Join date : 2011-08-10
Age : 68
Location : South Carolina, USA
 Re: Skyray 35 Build - Faux Streak look
Here's what I did. It's about what Phil suggested.
First I cut the wingtip shape from soft 1/8" balsa and marked the edges of where the lines could possibly sweep. Then I cut two more tips from some fairly hard 3/32 balsa. I laminated one of them with Titebond to the 1/8" piece and cut away between the marks I made..
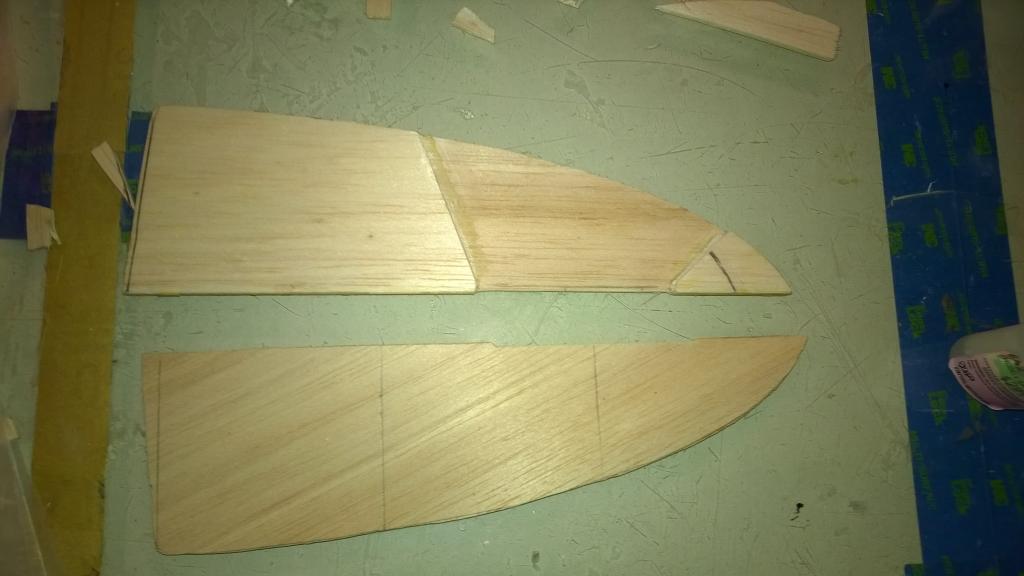
After cutting away the slot I used thin CA to harden all of the internal surfaces of the slot. I made sure I sanded a radius on any edges the lines can contact.
Here's where the lines enter
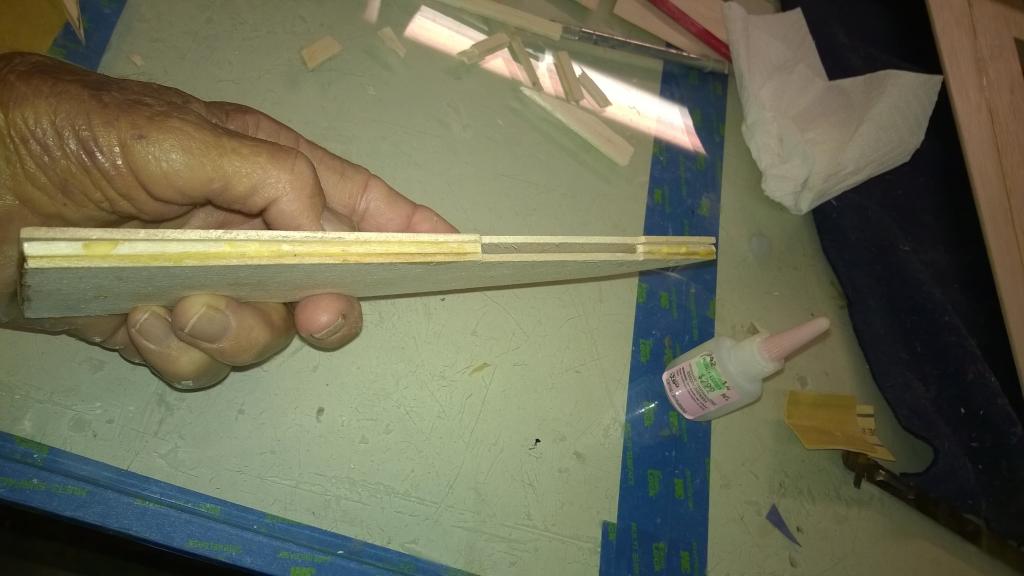
Here's where the lines exit
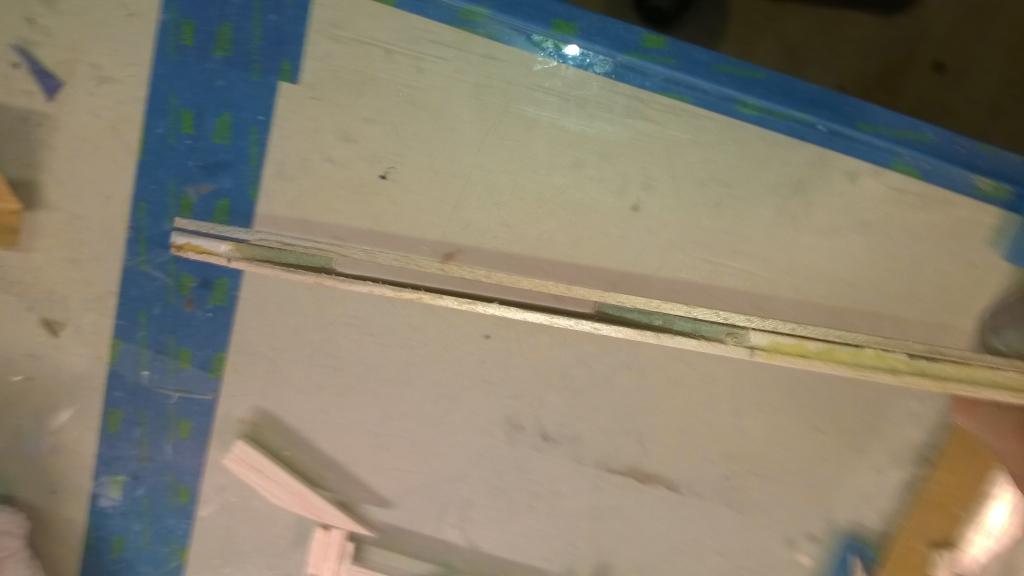
I think that will work out fine.
Rusty
First I cut the wingtip shape from soft 1/8" balsa and marked the edges of where the lines could possibly sweep. Then I cut two more tips from some fairly hard 3/32 balsa. I laminated one of them with Titebond to the 1/8" piece and cut away between the marks I made..

After cutting away the slot I used thin CA to harden all of the internal surfaces of the slot. I made sure I sanded a radius on any edges the lines can contact.
Here's where the lines enter

Here's where the lines exit

I think that will work out fine.
Rusty
_________________
Don't Panic!
...and never Ever think about how good you are at something...
while you're doing it!
My Hot Rock & Blues Playlist
...and never Ever think about how good you are at something...
while you're doing it!
My Hot Rock & Blues Playlist

RknRusty- Rest In Peace

- Posts : 10869
Join date : 2011-08-10
Age : 68
Location : South Carolina, USA
 Re: Skyray 35 Build - Faux Streak look
I cut a partial moon where there is no material for the tip to be glued, so as it is impossible to foul the adjuster screw. Otherwise it looks exactly like mine...other than grain direction.
Just double check your wrench turns freely in the slot. Now it is easy to fix something like that with some sandpaper wrapped on a putty knife. With the Brodak adjuster there should be plenty of space.
Phil
Just double check your wrench turns freely in the slot. Now it is easy to fix something like that with some sandpaper wrapped on a putty knife. With the Brodak adjuster there should be plenty of space.
Phil

pkrankow- Top Poster

- Posts : 3025
Join date : 2012-10-02
Location : Ohio
 Re: Skyray 35 Build - Faux Streak look
I think i have mine cutout like you're saying. If you look at my second image up there, there is a recess running the length of the slot where the hex screw cannot touch the wood.pkrankow wrote:I cut a partial moon where there is no material for the tip to be glued, so as it is impossible to foul the adjuster screw. Otherwise it looks exactly like mine...other than grain direction.
Just double check your wrench turns freely in the slot. Now it is easy to fix something like that with some sandpaper wrapped on a putty knife. With the Brodak adjuster there should be plenty of space.
Phil
It's more obvious in this piece. All three plates have that recess.

Regarding grain direction, I at least got some semi-cross grain in one of the caps. I was low on wood, so went with parallel grain on the other cap. I was wondering if anyone would notice. It's hard wood and strengthened Windy style with thin CA too. It passes my tenderness test.
Rusty
_________________
Don't Panic!
...and never Ever think about how good you are at something...
while you're doing it!
My Hot Rock & Blues Playlist
...and never Ever think about how good you are at something...
while you're doing it!
My Hot Rock & Blues Playlist

RknRusty- Rest In Peace

- Posts : 10869
Join date : 2011-08-10
Age : 68
Location : South Carolina, USA
 Re: Skyray 35 Build - Faux Streak look
I was much more generous on my stock removal. I am sure it will be fine.
Phil
Phil

pkrankow- Top Poster

- Posts : 3025
Join date : 2012-10-02
Location : Ohio
 Re: Skyray 35 Build - Faux Streak look
I have not glued the top cap on it yet. I'll take another look at it before I do.pkrankow wrote:I was much more generous on my stock removal. I am sure it will be fine.
Phil
_________________
Don't Panic!
...and never Ever think about how good you are at something...
while you're doing it!
My Hot Rock & Blues Playlist
...and never Ever think about how good you are at something...
while you're doing it!
My Hot Rock & Blues Playlist

RknRusty- Rest In Peace

- Posts : 10869
Join date : 2011-08-10
Age : 68
Location : South Carolina, USA
 Re: Skyray 35 Build - Faux Streak look
RknRusty wrote:I have not glued the top cap on it yet. I'll take another look at it before I do.pkrankow wrote:I was much more generous on my stock removal. I am sure it will be fine.
Phil
I left more material inside the layers, but I relieved more material through all the layers against the rib. I'll have to upload a picture later today.
Phil

pkrankow- Top Poster

- Posts : 3025
Join date : 2012-10-02
Location : Ohio
 Re: Skyray 35 Build - Faux Streak look
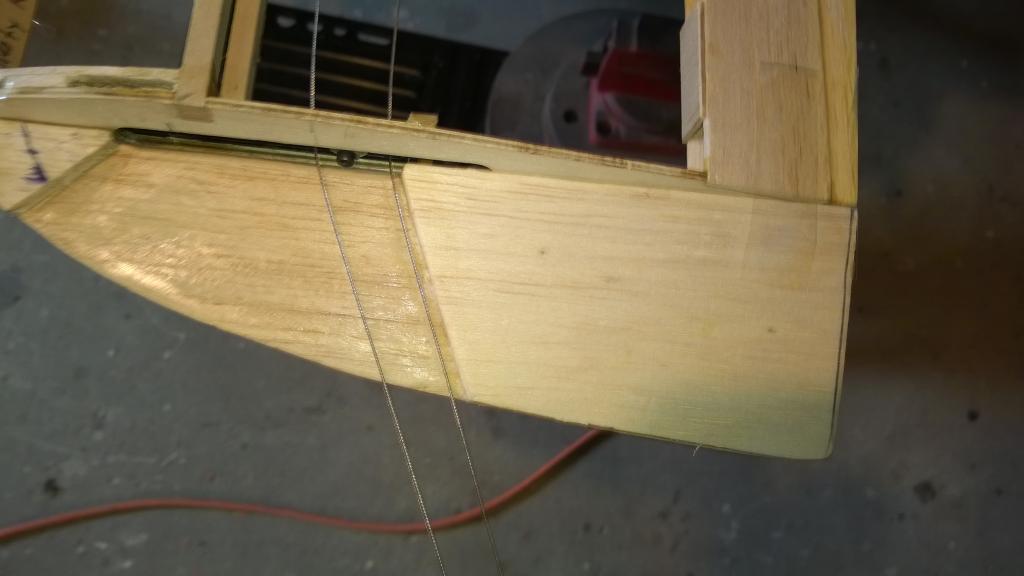
Before I glue the cap on it maybe I should remove some more of the balsa behind the rear line. See what you think about my pictures.pkrankow wrote:I left more material inside the layers, but I relieved more material through all the layers against the rib. I'll have to upload a picture later today.
Phil
1. This is the LO at Brett Buck's(and the forwardmost) recommended position:
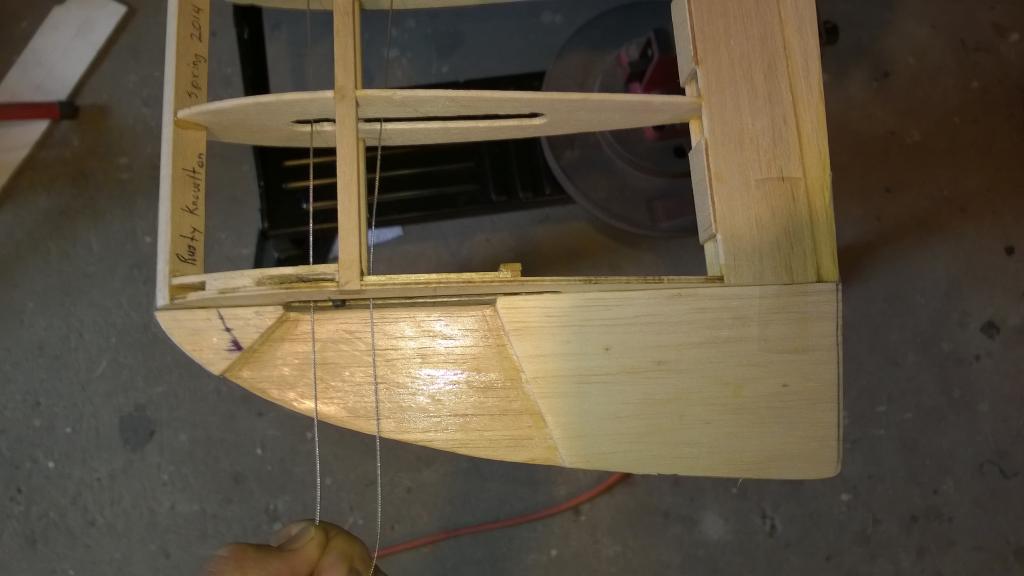
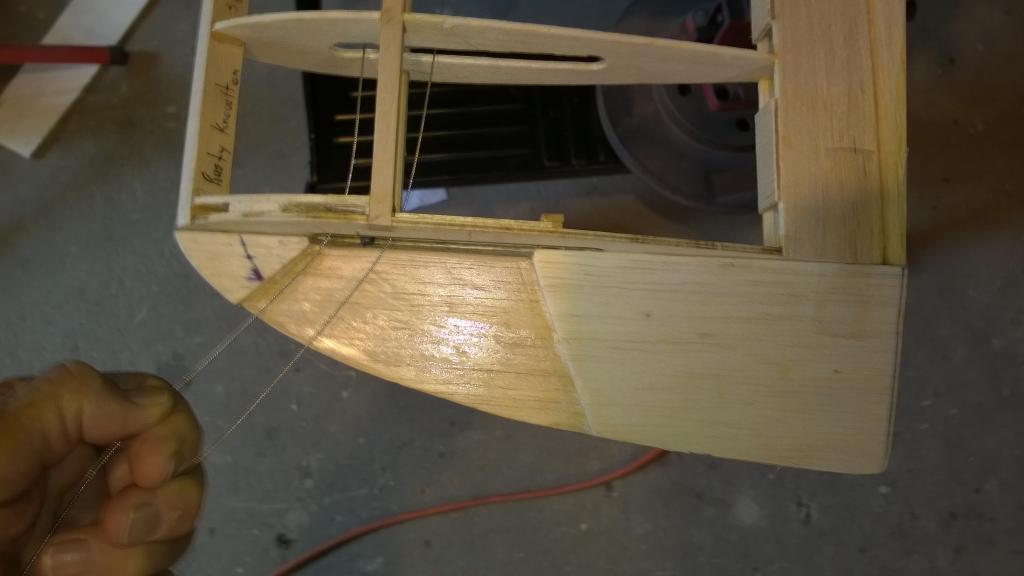
2. At the Skyray plan's position:

3. At the rearmost position:
_________________
Don't Panic!
...and never Ever think about how good you are at something...
while you're doing it!
My Hot Rock & Blues Playlist
...and never Ever think about how good you are at something...
while you're doing it!
My Hot Rock & Blues Playlist

RknRusty- Rest In Peace

- Posts : 10869
Join date : 2011-08-10
Age : 68
Location : South Carolina, USA
 Re: Skyray 35 Build - Faux Streak look
I think it will be fine the way you have it.
Phil
Phil

pkrankow- Top Poster

- Posts : 3025
Join date : 2012-10-02
Location : Ohio
 Re: Skyray 35 Build - Faux Streak look


Here's mine. Yours is fine.
Phil

pkrankow- Top Poster

- Posts : 3025
Join date : 2012-10-02
Location : Ohio
 Re: Skyray 35 Build - Faux Streak look
Ah yes, I think I'm good. I see what you meant about relieving more of a scoop against the rib.pkrankow wrote:
Here's mine. Yours is fine.
Phil
_________________
Don't Panic!
...and never Ever think about how good you are at something...
while you're doing it!
My Hot Rock & Blues Playlist
...and never Ever think about how good you are at something...
while you're doing it!
My Hot Rock & Blues Playlist

RknRusty- Rest In Peace

- Posts : 10869
Join date : 2011-08-10
Age : 68
Location : South Carolina, USA
 Re: Skyray 35 Build - Faux Streak look
Got my linkage done. Gravity pulls it full up and full down, free enough for an electric if I were of that persuasion.

Just fine tooth combing it.
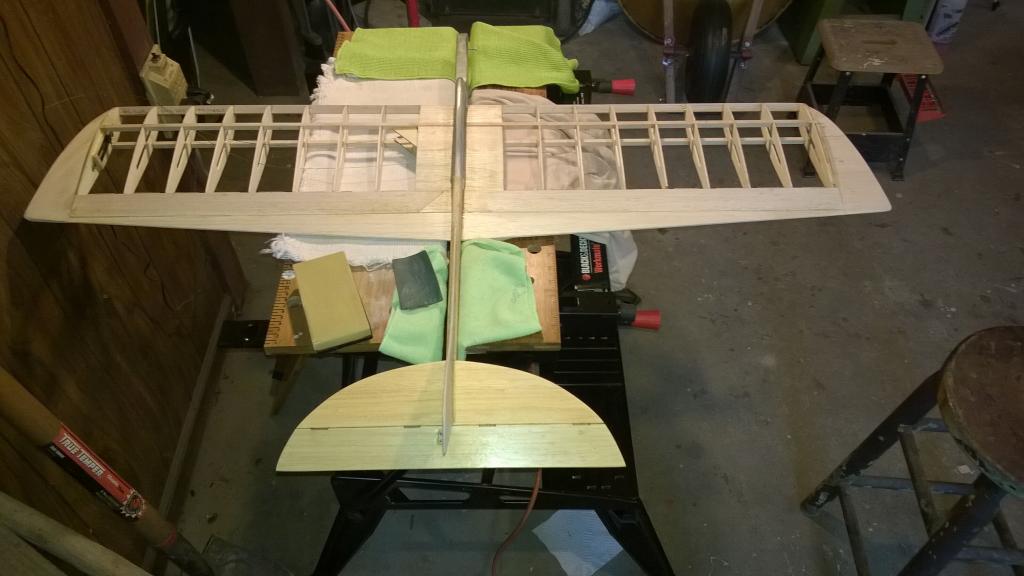
There is the tip with the adjustable leadouts
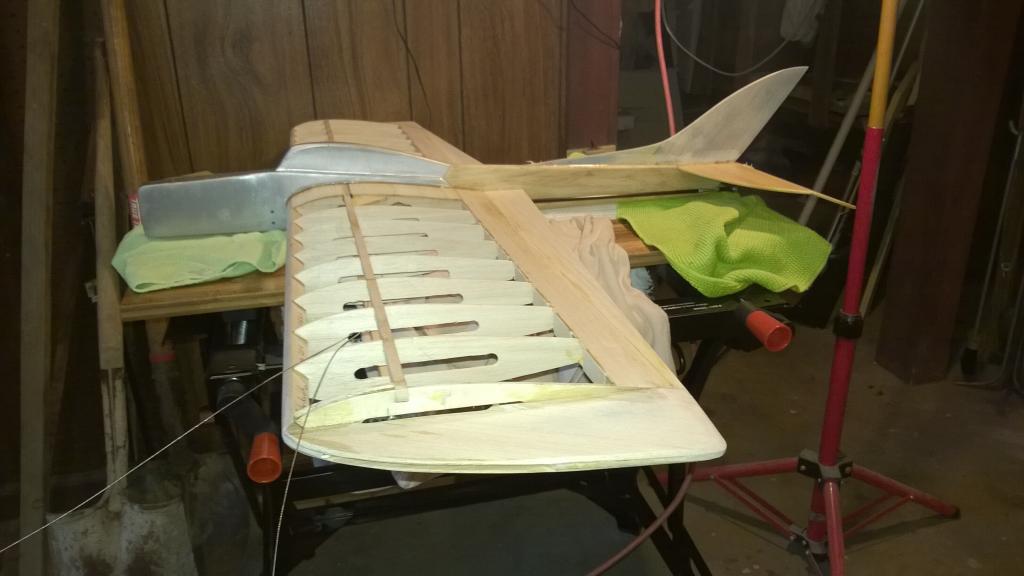
Ain't that a handsome bird! Even if Streaks don't particularly appeal to you.
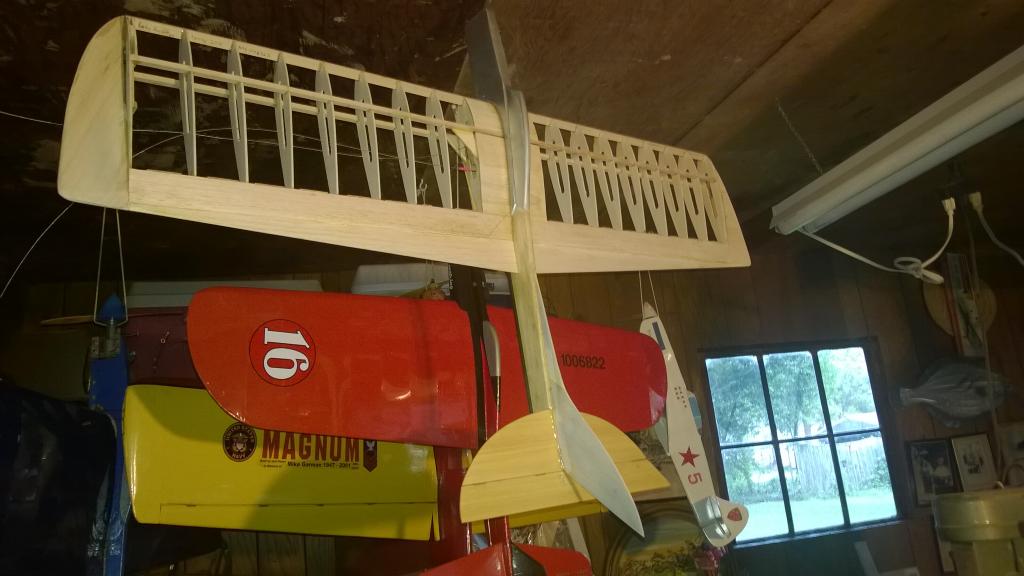
The only painting to be done is one more coat of polyurethane on the rear fuse, color on the tail, Monokote and decals. The canopy will be black. Sky blue with silver feathers on the wings
Relieved Rusty

Just fine tooth combing it.

There is the tip with the adjustable leadouts

Ain't that a handsome bird! Even if Streaks don't particularly appeal to you.

The only painting to be done is one more coat of polyurethane on the rear fuse, color on the tail, Monokote and decals. The canopy will be black. Sky blue with silver feathers on the wings
Relieved Rusty
_________________
Don't Panic!
...and never Ever think about how good you are at something...
while you're doing it!
My Hot Rock & Blues Playlist
...and never Ever think about how good you are at something...
while you're doing it!
My Hot Rock & Blues Playlist

RknRusty- Rest In Peace

- Posts : 10869
Join date : 2011-08-10
Age : 68
Location : South Carolina, USA
Page 6 of 9 •  1, 2, 3, 4, 5, 6, 7, 8, 9
 Similar topics
» Scratch build skyray with beam mount for 0.049 teedee
» [solved]Baby Flight Streak build log
» Baby Flite Streak build thread
» Hybrid-Profile Flite Streak/Cox Hyper Viper scratch build
» Great video on building and flying the 1/2A Skyray and Skyray 35
» [solved]Baby Flight Streak build log
» Baby Flite Streak build thread
» Hybrid-Profile Flite Streak/Cox Hyper Viper scratch build
» Great video on building and flying the 1/2A Skyray and Skyray 35
Page 6 of 9
Permissions in this forum:
You cannot reply to topics in this forum

 Rules
Rules


