Log in
Search
Latest topics
» Free Flight Radio Assist by GallopingGhostler Today at 12:54 pm
» My N-1R build log
by akjgardner Today at 12:39 pm
» Purchased the last of any bult engines from Ken Enya
by getback Today at 12:05 pm
» Funny what you find when you go looking
by rsv1cox Yesterday at 3:21 pm
» Landing-gear tips
by 1975 control line guy Yesterday at 8:17 am
» Cox NaBOO - Just in time for Halloween
by rsv1cox Tue Nov 19, 2024 6:35 pm
» Canada Post strike - We are still shipping :)
by Cox International Tue Nov 19, 2024 12:01 pm
» Duende V model from RC Model magazine 1983.
by getback Tue Nov 19, 2024 6:08 am
» My current avatar photo
by roddie Mon Nov 18, 2024 9:05 pm
» My latest doodle...
by TD ABUSER Mon Nov 18, 2024 11:30 am
» Brushless motors?
by rsv1cox Sun Nov 17, 2024 6:40 pm
» Tribute Shoestring build
by amurphy6812 Sun Nov 17, 2024 5:43 pm
Cox Engine of The Month
experimental reed-valve test 5-5-18
Page 1 of 3
Page 1 of 3 • 1, 2, 3 
 experimental reed-valve test 5-5-18
Hi people. Today's weather in Northern Rhode Island permitted bench-running a model-engine outdoors. I'd been wanting to test one of the experimental reeds that I made recently, to fit the Cox .049 glow-engine.
To briefly summarize; the reed-material is .008" thickness plastic-sheet which has a glossy finish on one side.. and matte finish on the other.
I "hand-cut" the reed with scissors.. after laying it out using a circle-template and forming a "four-pointed" star-shape using a 1/8" hole-punch (paper/plier-type)..

I configured a "product-engine" to test the reed.. and also a DAL-brand #5040 (5d x 4p) L/H propeller for running in my current 1/2A C/L P38 Lightning build.
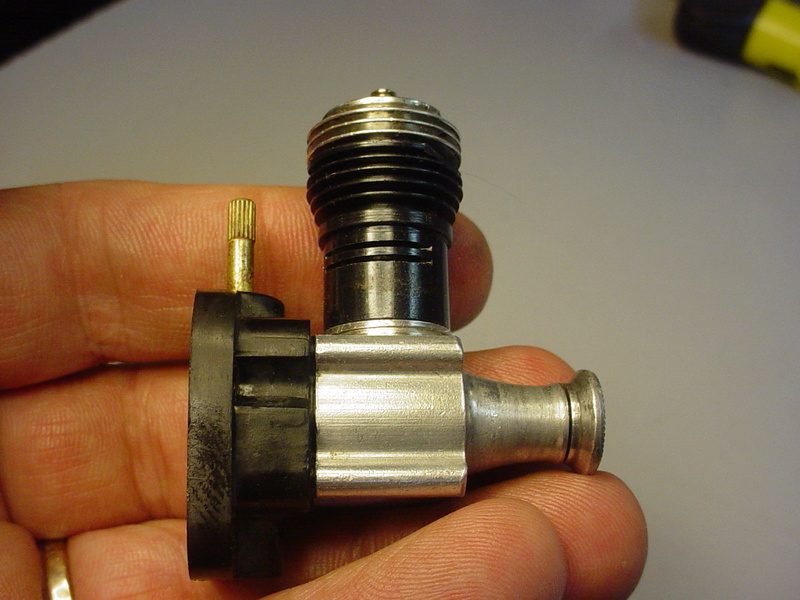


I shot a vid of the initial/successful engine-run.. but had some issues with the camera which prevented extracting the file. This vid is my "2nd attempt"..
https://www.youtube.com/watch?v=Rxfbh-bFTek
Some notes on this bench-run;
-engine configuration; early Cox .049 extruded-type crankcase, 2nd-generation Cox horseshoe back-plate/carb. (flanged/cap-style reed-retainer).. dual-bypass/slit-exhaust/non-SPI cylinder, std. glow-head, std./short 80TPI needle-valve, stk. piston/rod
-propeller; "DAL" #5040 5"d x 4"p L/H 2-blade. Hub-hole bushed using silicone fuel-tubing
-fuel-delivery; Perfect-brand #17 wedge-tank (capacity=7.39cc) *mounted* conventionally. (*3.7cc available-static*)
-fuel-line; Dubro sm. size #221
-fuel-type; Sig "Champion-25".. (old fuel.. 20+ years..)
To briefly summarize; the reed-material is .008" thickness plastic-sheet which has a glossy finish on one side.. and matte finish on the other.
I "hand-cut" the reed with scissors.. after laying it out using a circle-template and forming a "four-pointed" star-shape using a 1/8" hole-punch (paper/plier-type)..

I configured a "product-engine" to test the reed.. and also a DAL-brand #5040 (5d x 4p) L/H propeller for running in my current 1/2A C/L P38 Lightning build.


I shot a vid of the initial/successful engine-run.. but had some issues with the camera which prevented extracting the file. This vid is my "2nd attempt"..
https://www.youtube.com/watch?v=Rxfbh-bFTek
Some notes on this bench-run;
-engine configuration; early Cox .049 extruded-type crankcase, 2nd-generation Cox horseshoe back-plate/carb. (flanged/cap-style reed-retainer).. dual-bypass/slit-exhaust/non-SPI cylinder, std. glow-head, std./short 80TPI needle-valve, stk. piston/rod
-propeller; "DAL" #5040 5"d x 4"p L/H 2-blade. Hub-hole bushed using silicone fuel-tubing
-fuel-delivery; Perfect-brand #17 wedge-tank (capacity=7.39cc) *mounted* conventionally. (*3.7cc available-static*)
-fuel-line; Dubro sm. size #221
-fuel-type; Sig "Champion-25".. (old fuel.. 20+ years..)
Last edited by roddie on Sat May 05, 2018 7:14 pm; edited 4 times in total (Reason for editing : correction in red-edit title to reflect test date)
 Re: experimental reed-valve test 5-5-18
Way To Go! Great run on the new reed. Once she warmed up, she ran nice. Maybe someone with a audio RPM can do a reading for the Peak run.

Marleysky- Top Poster


Posts : 3618
Join date : 2014-09-28
Age : 72
Location : Grand Rapids, MI
 Re: experimental reed-valve test 5-5-18
Great video. Sounds like it was running good, especially for reverse... The one fun part of Cox engines without starter springs! Anyways, glad the reed ran good for you. Also, the props do hold out good too. Cheap as well. Do you have a model or part number of the props you used, as they look different from the ones I have. Mine are the 'Bullnose' variety in I believe 5045. Could not see a 5030. Might order a set or two for myself. Thanks.

NEW222- Top Poster

- Posts : 3896
Join date : 2011-08-13
Age : 46
Location : oakbank, mb
 Re: experimental reed-valve test 5-5-18
My wife (Lynne..) helped me to realize the "comic-value" to that video...  My electric-starter motor must be tired. It's almost 30 years old. I'd gotten used to using it to start my reed-valve engines in the proper-rotation. I plug the banana-plug leads into the 12V. "fuel-pump" connections.. and use the in/out (polarity switch) to reverse the rotation for R/H vs. L/H propellers. A drop or two of light-oil behind the engine's drive-plate helps to prevent wear from friction between the front of the crankcase.
I think I'll prep another 540 can-motor for the task. It had worked quite well for many years.. and many engine-starts.

I think I'll prep another 540 can-motor for the task. It had worked quite well for many years.. and many engine-starts.

 Re: experimental reed-valve test 5-5-18
I liked the look of your starter, and now I do see it better. I had made one myself but the thing I had problems with was keeping the hose to grab the spinner attached. Mine had gone flying many times before giving up. I will try to get a picture shorthly. Mine is a redneck version.... I also like the thought of plugging it into the fuel pump for starting in either direction. Thanks for the ideas.

NEW222- Top Poster

- Posts : 3896
Join date : 2011-08-13
Age : 46
Location : oakbank, mb
 Re: experimental reed-valve test 5-5-18
And here it is... It was outside in the garage. As mentioned, I had a hard time keeping the starter cone on it and it truly shows in the picture. I think last time I used it it went flying so I sent the starter after it. However, I only recovered the starter.... Looks like the main difference between ours is the good looks and time you took to build yours vs my quick to get done starter. Should have seen the ol lady when she saw it and said it looked good. I said thanks. Right after she asked what the button was from, so, I told her to try ringing the doorbell. The look on her face was priceless! 


NEW222- Top Poster

- Posts : 3896
Join date : 2011-08-13
Age : 46
Location : oakbank, mb
 Re: experimental reed-valve test 5-5-18
May I ask what you cut your reeds from, or where did you find it? I would like to make a couple like them and try them out as well. Thinking that the design is similar enough to the original 'star' shaped reed, that would be a nice test in my rebuilt Bee I just finished. Thank you.

NEW222- Top Poster

- Posts : 3896
Join date : 2011-08-13
Age : 46
Location : oakbank, mb
 Re: experimental reed-valve test 5-5-18
Beautiful how a Roddie valve works! ... congratulations, very good video!

MauricioB- Top Poster

- Posts : 3712
Join date : 2016-02-16
Age : 53
Location : ARG
 Re: experimental reed-valve test 5-5-18
Looks like it works pretty good. Might be good to get a tach on it and compare with a stock reed.
The shape reminds me of an iron cross.
The shape reminds me of an iron cross.

Cribbs74- Moderator


Posts : 11907
Join date : 2011-10-24
Age : 50
Location : Tuttle, OK
 Re: experimental reed-valve test 5-5-18
Just curious Roddie, is the ring in the middle of the reed just a drawn-on reference for centre?

Oldenginerod- Top Poster

- Posts : 4018
Join date : 2012-06-15
Age : 62
Location : Drouin, Victoria
 Re: experimental reed-valve test 5-5-18
You need to do a tutorial on that reed roddie. I am fascinated by it. How your ever cut those tiny precision holes is a mystery to me. And....it works.
Liked your video roddie, finally someone that sounds like me.
Bob
Liked your video roddie, finally someone that sounds like me.
Bob

rsv1cox- Top Poster


Posts : 11245
Join date : 2014-08-18
Location : West Virginia
 Re: experimental reed-valve test 5-5-18
Chancey, What's NOT showing in the photo of "my" starter.. is a small-size hose-clamp (screw-type) with a stainless steel band. This is the only good way I found to attach the "hose" to the gear on the motor-shaft. I removed it.. because it always caused an out-of-balance condition (moderate vibration). I thought that "zip-ties" would work.. but they can't be secured tight enough.
The hose I use is automotive-type rubber fuel-line.. or PCV hose, because it fits snugly on the "gear" on my motor's output-shaft. The hoses' inside-diameter is 5/16" (8mm). You could probably use 1/4" ID (6.35mm).. if your motor's gear has a smaller diameter.
A WORD OF CAUTION.. keep fingers clear of the spinning clamp. I see that your motor switch is "piggy-back" on your motor-case. I would make a "tube" to encase the motor.. and have it be long enough to grip securely in your hand, and a good distance from the propeller. I made mine from .010" (.25mm) aluminum-sheet (flashing) cut to the size of a sheet of stenographer's paper (6" x 9").. and rolled into a tube. Find an end-cap/plug, the same diameter as the motor-case.. and drill a hole in the center for the wiring-harness. A wooden closet-pole is close to the diameter of a 540-series motor. Cut-off a 1/2" length piece for an end-cap.
A hose-clamp on each end of the tube holds the motor and the end-cap tightly in place. You could probably use the plastic from a 2 liter soda-bottle to make the tube.
Lastly.. my momentary-switch is "inset" into a cap which surrounds it.. and is deep enough to prevent the switches' push-button from being accidently pressed. It would be easy to apply this principal to the button on your doorbell switch.
I'd be happy to elaborate on any of this.. if you have questions.
 Re: experimental reed-valve test 5-5-18
Oldenginerod wrote:Just curious Roddie, is the ring in the middle of the reed just a drawn-on reference for centre?
Yes, The Cox .049's seat-diameter where the reed "seals".. is approx. 7/32" (.218"/5.5mm) so it's best to mark that on the reed-material "first".. because it helps to "gage the distance" for making the radius-cuts with a punch.. so as not to cut into the seat-area.
I bought a circle-drawing template (C-Thru brand) which has really been a great tool to have.
seen in the photo below, beneath the large French curve..

It definitely helps for laying-out a reed. I trace the 7/32" circle (seat-area) inside/on-center of a 7/16" circle-tracing. The Cox OEM reeds measure approximately .450" (11.5mm) in diameter.. whether oblong or star-shaped. Using a 7/16" (.437"/11.11mm) circle; allows for cutting "outside the line" slightly.. and ending-up somewhere in-between those two numbers.
In the photo below; I marked the two circle-sizes, as outlined in the above paragraph..
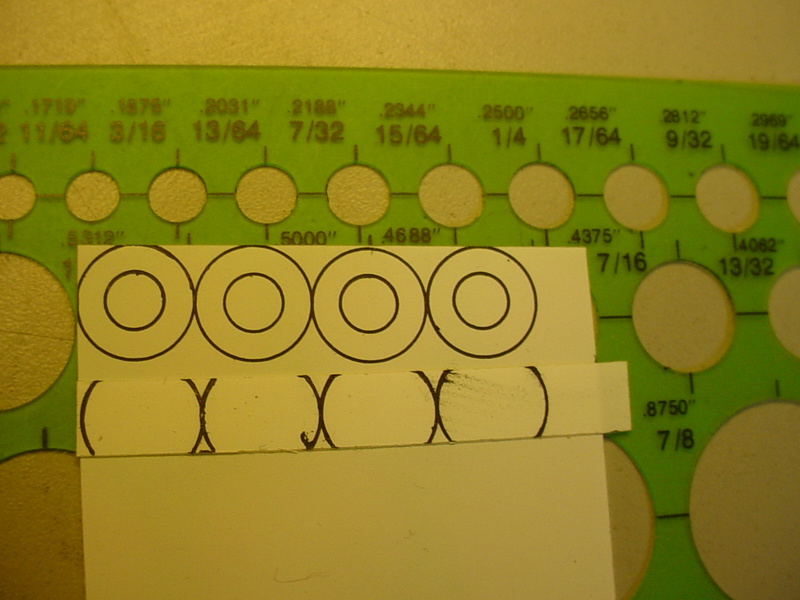
As evidenced by my bench-test; I don't think it imperative to have the size exact.. or perfectly symmetrical, for that matter. Maybe I lucked-out.. but I don't think so. The "material-type" is important. Some of the commercially available reeds are made of Mylar (.005"), Teflon (.010") or Steel (.002"). The original Cox star-shaped Beryllium/Copper reed is .001" thickness.
I'd been coming into contact with various thin-plastic sheet-material while I was working the computer-recycling job. I cataloged some samples with their thickness checked via a vernier-caliper.. and marked for future reference. Some of these samples fell into the thickness-category of the commercially-available reeds.
The material used for this test, was designed for "backlit-signage" panels. It is a .008" thickness translucent plastic sheet which as I previously mentioned; has a matte "front-side" to accept a silk-screened image and a glossy "backside".. to be "backlit" with LED's. Part of my job was to disassemble "AVR" (Asset Value Recovery) material.. and separate the various components into "commodities" for responsible-recycling. This particular material came from that job.. and I have enough of it to make a LOT more reeds..
 Re: experimental reed-valve test 5-5-18
Marleysky wrote:Way To Go! Great run on the new reed. Once she warmed up, she ran nice. Maybe someone with a audio RPM can do a reading for the Peak run.
Thanks a LOT Rene!
 Yes.. I hope someone (maybe Brad or Andras) can use their audio-tach/phone-app. to check the video.. and capture the engine's rpm's. My optical-tachometer hasn't been giving solid readings the last few times that I've used it. It may be my fault for not providing an environment for it to function properly..
I had ran the engine previously (within an hour..) and captured a video.. but had problems extracting it from the camera. This wasted a lot of time.. and the engine cooled-down to the ambient outdoor temp. of 47 degrees (F)... which was considerably cooler than the 1st run; where it (and the fuel..) had just been brought outdoors from a 70 degree (F) environment.
I was still pretty psyched though! This engine was configured from parts that are at least 30 years old.
 Re: experimental reed-valve test 5-5-18
rsv1cox wrote:You need to do a tutorial on that reed roddie. I am fascinated by it. How your ever cut those tiny precision holes is a mystery to me. And....it works.
Liked your video roddie, finally someone that sounds like me.
Bob
Hi Robert, Thank you for commenting! My reed-construction was outlined in a previous thread.. (link below).. but I would be happy to expand on my methods, if you'd like to try your hand at making some to test. My documented engine-run is proof that a reed doesn't need to be machine-cut.. or perfectly-symmetrical to function properly.
https://www.coxengineforum.com/t11653p25-reed-valve-design-ideas-poll
It's important to note; that I used a 1/8" "plier-type" hole-punch to form the reed used in the video. I bought it at a craft-store.
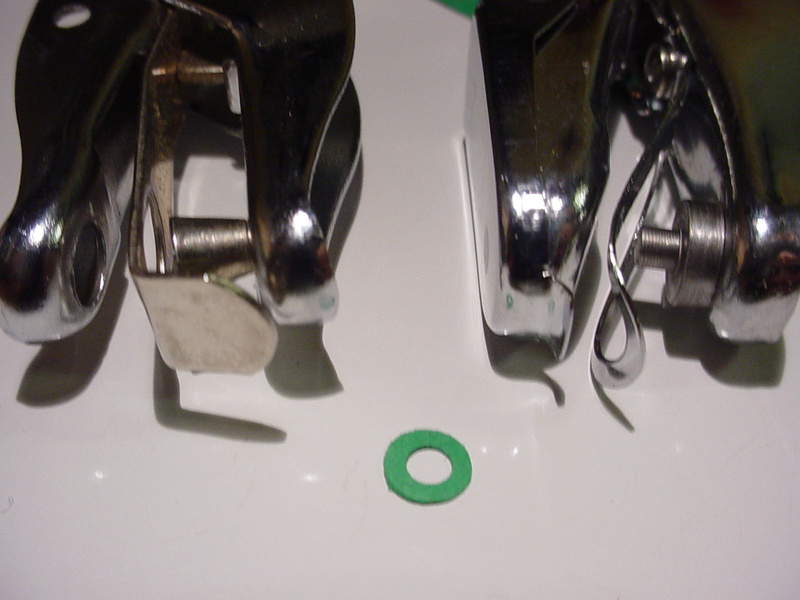


Note; its use in the photo below, to make the reed used in the vid.. You can see the difference in the radii.. between the standard 1/4" punch.. and the 1/8" punch.

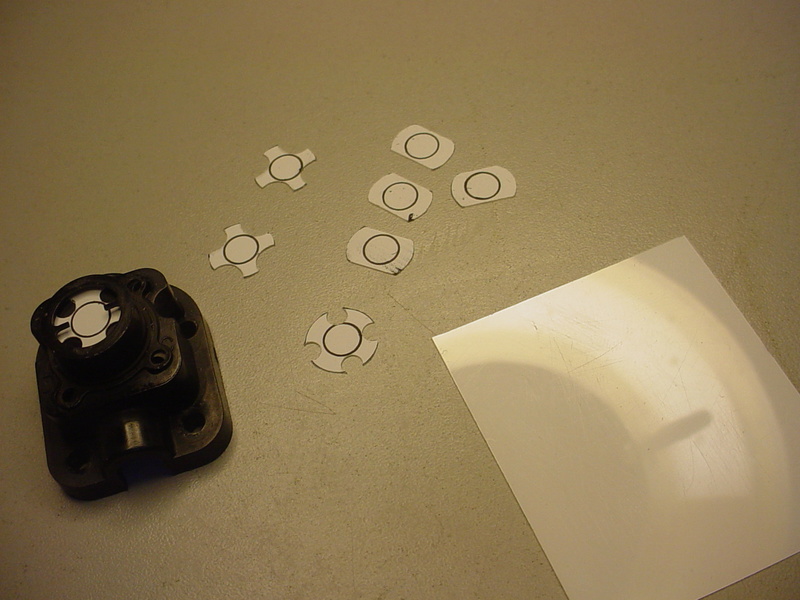

Read through both threads.. and note my methods used to lay-out and hand-cut these reeds. You can do it.
 Re: experimental reed-valve test 5-5-18
Thnaks for the starter help. I did have the same off balance using the hose clamp on mine too. I think the clamp helped the piece of hose shoot further away when it leaves the gear.  Also, I too first tried zip ties and went to the clamp. I now will be trying something else. I will go through your post again and look into the changes outlined. I now see I need a different set of hole punch as I had thought yours were the stamdard ones. Thanks for clarifying that. Lastly, I now see the value of a circle template as yours. I will now look into one too. After seeing the picture, I now think I solved my last mystery. While on holidays, I picked up a set of French Curves, because I knew I had seen someone use and mention them here. I personally do not know what I will do with them, but, now I do have them....

NEW222- Top Poster

- Posts : 3896
Join date : 2011-08-13
Age : 46
Location : oakbank, mb
 Re: experimental reed-valve test 5-5-18
Cribbs74 wrote:Looks like it works pretty good. Might be good to get a tach on it and compare with a stock reed.
The shape reminds me of an iron cross.
Hi Ron! Yes.. I was really excited when I brought the running-gear outdoors, set it up.. and got the engine started. It's kind of important to note that; the Sig Champion "25" that was used.. is well-over 20 years old. I have brand-new "fresh" Sig fuel.. but I wanted to see if/how the engine would run.. on the old fuel. I'm quite impressed with the old fuel's performance..
The "reed-shape" is definitely cool-looking.. and I agree with what you think it resembles. I'm wondering if that star-shape; with its "tighter radii".. might have a positive-effect on the way that the fuel/air mixture flows through the engine?
 Re: experimental reed-valve test 5-5-18
NEW222 wrote:Thnaks for the starter help. I did have the same off balance using the hose clamp on mine too. I think the clamp helped the piece of hose shoot further away when it leaves the gear.Also, I too first tried zip ties and went to the clamp. I now will be trying something else. I will go through your post again and look into the changes outlined. I now see I need a different set of hole punch as I had thought yours were the stamdard ones. Thanks for clarifying that. Lastly, I now see the value of a circle template as yours. I will now look into one too. After seeing the picture, I now think I solved my last mystery. While on holidays, I picked up a set of French Curves, because I knew I had seen someone use and mention them here. I personally do not know what I will do with them, but, now I do have them....
Hi again Chancey! I'm going to rebuild my 1/2A starter.. and will post a separate thread on that. Using a hose-clamp to grip the gear on the motor-shaft, works quite well. It just needs to be aligned straight and the clamp centered directly over the gear. The motor needs to be up-to the task though.. My motor was originally from a 12VDC. portable "Coleman" air-compressor. I think that the motor is "tired" now though. I have more motors that should work for this app.
Regarding the French curves; they are VERY handy for laying-out wing-ribs, wing-tips, canopy-profiles, turtle-decks.. fuse-belly contours and more! Sometimes you need a certain sweeping or sloping contour, to make a model look "slick".. rather than just ordinary. A French-curve can make that happen. I used one to draw the cockpit profile and lay-out the wingtips on my P-38.
 Re: experimental reed-valve test 5-5-18
MauricioB wrote:Beautiful how a Roddie valve works! ... congratulations, very good video!
Thank You Mauricio! It is fun to make experiments.. especially when they work!
 Re: experimental reed-valve test 5-5-18
NEW222 wrote:May I ask what you cut your reeds from, or where did you find it? I would like to make a couple like them and try them out as well. Thinking that the design is similar enough to the original 'star' shaped reed, that would be a nice test in my rebuilt Bee I just finished. Thank you.
Chancey, It is very helpful to have a precision measuring tool.. such as a micrometer or vernier-caliper to measure the thickness of subject-materials. The "thickest" commercially-available reed (AFAIK) is .010" (.26mm).
If you're planning on running a reed in a housing that uses a "circlip" type reed-retainer; it's CRUCIAL that the reed is free to "move" without being pinched by the circlip. The circlip retainer was originally designed for the very thin (.001") Beryllium-Copper "star-shape" reed. The "Mylar" reeds are .005" thickness.. and sometimes a circlip needs to be "sanded-thinner" to allow clearance for the reed to function properly. This is not so much an issue with the newer "Sure-Start" type of back-end/carb.
The material I used to make my reed is .008" thickness.. and is likely too thick for a circlip-type retention-system. My test-engine had a "flanged-cap" style reed-retainer.
You can often find "thin-enough" transparent semi-rigid plastic in the common protective-packaging of small-items. Small items don't usually require "thick" packaging. I checked the thickness of the packaging of two different small-items purchased recently.. and they both measured .005".
I can't say that the common packaging-plastic would be suitable.. but it definitely could be used to practice cutting the shape and testing the seal by assembling with a retainer... and checking the function via the "blow/suck" method.
The oblong/oval-shaped reed is fairly easy to make. Cut a strip of material to a 7mm width.. and having a 11.5mm radius. This will closely resemble the OEM oval reed. It should fit "totally-flat" in the housing with minimal-clearance. If it "bows".. trim it so that it sits flat.

balogh- Top Poster


Posts : 4958
Join date : 2011-11-06
Age : 66
Location : Budapest Hungary
 Re: experimental reed-valve test 5-5-18
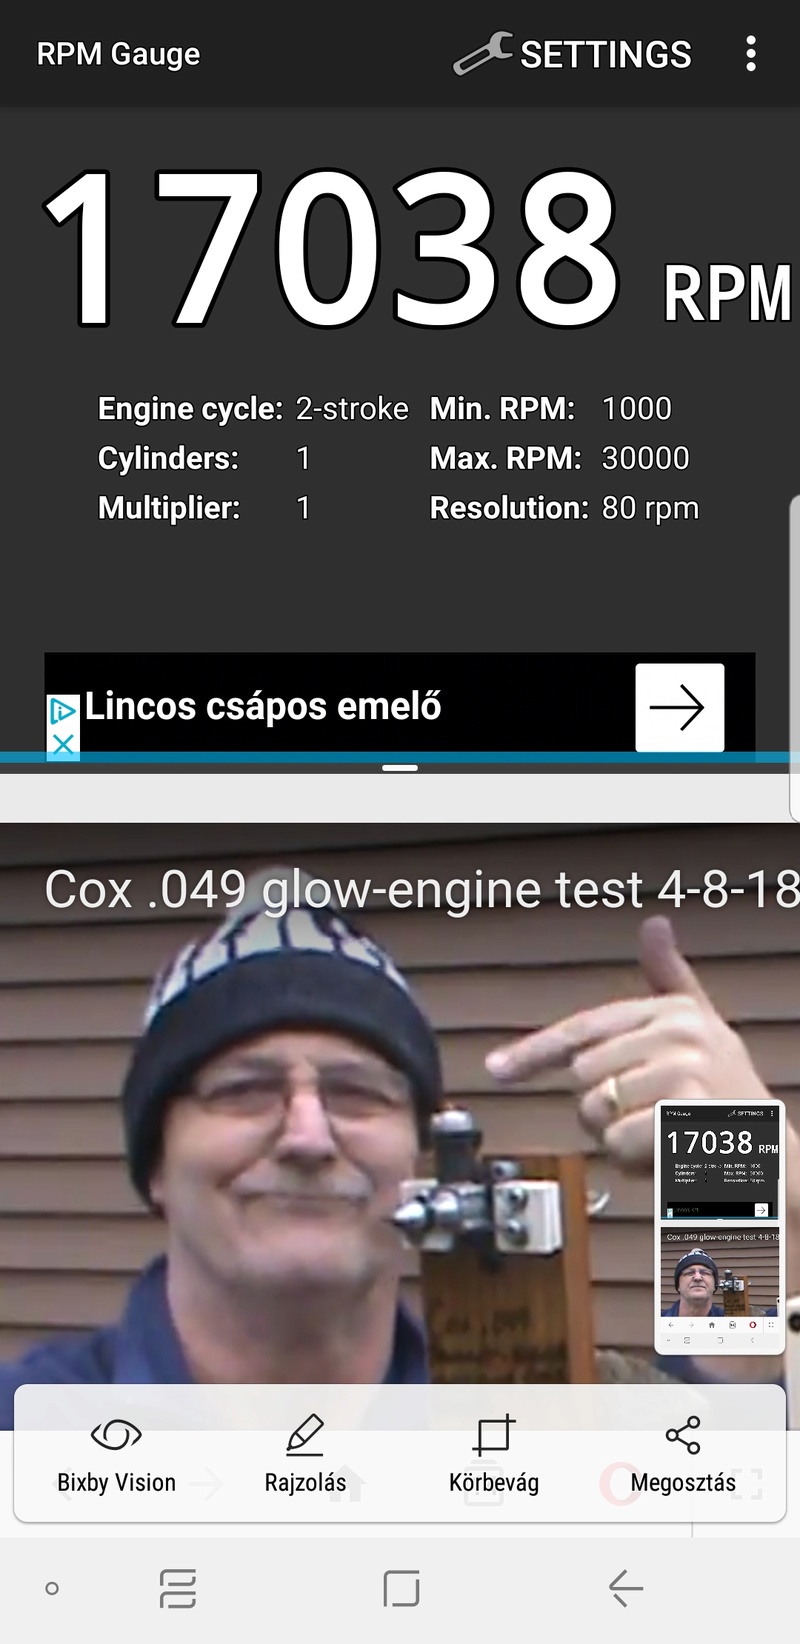
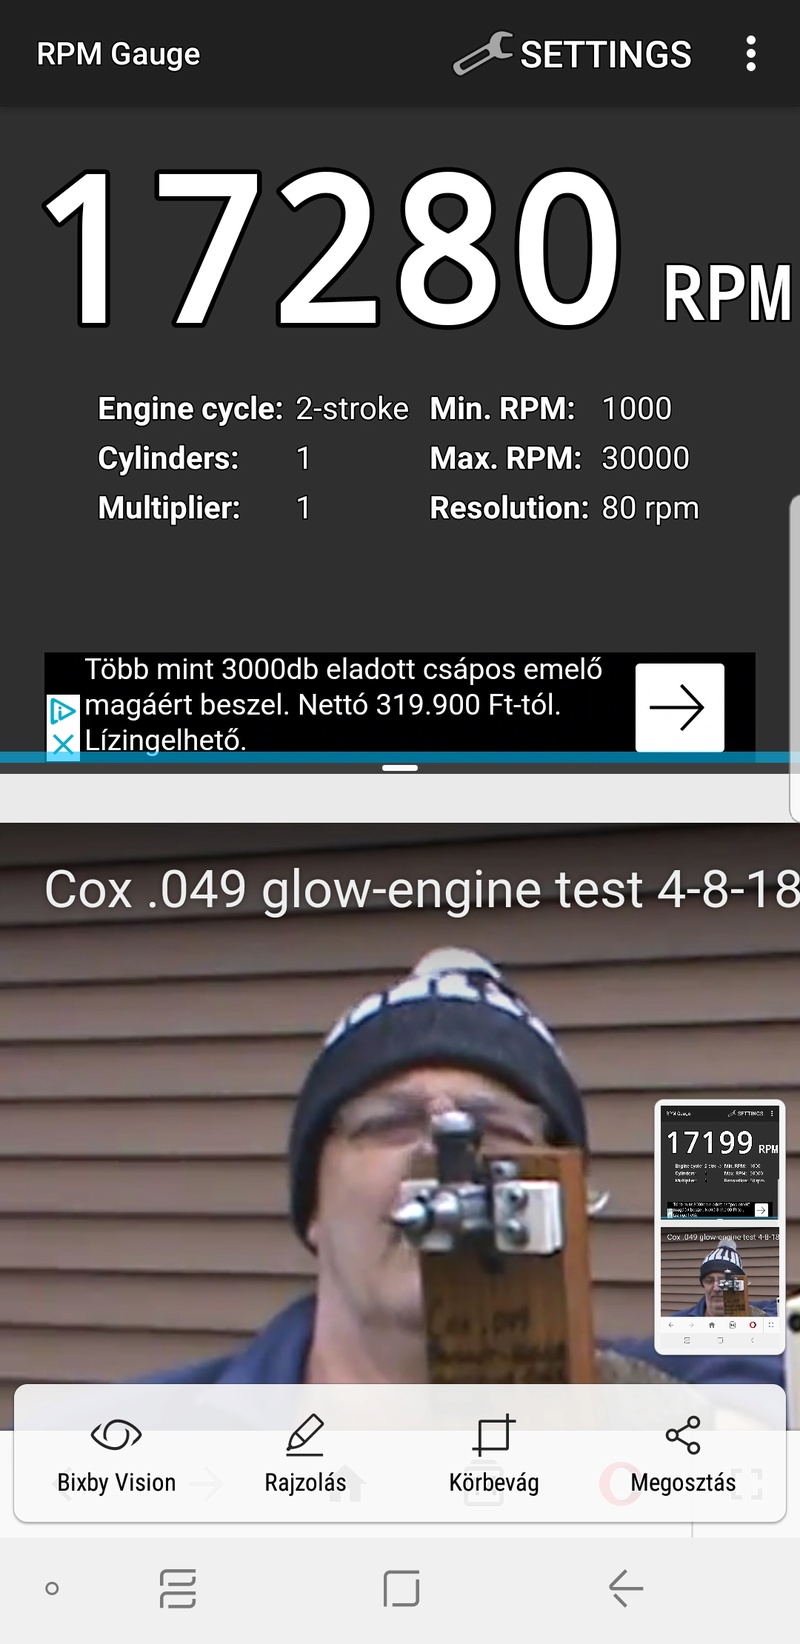
Ouch!! lol i know that feeling too well , Good run 5x3 prop running backwards and 20+ yr old 25% fuel at over 17K Damn good run . Look forward to doing some testing myself ,maybe this weekend weather permit of coarse . I can't do 50 * Thanks for the tips on the starter too i need to get mine made . we have some of these air hose clamps and the right tool for them at work ,may help offset the bal. 


getback- Top Poster


Posts : 10439
Join date : 2013-01-18
Age : 67
Location : julian , NC
 Re: experimental reed-valve test 5-5-18
balogh wrote:Great test Roddie and the engine spun above 17k:
Rhode-I Roddie Reed Run Rev Results Retroactively Recorded:
Thank You Andras!! Not a bad run for an experimental reed!
 Re: experimental reed-valve test 5-5-18
Good idea getback. We use those at work for airlines and their respective fittings. However, I am not sure they have them in that small of a ring. But, I am headed to the city tomorrow so will check our supply store out and see what they have. Those may be teh ticket.

NEW222- Top Poster

- Posts : 3896
Join date : 2011-08-13
Age : 46
Location : oakbank, mb
 Re: experimental reed-valve test 5-5-18
roddie wrote:rsv1cox wrote:You need to do a tutorial on that reed roddie. I am fascinated by it. How your ever cut those tiny precision holes is a mystery to me. And....it works.
Liked your video roddie, finally someone that sounds like me.
Bob
Hi Robert, Thank you for commenting! My reed-construction was outlined in a previous thread.. (link below).. but I would be happy to expand on my methods, if you'd like to try your hand at making some to test. My documented engine-run is proof that a reed doesn't need to be machine-cut.. or perfectly-symmetrical to function properly.
https://www.coxengineforum.com/t11653p25-reed-valve-design-ideas-poll
It's important to note; that I used a 1/8" "plier-type" hole-punch to form the reed used in the video. I bought it at a craft-store.
Note; its use in the photo below, to make the reed used in the vid.. You can see the difference in the radii.. between the standard 1/4" punch.. and the 1/8" punch.
Read through both threads.. and note my methods used to lay-out and hand-cut these reeds. You can do it.
Yeah, I missed that one roddie...How could I ever miss a roddie thread.....
Looks like a worthy venture but I'm sure my shaky fingers won't make it an option for me to try.
Bob

rsv1cox- Top Poster


Posts : 11245
Join date : 2014-08-18
Location : West Virginia
Page 1 of 3 • 1, 2, 3 
 Similar topics
» What's the Best Reed for Cox Reed Valve Engines.
» Pee Wee .020 Reed Valve
» Reed Valve
» Ace Cox Reed Valve Throttle
» Venturi Size .049
» Pee Wee .020 Reed Valve
» Reed Valve
» Ace Cox Reed Valve Throttle
» Venturi Size .049
Page 1 of 3
Permissions in this forum:
You cannot reply to topics in this forum

 Rules
Rules


