Log in
Search
Latest topics
» Night flying at Walters RC parkby 1975 control line guy Today at 7:29 pm
» Happy 77th birthday Andrew!
by GallopingGhostler Today at 7:10 pm
» Cox films/videos...
by GallopingGhostler Today at 7:07 pm
» Cox 020 PeeWee rebuild questions
by LooseSpinner99 Today at 6:13 pm
» Did you spot the Cox engine in this NASA research video?
by balogh Today at 5:08 pm
» Roger Harris revisited
by rsv1cox Today at 3:44 pm
» Retail price mark-up.. how much is enough?
by Ken Cook Today at 2:54 pm
» Tee Dee .020 combat model
by 1/2A Nut Today at 10:34 am
» Purchased the last of any bult engines from Ken Enya
by sosam117 Today at 8:15 am
» TEE DEE Having issues
by balogh Today at 7:42 am
» My N-1R build log
by roddie Today at 12:32 am
» Landing-gear tips
by roddie Yesterday at 6:17 pm
Cox Engine of The Month
Venturi Size .049
Page 1 of 1
 Venturi Size .049
I have a number of .049 motors. I have one I'm about to drill maybe the backplate to 2mm which is .082 thousandths. I have checked. I think the .082 dimension is correct. For sure 2 mm is. Then also the Venturi inlet also. Is this recommended our should I leave it stock? I have done many and they are good. But might leaving stock size be good?
Thanks
Ice
Thanks
Ice

Iceberg- Gold Member

- Posts : 382
Join date : 2018-11-03
Location : Suva Fiji Islands
 Re: Venturi Size .049
Boring the backplate alone accomplishes nothing, you have to drill the venturi inlet too.
The engine will be somewhat more user friendly in the stock configuration, easier to crank and needle. But if it has a dual bypass cylinder, the .082" venturi will make some more power. Higher nitro will alleviate any needling problems the bigger venturi brings. I run 35% nitro in all my 1/2A engines, and 25% will be almost as good. To get the full benefit of the bigger venturi, make sure your piston/cylinder is in an SPI configuration(ask if you need clarification on that). And a smaller prop will let it spin up into its peak power band. 5" or 5.25 x 3 is my old favorite.
Rusty
_________________
Don't Panic!
...and never Ever think about how good you are at something...
while you're doing it!
My Hot Rock & Blues Playlist
...and never Ever think about how good you are at something...
while you're doing it!
My Hot Rock & Blues Playlist

RknRusty- Rest In Peace

- Posts : 10869
Join date : 2011-08-10
Age : 68
Location : South Carolina, USA
 Drilling a Cox backplate
Iceberg wrote:I have a number of .049 motors. I have one I'm about to drill maybe the backplate to 2mm which is .082 thousandths. I have checked. I think the .082 dimension is correct. For sure 2 mm is. Then also the Venturi inlet also. Is this recommended our should I leave it stock? I have done many and they are good. But might leaving stock size be good?
Thanks
Ice
Ice,
Yes .082" venturi diameter is the largest /safest diameter Cox ever put out on their tanked reed valve engines, notably the Black Widow & Venom. My experience also has shown it's pretty much ideal for the AMA Mouse racing event.
One thing recommended by Cox designer Larry Renger is to have the backplate hole just a shade SMALLER than the venturi hole. Numbers vary, but if you have the precision, a backplate hole of .080" to compliment your .082" venturi is ideal. In any event it is NOT recommended to have a larger backplate hole than the venturi.
Personally, I've found individual drill bits can vary somewhat in size and also the tank venturi size can vary as well.
Therefore to maintain better accuracy, I prefer to sneek up on the final hole size starting with a size or two smaller than wanted so that the final drill cut is only .002" or so, rather than just putting in an .082" bit and drilling it all in one go, which leads to a larger & perhaps rougher size hole than what is desired.
In the end, I found I had to buy myself a set of precision gauge pins in .001" increments to REALLY determine exactly what the hole sizes are, and then match tank backplates to tanks that way.
For many years I drilled out both tank & backplate at the same time with an .082" drill bit. It does work (and I've won AMA Nats events that way) so, I question as to whether the above mentioned precision is really necessary. Being very precise absolutely does no harm plus it helps with consistency from engine to engine.
I have had seemingly similar tanks give (or lose) 2,000 RPM and I although I saw it on the tach, I often wondered WHY? It is quite possible that the correct mis-matching may have played a part in that phenomena. (that & other things I'm not quite sure about).
Rusty's comments above are well founded. Engines with larger venturi's tend to make setting of the needle valve (& consistency of the run) more sensitive and finicky.
I hope this has been of some help.
Cheers,
Paul (aka Mr. Mouse)

Paulgibeault- Gold Member

- Posts : 259
Join date : 2011-09-24
Location : Leduc, Alberta Canada
 Re: Venturi Size .049
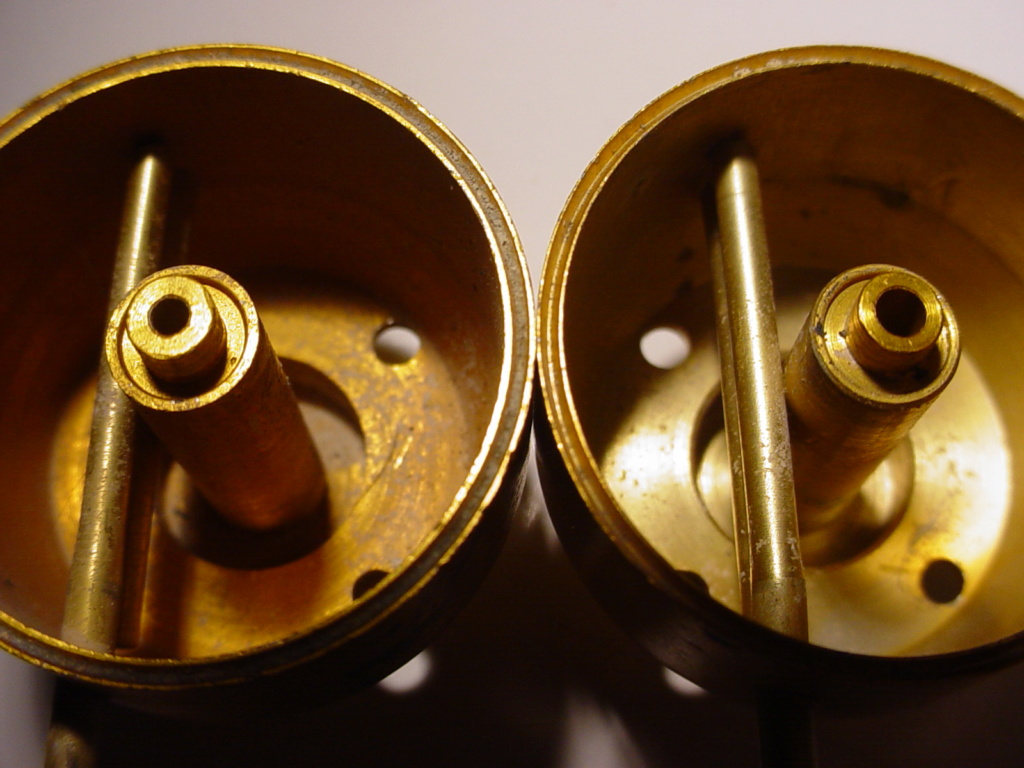
Hey Ice, I have a Cox "Golden Bee" (8cc-tanked reed-valve .049) back-end.. That has the .082" diameter inlets to both; the backplate and the tanks' venturi. I've mentioned this here on the forum several times.. but it hasn't garnered any comments.
The Cox Golden Bee .049 engine "was" basically an extension of the Babe Bee.. with 3cc's extra fuel capacity.. and stunt-venting applied to its' integral fuel-tank.
I have parts from X2 Cox Golden Bee engines which are traceable back to when they were new. One is the more "docile" version; having the .0625" venturi/air-intake.. but the other has a .082" venturi/air-intake.
Check-out the below photos to see the visible-difference. Left-side is .0625" and right-side is .082"
Note that the mesh debris-screens are installed.


I've wondered about this since discovering it. Unfortunately the cylinder-porting variations between the two engines is untraceable.
My theory is; that the larger-venturi variant was issued just-prior to the release of the Cox "Black Widow" high-performance .049 reed-valve engine.. having that same stunt-vented 8cc integral fuel-tank..
The Cox Golden Bee .049 engine "was" basically an extension of the Babe Bee.. with 3cc's extra fuel capacity.. and stunt-venting applied to its' integral fuel-tank.
I have parts from X2 Cox Golden Bee engines which are traceable back to when they were new. One is the more "docile" version; having the .0625" venturi/air-intake.. but the other has a .082" venturi/air-intake.
Check-out the below photos to see the visible-difference. Left-side is .0625" and right-side is .082"
Note that the mesh debris-screens are installed.


I've wondered about this since discovering it. Unfortunately the cylinder-porting variations between the two engines is untraceable.
My theory is; that the larger-venturi variant was issued just-prior to the release of the Cox "Black Widow" high-performance .049 reed-valve engine.. having that same stunt-vented 8cc integral fuel-tank..

 Venturi size .049
AS Roddie mentioned, it was / is indeed possible to get more than one variation of a given product engine such as the Golden Bee.
Quite right as mentioned the Golden Bee was a stuntable extension of the Babe Bee because (initially anyways) it had the same venturi size & same
single port cylinder. Those engines needled the easiest & ran the longest in duration.
One thing I forgot to mention in the venturi size discussion was the mesh screen cover. That mesh screen actually caused the engine venturi "to see"
a slightly smaller backplate hole than what is actually there. The mesh causes an effect somewhat similar to the backplate having a smaller hole.
Certainly I've noted the RPM increase when the mesh is removed from a given backplate.
The negative of removing the screen is that now the engine is free to ingest dirt & grass more readily...ARG!! I've posted previously photos showing
dirt & grass nearly plugging up the venturi hole which caused the engine to run quite weird. Once cleaned up the engine ran fine...
Cheers,
Paul
Last edited by Paulgibeault on Tue Jun 18, 2019 7:59 pm; edited 1 time in total

Paulgibeault- Gold Member

- Posts : 259
Join date : 2011-09-24
Location : Leduc, Alberta Canada
 Re: Venturi Size .049
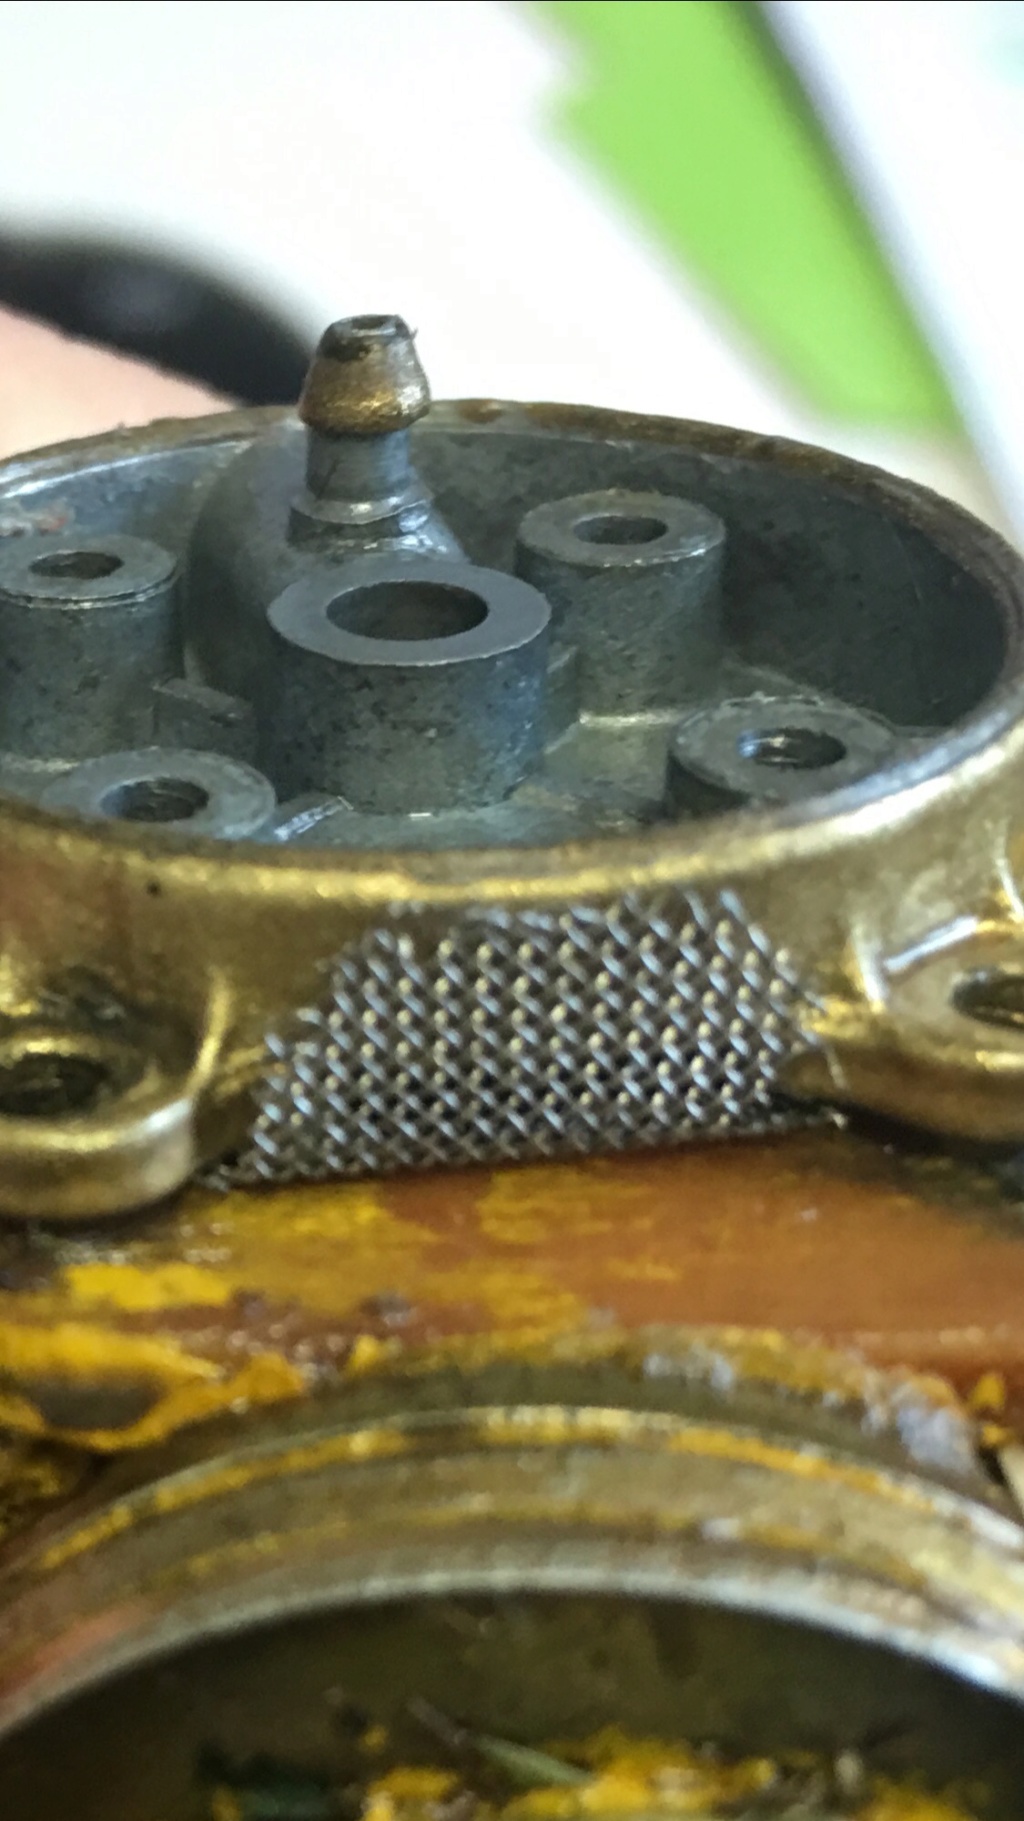
Very interesting comments from all thank you! I use a steel mesh under the backplate to keep the grass out. Seems to be good see the picture.
As for the different sizes in venturi also something a bit unusual. I guess different production months or something.
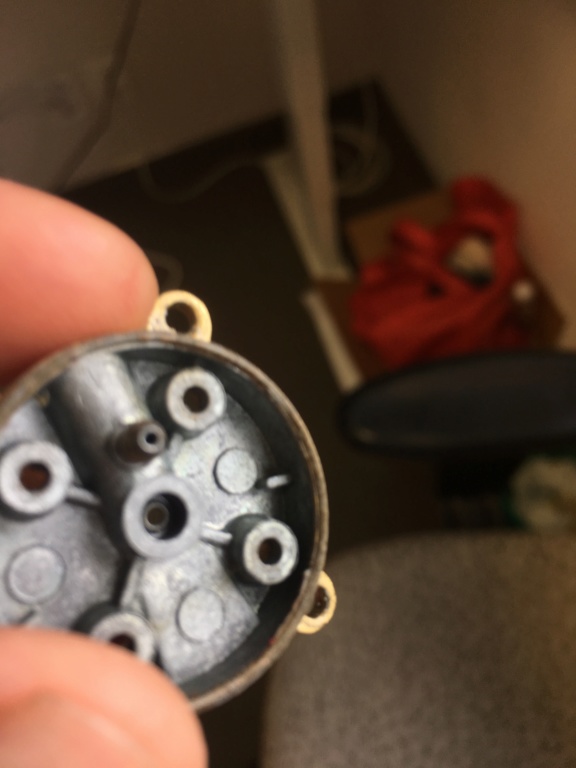
I also am about to drill the backplate but I enclosed the picture. There is a small flange curling in from the backplate. Do these flanges help or hinder the mixture and flow?
Thanks
Ice
It was mentioned to not have the back plate hole bigger than the venturi. I have a couple Texacos and they have a massive hole in the backplate but the tank inlet is small likely 30% smaller than the back plate. Now they run like 5 minutes plus with an 8x4 prop real well. Fred sent me the props and he really helped. The smaller props were too fast and I think the hole/venturi size in the tank was leaning after a few seconds but they are doing GREAT now Thanks Fred!! Get better soon!


Iceberg- Gold Member

- Posts : 382
Join date : 2018-11-03
Location : Suva Fiji Islands
 Cox reed valve venturi
Ice,
Honestly I don't know. Texaco's are designed to turn large props slow & for a long duration. Perhaps in that case it's not critical.
I would be very interested to compare early production Texaco's to the later production Texaco's. I believe towards the end, many engines were thrown together
in a hodge-podge manner.
The TRUTH however is to run a given engine with different size backplates and see "In the air" if there is a noticeable difference. No doubt I think the
competition Free flighter's would be the most knowledgeable on the subject...
Cheers,
Paul (aka Mr. Mouse)

Paulgibeault- Gold Member

- Posts : 259
Join date : 2011-09-24
Location : Leduc, Alberta Canada
 Re: Venturi Size .049
I think the purpose of that lip may be to distribute the fuel in the annulus area before it enters the intake channel...I figure fuel will flow around the lip before sucked into the channel...may help atomize the fuel in a circular form, that would enter the channel in large "gulps" instead without that lip?

balogh- Top Poster


Posts : 4960
Join date : 2011-11-06
Age : 66
Location : Budapest Hungary
 Re: Venturi Size .049
Thanks, Kris, I'd forgotten about that. I had no idea what I was looking for. Andras has as good of an idea as I can come up with. I started an answer to the Texaco question, but aborted it when I started guessing too much.
Rusty
Rusty
_________________
Don't Panic!
...and never Ever think about how good you are at something...
while you're doing it!
My Hot Rock & Blues Playlist
...and never Ever think about how good you are at something...
while you're doing it!
My Hot Rock & Blues Playlist

RknRusty- Rest In Peace

- Posts : 10869
Join date : 2011-08-10
Age : 68
Location : South Carolina, USA
 Re: Venturi Size .049
Thank you Rusty..my other guess for the purpose of that lip is less scientific:: the cast backplate has internal dimension inaccuracies that would not be acceptable in such a tiny engine..therefore the exact calibration of the lip length by machining it after the cast is made ensures the setting of the exact gap between the lip and intake channel necessary for the metered dosage of fuel into the air...(???)

balogh- Top Poster


Posts : 4960
Join date : 2011-11-06
Age : 66
Location : Budapest Hungary
 Re: Venturi Size .049
Thanks guys for the numerous good comments.
I drilled the .082 " hole through using a multi hole approach to achieve correct size a after a few increasingly larger holes as suggested by Paul. Then I carefully reamed the remaining lip from the inside of the venturi receiver to leave it perfectly flat with NO lip at all. Most motors are that way anyway. I seemed too tight to me and might restrict flow. I'll be out flying tonight and test it again.
Appreciate the expert advice.
Ice

Iceberg- Gold Member

- Posts : 382
Join date : 2018-11-03
Location : Suva Fiji Islands
 Re: Venturi Size .049
Ooooops Darren, this is a real surgery you have done, and I am curious to hear from your flight experience, also in context of my 2 last posts here where I theorized that the lip is an important element in creating a well metered and atomized dosing of fuel into the air. I hope your surgery will have positive effect though..

balogh- Top Poster


Posts : 4960
Join date : 2011-11-06
Age : 66
Location : Budapest Hungary
 Re: Venturi Size .049
Hi Andras
I'll know soon when I test fly. I'll let you know.
Thanks
I'll know soon when I test fly. I'll let you know.
Thanks

Iceberg- Gold Member

- Posts : 382
Join date : 2018-11-03
Location : Suva Fiji Islands
 Re: Venturi Size .049
The flange removed Andras did not adversely affect the mixture. The motor ran fine. Needle position was no more finicky than normal. Not sure how essential that lip is seems it works both way?
Thanks
Ice
Thanks
Ice

Iceberg- Gold Member

- Posts : 382
Join date : 2018-11-03
Location : Suva Fiji Islands
 Re: Venturi Size .049
Thanks Darren. I am happy that your experiment went well..looks like reality sometimes defies theory..especially if theory is wrong 


balogh- Top Poster


Posts : 4960
Join date : 2011-11-06
Age : 66
Location : Budapest Hungary
 Re: Venturi Size .049
I was moving around different sized backplates and put a very large drilled out from a golden I got from parts auction. I didn't drill it but obviously someone overdrilled it before I got it. Well I put on a very good condition Super Bee it runs awesome rpm I guess around 19-20K. But it is super hard to start because poor vacuum. Then need to lean out after starting as flooding like crazy and then during screaming run it will run for a maybe a minute then after any wingover it will conk out. it seems due to the massive venturi. Size. Is there any way to reduce an already over sized venturi hole? Maybe with a small sleeve or something. But the rpm is super fast during that one minute. Faster than one of my already fast Widows.
Thanks
Ice
Thanks
Ice

Iceberg- Gold Member

- Posts : 382
Join date : 2018-11-03
Location : Suva Fiji Islands
 Re: Venturi Size .049
I use tubing to downsize the venturi hole. I just use various pieces of copper tubing and use incremental sizes that can slip into each other. I have soldered them together, glued them into metal backplates and pressed them into plastic. I have also used eyelets made of brass. Whatever protrudes can easily be filed off.

Ken Cook- Top Poster

- Posts : 5644
Join date : 2012-03-27
Location : pennsylvania
 Re: Venturi Size .049
Hi Ken
Thanks very much for the idea. Might you have a picture or two of the finished product? The tubing I guess could be aluminum also maybe? Where to get the small tubing sizes in copper?
Thanks!
Ice
Thanks very much for the idea. Might you have a picture or two of the finished product? The tubing I guess could be aluminum also maybe? Where to get the small tubing sizes in copper?
Thanks!
Ice

Iceberg- Gold Member

- Posts : 382
Join date : 2018-11-03
Location : Suva Fiji Islands
 Re: Venturi Size .049
I use K&S brand tubing. I see no reason why aluminum wouldn't work, it's just that soldering pieces together isn't going to be a easy task if required to do so. I recently updated my computer and for some reason, I can't seem to get my camera to cooperate. This is driving me a bit crazy actually. The computer isn't recognizing the pictures on the camera. Early on, I was drilling all of my venturi's out to .093". While this hasn't been a huge issue, it does plague the run on certain engines. On product backplates, I was drilling them to 11/64" or using a #16 drill bit. I was just using JB weld or similar metal epoxies to hold the pieces in. I would just make certain the area was clean prior to epoxy. I would also let the repair cure for several days prior to running. While the pieces will be small, don't let them protrude too far into the backplate where it impedes the stepped down section of the tank to engage properly.

Ken Cook- Top Poster

- Posts : 5644
Join date : 2012-03-27
Location : pennsylvania
 Re: Venturi Size .049
Thanks again Ken
If you get your computer working a picture or ten would be much appreciated. Yes soldering aluminum is not as easy as copper.
Thank you!
Iceberg
If you get your computer working a picture or ten would be much appreciated. Yes soldering aluminum is not as easy as copper.
Thank you!
Iceberg

Iceberg- Gold Member

- Posts : 382
Join date : 2018-11-03
Location : Suva Fiji Islands
 Re: Venturi Size .049
Ken sounds like you need to download the application for that camera so it will recognize it , sometimes that stuff gets lost in the transformation to new equipment , You can look it up on google for a free download .I recently updated my computer and for some reason, I can't seem to get my camera to cooperate. This is driving me a bit crazy actually. The computer isn't recognizing the pictures on the camera. wrote:Ken

getback- Top Poster


Posts : 10443
Join date : 2013-01-18
Age : 67
Location : julian , NC

Iceberg- Gold Member

- Posts : 382
Join date : 2018-11-03
Location : Suva Fiji Islands
 Re: Venturi Size .049
If its a metal backplate, could try jb-weld or pc7, then dremel grind to shape if necessary, then drill to the size you want.
Page 1 of 1
Permissions in this forum:
You cannot reply to topics in this forum

 Rules
Rules


