Log in
Search
Latest topics
» Free Flight Radio Assist by Levent Suberk Today at 8:26 am
» Brushless motors?
by GallopingGhostler Today at 3:35 am
» Tribute Shoestring build
by 1/2A Nut Yesterday at 11:24 pm
» Cox 020 PeeWee rebuild questions
by TD ABUSER Yesterday at 11:17 pm
» Landing-gear tips
by 1975 control line guy Yesterday at 6:28 pm
» My current avatar photo
by GallopingGhostler Yesterday at 4:39 am
» It's the X Wing that has a canard
by rdw777 Yesterday at 3:58 am
» music vids.. some of your favorites
by Kim Fri Nov 15, 2024 12:28 am
» New Model Build
by bsadonkill Thu Nov 14, 2024 10:19 pm
» Kofuku Maru Fishing Boat Model
by Levent Suberk Thu Nov 14, 2024 8:39 pm
» TEE DEE Having issues
by GallopingGhostler Thu Nov 14, 2024 8:38 am
» Pathé Modeling Videos
by Levent Suberk Wed Nov 13, 2024 11:10 pm
Cox Engine of The Month
Homemade Fuel Tank
Page 1 of 1
 Homemade Fuel Tank
Hi all yet again. I have a set of Pinto plans here and I have an itch to try to build something nice over the course of a long time. So I started tonight with it by making the fuel tank. It is brass sheet with 3/32 brass tubing as per the plans. I am a bit worried, however at the weight, so I was just wondering if my time, money, and efforts were wasted, or do you feel I can safely use this tank. Please do not laugh at it, as it does have a few cosmetic issues, and was made by hand with crude hand tools.  Anyways, here are a couple of pictures for your enjoyment.
[img] [/img]
[img] [/img]
[img] [/img]
 Anyways, here are a couple of pictures for your enjoyment.
[img]
 [/img]
[img]
 [/img]
[img]
 [/img]
NEW222- Top Poster

- Posts : 3896
Join date : 2011-08-14
Age : 46
Location : oakbank, mb
 Re: Homemade Fuel Tank
Overall dimensions were unfortunately slightly over what is called for in the plans, and in case you may have missed it, it weighs in at around .81 ounces.

NEW222- Top Poster

- Posts : 3896
Join date : 2011-08-14
Age : 46
Location : oakbank, mb
 Re: Homemade Fuel Tank
Nice work! From what I can see it looks great. 


chevyiron420- Gold Member

- Posts : 251
Join date : 2015-01-29
Age : 66
Location : Barney Georgia
 Re: Homemade Fuel Tank
Looks good, and is most certainly safer than the tanks on Pinto cars 
What is the thickness of the brass sheet?

What is the thickness of the brass sheet?

KariFS- Diamond Member

- Posts : 2044
Join date : 2014-10-10
Age : 53
 Re: Homemade Fuel Tank
That's great! Is their an internal wedge for the pick-up tube? Have you leak-tested it yet? Once it passes a leak-test.. be sure to flush-out any flux on the inside using solvent. Ken Cook has a lot of experience with hard-tanks. Maybe he'll check-in with suggestions.
I built my first hard-tank(s) about a year ago.. and found it really enjoyable! I used .008" Tin-plate sheet and plumbed with 1/8" copper tube. The Tin sheet I found at "Lowes" home-center in the Hdwe. dept. and the copper tubing I got at the auto parts store; near where they sell the instrument gages.
My tanks are tiny.. These were built for the CEF Speed Contest.
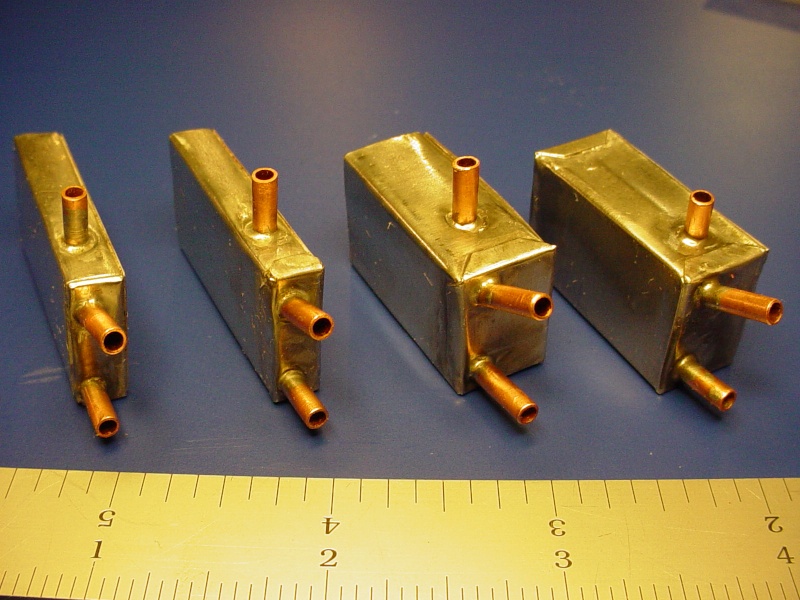

 Re: Homemade Fuel Tank
NEW222 wrote:Hi all yet again. I have a set of Pinto plans here and I have an itch to try to build something nice over the course of a long time. So I started tonight with it by making the fuel tank. It is brass sheet with 3/32 brass tubing as per the plans. I am a bit worried, however at the weight, so I was just wondering if my time, money, and efforts were wasted, or do you feel I can safely use this tank. Please do not laugh at it, as it does have a few cosmetic issues, and was made by hand with crude hand tools.Anyways, here are a couple of pictures for your enjoyment.
>
I am not sure for what use (i.e. CL or R/C plane or car) this tank is intended for, but I like it and most likely could not build the same...no tooling, limited manual ability, good only for scratching my forehead when seeing stuff like this, but cannot make one

I still find the party-baloon tanks the best at least in my R/C planes, as these adapt their shape to the fuselage interior easily, the foaming of fuel in vibration is prevented, and this is darn simple to make and replace...

balogh- Top Poster


Posts : 4957
Join date : 2011-11-06
Age : 66
Location : Budapest Hungary
 Re: Homemade Fuel Tank
Thank you all for the kind words. It is greatly appreciated.
@KariFS - Thickness is somewhere in the .004-.005 range.
Now, roddie. roddie. I don't know about you. You are a great wealth of knowledge and thanks for all the help you have given me lately. Anyways, now to answer your questions.
1. No, there is no internal wedge installed in the tank for the pick-up. I will have to look at it better to figure it out, disassemble the tank carefully, and make and install them.
2. As for the leak test, no, I did not perform it yet, as I was waiting to see if anyone noticed I forgot to put my wedged for pick up in.
3. Thanks for the recommendation of flushing out the fuel tank with solvents before use. I thought and wondered about the insides after assembly, and forgot to ask this in my original posts, so thank you again. What kind of solvents would you recommend. I have mineral spirits here at home, would that be ok?
I will try to remember to take a couple of pictures of the inside after I disassemble it and build it properly.
@balogh - It is for a 1/2a sized control line plane called the 'Pinto'.
@KariFS - Thickness is somewhere in the .004-.005 range.
Now, roddie. roddie. I don't know about you.
 You are a great wealth of knowledge and thanks for all the help you have given me lately. Anyways, now to answer your questions.
 1. No, there is no internal wedge installed in the tank for the pick-up. I will have to look at it better to figure it out, disassemble the tank carefully, and make and install them.
2. As for the leak test, no, I did not perform it yet, as I was waiting to see if anyone noticed I forgot to put my wedged for pick up in.
3. Thanks for the recommendation of flushing out the fuel tank with solvents before use. I thought and wondered about the insides after assembly, and forgot to ask this in my original posts, so thank you again. What kind of solvents would you recommend. I have mineral spirits here at home, would that be ok?
I will try to remember to take a couple of pictures of the inside after I disassemble it and build it properly.
@balogh - It is for a 1/2a sized control line plane called the 'Pinto'.

NEW222- Top Poster

- Posts : 3896
Join date : 2011-08-14
Age : 46
Location : oakbank, mb
 Re: Homemade Fuel Tank
Also, roddie. I will agree with you, that your tanks are small, now that I re-read your post and put together the size by knowing your tubing is 1/8". But they look very nice and solid.

NEW222- Top Poster

- Posts : 3896
Join date : 2011-08-14
Age : 46
Location : oakbank, mb
 Re: Homemade Fuel Tank
What flux did you use? If water soluble, then use water, 3-5 fill and empty, at least 1 through each tube. Follow this with some alcohol (denatured) to absorb the water and "dry" the tank.
I have about 3 olive oil cans to cut up as material for tinplate. When recycling food cans, open one end, wash with soap and water, then open and unroll flat. Using a rolling pin on the metal with a towel underneath works surprisingly well. The paint must be stripped prior to soldering. Finger nail polish remover often takes it off quick, but sanding is another choice.
Phil

pkrankow- Top Poster

- Posts : 3025
Join date : 2012-10-02
Location : Ohio
 Re: Homemade Fuel Tank
Great idea with the recycling tin food cans. I never thought of that. And believe me, i should have.

NEW222- Top Poster

- Posts : 3896
Join date : 2011-08-14
Age : 46
Location : oakbank, mb
 Re: Homemade Fuel Tank
NEW222 wrote:
Now, roddie.. to answer your questions.
1. No, there is no internal wedge installed in the tank for the pick-up. I will have to look at it better to figure it out, disassemble the tank carefully, and make and install them.
2. As for the leak test, no, I did not perform it yet, as I was waiting to see if anyone noticed I forgot to put my wedged for pick up in.
3. Thanks for the recommendation of flushing out the fuel tank with solvents before use. I thought and wondered about the insides after assembly, and forgot to ask this in my original posts, so thank you again. What kind of solvents would you recommend. I have mineral spirits here at home, would that be ok?
I will try to remember to take a couple of pictures of the inside after I disassemble it and build it properly.
Are there any other notes on the plan concerning tank construction? I asked about the internal wedge.. because of the pickup-tube being centered on the outboard-wall.. and the illustration shows what appears to be an internal V-shaped panel inside. A conventional wedge-tank's shape directs fuel to the pickup in flight because the pickup is located inside the bottom of the "V".. allowing all the fuel to be used. The tank-design on your plan is one that I'm unfamiliar with.
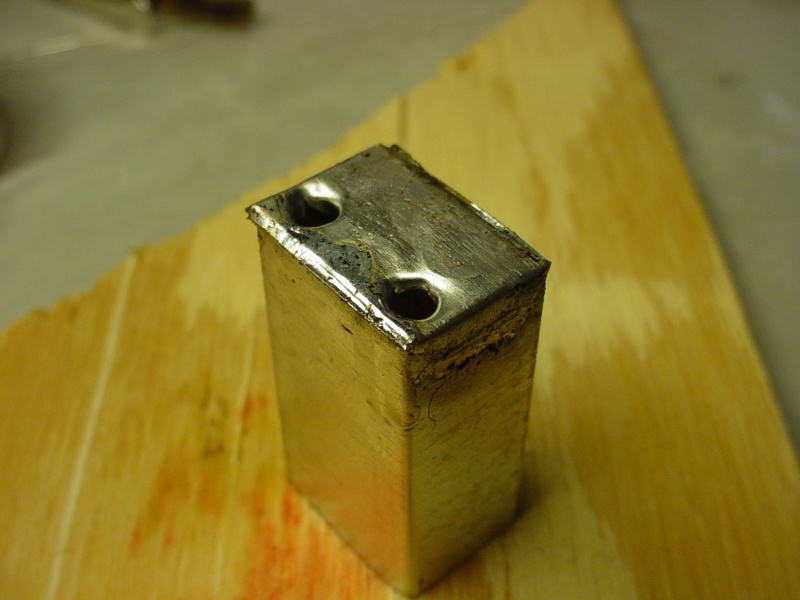
Since you're going to disassemble it, I would highly recommend using Copper tubing rather than brass, to resist corrosion. Use the same size if you want to stick to what the plan recommends.. but I personally would step-up to 1/8" Copper. Use an awl to enlarge the tube-holes slightly smaller than the 1/8" tubing.. and this will create a "pocket" for solder to fill around, giving you much stronger joints. Also.. be sure to solder (tack) the pickup tube to the tank-wall near the back as well.
dimples for solder to pool when installing tubes.
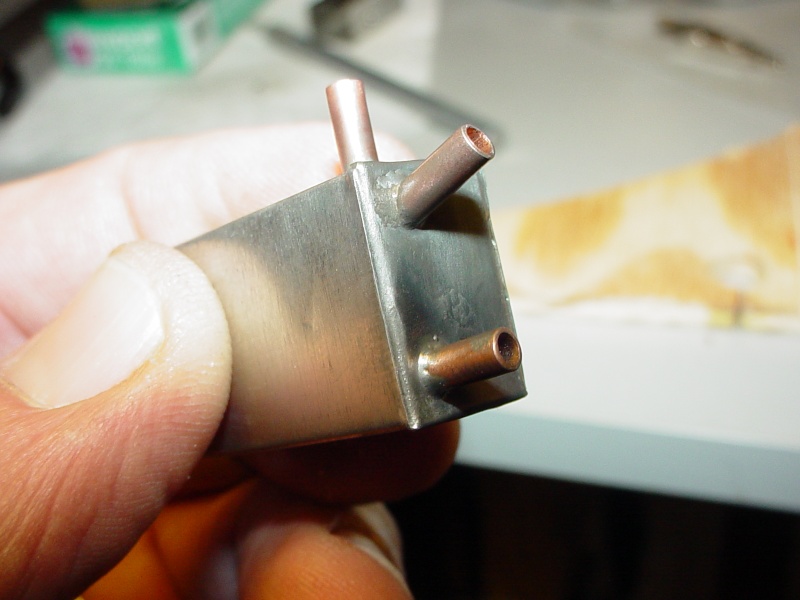
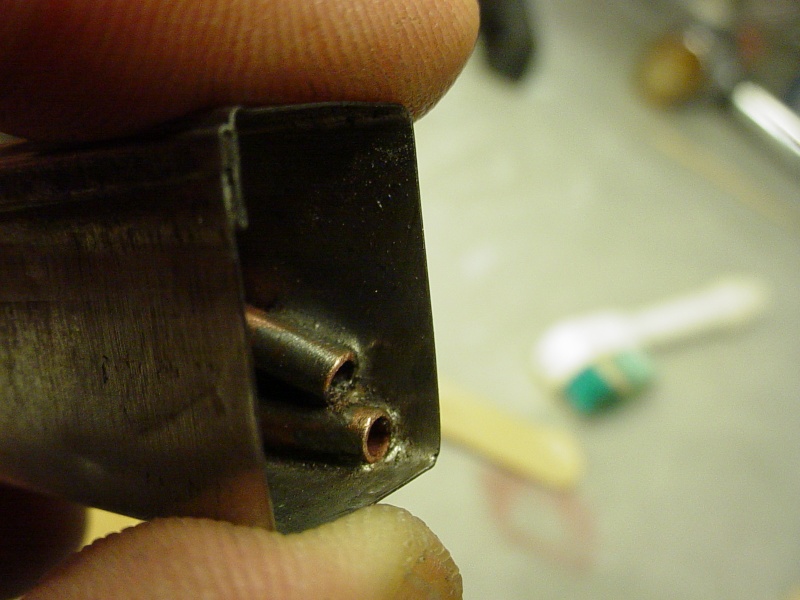
Below pic shows how I tacked my pickup tube at the rear corner. Be sure to leave room between the rear end-cap and pickup tube for fuel to flow! (The angled tube is a uniflow vent which wouldn't apply to your tank design)
I leak-tested my tanks using an empty fuel-bulb. Cap-off all but one tube and connect the fuel-bulb to it. Submerge in a glass bowl (or jar) of water and squeeze the bulb to pressurize the tank. If you see any bubbles.. mark the location(s) and re-solder. Re-test until it doesn't leak.
I flushed-out my tanks afterward using a solution of baking soda and HOT water in the glass bowl. Connect the fuel-bulb to the tank with all caps removed and submerge it. Rinse by drawing the solution into the tank and out.. by squeezing the bulb and letting it fill.. then squirting the solution back out several times. Afterwards.. remove the tank and force out any remaining water. Follow-up with a rinse using lacquer thinner in the fuel-bulb.. BEING CAREFUL not to squirt yourself!
How will the tank be mounted? Is it a lot bigger than the measurements on the plan? Building another one to the proper dimensions probably wouldn't take as much time as the first one; now that you have the technique down.
 Re: Homemade Fuel Tank
@roddie - No, sorry, there are no other notes on the plans of construction, or installation of the fuel tank. Just what I had posted. It does most definitely appear to be wedge in the design. I just could not picture it, then got to building and then forgot to add it. Call it weird, but after looking at the complete plans, the pick-up, wedge or not, is on the inboard side of the airplane. Weird if you ask me, the novice control line flyer. As far as I thought, it should be at the outboard side, no? As for the tubing, I could look into the copper tubing in 1/8", just thought since my other small stuff has used 3/32 copper, I would continue. And the dimples, I really like that idea, as I soldered inside and out for security. As for disassembly, it is. I saved the tubes, and large sides, the rest was scrapped, as it did not want to disassemble properly, so I salvaged what I could. And as for size wise, it was at absolute max allowable for the location. I will have to get a new sheet hopefully next week and try this all over again, only better. Also, I will draw it out on cardstock, and slightly smaller than the original so I have a bit of wiggle room. It appears to fit tightly in its location. If time permits, I may try to find some thin tin so I could get back on it sooner. Thanks.

NEW222- Top Poster

- Posts : 3896
Join date : 2011-08-14
Age : 46
Location : oakbank, mb
 Re: Homemade Fuel Tank
I have two things I didn't see mentioned. Roddie did mention brass tubes and corrosion. Brass will turn green and slough off, but it's not a problem with a little preventive maintenance. defuel it after use. And if you aren't using it every few days, flush the tank after and the tubes won't gook up in a few months. If it's been sitting unused for a long time, I blast it out with brake parts cleaner and that gets the green out. I filled an old ugly mystery tank with BP cleaner and shook it a few times and it works great on my Yak-9. Brass tube is the choice of most tank builders I've ever seen. It's harder than copper and still easy to solder.
Speaking of brass, Tin is a better choice for the tank shell, much lighter and I think somewhat easier to work with, more malleable. Besides, brass tubes or copper, you still need to flush your tank to prevent corrosion if not in regular use .
If this is a tether car then a wedge tank would be best. The pickup and wedge need to be on the same side as the outside of the circle, whichever way you run the car.
I think airplane thought is invading our car design. Remember it doesn't go up and down, so it seems to me the wedge should be at the bottom where gravity holds the fuel. Look at this picture I drew. Does this make more sense for a car. This example would be for a counter clockwise car, wedge points to the outboard side just like a plane. Y'all analyze my idea. I've never had a car or even seen one, so don't go all Rusty says... lol
Rusty
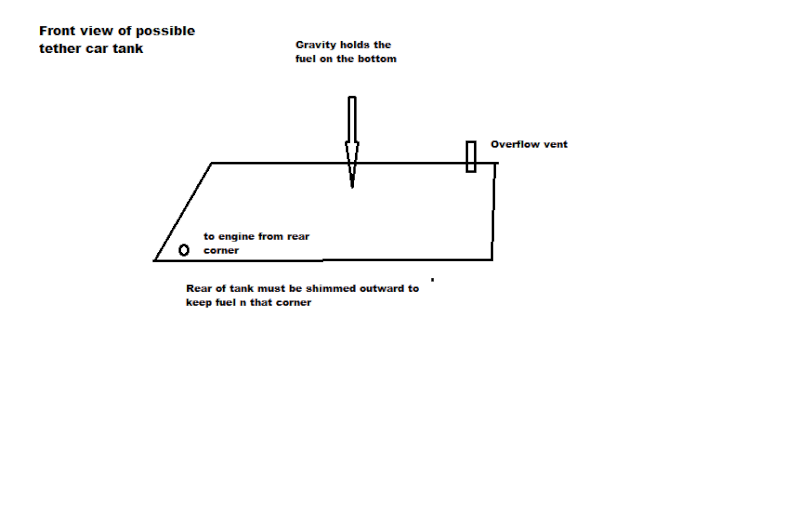
EDIT: Actually the overflow vent should b a "J" shape dropping in and turning back up to the top. Chamfer the end in case you get it too close to the wall while soldering.
Speaking of brass, Tin is a better choice for the tank shell, much lighter and I think somewhat easier to work with, more malleable. Besides, brass tubes or copper, you still need to flush your tank to prevent corrosion if not in regular use .
If this is a tether car then a wedge tank would be best. The pickup and wedge need to be on the same side as the outside of the circle, whichever way you run the car.
I think airplane thought is invading our car design. Remember it doesn't go up and down, so it seems to me the wedge should be at the bottom where gravity holds the fuel. Look at this picture I drew. Does this make more sense for a car. This example would be for a counter clockwise car, wedge points to the outboard side just like a plane. Y'all analyze my idea. I've never had a car or even seen one, so don't go all Rusty says... lol
Rusty

EDIT: Actually the overflow vent should b a "J" shape dropping in and turning back up to the top. Chamfer the end in case you get it too close to the wall while soldering.
_________________
Don't Panic!
...and never Ever think about how good you are at something...
while you're doing it!
My Hot Rock & Blues Playlist
...and never Ever think about how good you are at something...
while you're doing it!
My Hot Rock & Blues Playlist

RknRusty- Rest In Peace

- Posts : 10869
Join date : 2011-08-11
Age : 68
Location : South Carolina, USA
 Re: Homemade Fuel Tank
Sorry, I guess I should have been more clear when I said Pinto. It is a control line 1/2a design, flapped stunter. I will attach a photo of the plans. This is in case it helps anyone with what I am trying to accomplish. The tank picture I had posted earlier is in the bottom left corner.
[img] [/img]
[img]
 [/img]
NEW222- Top Poster

- Posts : 3896
Join date : 2011-08-14
Age : 46
Location : oakbank, mb
 Re: Homemade Fuel Tank
Oh. Duh. Yeah,I've even heard of that plane


_________________
Don't Panic!
...and never Ever think about how good you are at something...
while you're doing it!
My Hot Rock & Blues Playlist
...and never Ever think about how good you are at something...
while you're doing it!
My Hot Rock & Blues Playlist

RknRusty- Rest In Peace

- Posts : 10869
Join date : 2011-08-11
Age : 68
Location : South Carolina, USA
 Re: Homemade Fuel Tank
Thanks RknRusty for the advice especiallyfor that of flushing the tankout if not inuse for a while. I did nt think of storage. Also, where would one source out the tin you mentioned to build with? Is there a standard use for the stuff other than modeling? Thanks.

NEW222- Top Poster

- Posts : 3896
Join date : 2011-08-14
Age : 46
Location : oakbank, mb
 Re: Homemade Fuel Tank
New222 , I think Hobby Lobby has the tin as also brass sheets , tubes ect. http://shop.hobbylobby.com/products/-008-tin-sheet-107342/ Eric 

getback- Top Poster


Posts : 10432
Join date : 2013-01-18
Age : 67
Location : julian , NC
 Re: Homemade Fuel Tank
The Pinto is a scaled down version of the Oriental. The tank is a version of George Aldrich's "pinch corner" tank, although others probably also used it. There is no baffle inside, the end of the tank forms a wedge.
Brass tubing will corrode and sometimes get a hole or a crack inside the tank over time. Copper is much better for long-term use.
Holes for the tank have more surface area to solder if they are punched (sharpened nail) rather than drilled when using tin can stock.
If you have not soldered much, make sure you can tell if it is a cold-solder joint...and use a big iron or a torch.
Of course these are only opinions. Your tank, your choice.
George

gcb- Platinum Member

- Posts : 908
Join date : 2011-08-12
Location : Port Ewen, NY
 Re: Homemade Fuel Tank
Hi New, It looks like we're getting this figured out! I mentioned in my 1st post, where I got my materials. Other options would be to check your local hobby/craft stores. Call and ask if they carry "K & S" metals. If so; there's a good chance they'll have what you need. Tower Hobbies carries the K & S line too..
http://www3.towerhobbies.com/cgi-bin/wti0001p?&I=LXUTU8&P=ML
http://www3.towerhobbies.com/cgi-bin/wti0001p?&I=LXCGCJ&P=7
George (gcb) enlightened me concerning both; this model and it's "pinch-corner" tank design. This thread might help you to understand the tank-concept.
http://clstunt.com/htdocs/dc/dcboard.php?az=show_topic&forum=103&topic_id=43082&mesg_id=43082&listing_type=&page=25
 Re: Homemade Fuel Tank
http://www.aeromaniacs.com/Tips.html
At the very bottom of this page is a link to a GIF image of the template. Import the template into a program that allows you to stretch and size it (most word processors can do this, but are clumsy), then calculate the correct dimensions and stretch till you have them. Print it out and verify.
Working in metric might be easier since 1 oz is practically 30cc
Make a matching wood plug to have an easier time about it according to the CLstunt thread.
Phil

pkrankow- Top Poster

- Posts : 3025
Join date : 2012-10-02
Location : Ohio
 Re: Homemade Fuel Tank
pkrankow wrote: Make a matching wood plug to have an easier time about it according to the CLstunt thread. Phil
Yes.. I used plugs to build my tanks. I had (fortunately..) aluminum bar cut-offs to form the main tank-body and end-caps. Cutting "wood" plugs and shims really helps when soldering your tubes in. The wood doesn't sink as much heat away.
Although I've never tried it; you could probably build a conventional wedge-tank by making a plug; using a scrap piece of balsa "leading-edge" stock and hardening it with thin CA glue. Build-up the back side with hardwood to the depth (capacity) you want.. and glue it together for forming the tin sheet around.
 Re: Homemade Fuel Tank
Well, that's great info give here. I now know how this tank is supposed to look, as well as how to build it. Well, as soon as I can get my grubby hands on some metal, I will build it. Thank you all again for your help.

NEW222- Top Poster

- Posts : 3896
Join date : 2011-08-14
Age : 46
Location : oakbank, mb
 Similar topics
» homemade dual-feed fuel tank for bench running
» JR SATAN Build
» A PVC fuel tank?
» "Flying Blind" a build-thread for CEF 2018 Speed
» fuel tank ?
» JR SATAN Build
» A PVC fuel tank?
» "Flying Blind" a build-thread for CEF 2018 Speed
» fuel tank ?
Page 1 of 1
Permissions in this forum:
You cannot reply to topics in this forum

 Rules
Rules


