Log in
Search
Latest topics
» Funny what you find when you go lookingby rsv1cox Today at 1:01 pm
» My latest doodle...
by TD ABUSER Today at 11:30 am
» Duende V model from RC Model magazine 1983.
by MauricioB Today at 10:56 am
» Landing-gear tips
by 1975 control line guy Today at 10:07 am
» My N-1R build log
by roddie Yesterday at 6:54 pm
» Brushless motors?
by rsv1cox Yesterday at 6:40 pm
» Free Flight Radio Assist
by rdw777 Yesterday at 6:03 pm
» Tribute Shoestring build
by amurphy6812 Yesterday at 5:43 pm
» Cox 020 PeeWee rebuild questions
by LooseSpinner99 Yesterday at 5:17 pm
» My current avatar photo
by GallopingGhostler Fri Nov 15, 2024 7:39 pm
» It's the X Wing that has a canard
by rdw777 Fri Nov 15, 2024 6:58 pm
» music vids.. some of your favorites
by Kim Thu Nov 14, 2024 3:28 pm
Cox Engine of The Month
postage stamp mounting
Page 2 of 3
Page 2 of 3 •  1, 2, 3
 Re: postage stamp mounting
This thread is an excellent example of thought, fine tuning and "trial and error" leading to a very nice and useful product.
What did you "stick" the aluminium to the sacrificial board with ad to stop the parts moving about as they were cut through?
What did you "stick" the aluminium to the sacrificial board with ad to stop the parts moving about as they were cut through?

ian1954- Diamond Member

- Posts : 2688
Join date : 2011-11-16
Age : 70
Location : England
 Re: postage stamp mounting
ian1954 wrote:This thread is an excellent example of thought, fine tuning and "trial and error" leading to a very nice and useful product.
What did you "stick" the aluminium to the sacrificial board with ad to stop the parts moving about as they were cut through?
Ian, The 1mm (.040") aluminum sheet comes with a thin film approx. .01mm (.003") of scratch-protective liner, adhered to one side. I then additionally "mask" that side with sticky-paper that is .017mm (.005"). The sheet lays "masked-side down" on the vacuum table.. which holds the sheet from moving. The cutting is done in 4 passes at .25mm/pass. I used a feed rate of 50 inches per minute. The holes are drilled through FIRST.. and also "peck-drilled" in .25mm increments. The profile is done last.. and has an "inlay" cut which rounds the corners to the same radius as the tools diameter. The entire job is done with a 3.18mm (.125") diameter endmill. This method of cutting in multiple passes yielded a better finish.. and also helped keep the pieces from moving.. with the last pass cutting only .25mm.. rather than the entire 1mm thickness all at once.
This is the same brand and size endmill that I used. Ian, you may be familiar with the type of metal used in it's construction. I believe it's a European spec.

We use these "exclusively" at work, for cutting foam-board, plastics/cast acrylics, wood, and obviously aluminum.. up to 2.0mm thickness. The routers that I use, are not equipped to cut steel.. or other composite materials requiring coolant. I am the only person at this company who has ever had any metal-machining experience.. and the "methods" that apply to speed/feed-rates for extended tool life; by the means of using certain ones for a particular purpose... and "documenting" standards. It's ridiculous to see what a company will spend on tooling.. where there's no actual "engineering" department, to write the CNC programs.. and figure-in the cost of tooling to manufacture a product.
 a better plate-bending jig
The most laborious task in making these mounts, is in the bending.. and having the four bends be equally "square" to each other on both plates. I had initially made a 1 inch square PVC block with a 1/4" deep slot.. 1/16" (.062") in width.. because I was limited to our (smallest) 1/16" diameter endmill to cut the slot. The plates are .040" thick.. (leaving a .022" gap in the slot) Clamping the jig-block and plate in a vise "closes" the gap at the top.. but the PVC is soft; compared to the aluminum.. and deforms.. preventing a sharp corner from being made.

I thought to myself; "there must be a better way"... so I made another block with a 1/8" (.125") wide slot.. 1/4" deep.. and cut two jaws from the same .040" aluminum; 1/4" x 1.0" to fit in the slot, and "sandwich" the .040" plate. (.040" x3= .120")
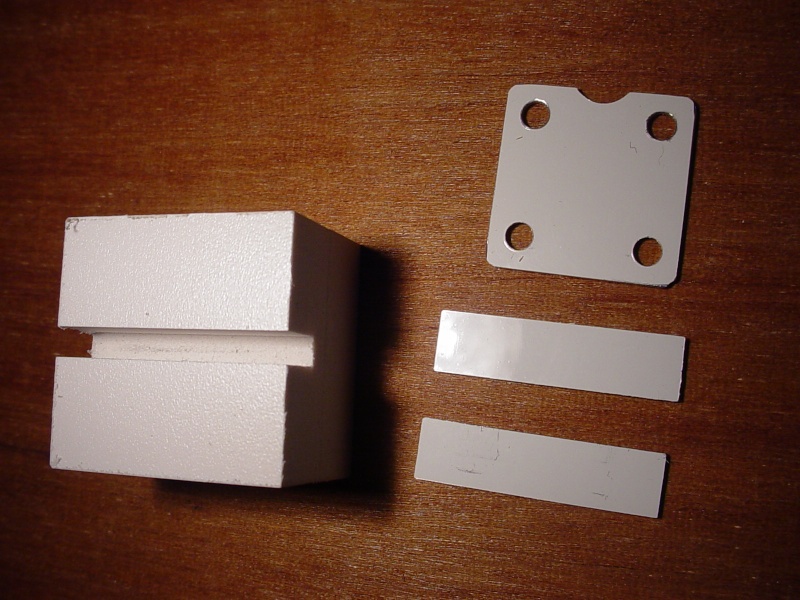

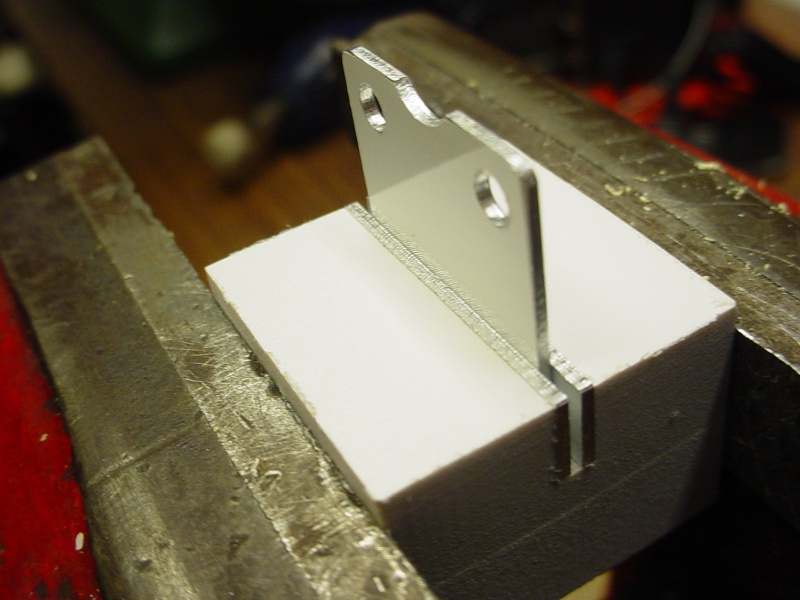
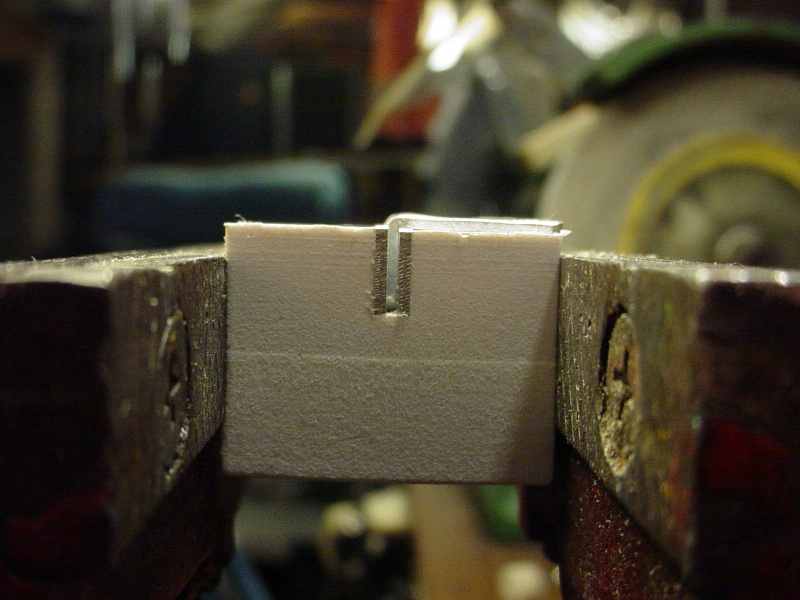
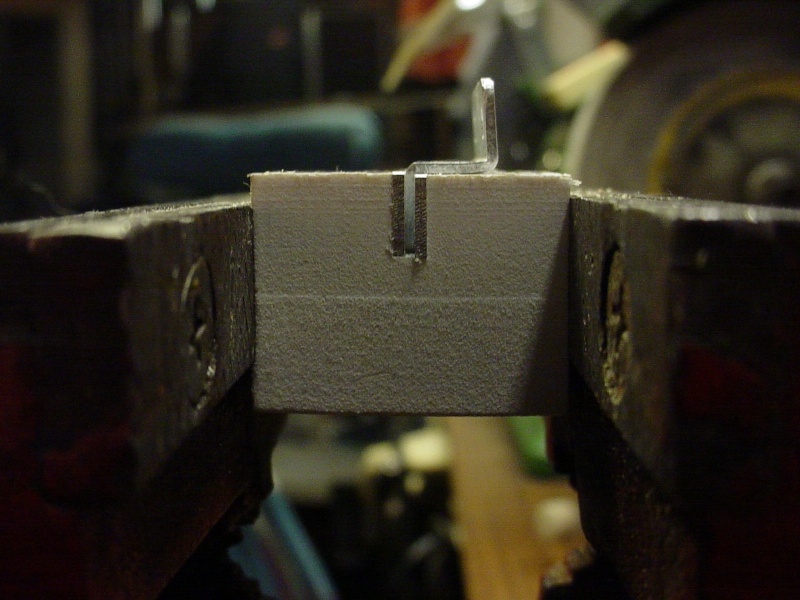
not bad.. but you can clearly see the now "downward" pressure exerted on the right jaw from the bends.. embedding it into the floor of the slot in the PVC block. I made 8 of these PVC blocks today.. which should be enough to bend all the mount-plates that I made. Kim, Eric and Mark M. are all interested in trying these out.. and I don't want to send them "Shoddy-Roddie" examples of my workmanship..

I thought to myself; "there must be a better way"... so I made another block with a 1/8" (.125") wide slot.. 1/4" deep.. and cut two jaws from the same .040" aluminum; 1/4" x 1.0" to fit in the slot, and "sandwich" the .040" plate. (.040" x3= .120")


not bad.. but you can clearly see the now "downward" pressure exerted on the right jaw from the bends.. embedding it into the floor of the slot in the PVC block. I made 8 of these PVC blocks today.. which should be enough to bend all the mount-plates that I made. Kim, Eric and Mark M. are all interested in trying these out.. and I don't want to send them "Shoddy-Roddie" examples of my workmanship..

 Re: postage stamp mounting
It is not easy to get a sharp bend with aluminium. It work hardens and hardens with age. It is not always as soft and malliable as you think.
I'm not sure how sharp a bend is needed but I use a "V" blade pressing the sheet into a "V" groove. This exerts pressure into the corner evenly and the bend is formed at the corner outwards.
It is also possible to make the bend easier by annealing the aluminium but this can be fraught.
You need to be very careful as the difference in temperature between softening and melting is marginal.
Clean up the metal first before coating it with household soap, directly from the bar, covering the area of the aluminium you need to anneal (any brand will do providing it is a solid household soap with no moisturiser).
With your blow-lamp set at a low heat, run it around the surface, warming the work up generally and make a point of not keeping your flame in one place for too long.
Keep warming it up until you see the soap turning black and then shut the heat off rapidly and dip it quickly in water water.
Give it a shine (heating will dull it) and bend it.

ian1954- Diamond Member

- Posts : 2688
Join date : 2011-11-16
Age : 70
Location : England
 Re: postage stamp mounting
ian1954 wrote:It is not easy to get a sharp bend with aluminium. It work hardens and hardens with age. It is not always as soft and malliable as you think.
I'm not sure how sharp a bend is needed but I use a "V" blade pressing the sheet into a "V" groove. This exerts pressure into the corner evenly and the bend is formed at the corner outwards.
It is also possible to make the bend easier by annealing the aluminium but this can be fraught.
You need to be very careful as the difference in temperature between softening and melting is marginal.
Clean up the metal first before coating it with household soap, directly from the bar, covering the area of the aluminium you need to anneal (any brand will do providing it is a solid household soap with no moisturiser).
With your blow-lamp set at a low heat, run it around the surface, warming the work up generally and make a point of not keeping your flame in one place for too long.
Keep warming it up until you see the soap turning black and then shut the heat off rapidly and dip it quickly in water water.
Give it a shine (heating will dull it) and bend it.
Hi Ian, I have no idea what "grade" this aluminum sheet is... but I'm sure it's not "machining-grade". The .040" thickness bends fairly easily by hand.. (even the 2nd bend, having less leverage to work with..) Once clamped in the vise, I start the bend with my thumbs.. to about 45 degrees, and finish the 90 using a small aluminum block; tapping with a small hammer.
This thickness aluminum plate is sturdy enough for the purpose, yet very lightweight. It may bend from a nose-in crash... but that could save the plastic backplate.. and "possibly" the nose of the model, from more severe damage.
 Re: postage stamp mounting
Hi Roddie,
I think that the method you are using is perfect for these mounts and providing a bending method with the plates is good planning. Using the tool for positioning accurately as well as bending is a bonus.
I am obviously not familiar with the material you are using as I bend and shape brass, steel, copper, aluminium ............ and, often, because of the application I need as sharp a bend as possible. This can weaken the metal.
If I fold card I usually score the reverse side to make a crisp fold. With thin metal sheet - I score the line with a blade. Thicker sheet, I may machine a V groove at a slightly smaller angle then the bend to allow for the metal springing back.
I tend to use a V tool with a V groove to make metal bending easier.

If I score - I weaken the metal but get a crisp fold. If I just use the V block (the V block having a narrower angle to allow springing back) - I get a stronger fold but not quite as sharp.
I think that bringing the postage stamp engines back into service is a marvelous project. (Even if these mounts are only going to be used to display a shelf queen!)
I think that the method you are using is perfect for these mounts and providing a bending method with the plates is good planning. Using the tool for positioning accurately as well as bending is a bonus.
I am obviously not familiar with the material you are using as I bend and shape brass, steel, copper, aluminium ............ and, often, because of the application I need as sharp a bend as possible. This can weaken the metal.
If I fold card I usually score the reverse side to make a crisp fold. With thin metal sheet - I score the line with a blade. Thicker sheet, I may machine a V groove at a slightly smaller angle then the bend to allow for the metal springing back.
I tend to use a V tool with a V groove to make metal bending easier.

If I score - I weaken the metal but get a crisp fold. If I just use the V block (the V block having a narrower angle to allow springing back) - I get a stronger fold but not quite as sharp.
I think that bringing the postage stamp engines back into service is a marvelous project. (Even if these mounts are only going to be used to display a shelf queen!)

ian1954- Diamond Member

- Posts : 2688
Join date : 2011-11-16
Age : 70
Location : England
 Re: postage stamp mounting
ian1954 wrote:Hi Roddie,
I think that the method you are using is perfect for these mounts and providing a bending method with the plates is good planning. Using the tool for positioning accurately as well as bending is a bonus.
I am obviously not familiar with the material you are using as I bend and shape brass, steel, copper, aluminium ............ and, often, because of the application I need as sharp a bend as possible. This can weaken the metal.
If I fold card I usually score the reverse side to make a crisp fold. With thin metal sheet - I score the line with a blade. Thicker sheet, I may machine a V groove at a slightly smaller angle then the bend to allow for the metal springing back.
I tend to use a V tool with a V groove to make metal bending easier.
If I score - I weaken the metal but get a crisp fold. If I just use the V block (the V block having a narrower angle to allow springing back) - I get a stronger fold but not quite as sharp.
I think that bringing the postage stamp engines back into service is a marvelous project. (Even if these mounts are only going to be used to display a shelf queen!)
Bending sheet materials can be a science in itself! I imagine that heating (to a certain degree) will relieve stress, when forming a sharp corner. I also think that "force" has a lot to do with how much the material is stressed. There is "heat" generated when forming any material "cold"... by the re-arranging of it's molecules. (I think I'm correct about this.. right?
 ) This would explain why certain plastics will "bend" if bent slowly.. yet they will "snap" if bent abruptly. Bending thin sheet metal "back and forth "briskly".. will usually break it.. (and you can feel the heat).. yet bending "slowly" in the same fashion; takes much more time for the material to separate.
 I am satisfied with the latest bending jig-block that I have made. The bends are tighter.. and there is no visual sign of any fatigue/cracking. I am also achieving fairly accurate repeatability.. as far as square'ness is concerned.
I mentioned the "weight" of the postage-stamp backplate a few posts ago... being slightly lighter than the horseshoe production backplate. My digital scale confirmed this. Tonight I decided to check the weights of two "Bee" engines for comparison. Although they don't have identical crankcases; the cylinders are the same.. and there are no needles installed in either engine.
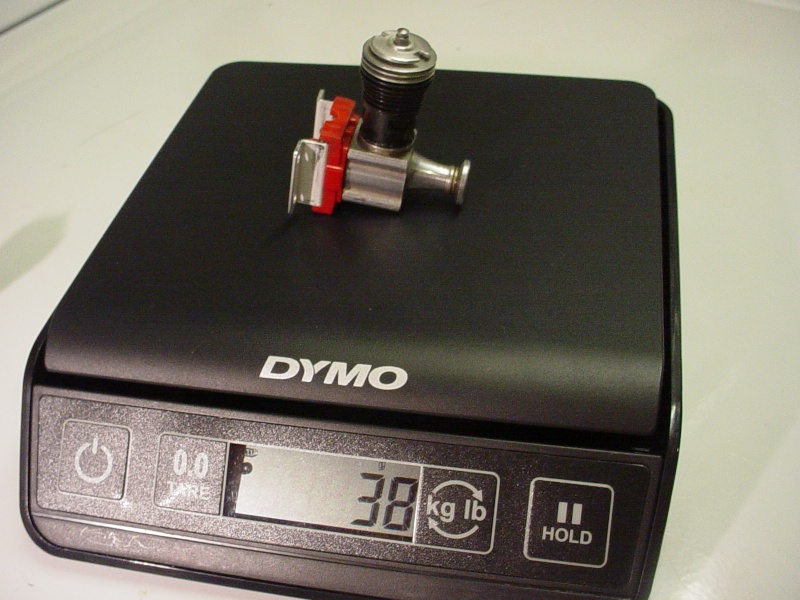
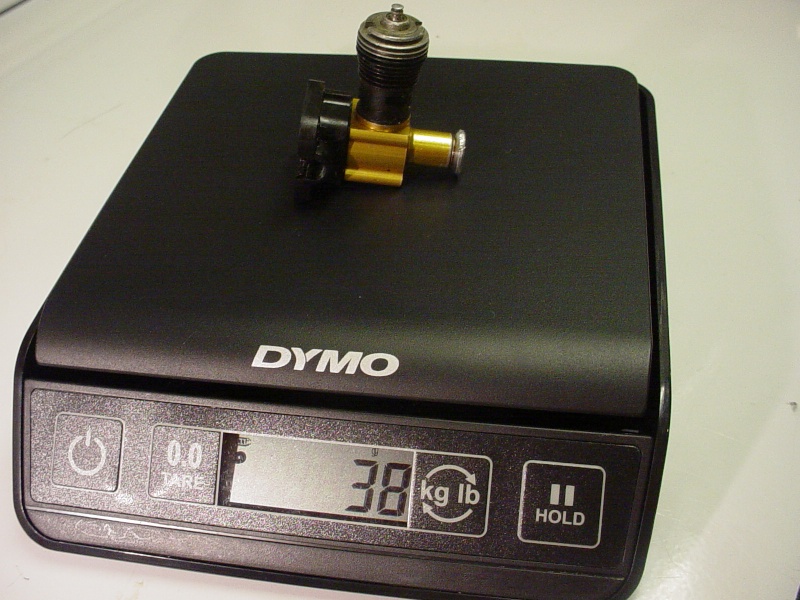
At least these mounts don't add any additional weight over the horseshoe style.
I was getting this postage-stamp engine ready to run.. and found that a used copper "star" shaped reed had the best seal, for some reason. I tried Mylar and Teflon... and they both leaked with the circlip-holder I was using. Then tonight.. I installed a R/H spring-starter.. and grabbed one of my NOS Cox black 6 x 2's for bench-testing this weekend. Guess what.. they're L/H props!
 Re: postage stamp mounting
They are here and mounted .....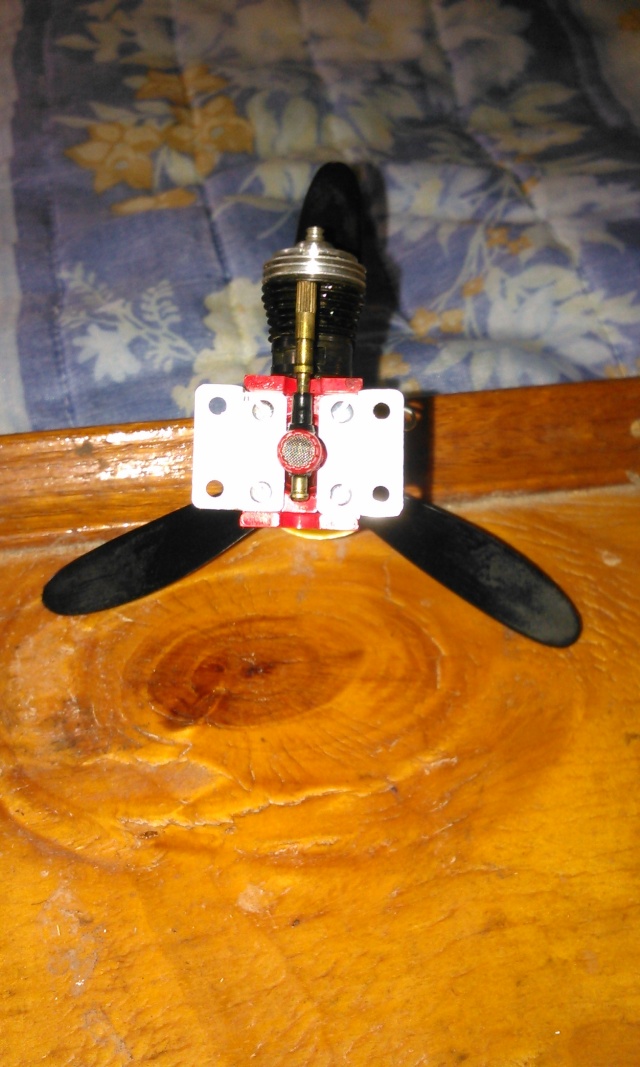 I want have time to run it right now have to go get Boy and do a meeting
  Thanks Roddie even comes with hardware very nice
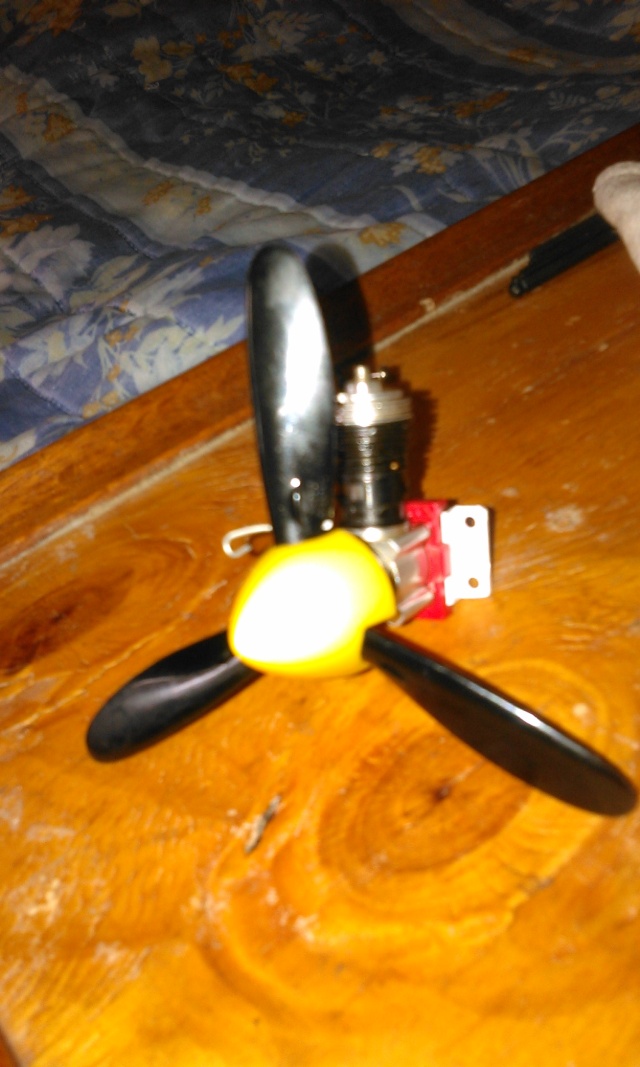
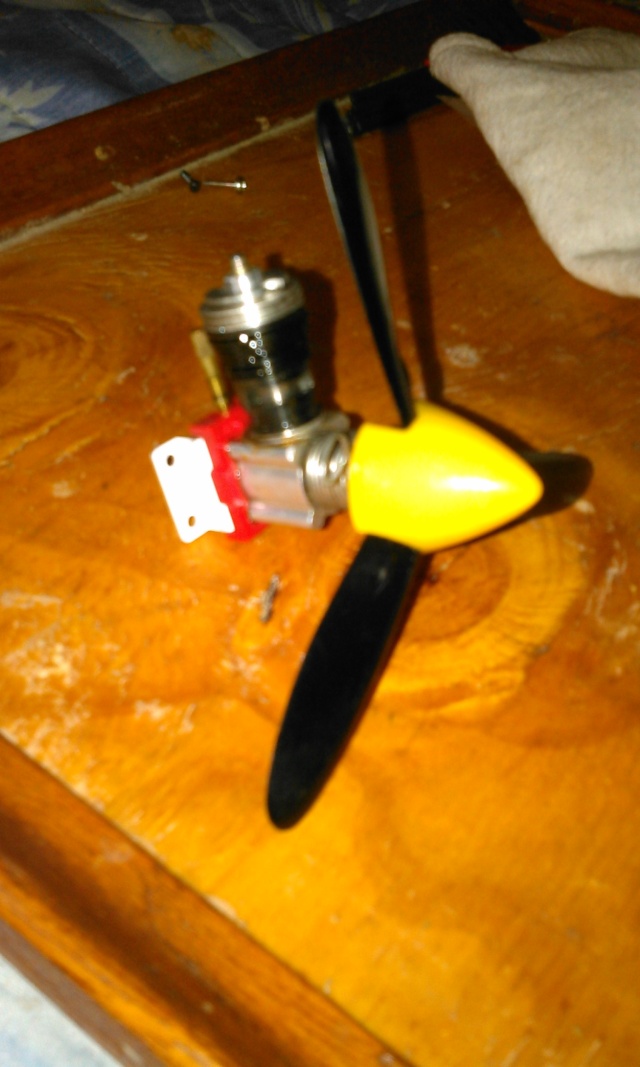 Later for now !Getback
  I am back with report after some cleaning I didn't know it needed , stupid window phone was over loaded but I was getting 19.7- 20.5 out of her the clearance is very close to the air intake butttt video is loading down now
 I want have time to run it right now have to go get Boy and do a meeting
 Later for now !Getback
 Last edited by getback on Fri Aug 29, 2014 4:47 pm; edited 1 time in total (Reason for editing : add run report)

getback- Top Poster


Posts : 10435
Join date : 2013-01-18
Age : 67
Location : julian , NC
 Re: postage stamp mounting
ian1954 wrote:
A classic air brake bender! Typically the groove is some angle less than 90 degrees so after spring back the bend is exact. The insert has some radius to it so a hard edge is not formed.
Phil

pkrankow- Top Poster

- Posts : 3025
Join date : 2012-10-02
Location : Ohio
 Re: postage stamp mounting
my Best run for today my God some one left the window open there at first 


getback- Top Poster


Posts : 10435
Join date : 2013-01-18
Age : 67
Location : julian , NC
 Re: postage stamp mounting
getback wrote:my Best run for today my God some one left the window open there at first
I can't wipe the grin off my face Eric!!!!!!!!!
 Re: postage stamp mounting
Another advantage to this mount.. is that the clearance between the venturi and the firewall is such, that you can "choke" the engine by using a strip of wide rubber-band. Slip it between the mounts and "stretch it thin" to slip between the intake and the firewall. when released, it will expand "thicker".. and seal the intake. Flip the prop while watching for fuel in the line.. then stretch the rubber-band again, to remove it. 
 Re: postage stamp mounting
Such it is , I have not feeler gaged it but looks like .020 to me ?? I still want to try and learn the bladder did find some plastic hemi-stats that i didn't even know I had  . I would still like to have one of those large syringes.......Roddie did Mike or Kim report in to U?? Eric

getback- Top Poster


Posts : 10435
Join date : 2013-01-18
Age : 67
Location : julian , NC
 Re: postage stamp mounting
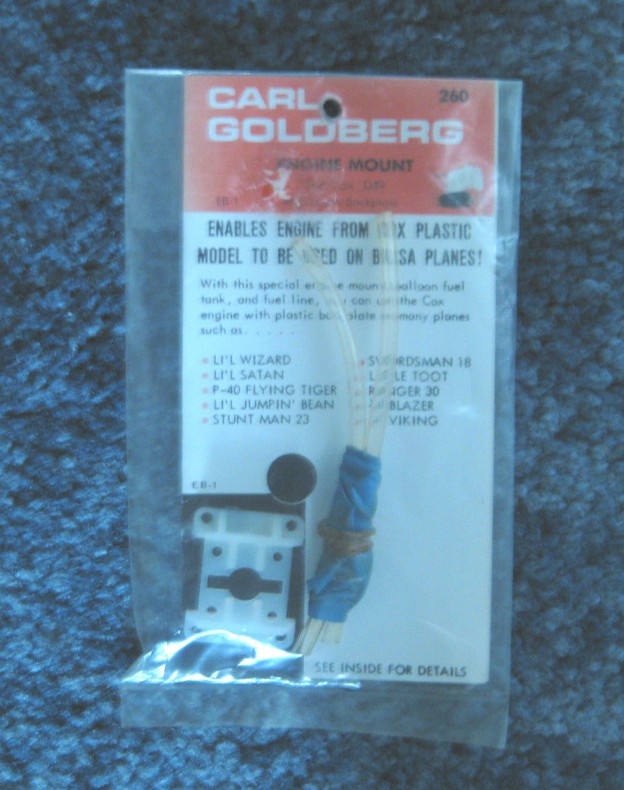
roddie wrote:Oldenginerod wrote:Just managed to score one of these original Goldberg engine mount kits, including a fuel bladder.
I guess after all this time the balloon mighty be perished, but I'm keen to be able to utilise one of my "postage stamp" engines without messing around making up mounts. Problem is the postage cost more than the kit (& probably more that what I paid on average for the engines).
Rod.
That's a COOL find Rod! Now you'll at least be able to mount and run those engines!
Goldberg mount arrived today. If anyone's interested, the seller has listed another the same.
http://www.ebay.com/itm/151395997050

Oldenginerod- Top Poster

- Posts : 4018
Join date : 2012-06-15
Age : 62
Location : Drouin, Victoria
 Re: postage stamp mounting
Here's another one:
http://www.ebay.com/itm/VINTAGE-COX-SERIES-190-049-C-L-MODEL-AIRPLANE-ENGINE-LATE-1960s-NR-/201160345013?pt=Radio_Control_Parts_Accessories&hash=item2ed61745b5
http://www.ebay.com/itm/VINTAGE-COX-SERIES-190-049-C-L-MODEL-AIRPLANE-ENGINE-LATE-1960s-NR-/201160345013?pt=Radio_Control_Parts_Accessories&hash=item2ed61745b5

JPvelo- Diamond Member

- Posts : 1972
Join date : 2011-12-02
Age : 57
Location : Colorado
 Re: postage stamp mounting
25- +- to the US man that's hi in my book when u have good friends willing to help just to see there product on a airplane and will that works for -O- Thanks again Roddie!!! Eric 

 ................. I am Definitely trying to do too many things at once !!! didn't even see the engine with it MY BAD!! Eric
 ................. I am Definitely trying to do too many things at once !!! didn't even see the engine with it MY BAD!! Eric
Last edited by getback on Wed Sep 03, 2014 5:33 pm; edited 1 time in total

getback- Top Poster


Posts : 10435
Join date : 2013-01-18
Age : 67
Location : julian , NC
 Re: postage stamp mounting
getback wrote:25- +- to the US man that's hi in my book when u have good friends willing to help just to see there product on a airplane and will that works for -O- Thanks again Roddie!!! Eric

Your welcome Eric! It was a real treat to see the vid of you "running" yours!!! You asked if I'd heard back from "Mike and Kim". Mike didn't have a postage-stamp back-plate yet.. so I didn't send him a set of mounts. I sent them to you, Mark McRiley (batjac) and Kim. Mark PM'd me that he got his. I haven't heard from Kim yet.. but I know he was looking forward to trying a set on one his "famous" birds... Time will tell...
 Re: postage stamp mounting
I am excited about getting it on a plane and testing the run  Just need to get some stuff behind me so I can build something?!?!?!! Wee will see if there is enough space in there once it gets wound up
 Eric
Eric 


getback- Top Poster


Posts : 10435
Join date : 2013-01-18
Age : 67
Location : julian , NC
 Re: postage stamp mounting
Some useful info on my custom mounts.
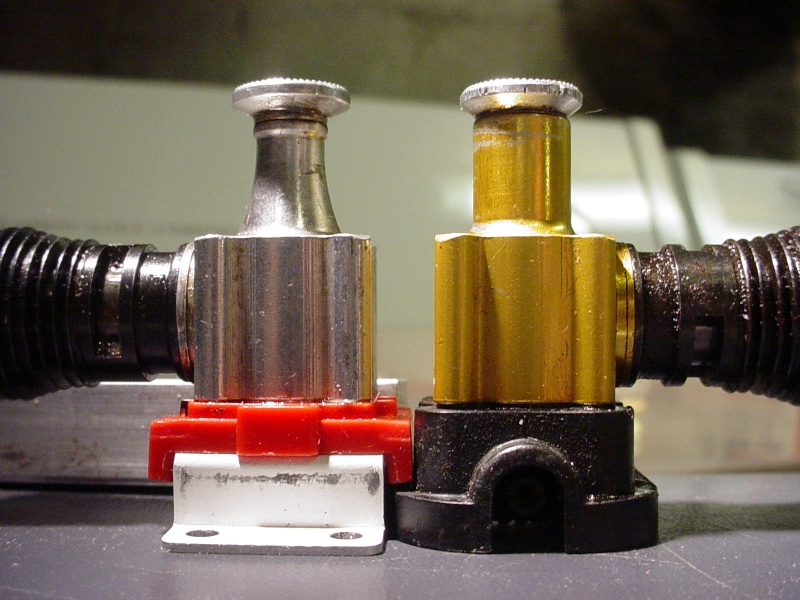
As you can see.. the distance from/to the firewall is the same as a horseshoe production back-plate, using my latest design. They have a firewall mount-spacing of 17/32" x 1-1/16" and an overall size of 13/16" x 1-5/16".
I'm glad I made a handful of these.. because I no longer have access to the router machine/CAD program I used to make them.
I'm using this postage-stamp mount on my "Phred's Phault" 50% scale version of a VooDoo, and using a balloon belly-tank.
 Re: postage stamp mounting
Eric (Getback) recently informed me of a failure in one of the mounts I sent to him. He had run his engine on the bench and also flew it on one of his airplanes. The aluminum separated/cracked on one of the 90 degree bends, which he noticed while swapping-out the engine with another. I really hope that this is an isolated incident.. otherwise the aluminum might not be able to take the stresses of engine vibration at the bend points. The mounts shown on the "290 Special" plan at the beginning of this thread, are made of sheet-steel.. by comparison.
I sent out a few sets to people here.. and will replace any that have broken. Just send me a PM.
I sent out a few sets to people here.. and will replace any that have broken. Just send me a PM.
 Re: postage stamp mounting
[url= ://www.servimg.com/view/19086392/9]
 [/url]
This is how we did it a long time ago, hope it helps.
On forming aluminum the aircraft materials 2024-T3 ,6061-T6 , 7075-T7 all need to be formed with a specific minimum inside radius or they will all crack. 5052-H32 and the lesser materials should form on a sharp inside radius.
 ://www.servimg.com/view/19086392/9]
 [/url]
This is how we did it a long time ago, hope it helps.
On forming aluminum the aircraft materials 2024-T3 ,6061-T6 , 7075-T7 all need to be formed with a specific minimum inside radius or they will all crack. 5052-H32 and the lesser materials should form on a sharp inside radius.

schiada96- Moderate Poster

- Posts : 16
Join date : 2014-11-23
 Re: postage stamp mounting
Hey schiada96, welcome to the forum. Didn't see
you sneak in.
That mount is a thing of beauty. The idea of beam
mounting a Cox reedy has always facinated me, and
I'm a big fan of the 290 engine with it's 128tpi needle assy.
Thanks for sharing that.
Bob
you sneak in.
That mount is a thing of beauty. The idea of beam
mounting a Cox reedy has always facinated me, and
I'm a big fan of the 290 engine with it's 128tpi needle assy.
Thanks for sharing that.
Bob

dckrsn- Diamond Member

- Posts : 2750
Join date : 2010-10-21
Age : 71
Location : Long Island, New York
 Re: postage stamp mounting
Yes I Like that too , never seen it done that way ! Good idea , Thanks , Eric

getback- Top Poster


Posts : 10435
Join date : 2013-01-18
Age : 67
Location : julian , NC
 Re: postage stamp mounting
I had sent Eric (getback) a set of the mounts I made a while back.. and one of them broke. I'm making-up a new set for him. Actually.. I'm making two sets using different bending-methods and will identify them with etchings.
Here's a photo of two different bending jigs in a vise.

The blocks are PVC.. and I had previously experienced deformation on the design without the padded-slot, when making the 90-degree bends.
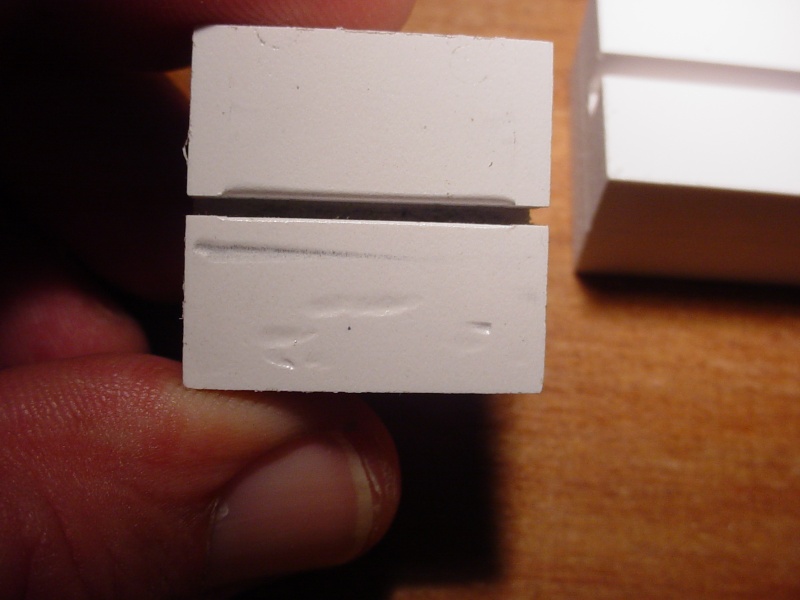
The "padded" block uses the same aluminum for the pads as the material to be bent. This forms a much sharper corner.

I don't know if forming the sharper corner may have caused the failure. More test-running may prove that theory. The mounts that I previously sent were formed with the sharp-cornered bends. It may have just been a "fluke".. but I'd like Eric to give them another try.
Here's a photo of two different bending jigs in a vise.

The blocks are PVC.. and I had previously experienced deformation on the design without the padded-slot, when making the 90-degree bends.

The "padded" block uses the same aluminum for the pads as the material to be bent. This forms a much sharper corner.

I don't know if forming the sharper corner may have caused the failure. More test-running may prove that theory. The mounts that I previously sent were formed with the sharp-cornered bends. It may have just been a "fluke".. but I'd like Eric to give them another try.
 Re: postage stamp mounting
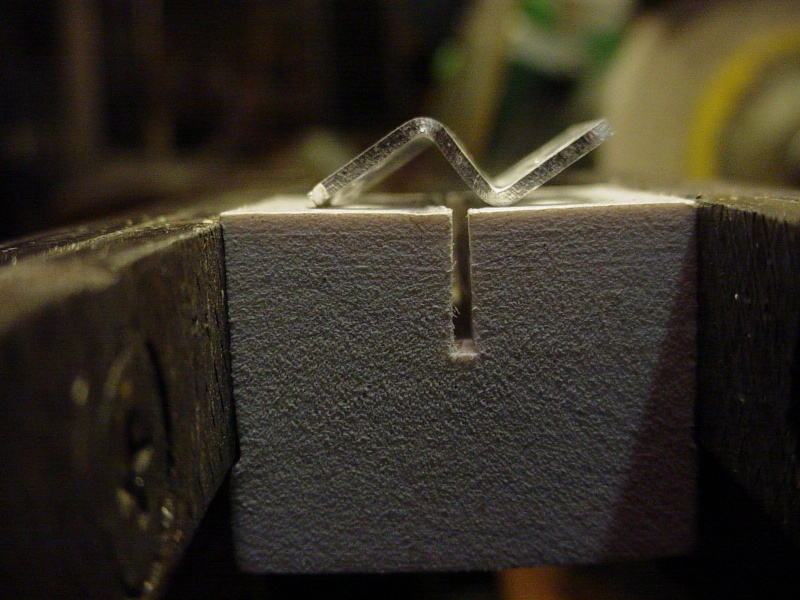
Bending commences..
Without pads..
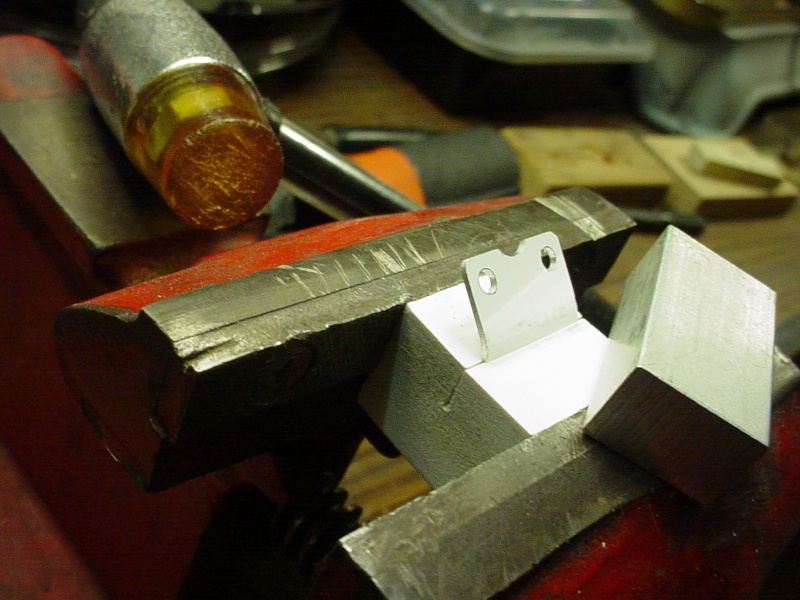

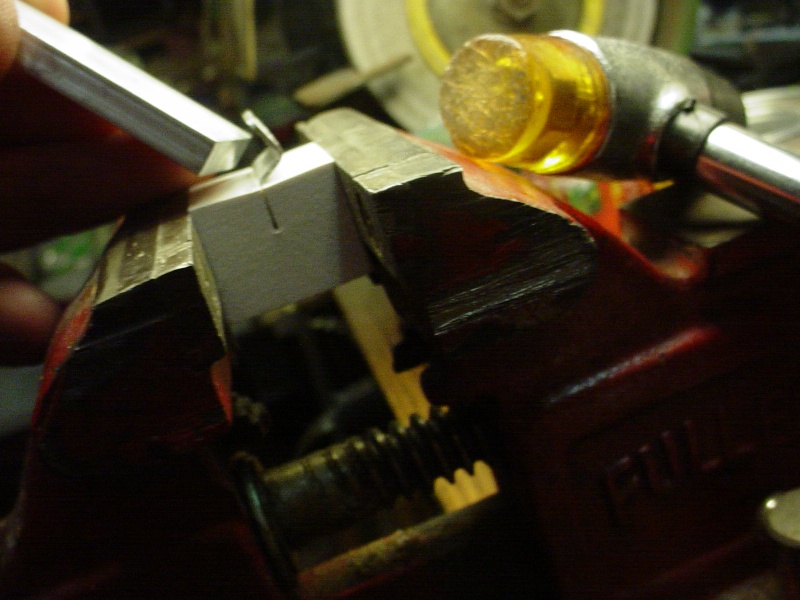
and with pads..
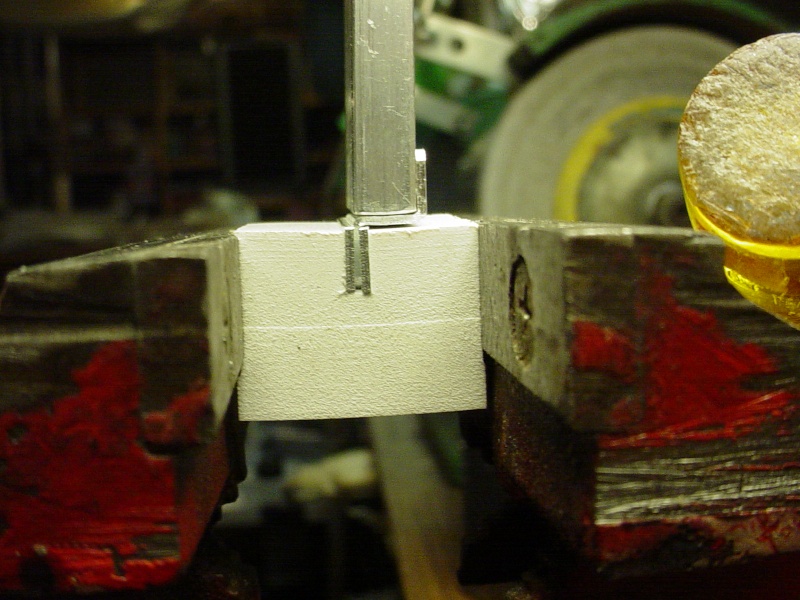
I etched the pairs; "B" for blunt-corner and "S" for sharp-corner. Note the slight difference in size between the two sets.

Without pads..


and with pads..

I etched the pairs; "B" for blunt-corner and "S" for sharp-corner. Note the slight difference in size between the two sets.

Page 2 of 3 •  1, 2, 3
 Similar topics
» Cox postage stamp backplates.
» Postage stamp backplates
» *Cox Engine of The Month* Submit your pictures! -February 2023-
» CG postage stamp mounts.
» Cox Postage Stamp Engine Mount
» Postage stamp backplates
» *Cox Engine of The Month* Submit your pictures! -February 2023-
» CG postage stamp mounts.
» Cox Postage Stamp Engine Mount
Page 2 of 3
Permissions in this forum:
You cannot reply to topics in this forum

 Rules
Rules


