Log in
Search
Latest topics
» It's the X Wing that has a canardby GallopingGhostler Today at 8:51 pm
» My current avatar photo
by GallopingGhostler Today at 7:02 pm
» Cox 020 PeeWee rebuild questions
by LooseSpinner99 Today at 4:38 pm
» music vids.. some of your favorites
by Kim Today at 3:28 pm
» New Model Build
by bsadonkill Today at 1:19 pm
» Kofuku Maru Fishing Boat Model
by Levent Suberk Today at 11:39 am
» Free Flight Radio Assist
by rdw777 Today at 11:24 am
» TEE DEE Having issues
by GallopingGhostler Yesterday at 11:38 pm
» Pathé Modeling Videos
by Levent Suberk Yesterday at 2:10 pm
» My latest doodle...
by layback209 Yesterday at 1:20 am
» Drones, pretty nifty...........
by rsv1cox Tue Nov 12, 2024 6:55 pm
» Project Cox .049 r/c & Citabrian Champion
by roddie Tue Nov 12, 2024 6:20 pm
Cox Engine of The Month
McCoy BabyMac Tank Repair
Page 1 of 1
 McCoy BabyMac Tank Repair
Hi again. So in light of my last topic, I have decided to repair the fuel tank rather than cut it up. Anyways, I have nover had an engine with a tank like this before and I just want to know if there is anything else I need to do to it before sealing it up. I will attach a picture of teh insides here. I would just like to know if I need a pick up tube or anything installed before putting teh back cap on permanently. I am assuming I would just need to put a fuel tube into the tank that would go to the fuel nipple up front. Any help or advice is greatly appreciated. I will not do no repairs until I know more. Thank you.


NEW222- Top Poster

- Posts : 3896
Join date : 2011-08-13
Age : 46
Location : oakbank, mb
 Re: McCoy BabyMac Tank Repair
https://www.ebay.com/itm/Vintage-McCoy-Baby-MAC-049-Control-Line-Model-Airplane-Engine-With-Tank-/331818827888?hash=item4d41f18070&nma=true&si=uKGm2D3U%252FJQNr06%252FW%252FHx0G4lmZk%253D&orig_cvip=true&rt=nc&_trksid=p2047675.l2557
Use clear vinyl tubing, cut it on a slight angle on end, so it won't close off flow and you should be good to go.
Use clear vinyl tubing, cut it on a slight angle on end, so it won't close off flow and you should be good to go.
 Re: McCoy BabyMac Tank Repair
Thank you Mark. You have been a great help lately with this. If I may also ask, is it better to solder the rear tin plate on, or would JB Weld be ok.

NEW222- Top Poster

- Posts : 3896
Join date : 2011-08-13
Age : 46
Location : oakbank, mb
 Re: McCoy BabyMac Tank Repair
Would it be acceptable to believe that the drive washer is pressed onto the engine as is a Cox one? I have got it apart all except for that and it will go for an antifreeze bath.... Looking forward to this. Thanks.

NEW222- Top Poster

- Posts : 3896
Join date : 2011-08-13
Age : 46
Location : oakbank, mb
 Re: McCoy BabyMac Tank Repair
NEW222 wrote:Thank you Mark. You have been a great help lately with this. If I may also ask, is it better to solder the rear tin plate on, or would JB Weld be ok.
lol, i'd guess it would depend how well you can solder....i'd go with JB!
i'd try to heat the head really warm and remove before crock pot, as high temps will bleach dye off of anodized aluminum, you might just scrub it up with WD-40 and stiff brush, i don't think its froze?
if your going to display it, you can touch up head with a red Sharpie, this is the engine that got me into anodizing!
 Re: McCoy BabyMac Tank Repair
Ok. Just a little update. A few minutes ago I took it outside to the vise and carefully tightened it up with a block of wood behind. The thrust washer popped off nicely. So I then seperated the red head from the cylinder and put it aside. So now as i type this, the engine is sitting in the crock pot in pieces all wired together. Looking like it will be a late night.... I will just pop the red head in some old fuel I have set aside to clean as I heard that the crock pot can discolor the anodizing. Stay tuned.....

NEW222- Top Poster

- Posts : 3896
Join date : 2011-08-13
Age : 46
Location : oakbank, mb
 Re: McCoy BabyMac Tank Repair
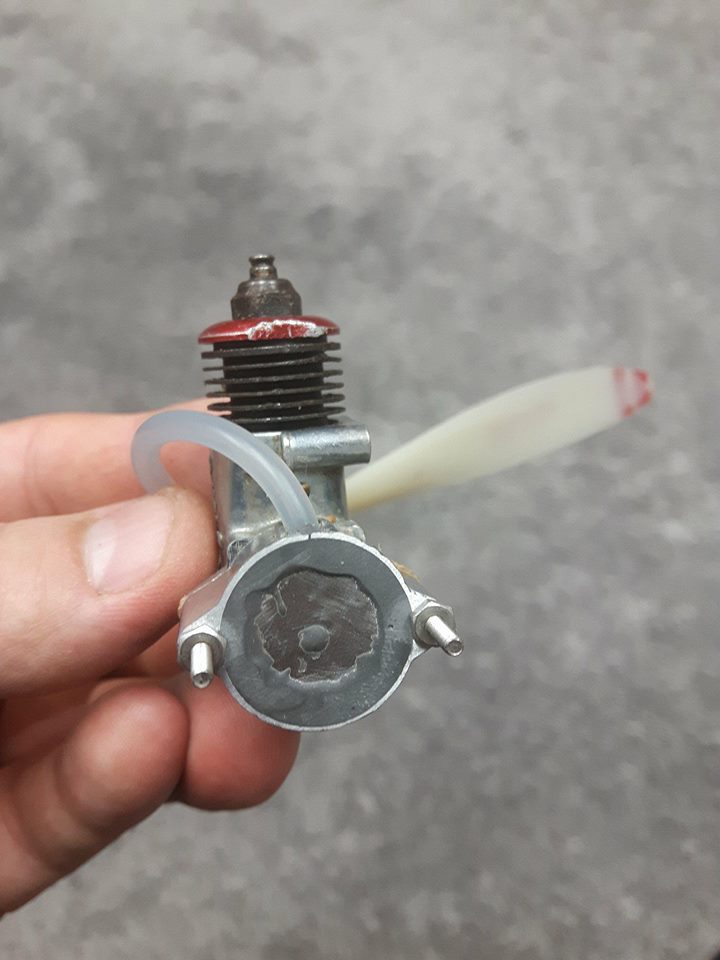
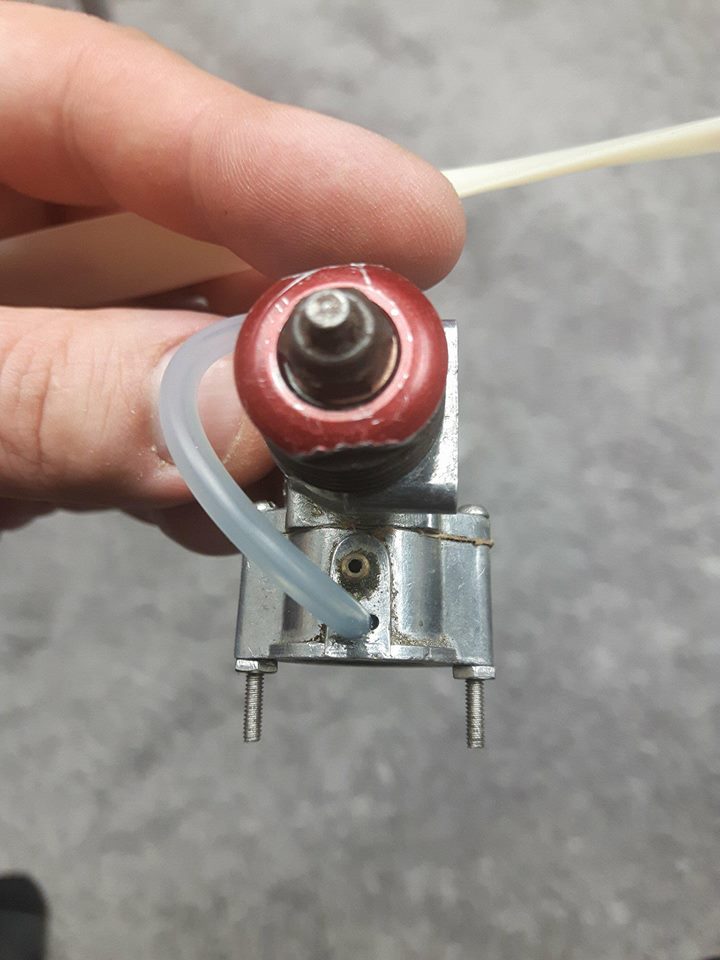
Again, thanks to Mark confirming my ideas, here is my finished fuel tank for my McCoy Baby Mac engine. I did as Mark reccommended and put the fuel line to the bottom with a 45 degree angle cut on it. I then put a piece of tin I cut in place with JB Weld and allowed to dry. Just a few minutes ago, I used a fine file to smooth it out, followed by a light sanding with 400 on a flat surface to finish it. I then did teh same to teh crankcase and made a gasket and assembled it. The only funny one is in the second picture. Right where the fuel line exits the tank, there is an extra tiny notch there (at the 3 o'clock position). It has all appearance of being factory. Can anyone confirm this, and if not, I will just add a dab of something to seal it. Thanks again.


NEW222- Top Poster

- Posts : 3896
Join date : 2011-08-13
Age : 46
Location : oakbank, mb
 Similar topics
» McCoy BabyMac Question
» testors mccoy repair project
» Repair Tee Dee .01 tank
» Plastic tank Repair
» Black Widow - Tank Repair
» testors mccoy repair project
» Repair Tee Dee .01 tank
» Plastic tank Repair
» Black Widow - Tank Repair
Page 1 of 1
Permissions in this forum:
You cannot reply to topics in this forum

 Rules
Rules


