Log in
Search
Latest topics
» Free Flight Radio Assist by TD ABUSER Today at 4:46 pm
» Brushless motors?
by rsv1cox Today at 3:52 pm
» Tribute Shoestring build
by 1/2A Nut Today at 2:24 pm
» Cox 020 PeeWee rebuild questions
by TD ABUSER Today at 2:17 pm
» Landing-gear tips
by 1975 control line guy Today at 9:28 am
» My current avatar photo
by GallopingGhostler Yesterday at 7:39 pm
» It's the X Wing that has a canard
by rdw777 Yesterday at 6:58 pm
» music vids.. some of your favorites
by Kim Thu Nov 14, 2024 3:28 pm
» New Model Build
by bsadonkill Thu Nov 14, 2024 1:19 pm
» Kofuku Maru Fishing Boat Model
by Levent Suberk Thu Nov 14, 2024 11:39 am
» TEE DEE Having issues
by GallopingGhostler Wed Nov 13, 2024 11:38 pm
» Pathé Modeling Videos
by Levent Suberk Wed Nov 13, 2024 2:10 pm
Cox Engine of The Month
Please help me to identify this COX engine
Page 1 of 2
Page 1 of 2 • 1, 2 
 Please help me to identify this COX engine
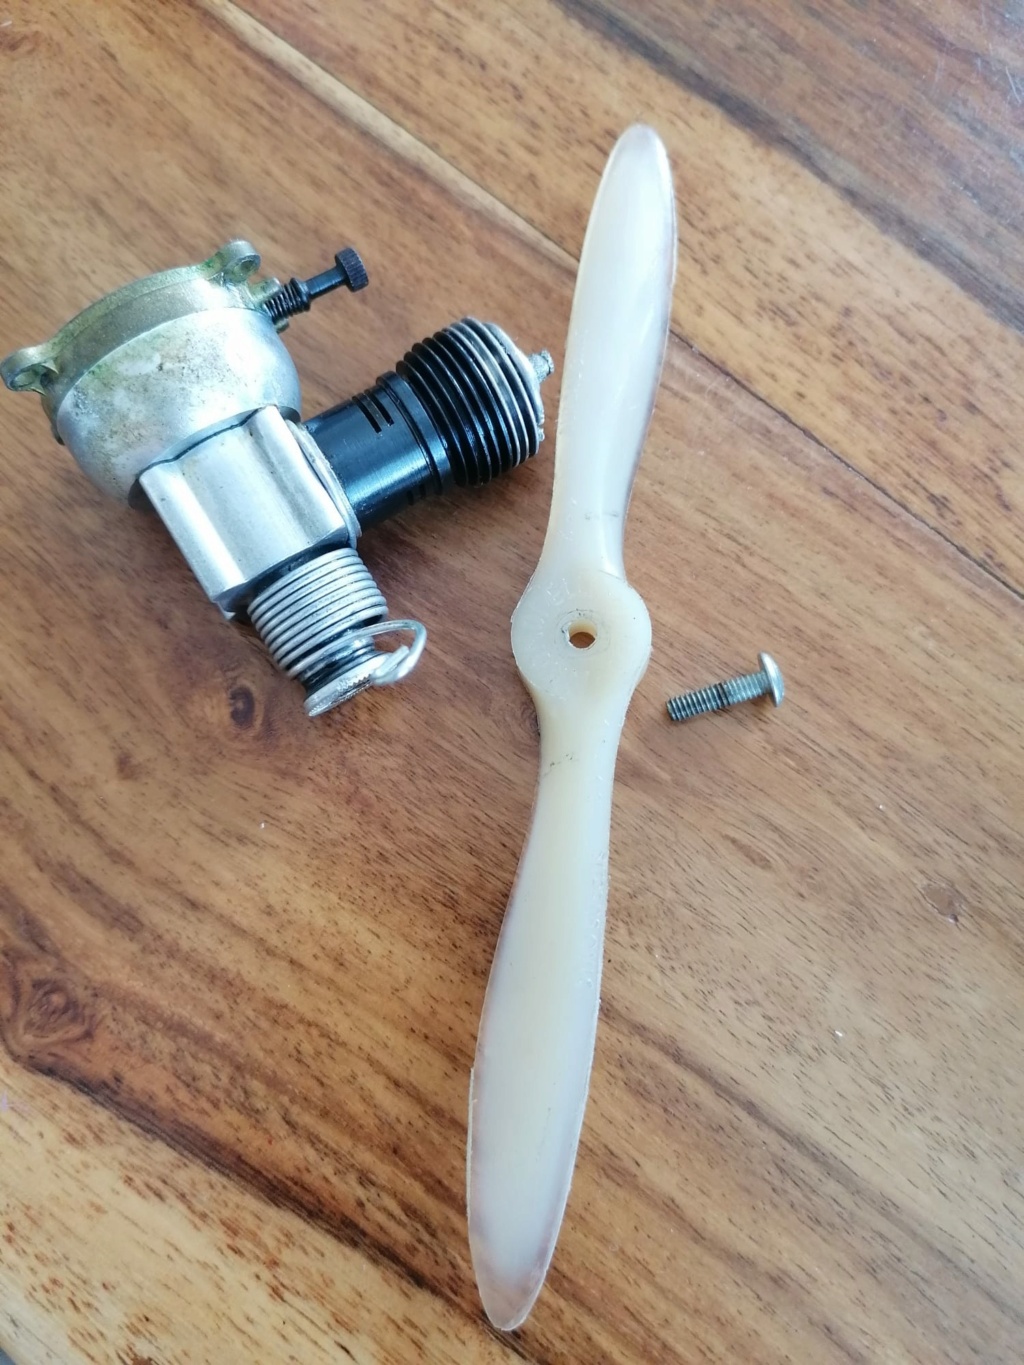
Hi, can you please help me to identify which model is that?
Hope you can see the 2 pictures. My father must have bought it in the late 80s (I believe), but never really used it, and now I'd like to give it a try on top of the wings of the glider I'm about to complete.
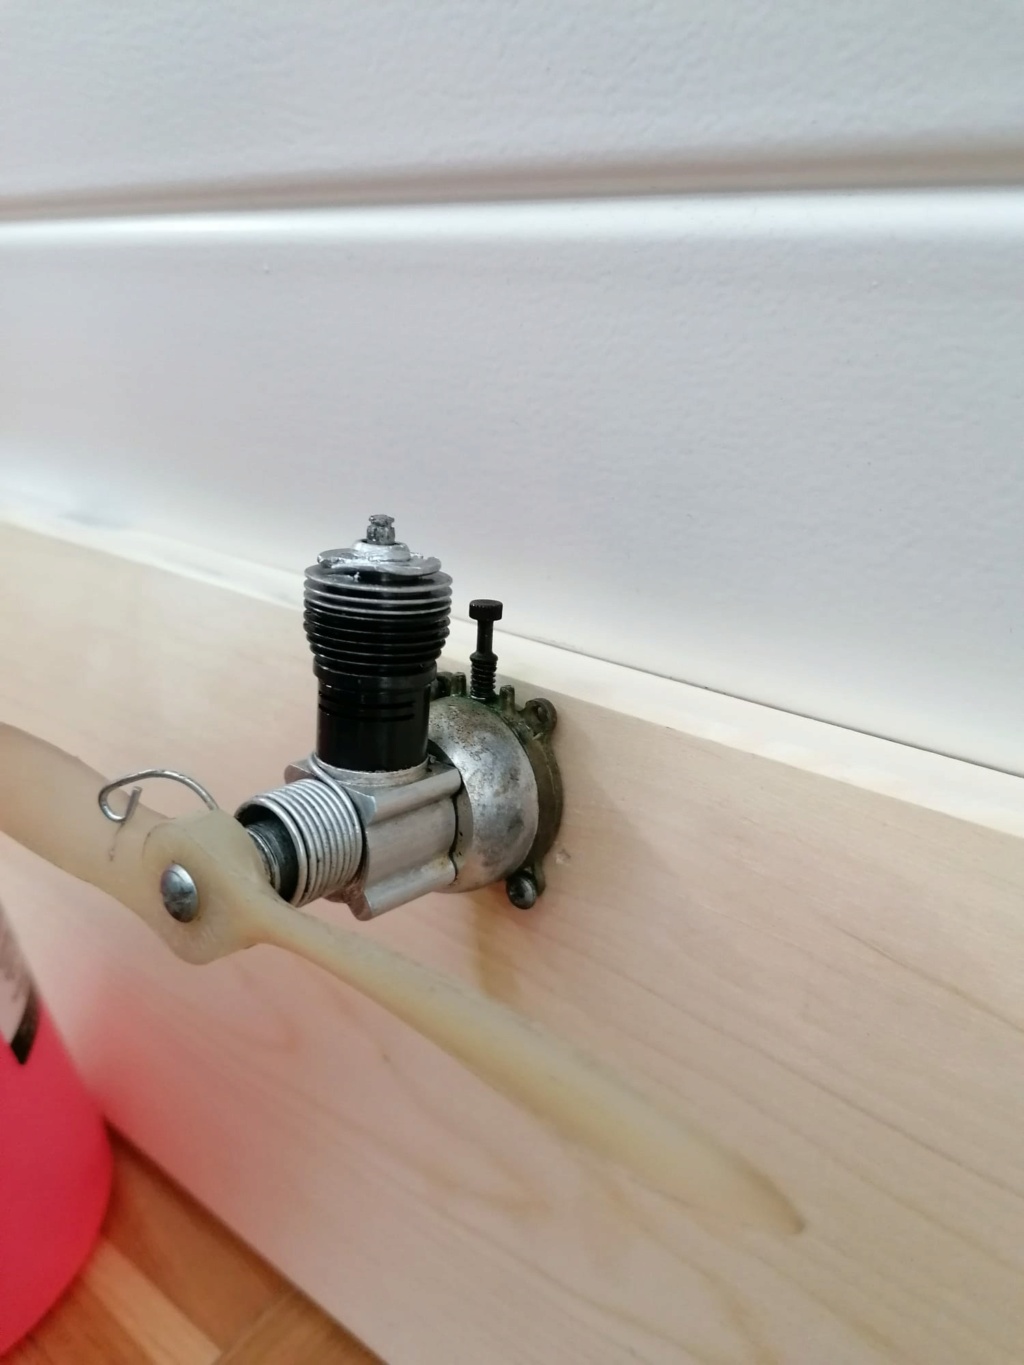
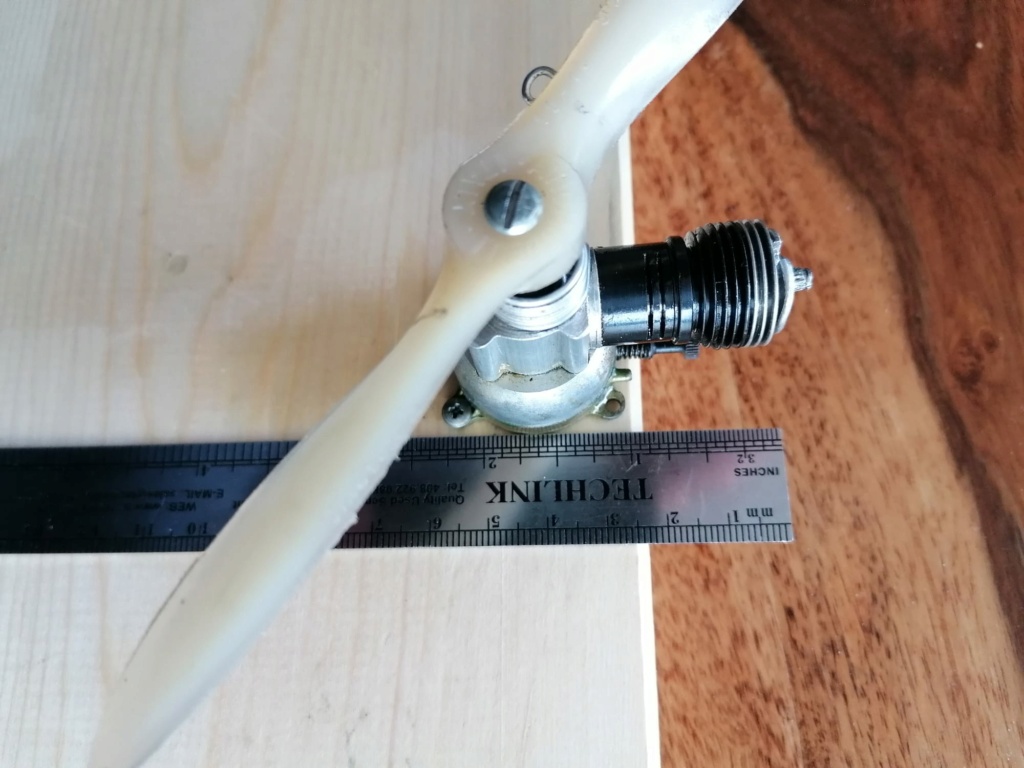
It doesn't start at all, so I'm (quite) sure it must be the glow head, as I gave him a good mix with high nitro (25%) and a nice 1.5V using 3x AAA batteries but...no signs of life.
Hope you can see the 2 pictures. My father must have bought it in the late 80s (I believe), but never really used it, and now I'd like to give it a try on top of the wings of the glider I'm about to complete.


It doesn't start at all, so I'm (quite) sure it must be the glow head, as I gave him a good mix with high nitro (25%) and a nice 1.5V using 3x AAA batteries but...no signs of life.

GigoZago- Beginner Poster

- Posts : 7
Join date : 2023-05-20
Age : 43
Location : Zurich
 Re: Please help me to identify this COX engine
Cox Babe Bee .049 (0.8cc).
You can check the glow-plug (without undoing it) by measuring the resistance, it should be very close to zero.
You can check the glow-plug (without undoing it) by measuring the resistance, it should be very close to zero.

Surfer_kris- Diamond Member

- Posts : 1912
Join date : 2010-11-20
Location : Sweden
 looks to be a babe bee
WHat you have there looks to be a babe bee engine.
Parts are still available.
You should check if the glow head glows an if not it needs to be replaced.
Other reasons for it not to run are ussaly either dirt (oil remains) or leaking gaskets.
Taking it apart and cleaning is common maintenance with these engines.
If you deside to order replacement parts then besides a few spare glow plugs also get a new gasket set and a pair of the special tools to remove the glowhead.
Online shops that sell parts include Cox International from Canada and EX Model Engines from the states.
These are fun little engines and can be used to power a wide range of models.

cmulder- Gold Member

- Posts : 279
Join date : 2022-02-10
 Re: Please help me to identify this COX engine
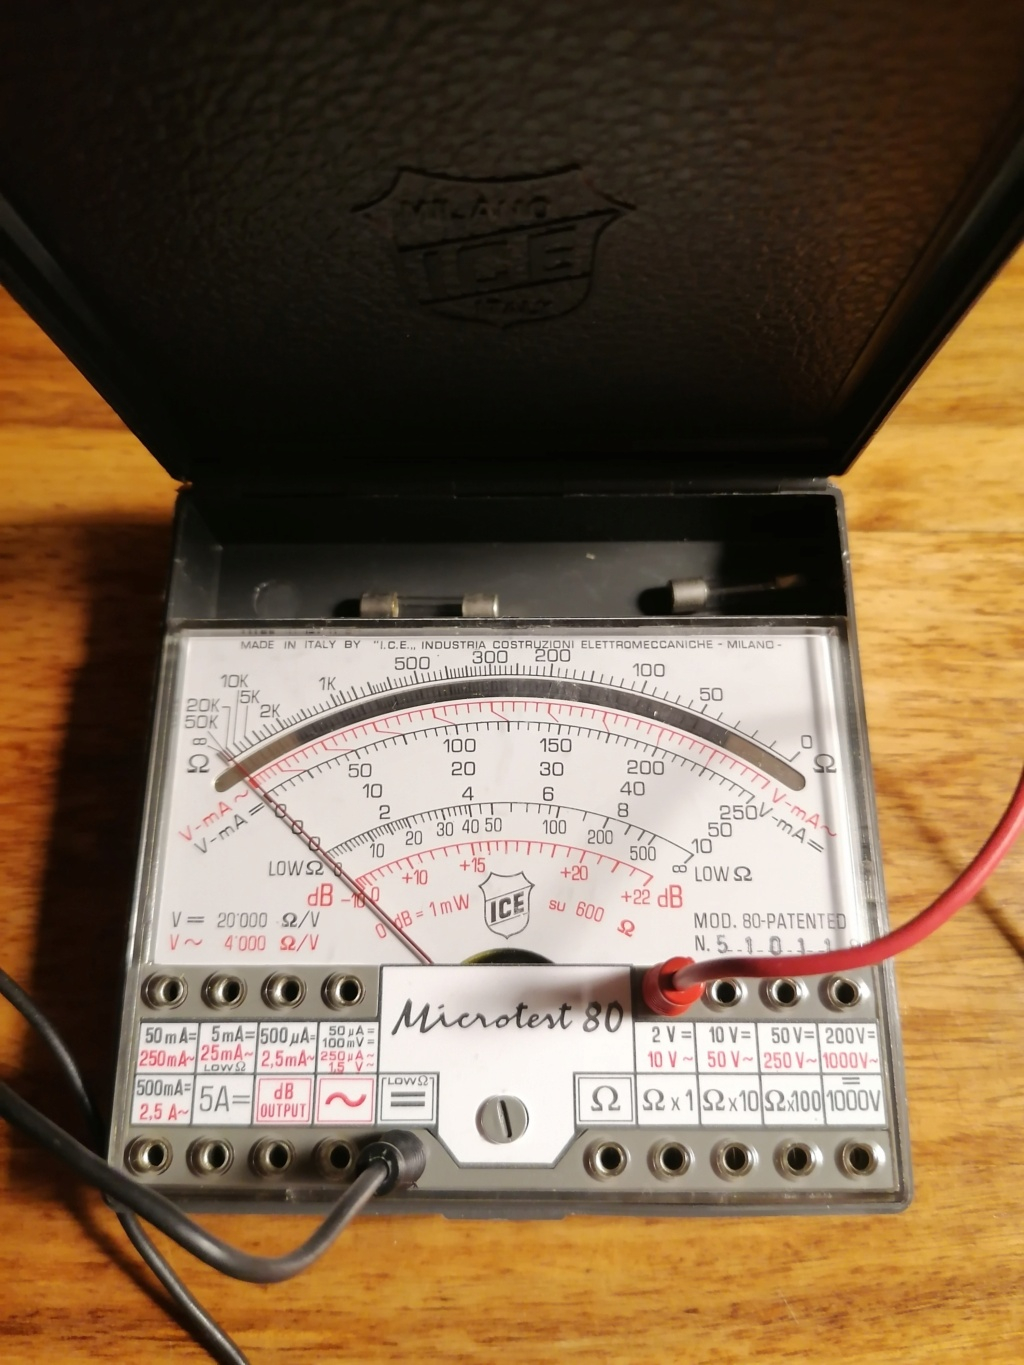
Thanks for your help! So, I will order parts for the babe bee 049: couple of glow heads, the tools to remove it and a set with other small parts including the gasket. I had already unscrewed the tank from the rest of the engine and cleaned it with some WD40 spray oil, there were indeed some greenish debris. The small plastic tube in the tank looked in good condition, the needle valve seems to do its job too. But the glow head looks damaged at first sight, probably a bad attempt to unscrew it. I have got a tester for electrical measurements (picture) but I'm not really sure on how to use it for testing its resistance... (?). I attached the + in the central pin and the - on the body of the glow head, using the tester to make sure all connections the AA batteries work. Filled with nitro, charged the propeller around its spring...nothing happens


GigoZago- Beginner Poster

- Posts : 7
Join date : 2023-05-20
Age : 43
Location : Zurich
 Re: Please help me to identify this COX engine
Welcome to the Forum! For checking the glow head, you want to put the red lead for the meter in the far left lower jack on the meter (ohm) to read resistance. Then touch one lead to the center post on the head, and the other lead to one of the fins, if the head is good, you should read almost no resistance. Should read to the far right side of the meter.
Don
(The far left jack on the lower row of jacks on the right hand side of the meter)
Don
(The far left jack on the lower row of jacks on the right hand side of the meter)
Last edited by pman1111 on Sat May 20, 2023 8:46 pm; edited 2 times in total (Reason for editing : clarification)

pman1111- Silver Member

- Posts : 96
Join date : 2022-01-15
 Re: Please help me to identify this COX engine
Hi GeoZago,
Welcome to this forum, you will like it...
A Cox glowplug glows, until it wont. First thing to check.
(I have worse looking glowplugs that still glow)
The cylinder looks newer than the rest of the engine. (good thing)
The prop looks like it is old white nylon.
Boil some eggs, put the prop with them.
Make sure you have the right 5-40 thread to mount the prop.
Good luck with your project,
Take care,
Have fun,
Dave

HalfaDave- Platinum Member

- Posts : 615
Join date : 2022-12-06
Location : Oakville, Ontario
 that meter is a collectors item itself
have a look here:meter info and schematics
when you test the ohm function first tutch the leads togeather (short) and check if the needle goes to full/max scale.
Its possible the battery is empty and that can cause a wrong reading.
It was made from 1970 to '77 so its unlikely the original battery still works

when you test the ohm function first tutch the leads togeather (short) and check if the needle goes to full/max scale.
Its possible the battery is empty and that can cause a wrong reading.
It was made from 1970 to '77 so its unlikely the original battery still works

cmulder- Gold Member

- Posts : 279
Join date : 2022-02-10
 just in case
here is the download link to the instructions for cox products.
it for example shows what power to use for the glowhead
it for example shows what power to use for the glowhead

cmulder- Gold Member

- Posts : 279
Join date : 2022-02-10
 Re: Please help me to identify this COX engine
Gents, that "almost zero resistance" should be around 0.5 ohm (R)..a COX glow head works with around 3 amps (I) of current at 1.5Volts (U) voltage. It flows from Ohm's law: R=U/I. 
GigoZago, do you know anything about the history of the fuel you are trying to start your engine with? If too long in contact with ambient air like stored in a can not closed airtight for years, its ingredients like methanol, and nitromethane may have partially evaporated, and the remaining methanol absorbed humidity of air, that both will impact its strength negatively.
If you have a hobbyshop near you that sells glow fuel, buy some fresh one and check before you buy what sort of lube oil (synthetic or castor or a blend of these two) is in it. COX engines like to have a certain minimum castor in the fuel. If e.g. the lube content of fuel is 20%, at least half of it i.e. 10% should preferably be castor. (The castor to synth ratio depends on who you talk to...I prefer all castor, others have good experience with mixtures with synth too.)
Unfortunately most fuels sold in Europe are synthetic oil based (one exception I know of are FAI fuels with 80% meth and 20% castor of Czech hobby supplier Pelikan, or the similar product of German Kavan, but these are 0% on nitro, so you must add some) so you must morph into a chemist and add some castor, methanol and nitro to have enough castor in it without making it too thick.
COX engine fuel is typically ~20% oil (all castor, but also can be castor mixed with synth oil), ~15...30% nitromethane and the balance ~50...65% methanol. Methanol and nitro both are poisonous, so be careful using them.
Another go-to solution is checking engine compression..you mentioned this engine is almost new. The gasket under the glow head still may leak and you may want to check that with a drop of fuel added between the head and cylinder fins. When the engine is slowly cranked over compression, no air bubbles should appear between the head and cylinder interface fins.
Sorry if I have over-explained it and you already knew all these details..I am not sure about your level of glow engine expertise, please tell us more about your involvement in the hobby.
Last edited by balogh on Sun May 21, 2023 3:04 am; edited 2 times in total (Reason for editing : typo corrected, post written on my phone is my excuse)

balogh- Top Poster


Posts : 4957
Join date : 2011-11-06
Age : 66
Location : Budapest Hungary

Levent Suberk- Diamond Member

- Posts : 2263
Join date : 2017-12-24
Location : Türkiye
 Re: Please help me to identify this COX engine
cmulder wrote:have a look here:[]meter info and schematics[/url]
when you test the ohm function first tutch the leads togeather (short) and check if the needle goes to full/max scale.
Its possible the battery is empty and that can cause a wrong reading.
It was made from 1970 to '77 so its unlikely the original battery still works
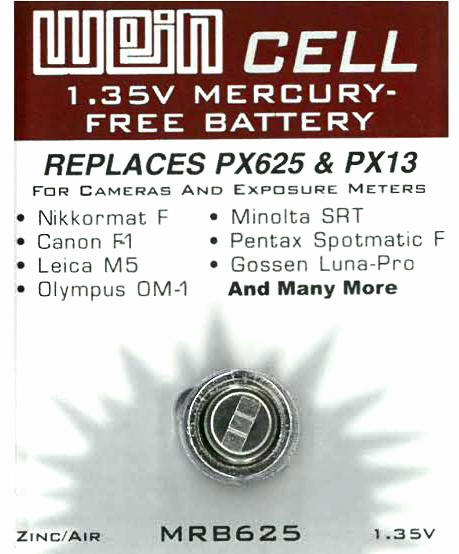
Thanks cmulder - My father should have bought it in Milan around 1990/1991, I found the hard-copy of the booklet, quite an interesting reading for someone (like me!) almost analphabet in electrical engineering. Indeed as you said, the tool has a battery inside for Ohm-testing (almost completely dead, I tested it for 100 mV and the needle barely moved). Unfortunately, it's a 625-type 1.35V mercury battery...no longer in production in most countries, due to environmental concerns. Beside ordering it from Russia (!), it seems there are other viable alternatives, although none of these can offer the same voltage stability of old mercury batteries, but I believe that for a generic test of the resistance of the glow head, any mercury-free alternatives would work well too. I'll get one and will keep you posted about the result!

GigoZago- Beginner Poster

- Posts : 7
Join date : 2023-05-20
Age : 43
Location : Zurich
 Re: Please help me to identify this COX engine
balogh wrote: GigoZago, do you know anything about the history of the fuel you are trying to start your engine with?
Possibly, the fuel is the only new item I have got - just bought it new in Switzerland (picture attached). It has a high % of nitro (been told it's exactly 25%), but no castor oil, only synth lube (20%). I plan to use it as is in order to start the engine just once, after I got the spare parts shipped from US/Canada (which may take a bit). And see if it works at all. The rc model shop where I got it advised me to buy some castor oil, available in every pharmacy, and just "add it" to the mix. As you said, though, that would make the mix too thick, so I'll have to get some plain nitro and methanol to re-balance the composition...I'll do some further search to see what's available on the market.
balogh wrote: Another go-to solution is checking engine compression..you mentioned this engine is almost new. The gasket under the glow head still may leak and you may want to check that with a drop of fuel added between the head and cylinder fins. When the engine is slowly cranked over compression, no air bubbles should appear between the head and cylinder interface fins.
I would say that looks fine - couldn't see any bubbles between the glow head and where the cylinder starts. I showed the engine to the guys of the shop where I got the fuel, they turned the propeller and said that "the compression of the piston looks good". They told me that, by replacing the glow head, the engine should work smoothly. Just unscrewing the glow head might be an issue, they said, and recommended to either use an "ultrasonic cleaning machine" or just put the engine in the oven at 250 C and see if that helps to facilitate detaching the head from the rest of the engine, as the oil might have glued inside. It goes without saying that I have no ideas about where to find an ultrasonic cleaning machine...and even cooking it in the oven scaries me a bit !
balogh wrote: Sorry if I have over-explained it and you already knew all these details..I am not sure about your level of glow engine expertise, please tell us more about your involvement in the hobby.
I'm a completely newby here, so any help/advise is appreciated...!

GigoZago- Beginner Poster

- Posts : 7
Join date : 2023-05-20
Age : 43
Location : Zurich
 Re: Please help me to identify this COX engine
HalfaDave wrote: A Cox glowplug glows, until it wont. First thing to check.
Hi Dave! I believe that when you say it glows, you mean that the glow head glows after attaching it to the battery and watching it from the "inside" (I'm waiting to receive the wrenches to try and open it, so I can't really say atm!). From the outside, absolutely nothing happens. Not sure if that were to be the case, but can't even hear any "frying" noise or else (ok, maybe 1.5V is too little to produce any noise).
HalfaDave wrote: The prop looks like it is old white nylon.
Boil some eggs, put the prop with them.
Make sure you have the right 5-40 thread to mount the prop.
I found the engine and the propeller linked together, so I assume they were bought together. On the propeller I can read "Aviomodelli - Italy", "15-10 Supersonic" on one blade and "6-4 Supersonic" on the other one. No idea what they mean (beside the brand and the country of course

GigoZago- Beginner Poster

- Posts : 7
Join date : 2023-05-20
Age : 43
Location : Zurich
 Re: Please help me to identify this COX engine
GigoZago I would not recommend heating the engine to 250C as this may change the metallurgy of the aluminum and the steel too..while recrystallization of steel alloys may occur at higher than 340C or so, the 250C may also cause the soft steel to change its properties, I do not know. The operating temperature of a COX cylinder should be less than 150C even in summer peak conditions, I would not expose the cylinder to much higher than this temperature, if you still decide to put it in a kitchen owen..
I managed to loosen stubborn glow heads by periodically heating them with a hair dryer, then pushing an ice cube against it. Such repeated expansion/ contraction may help relieve the bond by the thickened castor..I suppose you have the stock COX wrench for the glow head?
I managed to loosen stubborn glow heads by periodically heating them with a hair dryer, then pushing an ice cube against it. Such repeated expansion/ contraction may help relieve the bond by the thickened castor..I suppose you have the stock COX wrench for the glow head?

balogh- Top Poster


Posts : 4957
Join date : 2011-11-06
Age : 66
Location : Budapest Hungary
 Re: Please help me to identify this COX engine
balogh wrote: I managed to loosen stubborn glow heads by periodically heating them with a hair dryer, then pushing an ice cube against it. Such repeated expansion/ contraction may help relieve the bond by the thickened castor..I suppose you have the stock COX wrench for the glow head?
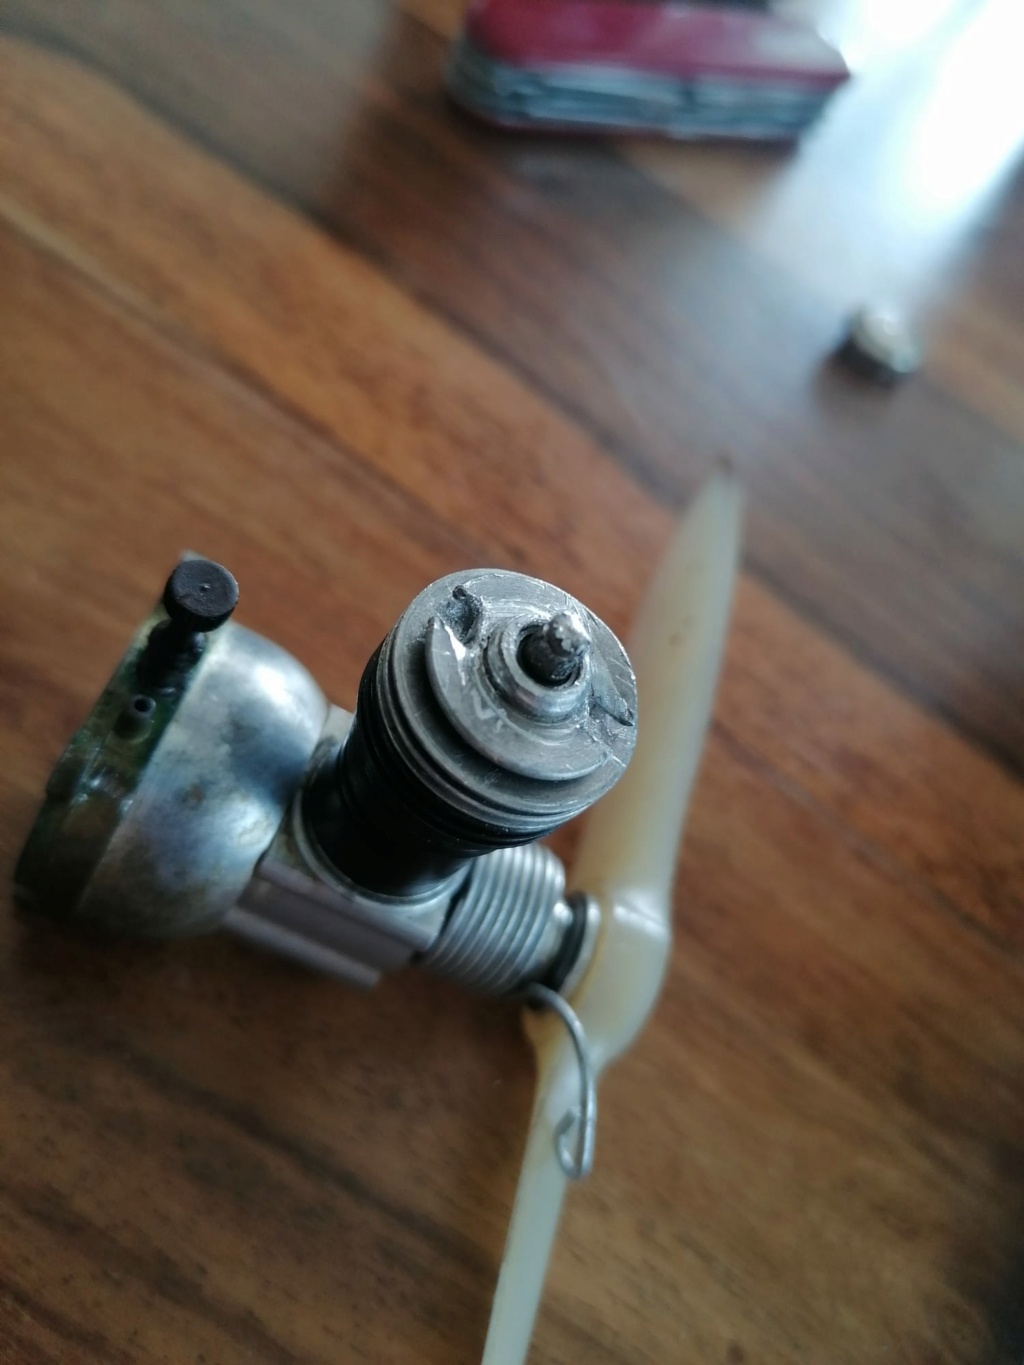
Yours sounds to me like a reasonable advice, I won't put it in the oven. Some careless attempts were made to remove the glow head without using its proper wrenches, indeed the fins look a bit "injured", so I won't insist even by hands until I get the proper equipment. Hopefully the fins of the head are not too compromised already to fit into the wrench, hopeI can fix them carefully with a screwdriver or so in case they won't:
I am about to order glow heads, wrenches, battery plug and some minor parts like the gaskets from either the US or the Canadian online store (I want to make an order of meaningful size, as shipment would be quite a relevant proportion of its total cost anyway)

GigoZago- Beginner Poster

- Posts : 7
Join date : 2023-05-20
Age : 43
Location : Zurich
 Re: Please help me to identify this COX engine
Hello Gigo there are instruction sheet downloads to the left of the page here under subjects , take a look through them ,,, get you the battery holder w/wire for starting takes 2 D cell https://coxengines.ca/field-gear/cox-starter-battery-box-with-clip.html Here are some troubleshooting guides >> https://drive.google.com/file/d/1iNo75W7RzPkE4QDKCHwa1ixYhbhjiYSq/view And >> https://drive.google.com/file/d/1SPClMn_IqkpE-nMa3APGHAy8UZgKLZs_/view

getback- Top Poster


Posts : 10432
Join date : 2013-01-18
Age : 67
Location : julian , NC

Levent Suberk- Diamond Member

- Posts : 2263
Join date : 2017-12-24
Location : Türkiye
 about propellers.
"15-10 Supersonic" on one blade and "6-4 Supersonic"
The first number is the diameter so 15cm/ 6 inch and the second is the "pitch" of 10cm/ 4 inch.
You can buy propellors in a whole range of diameter and pitch ranges and that allows you to choose the best size for your model engine combination and flying style/ taste.
The diameter is what gives the "pulling power". A large propellor will pull a lot; helicopters are a extreme example of a big diameter "prop"
/rotor
Pitch is what gives speed. Your prop has a 10 cm "pitch" so in ideal conditions would pull the model forwards 10cm for each revolution.
So if the prop rotates at 10 revolutions every second /600 rpm your model would travel at 1meter every second (or 3.6 km/h)
Your engine has a rpm where it gives the most power. A plane model has a best performing flying speed . So you take the ideal speed for the model and the ideal rpm for your engine and you have what pitch your prop should have.
Since its easy to change a prop you can use them like the gearbox in a car.
When learning to fly its better to have a slower flying model so you have time to react. so a bigger diameter lower pitch prop is ideal.
Think like learning to drive in 1st gear.
Then your skills improve and you like the model to go a bit faster, you change the prop to one with a bit more pitch but smaller diameter.
You will find taking off is a bit slower as the result of lower pulling power but the final speed will be higher.
Like driving away in second gear from standstill.
About the boiling of props
These model propellors are made of nylon plastics. Some like the grey "graupner" have glass fibre mixed into the plastic and "master airscrew" from the states adds carbon too the plastic.
Your prop is rather flexible and that make it durable to avoid damage from poor landings.
Stiffer props give a bit better performance but snap quicker if your landing isn't good.
Nylon needs to have so water in it to keep the plastic "flexible" so to avoid it becoming brittle the water can be put back in the pastic by boiling them in water. Eggs do not add anything but since most people like there eggs boiled less then 8 minutes that is a good duration to boil your prop too so why not combine it
Choosing the right prop is a whole science and there is also a lot of "personal preference" included. For example i perfer the "Graupner" brand props for most of my "sunday flyer" models because they give a good ballance between being rather durabe with good perfomance. For more performance models i prefer "APC" from the states but they are more sharp and brittle so have to be a bit more carefull when using them.
For my cox engines i use the "black" flexible props and the gray stiffer "competition" props sold by they guys in canada/ the states

cmulder- Gold Member

- Posts : 279
Join date : 2022-02-10
 RC glider
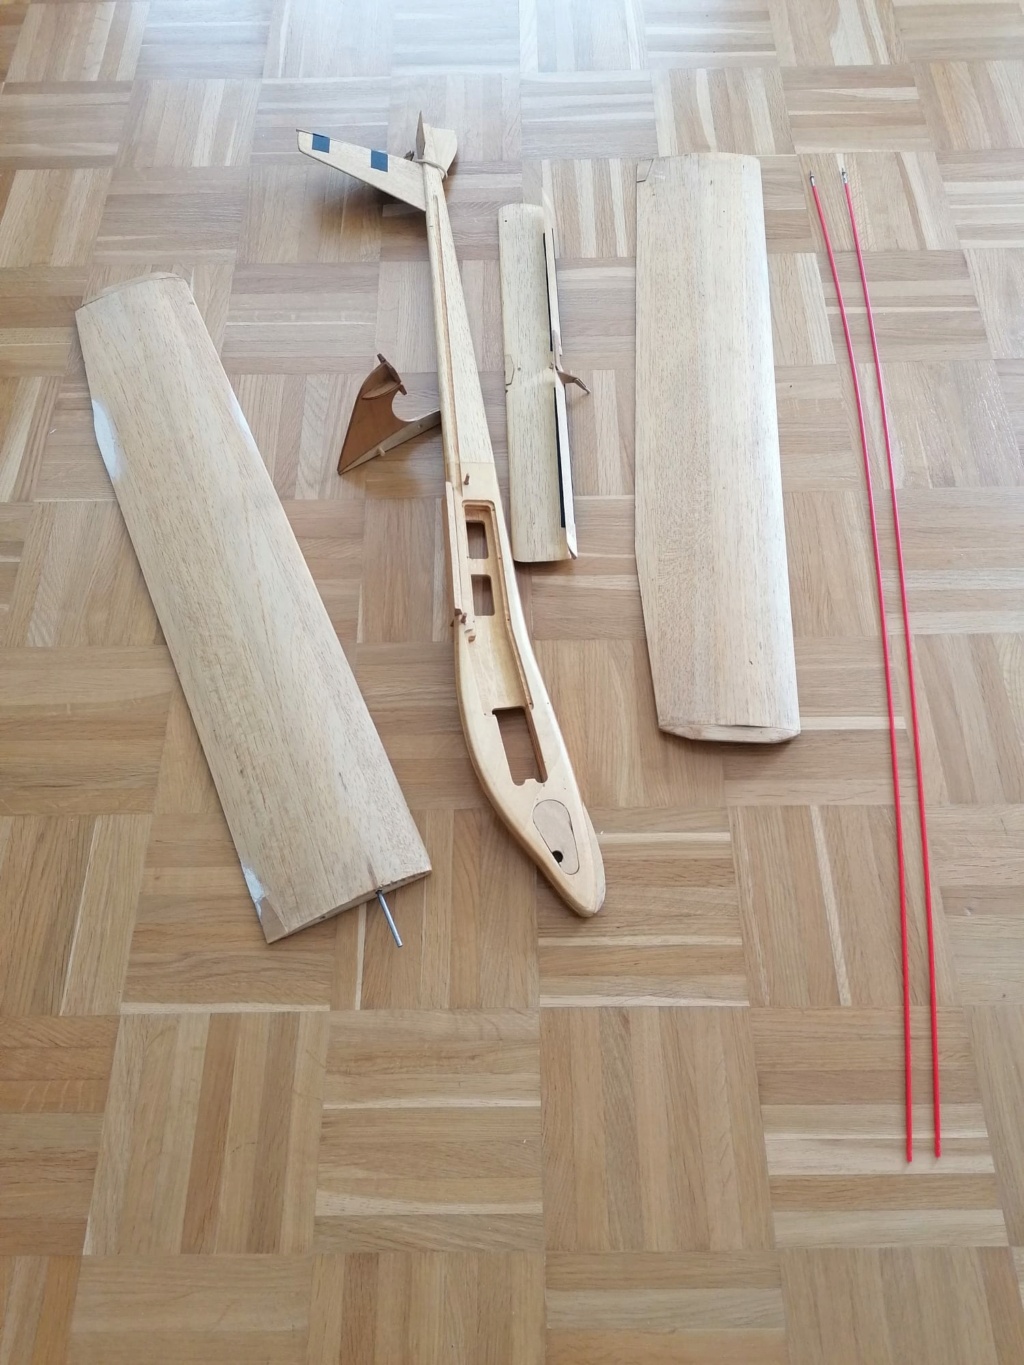
Hopefully that's not too much off topic: so, this is going to be the sailplane which will be hosting the Cox engine. It's a sailplane kit I put together many years ago, ca. 150cm wing span, entirely made of balsa wood plywood, with no ailerons. Supposedly quite easy to manage.
Unfortunately, the original box got lost, and I can't recall the model / producer name of the set. Luckily enough though, it aged quite well in the cellar, just got some minor damages to the wings which I could easily repair with some balsa parts, glue, filler and sandpaper....
My idea is that the engine will just serve to lift it up, thermals and some light wind will do the rest; I'll see if the nylon propeller will provide enough "pulling power" combined with a reasonable speed. The slower the better, I would say, as I am not feeling quite confident with a fast model at the moment.
I've ordered on Amazon Italy a basic 6-ch sender + receiver, 2 servos, a LiPo 3S 1600 mAh battery (140 gr), along with a 2200 KV brushless engine. The plan is still to switch to the Cox engine, at a certain point, and possibly save some weight by replacing the 1600 mAh with a lighter battery.


GigoZago- Beginner Poster

- Posts : 7
Join date : 2023-05-20
Age : 43
Location : Zurich
 Re: Please help me to identify this COX engine
GigoZago wrote:Hopefully that's not too much off topic: so, this is going to be the sailplane which will be hosting the Cox engine. It's a sailplane kit I put together many years ago, ca. 150cm wing span, entirely made of balsa wood plywood, with no ailerons. Supposedly quite easy to manage.
Unfortunately, the original box got lost, and I can't recall the model / producer name of the set. Luckily enough though, it aged quite well in the cellar, just got some minor damages to the wings which I could easily repair with some balsa parts, glue, filler and sandpaper....
My idea is that the engine will just serve to lift it up, thermals and some light wind will do the rest; I'll see if the nylon propeller will provide enough "pulling power" combined with a reasonable speed. The slower the better, I would say, as I am not feeling quite confident with a fast model at the moment.
I've ordered on Amazon Italy a basic 6-ch sender + receiver, 2 servos, a LiPo 3S 1600 mAh battery (140 gr), along with a 2200 KV brushless engine. The plan is still to switch to the Cox engine, at a certain point, and possibly save some weight by replacing the 1600 mAh with a lighter battery.I had two of them. One in a kit and the other one built quite heavy. I think the guy sealed it with polyester or epoxy resin that was very thick. The built one flew so badly with a B Bee that I sold both. Kind of felt bad for the guy I sold it to, as he was/is a friend. I remember it being at the edge of a stall all the time, and it would not climb, and sink to the ground with no rudder control. Slow crash with the engine screaming. It had a pod on top, and lots of upthrust. The glide was just a drop. Maybe it could be OK if it is built light. I liked the plywood fuselage that was finger jointed to the balsa.Seems like a good idea. Anyway, the name of the model was the Duet (pronounced du eh as it said on the plan) I think the wing is the Jedelski design. Don't know the name of the company that built it any more. If yours is built lightly, maybe the electric motor will be good, as most gliders are best with electric. In hindsight, I would probably skip the power pod, and bolt the motor on the nose somehow.

aspeed- Platinum Member

- Posts : 796
Join date : 2013-01-18
Location : Leamington Ont. Can.
 fuelproofing and keeping it light
The glider is a good beginner model.
There are a few detail to keep in mind; the balsa wood need to be protected agains moisture and if you want to use a engine fuel/oil ect.
2 ways to do that; covering film like oracover or the much cheaper "chinacote" that used to be sold by hobbyking. Or paint/varnish ect.
Since this is a full wood model the paint/varnish is the simpler way.
My personal prefernce is a clear (ish) polyurethane "resin" called "g4" that is sold to make stone walls in basements and cellers waterproof.
I thin it little and it 2 coats protects agains most chemicals.
Some of the models its used on are over 30 years old and still in good shape.
Other varnish like wood floor coating made with polyurethane might also be fuel resistant; if you have any best to varnissh a wooden test sample, let it dry/cure for at least a week and then see if glow fuel attacts it.
The style of the model implies its also a aviomodelli model but i do not know its name.
Once you have the parts covered/ varnished and the rc gear installed, ballance it at 1/3 of the "chord" / width of the wing from the front.
Then find a field with tall grass for your first test glides and launch by hand into the wind. the grass should be tall enough to avoid damge on thoe first poor landing. add or remove weight from the nose (or move the rc battery) to get the best glide distance before trying any motor.
Best thing is to join a local model club with instructors to teach you to fly.

cmulder- Gold Member

- Posts : 279
Join date : 2022-02-10
 servo's
this glider was designed before smaller servo's became as cheap and powerful as they are today.
Get so called "9" gram servo's with metal gear or even "11" gram versions (weight of cable and connector are often not included in the stated weight)
The current servo cutouts under the wingare best closed with some balsa and mount the servo's much more towards the nose.
Recievers also much smaller these days so you can move those towards the nose too.
You might have to add more weight in the front "ballast" compartment but the totall weight will be much lower then with the rc gear this model was designed for.
example of servo

cmulder- Gold Member

- Posts : 279
Join date : 2022-02-10
 Re: Please help me to identify this COX engine
Oil based polyurethane varnish is low nitro fuelproof but smells bad and releases toxic fumes. I experienced it. Water based polyurethane is not fuelproof. Thinned and brushed epoxy is OK but yellows within time. Only choice is covering film.

Levent Suberk- Diamond Member

- Posts : 2263
Join date : 2017-12-24
Location : Türkiye
 Re: Please help me to identify this COX engine
The Duet has an undercamber with a couple ribs sticking out the bottom, so covering would be a bit tricky. It really is a nice looking wing though, all sanded at the factory. I just thought with the needed nose weight and the extra pod on top, that the Bee motor would do well at the front for balance, and then less drag from the pod.

aspeed- Platinum Member

- Posts : 796
Join date : 2013-01-18
Location : Leamington Ont. Can.
 30 years and counting
Levent Suberk wrote:Oil based polyurethane varnish is low nitro fuelproof but smells bad and releases toxic fumes. I experienced it. Water based polyurethane is not fuelproof. Thinned and brushed epoxy is OK but yellows within time. Only choice is covering film.
Some of my models are over 30 years old and and my fuel is up to 30% nitro. the smell was gone once the varnish had dried/cured and that takes a day or two.
Ofcoure like with most paints you need to ventilate when you use it.
"G4" has become my choice for any wooden object that i want to last; planes,starter box (37 year old now), wooden fittings in my bathroom and furniture including my kitchen table.
My balsa glow planes have there inside coated with it too so that any fuel leak does not get into the wood.
One of my balsa models has landed in a lake and after cleaning it was ready to fly again.
ALso used to laminate a delta with glassfibre and that is amost bullitproof just a bit heavy.
You will not find "G4" in paint shops ; it is sold to make concrete waterproof. On mainland europe its sold as "dampshield" for basements/ cellars and as "primer" to aply epoxy on concrete floors. In the UK and ireland its sold to make garden ponds waterproof. Locally its sold by a polyester / epoxy supplies shop.
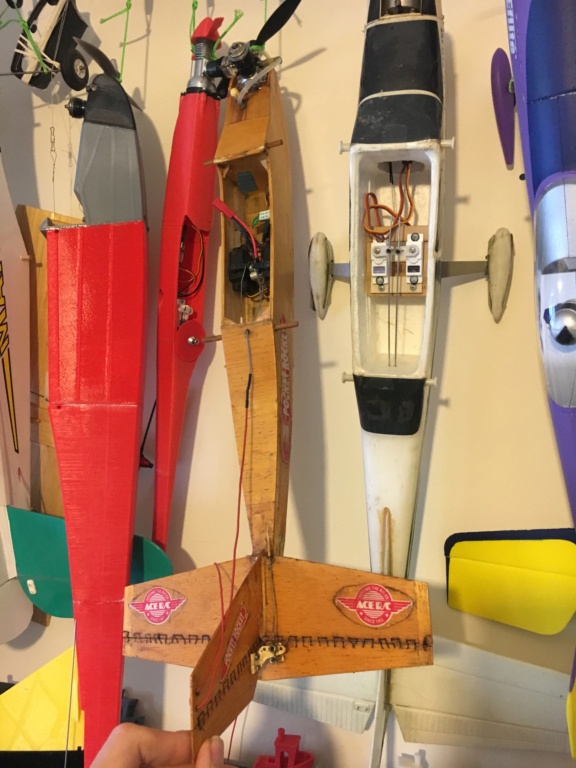
This "pocket rocket" is from the mid '90s and has flown a lot
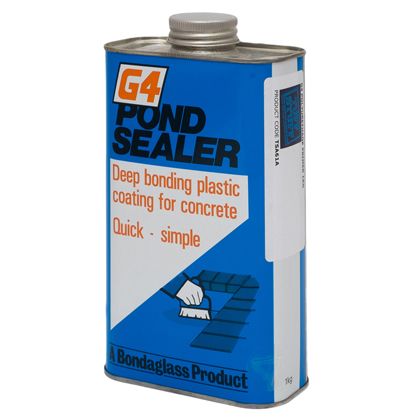
How its sold in Th Uk and Ireland
Last edited by cmulder on Sun May 21, 2023 7:22 pm; edited 5 times in total

cmulder- Gold Member

- Posts : 279
Join date : 2022-02-10
Page 1 of 2 • 1, 2 
 Similar topics
» Can someone identify this engine?
» Identify this engine
» Can someone identify my Cox engine.
» Need some help to identify this engine
» Can you identify this engine?
» Identify this engine
» Can someone identify my Cox engine.
» Need some help to identify this engine
» Can you identify this engine?
Page 1 of 2
Permissions in this forum:
You cannot reply to topics in this forum

 Rules
Rules


