Log in
Search
Latest topics
» My current avatar photoby rsv1cox Today at 6:37 pm
» Funny what you find when you go looking
by rsv1cox Today at 5:28 pm
» My N-1R build log
by rdw777 Today at 5:24 pm
» Duende V model from RC Model magazine 1983.
by rdw777 Today at 5:06 pm
» My latest doodle...
by TD ABUSER Today at 11:30 am
» Landing-gear tips
by 1975 control line guy Today at 10:07 am
» Brushless motors?
by rsv1cox Yesterday at 6:40 pm
» Free Flight Radio Assist
by rdw777 Yesterday at 6:03 pm
» Tribute Shoestring build
by amurphy6812 Yesterday at 5:43 pm
» Cox 020 PeeWee rebuild questions
by LooseSpinner99 Yesterday at 5:17 pm
» It's the X Wing that has a canard
by rdw777 Fri Nov 15, 2024 6:58 pm
» music vids.. some of your favorites
by Kim Thu Nov 14, 2024 3:28 pm
Cox Engine of The Month
A quick project to knock out.
Page 1 of 2
Page 1 of 2 • 1, 2 
 A quick project to knock out.
There’re a couple of projects that I’ve been wanting to do for a few years, but just never made time. I can’t claim credit for the original idea. I saw a sketch a few years ago on the idea and it stuck with me. I don’t remember where, but I saw the sketch of an F8F Bearcat and a Zero both using a Baby Ringmaster wing. Seemed a good idea, but neither plane looked quite right with the BRM wing. The wing shape just didn’t match the planes. But the more I looked at the BRM wing, the more I realized that its shape did work for an F4F Wildcat. It wouldn’t be too much effort to do, but I just wasn’t in the mood to build a couple of BRM wings. I know I could order a BRM kit from PDK or Brodak, but it seemed like too much money for just the wing. Not saying the kits are not worth the money, just not what I want to invest in this idea. So I put the project on the back burner until my plate cleared (yeah, right!) and I had time to scratch out a couple of BRM wings.
Back at the end of February, Doug Hart (WillyNillies) posted about their new BRM kit. At $24.95, it was closer to being worth shelling out some dough, but not quite. I asked Doug what it would cost for just the wing kit, and he eventually got back to me with a price of $16.95 for just the wing kit and hardware. That was the sweet spot. So, I ordered two wing kits and one BRM kit. You can never have enough Baby Ringmasters. Being the patriotic guy he is, Doug also gives a discount to active duty military and vets. So that was another 5% off the total, before shipping.
The wing kits came a couple of weeks ago, but as usual, I was in the middle of a couple of other projects I needed to finish. After pretty much getting done with the Snip, I cleared some space on the build table. I really shouldn’t be starting a new project, but what the hell. Looking through what came, I have everything but the leadout materials. They got left out somehow. No biggie, I have materials to make up a couple of leadouts, and it’s not worth calling them over. The 5% discount more than makes up for the cost of the leadout wire and crimps. The wing is laser cut, and well thought out. It slides together in a few minutes and you just put a drop of CA, or whatever your preferred glue is, on the joints. The wing builds in no time. It’s not the standard BRM wing, so don’t expect it to be exactly like what you’d get from PDK, Brodak, Sterling, Estes, whoever. But it’s a good wing. Here it is built, but with only the top sheeting left to install:
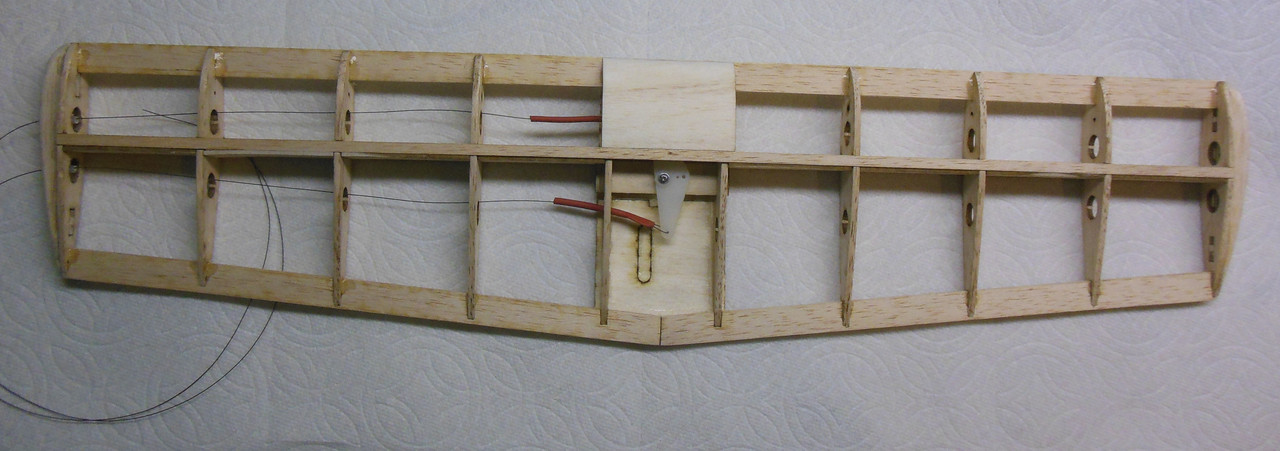
I’ll close this out once I make a fuselage and know how long to make the elevator pushrod. As you can see, the leading edge is a flat piece of 9/16”x1/8” balsa, as is the t.e, rather than a stick of square or rounded l.e. stock. So what you get is a little different from your standard BRM wing. But it’ll fly well. I used thick CA to tack the ribs, as that’s what I had on hand without opening a new bottle of CA. Next wing I’ll do everything I can with thin CA.
All the wing pieces, except the top sheeting and shear webs, are laser cut from one stick of 1/8”x3” balsa, so I’m not sure why he programmed the l.e. for 9/16” width. Maybe to give the ribs plenty of mating surface. He also cuts the wing ribs from the same 1/8” stock, so the ribs are very stout. WillyNillies produces 13 plane kits, but only one of them is a CL plane, so I’m assuming Doug is mostly an RC guy and has little CL experience. That’s probably why he designed this kit so stout. Or maybe it just makes more economical sense for him to use the wood the way he does. I’ll not second-guess him for making a good kit at a good price.
More to come…
The Copycat Mark
Back at the end of February, Doug Hart (WillyNillies) posted about their new BRM kit. At $24.95, it was closer to being worth shelling out some dough, but not quite. I asked Doug what it would cost for just the wing kit, and he eventually got back to me with a price of $16.95 for just the wing kit and hardware. That was the sweet spot. So, I ordered two wing kits and one BRM kit. You can never have enough Baby Ringmasters. Being the patriotic guy he is, Doug also gives a discount to active duty military and vets. So that was another 5% off the total, before shipping.
The wing kits came a couple of weeks ago, but as usual, I was in the middle of a couple of other projects I needed to finish. After pretty much getting done with the Snip, I cleared some space on the build table. I really shouldn’t be starting a new project, but what the hell. Looking through what came, I have everything but the leadout materials. They got left out somehow. No biggie, I have materials to make up a couple of leadouts, and it’s not worth calling them over. The 5% discount more than makes up for the cost of the leadout wire and crimps. The wing is laser cut, and well thought out. It slides together in a few minutes and you just put a drop of CA, or whatever your preferred glue is, on the joints. The wing builds in no time. It’s not the standard BRM wing, so don’t expect it to be exactly like what you’d get from PDK, Brodak, Sterling, Estes, whoever. But it’s a good wing. Here it is built, but with only the top sheeting left to install:

I’ll close this out once I make a fuselage and know how long to make the elevator pushrod. As you can see, the leading edge is a flat piece of 9/16”x1/8” balsa, as is the t.e, rather than a stick of square or rounded l.e. stock. So what you get is a little different from your standard BRM wing. But it’ll fly well. I used thick CA to tack the ribs, as that’s what I had on hand without opening a new bottle of CA. Next wing I’ll do everything I can with thin CA.
All the wing pieces, except the top sheeting and shear webs, are laser cut from one stick of 1/8”x3” balsa, so I’m not sure why he programmed the l.e. for 9/16” width. Maybe to give the ribs plenty of mating surface. He also cuts the wing ribs from the same 1/8” stock, so the ribs are very stout. WillyNillies produces 13 plane kits, but only one of them is a CL plane, so I’m assuming Doug is mostly an RC guy and has little CL experience. That’s probably why he designed this kit so stout. Or maybe it just makes more economical sense for him to use the wood the way he does. I’ll not second-guess him for making a good kit at a good price.
More to come…
The Copycat Mark
batjac- Diamond Member


Posts : 2373
Join date : 2013-05-22
Age : 61
Location : Broken Arrow, OK, USA
 Re: A quick project to knock out.
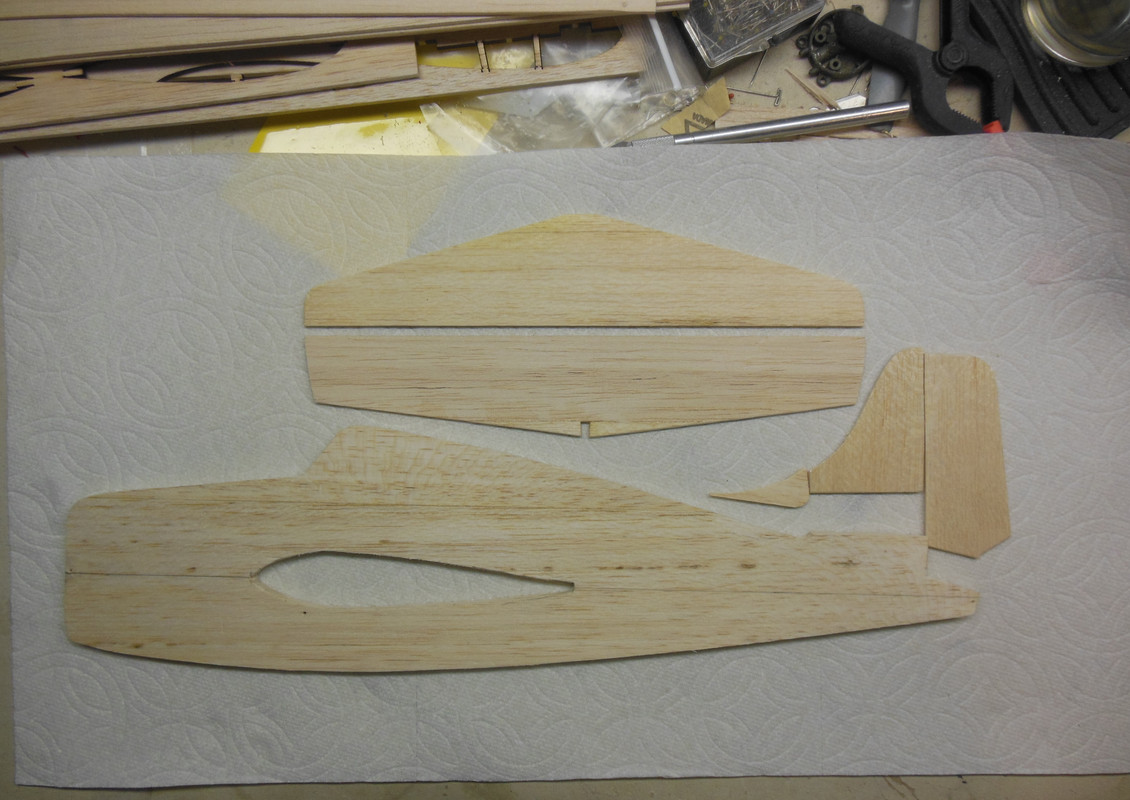
A little more time into this. I cut the fuselage and drew my reference line.
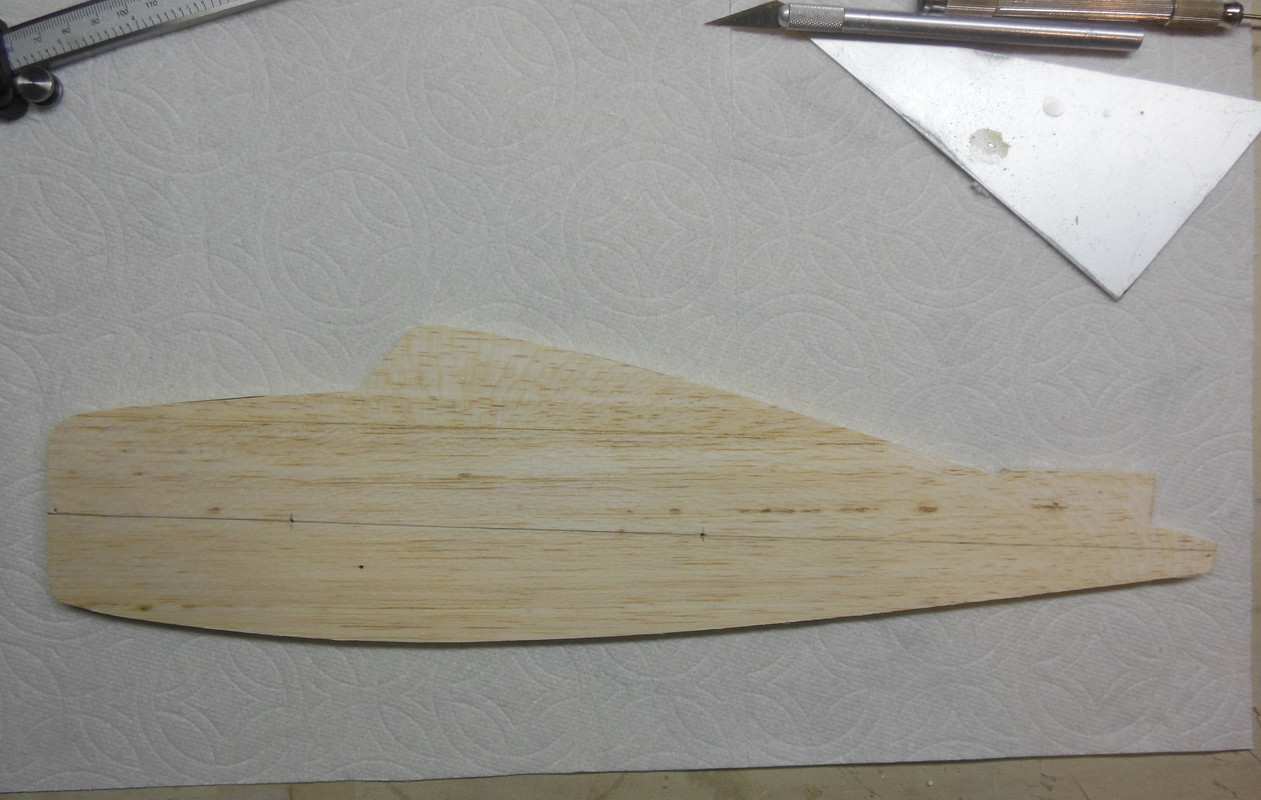
Then I traced the cutout of the #1 rib and added around it to account for the rib sheeting.
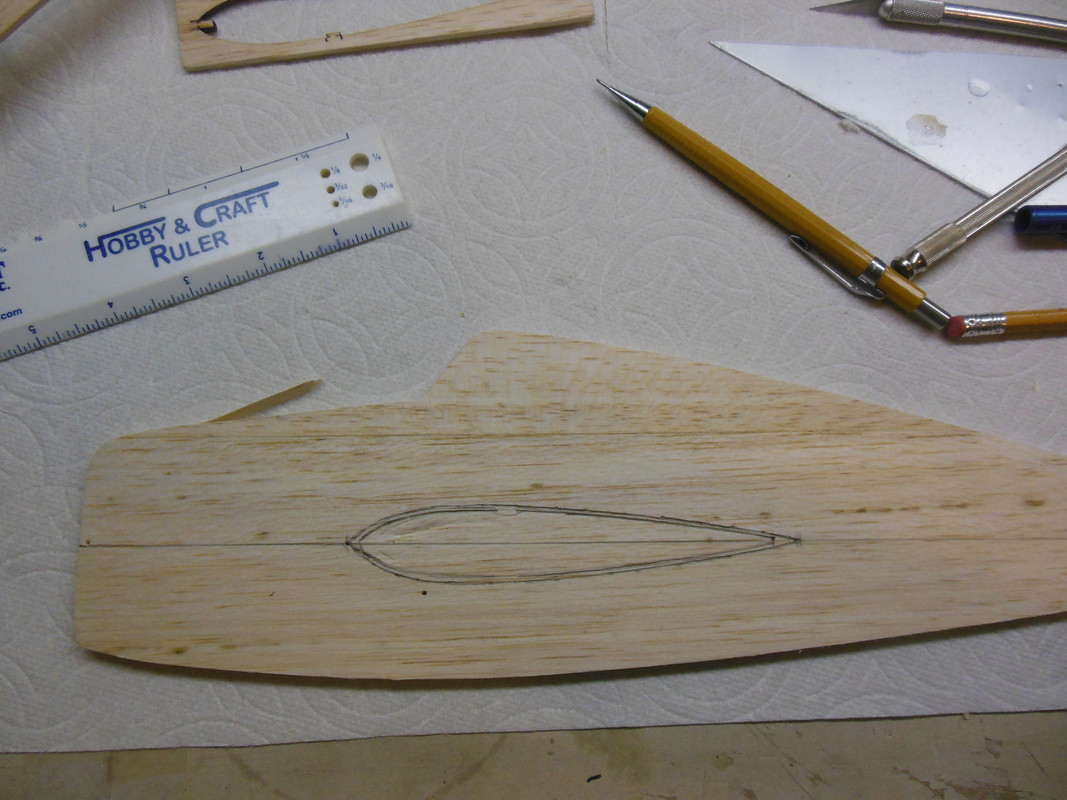
Then I cut out the fuselage for the wing, and cut my tail surfaces.
My further plan of attack is to:
1) Make the wire joiner for the elevators and install it.
2) Hinge the stab/elevator with a MonoKote hinge.
3) Drill the elevator for the 1/2A control horn.
4) Pin the stab in place and figure out the pushrod length, then cut to size.
5) Finish cutting the elevators into two halves. I left the center balsa in place so it’d be easier to work with for the above 4 steps.
6) Install the pushrod and glue on the remaining center sheeting.
7) Cut the fuse for the engine bearers.
8 ) Temporarily mount the wing and then drill the engine bearers for the Medallion .049 I plan to use, using my homemade incidence tools to make sure the engine thrust line is 0° to the wing.
9) Bend up the landing gear and drill the mounting holes in the fuse.
10) Cut out and glue on the doublers.
11) Cover the wings and fuse.
12) Make up the roundels for the wings and fuselage, and the stripes for the fin.
13) Glue it all together.
14) Take a bunch of pictures.
15) Put it away on a shelf because I’m too chicken to fly it and possibly crash it.
The Lion Mark

Then I traced the cutout of the #1 rib and added around it to account for the rib sheeting.

Then I cut out the fuselage for the wing, and cut my tail surfaces.

My further plan of attack is to:
1) Make the wire joiner for the elevators and install it.
2) Hinge the stab/elevator with a MonoKote hinge.
3) Drill the elevator for the 1/2A control horn.
4) Pin the stab in place and figure out the pushrod length, then cut to size.
5) Finish cutting the elevators into two halves. I left the center balsa in place so it’d be easier to work with for the above 4 steps.
6) Install the pushrod and glue on the remaining center sheeting.
7) Cut the fuse for the engine bearers.
8 ) Temporarily mount the wing and then drill the engine bearers for the Medallion .049 I plan to use, using my homemade incidence tools to make sure the engine thrust line is 0° to the wing.
9) Bend up the landing gear and drill the mounting holes in the fuse.
10) Cut out and glue on the doublers.
11) Cover the wings and fuse.
12) Make up the roundels for the wings and fuselage, and the stripes for the fin.
13) Glue it all together.
14) Take a bunch of pictures.
15) Put it away on a shelf because I’m too chicken to fly it and possibly crash it.
The Lion Mark

batjac- Diamond Member


Posts : 2373
Join date : 2013-05-22
Age : 61
Location : Broken Arrow, OK, USA
 Re: A quick project to knock out.
Well, I was bad and didn’t take photos as I went, but I made the elevator joiner and then fabricated the stab and elevator. I covered them and then pinned them in place to get the measurement for the elevator pushrod. I cut the pushrod, and then installed the last center sheet piece.
Then I installed the engine bearers and glued on the 1/32 ply doublers. With the major construction finished, I then moved to the engine mounting. I used my homemade jig to verify I was drilling the mounting holes properly. I did remember to take a photo. As you can see, the jig is way too huge for this model. I just have to make a 1/2A sized jig.
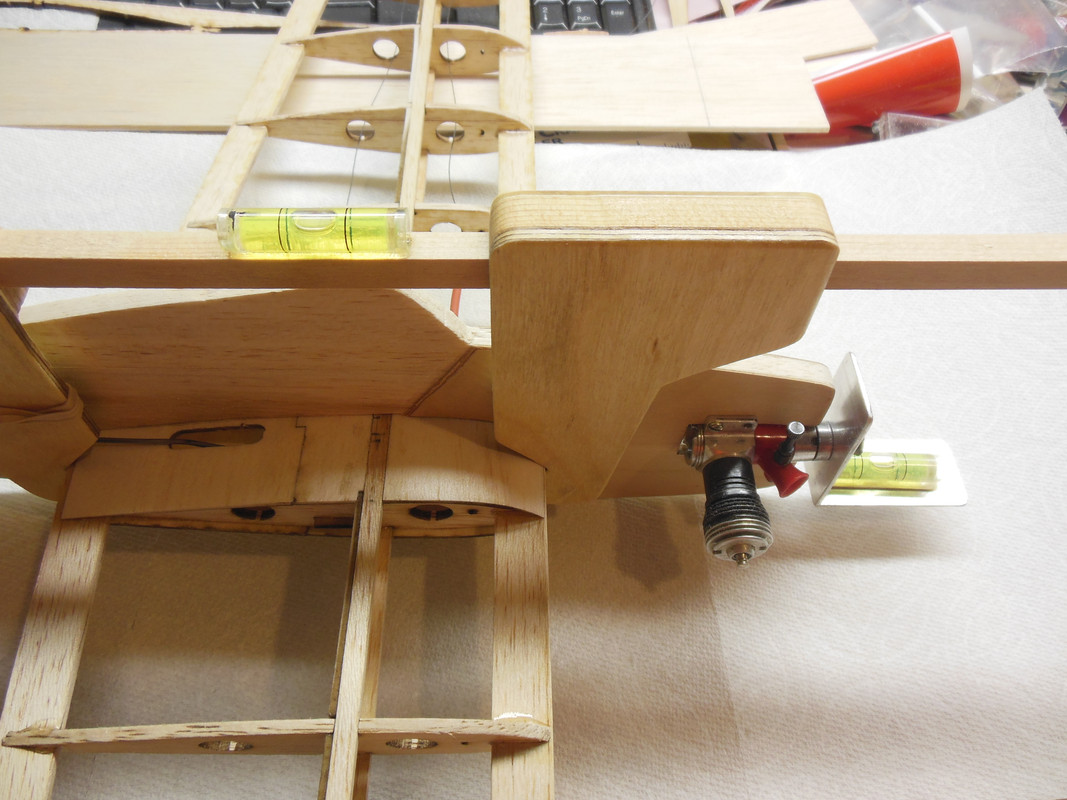
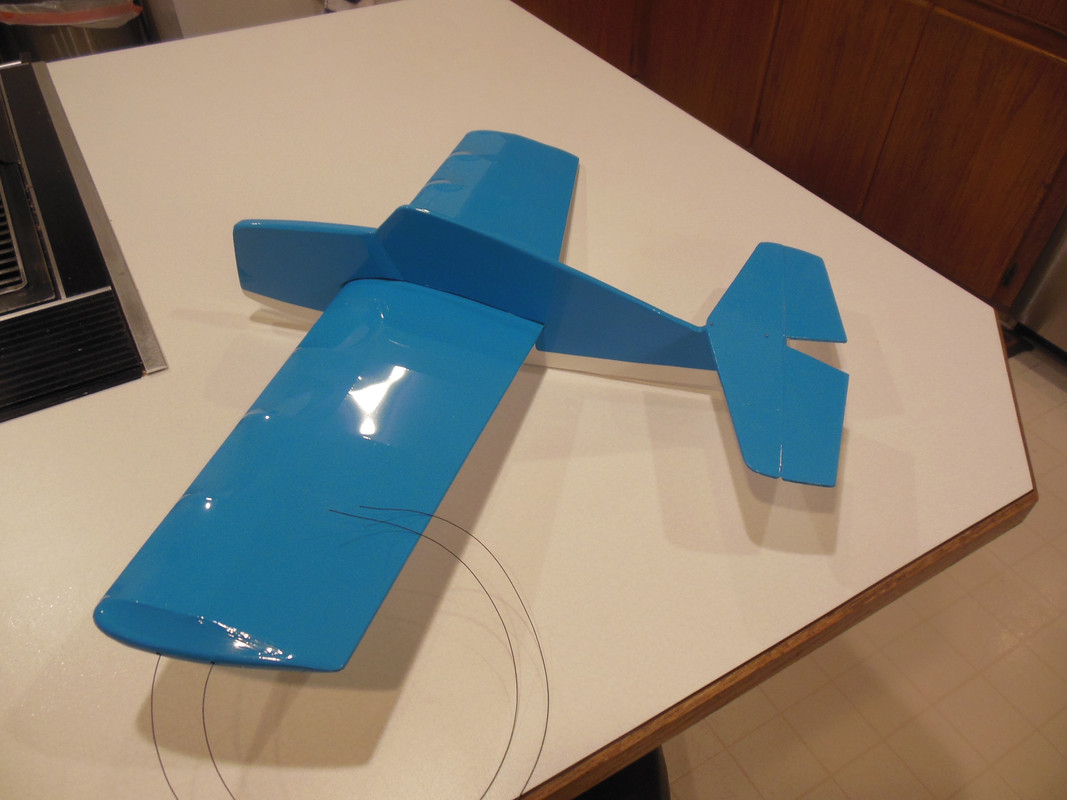
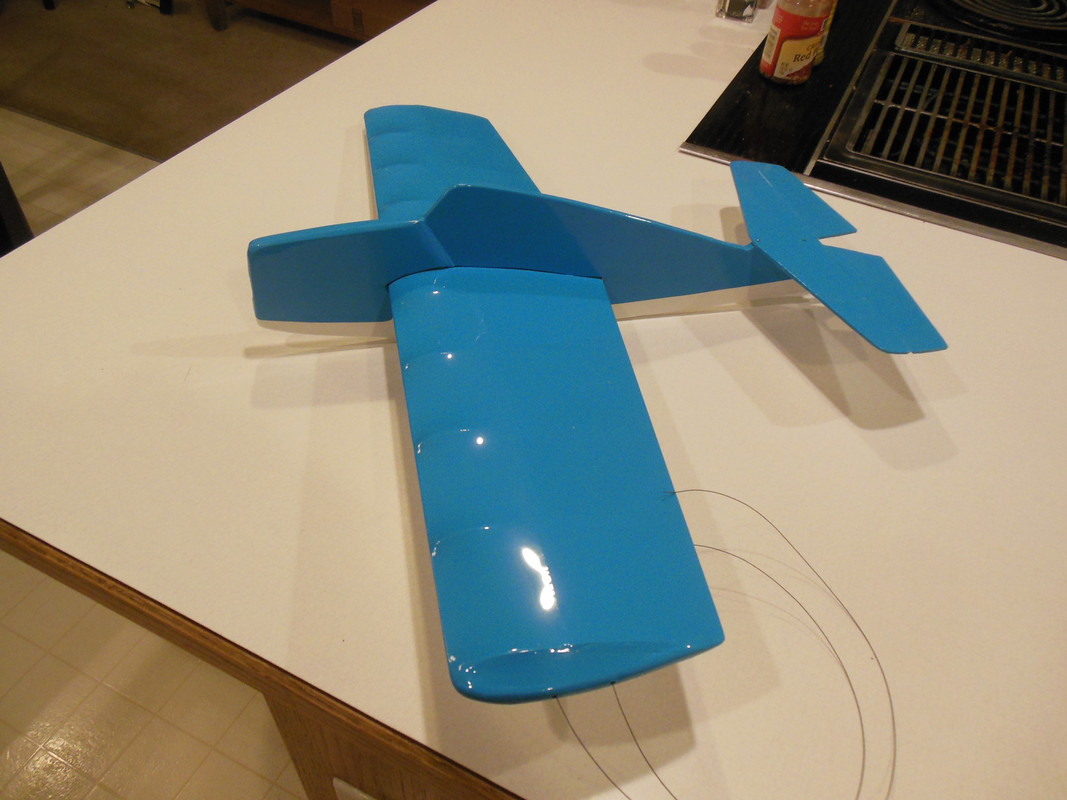
With the holes drilled and the blind nuts installed and glued, I added a 3/32” tripler on the inboard side and sanded everything to shape. Then I covered the fuselage with white MonoKote and blue EconoKote. I have work tomorrow morning, so I had to stop for the night. Not my neatest covering job, but okay for the task. Here’s where she sits:
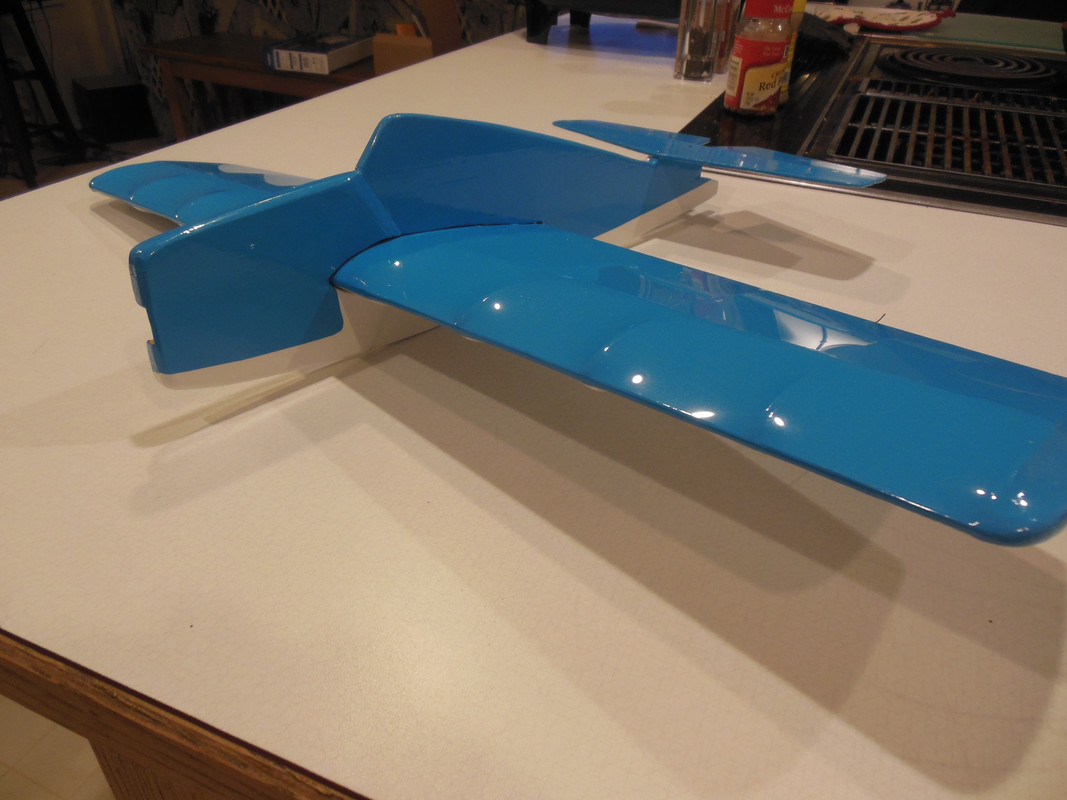
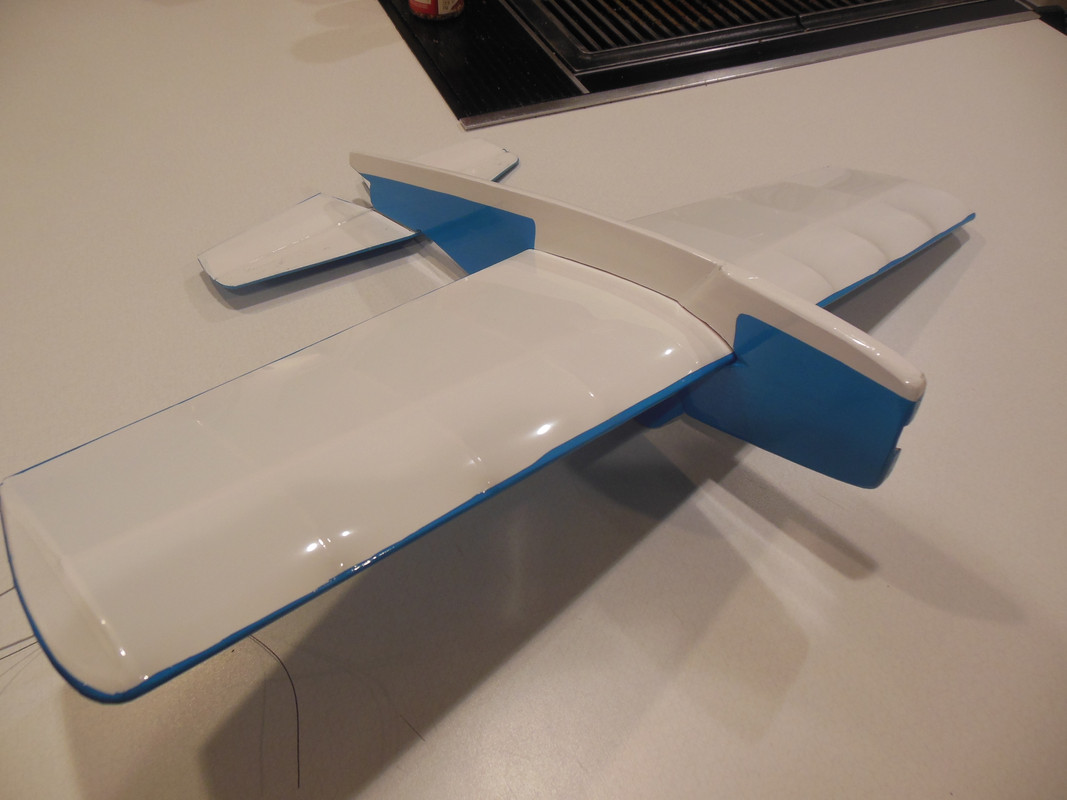
The Wild Mark
Then I installed the engine bearers and glued on the 1/32 ply doublers. With the major construction finished, I then moved to the engine mounting. I used my homemade jig to verify I was drilling the mounting holes properly. I did remember to take a photo. As you can see, the jig is way too huge for this model. I just have to make a 1/2A sized jig.

With the holes drilled and the blind nuts installed and glued, I added a 3/32” tripler on the inboard side and sanded everything to shape. Then I covered the fuselage with white MonoKote and blue EconoKote. I have work tomorrow morning, so I had to stop for the night. Not my neatest covering job, but okay for the task. Here’s where she sits:


The Wild Mark

batjac- Diamond Member


Posts : 2373
Join date : 2013-05-22
Age : 61
Location : Broken Arrow, OK, USA
 Re: A quick project to knock out.
Hello batjac, I am seeing your work, I like to read the description of what you received. I am surprised that the ribs of that wing are 3 mm thick, generally with a 1.5 to 2 mm maximum is more than enough, as you say, perhaps they want a very robust model from the manufacturer.
I also see that you have a wing incidence meter placed there, you have made it yourself ... I found a very good job done on that tool as well!
I also see that you have a wing incidence meter placed there, you have made it yourself ... I found a very good job done on that tool as well!

MauricioB- Top Poster

- Posts : 3711
Join date : 2016-02-16
Age : 53
Location : ARG
 Re: A quick project to knock out.
Simply gorgeous. Makes me want to try out CL flying.
What thickness balsa did you use for the fuselage?
Is the engine a 049TD?
What thickness balsa did you use for the fuselage?
Is the engine a 049TD?

dirk gently- Gold Member

- Posts : 430
Join date : 2012-02-03
Age : 42
Location : Poznań
 Re: A quick project to knock out.
Great job. I really like how well your covering came out. Nice, sharp, and clean. Can't wait to see what's next.

NEW222- Top Poster

- Posts : 3896
Join date : 2011-08-13
Age : 46
Location : oakbank, mb
 Re: A quick project to knock out.
When I got home last night I decided to knock out the roundels. It took a lot longer than I thought, using just an X-Acto knife, compass, and pair of scissors.
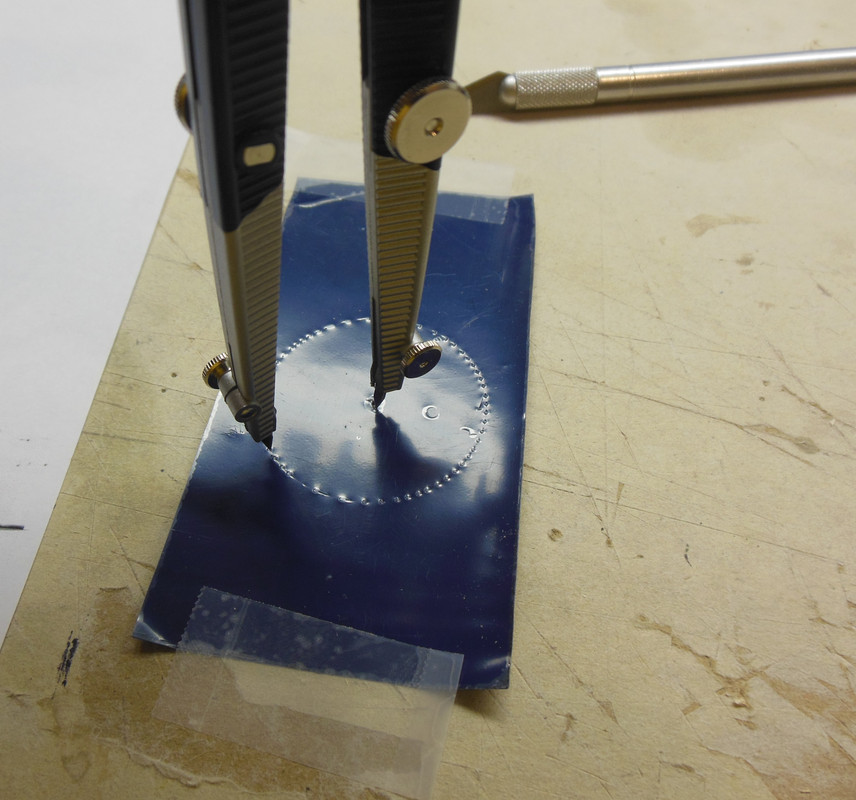
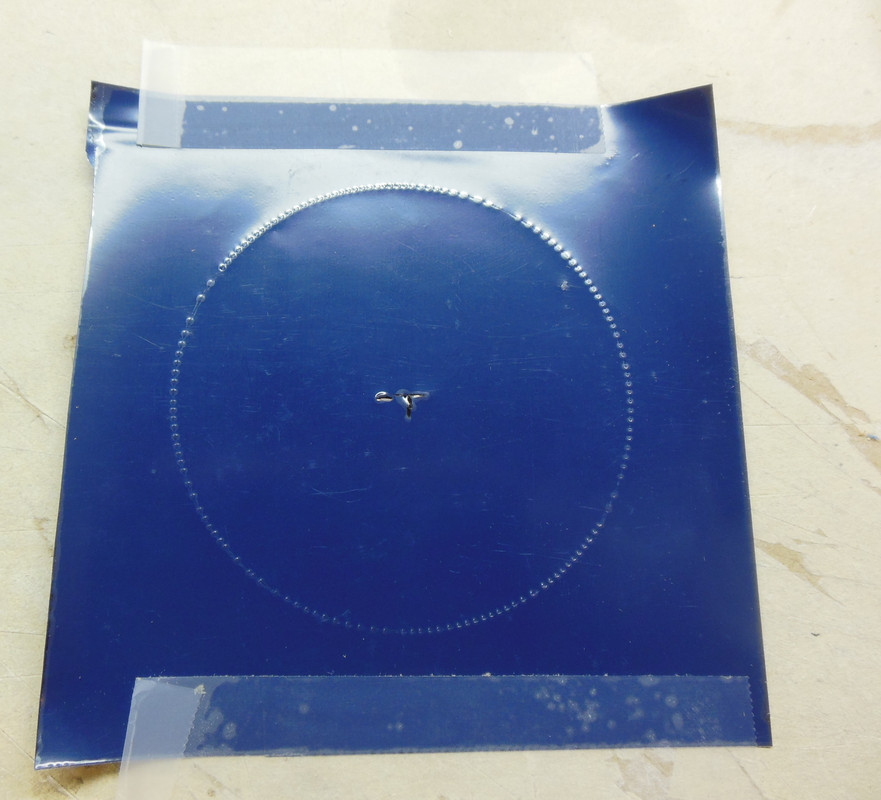

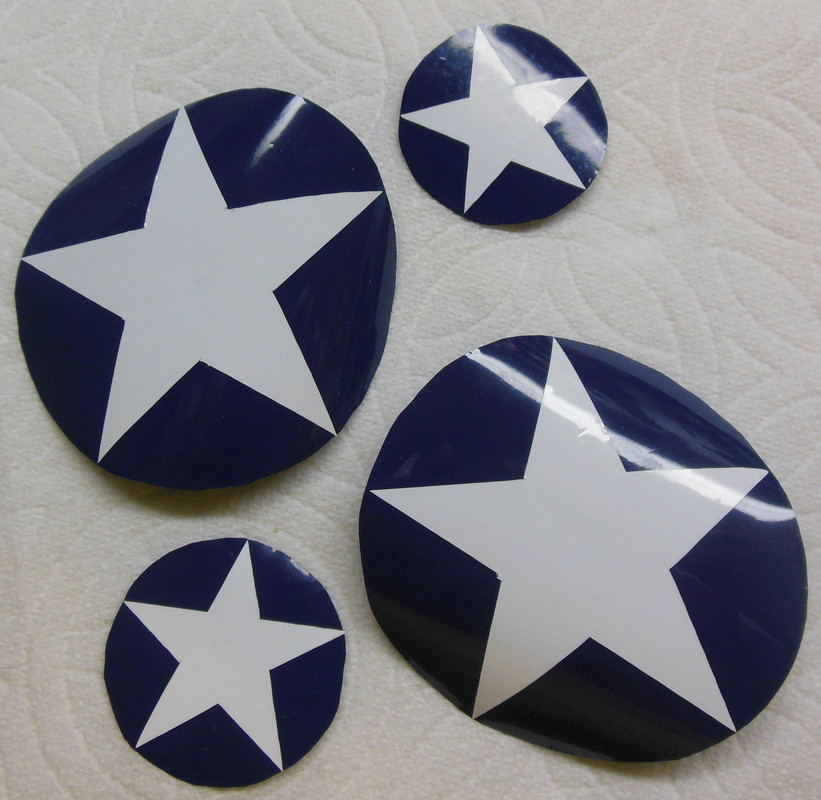
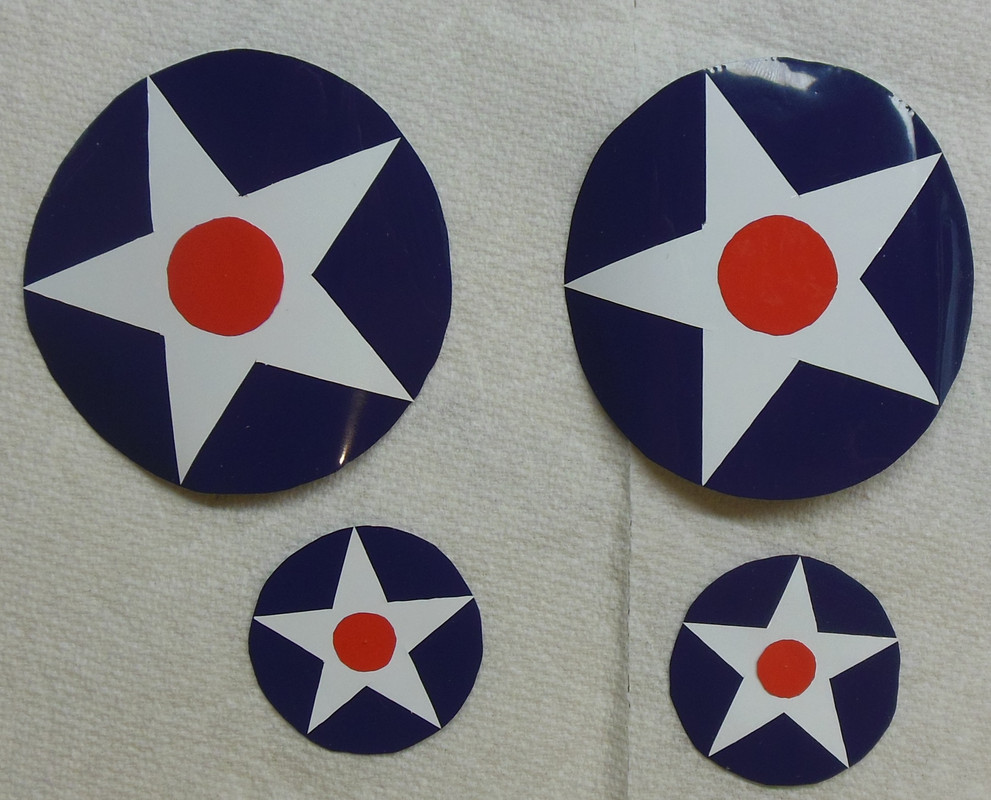
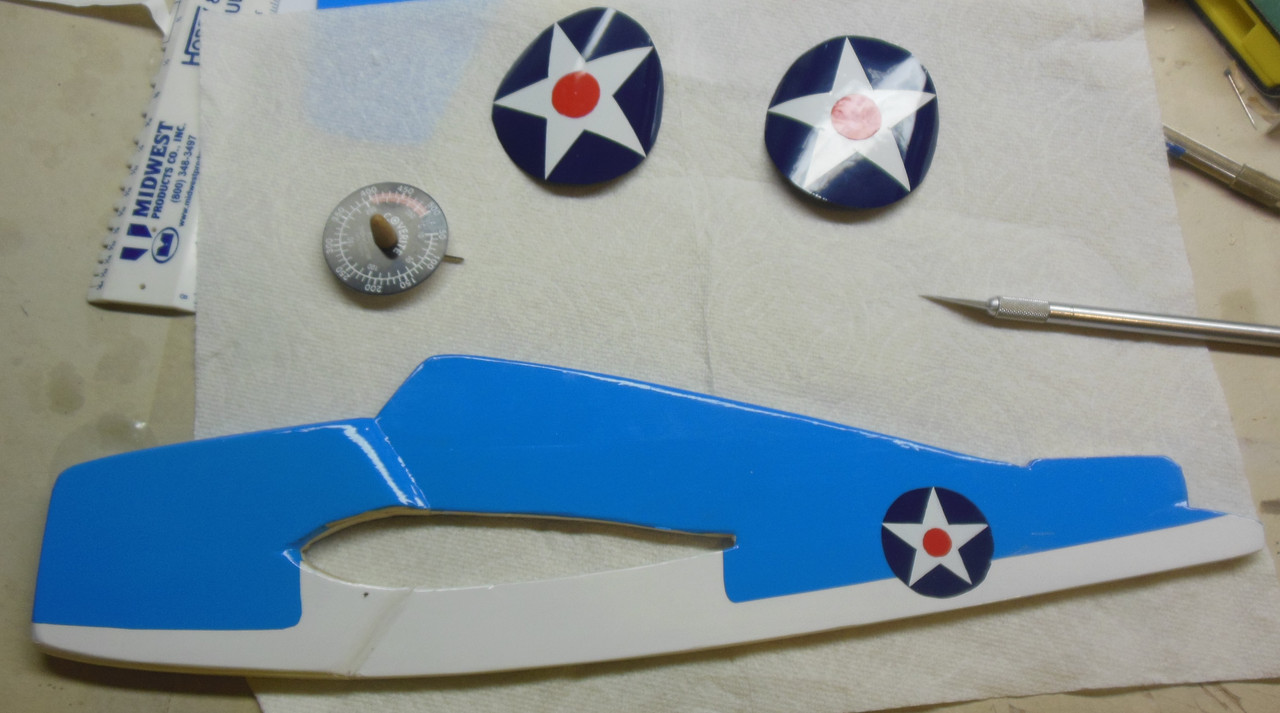
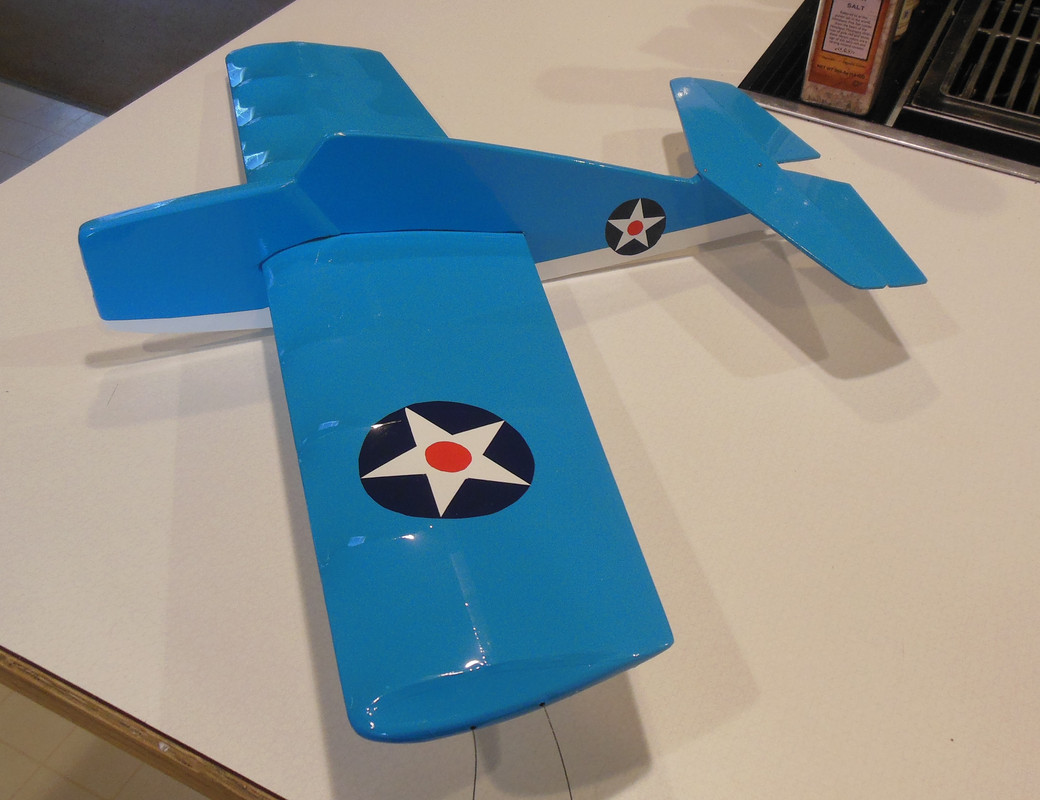
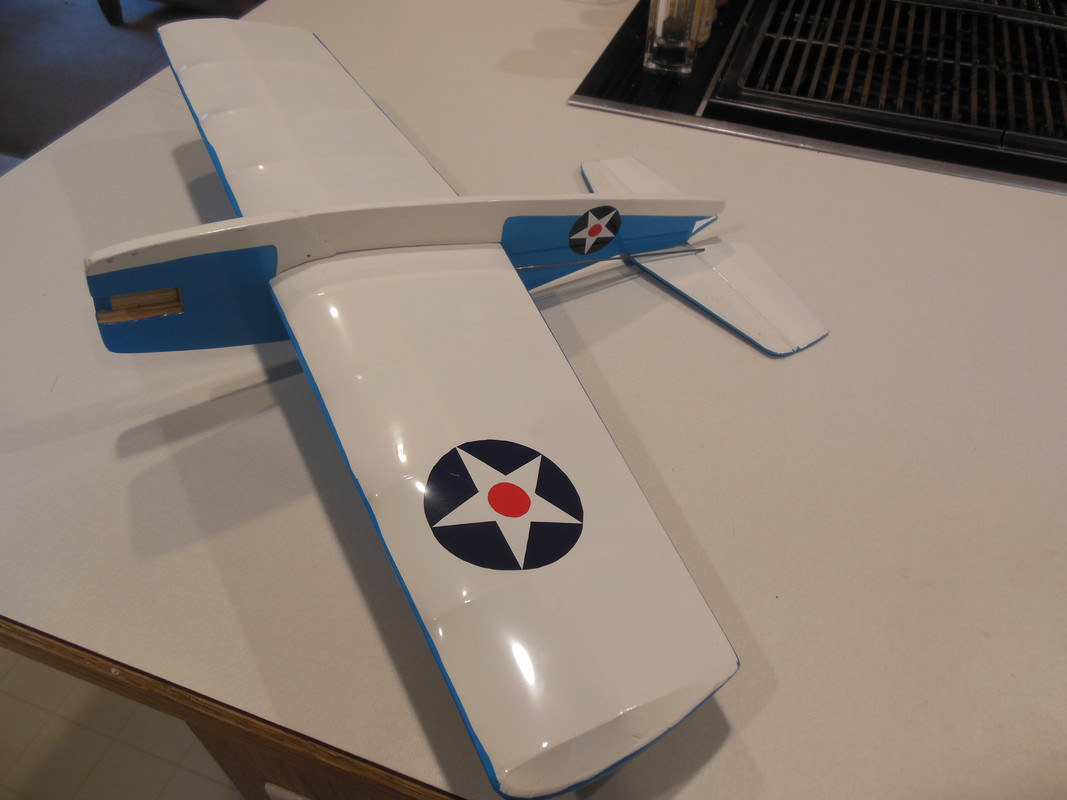
They don’t look too bad for cutting these out free-hand.
The Rotund Mark


They don’t look too bad for cutting these out free-hand.
The Rotund Mark

batjac- Diamond Member


Posts : 2373
Join date : 2013-05-22
Age : 61
Location : Broken Arrow, OK, USA
 Re: A quick project to knock out.
Nice work! I like it!

OhBee- Platinum Member

- Posts : 698
Join date : 2016-03-23
Age : 73
Location : Minnesota
 Re: A quick project to knock out.
Yes. nice work

akjgardner- Diamond Member


Posts : 1599
Join date : 2014-12-28
Age : 65
Location : Greensberg Indiana
 Re: A quick project to knock out.
Almost there. Just three or four more little things and then it’ll be ready to glue everything together. The canopy didn’t quite come out as it looked in my mind, but it’s okay. I only had to re-do it two times. The rudder came out good, I think. Working with four different types of covering is something of a pain, though. When putting the number on the sides, I found that the blue Monokote of the roundels had shrunk slightly. I’ve never seen that happen before. I debated for a long while about whether to put the cowling lines on it, but I went ahead and did it. I kinda wish that my panel line pen was more of a grey than such a dark black. The lines stand out a little too much for me. I did the ailerons with the panel line pen but since the ailerons on the Wildcat were so surprisingly small it just didn’t look right. So I used some Monokote Trim Solvent and removed the lines. Ah, well.
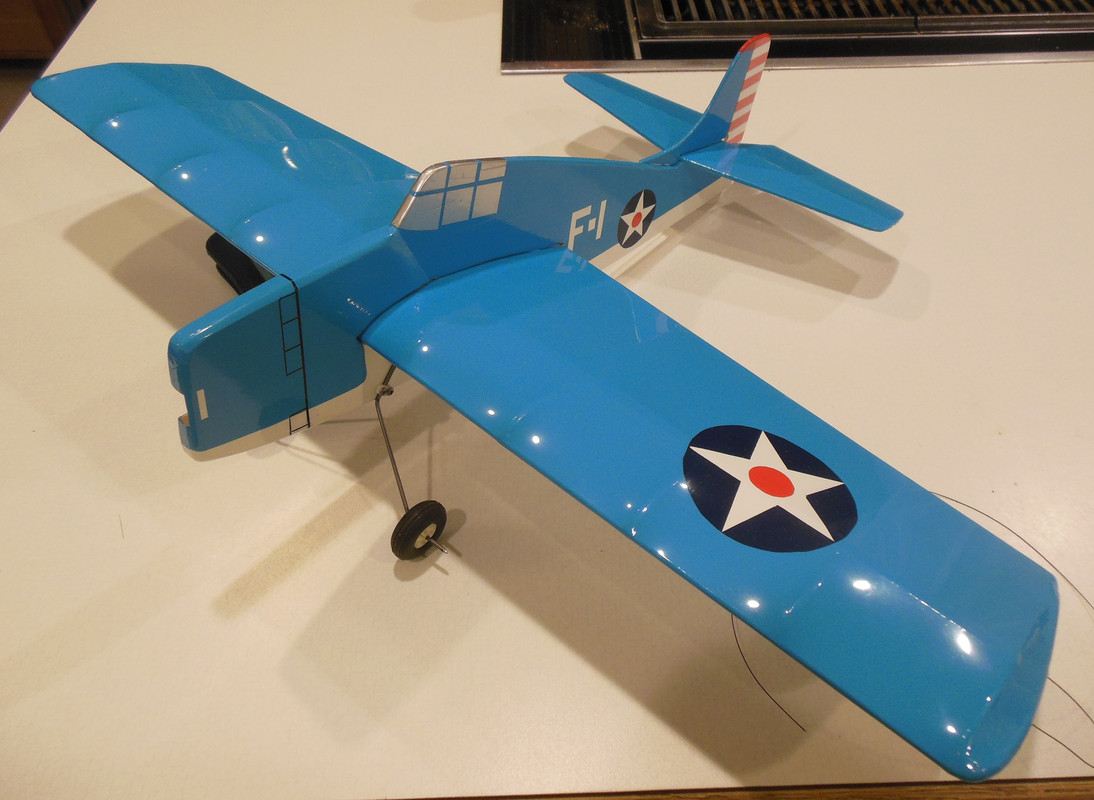
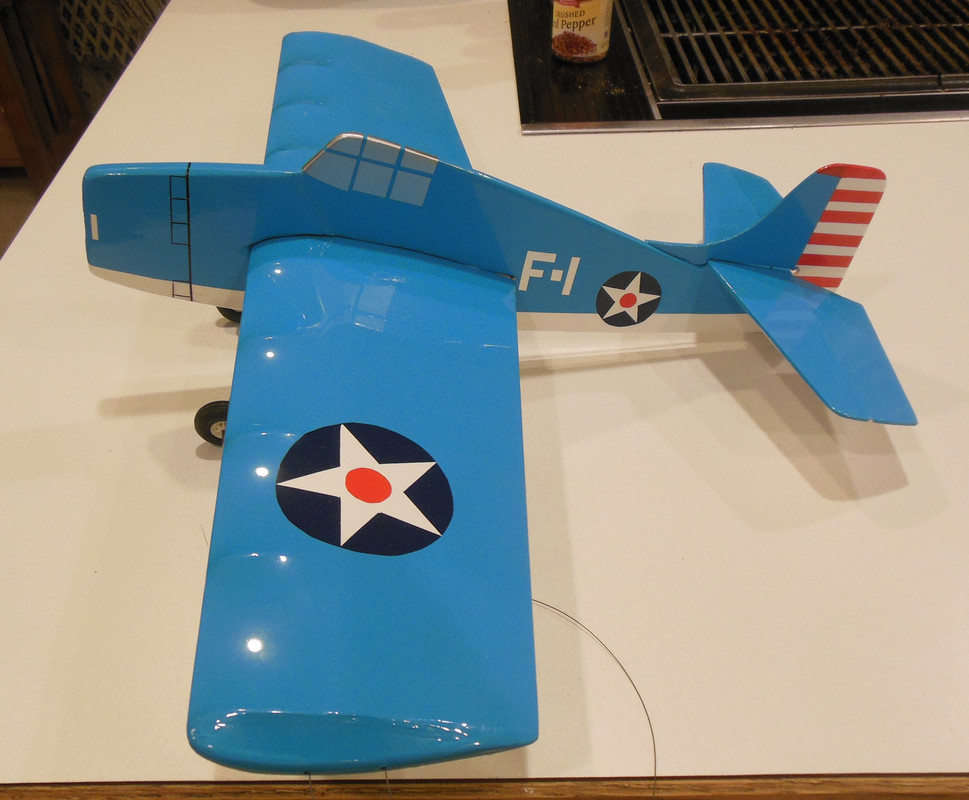
More when I finish it off in the next couple of days.
The Home Stretch Mark


More when I finish it off in the next couple of days.
The Home Stretch Mark

batjac- Diamond Member


Posts : 2373
Join date : 2013-05-22
Age : 61
Location : Broken Arrow, OK, USA
 Re: A quick project to knock out.
dirk gently wrote:Simply gorgeous. Makes me want to try out CL flying.
What thickness balsa did you use for the fuselage?
Is the engine a 049TD?
Sorry, Dirk. I meant to answer this earlier. The fuselage thickness is 1/4" Medium balsa. The engine is going to be a Medallion .049 on this. The Medallion should be enough to do this plane right.
And you should definitely try out CL flying. I started out as a kid with CL, but in 1978 I graduated to flying R/C. I did R/C exclusively until 2013, when one of the members from this forum let me fly his .049 WingMaster and his Junior Ringmaster at a local 4th of July fly-in. I've been doing CL ever since. My R/C stuff is getting sold off or given away.
Funny, I clearly remember flying Duke's WingMaster, but I have absolutely no recollection of flying his Junior Ringmaster. I guess anything larger than .049 is just useless information to be forgotten as soon as possible.
The Discriminating Mark

batjac- Diamond Member


Posts : 2373
Join date : 2013-05-22
Age : 61
Location : Broken Arrow, OK, USA
 Re: A quick project to knock out.
Looks good Mark. I like it, well done.

Cribbs74- Moderator


Posts : 11907
Join date : 2011-10-24
Age : 50
Location : Tuttle, OK
 Re: A quick project to knock out.
Nice job, Mark, immediately caught my attention, another trip down memory lane. Back in high school 1972, I made a 20 inch profile F4F with 1/8th inch sheet wing, which incidentally was doped the same medium blue colour as yours. I mounted a Cox 290 postage stamp engine and separate tank, made sheet engine mounts from the sheet metal frame of a Polaroid instant film flat pack canister.

GallopingGhostler- Top Poster


Posts : 5715
Join date : 2013-07-13
Age : 70
Location : Clovis NM or NFL KC Chiefs
 Re: A quick project to knock out.
Looks pretty darn good to me , i bet she will fly well also , Good Fun Mark 

getback- Top Poster


Posts : 10435
Join date : 2013-01-18
Age : 67
Location : julian , NC
 Re: A quick project to knock out.
Looks good, Prompted me to by 3 BRM from willieNillie, s You need to get your sales commission 

akjgardner- Diamond Member


Posts : 1599
Join date : 2014-12-28
Age : 65
Location : Greensberg Indiana
 Re: A quick project to knock out.
akjgardner wrote:Looks good, Prompted me to by 3 BRM from willieNillie, s You need to get your sales commission
I was just looking over on RCG, and Doug says they got over 500 orders in April alone! Gonna be interesting to see how all the lockdowns work out for small garage businesses like WillyNillies at the end of all this.
The Ponderer Mark

batjac- Diamond Member


Posts : 2373
Join date : 2013-05-22
Age : 61
Location : Broken Arrow, OK, USA
 Re: A quick project to knock out.
Great,
one last question - what's the wingspan?
one last question - what's the wingspan?

dirk gently- Gold Member

- Posts : 430
Join date : 2012-02-03
Age : 42
Location : Poznań
 Re: A quick project to knock out.
Looks like 24" Dirk https://willynillies.com/shop?olsPage=products%2Fjr-skylark-250-beta-kit-pre-order-now-limited-quantities-available-shipping-3rd-week-of-december Man there even running a Discount !!!!

getback- Top Poster


Posts : 10435
Join date : 2013-01-18
Age : 67
Location : julian , NC
 Re: A quick project to knock out.
Nice job Mark. From April 18th until today. Quick project indeed, takes me that long to think about it.
You are the Mono/Econokote King. Beautiful job on the custom roundels.
Bob
You are the Mono/Econokote King. Beautiful job on the custom roundels.
Bob

rsv1cox- Top Poster


Posts : 11238
Join date : 2014-08-18
Location : West Virginia
 Re: A quick project to knock out.
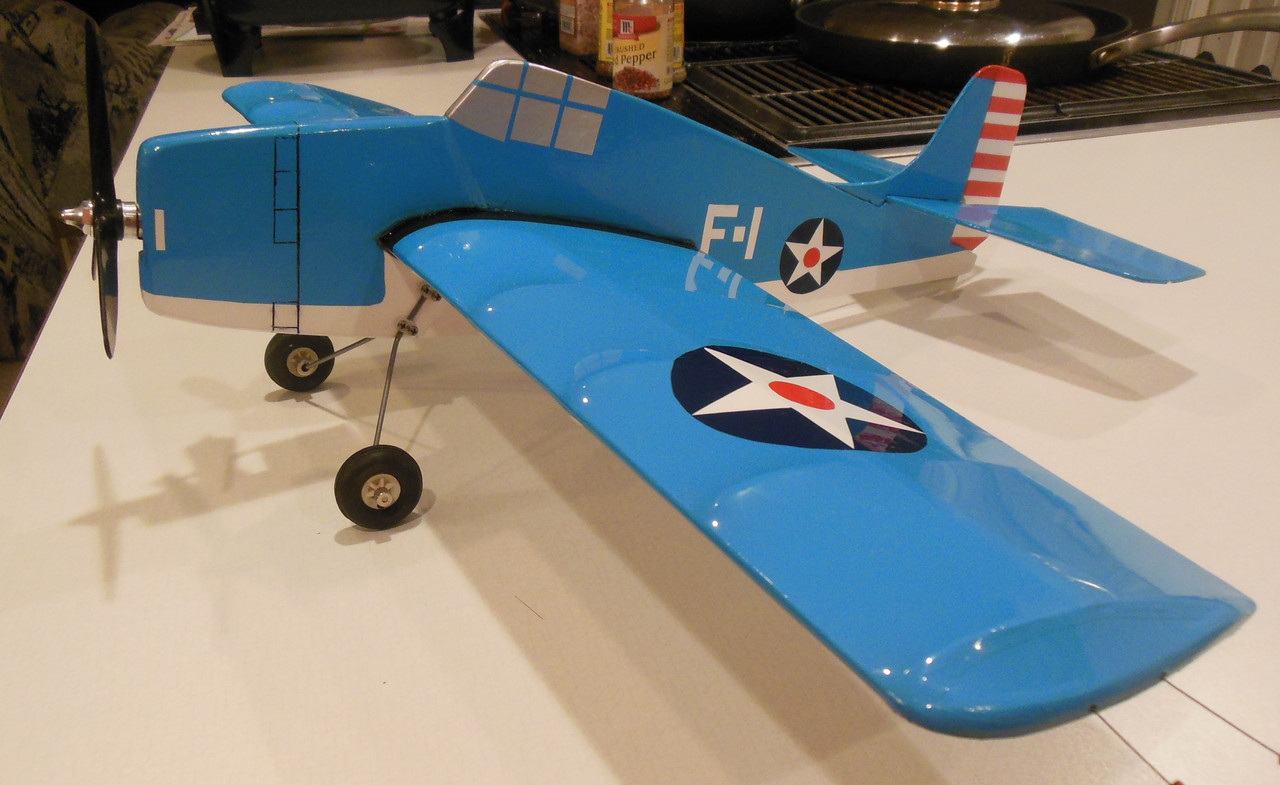
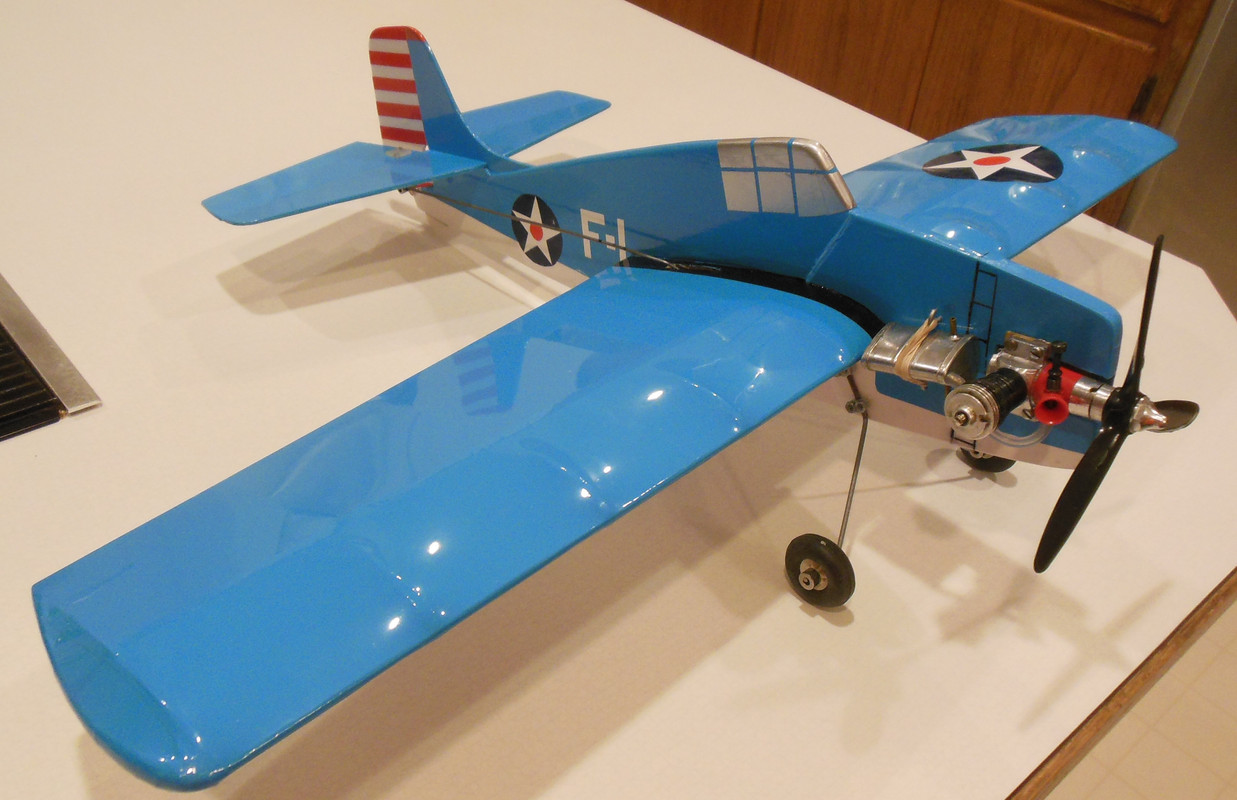
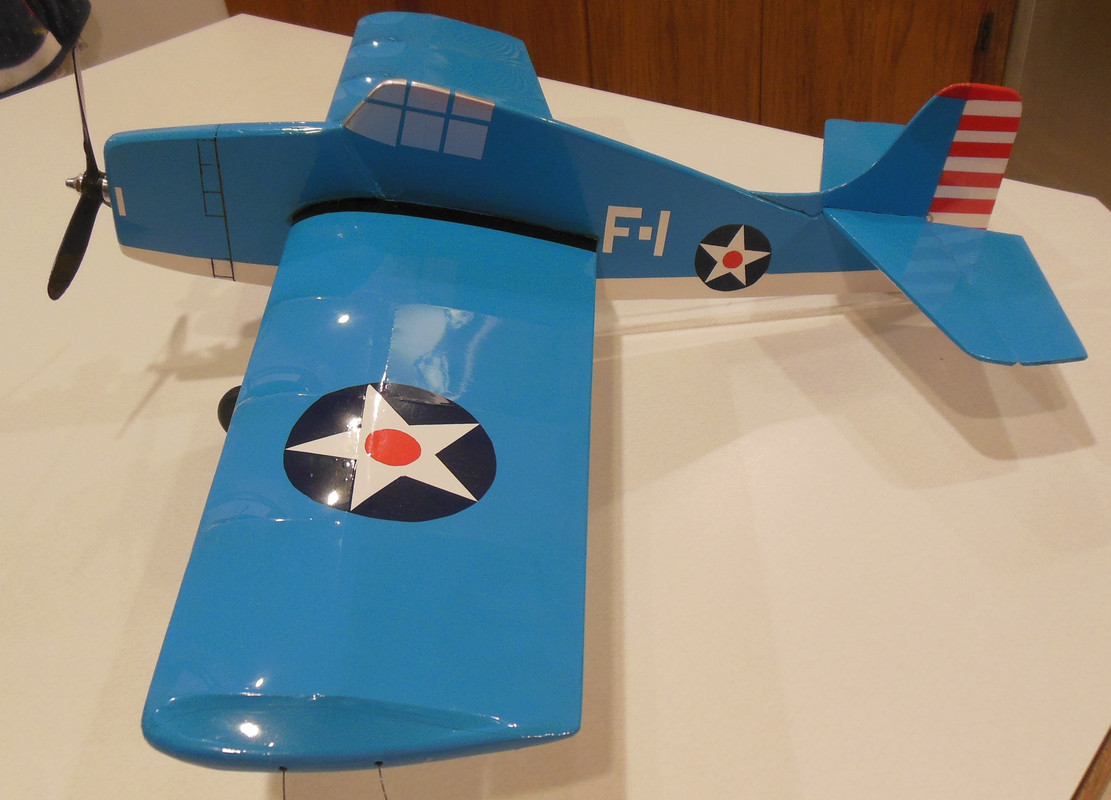
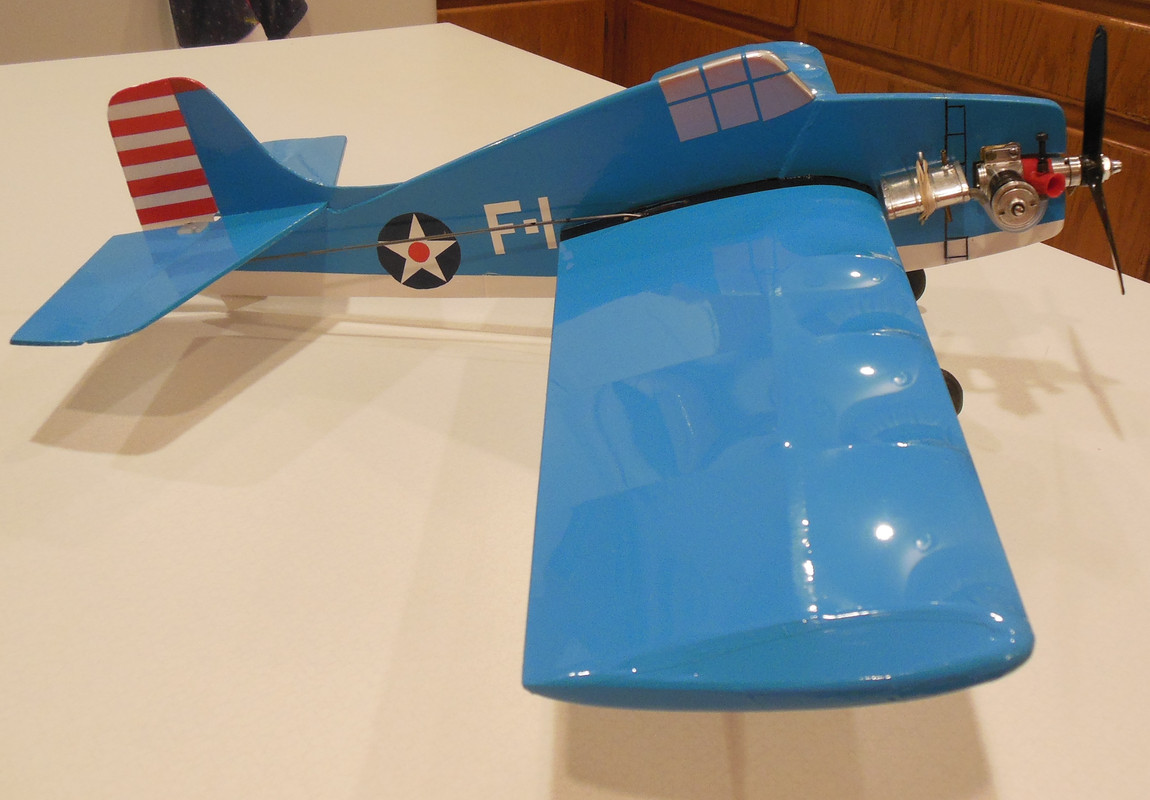
Pretty much finished with this one. ‘Bout the only thing left is to put on the right prop and other wheel collars. I ran out of 1/16” wheel collars, and as far as I can find, the old Goldberg spring collars for 3/64” wire are unobtanium. I think a Master Airscrew 5x3 three blade prop will look better on this so I ordered a couple. Hopefully the wheel collars and props will be here by the weekend. I also need to put some kind of padding under the tank to keep in from marring the EconoKote and to keep it from moving.
I like how this came out, but it’s a porker. 7.8 ounces ready to fly. The balance point is right at 25%, which is slightly aft of where I like it. I prefer 15%-20%, but oh well. Hang test came out fine, though.
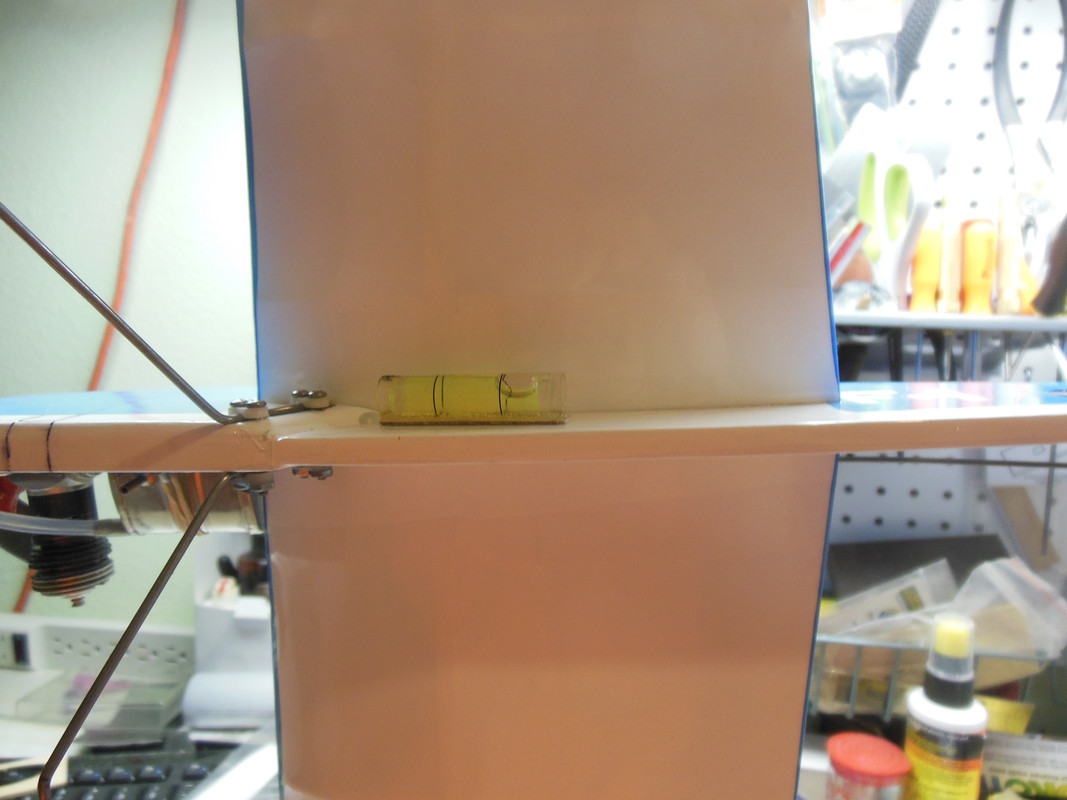
Almost ready to fly:

The Last Act Mark
I like how this came out, but it’s a porker. 7.8 ounces ready to fly. The balance point is right at 25%, which is slightly aft of where I like it. I prefer 15%-20%, but oh well. Hang test came out fine, though.

Almost ready to fly:


The Last Act Mark

batjac- Diamond Member


Posts : 2373
Join date : 2013-05-22
Age : 61
Location : Broken Arrow, OK, USA
 Re: A quick project to knock out.
Looking great,
hope you weren't serious about not flying it.
hope you weren't serious about not flying it.

dirk gently- Gold Member

- Posts : 430
Join date : 2012-02-03
Age : 42
Location : Poznań
 Re: A quick project to knock out.
dirk gently wrote:Looking great,
hope you weren't serious about not flying it.
Not really. I'll fly it when we get out of this shelter in place B.S.
The Had-It Mark

batjac- Diamond Member


Posts : 2373
Join date : 2013-05-22
Age : 61
Location : Broken Arrow, OK, USA
 Re: A quick project to knock out.
Bump for RSV1Bob...Bob, I know you have a thing for Hellcats.
Mark did a sweet job with this.
Oh, and the Brodak kit that could easily be massaged into a Hellcat:
https://brodak.com/f4f-wildcat-kit.html
Mark did a sweet job with this.
Oh, and the Brodak kit that could easily be massaged into a Hellcat:
https://brodak.com/f4f-wildcat-kit.html
_________________
Never enough time to build them all...always enough time to smash them all!
944_Jim- Diamond Member


Posts : 2022
Join date : 2017-02-08
Age : 59
Location : NE MS
 Re: A quick project to knock out.
944_Jim wrote:Bump for RSV1Bob...Bob, I know you have a thing for Hellcats.
Mark did a sweet job with this.
Oh, and the Brodak kit that could easily be massaged into a Hellcat:
https://brodak.com/f4f-wildcat-kit.html
Thanks Jim, ordered one immediately! Something even I can build. Shakey hands, eighty four year old brain, stumbling, bumbling dummy that I am.
Bob

rsv1cox- Top Poster


Posts : 11238
Join date : 2014-08-18
Location : West Virginia
 Re: A quick project to knock out.
Beautiful plane.
firstwordisee- Gold Member


Posts : 147
Join date : 2021-11-01
Location : Descanso CA
Page 1 of 2 • 1, 2 
 Similar topics
» A quick evening’s project.
» Cox Mercedes W196 TD Knock-Off Nut
» A quick side trip
» Quick or slow set epoxy
» Well, that was quick. Two Wen Mac .049's arrive
» Cox Mercedes W196 TD Knock-Off Nut
» A quick side trip
» Quick or slow set epoxy
» Well, that was quick. Two Wen Mac .049's arrive
Page 1 of 2
Permissions in this forum:
You cannot reply to topics in this forum

 Rules
Rules


