Log in
Search
Latest topics
» Funny what you find when you go lookingby rsv1cox Today at 9:18 am
» My latest doodle...
by batjac Today at 1:36 am
» My N-1R build log
by roddie Yesterday at 6:54 pm
» Brushless motors?
by rsv1cox Yesterday at 6:40 pm
» Free Flight Radio Assist
by rdw777 Yesterday at 6:03 pm
» Tribute Shoestring build
by amurphy6812 Yesterday at 5:43 pm
» Cox 020 PeeWee rebuild questions
by LooseSpinner99 Yesterday at 5:17 pm
» Landing-gear tips
by roddie Yesterday at 11:27 am
» My current avatar photo
by GallopingGhostler Fri Nov 15, 2024 7:39 pm
» It's the X Wing that has a canard
by rdw777 Fri Nov 15, 2024 6:58 pm
» music vids.. some of your favorites
by Kim Thu Nov 14, 2024 3:28 pm
» New Model Build
by bsadonkill Thu Nov 14, 2024 1:19 pm
Cox Engine of The Month
Scientific Stunt Master........What was he thinking?
Page 1 of 1
 Scientific Stunt Master........What was he thinking?
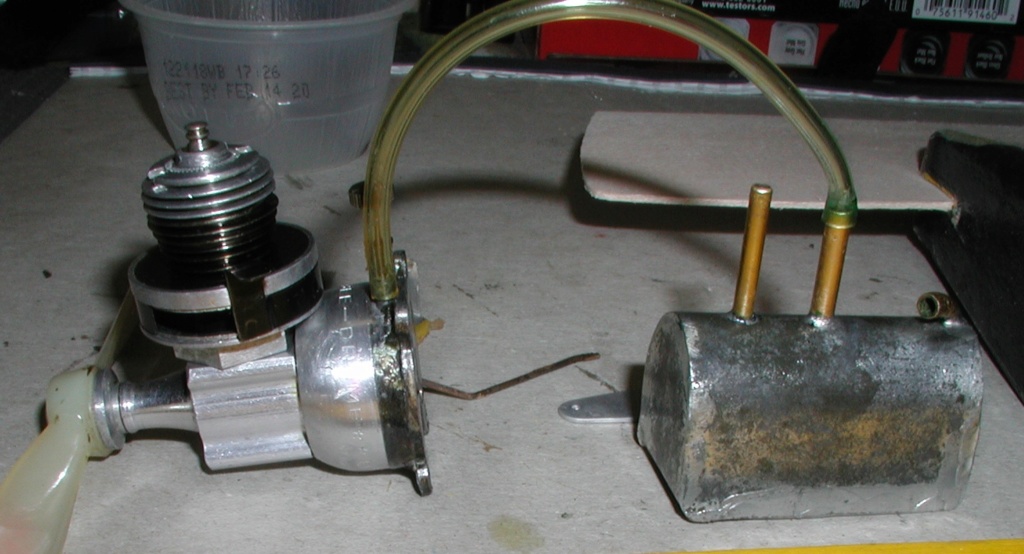
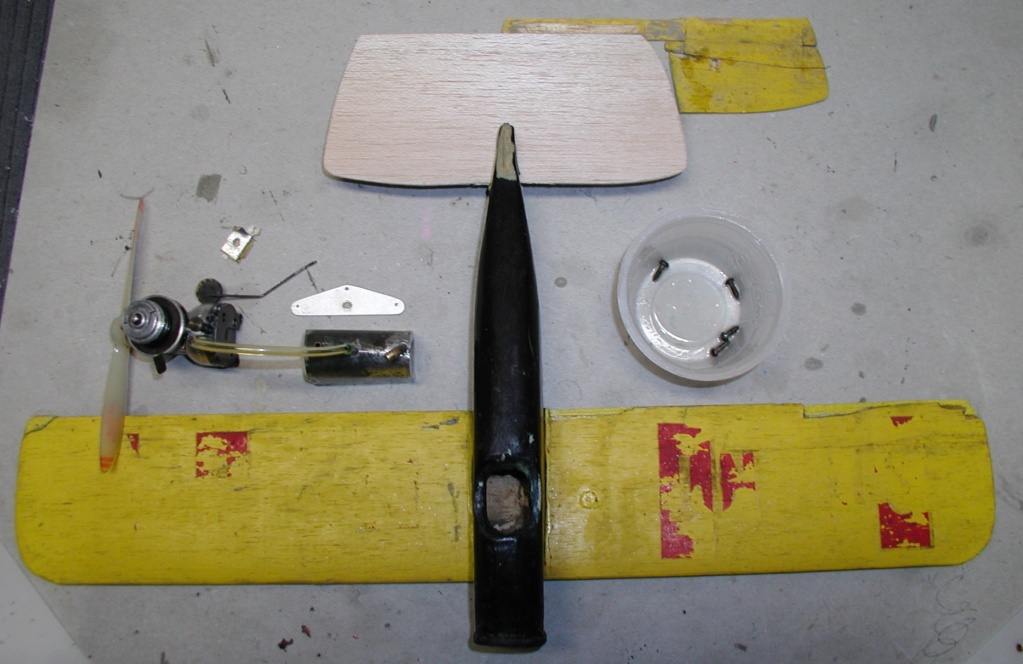
As discussed before. Fuel tank stuck in the middle with a line from the tank to the QZ.

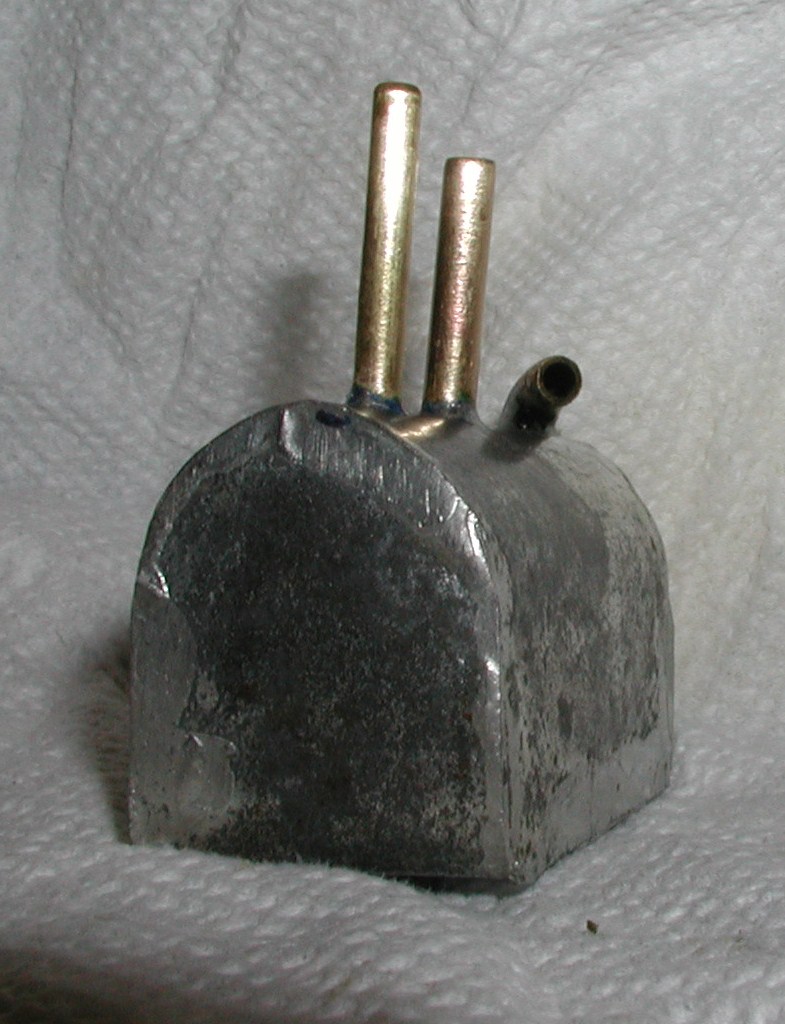
Nice tank. Custom built? Ram air opening, plus two tubes - the forward one flush with the top of the tank, the rear pickup tube extending to the bottom. Fuel tubing attached to the pickup.

The tank is located directly above the wing, but even with a correct CG I doubt with a full tank (est. 1+ oz) it would ever leave the ground even if the engine would draw fuel from the tank. Maybe so, maybe not.
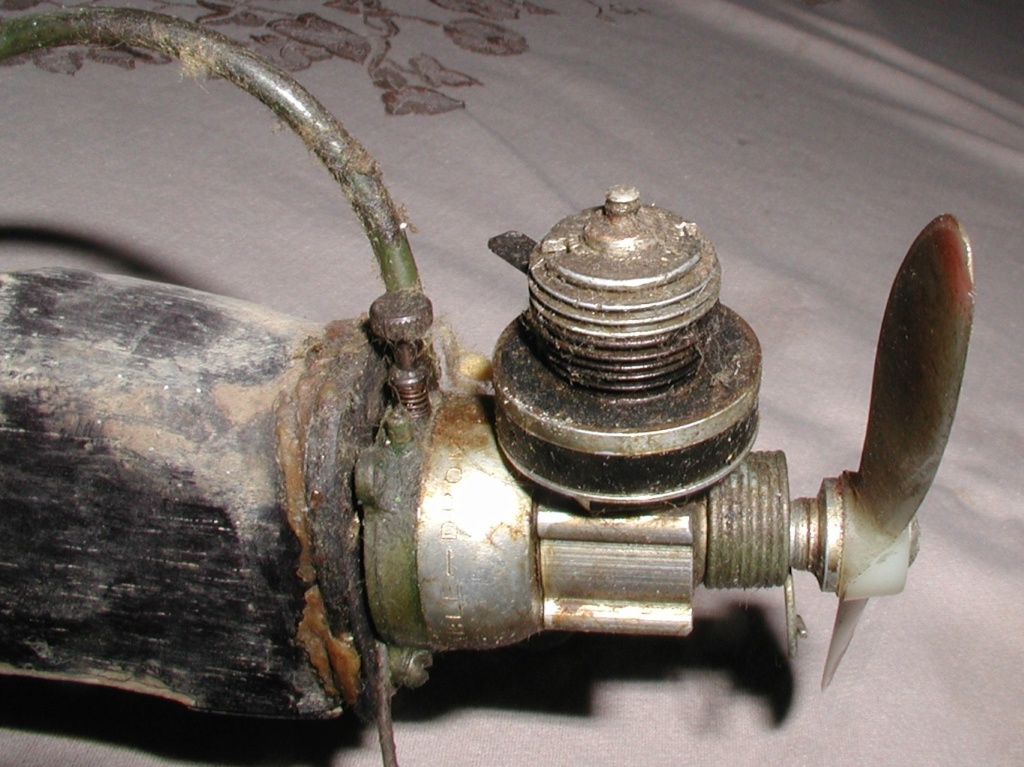
I have cleaned the engine and ran Simple Green through the tank followed by a hot water rinse. All came out clean leading me to believe the tank was never fueled. Usually Simple Green emulsifies coagulated fuel and it comes out in black lumps, none of that.


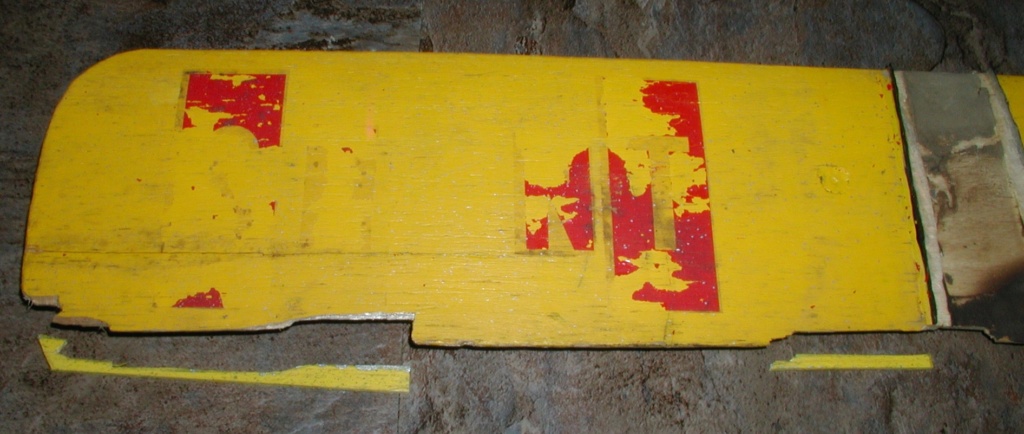
I have decided to re-install the tank, clean the engine and leave the rest of the plane as found. Almost. I cleaned the air frame with Simple Green and a clear water wipe. It removed most of the grime while leaving the patina. I cut some replacement balsa pieces, painted them lustrekote yellow and distressed a bit with black over-spray. Still a lot to do.
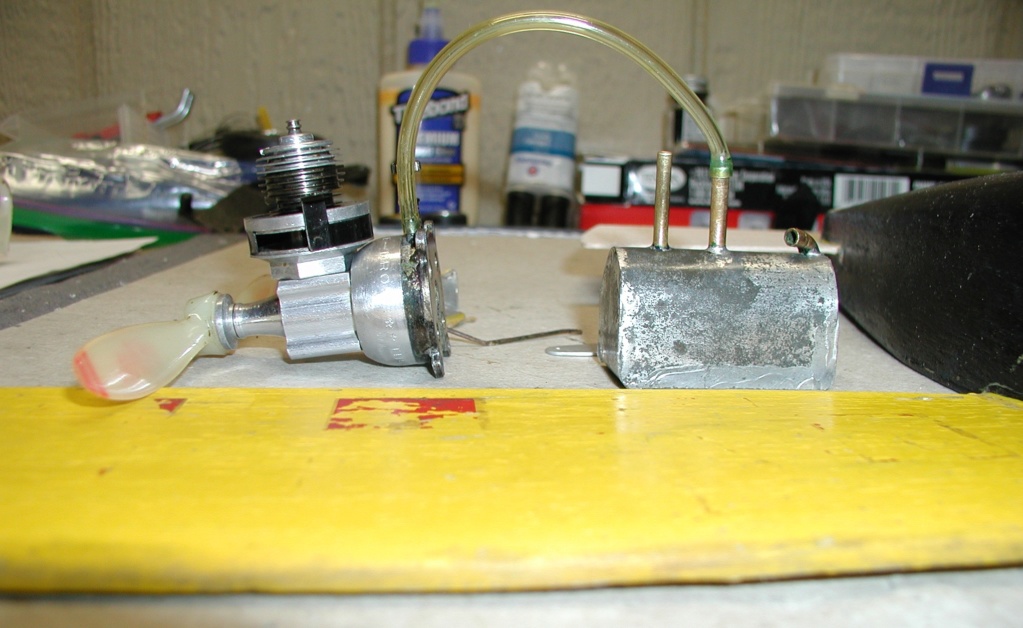
Bob

Nice tank. Custom built? Ram air opening, plus two tubes - the forward one flush with the top of the tank, the rear pickup tube extending to the bottom. Fuel tubing attached to the pickup.

The tank is located directly above the wing, but even with a correct CG I doubt with a full tank (est. 1+ oz) it would ever leave the ground even if the engine would draw fuel from the tank. Maybe so, maybe not.
I have cleaned the engine and ran Simple Green through the tank followed by a hot water rinse. All came out clean leading me to believe the tank was never fueled. Usually Simple Green emulsifies coagulated fuel and it comes out in black lumps, none of that.


I have decided to re-install the tank, clean the engine and leave the rest of the plane as found. Almost. I cleaned the air frame with Simple Green and a clear water wipe. It removed most of the grime while leaving the patina. I cut some replacement balsa pieces, painted them lustrekote yellow and distressed a bit with black over-spray. Still a lot to do.


Bob

rsv1cox- Top Poster


Posts : 11234
Join date : 2014-08-18
Location : West Virginia
 Re: Scientific Stunt Master........What was he thinking?
Amazing Bob. She looks great. I am honestly shocked how well the Simple Green works. I just may have to try it sometime. The restoration is coming along looking well.

NEW222- Top Poster

- Posts : 3896
Join date : 2011-08-13
Age : 46
Location : oakbank, mb
 Re: Scientific Stunt Master........What was he thinking?
Good going, Bob, it looks great and on its way to restoration. I find it interesting that there were two half-A Stunt Masters, first from the 1950's was hollow log, the 1960 second one was built up with plastic turtle deck.
Photos from E-Bay: E-Bay #123596628641, Scientific Stunt Master model airplane u-control
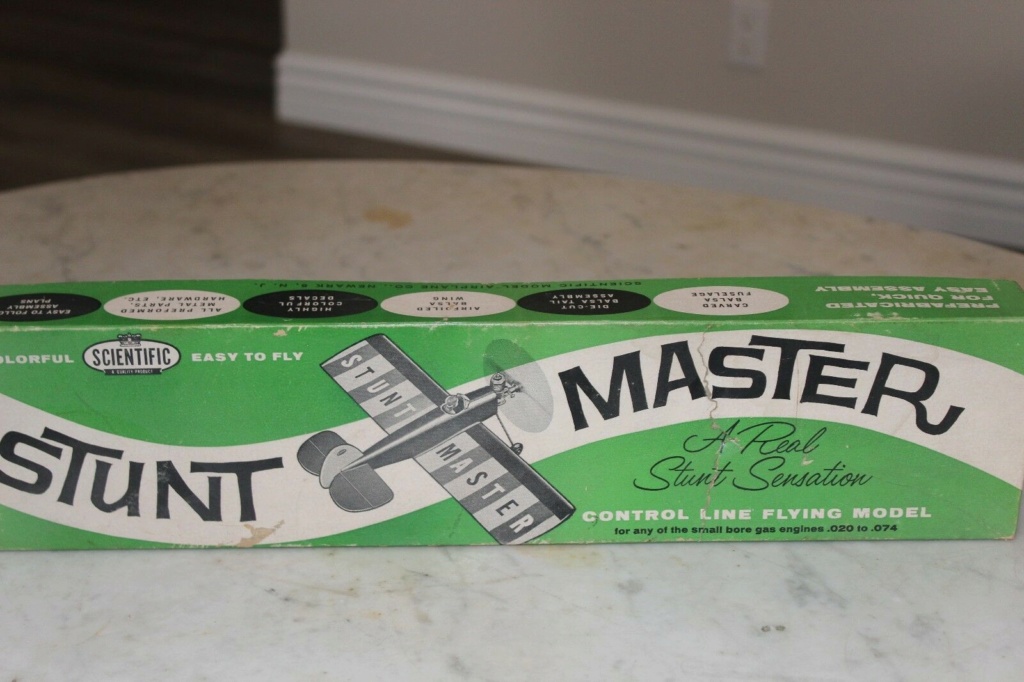
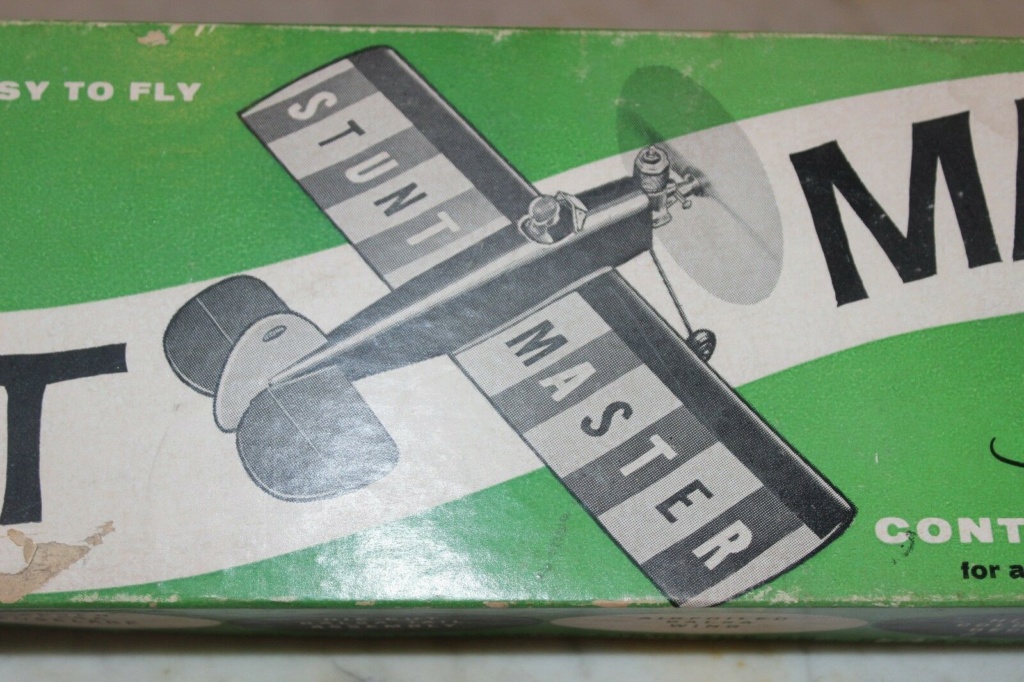

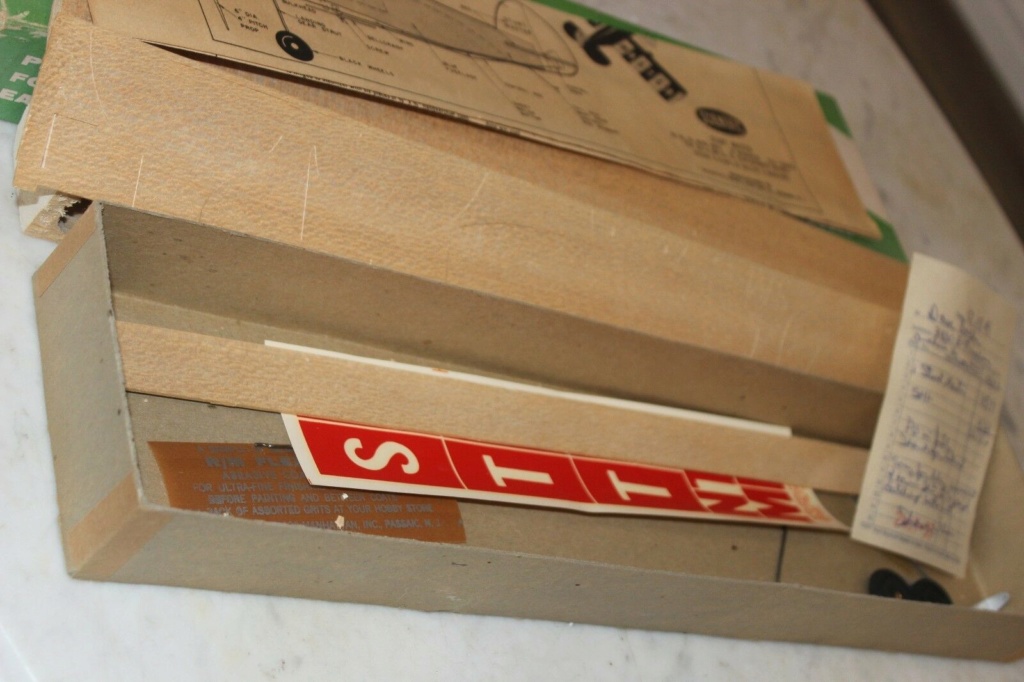
An interesting note is that earlier decal set attempted to get the most bang for the buck by including a red full panel for the white letters, but for the white panels included the red letter only, to be put on a white painted wing with a red painted leading edge panel across the wing. It was probably the same for the later version, I imagine.
AeroFred: Baby Stunt Master (later version)
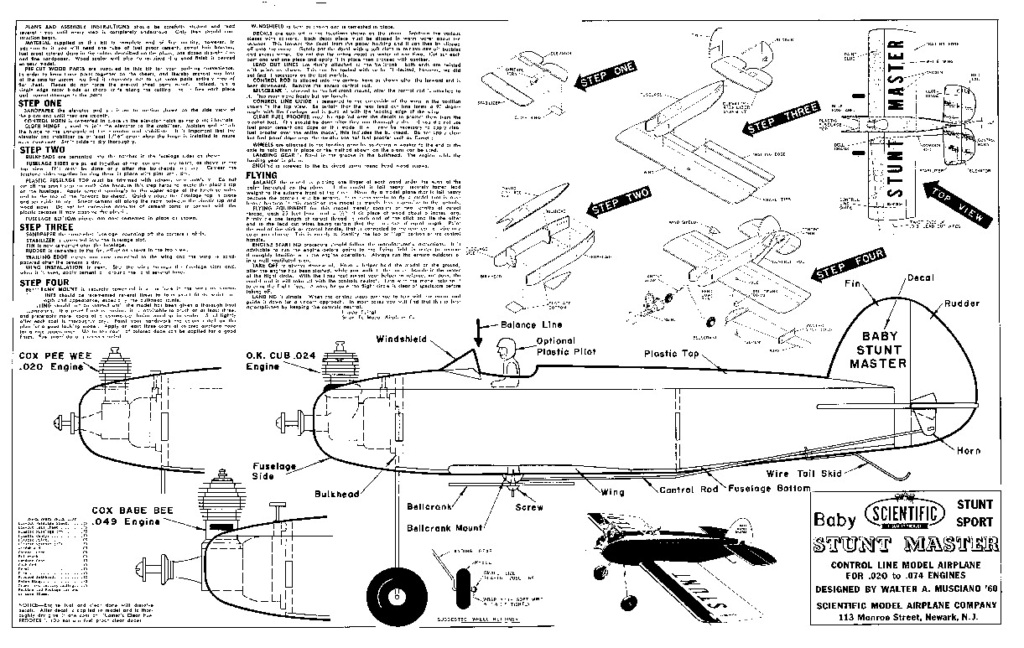
Given its small wingspan of only 16 inches (406 mm), even with wider chord, on a .049 it probably wasn't much of a stunter. Perhaps under Pee Wee power and built light might have better luck. Having never flown one, I can't say for sure but that's my impressions.
Photos from E-Bay: E-Bay #123596628641, Scientific Stunt Master model airplane u-control


An interesting note is that earlier decal set attempted to get the most bang for the buck by including a red full panel for the white letters, but for the white panels included the red letter only, to be put on a white painted wing with a red painted leading edge panel across the wing. It was probably the same for the later version, I imagine.
AeroFred: Baby Stunt Master (later version)

Given its small wingspan of only 16 inches (406 mm), even with wider chord, on a .049 it probably wasn't much of a stunter. Perhaps under Pee Wee power and built light might have better luck. Having never flown one, I can't say for sure but that's my impressions.

GallopingGhostler- Top Poster


Posts : 5714
Join date : 2013-07-13
Age : 70
Location : Clovis NM or NFL KC Chiefs
 Re: Scientific Stunt Master........What was he thinking?
Yes Chancey, SG works great to remove caked on castor and dirt. I use the concentrated not the household diluted. One to two hour soak usually does it. Never leave it in too long as it will turn aluminum black, not easily removed. Same for the back plate. I dump the engine in whole, then disassemble. Comes apart easier but a small application of heat doesn't hurt. Then I put the parts back in SG and stir and brush where needed then rinse in hot water.
And George, yes, the SM came as a Baby SM and SM. Then the built up wing Super. The baby has a 16" wing, the SM 18". The only plans available (thanks Ron) are for the B SM so when building the tail sections I just scaled up. I have them cut out, just need to seal and paint.
I would like to fly it when finished or have my son with the center tank installed but not fueled. After that, I may try filling the tank per suggestions in a different thread just to see if it will fly with a full fuel load and draw fuel.
Bob
BTW - The prop (pictured above) came out quickly as SG will remove paint and almost everything else, witness the Cox Pinto. That engine was painted silver at the factory and the PO had painted (badly) some parts gold. All removed by SG. Wear gloves. I usually don't then pay the price. I just can't get the proper grip on things with gloves.

rsv1cox- Top Poster


Posts : 11234
Join date : 2014-08-18
Location : West Virginia
 Re: Scientific Stunt Master........What was he thinking?
Bob,
I like that tank! It is almost what I need for the Scientific P-40 Red Tiger.
However, I believe your vertical tubes are fill and vent, and the curved on is your fuel pickup. Not that it matters for a show piece.
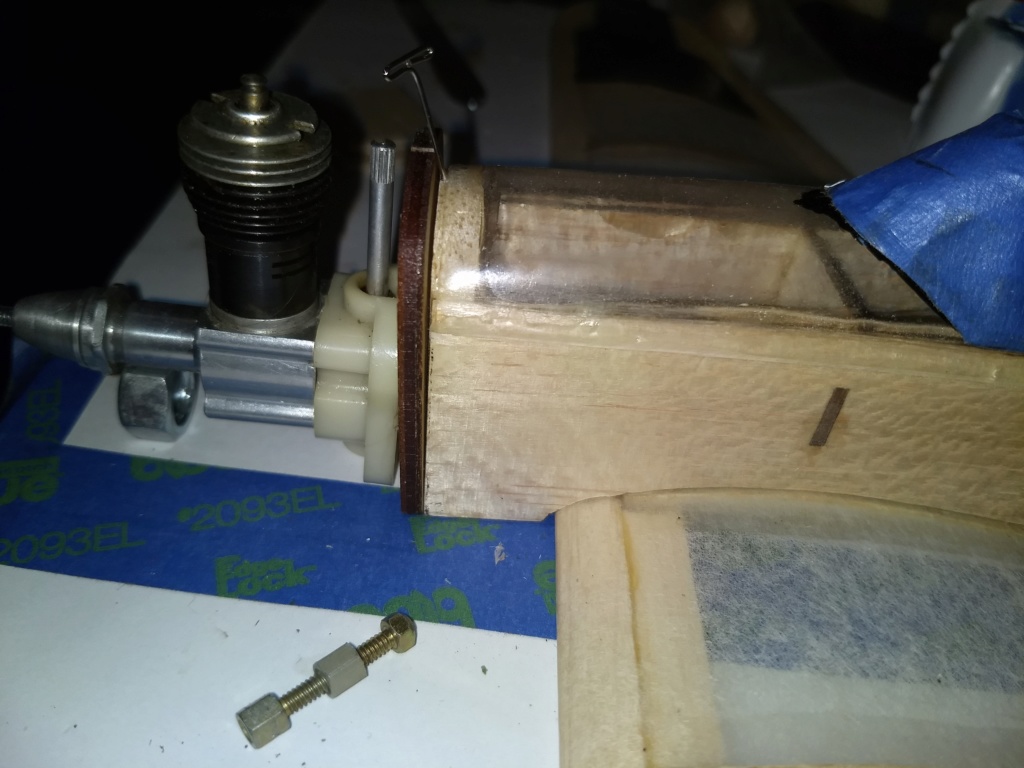
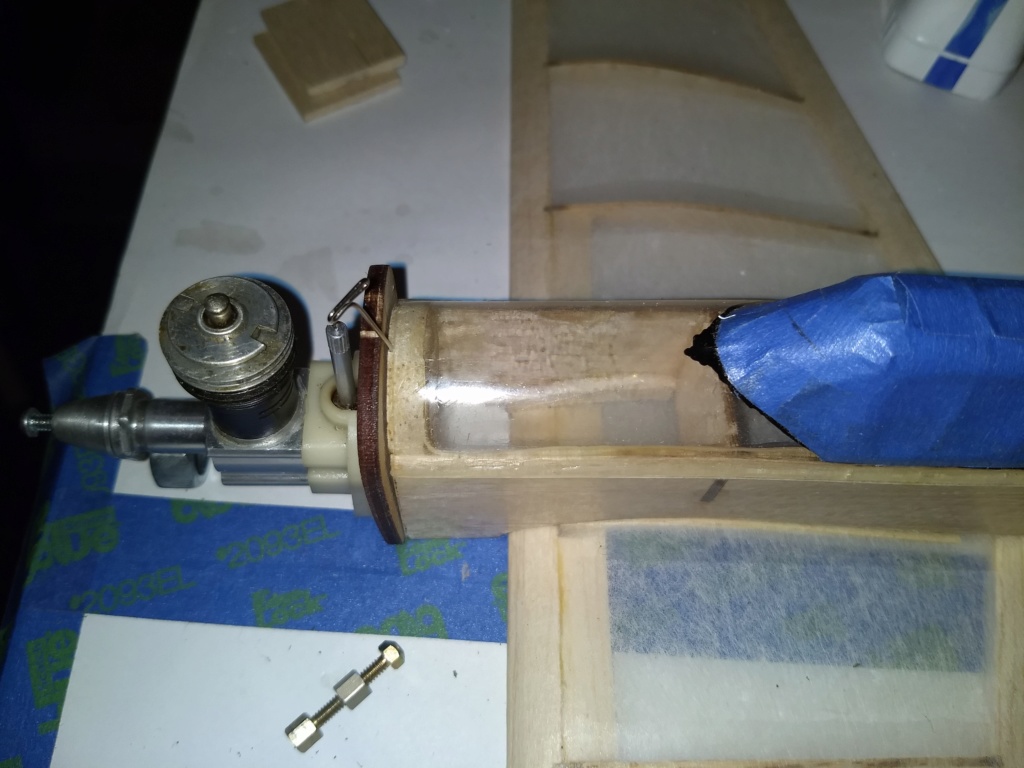
Can you provide a couple of shots of the tank? Are there any rolled seams along the front/back plates? Or was the curved top/sides just formed around a folded bottom/ends and very carefully soldered?
Like I mentioned, this is really close to what I need for the Red Tiger, except I need to bottom feed the pickup:


944_Jim- Diamond Member


Posts : 2022
Join date : 2017-02-08
Age : 59
Location : NE MS
 Re: Scientific Stunt Master........What was he thinking?
Well, if my goal was to trash this thing up, I'm achieving it in spades.
I changed my mind about stripping and sanding and trying to make something out of it. Too much work. So, as I said above, I'm leaving it "as found" as far that goes.
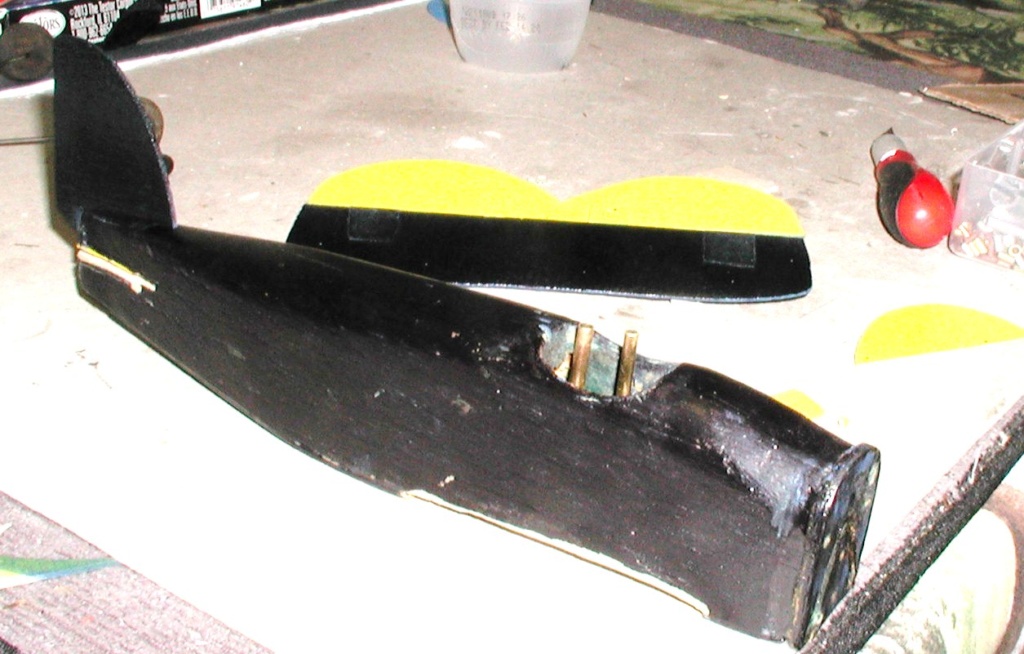
But, I would like to fly it and I'm having issues with positioning the lead-out guide. Most bell-crank pivots are positioned well toward the leading edge of the wing, but this one is about mid-way. Should I position the guide accordingly or more toward the leading edge? Also should I maintain the distance between the lead-out holes on the bell-crank and the guide or constrict them somewhat?

I know there is some sort of science about this.
I changed my mind about stripping and sanding and trying to make something out of it. Too much work. So, as I said above, I'm leaving it "as found" as far that goes.

But, I would like to fly it and I'm having issues with positioning the lead-out guide. Most bell-crank pivots are positioned well toward the leading edge of the wing, but this one is about mid-way. Should I position the guide accordingly or more toward the leading edge? Also should I maintain the distance between the lead-out holes on the bell-crank and the guide or constrict them somewhat?

I know there is some sort of science about this.

rsv1cox- Top Poster


Posts : 11234
Join date : 2014-08-18
Location : West Virginia
 Re: Scientific Stunt Master........What was he thinking?
944_Jim wrote:Bob,
I like that tank! It is almost what I need for the Scientific P-40 Red Tiger.
However, I believe your vertical tubes are fill and vent, and the curved on is your fuel pickup. Not that it matters for a show piece.
Can you provide a couple of shots of the tank? Are there any rolled seams along the front/back plates? Or was the curved top/sides just formed around a folded bottom/ends and very carefully soldered?
Like I mentioned, this is really close to what I need for the Red Tiger, except I need to bottom feed the pickup:
]
I like that Red Tiger Jim. Nice taunt silk span always impresses.
It looks like the tank is custom made, and not too bad either.
As I mentioned the forward tube only goes inside the tank a little way. I know this from filling and draining with cleaner. The aft tube seems to be the pick-up as it goes all the way to the bottom, again verified in the cleaning process.
The large tube at the back only goes in part way, not all the way to the bottom.

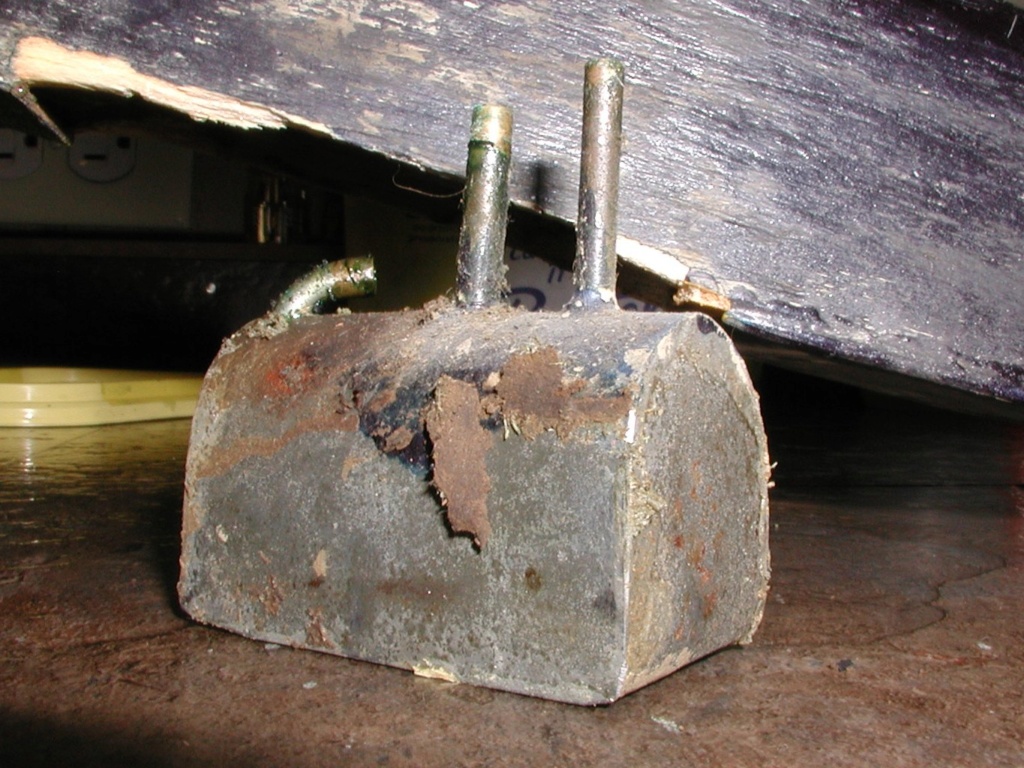

Best pictures that I have, let me know if you would like a different view.
Bob

rsv1cox- Top Poster


Posts : 11234
Join date : 2014-08-18
Location : West Virginia
 Re: Scientific Stunt Master........What was he thinking?
The bellcrank position is not a determining factor as to where the leadouts exit the wing. Just put the guides where the plans suggest. When you run your leadouts they will follow the line of the guide. It should work fine. That’s what I would do

Cribbs74- Moderator


Posts : 11907
Join date : 2011-10-24
Age : 50
Location : Tuttle, OK
 Re: Scientific Stunt Master........What was he thinking?
I don't think the tank plumbing scheme as demonstrated in photo of the clean QZ will draw. I like the mailbox tank though. If it is clean an properly plumbed on inside, I would use it with a horseshow back plate Bee on the MSM. The clean QZ looks nice enough to go in display cabinet.

ticomareado- Account Under Review
- Posts : 1089
Join date : 2013-10-03
Location : NC
 Re: Scientific Stunt Master........What was he thinking?
RE: Bell crank position relative to LE. Once you include the separate glue on "wing widening" panels in total chord, the bell crank pivot will look more "natural".

ticomareado- Account Under Review
- Posts : 1089
Join date : 2013-10-03
Location : NC

Cribbs74- Moderator


Posts : 11907
Join date : 2011-10-24
Age : 50
Location : Tuttle, OK
 Re: Scientific Stunt Master........What was he thinking?
Who ever made that tank as crude as it looks probably was very proud in its construction. That was the nice thing about the hobby back then. I guess I was more of a perfectionist in school and shot for the best looking finish, learned to use sanding sealer, sanding, color doping, masking for 2 tone, etc.
Personally I don't know if I'd ever want to have extended flights on a half-A with limited wing area and fast flights on 30 to 35 foot lines doing 2.5 to 3 seconds per lap. Using a Babe Bee with its shorter 5 cc attached tank made me dizzy enough after a flight.
That home made tank looks like it would make a normal 2.5 minute flight into 7 or more minutes.
I can handle 5 minutes of 4.5 - 5 second a lap flight on longer lines and larger aircraft, not near as dizzying.
Personally I don't know if I'd ever want to have extended flights on a half-A with limited wing area and fast flights on 30 to 35 foot lines doing 2.5 to 3 seconds per lap. Using a Babe Bee with its shorter 5 cc attached tank made me dizzy enough after a flight.
That home made tank looks like it would make a normal 2.5 minute flight into 7 or more minutes.

I can handle 5 minutes of 4.5 - 5 second a lap flight on longer lines and larger aircraft, not near as dizzying.


GallopingGhostler- Top Poster


Posts : 5714
Join date : 2013-07-13
Age : 70
Location : Clovis NM or NFL KC Chiefs
 Re: Scientific Stunt Master........What was he thinking?
Just a bit of blue over-spray Ron, gone now but it did cause me to take a second look. I had filled the tank with water, blocked off two ports and blew into the other finding no leaks. Not that I ever intend to use it. I still think it wouldn't get off the ground with a full tank, but I would like to know if it would work. Agreeing with George though, just not practical.
I decided to wing it on that lead-out guide, positioned it in-line with the bell crank and constricted the line spacing a bit.
Still have some filler to apply and age the whole thing some more. The fuselage cleaned up too good making the wing look worse than it is if that's possible. It's more black than blue.


I made the guide out of left-overs from the tail section, saved the bell crank and control horn but had to make the tail section from on-hand balsa. All eye ball. Not pretty or intended to be.
Bob
I decided to wing it on that lead-out guide, positioned it in-line with the bell crank and constricted the line spacing a bit.
Still have some filler to apply and age the whole thing some more. The fuselage cleaned up too good making the wing look worse than it is if that's possible. It's more black than blue.


I made the guide out of left-overs from the tail section, saved the bell crank and control horn but had to make the tail section from on-hand balsa. All eye ball. Not pretty or intended to be.
Bob
Last edited by rsv1cox on Fri Feb 01, 2019 9:54 am; edited 1 time in total

rsv1cox- Top Poster


Posts : 11234
Join date : 2014-08-18
Location : West Virginia
 Re: Scientific Stunt Master........What was he thinking?
From that pic the bellcrank looks big or the wing has little area ? but either way not looking bad and if you think about it most people would have took the engine off and trashed the rest !! Nice save Bob ! 


getback- Top Poster


Posts : 10434
Join date : 2013-01-18
Age : 67
Location : julian , NC
 Re: Scientific Stunt Master........What was he thinking?
ticomareado wrote:RE: Bell crank position relative to LE. Once you include the separate glue on "wing widening" panels in total chord, the bell crank pivot will look more "natural".
Yes, The model came without them and I was trying to keep it as found, a losing effort. So, I think I'm going to add them. More lift and it would look better.
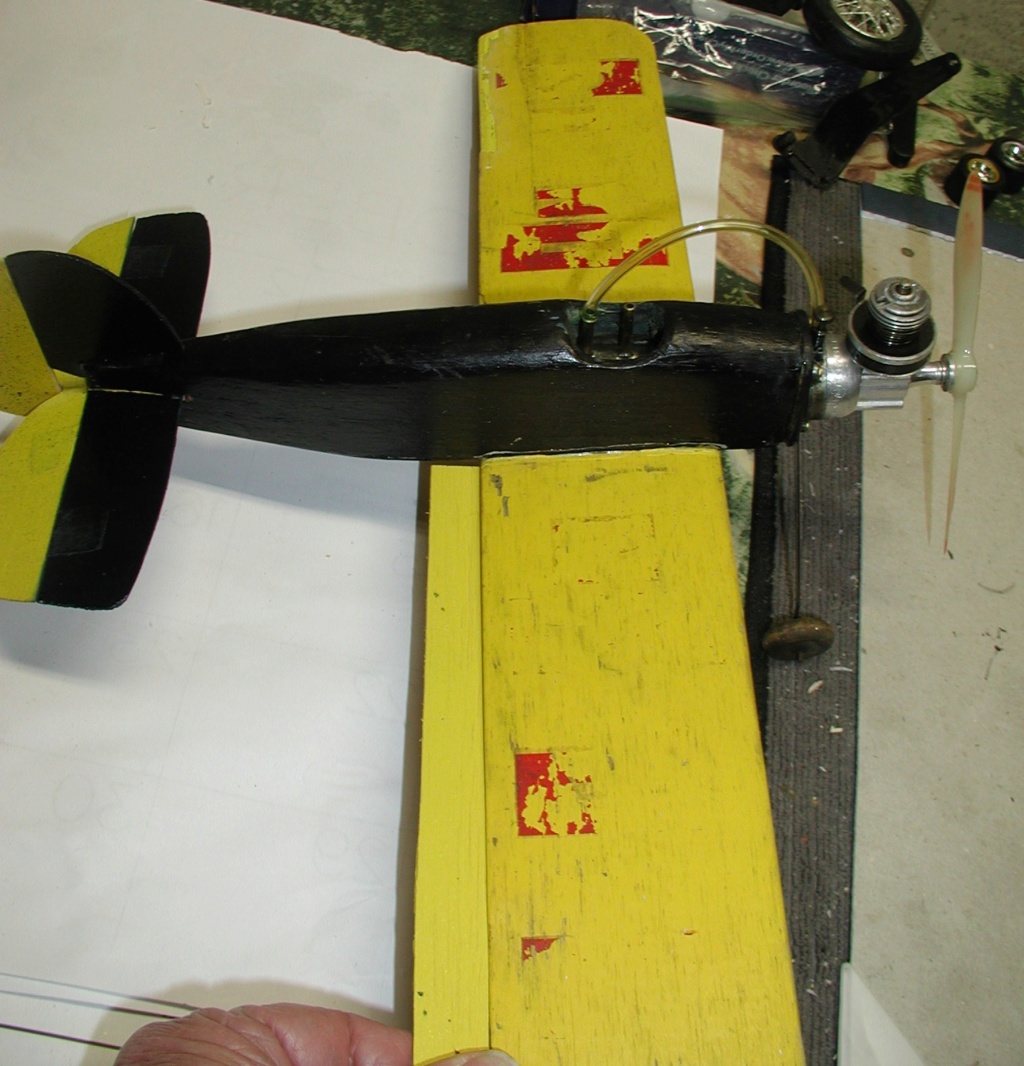
For better or worse for now it's finished. I saved all the old parts that came with it, only some balsa is new. Same engine, only clean with new gaskets.
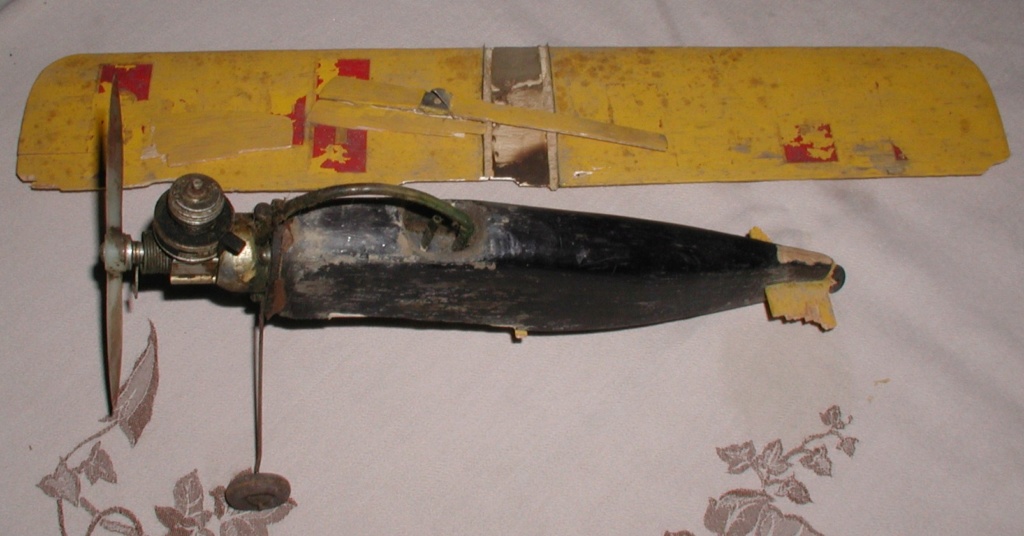
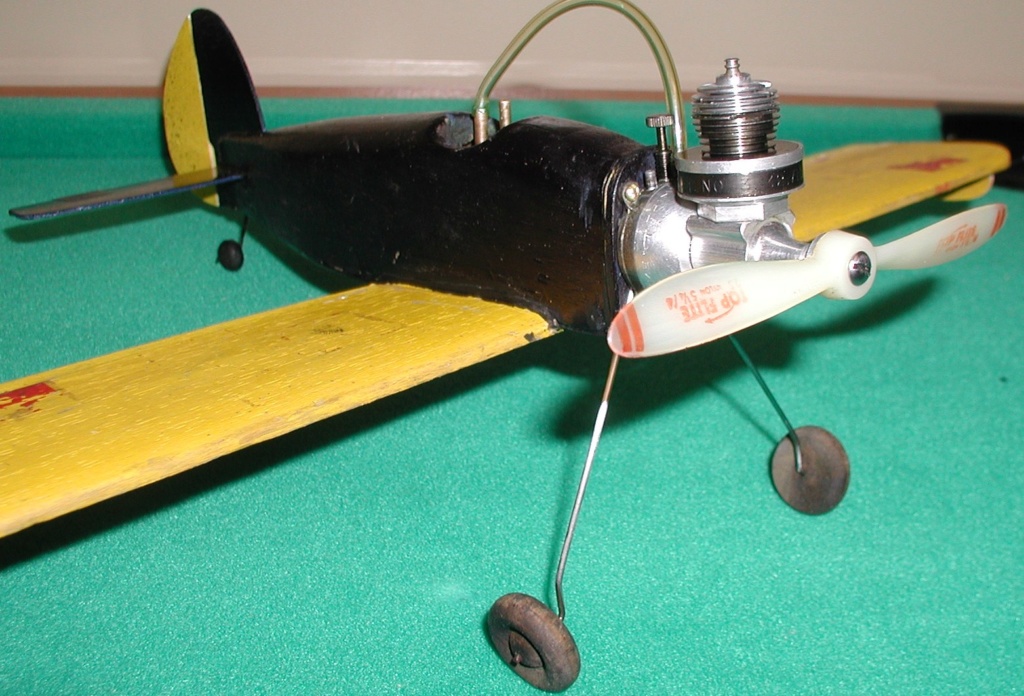
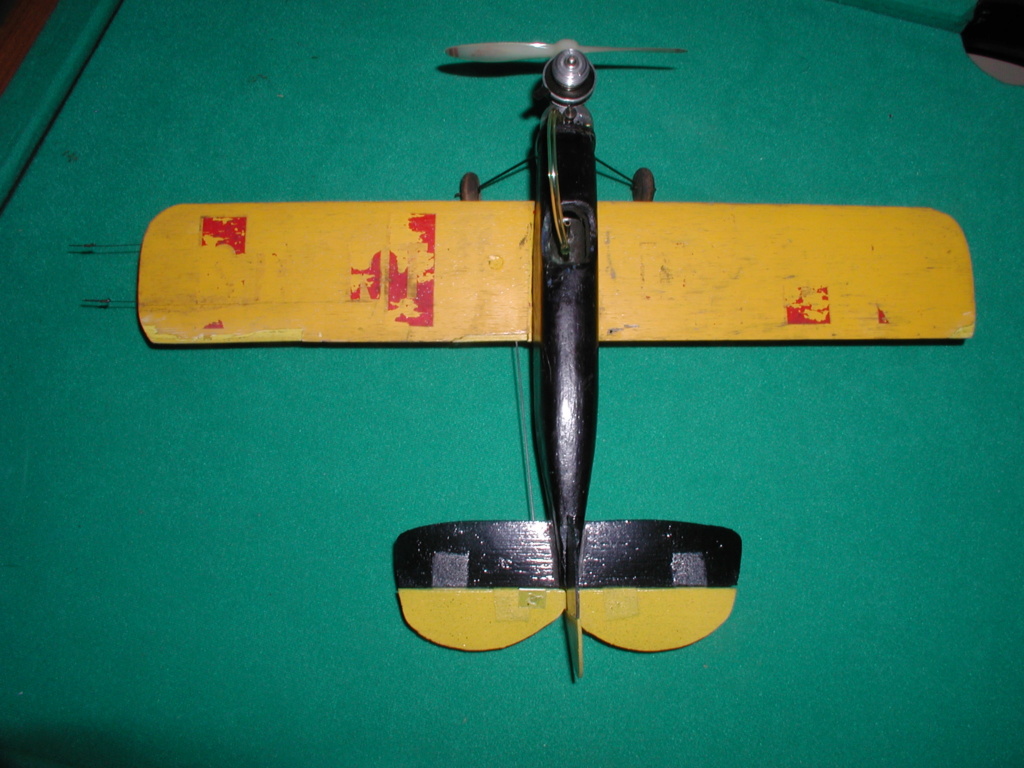
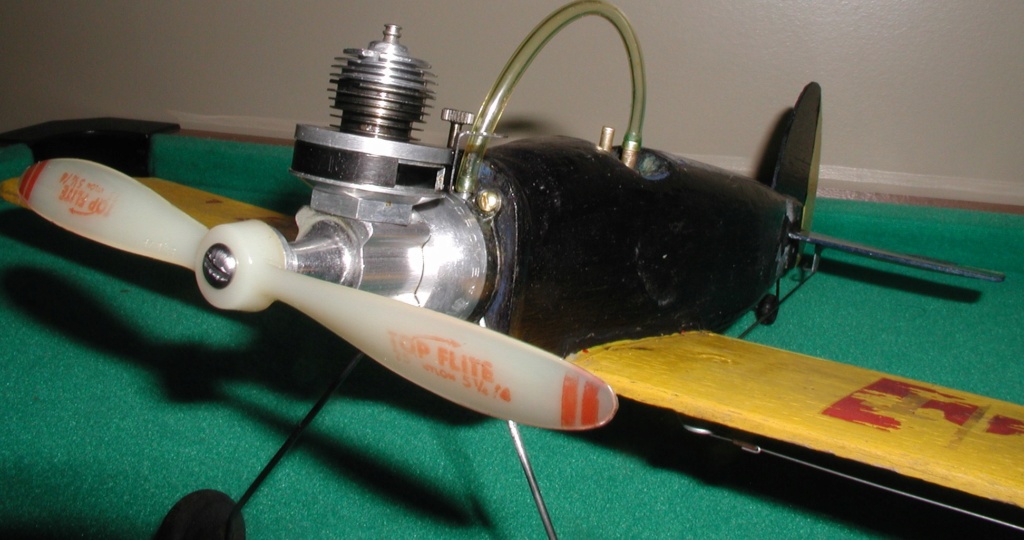
A fun, no stress project.
Bob
Edit add:
According to another bolt pattern on the firewall, it once flew with a triangle mount engine. Also there is a hole in the firewall for fuel line probably leading back to a tank in the fuselage.

rsv1cox- Top Poster


Posts : 11234
Join date : 2014-08-18
Location : West Virginia
 Stunt Master
This thread was really interesting and brought back many memories of these Scientific kits. I loved the Super Stunt Master, even had all three of them at one time. Seems that the S.S.M. flew the best of all three. You know, I haven't flown 1/2 A in many years now, even still have all my original plans from my Scientific days put away. While it is still winter up here, I just may put together another fleet of Stunt Masters for this summer. Thanks for the great restoration on plane from an era that we won't see again. I do hope you have fun flying it.

Eddy- Silver Member

- Posts : 94
Join date : 2018-04-29
Age : 80
Location : Portage, Michigan
 Re: Scientific Stunt Master........What was he thinking?
Hi Eddy, Thanks for the comments and I'm glad that you enjoyed it. Looking forward to seeing your SM builds posted here.
Looking at it, I realized that it's not finished. I want to add those wing extenders and a windshield and maybe touch it up a bit. I was surprised at how well the fuselage cleaned up. I used Simple Green wiped on. I just had to remove the rubberized glue around the firewall and epoxy. Ought to be good for a circle or two. I intentionally left off the starter spring. I don't care for them and they detract from the look of the engine.
It will be flown and it balances well.
Bob

rsv1cox- Top Poster


Posts : 11234
Join date : 2014-08-18
Location : West Virginia
 Re: Scientific Stunt Master........What was he thinking?
getback wrote:From that pic the bellcrank looks big or the wing has little area ? but either way not looking bad and if you think about it most people would have took the engine off and trashed the rest !! Nice save Bob !
Thanks Eric, It was a labor of love.
The bell crank came on the plane, probably original to the kit.
Bob

rsv1cox- Top Poster


Posts : 11234
Join date : 2014-08-18
Location : West Virginia
 Re: Scientific Stunt Master........What was he thinking?
The triangular mounting is from a OK cub. It uses the same spacing as a bee aside from the lower mounting hole.

Ken Cook- Top Poster

- Posts : 5635
Join date : 2012-03-27
Location : pennsylvania
 Re: Scientific Stunt Master........What was he thinking?
Wow. She srur is a thing of beauty there Bob. Another great restoration / bring back to life plane and engine combonation.

NEW222- Top Poster

- Posts : 3896
Join date : 2011-08-13
Age : 46
Location : oakbank, mb
 Similar topics
» Scientific Circle Master
» Thinking of a .35 style balsa stunt kit?
» Scientifc Stunt Trainer
» COX Flight Contest: What's Your Entry?
» thinking of a new project
» Thinking of a .35 style balsa stunt kit?
» Scientifc Stunt Trainer
» COX Flight Contest: What's Your Entry?
» thinking of a new project
Page 1 of 1
Permissions in this forum:
You cannot reply to topics in this forum

 Rules
Rules


