Log in
Search
Latest topics
» Purchased the last of any bult engines from Ken Enyaby getback Today at 7:24 am
» My N-1R build log
by rsv1cox Today at 7:05 am
» Funny what you find when you go looking
by rsv1cox Yesterday at 3:21 pm
» Landing-gear tips
by 1975 control line guy Yesterday at 8:17 am
» Cox NaBOO - Just in time for Halloween
by rsv1cox Tue Nov 19, 2024 6:35 pm
» Canada Post strike - We are still shipping :)
by Cox International Tue Nov 19, 2024 12:01 pm
» Duende V model from RC Model magazine 1983.
by getback Tue Nov 19, 2024 6:08 am
» My current avatar photo
by roddie Mon Nov 18, 2024 9:05 pm
» My latest doodle...
by TD ABUSER Mon Nov 18, 2024 11:30 am
» Brushless motors?
by rsv1cox Sun Nov 17, 2024 6:40 pm
» Free Flight Radio Assist
by rdw777 Sun Nov 17, 2024 6:03 pm
» Tribute Shoestring build
by amurphy6812 Sun Nov 17, 2024 5:43 pm
Cox Engine of The Month
Best $2 I spent this year
Page 1 of 1
 Best $2 I spent this year
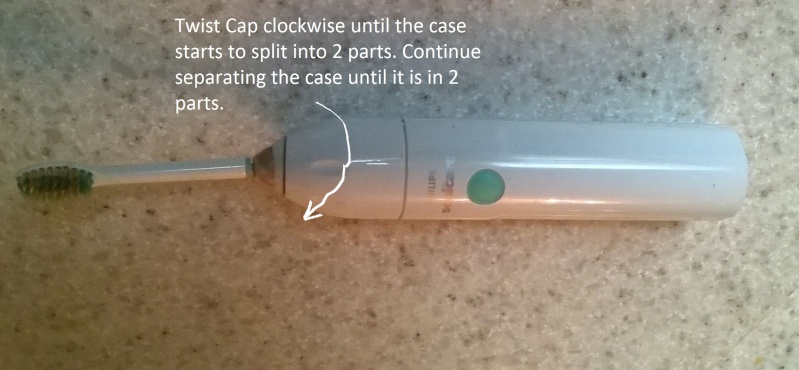
How many of you have one of these sitting in a drawer somewhere? An old electric toothbrush.

This one is a Phillips Sonic care.
The batteries were dead soon after purchasing it and Phillips sent us a replacement so this set in a drawer for more than 4 years. Until I saw an ad for replacement batteries for the toothbrush on ebay AND a video on how to open the case and replace the batteries. There are several models and several types of batteries used, but I am only showing this one model. There are video available for most types of toothbrushes and types of batteries, AA, sub C, etc.

This is the PCB after separating the 2 halves of the case,
The next part is a little tricky because the batteries were RTV'd into the case and wouldn't come out easy, so I had to remove the PCB from the batteries, 2 - AA NiCd and the 2 coils for induction pickup to charge the toothbrush and for the coil to vibrate the brush head.

CAREFULLY unsolder the shown 8 connections, Make solder is completely remover from the hole and the top and bottom of the PCB or the PCB will not separate from the components, (batteries, left coil, right coil).
After the PCB is separated from the components you will need to remove the batteries from the toothbrush case. Mine were held in with RTV and were fairly easy to remove. Be sure to save the little pins on the ends on the batteries, (+), and (-), and the strap connecting the 2 batteries together, (-) end of one battery to (+) end of other battery.
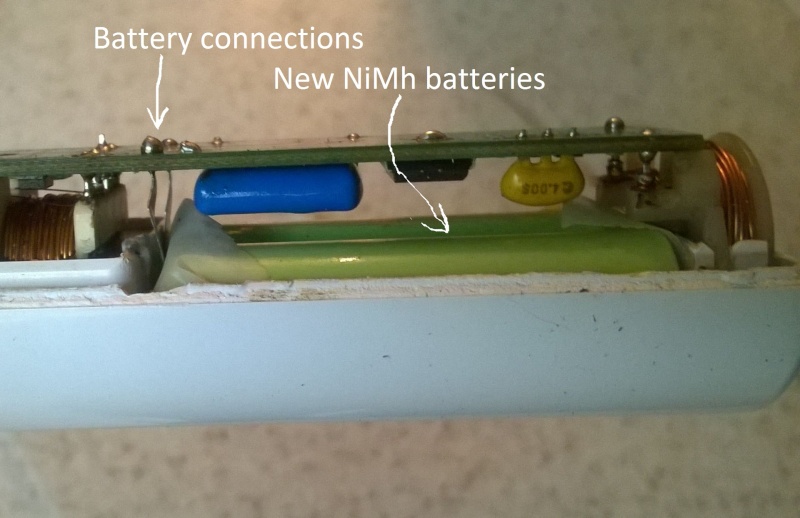
Prepare your new batteries, 2 AA either NiCd or NiMh by using the jumper and pins litke the batteries that were removed. NiMh batteries charge will last longer, but will also take a little longer to charge. The charge circuit is built into the PCB and shuts off the charge voltage when the voltage peaks at the optimum voltage determined by Phillips and the battery manufacturer. After preparing the batteries with the pins and jumper install them into the case and reinstall the PCB over the batteries and 2 coils contacts and carefully re-solder the 8 connections. I used a PCB contact cleaner to remove any excess flux residue.

Side view of the PCB and battery connections of the toothbrush.
put the 2 halves back together, charge the toothbrush and use as needed. I now have an electric brush to clean small engines.
happydad


This one is a Phillips Sonic care.
The batteries were dead soon after purchasing it and Phillips sent us a replacement so this set in a drawer for more than 4 years. Until I saw an ad for replacement batteries for the toothbrush on ebay AND a video on how to open the case and replace the batteries. There are several models and several types of batteries used, but I am only showing this one model. There are video available for most types of toothbrushes and types of batteries, AA, sub C, etc.

This is the PCB after separating the 2 halves of the case,
The next part is a little tricky because the batteries were RTV'd into the case and wouldn't come out easy, so I had to remove the PCB from the batteries, 2 - AA NiCd and the 2 coils for induction pickup to charge the toothbrush and for the coil to vibrate the brush head.

CAREFULLY unsolder the shown 8 connections, Make solder is completely remover from the hole and the top and bottom of the PCB or the PCB will not separate from the components, (batteries, left coil, right coil).
After the PCB is separated from the components you will need to remove the batteries from the toothbrush case. Mine were held in with RTV and were fairly easy to remove. Be sure to save the little pins on the ends on the batteries, (+), and (-), and the strap connecting the 2 batteries together, (-) end of one battery to (+) end of other battery.
Prepare your new batteries, 2 AA either NiCd or NiMh by using the jumper and pins litke the batteries that were removed. NiMh batteries charge will last longer, but will also take a little longer to charge. The charge circuit is built into the PCB and shuts off the charge voltage when the voltage peaks at the optimum voltage determined by Phillips and the battery manufacturer. After preparing the batteries with the pins and jumper install them into the case and reinstall the PCB over the batteries and 2 coils contacts and carefully re-solder the 8 connections. I used a PCB contact cleaner to remove any excess flux residue.

Side view of the PCB and battery connections of the toothbrush.
put the 2 halves back together, charge the toothbrush and use as needed. I now have an electric brush to clean small engines.
happydad


happydad- Rest In Peace

- Posts : 1592
Join date : 2012-05-28
Age : 79
Location : Escondido, CA
 Re: Best $2 I spent this year
Funny you brought up the cleaning engines with a electric tooth brush I have been pondering on that , be nice if you could mount a brass brush into it also . Nice repair , Thanks for showing in detail how to do this . getback 


getback- Top Poster


Posts : 10437
Join date : 2013-01-18
Age : 67
Location : julian , NC
 Vent not?
getback wrote:Funny you brought up the cleaning engines with a electric tooth brush I have been pondering on that , be nice if you could mount a brass brush into it also . Nice repair , Thanks for showing in detail how to do this . getback
Why not? Just cut off the bristles on the used brush smooth, then mount your small brass brush to the brush head with screws, or whatever is needed. My brass brush is about 1 inch wide X 2 inches long with a handle 1/2 inch thick. It would be easy to rout a slot in the brass brush handle for the toothbrush head to fit into, then screw it down with a couple of #2 metal or wood screws.
I don't know about you, but we have lots of old toothbrush heads sitting around waiting to be used for cleaning some tiny little engine part.
Go to it man.
Happydad


happydad- Rest In Peace

- Posts : 1592
Join date : 2012-05-28
Age : 79
Location : Escondido, CA
 Re: Best $2 I spent this year

 Won't that hurt your gums!!
 (rotfl jus' kiddin' jus kiddin'!
modelbuilder49- Gold Member

- Posts : 290
Join date : 2013-09-12
Age : 75
Location : Titusville Florida
 Depends
modelbuilder49 wrote:
Won't that hurt your gums!!

(rotfl jus' kiddin' jus kiddin'!

)
I guess it depends on what is left. Mostly teeth or mostly gums.

I have 3 or more toothbrush heads. 1 for deep cleaning, 1 for soft areas like gums and now an old 1 for dirty Cox engine parts. And it works great for most things. It doesn't get down inside the Venturi area well. Especially if there is a screen over the intake. If there is no screen I use a paper towel soaked in old fuel shrunk down to the size of the Venturi and squeeze it thru then run it back and forth a few times. If there is a screen over one end I try to clean from one side then spray fuel from the s reenact side into my cleaning bowel-tray to reuse the fuel.
Happydad


happydad- Rest In Peace

- Posts : 1592
Join date : 2012-05-28
Age : 79
Location : Escondido, CA
Page 1 of 1
Permissions in this forum:
You cannot reply to topics in this forum

 Rules
Rules


