Log in
Search
Latest topics
» Free Flight Radio Assist by GallopingGhostler Today at 12:54 pm
» My N-1R build log
by akjgardner Today at 12:39 pm
» Purchased the last of any bult engines from Ken Enya
by getback Today at 12:05 pm
» Funny what you find when you go looking
by rsv1cox Yesterday at 3:21 pm
» Landing-gear tips
by 1975 control line guy Yesterday at 8:17 am
» Cox NaBOO - Just in time for Halloween
by rsv1cox Tue Nov 19, 2024 6:35 pm
» Canada Post strike - We are still shipping :)
by Cox International Tue Nov 19, 2024 12:01 pm
» Duende V model from RC Model magazine 1983.
by getback Tue Nov 19, 2024 6:08 am
» My current avatar photo
by roddie Mon Nov 18, 2024 9:05 pm
» My latest doodle...
by TD ABUSER Mon Nov 18, 2024 11:30 am
» Brushless motors?
by rsv1cox Sun Nov 17, 2024 6:40 pm
» Tribute Shoestring build
by amurphy6812 Sun Nov 17, 2024 5:43 pm
Cox Engine of The Month
Scorpion - Simple trainer build
Page 2 of 2
Page 2 of 2 •  1, 2
1, 2
 Re: Scorpion - Simple trainer build
KariFS wrote:Some progress with "the Boy": I decided to paint only some red trim and leave most of it to wood colour. I was too lazy to do the scallops to the wings as per original kit and took some artistic liberties with tail feathers and cabin design too.
The wheels are held on with soldered washers, still have to dremel off some excess wire. Control linkage needs to be built too, and the motor mount is not yet attached properly. But other than that, it's pretty much done. Right now it weighs 150g or 5.3oz. CG is a little too far aft, it is right at the edge of the red area on the wing. I'll see if an extended-tank Bee with a muffler is enough to move the CG sufficiently.
I have a question: Should I add wingtip weight and if so, how much? I have a small jar of U.S. pennies, should I add one or two?
Here's a couple of pics:
Very nice build

CHELLIE- Bronze Member

- Posts : 34
Join date : 2015-04-30
Location : High Desert California
 Re: Scorpion - Simple trainer build
roddie wrote:
Hard to say how much outboard tip-weight would be adequate. Once your lead-outs are installed, you'll have a better idea. Are you planning on running your main-lines through the guide and attaching directly to the bellcrank? That would be the lightest weight to offset on the outboard wing-tip.
You could make a simple adjustable lead-out guide.. not necessary, but convenient. I've built "comb" type guides which are fairly simple and lightweight. It can help with flight-trimming.
Thanks again Roddie. I already made a fixed lead out guide. My lead-outs are made from thin steel wire and the pushrod is steel too. I'll post some pics later. I bought some fishing lure attachment thingys for lead-outs for the other plane, the Scorpion, they are about 10" steel cables with loops and clips in the ends, tested for 40lbs.
That adjustable arrangement looks convenient, and it is certainly worth considering. My first two planes have fixed guides, positioned according to the plans. The one on the Scorpion is long enough so that I can drill more holes if necessary. The guides are pretty far back as both planes have a lot of rudder offset. This may hurt the performance but these are my first planes and I don't mind if they are a little sluggish, I just don't want them to turn in. My balance and coordination suck, I can't dance and I'm lousy at sports in general so I have to play it safe
There's a good discussion about offset and counterweights going on in another thread, I have to read it through again a couple of times

KariFS- Diamond Member

- Posts : 2044
Join date : 2014-10-10
Age : 53
 Re: Scorpion - Simple trainer build
CHELLIE wrote:
Very nice build
Thanks, I am glad you like it
Thanks for the info too. I didn't realize that basically you just need to make the balance even and then add some. I have to find my (incomplete) commemorative quarter collection and weigh some coins
Thanks again Chellie

KariFS- Diamond Member

- Posts : 2044
Join date : 2014-10-10
Age : 53
 Re: Scorpion - Simple trainer build
Kari, that American Boy looks Awesome! Great job!
On mine, I just put the leadout guide per the plans, and for the wingtip weight, I just glued on a nickel per the plans also. An American nickel weighs approximately 47 grams.


The Conversion Mark
On mine, I just put the leadout guide per the plans, and for the wingtip weight, I just glued on a nickel per the plans also. An American nickel weighs approximately 47 grams.


The Conversion Mark

batjac- Diamond Member


Posts : 2373
Join date : 2013-05-22
Age : 61
Location : Broken Arrow, OK, USA
 Re: Scorpion - Simple trainer build
batjac wrote:Kari, that American Boy looks Awesome! Great job!
On mine, I just put the leadout guide per the plans, and for the wingtip weight, I just glued on a nickel per the plans also. An American nickel weighs approximately 47 grams.
The Conversion Mark
Thanks, glad you like it
I tried to eyeball and even measure the lead out guide position but it seems that mine is further back than yours. I did eyeball the bell crank position too and maybe the bell crank is different size so... Lot of variables. But a wise man once said, "well, this ain't rocket surgery", I hope he was right
By the way, I think the nickel weighs 4,7 grams
The Nit-Picking Kari
Last edited by KariFS on Thu May 28, 2015 3:42 pm; edited 1 time in total

KariFS- Diamond Member

- Posts : 2044
Join date : 2014-10-10
Age : 53
 Re: Scorpion - Simple trainer build
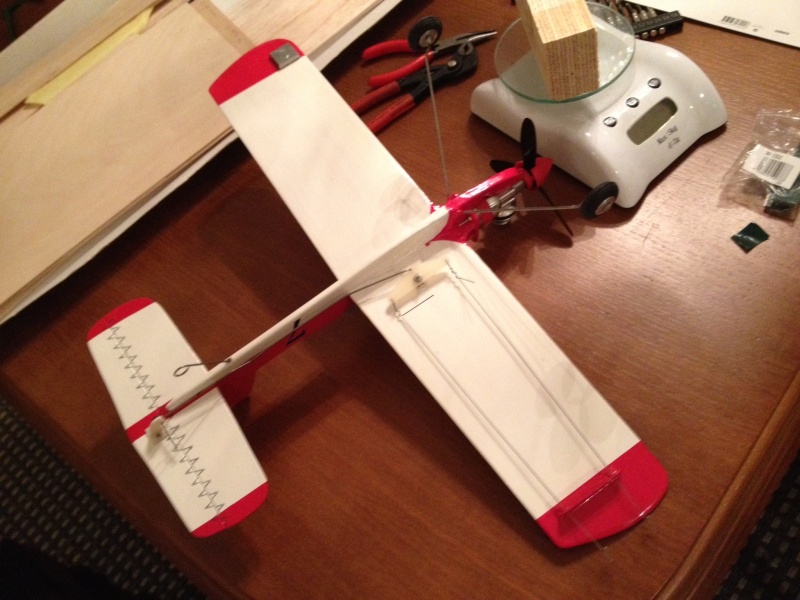
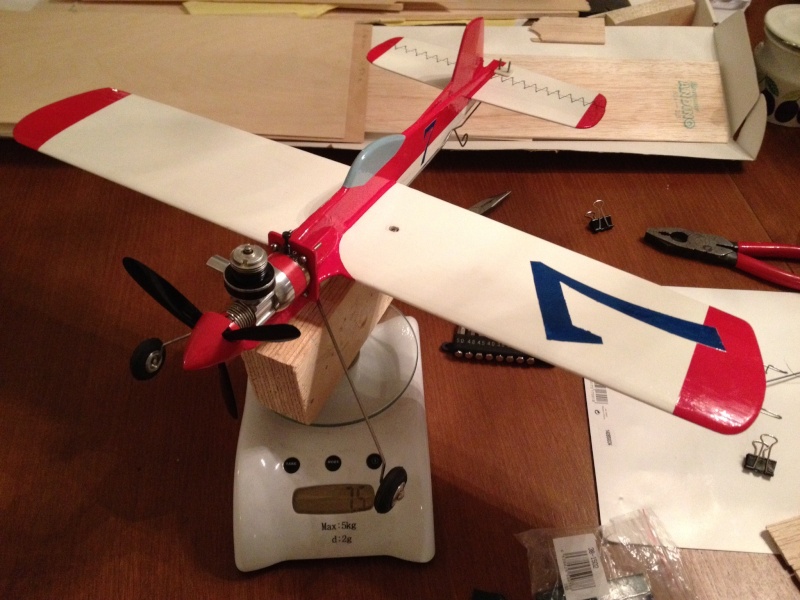
OK, now the Scorpion is painted too. At first I thought I'll do a basic red over white scheme, and did, but it seemed a little plain. So I decided to add some racing numbers, inspired by Reno racers, hey they fly circles too  I picked number 7 because it's easy to cut the mask for it
Still have to learn how to sew the elevator hinge, build the control linkage and dremel off the excess wire off the landing gear. I didn't have wheel collars so I went the nostalgia route and soldered some washers on to hold the wheels. The engine mount may have an unintentional upwards angle built in, don't know how that happened, need to check again and shim if necessary
In the background of the second photo you can see one of the things I love most about summers in Finland, the photo was taken at 11pm and it's still not dark outside.


Still have to learn how to sew the elevator hinge, build the control linkage and dremel off the excess wire off the landing gear. I didn't have wheel collars so I went the nostalgia route and soldered some washers on to hold the wheels. The engine mount may have an unintentional upwards angle built in, don't know how that happened, need to check again and shim if necessary

In the background of the second photo you can see one of the things I love most about summers in Finland, the photo was taken at 11pm and it's still not dark outside.


KariFS- Diamond Member

- Posts : 2044
Join date : 2014-10-10
Age : 53
 Re: Scorpion - Simple trainer build
Practiced some hinge stitching the other day. First on two pieces of scrap balsa, then on the elevator of the Scorpion. I pre-punched the holes with a needle on 10mm intervals on the stabilizer, then the same thing on the elevator, with a 5mm offset. I used "Dyneema" fishing line as it is not supposed to stretch or absorb any liquids. Afterwards i put a drop of superglue in the needle holes. Here's the result, maybe a tad tight but not too bad.

I also installed lead-outs and the bellcrank. I thought that the lead-out guide was long enough to allow some adjustment, but my bellcrank was bigger than I thought, and to prevent binding I had to drill the holes close to the ends of the guide. Overall the lead-outs point "in average" slightly aft. Hope it'll be OK. I had to make a little bend to the pushrod to adjust the length. It is difficult for me to get the bends precisely to the right places. I also need to learn how to make neat and sharp z-bends. Or maybe I'll start using some adjustable RC-style pushrod ends in my future planes. I checked for the balance and added 10 grams to the right wingtip.

This thing is built like a tank and it came out pretty heavy. Last time weighed it it had 2 coats of clear, and it weighed 162 grams. Now, after the paint job, the balancing weight and controls the whole thing is 214 grams, that's 7.5 oz. Kinda heavy, no?

The American Boy is also completed minus some nose weight, right now it weighs about 5.5 oz with its 5 gram wingtip weight and a short-tank Babe Bee.

Flight report will surely be filed shortly after the maiden flights

I also installed lead-outs and the bellcrank. I thought that the lead-out guide was long enough to allow some adjustment, but my bellcrank was bigger than I thought, and to prevent binding I had to drill the holes close to the ends of the guide. Overall the lead-outs point "in average" slightly aft. Hope it'll be OK. I had to make a little bend to the pushrod to adjust the length. It is difficult for me to get the bends precisely to the right places. I also need to learn how to make neat and sharp z-bends. Or maybe I'll start using some adjustable RC-style pushrod ends in my future planes. I checked for the balance and added 10 grams to the right wingtip.

This thing is built like a tank and it came out pretty heavy. Last time weighed it it had 2 coats of clear, and it weighed 162 grams. Now, after the paint job, the balancing weight and controls the whole thing is 214 grams, that's 7.5 oz. Kinda heavy, no?

The American Boy is also completed minus some nose weight, right now it weighs about 5.5 oz with its 5 gram wingtip weight and a short-tank Babe Bee.

Flight report will surely be filed shortly after the maiden flights


KariFS- Diamond Member

- Posts : 2044
Join date : 2014-10-10
Age : 53
 Re: Scorpion - Simple trainer build
Kari,
I thought I had commented on this thread, sorry, I have been following.
Your models really turned out great. Do you have a PDF. Of the plans?
I really think with a different wing that Scorpion could be a neat little stunt model.
Ron
I thought I had commented on this thread, sorry, I have been following.
Your models really turned out great. Do you have a PDF. Of the plans?
I really think with a different wing that Scorpion could be a neat little stunt model.
Ron

Cribbs74- Moderator


Posts : 11907
Join date : 2011-10-24
Age : 50
Location : Tuttle, OK
 Re: Scorpion - Simple trainer build
That really is a good looking build, you can be proud of that plane. I like it a lot, really looks tough and capable. I'm a big fan of sewn hinges too. If you ever decide to add some engine offset, you can buy nylon shims for that job. They come in sets of 1,2, and 3 degrees.
For leadout weight, fly it and see. An observer outside of the circle needs to know how to watch while you fly low and flat. He/she should follow the lines and continue them as an imaginary progression of the line through the plane. If the outboard tip is angled higher or lower than that line, then adjust tip weight accordingly. That will have a big effect on the plane's stability in a crosswind.
Good luck.
Rusty
_________________
Don't Panic!
...and never Ever think about how good you are at something...
while you're doing it!
My Hot Rock & Blues Playlist
...and never Ever think about how good you are at something...
while you're doing it!
My Hot Rock & Blues Playlist

RknRusty- Rest In Peace

- Posts : 10869
Join date : 2011-08-10
Age : 68
Location : South Carolina, USA
 Re: Scorpion - Simple trainer build
Wow. Those are great looking planes you got. You did a very nice job of building and should be proud. And if they were mine, well, lets not go there as I have a lot to learn in building....

NEW222- Top Poster

- Posts : 3896
Join date : 2011-08-13
Age : 46
Location : oakbank, mb
 Re: Scorpion - Simple trainer build
Forgot to add, I love the look of the hinges. I would like to ask is it just threaded from one side to the other and glued, or back and forth then glued?

NEW222- Top Poster

- Posts : 3896
Join date : 2011-08-13
Age : 46
Location : oakbank, mb
 Re: Scorpion - Simple trainer build
Thanks guys. I had a lot of fun building and painting these. Before this spring I thought the frown on my face was permanent but apparently not. Model planes and waterdog puppies (wife's hobby but I get to play with them) make miracles happen 
Ron, I also thought the Scorpion would look good with a built-up wing. I like the fuselage shape, it has some Mustang and some late-model Spitfire in it, very classic. I like to modify stuff and I already was thinking about "Scorpion II", maybe adapting the Ringmaster wing design or similar and then installing my Medallion (w/ a Black Widow cylinder) on it. But first I need to learn how to fly round and round with these two The original plan was from Outerzone, there's a link to it earlier in this thread.
Rusty, thanks again for the tips. My son has already promised to work as a pit man (actually I don't think I could keep him away even if I tried ). I'll have him watch and/or video the flights. And maybe he can fly and I can watch. I suppose a little too much weight is safer than too little weight?
NEW, these were simple builds, not a lot of skill involved. I have built model planes before but it has been almost 20 years since the last ones before these. Profile planes are simple, cheap and fun to build and any suggestions are welcome
The hinges are threaded in a "figure 8" fashion, first through one panel, then through the hinge line, then through the other panel, again through the hinge line and so on. I started from the middle of the elevator, worked to the left, and when I reached the end the hinge looked sort of like this (stole the pic from http://www.modelflying.co.uk/forums/postings.asp?th=37544 ):

Then I worked back through the same holes towards the middle, over to the right end and then back to the middle where the ends of the thread met again and were tied together. So the entire hinge was made of a single length of thread. Kinda hard to explain but if you take a couple of, say, 4" pieces of 1/8" scrap balsa or ply, punch the holes and start threading, you'll get it. During the sewing the panels were held together and parallel by a binderclip in each end of the hinge line. After the hinge was complete, I moved the elevator up and down, past its normal operational range a few times to even out the tension (my stitching is not perfectly constant ) and adjusted some parts of the thread so that it looked as neat as possible. Then some superglue in the holes, mostly to seal them against moisture and castor fog. The process was not difficult, maybe somewhat tedious but I like this method a lot better than fabric hinges. And I like the look of them too. It did take me an hour or maybe a little more to complete, including a few mistakes that required some un-stitching to correct.
Ron, I also thought the Scorpion would look good with a built-up wing. I like the fuselage shape, it has some Mustang and some late-model Spitfire in it, very classic. I like to modify stuff and I already was thinking about "Scorpion II", maybe adapting the Ringmaster wing design or similar and then installing my Medallion (w/ a Black Widow cylinder) on it. But first I need to learn how to fly round and round with these two
Rusty, thanks again for the tips. My son has already promised to work as a pit man (actually I don't think I could keep him away even if I tried
NEW, these were simple builds, not a lot of skill involved. I have built model planes before but it has been almost 20 years since the last ones before these. Profile planes are simple, cheap and fun to build and any suggestions are welcome
The hinges are threaded in a "figure 8" fashion, first through one panel, then through the hinge line, then through the other panel, again through the hinge line and so on. I started from the middle of the elevator, worked to the left, and when I reached the end the hinge looked sort of like this (stole the pic from http://www.modelflying.co.uk/forums/postings.asp?th=37544 ):

Then I worked back through the same holes towards the middle, over to the right end and then back to the middle where the ends of the thread met again and were tied together. So the entire hinge was made of a single length of thread. Kinda hard to explain but if you take a couple of, say, 4" pieces of 1/8" scrap balsa or ply, punch the holes and start threading, you'll get it. During the sewing the panels were held together and parallel by a binderclip in each end of the hinge line. After the hinge was complete, I moved the elevator up and down, past its normal operational range a few times to even out the tension (my stitching is not perfectly constant

KariFS- Diamond Member

- Posts : 2044
Join date : 2014-10-10
Age : 53
 Re: Scorpion - Simple trainer build
Thanks for the reply. It is very clear and answers my questions, thank you. I will have to give this a try on my next build.

NEW222- Top Poster

- Posts : 3896
Join date : 2011-08-13
Age : 46
Location : oakbank, mb
 Re: Scorpion - Simple trainer build
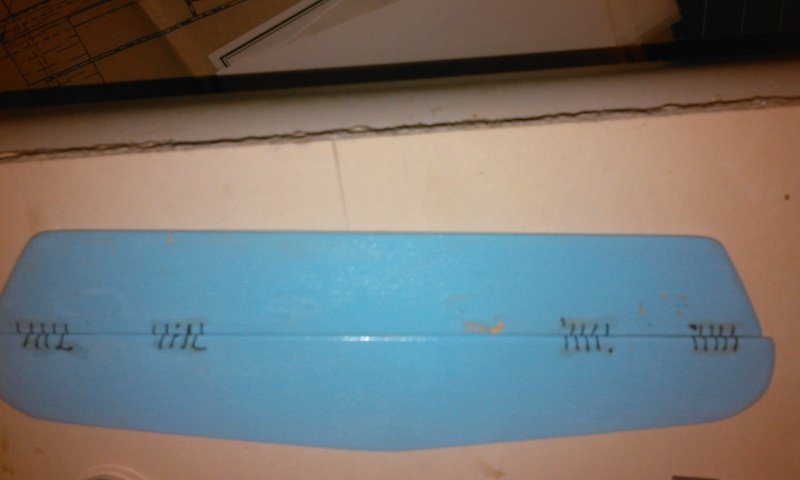
KariFS , Your airplanes look great and well done on the hinge stitching , mine didn't come out as well but I think I am going to stay with it for the cloth never again and the glass maybe but , I will get more practice for sure . The color scheme is very nice ! Look forward to some video  Heres mine after I ripped off the cloth mess ....
  some how I even put the elev. horn mount brace on backwards
  and had to rip, grind that off and replace
  . Eric
 some how I even put the elev. horn mount brace on backwards
  and had to rip, grind that off and replace
  . Eric
getback- Top Poster


Posts : 10439
Join date : 2013-01-18
Age : 67
Location : julian , NC
Page 2 of 2 •  1, 2
1, 2
 Similar topics
» Guillows Cessna 150 build circa 1970 (Build Log)
» Cox scorpion ARF build!
» Simple Sabar Trainer ?
» Simple Baby Ringmaster build
» Cox Scorpion ARF
» Cox scorpion ARF build!
» Simple Sabar Trainer ?
» Simple Baby Ringmaster build
» Cox Scorpion ARF
Page 2 of 2
Permissions in this forum:
You cannot reply to topics in this forum

 Rules
Rules


