Log in
Search
Latest topics
» Cox films/videos...by Coxfledgling Today at 4:46 am
» Purchased the last of any bult engines from Ken Enya
by Coxfledgling Today at 4:18 am
» My N-1R build log
by roddie Today at 12:32 am
» Happy 77th birthday Andrew!
by akjgardner Today at 12:27 am
» TEE DEE Having issues
by TD ABUSER Yesterday at 9:43 pm
» Landing-gear tips
by roddie Yesterday at 6:17 pm
» Roger Harris revisited
by TD ABUSER Yesterday at 2:13 pm
» Tee Dee .020 combat model
by Ken Cook Yesterday at 1:41 pm
» Retail price mark-up.. how much is enough?
by Ken Cook Yesterday at 1:37 pm
» My latest doodle...
by roddie Yesterday at 10:43 am
» Chocolate chip cookie dough.........
by roddie Fri Nov 22, 2024 1:13 pm
» Free Flight Radio Assist
by rdw777 Fri Nov 22, 2024 9:24 am
Cox Engine of The Month
"Phred's Phault"
Page 2 of 7
Page 2 of 7 •  1, 2, 3, 4, 5, 6, 7
 Re: "Phred's Phault"
Trace the shape of the tank/tube and have at it with any electric soldering iron slowly until you have the foam depressed into the basic shape....hot glue, slow epoxy, or plain old elmers white glue will stick it firm especially if you plan to cover (like I do) with shrink covering

fredvon4- Top Poster


Posts : 4012
Join date : 2011-08-26
Age : 69
Location : Lampasas Texas
 Re: "Phred's Phault"
fredvon4 wrote:Trace the shape of the tank/tube and have at it with any electric soldering iron slowly until you have the foam depressed into the basic shape....hot glue, slow epoxy, or plain old elmers white glue will stick it firm especially if you plan to cover (like I do) with shrink covering
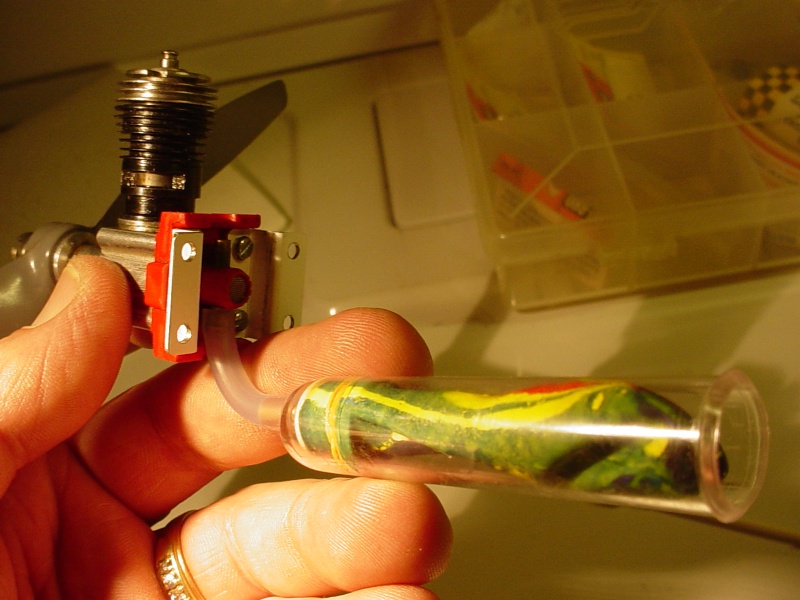
I like the soldering iron idea.. I may try using a pc. of curved Tin sheet, formed to the tube radius.. and heating it evenly to form a trough. I don't want to enclose the balloon tube. I want the option to swap-out the balloon quickly if there's a problem or a leak. I devised a cartridge system for the housing. The tanks fuel line fitting is centered in a small wooden plug/spool that the balloon neck stretches over. The pick-up is on the inner side.. and the outer side is for the fuel line to the spraybar nipple. The inner tank assy. slides into the housing from the rear.. with the pick-up tube protruding out the front, for the fuel line attachment.
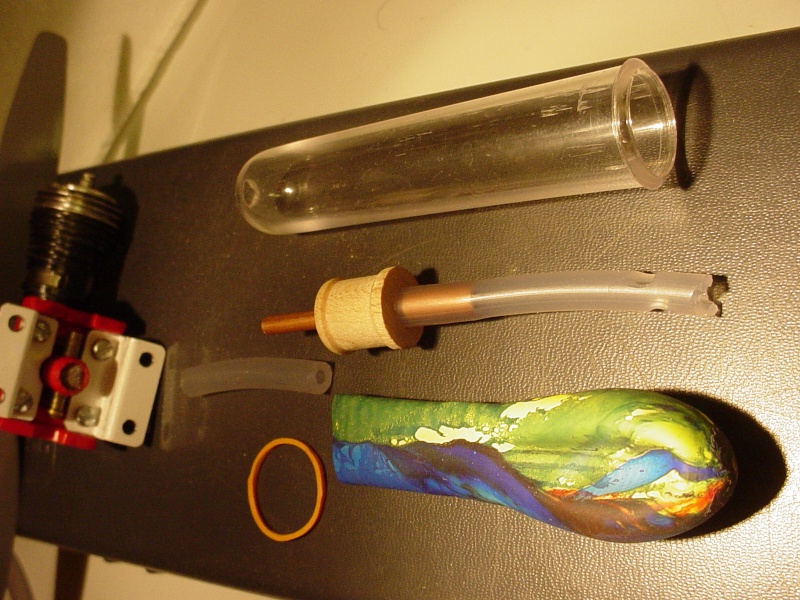
The inner-tank has some protection from abrasion when landing.
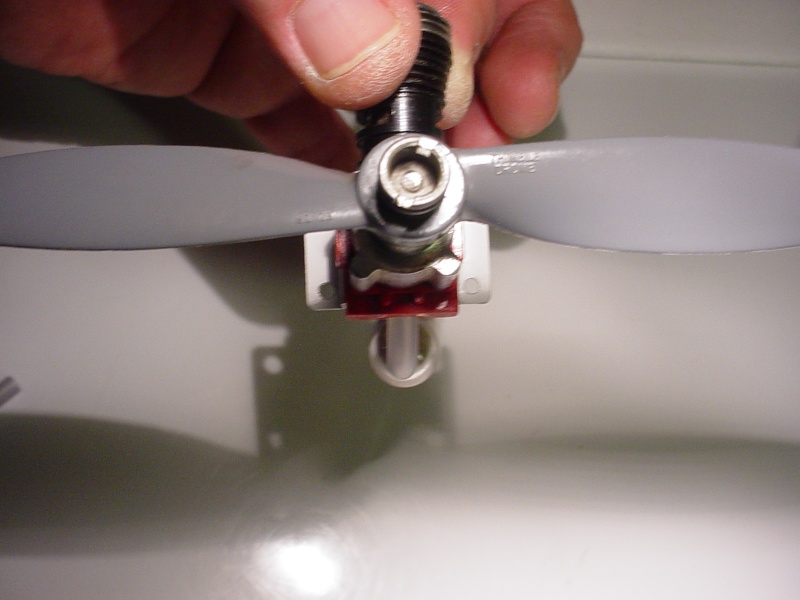
A front view shows it's low-profile..
 Re: "Phred's Phault"
Those are nicely manufactured mounting brackets for the Cox 290 engine. 


GallopingGhostler- Top Poster


Posts : 5724
Join date : 2013-07-13
Age : 70
Location : Clovis NM or NFL KC Chiefs
 Re: "Phred's Phault"
roddie wrote:I just received notice this week.. so I find myself back there again.
That's no good Roddie. Hope you can find yourself back in the workforce soon.
Rod.

Oldenginerod- Top Poster

- Posts : 4018
Join date : 2012-06-15
Age : 62
Location : Drouin, Victoria
 Re: "Phred's Phault"
I missed that, ditto for you too, Roddie. Having time off is good, but only if you can afford it. Will be praying for you.Oldenginerod wrote:That's no good Roddie. Hope you can find yourself back in the workforce soon. Rod.roddie wrote:I just received notice this week.. so I find myself back there again.

GallopingGhostler- Top Poster


Posts : 5724
Join date : 2013-07-13
Age : 70
Location : Clovis NM or NFL KC Chiefs
 Re: "Phred's Phault"
I too am sorry to hear this Roddie. i thought you had found yourself a niche of a job.
I don't want to be contentious but every year I visit Chicago - people in my industry that I have become acquainted with are no longer around. It seems to be a "hire and fire" enviroment in the USA - the first excecise in "cost saving" always seems to be the work force.
One company that I deal with, over the last two years, has "laid off" over 300 - chosing to replace them rather than retrain for a changing environment.I have a natural inclination to dislike the replacements but when I look at the age groupd involved I am sure that they have been "laid off" in previous existences.
When I first started work in the 70s I was surrounded by people who had only been in the one organisation all their working lives and had progressed (or not) during that time. This had all changed by the 90s - my grandfathers and my father were coal miners. Started down the mine at age fourteen. My Grandfathers worked through until their 65th birthdays (one of my Grandfathers fought in France 1914 -18). He joined up before the ban on coal miners signing up. My father was made redundant at 56 and was then unemployable following the closure of the mines.
I now see the younger work force having no sense of loyalty and changing jobs regularly (every couple of years) - usually through choice because of a lack of advancement or because the grass would appear to be greener elsewhere.) I no longer see real teamwork or camraderie. All I hear day to day is spin and bullshit, false positive outlooks and no sense of permanence.
I am glad that my retirement is approaching - I have been fortunate being in the "right place at the right time". However, now - despite liking my work, I dislike the environment. I see the constant deskilling of jobs, recruitment based on artificial and meaningless qualifications rather than aptitude and determination.
Sorry to rant but I am of an age wher I have seen better times. Times when I knew everyone in my street and when neighbours exhibited neighbourliness. Now I am surrounded by what is classed as the "Young and Upwardly mobile". Don't even return A "Good Morning" and show a selfishness beyond belief!
Maybe it is ny age and I am turning into a grumpy old man

ian1954- Diamond Member

- Posts : 2688
Join date : 2011-11-16
Age : 70
Location : England
 Re: "Phred's Phault"
Sad to read ian 1954's mild rant. It never occurred to me that (what he just posted) could ever be so close to my exact observations here in the USA.
My decades living in Europe and a brief part of life in Asian countries, provided exposures to different cultures and what I perceived as a much stronger neighbor, family, and work ethos than my home country.
Roddie I sincerely hope meaningful employment comes your way soon
My decades living in Europe and a brief part of life in Asian countries, provided exposures to different cultures and what I perceived as a much stronger neighbor, family, and work ethos than my home country.
Roddie I sincerely hope meaningful employment comes your way soon

fredvon4- Top Poster


Posts : 4012
Join date : 2011-08-26
Age : 69
Location : Lampasas Texas
 Re: "Phred's Phault"
Guys.. thanks so very much. Being in this position repeatedly.. as I have been over the last 5 years, is tough on a man's soul. I am fortunate to have a good wife who loves me.. reasonable good health.. good friends; like all of you here.. and my creative nature. A positive outlook isn't always easy to "muster-up".. but when I'm down, I try to distract by doing things I enjoy... This forum has been a HUGE source of enjoyment for me.
This employer (a company I have a total of 7 years with, and last left in 2007) had suffered the loss of one of their biggest contracts last Winter. When they hired me back last June, (after a six year absence..) they told me it would be temporary. I hoped it would turn into more.. but as "Ian" mentioned in his post above.. the general attitude I see in the workplace these days, is one of FEAR and paranoia.. which leads to distraction, mistakes, poor quality.. and ultimately a breakdown in any hopes for establishing teamwork. It's amazing to see the effect this has on productivity.
They know the value.. in the work I have done there.. and this last "short run" with them is no exception. If business picks back up, I feel confident that I may be called back to work.. but their recent last ditch-effort on a promising new contract/new customer was so mishandled, and miscommunicated.. that they'll probably lose it too.. due to either; loss of customer confidence.. or their continued mistakes cutting deeply into their "shrinking" profit margin.
ok.. let's get back to the enjoyment part...
 Re: "Phred's Phault"
ian1954 wrote:Sorry to rant but I am of an age wher I have seen better times. Times when I knew everyone in my street and when neighbours exhibited neighbourliness. Now I am surrounded by what is classed as the "Young and Upwardly mobile". Don't even return A "Good Morning" and show a selfishness beyond belief! Maybe it is my age and I am turning into a grumpy old man
No, all you stated is spot on and seems universal whether UK or US. Regarding neighborliness, I don't even dare to say hello to many women let alone some gents. There is no longer the attitude of brotherly and sisterly relationships between adults, replaced by suspicion and distrust. Racial profiling is on the rise. We as a society have changed form 1950's Mayberry RFD in the Andy Griffith show with police as friendly, to nowadays we all are presumed as suspect criminals.
However, I've got to agree with Roddie. Life is short, and at least in this forum, we can rant to an extent but also share our joys with our modeling creations and love for internal combustion engines, especially the Coxes.
 I think we all have something universally enjoyable to all here.
GallopingGhostler- Top Poster


Posts : 5724
Join date : 2013-07-13
Age : 70
Location : Clovis NM or NFL KC Chiefs
 Re: "Phred's Phault"
GallopingGhostler wrote:ian1954 wrote:Sorry to rant but I am of an age wher I have seen better times. Times when I knew everyone in my street and when neighbours exhibited neighbourliness. Now I am surrounded by what is classed as the "Young and Upwardly mobile". Don't even return A "Good Morning" and show a selfishness beyond belief! Maybe it is my age and I am turning into a grumpy old man
No, all you stated is spot on and seems universal whether UK or US. Regarding neighborliness, I don't even dare to say hello to many women let alone some gents. There is no longer the attitude of brotherly and sisterly relationships between adults, replaced by suspicion and distrust. Racial profiling is on the rise. We as a society have changed form 1950's Mayberry RFD in the Andy Griffith show with police as friendly, to nowadays we all are presumed as suspect criminals.
However, I've got to agree with Roddie. Life is short, and at least in this forum, we can rant to an extent but also share our joys with our modeling creations and love for internal combustion engines, especially the Coxes.I think we all have something universally enjoyable to all here.

I consider myself to be a friendly and respectful person. I make eye contact with people during a conversation. I respect elders.. because I'm slowly becoming one. The younger majority today, see's itself as superior. Media and technology feed this trend. I have two autistic sons who will never know of these social illnesses in society. I am thankful that there is a greater awareness of special needs, and activities.. than there was when I was young.
 Re: "Phred's Phault"
Re-thinking my fuel-delivery for this little wing. Where I'm using a postage-stamp back-plate.. why not try a bladder? I've never run one before. This design dictates a vertical oriented cylinder. Not wanting either the cylinder or the "needle" on the bottom.. this leaves a bladder to be mounted there..  I'm thinking on using a piece of fiberglass (window-type) screen material, to protect both; the bladder and fuel line from the abrasion of belly landings.
 Re: "Phred's Phault"
Ken has suggested in the past to use flourescent light tube protector to hold the bladder. It. super cheap and available at Lowes in 6ft lengths.
Ignore the loose engine. It was a shakedown flight. You can clearly see the tubing I am talking about.

Ignore the loose engine. It was a shakedown flight. You can clearly see the tubing I am talking about.


Cribbs74- Moderator


Posts : 11907
Join date : 2011-10-24
Age : 50
Location : Tuttle, OK
 Re: "Phred's Phault"
Cribbs74 wrote:Ken has suggested in the past to use flourescent light tube protector to hold the bladder. It. super cheap and available at Lowes in 6ft lengths.
Ignore the loose engine. It was a shakedown flight. You can clearly see the tubing I am talking about.
Yes.. I like that light-tube idea. It protects both; the bladder and you... plus it's transparent. Being me.. I'm going to try something different.. and maybe original.. we'll see.
I'm doing laundry right now.. because I'm the "man of the house"... and trying not to get super-focused on this model. I've been compartmentalizing the build.. and can't seem to continue anywhere. Maybe it's the foam. I'm going to have to make all my cuts "cold" using knives and saws. These are just excuses for me stalling.
My booms fit really well.. so I made templates.. (I've got 3 more wing panels I could build) but I'm concerned about their strength. I used the large size craft sticks. The tail weighs next to nothing.. which is why I'm starting with the engine-mount set into the leading-edge about 3/4". If the tail breaks.. I'll fix it. If I scaled it correctly; the tail-moment is close to the full size model.
I'm stalled on cutting the hole for my bell-crank. I need to make 3 precise cuts.. one being a 1-1/2" diameter circle, cored down all the way through the wing.. and the other (actually two cuts..) being a 3" x 1/2" slot cut across the circle-cut span-wise.. and at a depth to install a plywood plate of those dimensions, for the bell-crank mount. I'm thinking that the lead-out "slots".. out to the wingtip, don't need to be too deep. I can feather the slot down deeper approaching the tip and guides. This will allow the bell-crank assembly to be installed just under the wing's top surface.
Well.. all this talk has motivated me to lay-out the cuts in my wing.. and do laundry at the same time!

Note the firewall cut-out mark. This will place the back of the engine's case even with the leading edge.. for starters anyway.

The lead-out slots will widen toward the tip in case I need to trim fore/aft.
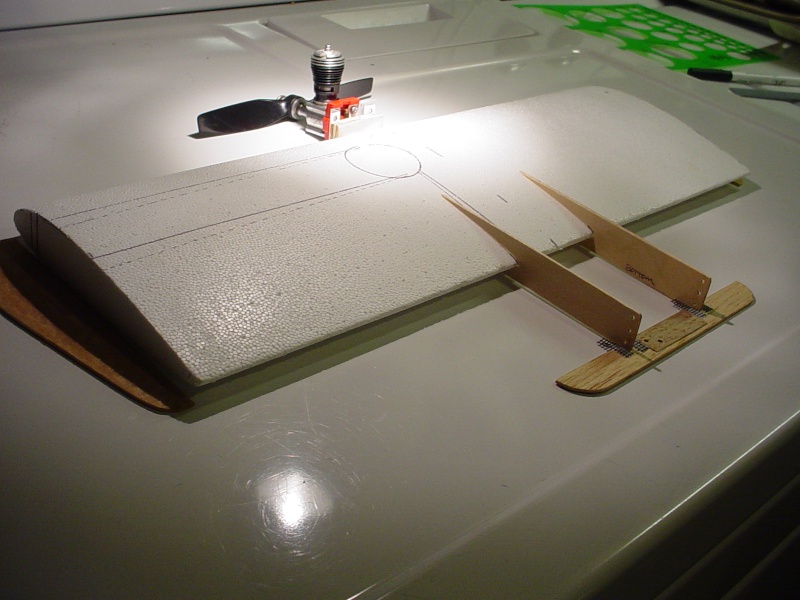
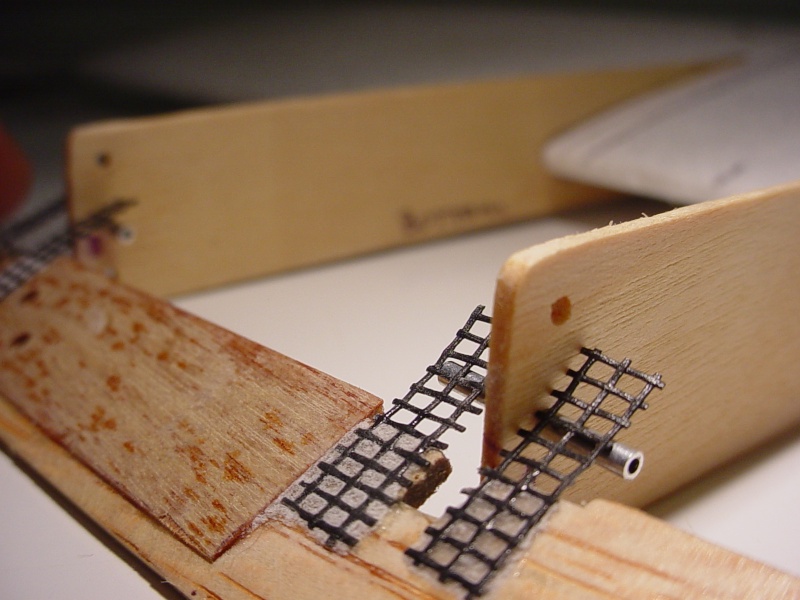
The stab hinge is free-floating. The aluminum pins ride in their slots.. with the boom-holes and screen straps as bearings. I'll need to fill/sand 90% of the stab. prior to assembly/hinging... then fill the screen tabs on the bottom after they're glued in place. Final sanding with the booms attached will be tedious.. so I had planned on an alignment block to spread/center the booms when attaching to the wing.. and I could also use it to support the tail assembly when final-sanding.
 Re: "Phred's Phault"
For foamie 1/2A's, I cut the hole and I use 2 layers of packing tape top and bottom. I use covering over the entire wing after that. You don't need any additional tube. Nothing is going to penetrate the covering. I then use a soldering iron to cut the hole for the bladder entrance. That hole is then laced with a 1" strip of reinforced fiberglass tape and another 1" piece perpendicular to it. If you need a pic I can provide that for you.Ken

Ken Cook- Top Poster

- Posts : 5640
Join date : 2012-03-27
Location : pennsylvania
 Re: "Phred's Phault"
Ken Cook wrote: For foamie 1/2A's, I cut the hole and I use 2 layers of packing tape top and bottom. I use covering over the entire wing after that. You don't need any additional tube. Nothing is going to penetrate the covering. I then use a soldering iron to cut the hole for the bladder entrance. That hole is then laced with a 1" strip of reinforced fiberglass tape and another 1" piece perpendicular to it. If you need a pic I can provide that for you.Ken
I think I understand.. I had to walk away and come back to this.. because I was having trouble visualizing it. That's a cool way to do it.. and very streamlined too. I'm confused about the packing tape though.. if I'm seeing this correctly; it is sealing the top/bottom of the bladder bay, which is inside the wing. What about the exposed adhesive on the inside? Wouldn't the inflated bladder stick to it? I've used corn starch/talcum powder to neutralize adhesive where I didn't want it.. maybe a dusting would prevent that?
 Re: "Phred's Phault"
Work is continuing.. I overcame my "fear of foam" and made 2 of the 3 cuts I was concerned with.

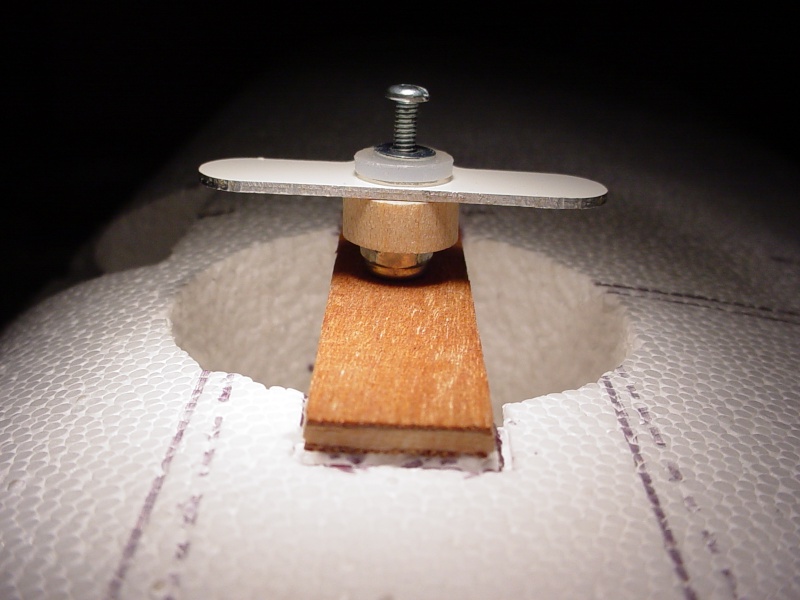
The slot for my bell-crank platform couldn't be cut to "depth" until I set-up the bell-crank assembly. The depth is now marked at 9/16" from the top-surface of the wing.. (approx. 2/3 the way through). It looks scary now.. but I'll be filling the gaps above the platform with soft balsa blocks. The platform is a 1/2" x 2-1/2" piece of 3mm Luan-type plywood.. of which I have a surplus of. (I'm planning on using it for my full size VooDoo booms)
I cored-through the wing using a larger than planned 1-3/4" hole-saw. The recessed firewall slot is real close the to bell-crank bay.. but the 1/4" plywood firewall will be epoxied into the foam and boxed into the leading edge with 1/16" hard balsa. Once the bell-crank platform and balsa filler-blocks are epoxied into place, some rigidity will be restored to that area.
The bushing below the bell-crank is a small hardwood spool cut-down to 1/4" thick to allow clearance between the pushrod linkage and platform. The bell-crank assembly is bushed for a 2-56 machine-screw and locknut. I have not arrived at a wire-size for my solid lead-outs or pushrod yet.. but they're going to as light as possible. I'm leaning toward .015" m/w lead-outs.. and a .062" carbon fiber pushrod.
I'm working on the 1/16" sheet-balsa wing-tips/gussets tonight.. and will put some thought into how I'm going to do the guides.

The slot for my bell-crank platform couldn't be cut to "depth" until I set-up the bell-crank assembly. The depth is now marked at 9/16" from the top-surface of the wing.. (approx. 2/3 the way through). It looks scary now.. but I'll be filling the gaps above the platform with soft balsa blocks. The platform is a 1/2" x 2-1/2" piece of 3mm Luan-type plywood.. of which I have a surplus of. (I'm planning on using it for my full size VooDoo booms)
I cored-through the wing using a larger than planned 1-3/4" hole-saw. The recessed firewall slot is real close the to bell-crank bay.. but the 1/4" plywood firewall will be epoxied into the foam and boxed into the leading edge with 1/16" hard balsa. Once the bell-crank platform and balsa filler-blocks are epoxied into place, some rigidity will be restored to that area.
The bushing below the bell-crank is a small hardwood spool cut-down to 1/4" thick to allow clearance between the pushrod linkage and platform. The bell-crank assembly is bushed for a 2-56 machine-screw and locknut. I have not arrived at a wire-size for my solid lead-outs or pushrod yet.. but they're going to as light as possible. I'm leaning toward .015" m/w lead-outs.. and a .062" carbon fiber pushrod.

I'm working on the 1/16" sheet-balsa wing-tips/gussets tonight.. and will put some thought into how I'm going to do the guides.
 Re: "Phred's Phault"
Work is continuing.. I overcame my "fear of foam" and made 2 of the 3 cuts I was concerned with.

The slot for my bell-crank platform couldn't be cut to "depth" until I set-up the bell-crank assembly. The depth is now marked at 9/16" from the top-surface of the wing.. (approx. 2/3 the way through). It looks scary now.. but I'll be filling the gaps above the platform with soft balsa blocks. The platform is a 1/2" x 2-1/2" piece of 3mm Luan-type plywood.. of which I have a surplus of. (I'm planning on using it for my full size VooDoo booms)
I cored-through the wing using a larger than planned 1-3/4" hole-saw. The recessed firewall slot is real close the to bell-crank bay.. but the 1/4" plywood firewall will be epoxied into the foam and boxed into the leading edge with 1/16" hard balsa. Once the bell-crank platform and balsa filler-blocks are epoxied into place, some rigidity will be restored to that area.
The bushing below the bell-crank is a small hardwood spool cut-down to 1/4" thick to allow clearance between the pushrod linkage and platform. The bell-crank assembly is bushed for a 2-56 machine-screw and locknut. I have not arrived at a wire-size for my solid lead-outs or pushrod yet.. but they're going to as light as possible. I'm leaning toward .015" m/w lead-outs.. and a .062" carbon fiber pushrod.

I'm working on the 1/16" sheet-balsa wing-tips/gussets tonight.. and will put some thought into how I'm going to do the guides.

The slot for my bell-crank platform couldn't be cut to "depth" until I set-up the bell-crank assembly. The depth is now marked at 9/16" from the top-surface of the wing.. (approx. 2/3 the way through). It looks scary now.. but I'll be filling the gaps above the platform with soft balsa blocks. The platform is a 1/2" x 2-1/2" piece of 3mm Luan-type plywood.. of which I have a surplus of. (I'm planning on using it for my full size VooDoo booms)
I cored-through the wing using a larger than planned 1-3/4" hole-saw. The recessed firewall slot is real close the to bell-crank bay.. but the 1/4" plywood firewall will be epoxied into the foam and boxed into the leading edge with 1/16" hard balsa. Once the bell-crank platform and balsa filler-blocks are epoxied into place, some rigidity will be restored to that area.
The bushing below the bell-crank is a small hardwood spool cut-down to 1/4" thick to allow clearance between the pushrod linkage and platform. The bell-crank assembly is bushed for a 2-56 machine-screw and locknut. I have not arrived at a wire-size for my solid lead-outs or pushrod yet.. but they're going to as light as possible. I'm leaning toward .015" m/w lead-outs.. and a .062" carbon fiber pushrod.

I'm working on the 1/16" sheet-balsa wing-tips/gussets tonight.. and will put some thought into how I'm going to do the guides.
 Re: "Phred's Phault"
I got distracted away from my wingtips.. toward my bell-crank assembly. I thinned the wood bushing down to 3/16" thick from 1/4", swapped out the main "thru-bushing" from alum. to hard-copper, center-drilled the platform .082" for the 2-56 machine-screw.. and drilled my bell-crank's pushrod and lead-out holes.
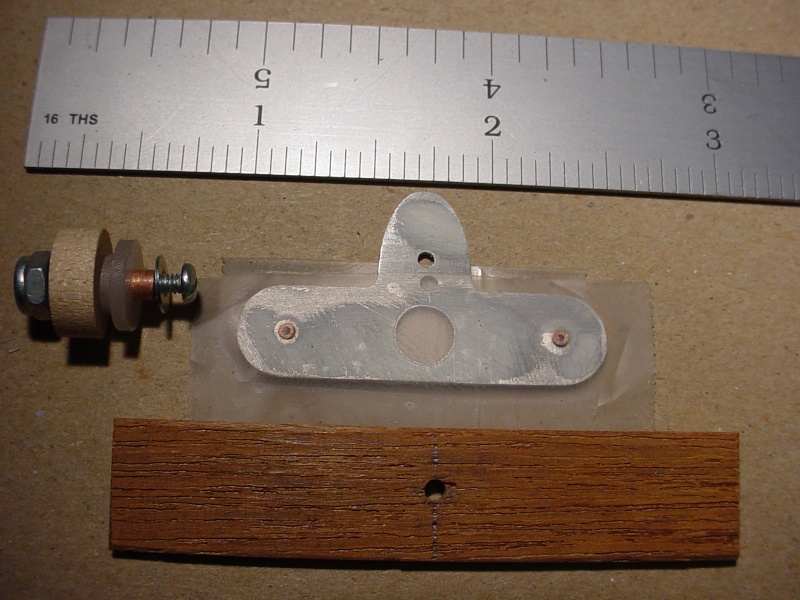
I opted for .025" music-wire solids.. because .015's are pretty frail. That.. plus seeing that my smallest drill is .047".. I decided to bush the crank's lead-out holes with 1/16" hard-copper tubes. (let me tell you.. it's getting harder to see with age!) The bushings are slightly longer than the crank is "thick".. and having them taped in place; both sides.. will allow me to make 3/4" long "L"-bends in my .025" music-wire, poke it through the taped bushing-holes.. and make the "U"-bend with the bushings held captive.


I opted for .025" music-wire solids.. because .015's are pretty frail. That.. plus seeing that my smallest drill is .047".. I decided to bush the crank's lead-out holes with 1/16" hard-copper tubes. (let me tell you.. it's getting harder to see with age!) The bushings are slightly longer than the crank is "thick".. and having them taped in place; both sides.. will allow me to make 3/4" long "L"-bends in my .025" music-wire, poke it through the taped bushing-holes.. and make the "U"-bend with the bushings held captive.

 Re: "Phred's Phault"
Hey Roddie, could you measure the thickness of your wing for me? You already told the span, and maybe the cord too, have to check that, but how thick is it?
The reason I'm asking is that there is some styro wing cores available at the local hobby shop but they are made for gliders. I thought I could combine two of them bottom-to-bottom to make a symmetrical profile wing. But since I haven't really ever even seen a cox powered or any other C/L plane, I have no insight to whether it would work or not. I would build a balsa plank or simple box fuselage for it and use a babe bee for power.
Here's a pic of the wing element, it's about 4 1/2" by 2', price about 5 or 6 bucks a piece.

EDIT: Your cord seems to be 5.25", mine would be about the same when the necessary front and rear spars are added.
The reason I'm asking is that there is some styro wing cores available at the local hobby shop but they are made for gliders. I thought I could combine two of them bottom-to-bottom to make a symmetrical profile wing. But since I haven't really ever even seen a cox powered or any other C/L plane, I have no insight to whether it would work or not. I would build a balsa plank or simple box fuselage for it and use a babe bee for power.
Here's a pic of the wing element, it's about 4 1/2" by 2', price about 5 or 6 bucks a piece.

EDIT: Your cord seems to be 5.25", mine would be about the same when the necessary front and rear spars are added.

KariFS- Diamond Member

- Posts : 2044
Join date : 2014-10-10
Age : 53
 Re: "Phred's Phault"
KariFS wrote:Hey Roddie, could you measure the thickness of your wing for me? You already told the span, and maybe the cord too, have to check that, but how thick is it?
The reason I'm asking is that there is some styro wing cores available at the local hobby shop but they are made for gliders. I thought I could combine two of them bottom-to-bottom to make a symmetrical profile wing. But since I haven't really ever even seen a cox powered or any other C/L plane, I have no insight to whether it would work or not. I would build a balsa plank or simple box fuselage for it and use a babe bee for power.
Here's a pic of the wing element, it's about 4 1/2" by 2', price about 5 or 6 bucks a piece.
EDIT: Your cord seems to be 5.25", mine would be about the same when the necessary front and rear spars are added.
Hi Kari, My core's airfoil thickness max's out at .960" at a point approx. 1.75" back from the leading-edge. The chord is 5.5" and the span was originally 18".. but I trimmed 1.0" off each tip, so I could build/add my own balsa gusseted-style tips.
The core measurements in your illustration (provided it's a constant-chord) work out to a 104 sq. in. wing. (23.6" span and 4.4" chord).
I realize that 1/2A control-line kits are scarce.. but for your first experience and using a Babe Bee.. I'd recommend buying some 1/8" and 1/4" balsa sheet.. and downloading a plan for a model like the Carl Goldberg "Stuntman 23" or the Sig "Skyray". Both have simple 1/8" slab-wing/tail construction and a sturdy 1/4" fuse.. and utilize a radial-mount for your Babe Bee. Both of these models will have superior performance compared to a plastic Cox RTF model.. as long as they're built straight and light. This is you're best bet being a beginner in this class of models. That said; there's no reason why you couldn't try to build a wing this way.. but there are challenges associated.. and I've never attempted what I'm recommending here... it's just how "I'd" do it, if using a pair of under-cambered cores.
Just a reminder to use foam-safe adhesives on the foam. Most epoxies work well, but be sure to wipe-off any drips using a tissue.. and re-check glue joints for "oozing" before the epoxy sets. I prefer to use slower-setting epoxies because of this.
I bought my cores over 20 years ago.. so I don't know what they'd cost now.. but $5-6/panel for the ones locally available to you, doesn't sound bad. Bring a small ruler with you to the shop that has them, and ask if you can open a package to check the thickness on a countertop. This will give you an idea how much material needs to be removed from the under-cambered side, to make a pair fully symmetrical. This won't be easy.. because both panels will need the leading-edge trimmed-off the front and probably the bottom (to establish the desired foil-thickness). Trimming the "bottom" especially; is where you need to be precise.. or else the airfoil thickness will vary across the span.. and your leading-edge (balsa?) will not fit flush to the two cores.
Do you have any experience in hot-wire foam-cutting? If so; the best way to join these two cores (in my opinion..) is to make a little stationary hot-wire fixture, where the cutting wire is perpendicular to the core's span, and raised slightly over a level baseboard. Make two fences set-apart; the width of the chord.. and shim-"up" the trailing edge to start with.. (see *** below) so it is not cut by the wire. Feeding the core (bottom side down) through the hot-wire should trim the bottom of the leading-edge down evenly... and also establish "flats" for gluing the two under-cambered cores together. You can then trim each of the core's leading-edges, by doing a "rip-cut" on a table saw, with the bottom side down and trailing-edge against the fence.. and shimmed-"up" so that the blade is perpendicular to the flat cut by the hot-wire. Note the distance from the fence to the cut; to only remove 1/2 the thickness of your balsa leading-edge stock from the core.
*** You could forego shimming-up the core's trailing-edge when hot-wire cutting... but it depends greatly on it's taper.. and also the size of your trailing-edge stock. Trimming the bottom of the core's trailing-edge the same amount as the leading-edge; could reduce the chord significantly if the taper is thin. You don't want to end up "making-up" the planned chord by having to use larger/heavier balsa T/E stock, but.. again; if you remove a little material from the T/E bottoms.. it will form "flats" for gluing the cores together. Once joined; you can then trim the core's T/E perpendicular.. with a single rip-cut through a table-saw, to the thickness of your trailing-edge stock to be used.
Be sure to let us know, if you decide on a build. Good luck!

 Re: "Phred's Phault"
Hard lesson.. My bushed bell-crank isn't working out. These are things you learn when you're making parts from scratch. This was my 2nd attempt..
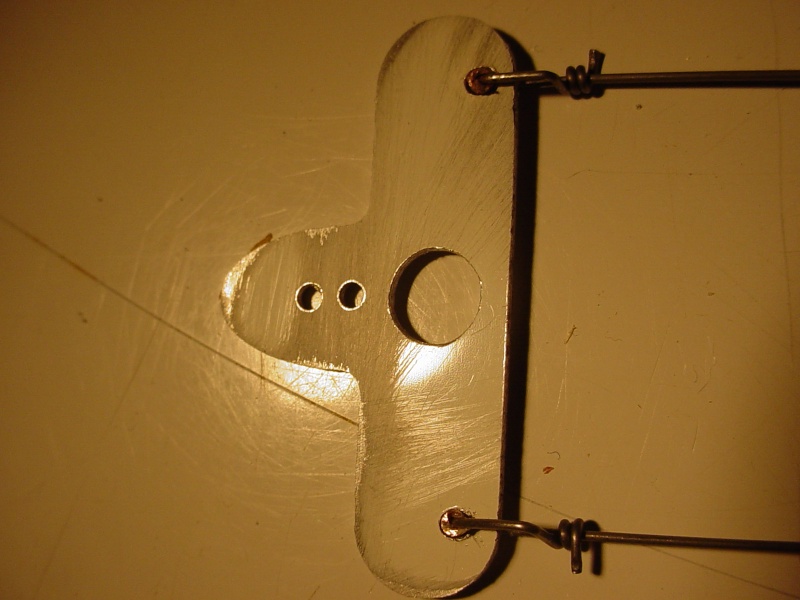

The "U" bend in the wire process "ovals-out" the bushing hole in the aluminum crank.. and is too much pressure on the bushing walls. My first attempt; the bushing holes were drilled on center with "witness" points I'd written into the CNC program for a general hole location. The material is thinner there.. and the bushing holes egged-out as soon as I started the U-bend. The bell-crank is only .040" thick, so I tried drilling off-center.. but still no good. Bell-crank #3 will be drilled with the smallest drill I have.. and I'll forego the bushings.
I'm going with the solids.. because the lead-outs "ramp-down" from the crank to the tip.. and a braid will have a "sawing" effect on the slot. I want to try to keep the option open for a simple adjustable lead-out guide without dealing with ridges cut into the foam.
The K & S .025" solids come in packs of 4 @12" long. One package is enough to do two small airplanes.. unless you screw up..
I know I write a lot.. but I do a lot of thinking while writing.


The "U" bend in the wire process "ovals-out" the bushing hole in the aluminum crank.. and is too much pressure on the bushing walls. My first attempt; the bushing holes were drilled on center with "witness" points I'd written into the CNC program for a general hole location. The material is thinner there.. and the bushing holes egged-out as soon as I started the U-bend. The bell-crank is only .040" thick, so I tried drilling off-center.. but still no good. Bell-crank #3 will be drilled with the smallest drill I have.. and I'll forego the bushings.
I'm going with the solids.. because the lead-outs "ramp-down" from the crank to the tip.. and a braid will have a "sawing" effect on the slot. I want to try to keep the option open for a simple adjustable lead-out guide without dealing with ridges cut into the foam.
The K & S .025" solids come in packs of 4 @12" long. One package is enough to do two small airplanes.. unless you screw up..

I know I write a lot.. but I do a lot of thinking while writing.

 Re: "Phred's Phault"
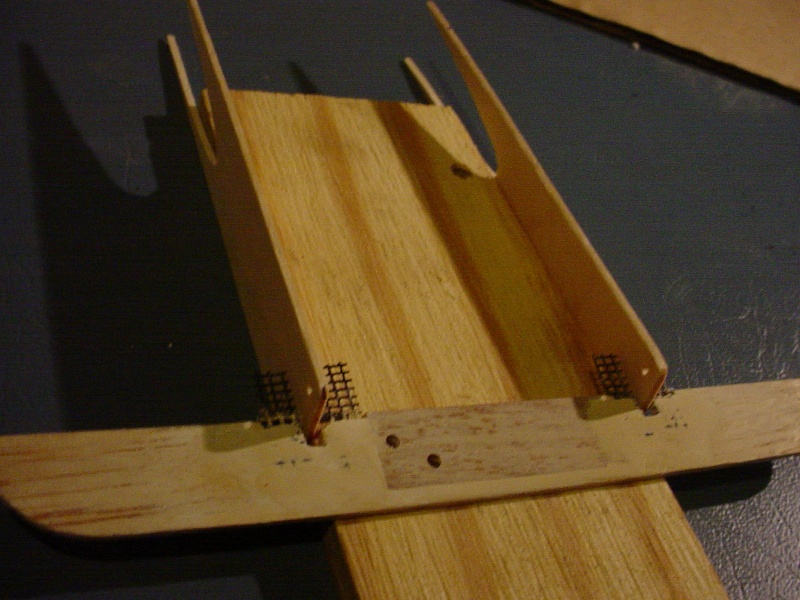
disgusted..  I decided to make an alignment jig for my booms. It will also help when filling/finish-sanding the bottom hinge-tabs on the stab. which must be done as an assembly.

 Re: "Phred's Phault"
Roddie,
Metal bellcranks are very famous for being short lived. Bushed as shown and wrapped with copper wire, the nylon cranks from Brodak and Sig will outlive us all.
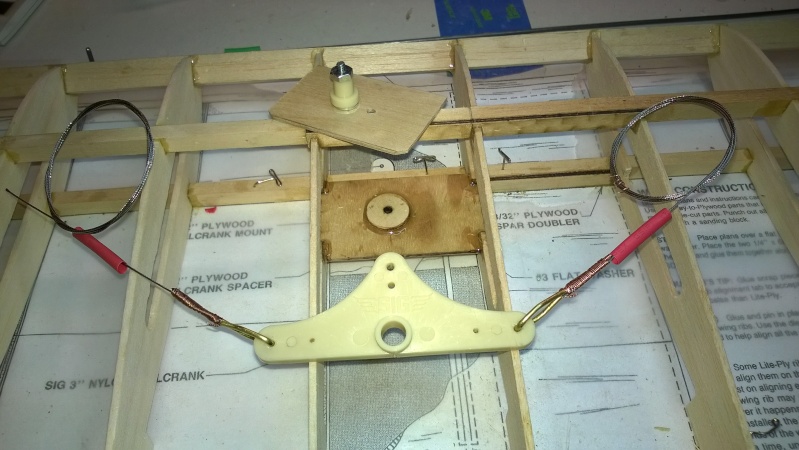
Below: Note the shape of the brass tube is bent to both clear the bellcrank surfaces and also keep the leadout from flopping when not under tension.
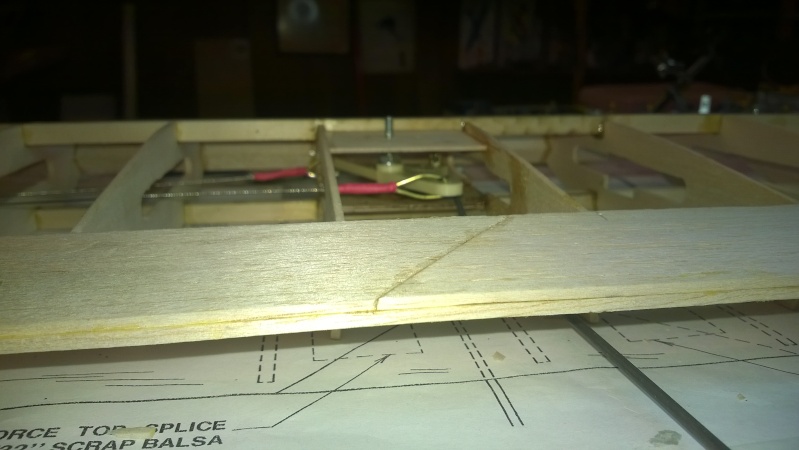
Or if you want to make them, phenolic circuit board sheets are strong and rugged. Bush them the same way.
Metal bellcranks are very famous for being short lived. Bushed as shown and wrapped with copper wire, the nylon cranks from Brodak and Sig will outlive us all.

Below: Note the shape of the brass tube is bent to both clear the bellcrank surfaces and also keep the leadout from flopping when not under tension.

Or if you want to make them, phenolic circuit board sheets are strong and rugged. Bush them the same way.
_________________
Don't Panic!
...and never Ever think about how good you are at something...
while you're doing it!
My Hot Rock & Blues Playlist
...and never Ever think about how good you are at something...
while you're doing it!
My Hot Rock & Blues Playlist

RknRusty- Rest In Peace

- Posts : 10869
Join date : 2011-08-10
Age : 68
Location : South Carolina, USA
 Re: "Phred's Phault"
Roddie, I'm assuming that ply plate is all that's holding your bellcrank in? Cox engines are very underpowered compared to more modern powerplants so I can see it working for that, but in a jerk of the lines I can see that assembly coming undone. Having a center rib of bass would give not only your engine a suitable mount, but if you incorporate it into your bellcrank you have really secured things. In addition, having a sound mount will probably and more than likely yield about 500 more rpms's rather than being lost to vibration.
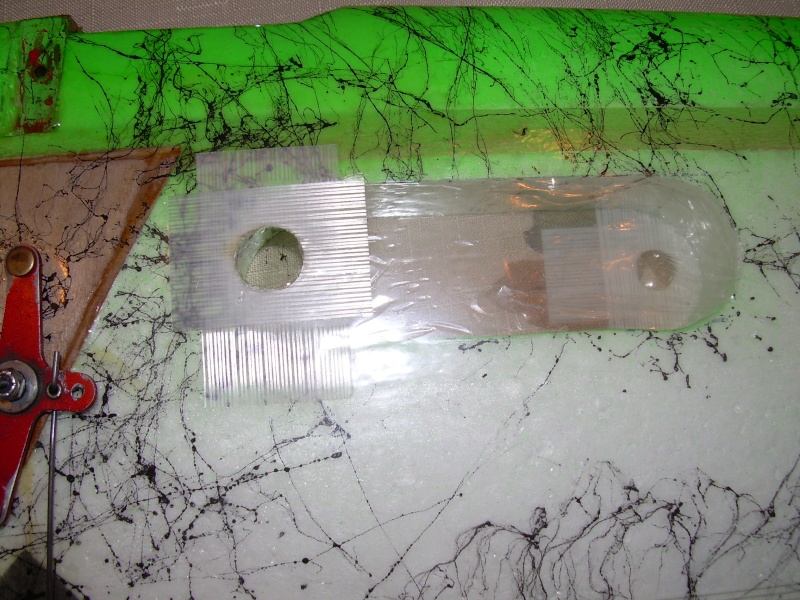
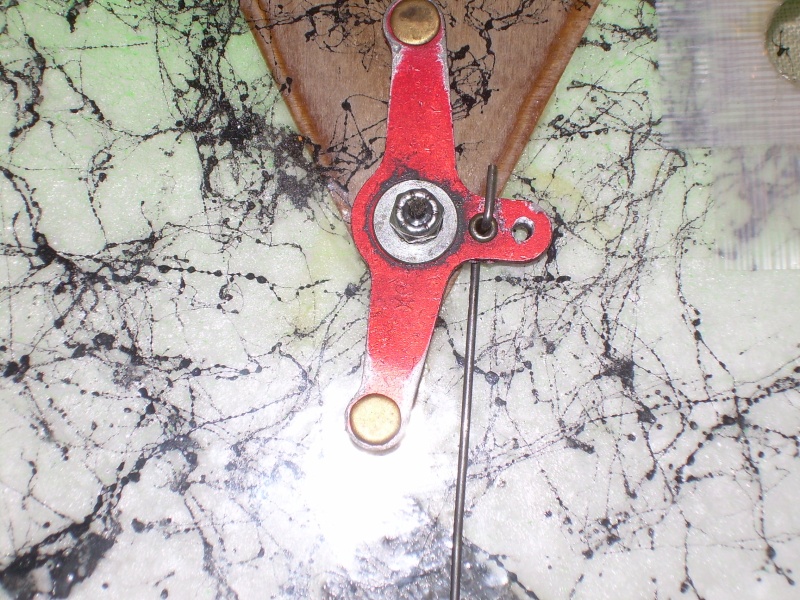
Using leadouts is not necessary on 1/2A's. They just get in the way and tangled not to mention bent. Line clips are also problematic on 1/2A's and they too get entwined and jammed. Do yourself a favor and do away with them on these types of models. Making a bellcrank with buttons is far superior and easier. A simple leadout guide is a piece of 1/16" ply with a Single 3/16" hole in it that both lines run through. Placing both lines through the one hole stops the plane from crabbing when flying. Have the guide forward. Here's a picture of a bladder compartment that I do in 1/2A foamies. There's no tube cardboard or plastic. No need for it in 1/2A and your not going to puncture this setup. There's two layers of Fascal and one layer of covering. The inside is lined as well and the entire compartment is sealed afterwards with thinned white glue.
When I tie up a set of .012's for flying, I highly recommend those over .008's I crimp up a piece of .027 for a loop which goes over the button on the bellcrank. This Bellcrank was a Fox bellcrank. Buttons can easily be made from small allen screws and blind nuts turned upside down and the barbed teeth ground off. For Cox and Norvel flying, a piece of .018 would work fine for the termination loop. If you chose not to use a heavier piece, double looping the .012's through the crimp tube works marvelous. A single loop is all that's required of using Pro Braid Spectra. I use Pro Braid for everything anymore and I use button bellcranks on all of my combat planes. Ken


Ken Cook- Top Poster

- Posts : 5640
Join date : 2012-03-27
Location : pennsylvania
 Re: "Phred's Phault"
RknRusty wrote:Roddie,
Metal bellcranks are very famous for being short lived. Bushed as shown and wrapped with copper wire, the nylon cranks from Brodak and Sig will outlive us all.
Below: Note the shape of the brass tube is bent to both clear the bellcrank surfaces and also keep the leadout from flopping when not under tension.
Or if you want to make them, phenolic circuit board sheets are strong and rugged. Bush them the same way.
All of this bell crank talk has got me thinking and a little concerned. I can't remember which crank I used in my first Nieuport, but I'm betting that it's just conventional and unbushed. But I have many flights on the old girl with no problems....so far.
I did bush the Omni metal bell crank on my latest but used the same stranded leadouts as on the original. I have it all buttoned up and I'm not going to unbutton it now just to install a Brodak/Sig crank, but my next model, I will be sure to do just that.
I really like the setup pictured in Rusty's model with support on both ends. With the amount of space in this Nieuports front end I should be able to use that technique in my next model.


rsv1cox- Top Poster


Posts : 11250
Join date : 2014-08-18
Location : West Virginia
Page 2 of 7 •  1, 2, 3, 4, 5, 6, 7
Page 2 of 7
Permissions in this forum:
You cannot reply to topics in this forum

 Rules
Rules


