Log in
Search
Latest topics
» Cox films/videos...by Coxfledgling Today at 4:46 am
» Purchased the last of any bult engines from Ken Enya
by Coxfledgling Today at 4:18 am
» My N-1R build log
by roddie Today at 12:32 am
» Happy 77th birthday Andrew!
by akjgardner Today at 12:27 am
» TEE DEE Having issues
by TD ABUSER Yesterday at 9:43 pm
» Landing-gear tips
by roddie Yesterday at 6:17 pm
» Roger Harris revisited
by TD ABUSER Yesterday at 2:13 pm
» Tee Dee .020 combat model
by Ken Cook Yesterday at 1:41 pm
» Retail price mark-up.. how much is enough?
by Ken Cook Yesterday at 1:37 pm
» My latest doodle...
by roddie Yesterday at 10:43 am
» Chocolate chip cookie dough.........
by roddie Fri Nov 22, 2024 1:13 pm
» Free Flight Radio Assist
by rdw777 Fri Nov 22, 2024 9:24 am
Cox Engine of The Month
"Phred's Phault"
Page 5 of 7
Page 5 of 7 •  1, 2, 3, 4, 5, 6, 7
 Re: "Phred's Phault"
Did you ever finish and fly this experiment?

fredvon4- Top Poster


Posts : 4012
Join date : 2011-08-26
Age : 69
Location : Lampasas Texas
 Re: "Phred's Phault"
fredvon4 wrote:Did you ever finish and fly this experiment?
Fred, It's all too phitting that you should ask..
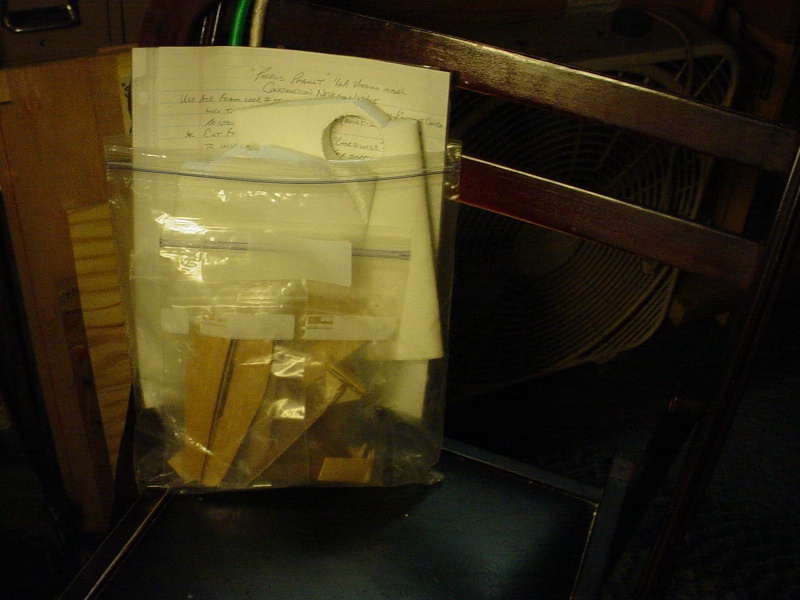
My gallon-size freezer-bag small airplane WIP storage system. I used to save the paper 5# Domino sugar bags to store tanks, hardware and such while painting/rebuilding a model. I have several such bags with parts in them.. in a box.. somewhere around here.
 Re: "Phred's Phault"
Somehow I got the urge to work on this model yesterday. Not much to show here.. but what I had to do was difficult.
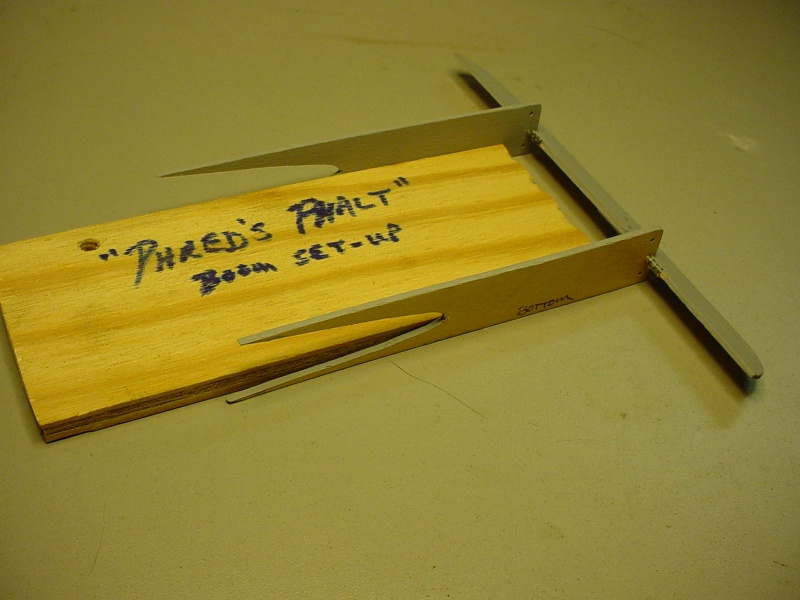
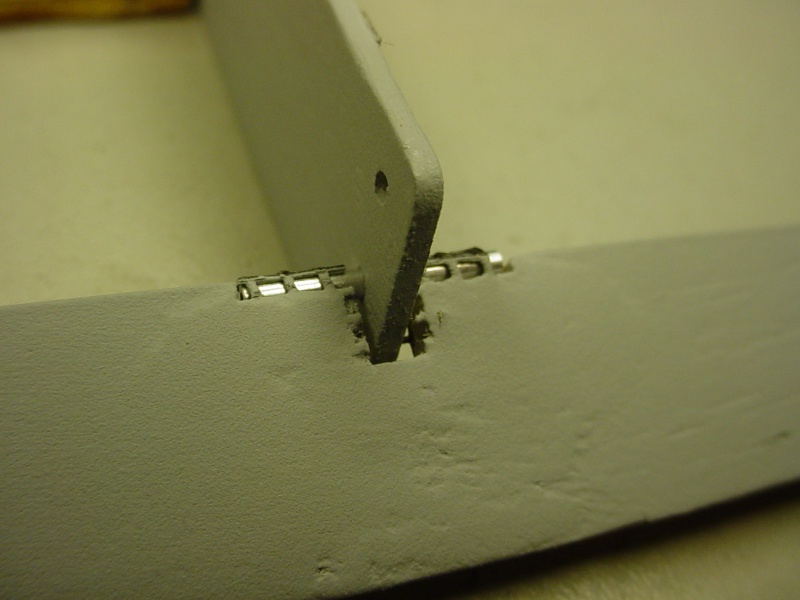
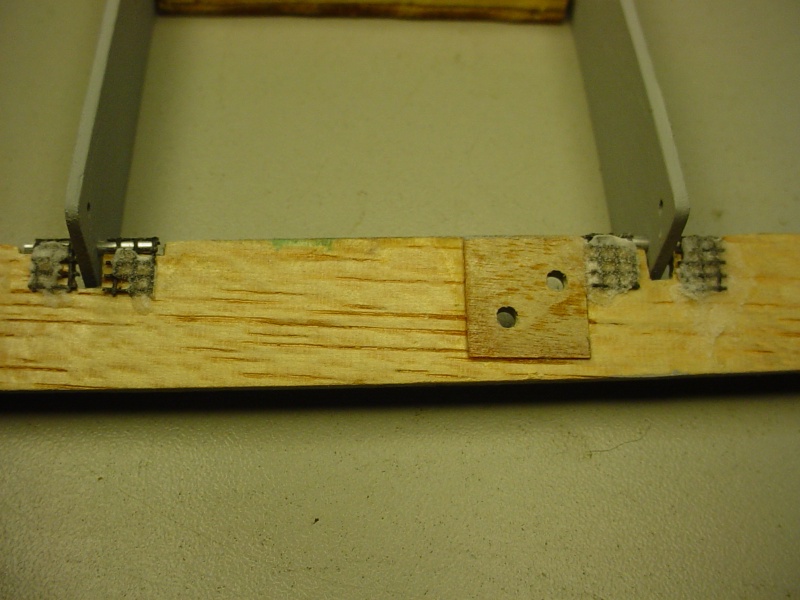
The unpainted side of the stab needed to have those screen hinges attached.. and the only way to do it was to assemble the booms with the AL-tube hinge-pins. I used a common (sewing) pin to pull the screen tight and tack it to the stab while I spread thick CA through the weave. I sprinkled some baking-soda over the CA to speed the cure while working under a lighted magnifier..
Now I'll need to "fair" them into the stab by filling and sanding.. which will be even more tedious now that it's assembled. I suppose I'll need to make a fixture that the booms will sit "down" into.. and "pin" the stab onto some suitable base to keep it rigid.. or else I risk breaking something.
 Re: "Phred's Phault"
I will be taking my ACE "Sort-O-Satan" to the S.M.A.L.L
Roddie...finish the long build bugger and then go pile it in to terra firma a few times...then some more... then put a real engine on it and enjoy 1.5 second laps... Har dee har har....
seriously brother get the plane off the table and in the air...I promise it will be much fun and near indestructible.... comes out a fair bit heavier than a real built wing lil Satan but good strong .049/.051 hauls it faster than us old buggers can keep up

fredvon4- Top Poster


Posts : 4012
Join date : 2011-08-26
Age : 69
Location : Lampasas Texas
 Re: "Phred's Phault"
fredvon4 wrote:I will be taking my ACE "Sort-O-Satan" to the S.M.A.L.L
Roddie...finish the long build bugger and then go pile it in to terra firma a few times...then some more... then put a real engine on it and enjoy 1.5 second laps... Har dee har har....
seriously brother get the plane off the table and in the air...I promise it will be much fun and near indestructible.... comes out a fair bit heavier than a real built wing lil Satan but good strong .049/.051 hauls it faster than us old buggers can keep up
Hey Phred,
I need to be mindful with proceeding in a methodical way with this airplane where I've let it sit for so long. I have "chicken-scratch" notes accompanying most of my builds.. along with zipper-bags of prototype parts.. that may or may not be used. This boom assy. for example; was going to be painted complete, prior to assembly.. but that wouldn't have been a good idea. I'm still faced with painting it assembled; after I fill and sand the fiberglass-screen hinges. Currently; the hinge-barrels (1/16" aluminum tubing) move freely inside the screen and the boom-holes. The stab. will flop to and fro with gravity. The stab. is notched to hold the pins captive.. but it might be better to bind the pins to the screen and stab.. so that the pins rotate in the boom-holes only. I'm concerned about the pins locking-up in the boom-holes when I paint the assembly. There didn't seem to be any way around it.. other than "waxing" the pins beforehand.
 Maybe I could melt drops of wax onto the pins to keep them from sticking.. We'll see.
I'm very tempted to rush finishing this (as well as my T33 speed model) out of embarrassment. I think I'm going to let that urge overcome my tendency to overthink and procrastinate. You guys can hold me to this statement!
 Re: "Phred's Phault"
Picture worth a lot of words
I think you will be fine with your plan to keep it free floating after paint/dope
here are some of my methods....in all cases the boom has a brass...or aluminum...or copper tubing as a bearing
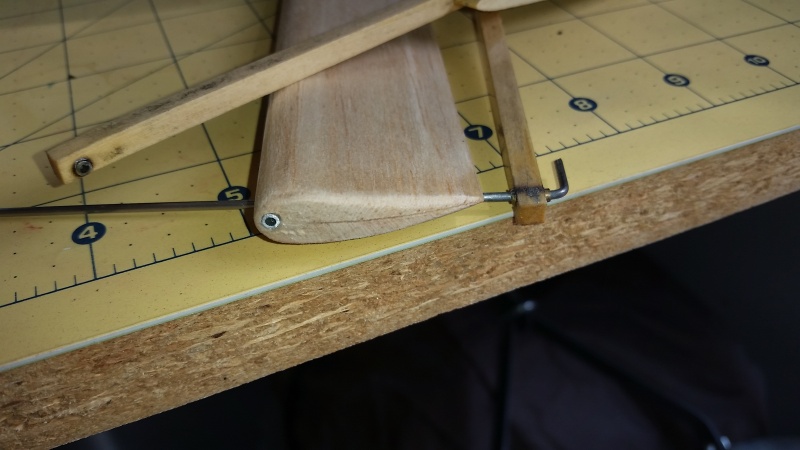
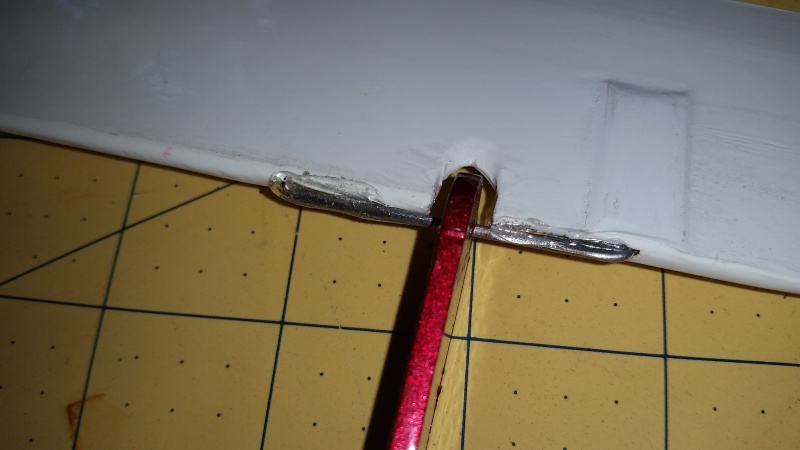
This one is the tail of the Sort-A-Satan....the black is fuel tubing spacers


I think you will be fine with your plan to keep it free floating after paint/dope
here are some of my methods....in all cases the boom has a brass...or aluminum...or copper tubing as a bearing


This one is the tail of the Sort-A-Satan....the black is fuel tubing spacers


fredvon4- Top Poster


Posts : 4012
Join date : 2011-08-26
Age : 69
Location : Lampasas Texas
 Re: "Phred's Phault"
fredvon4 wrote:Picture worth a lot of words
I think you will be fine with your plan to keep it free floating after paint/dope
here are some of my methods....in all cases the boom has a brass...or aluminum...or copper tubing as a bearing
My booms lack an insert-bearing.. if that's what you meant.
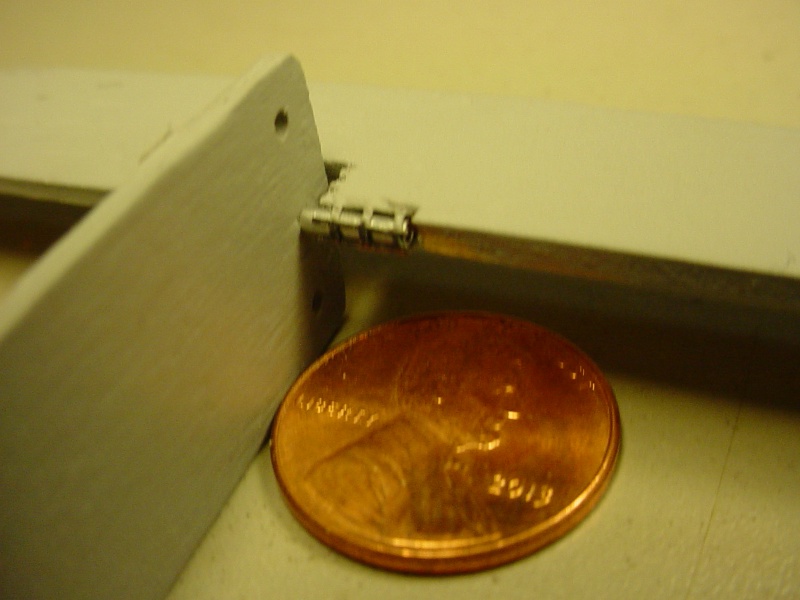
I saved your photos for future reference. Thanks Fred.
The tail-booms and stab. are 50% scale Voo Doo outlines exactly. The booms aren't plywood though. They're cut from hardwood craft-sticks.
Is slow-cure epoxy the best choice for gluing wood to foam.. or are there other (or better) alternatives?
 Re: "Phred's Phault"
I use 30 minute epoxy. First I use a toothpick to dot the hinges with vaseline. Then hit them quickly with a heat gun and the Vaseline disappears into the hinge barrel. It's hard for me to use little enough epoxy, so I have to wipe it as it scoots out during hinge insertion with the corner of an acetone damp paper towel. That's with Dubro hinges, you probably won't have that problem with your configuration.
_________________
Don't Panic!
...and never Ever think about how good you are at something...
while you're doing it!
My Hot Rock & Blues Playlist
...and never Ever think about how good you are at something...
while you're doing it!
My Hot Rock & Blues Playlist

RknRusty- Rest In Peace

- Posts : 10869
Join date : 2011-08-10
Age : 68
Location : South Carolina, USA
 Re: "Phred's Phault"
Considering these experiments may not fly 100s of flights then just having the hinge in the bare hardwood will be fine
For most of the foam models I use 30 min epoxy, 1.5 hour epoxy, straight white glue, thinned white glue, non foaming and foaming Gorilla glue, Bob Smith Gold foam safe CA.... each has plus and not so plus uses
I prefer Micro Balloons but talc, or cornstarch can be used to thicken many glues so they don't run, stay put and can be formed as in fillets
Probably what is best for setting the booms is thickened slow cure epoxy
On one foam wing I was covering with SLC---- I sprayed the very clean dust free panel with aquanet hair spray to help keep the SLC from sliding around but this was a two person affair because six hands are needed

fredvon4- Top Poster


Posts : 4012
Join date : 2011-08-26
Age : 69
Location : Lampasas Texas
 Re: "Phred's Phault"
RknRusty wrote:I use 30 minute epoxy. First I use a toothpick to dot the hinges with vaseline. Then hit them quickly with a heat gun and the Vaseline disappears into the hinge barrel. It's hard for me to use little enough epoxy, so I have to wipe it as it scoots out during hinge insertion with the corner of an acetone damp paper towel. That's with Dubro hinges, you probably won't have that problem with your configuration.
Hey Rus, I think I'm gonna be ok with my hinge-pins.. but may try your idea with a tiny bit of Vaseline on a toothpick where they pass through the boom-holes. I probably should have coated the pins with something before I installed them.
Thanks Fred. Looking back through this thread.. Ken had also recommended Gorilla-Glue.. which I "have".. and think I'll try on some assemblies, instead of mixing epoxy.
 Re: "Phred's Phault"
Hey Roddie , I had forgotten about this build , Glad you are back on it and look forward to the flying finish  I like the hinges Fred's got you trying out and may have to employ them into a build next time . getback


getback- Top Poster


Posts : 10442
Join date : 2013-01-18
Age : 67
Location : julian , NC
 Re: "Phred's Phault"
getback wrote:Hey Roddie , I had forgotten about this build , Glad you are back on it and look forward to the flying finishI like the hinges Fred's got you trying out and may have to employ them into a build next time . getback
Yea Eric... we're off to a flying... fly in the ointment...
So.. after a year and a half, I finally conjure-up the testicular fortitude to cut the channel for the lead-outs.
Check my depth to the bottom of the guide-slot in the tip as a gage.. good.

Commence to rout the channel.. going much smoother than I expected.. AWESOME!
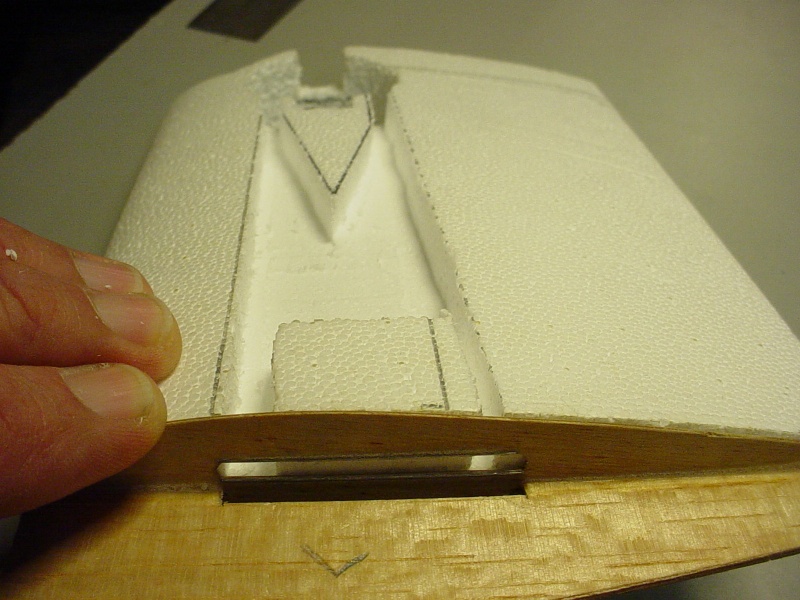
But then..
 Re: "Phred's Phault"
I hate it when a tools craps out
I have several (3) Dremel tools...not cuz they crap OUT, but mostly for convenience of each having a different purpose
Of course this makes the occasional crap out a non event
I also tend to recommend Harbor Freight stuff with cautions...my attitude is, if you understand the HF item is a low cost alternative ..AND it's limitations ..then a person can make a frugal purchase and not be disappointed when it later fails
so HF has a very good and cheap rotary tool you should consider
http://www.harborfreight.com/rotary-tool-kit-80-pc-69451.html
The $9.99 is worth the item just for all the bits and cut off wheels.... I have had three of these in the last 5 years and two are still working fine...one hit the trash can when the front bearing started singing
I still use my very old Dremel Model 395 corded a lot-- even with a sloppy front bearing, and both my (gifted to me) cordless 8020s are invaluable---though frugal me would probably have never bought the $80+/- LiOn Dremels...
Do NOT forget Dremel has a very good rebuild program and if your tool is out of production they send you the newer version for a very nominal price

fredvon4- Top Poster


Posts : 4012
Join date : 2011-08-26
Age : 69
Location : Lampasas Texas
 Re: "Phred's Phault"
fredvon4 wrote:I hate it when a tools craps out
I have several (3) Dremel tools...not cuz they crap OUT, but mostly for convenience of each having a different purpose
Of course this makes the occasional crap out a non event
I also tend to recommend Harbor Freight stuff with cautions...my attitude is, if you understand the HF item is a low cost alternative ..AND it's limitations ..then a person can make a frugal purchase and not be disappointed when it later fails
so HF has a very good and cheap rotary tool you should consider
http://www.harborfreight.com/rotary-tool-kit-80-pc-69451.html
The $9.99 is worth the item just for all the bits and cut off wheels.... I have had three of these in the last 5 years and two are still working fine...one hit the trash can when the front bearing started singing
I still use my very old Dremel Model 395 corded a lot-- even with a sloppy front bearing, and both my (gifted to me) cordless 8020s are invaluable---though frugal me would probably have never bought the $80+/- LiOn Dremels...
Do NOT forget Dremel has a very good rebuild program and if your tool is out of production they send you the newer version for a very nominal price
Thanks Phred.. This is a model 395.. and what really kills me.. is that I hadn't used it since my Dad gave it to me. It was his.. and I know that he probably only used it once or twice. I was running on #2 slow-speed when I heard what sounded like a snap. The shaft-lock still engages.. so it didn't break there.
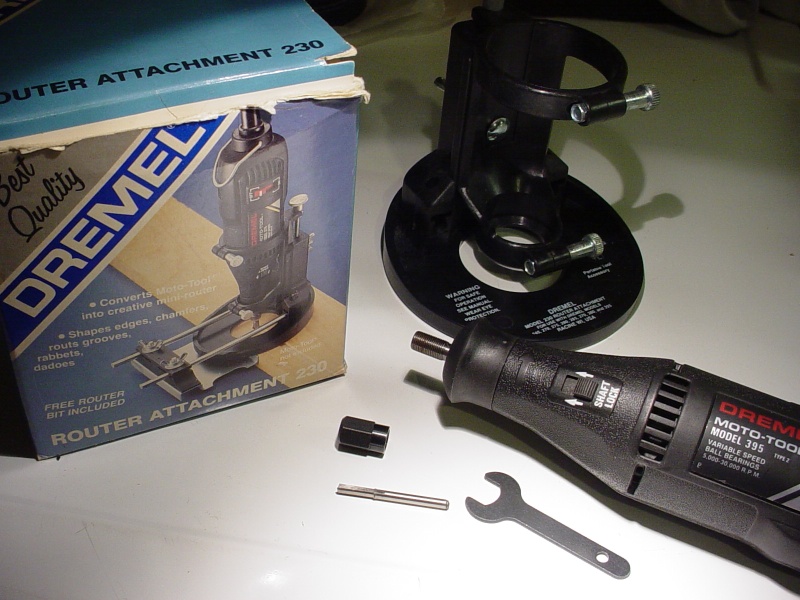
I'd rather get another #395 so I can use the router attachment. Maybe I can find a NOS/used one for cheap.
 Re: "Phred's Phault"
Here's what I found when I took the #395 Dremel apart.
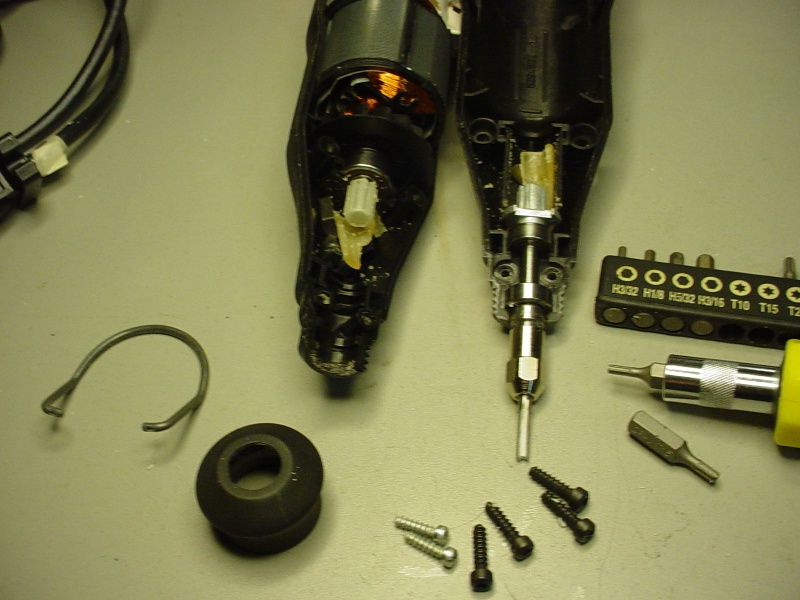
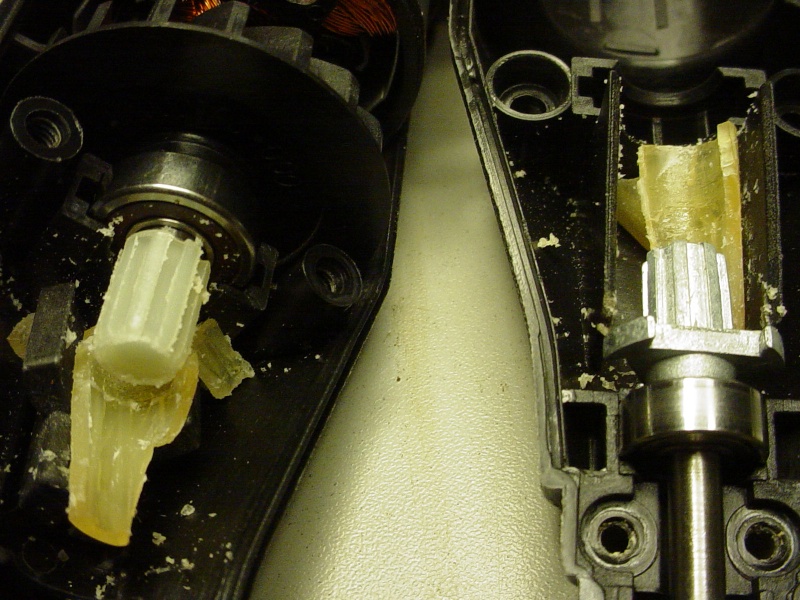
This broken part is not of a rigid plastic.. but rather a soft; almost "waxy" consistency.
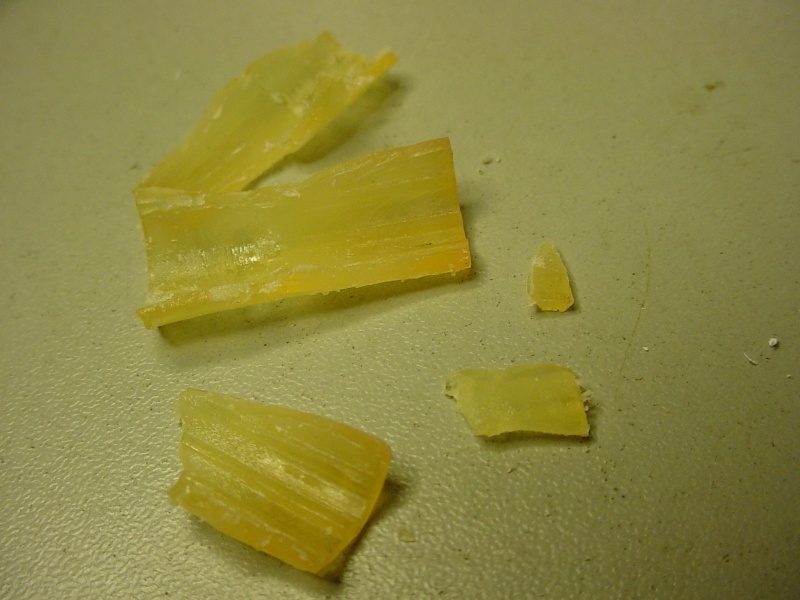
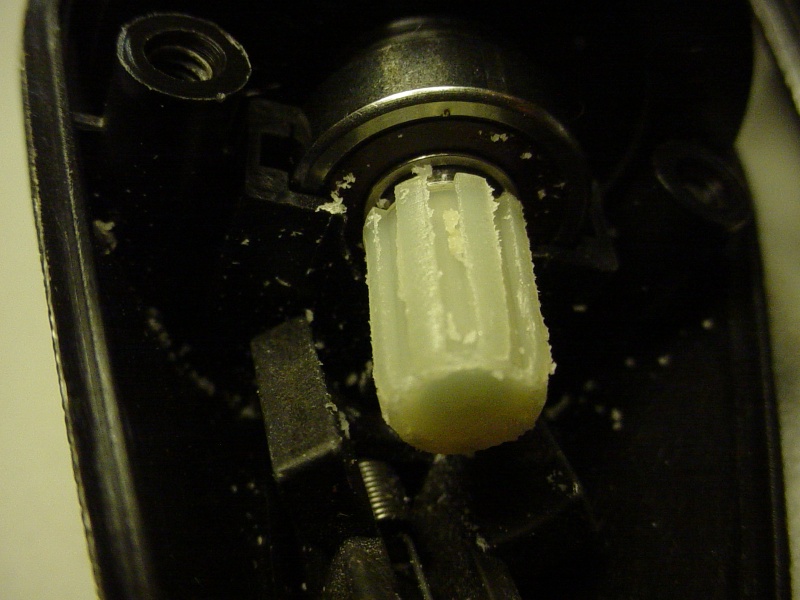
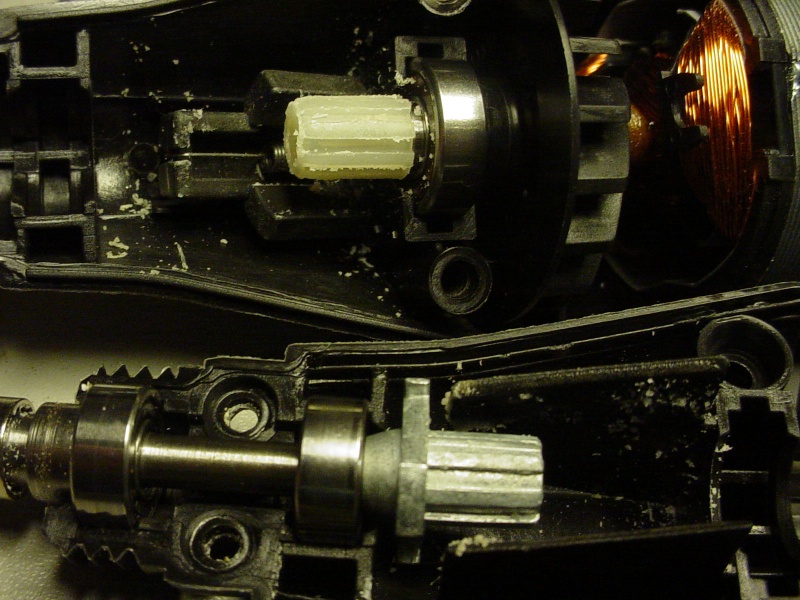
Seems to me.. Dremel should still stock this part.. or an upgrade made of better material.


This broken part is not of a rigid plastic.. but rather a soft; almost "waxy" consistency.


Seems to me.. Dremel should still stock this part.. or an upgrade made of better material.
 Re: "Phred's Phault"
Hey Roddie, have a look at this web site:
http://www.ereplacementparts.com/dremel-395-type-corded-multitool-parts-c-15440_15456_202529.html
I think it is part nr5 that you need, only 2,99 USD!! I hope you can your Dremel fixed. I like your work on the wing. Never seen before.
http://www.ereplacementparts.com/dremel-395-type-corded-multitool-parts-c-15440_15456_202529.html
I think it is part nr5 that you need, only 2,99 USD!! I hope you can your Dremel fixed. I like your work on the wing. Never seen before.

OVERLORD- Diamond Member

- Posts : 1807
Join date : 2013-03-19
Age : 58
Location : Normandy, France
 Re: "Phred's Phault"
OVERLORD wrote:Hey Roddie, have a look at this web site:
http://www.ereplacementparts.com/dremel-395-type-corded-multitool-parts-c-15440_15456_202529.html
I think it is part nr5 that you need, only 2,99 USD!! I hope you can your Dremel fixed. I like your work on the wing. Never seen before.
Yes.. that's the part Lieven. Thank You!!! At that $$.. I should get a couple.. maybe 3. I think it would be worth it. The tool otherwise looks to be in fine shape. I'll bet the motor-brushes aren't even seated yet. I checked out Dremel's web site.. and it's just as Fred explained. They'd probably send me a reconditioned upgrade that likely wouldn't fit into my router attachment.
Luckily most of that wing channel has been cut. I'll take a flat rasp to that section near the tip.. and finish off with a small sanding block. I can use a thin steel straight-edge and pencil-iron to melt a slot for the pushrod.
On a positive note.. I have the foam-dust swept into a bag to use as a filler for where I bungled the wing on the table saw a while back..
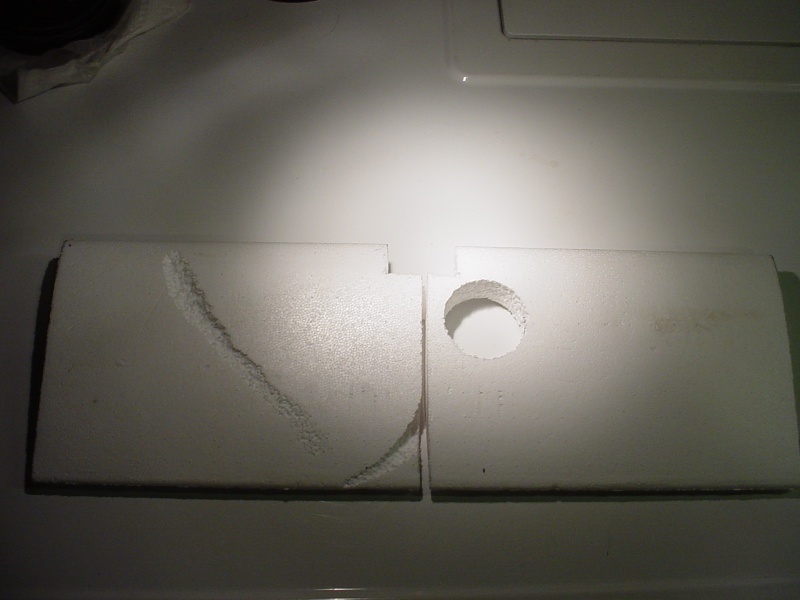
I'm thinking white glue.. maybe thinned, to mix the foam-dust for filler?
 Re: "Phred's Phault"
The coupler failing is quite a common problem with the Dremel but Bosch, I believe they bought Dremel, still stock spare couplers.
The coupler is meant to fail to stop the motor stalling and burning out. However, they also deteriorate with age (me too!) - I suppose there is a fine line between having a coupler made of a material that lasts and one that will break to save the motor.
You will see that the material on the newer replacement parts is different.
It is worth repairing - the older dremels are far more reliable than the newer ones.
I have a Dremel 300 and it is fine hand held but the speeds aren't variable, it vibrates and the drills wobble in it. It is not good for accurate holes in metal. The older Dremel I had (which was a 395) lasted many years - I wore it out by using it to rout holes and cut ceramic tiles.
I have migrated over the years to Proxxon. Not cheap but very good. I have the Proxxon IBS/E - even used it for milling aluminium with my Stepcraft CNC. I have my Proxxon tools shipped to me from Italy -
Why?
IBS/E Italy
https://www.foxcot.com/proxxon/power-tools/drill-grinder/drill-grinder-proxxon-28481-micromot-ibs-e.html
IBS/E UK
http://www.cooksongold.com/Jewellery-Tools/Proxxon-Professional-Drill-prcode-999-3206?p=gs&gclid=Cj0KEQjwmpW6BRCf5sXp59_U_ssBEiQAGCV9GiIzq0ta9eqPaqJcdmF6oWmcr1T0xFJuReJLVWaVa9kaAsoM8P8HAQ
We are talking quite a saving and it is across the range of Proxxon tools! Don't know why!
This video shows the difference between the Dremel and the Proxxon.
Unfortunately - I thought Proxxon was expensive in the UK, luckily - Italy is on the same voltage 240v, but in the USA
http://www.woodcraft.com/product/822516/proxxon-professional-rotary-tool-ibe-model-38481.aspx
?????????

ian1954- Diamond Member

- Posts : 2688
Join date : 2011-11-16
Age : 70
Location : England
 Re: "Phred's Phault"
Try white gorilla glue and low tack masking tape. The foaming action will fill that gap. 3 layers of masking tape should resist all movement and present a continuous profile
Phil
Phil

pkrankow- Top Poster

- Posts : 3025
Join date : 2012-10-02
Location : Ohio
 Re: "Phred's Phault"
Thanks guys.. I really appreciate the comments after such an abandoned build as this. I'll try my best to keep up the momentum. Ron Cribbs is coming to Rhode Island this late Summer to do some work at *Quonset Point* .. and I'd really like to have a handful of airplanes to fly while he's here!
Ian, I want to fix my Dremel tool. Hopefully the replacement coupler is of a more durable material.. because NOS spare parts would be subject to the same degradation. Maybe Bosch upgraded the mat'l. spec on the coupler when they acquired Dremel? I can understand it being a "sacrificial" part of the assembly.. but most people who would buy a rotary tool, would be conscious of a motor-stalling condition. The material that was used for my coupler could very well be considered as substandard.. with a high rate of failure. Warranty claims were likely numerous in cases where the tool was used rigorously in the first few months following purchase. I would expect a tool such as this to develop a bearing failure.. or have the motor-brushes wear-out.. before what I experienced.
Phil, Thanks for the tip on the filler. I'll naturally want something that won't expand. I bought some "Elmer's" white glue recently.. because there's none in the house.. I also have Aliphatic Resin. Neither of these have the tendency to expand.. but if given the option; ease of sanding is important to me. I'm not sure now; how I'm going to cover the wing. The tips are wood.. and I'm tempted to cover them separately with regular mono-kote. I have a roll of white low-temp covering that I can use for the foam.. but I asked a question recently about adhering silkspan to the foam.. as a barrier to protect against finishes that might attack "raw-foam".. so I need a little more feedback on that.
Just to recap.. my wing is cut into two 7.75" panels.. with 1.25" tips for a 18.0" span. 50% scale Goldberg Voo Doo. I have a central 3mm luan-ply rib which joins the halves. This rib is trimmed short at the front to accommodate a 1/4" ply radial engine-mount plate, backed up by triangular 3/4" ply wood gussets. This rib is slotted to receive a central 5" spreader-plate/spar of the same material.. to provide a bellcrank-mount inside the inboard wing-panel, and extra reinforcement for the outboard wing-panel. This central rib/engine-mount/spreader-plate will be imbedded into the two wing-panels with an adhesive.. either epoxy or polyurethane.. and capped on the top-side with laminated balsa, flush with the top-side of the wing surface.
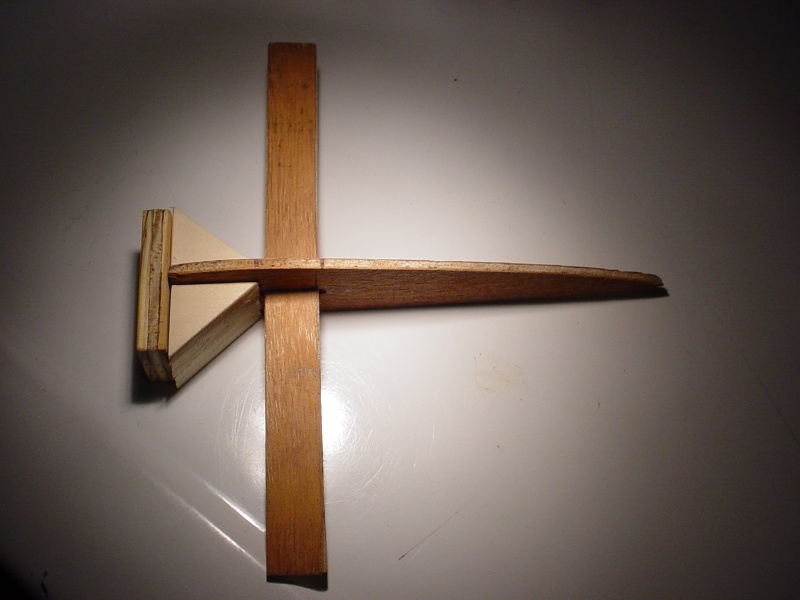
Me being me.. I'm trying to think ahead with fuel-delivery to the planned Cox .049 reedy with "postage-stamp" backplate. The engine is planned to be a vertically-oriented cylinder and needle-valve; leaving the belly free to accept a fuel-feed.
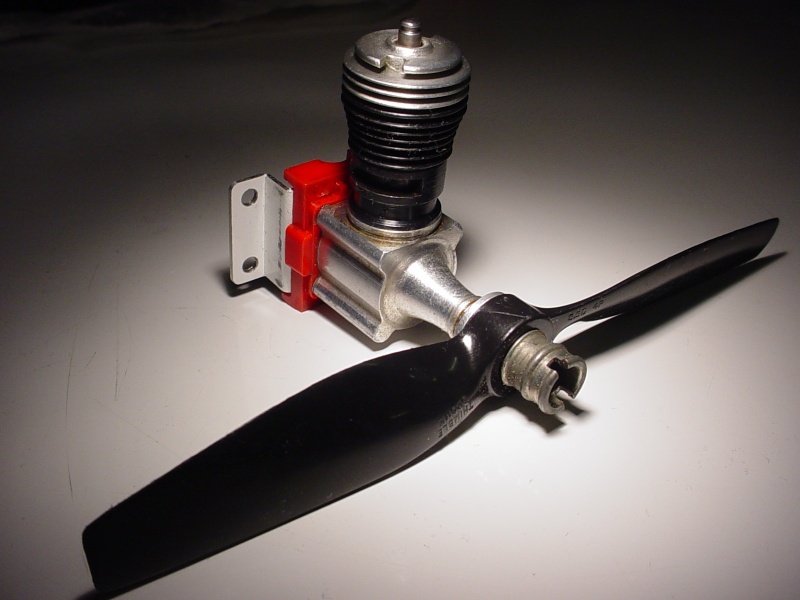
These are the .040" aluminum mounts for the old production backplate that I made a few years ago..
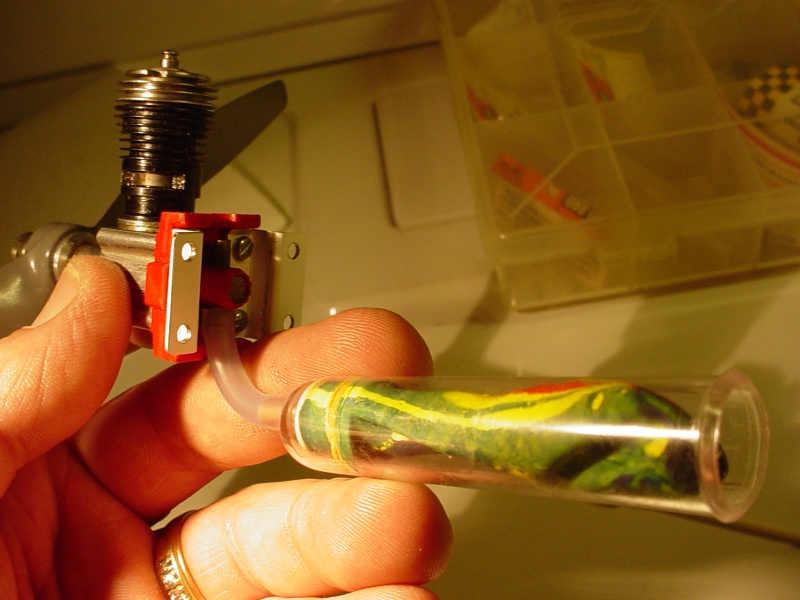
I still want to go with an under-belly capsule for a balloon-tank. This will require installation of brackets for the capsule. I'm planning on two .015" m/w "hoops" bound to the bottom of the central rib, to hold the balloon capsule. I can do that at this point in construction fairly easily. I can always snip the wires off later, if it doesn't prove-out. It would however; be aerodynamically efficient.
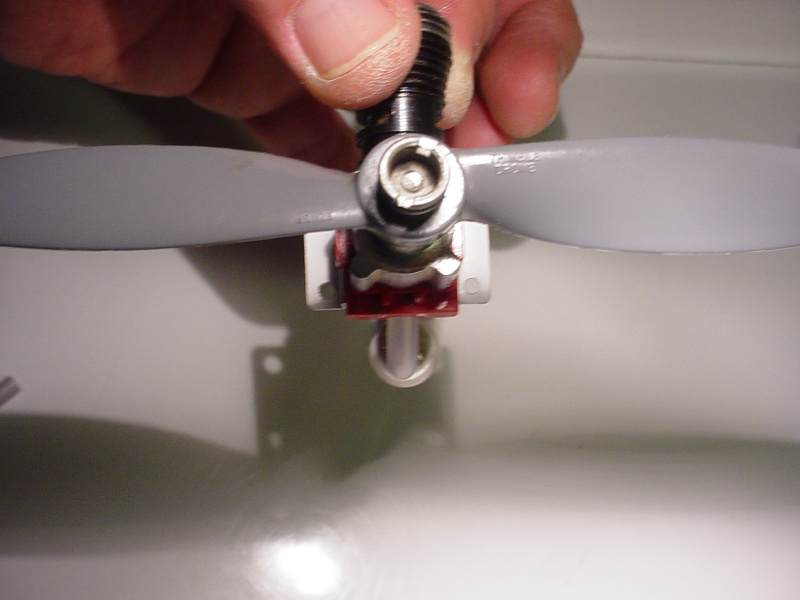
I'd really like to be the first guy that I've seen here; since "I've" been a CEF member.. to utilize a postage-stamp backplate in a scratch-built model!
Ian, I want to fix my Dremel tool. Hopefully the replacement coupler is of a more durable material.. because NOS spare parts would be subject to the same degradation. Maybe Bosch upgraded the mat'l. spec on the coupler when they acquired Dremel? I can understand it being a "sacrificial" part of the assembly.. but most people who would buy a rotary tool, would be conscious of a motor-stalling condition. The material that was used for my coupler could very well be considered as substandard.. with a high rate of failure. Warranty claims were likely numerous in cases where the tool was used rigorously in the first few months following purchase. I would expect a tool such as this to develop a bearing failure.. or have the motor-brushes wear-out.. before what I experienced.
Phil, Thanks for the tip on the filler. I'll naturally want something that won't expand. I bought some "Elmer's" white glue recently.. because there's none in the house..
Just to recap.. my wing is cut into two 7.75" panels.. with 1.25" tips for a 18.0" span. 50% scale Goldberg Voo Doo. I have a central 3mm luan-ply rib which joins the halves. This rib is trimmed short at the front to accommodate a 1/4" ply radial engine-mount plate, backed up by triangular 3/4" ply wood gussets. This rib is slotted to receive a central 5" spreader-plate/spar of the same material.. to provide a bellcrank-mount inside the inboard wing-panel, and extra reinforcement for the outboard wing-panel. This central rib/engine-mount/spreader-plate will be imbedded into the two wing-panels with an adhesive.. either epoxy or polyurethane.. and capped on the top-side with laminated balsa, flush with the top-side of the wing surface.

Me being me.. I'm trying to think ahead with fuel-delivery to the planned Cox .049 reedy with "postage-stamp" backplate. The engine is planned to be a vertically-oriented cylinder and needle-valve; leaving the belly free to accept a fuel-feed.
These are the .040" aluminum mounts for the old production backplate that I made a few years ago..

I still want to go with an under-belly capsule for a balloon-tank. This will require installation of brackets for the capsule. I'm planning on two .015" m/w "hoops" bound to the bottom of the central rib, to hold the balloon capsule. I can do that at this point in construction fairly easily. I can always snip the wires off later, if it doesn't prove-out. It would however; be aerodynamically efficient.


I'd really like to be the first guy that I've seen here; since "I've" been a CEF member.. to utilize a postage-stamp backplate in a scratch-built model!
 Re: "Phred's Phault"
The gorilla white glue will sand just fine. It will need a coating of some type after it is done. The tape is temporary, and makes the mold for the polyurethane foam to fill. I have repaired sanding gouges in balsa LE material with this method and after paint can't find the damage even though I know exactly where it should be!
Phil
Phil

pkrankow- Top Poster

- Posts : 3025
Join date : 2012-10-02
Location : Ohio
 Re: "Phred's Phault"
Hey Roddie I had my 395 Dremel do the same thing some time back ,,a good friend of mine took it apart and repaired it with a piece of fuel hose !! Made me feel kind of stupid but I have taken drills apart and they ended up in the 100 mph trash can . Wing is coming along nicely man good to see it !! Say Cribbs is coming to your part of the town COOL !! getback 


getback- Top Poster


Posts : 10442
Join date : 2013-01-18
Age : 67
Location : julian , NC
 Re: "Phred's Phault"
getback wrote:Hey Roddie I had my 395 Dremel do the same thing some time back ,,a good friend of mine took it apart and repaired it with a piece of fuel hose !! Made me feel kind of stupid but I have taken drills apart and they ended up in the 100 mph trash can . Wing is coming along nicely man good to see it !! Say Cribbs is coming to your part of the town COOL !! getback
Hey Eric, I just ordered the parts through the link that Lieven provided (
 thanks again Lieven) and watched the repair video that Ian provided (
  thanks Ian)
 After reading "your" post.. I was very tempted to try making a coupler from some 5/16" ID clear vinyl tubing.. but decided that it would be safer to obtain the replacement part. I bought x2.. for less than $12.00/shipped. I should receive them before the end of next week.. and until then, there's plenty of other work I can do on the model.
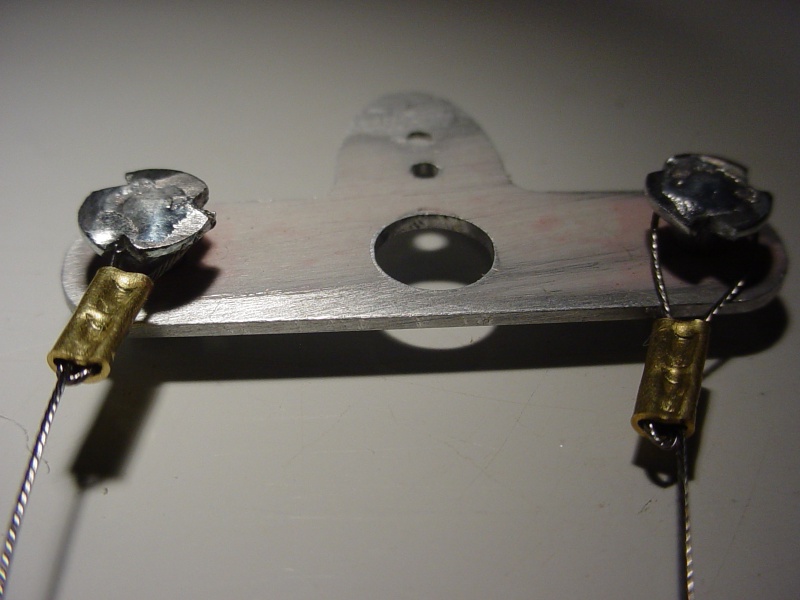
The bell-crank is one that I made.. and has buttons. I need to re-make the lead-outs with smaller loops that won't slip-off the button-heads. It's either that.. or cut-down one of my Sig 1/2A nylon bell-cranks.
 Re: "Phred's Phault"
I do the same thing for making button bellcranks on 1/2A's

Ken Cook- Top Poster

- Posts : 5640
Join date : 2012-03-27
Location : pennsylvania
 Re: "Phred's Phault"
roddie wrote:I'd really like to be the first guy that I've seen here; since "I've" been a CEF member.. to utilize a postage-stamp backplate in a scratch-built model!
Don't worry, there's a good chance that you will...
I've been considering my own version of Dale Kirn's "290 Special" for a few months, it is on "the list" but knowing me, it'll take a few months more even though I do have an engine already cleaned up for it
EDIT: here's a link to the plan:
http://www.outerzone.co.uk/plan_details.asp?ID=6104

KariFS- Diamond Member

- Posts : 2044
Join date : 2014-10-10
Age : 53
Page 5 of 7 •  1, 2, 3, 4, 5, 6, 7
Page 5 of 7
Permissions in this forum:
You cannot reply to topics in this forum

 Rules
Rules


