Log in
Search
Latest topics
» My N-1R build logby roddie Yesterday at 9:29 pm
» Funny what you find when you go looking
by rsv1cox Yesterday at 3:21 pm
» Landing-gear tips
by 1975 control line guy Yesterday at 8:17 am
» Purchased the last of any bult engines from Ken Enya
by sosam117 Yesterday at 7:45 am
» Cox NaBOO - Just in time for Halloween
by rsv1cox Tue Nov 19, 2024 6:35 pm
» Canada Post strike - We are still shipping :)
by Cox International Tue Nov 19, 2024 12:01 pm
» Duende V model from RC Model magazine 1983.
by getback Tue Nov 19, 2024 6:08 am
» My current avatar photo
by roddie Mon Nov 18, 2024 9:05 pm
» My latest doodle...
by TD ABUSER Mon Nov 18, 2024 11:30 am
» Brushless motors?
by rsv1cox Sun Nov 17, 2024 6:40 pm
» Free Flight Radio Assist
by rdw777 Sun Nov 17, 2024 6:03 pm
» Tribute Shoestring build
by amurphy6812 Sun Nov 17, 2024 5:43 pm
Cox Engine of The Month
Giving new life to a classic?
Page 2 of 3
Page 2 of 3 •  1, 2, 3
 Re: Giving new life to a classic?
Well, as I said, I took the easy way out on the wing. I decided to use 1/16” balsa sheet top and bottom with ribs from the same. I didn’t have the balsa on hand, so I ran to the hobby shop yesterday. They didn’t have what I wanted, so I was resigned to butt gluing sheets of 3” balsa sheets together for the 6” sheet I needed. The woman at the hobby shop saw me sorting through her balsa asked if I was finding what I needed. She said she just got in a box of wood she hadn’t opened yet, so I jumped at the chance. I made a nuisance of myself by pulling out all the wood out of the box to get to the wide sheets on the bottom. The big box from Bud Nosen had lots of goodies, and to my delight it had 15 sheets of 1/16x6x36 in it. As I was sorting them, the woman asked what I was looking for, so I took a few minutes to educate her on how to grade balsa sheets.
I selected one sheet of medium balsa, and a nice sheet that was half medium balsa and half light balsa. Perfect for what I’m doing. I also got a great price on the sheets at $1.75 each!
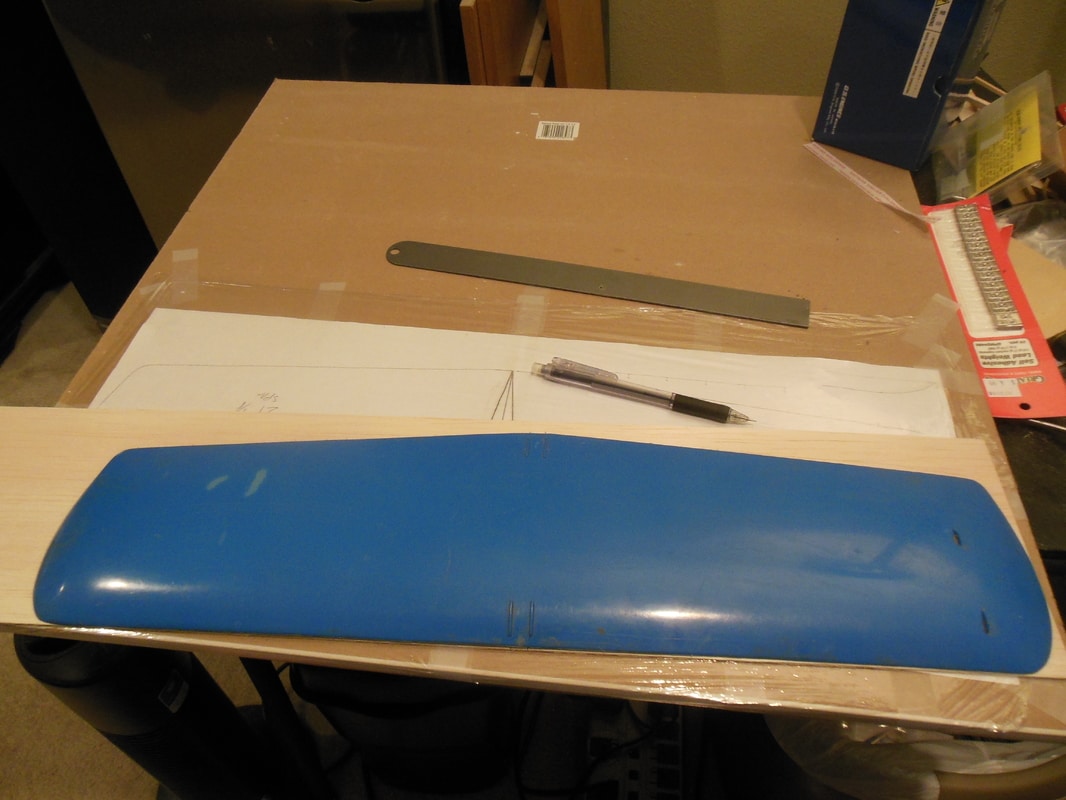
On to the wing build. I took the medium sheet and put the wing on it to trace the shape using the original wing. Then I cut it out to shape.

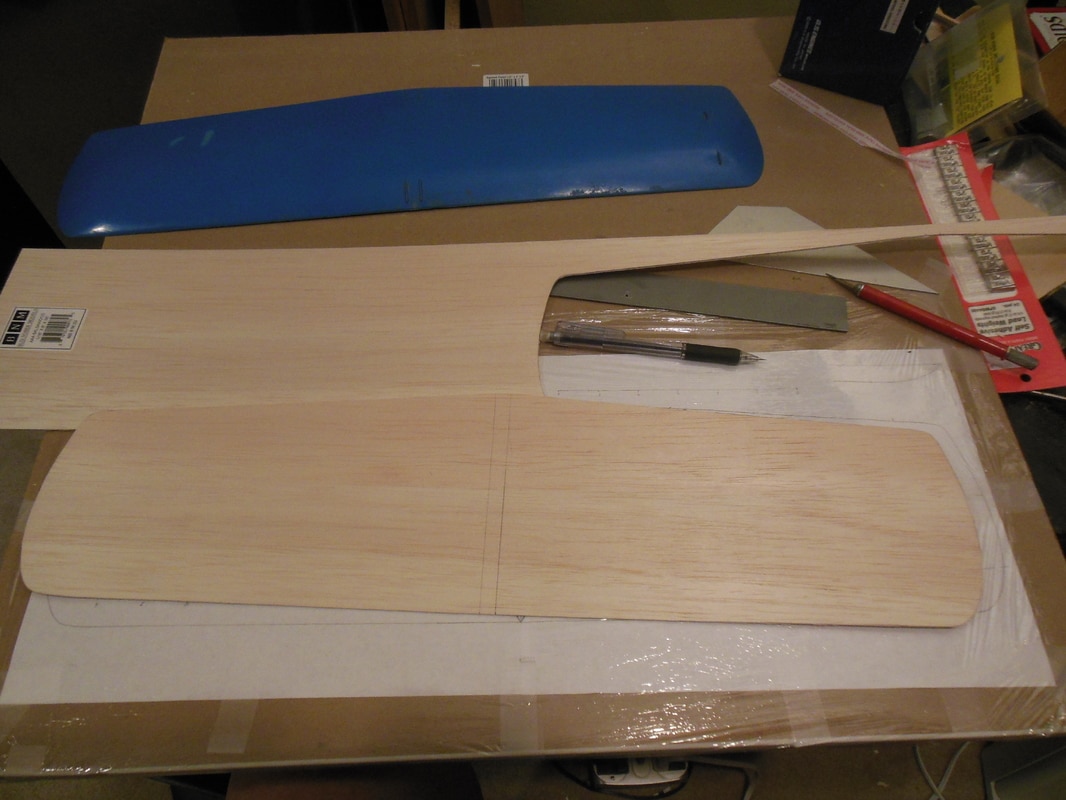
Next, I traced out the airfoil on some 1/32” ply to use as a rib template and cut out six 1/16” ribs and a ¼” rib for the center.
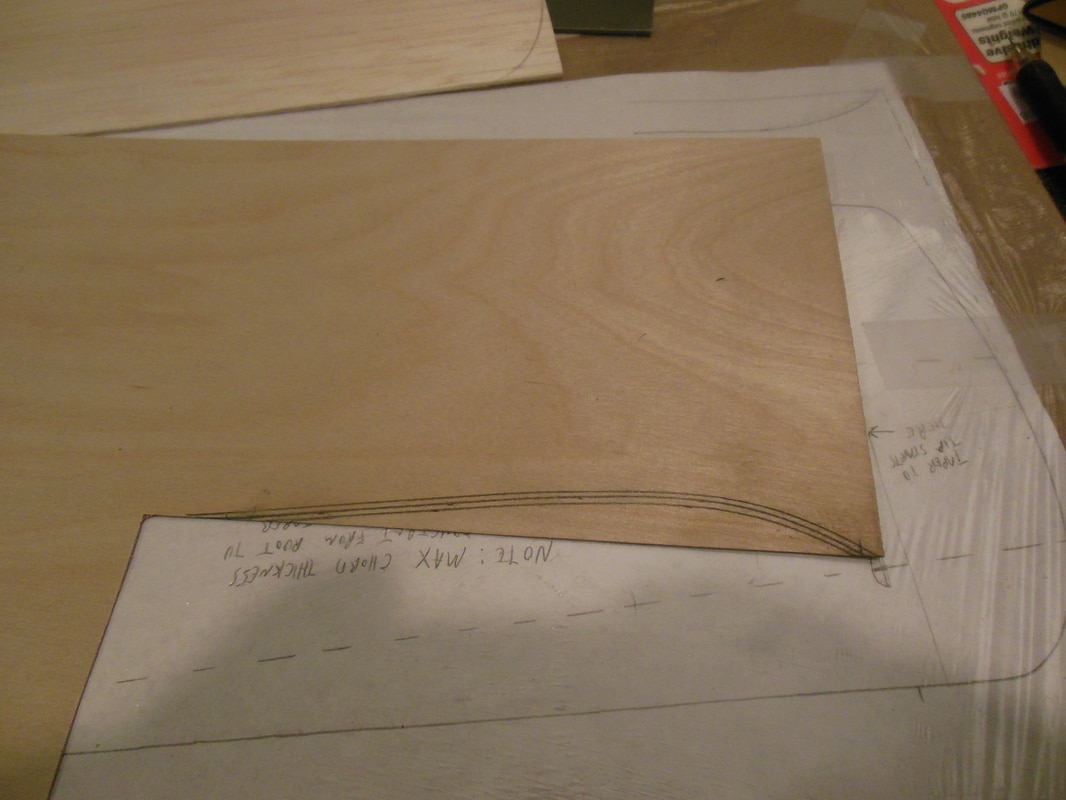
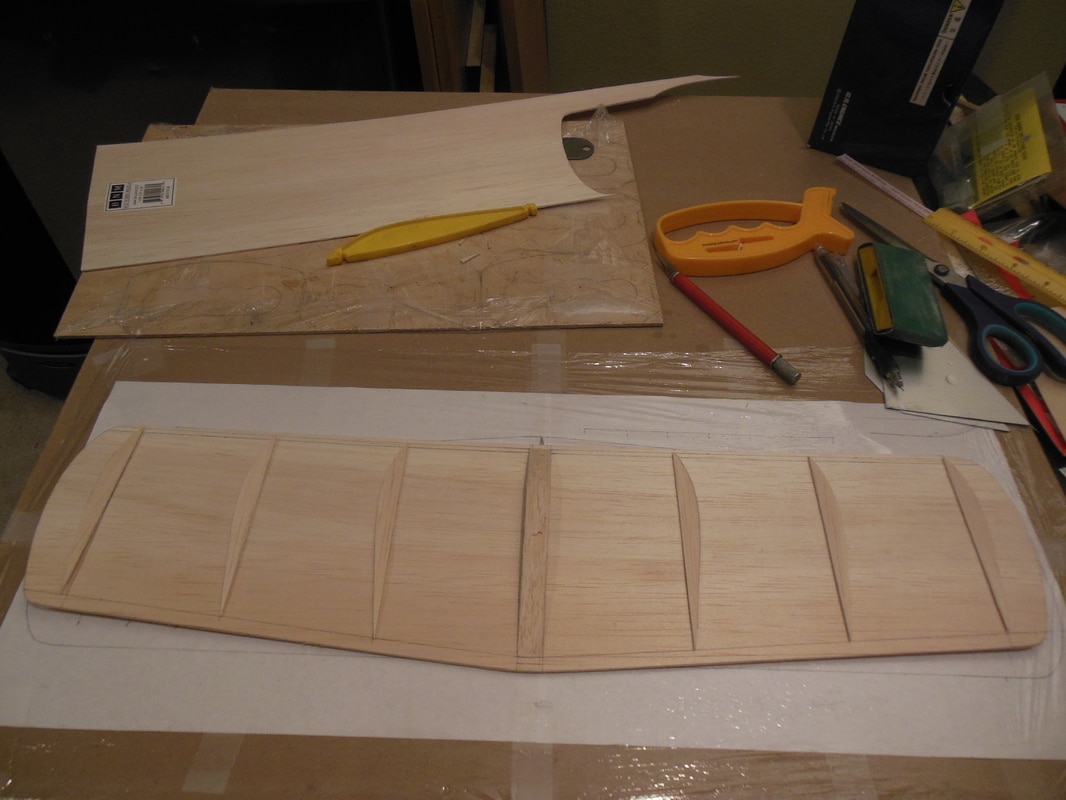
I pinned the lower wing sheet to the building board and glued the ribs in place.
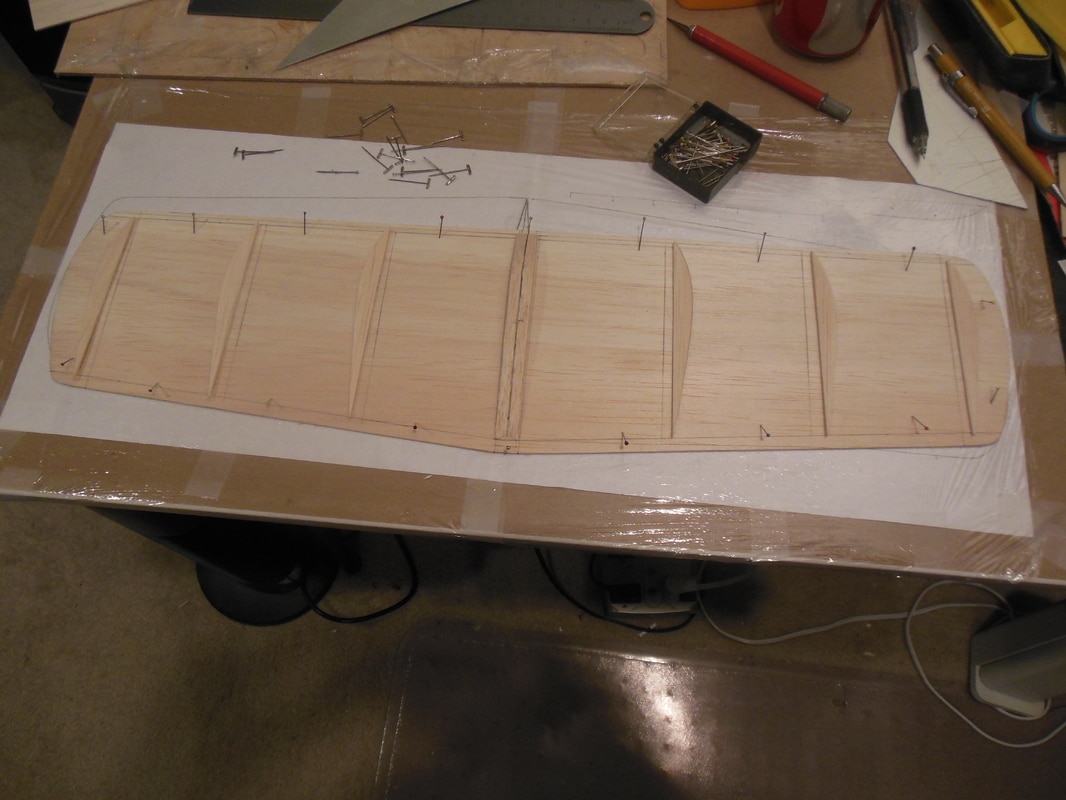

Next I cut a section of the other sheet to fit across the ribs and beveled the front edge. This is where that great piece of mis-matched balsa came in. The lighter half worked great to form over the curve of ribs smoothly while the harder side worked for the straighter rear. After taping the beveled edge to the front of the lower sheet, I put a bead along the front and then folded it over to glue the front edges together.
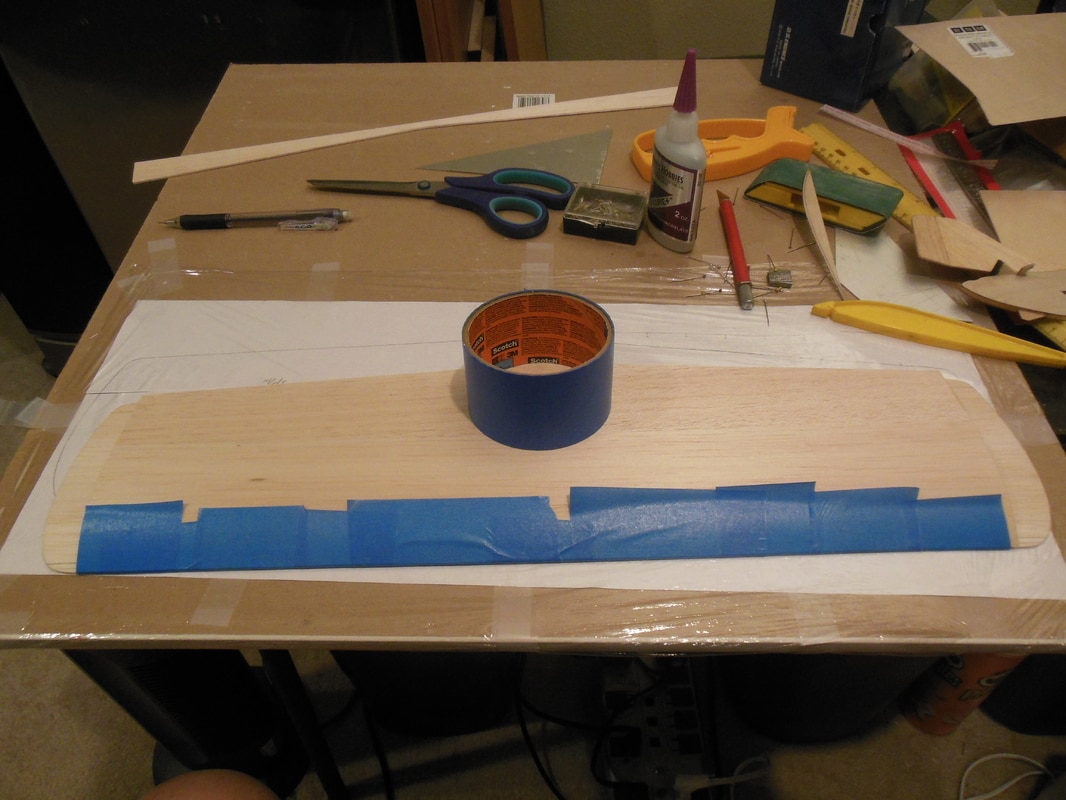
After that, I pulled the upper sheet tight over the ribs and trimmed the upper sheet to match the lower sheet. When it was all trimmed and aligned, I went ahead and beveled the bottom rear of the top sheet and glued it in place. That left just the tips to finish up.

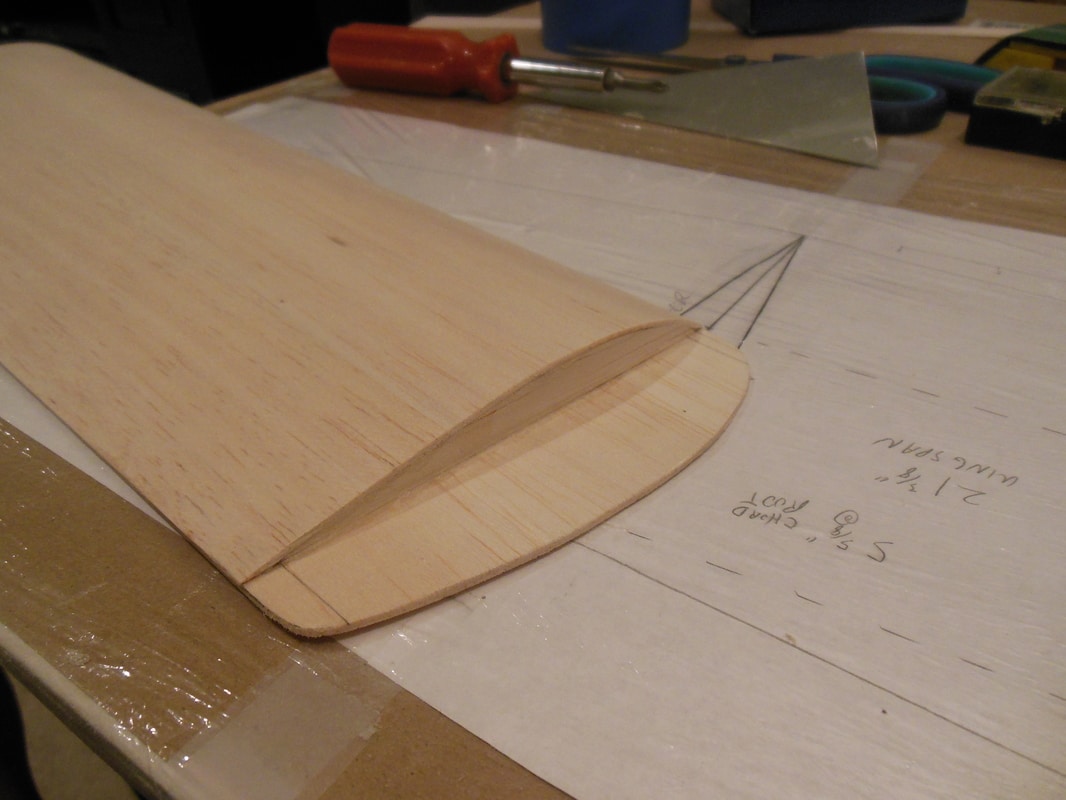
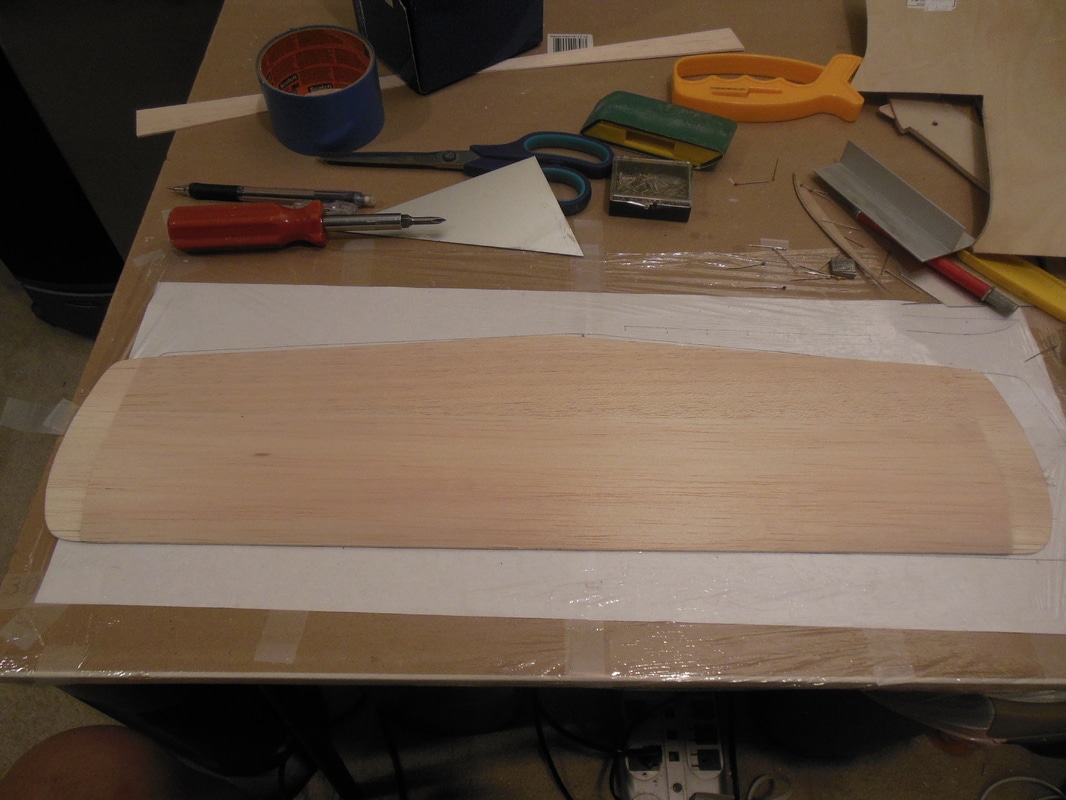
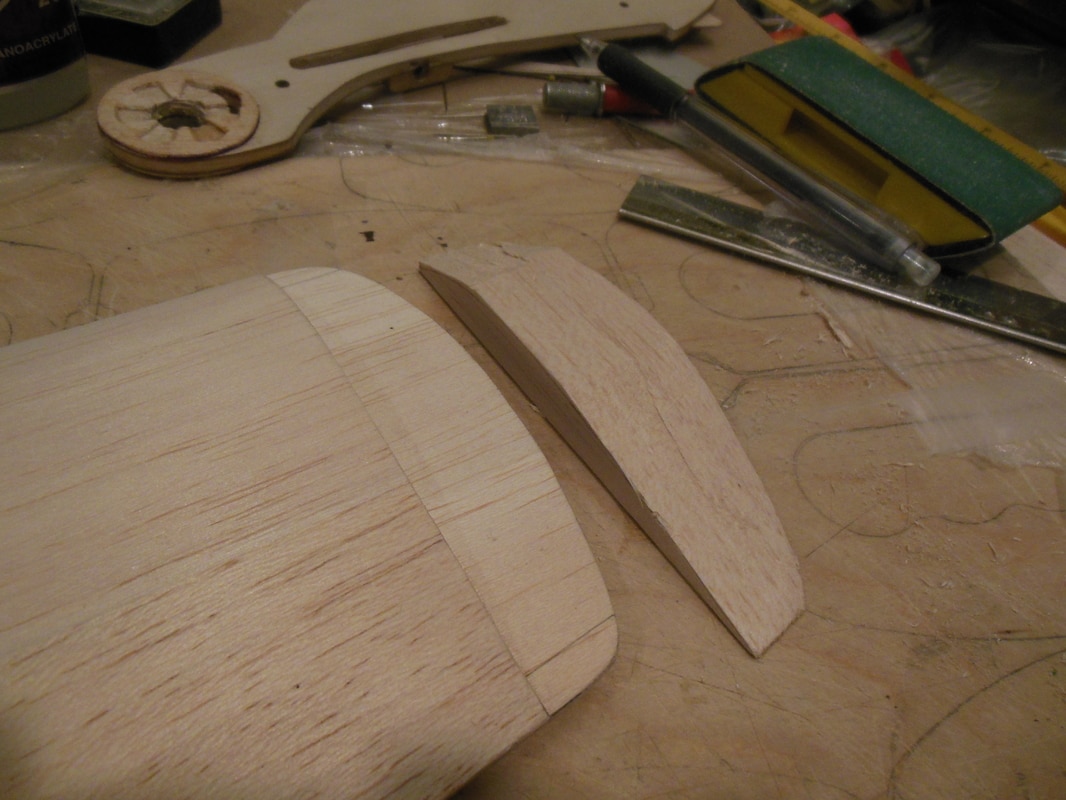
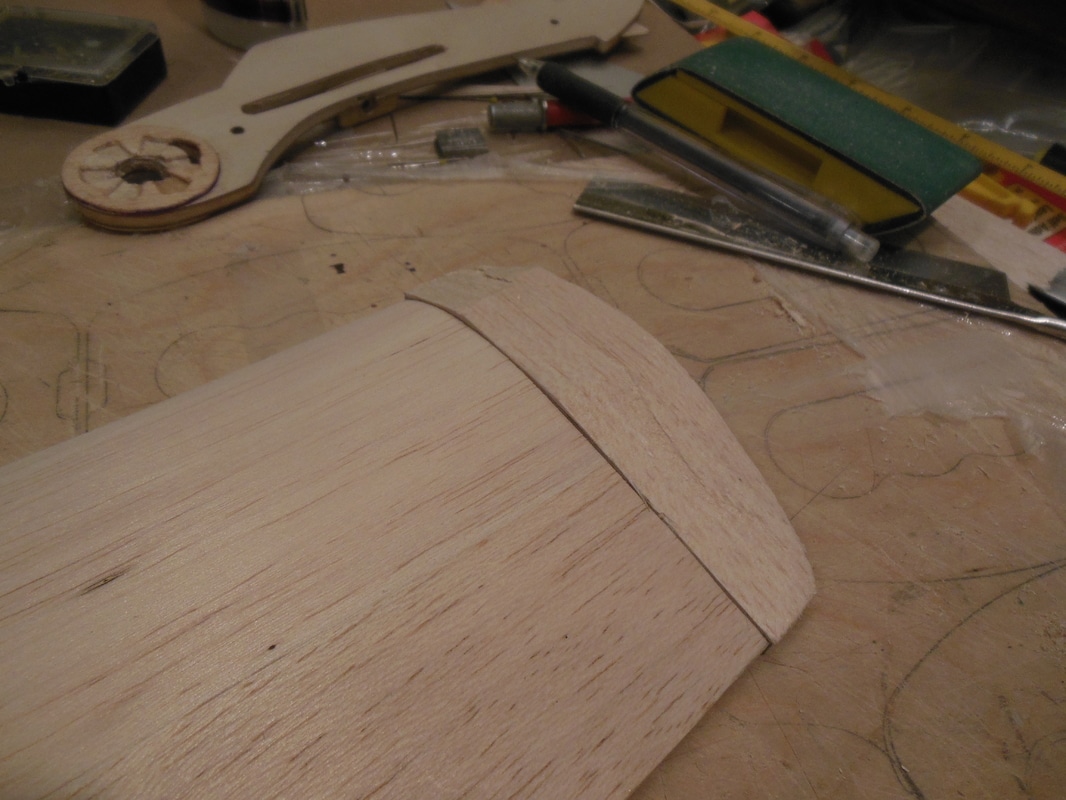
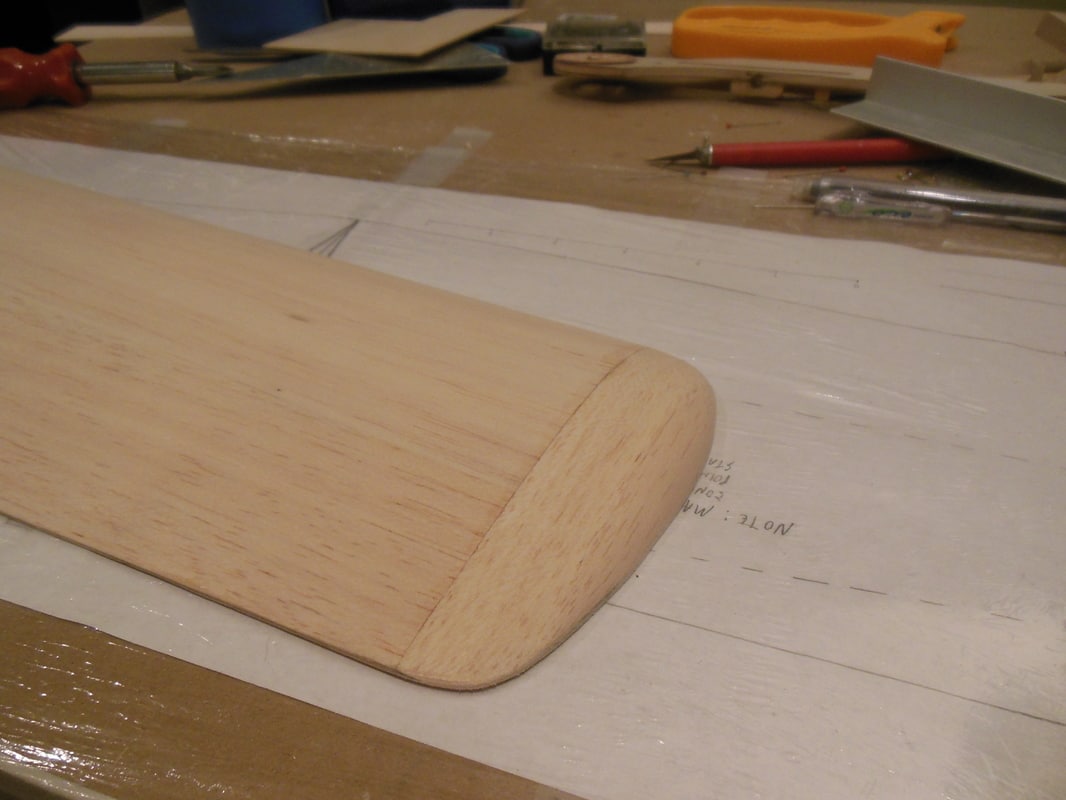
I rough cut some ¼” blocks to shape for the tips and glued them in place. On the outboard tip I recessed the wood and glued a ¼ ounce tip weight in the block before gluing. Some time with a sanding block, and voila! The two slots in the inboard tip are to glue in the leadout guides later.

That’s it for now.
The Tired Mark
I selected one sheet of medium balsa, and a nice sheet that was half medium balsa and half light balsa. Perfect for what I’m doing. I also got a great price on the sheets at $1.75 each!
On to the wing build. I took the medium sheet and put the wing on it to trace the shape using the original wing. Then I cut it out to shape.


Next, I traced out the airfoil on some 1/32” ply to use as a rib template and cut out six 1/16” ribs and a ¼” rib for the center.


I pinned the lower wing sheet to the building board and glued the ribs in place.


Next I cut a section of the other sheet to fit across the ribs and beveled the front edge. This is where that great piece of mis-matched balsa came in. The lighter half worked great to form over the curve of ribs smoothly while the harder side worked for the straighter rear. After taping the beveled edge to the front of the lower sheet, I put a bead along the front and then folded it over to glue the front edges together.

After that, I pulled the upper sheet tight over the ribs and trimmed the upper sheet to match the lower sheet. When it was all trimmed and aligned, I went ahead and beveled the bottom rear of the top sheet and glued it in place. That left just the tips to finish up.


I rough cut some ¼” blocks to shape for the tips and glued them in place. On the outboard tip I recessed the wood and glued a ¼ ounce tip weight in the block before gluing. Some time with a sanding block, and voila! The two slots in the inboard tip are to glue in the leadout guides later.


That’s it for now.
The Tired Mark
batjac- Diamond Member


Posts : 2373
Join date : 2013-05-22
Age : 61
Location : Broken Arrow, OK, USA
 Re: Giving new life to a classic?
Well, I couldn’t sleep so I worked on this some more. NOW it’s ready for paint and cover. And now I’M ready for bed.
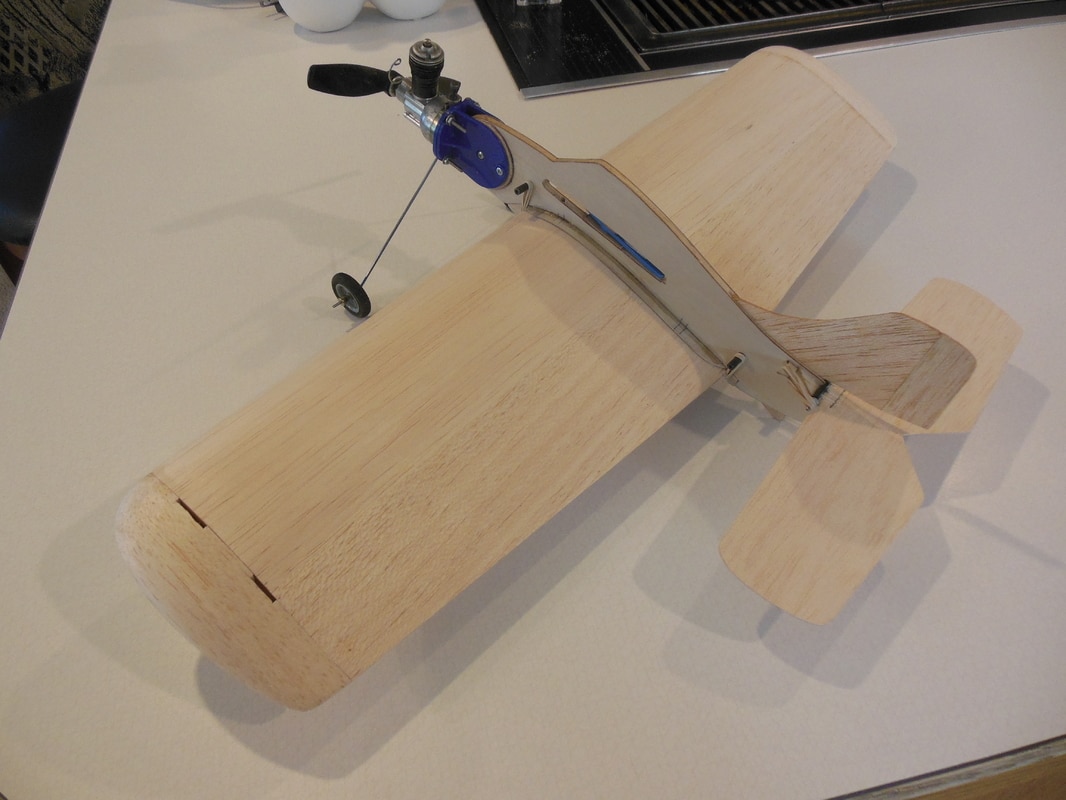
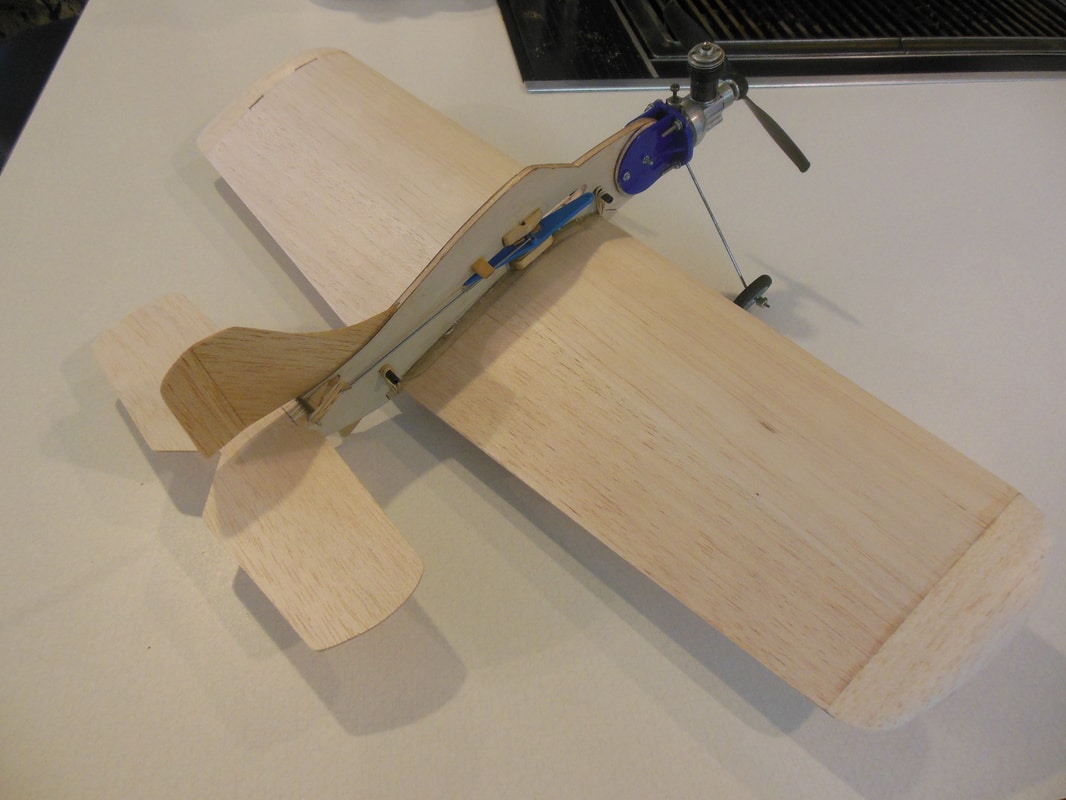
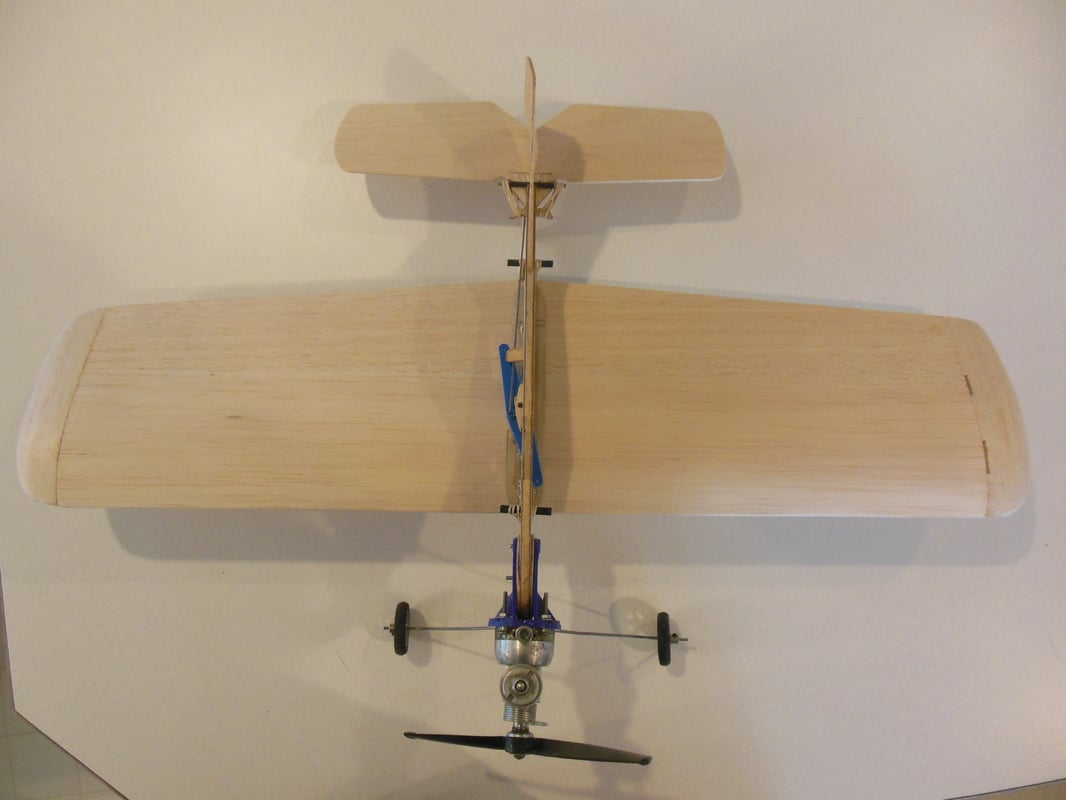
The Snoozer Mark


The Snoozer Mark

batjac- Diamond Member


Posts : 2373
Join date : 2013-05-22
Age : 61
Location : Broken Arrow, OK, USA
 Re: Giving new life to a classic?
dckrsn wrote:Hey, thanks for doing that Roddie.roddie wrote:
I always wondered if there would be an
overheating issue, using one.
Bob
My pleasure Bob.. and I was thinking the same thing; regarding adequate-cooling..
 I guess if you just used the disc/kit a few times.. until you got the hang of flying, that it might not be of concern. On the other hand (she wore a glove..
  Re: Giving new life to a classic?
roddie wrote:dckrsn wrote:Hey, thanks for doing that Roddie.roddie wrote:
I always wondered if there would be an
overheating issue, using one.
Bob
My pleasure Bob.. and I was thinking the same thing; regarding adequate-cooling..I guess if you just used the disc/kit a few times.. until you got the hang of flying, that it might not be of concern. On the other hand (she wore a glove..
) if used on an over-lean engine-run.. it could cause premature wear on the cylinder pretty quickly. I don't think it's a genuine Cox part.. and I can't see Cox recommending its' use either.
Roddie,
Cox actually sold these Training Aid Kits. If you look at item #3 on the first page and Lesson #3 from the third page of these TD-3 instructions, you’ll see the description of the device is the same.
http://www.mh-aerotools.de/airfoils/documents/cox_td3_instructions.pdf
I can’t read the printing on the picture, but the eBay auction states Cox part, so I figure it probably is an original. The 50 cent price is the same as printed in the Cox manual. The eBay description also sounds similar the Cox material:
eBay description - “Learn to fly on your first try. Rubber spinner cushions impacts if plane lands on nose. Also, adds stabilizing weight to front and makes control easier while learning.”
Cox instructions - “Get a training aid kit from your dealer for only 50c. The training aid kit is a good insurance value as it may save your plane while learning. It consists of an aluminum disk with a hole in the center and a rubber prop spinner. Install as per directions which come with the kit. The disk will set up frontal resistance and cause the plane to fly very slowly so that you can better feel out the control. The rubber spinner provides extra weight on the nose which has a stabilizing influence on control. It also absorbs sharp impact in case of nose crashes and minimizes damage.
The Cut 'N Paste Mark

batjac- Diamond Member


Posts : 2373
Join date : 2013-05-22
Age : 61
Location : Broken Arrow, OK, USA
 Re: Giving new life to a classic?
Yep, laughed out loud. Thanks for that too, Roddie!roddie wrote: On the other hand (she wore a glove..)
Bob

dckrsn- Diamond Member

- Posts : 2750
Join date : 2010-10-21
Age : 71
Location : Long Island, New York
 Re: Giving new life to a classic?
I really doubt the engine would overheat. It would have airflow, not as much as not running the disc, but enough. Air would be passing through the fins from the plane moving through the air also.
Cox cars had extremely poor cooling yet they managed to run and last.
Cox cars had extremely poor cooling yet they managed to run and last.

Cribbs74- Moderator


Posts : 11907
Join date : 2011-10-24
Age : 50
Location : Tuttle, OK
 Re: Giving new life to a classic?
Cribbs74 wrote:I really doubt the engine would overheat. It would have airflow, not as much as not running the disc, but enough. Air would be passing through the fins from the plane moving through the air also.
Cox cars had extremely poor cooling yet they managed to run and last.
Yes.. that is true. I'm also not up on old Cox parts at all. That kit (if Mark can score it) would be nice to display with his original model for sure.
 Re: Giving new life to a classic?
Well, this started to languish in the corner again. That is, until my wife brought me some motivational fare to get me going again:
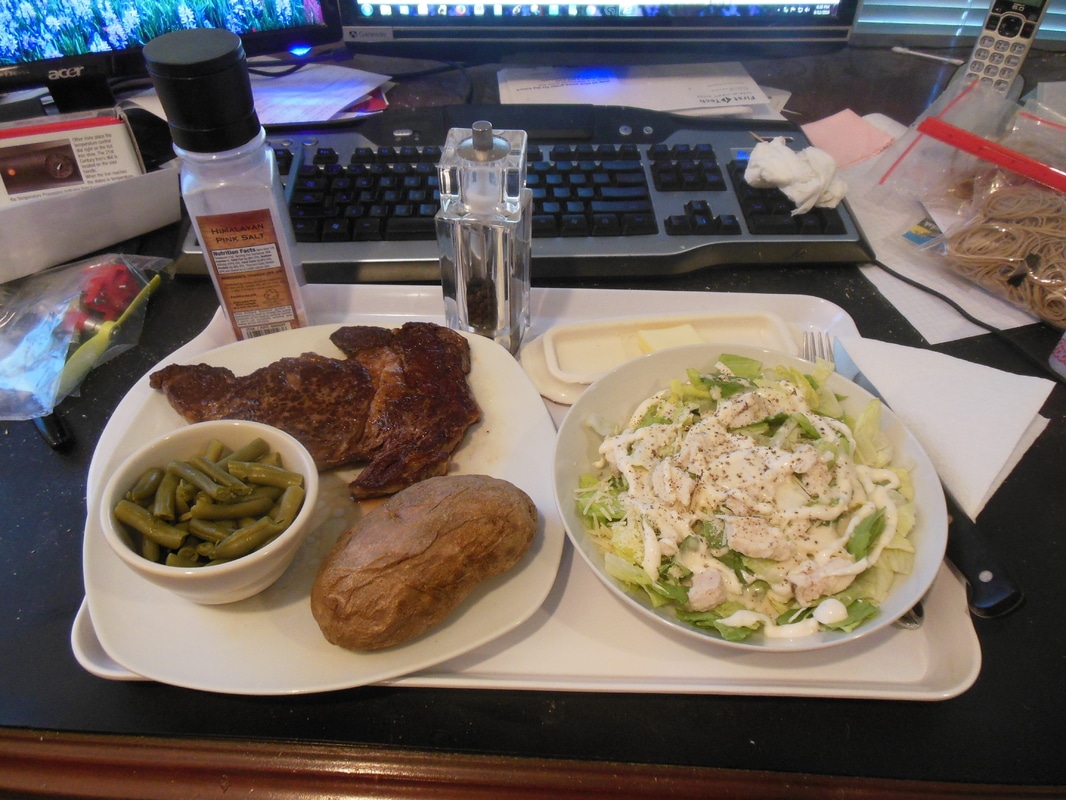
The Insignia Blue is a little too dark for this model, but unfortunately it is the only color of blue that LustreKote comes in. The yellow is perfect, though. Here it is, compared to the 1956 original, only needing a couple of small detail items to be ready to fly. It has a standard Babe Bee on it, but it’s getting a little hopped up Bee soon to pull it through the maneuvers a little better. The original weighs 9.1 ounces, and my replica weighs 6.9 ounces. A little more than I was hoping for, but it still shaved a couple of ounces off the final weight. With the saddle as built, the wing is rock solid, not incredibly wobbly like the original. And the built up box wing has zero twist, while the original wing will twist a good 45 degrees either way.
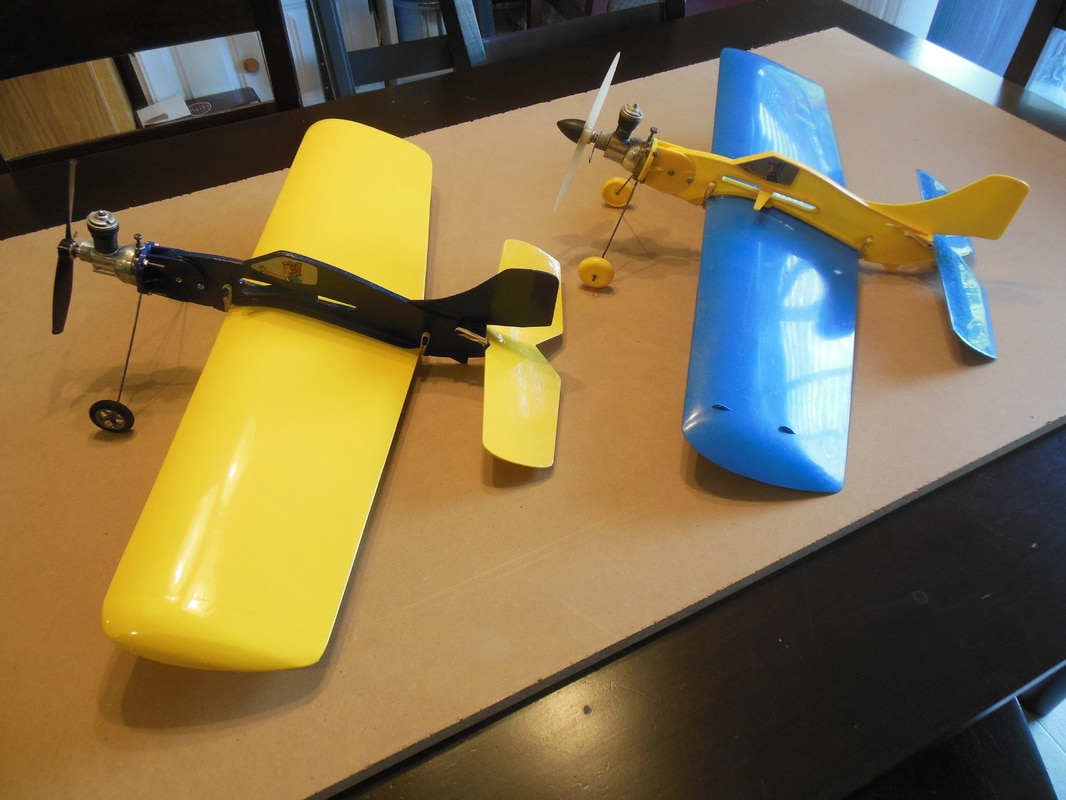
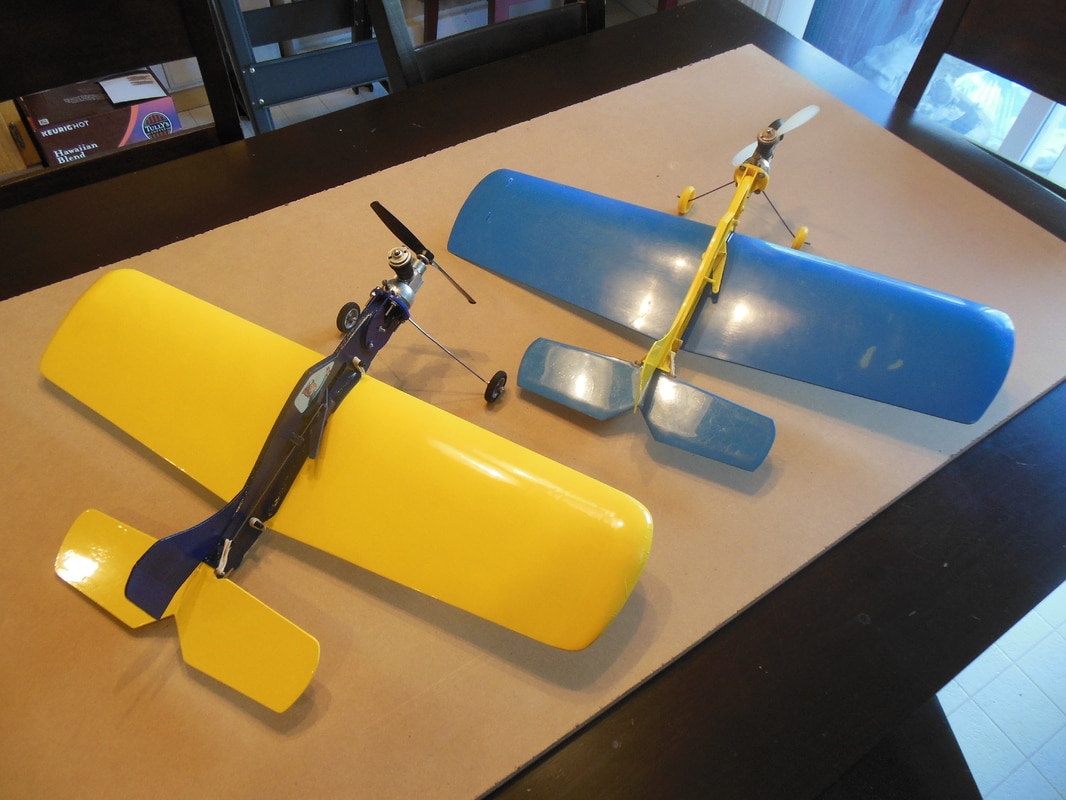

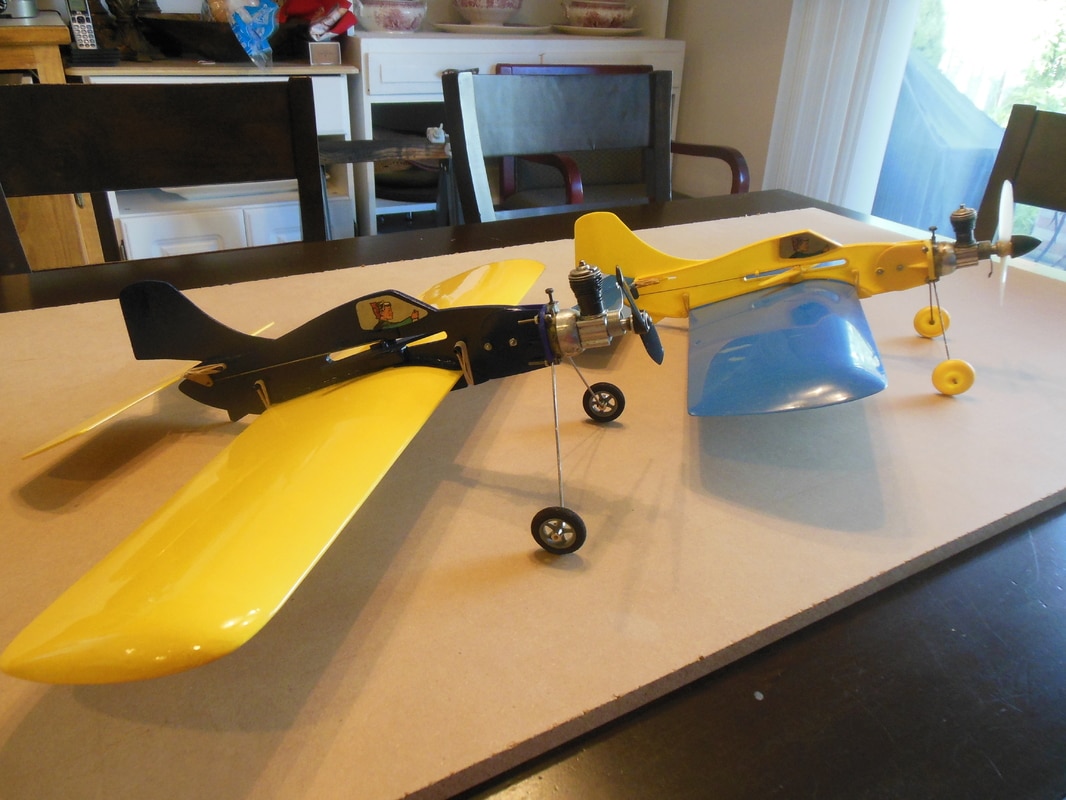
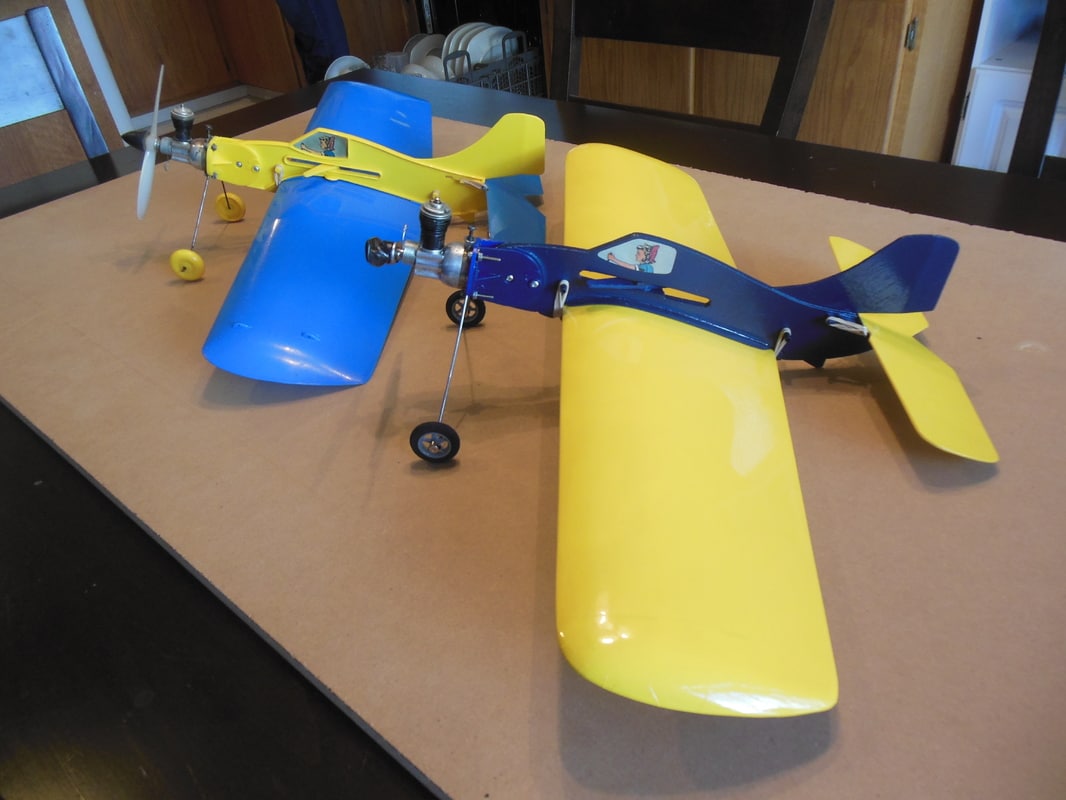
Who knows, if it’ll stay tight on the lines, maybe I’ll enter this in Beginner Pattern…. How many decades has it been since a TD-4 has flown in a contest?
The Gourmand Mark

The Insignia Blue is a little too dark for this model, but unfortunately it is the only color of blue that LustreKote comes in. The yellow is perfect, though. Here it is, compared to the 1956 original, only needing a couple of small detail items to be ready to fly. It has a standard Babe Bee on it, but it’s getting a little hopped up Bee soon to pull it through the maneuvers a little better. The original weighs 9.1 ounces, and my replica weighs 6.9 ounces. A little more than I was hoping for, but it still shaved a couple of ounces off the final weight. With the saddle as built, the wing is rock solid, not incredibly wobbly like the original. And the built up box wing has zero twist, while the original wing will twist a good 45 degrees either way.


Who knows, if it’ll stay tight on the lines, maybe I’ll enter this in Beginner Pattern…. How many decades has it been since a TD-4 has flown in a contest?
The Gourmand Mark

batjac- Diamond Member


Posts : 2373
Join date : 2013-05-22
Age : 61
Location : Broken Arrow, OK, USA
 Re: Giving new life to a classic?
[quote="batjac"]Well, this started to languish in the corner again. That is, until my wife brought me some motivational fare to get me going again:

Looks like Emirates, first class!
The "now I'm hungry and way off topic", Bob.

Looks like Emirates, first class!
The "now I'm hungry and way off topic", Bob.

dckrsn- Diamond Member

- Posts : 2750
Join date : 2010-10-21
Age : 71
Location : Long Island, New York
 Re: Giving new life to a classic?
Well Crap I been following you Mark , Now your finished ? I cant see the pics. there all Xs can see the old ones not the latest 
 *&%*&% I guess I [bleep] it off now I see them and FOOD time for brunch will get back to you soon !

 *&%*&% I guess I [bleep] it off now I see them and FOOD time for brunch will get back to you soon !
Last edited by getback on Mon Sep 19, 2016 9:56 am; edited 1 time in total (Reason for editing : ??? i can see)

getback- Top Poster


Posts : 10436
Join date : 2013-01-18
Age : 67
Location : julian , NC
 Re: Giving new life to a classic?
Mark that looks FANTASTIC !! I hope it fly's as good as it looks , That would blows some people away seeing the TD-4 in competition . Good Fun , want to see this one flying 


getback- Top Poster


Posts : 10436
Join date : 2013-01-18
Age : 67
Location : julian , NC
 Re: Giving new life to a classic?
Mark, I re-read it from the beginning, once again. This is a more than remarkable reproduction with an even better wing. Bravo, Dude, you've outdone yourself.
Everything about it looks like it will fly well. Like you mentioned, I'm a little worried about the vertical stab if you land inverted, but that would only cause minor grief.
Rusty
Everything about it looks like it will fly well. Like you mentioned, I'm a little worried about the vertical stab if you land inverted, but that would only cause minor grief.
Rusty
_________________
Don't Panic!
...and never Ever think about how good you are at something...
while you're doing it!
My Hot Rock & Blues Playlist
...and never Ever think about how good you are at something...
while you're doing it!
My Hot Rock & Blues Playlist

RknRusty- Rest In Peace

- Posts : 10869
Join date : 2011-08-10
Age : 68
Location : South Carolina, USA
 Re: Giving new life to a classic?
CoNgRaTuLaTiOnS!!!!!!!
To me this is one of the coolest builds i've seen in a long time, well done, I bet it'll fly pretty nice! You may of started something here, 1:1 scale models of model RTF airplanes!
They did make a dark blue one, it should have the black rubber spinner (later used on the PT-19 and the early round tipped Thimble-Drome prop:


Last edited by Mark Boesen on Tue Sep 20, 2016 9:12 pm; edited 1 time in total
 Re: Giving new life to a classic?
Hey Mark,
Unbeknownst to you, your paint scheme was actually a success! Thanks to the other Mark's post it seems you nailed it.
You really did a good job, if you can get it through the beginner pattern you will be the man.
If you have the time take a look a look at this Cox balsa reproduction. It's really a work of art...
http://stunthanger.com/smf/12-a-building/cox-spitfire-replica-build-flight-video/

Cribbs74- Moderator


Posts : 11907
Join date : 2011-10-24
Age : 50
Location : Tuttle, OK
 Re: Giving new life to a classic?
From a thread over on Stunthangar, and ad from the 50's. At the bottom is an ad for a TD-4 at "an exceptionally low price" of 7.95, and "comes with the powerful Thimble Drome Babe Bee engine."

The Geezer Mark
The Geezer Mark

batjac- Diamond Member


Posts : 2373
Join date : 2013-05-22
Age : 61
Location : Broken Arrow, OK, USA
 Re: Giving new life to a classic?
Well, it’s been a little while coming. Between long work hours, rainy weather, and the wife in the hospital I’ve not had time to get out and fly this. But I really needed to get it in the air. It was really too wet out still, but I figured I’d get it in the air yesterday morning before the rain hit.
The plane is flying on 25 foot lines like the original. They’re 10 pound test Spectra lines. The Babe Bee engine is hopped up a bit. The plane balances out at around the 17% chord position. I normally shoot for about 20% on my models, but with that big stabilator I decided to start out at 15%. For some reason, I like to use coins to balance my models. They’re easy to use, and actually cheaper than the lead balance weight sold at the hobby shop. Two nickels brought it right to 17%. Final flying weight is 7.2 ounces, versus the original’s flying weight of 9.1 ounces.
The hopped up Babe Bee goes through the 5cc’s of fuel pretty quick. I get right around 1:45 on a tank, so with starting the engine, giving it a final tweak, and then getting up off my creaky knees and walking out to the handle, I get a little over a minute of airtime. 5cc is good for beginners’ control line or free flight, but I need more. I’ll put an 8cc tank and 30 foot lines for the next series of flights.
Sorry about the heavy breathing on the video. I’ve been a little sick and I was feeling kinda weak and puny out there. I thought about adding music to cover it up, but then it’d cover up that sweet Babe Bee sound.
It flies very nicely. The up and down oscillations are pilot induced, not plane induced. That big stabilator makes the input response quite sensitive. When I do my part, it flies smoothly. When I get used to not over-controlling it, the loops will be great. You can see a couple of almost circular loops on the video. I hoped for a 1:1 ratio of the handle spacing to bellcrank so the control input would be rather tame, but it wasn't convenient with the SIG handle. The bellcrank spacing is 3” and the handle spacing is 2 1/8”, so it should have been slightly under-controlled, but it’s still very responsive.
Five flights were about all I was worth, so I called it a day. Going home with the plane in one piece is a win, I’d say.
The Hulk-Smashed Mark
Last edited by batjac on Sat Nov 12, 2016 9:11 pm; edited 1 time in total

batjac- Diamond Member


Posts : 2373
Join date : 2013-05-22
Age : 61
Location : Broken Arrow, OK, USA
 Re: Giving new life to a classic?
Great flights. It would be really interesting to compare the performance with the original plastic version, but I reckon that the balsa version would definitely fly a heap better. It leaps up off the runway pretty quick and the Babe Bee certainly gives it enough performance to do what it has to do. That 5cc tank does give it a pretty short run time though.
Well done Mark.
Well done Mark.

Oldenginerod- Top Poster

- Posts : 4018
Join date : 2012-06-15
Age : 62
Location : Drouin, Victoria
 Re: Giving new life to a classic?
I am jealous. I can only fly electric in the local park and miss that sound. (Although I prefer the diesel bark!)
I enjoyed the video and the sound!
I enjoyed the video and the sound!

ian1954- Diamond Member

- Posts : 2688
Join date : 2011-11-16
Age : 70
Location : England
 Re: Giving new life to a classic?
batjac wrote:Well, it’s been a little while coming. Between long work hours, rainy weather, and the wife in the hospital I’ve not had time to get out and fly this. But I really needed to get it in the air. It was really too wet out still, but I figured I’d get it in the air yesterday morning before the rain hit.
The plane is flying on 25 foot lines like the original. They’re 10 pound test Spectra lines. The Babe Bee engine is hopped up a bit. The plane balances out at around the 17% chord position. I normally shoot for about 20% on my models, but with that big stabilator I decided to start out at 15%. For some reason, I like to use coins to balance my models. They’re easy to use, and actually cheaper than the lead balance weight sold at the hobby shop. Two nickels brought it right to 17%. Final flying weight is 7.2 ounces, versus the original’s flying weight of 9.1 ounces.
The hopped up Babe Bee goes through the 5cc’s of fuel pretty quick. I get right around 1:45 on a tank, so with starting the engine, giving it a final tweak, and then getting up off my creaky knees and walking out to the handle, I get a little over a minute of airtime. 5cc is good for beginners’ control line or free flight, but I need more. I’ll put an 8cc tank and 30 foot lines for the next series of flights.
Sorry about the heavy breathing on the video. I’ve been a little sick and I was feeling kinda weak and puny out there. I thought about adding music to cover it up, but then it’d cover up that sweet Babe Bee sound.
It flies very nicely. The up and down oscillations are pilot induced, not plane induced. That big stabilator makes the input response quite sensitive. When I do my part, it flies smoothly. When I get used to not over-controlling it, the loops will be great. You can see a couple of almost circular loops on the video. I hoped for a 1:1 ratio of the handle spacing to bellcrank so the control input would be rather tame, but it wasn't convenient with the SIG handle. The bellcrank spacing is 3” and the handle spacing is 2 1/8”, so it should have been slightly under-controlled, but it’s still very responsive.
Five flights were about all I was worth, so I called it a day. Going home with the plane in one piece is a win, I’d say.
The Hulk-Smashed Mark
I have got to give this thread new life. Spectular all around.
But....at about 3:05 minutes in on the end of the fourth flight attempted - your control handle is the same as the one that I have coming on my ebay partial TD-4. It's just a glimse a frame or two but it's there.
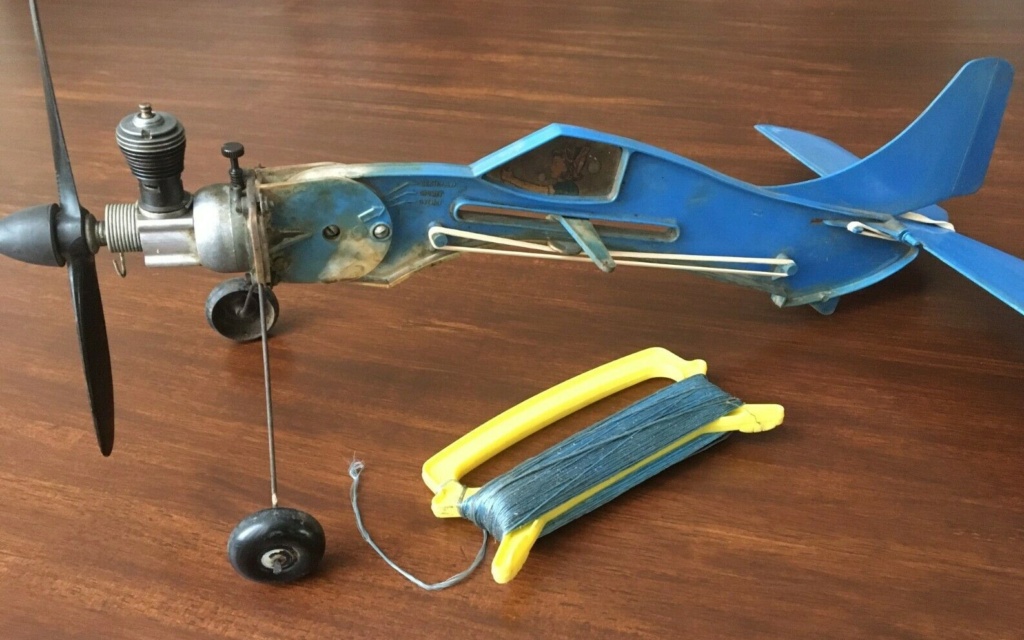
It seems to have the correct black spinner that Mark Boesen mentions.

Beautiful work Mark, and I'm going to have questions. I have copied and printed out some of your diagrams but I might need scale.
Bob

rsv1cox- Top Poster


Posts : 11244
Join date : 2014-08-18
Location : West Virginia
 Re: Giving new life to a classic?
batjac,
Brings back a lot of pleasant memories.
The TD4 is how I got started in controline flying.
Please send PDF copies of your TD-4 drawings.
Thanks in advance!
Don Link
Brings back a lot of pleasant memories.
The TD4 is how I got started in controline flying.
Please send PDF copies of your TD-4 drawings.
Thanks in advance!
Don Link

Don Link- Beginner Poster

- Posts : 5
Join date : 2024-08-11
 Re: Giving new life to a classic?
I loved the build and all the photos showing how it was done, great job!
Juan

F4D Phantom II- Gold Member

- Posts : 245
Join date : 2019-04-08
 Re: Giving new life to a classic?
Don, I have no idea where the drawings are. But there's enough info in the first post to do this. I have a scale marked on the pages that you can use when printing out the pictures. Just copy the pics to your drive and then print them out to size using the scale on the sheet.
The Forgetful Mark
The Forgetful Mark

batjac- Diamond Member


Posts : 2373
Join date : 2013-05-22
Age : 61
Location : Broken Arrow, OK, USA
 Re: Giving new life to a classic?
Forgetful Mark,
Thanks for looking for the drawings.
I tried to print the pictures but when I clicked on them I was sent to the Photobucket signup site.
I'll try printing screen shots and use the measurements on the drawings.
Thanks again for presenting this build and generously providing your drawings and pictures.
Don Link

Don Link- Beginner Poster

- Posts : 5
Join date : 2024-08-11
 Re: Giving new life to a classic?
Don, try right clicking on each drawing, and then select "save drawing as" to save the image to your hard drive a a .jpg file. That'd be easier than a screen capture.
The Glue Eating Mark
The Glue Eating Mark

batjac- Diamond Member


Posts : 2373
Join date : 2013-05-22
Age : 61
Location : Broken Arrow, OK, USA
Page 2 of 3 •  1, 2, 3
 Similar topics
» Giving away my Cox collection
» Giving it another shot
» widow giving me fits
» Engine rebuild - giving it the needle
» Classic doh
» Giving it another shot
» widow giving me fits
» Engine rebuild - giving it the needle
» Classic doh
Page 2 of 3
Permissions in this forum:
You cannot reply to topics in this forum

 Rules
Rules


