Log in
Search
Latest topics
» Chocolate chip cookie dough.........by roddie Today at 1:13 pm
» Purchased the last of any bult engines from Ken Enya
by sosam117 Today at 11:32 am
» Tee Dee .020 combat model
by rsv1cox Today at 10:07 am
» Free Flight Radio Assist
by rdw777 Today at 9:24 am
» My latest doodle...
by batjac Yesterday at 9:47 pm
» My N-1R build log
by roddie Yesterday at 8:50 pm
» Funny what you find when you go looking
by rsv1cox Wed Nov 20, 2024 3:21 pm
» Landing-gear tips
by 1975 control line guy Wed Nov 20, 2024 8:17 am
» Cox NaBOO - Just in time for Halloween
by rsv1cox Tue Nov 19, 2024 6:35 pm
» Canada Post strike - We are still shipping :)
by Cox International Tue Nov 19, 2024 12:01 pm
» Duende V model from RC Model magazine 1983.
by getback Tue Nov 19, 2024 6:08 am
» My current avatar photo
by roddie Mon Nov 18, 2024 9:05 pm
Cox Engine of The Month
Tank building
Page 1 of 1
 Tank building
This post may get a little confusing as it includes a few hints on what to do and at first sight - a successful build turned into an abject failure!
Why build your own? To maximise the space available, end up with pipes where to want them and how you want them.
I needed this tank to proceed with building the KK Radian so that I can continue the "Cox Flight Contest". The tank is a prerequisite for building the fuselage.
Here it started. Careful measurement - just cut a length of card and bend it to shape.
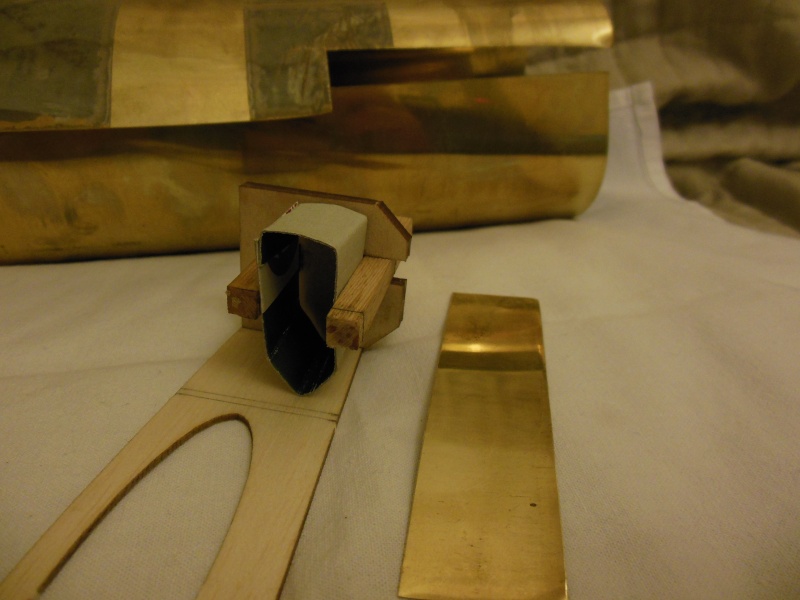
Then cut a strip of brass. Easy peezy so far!

Use the bent bit of card as a template

The carcass is ready to test fit
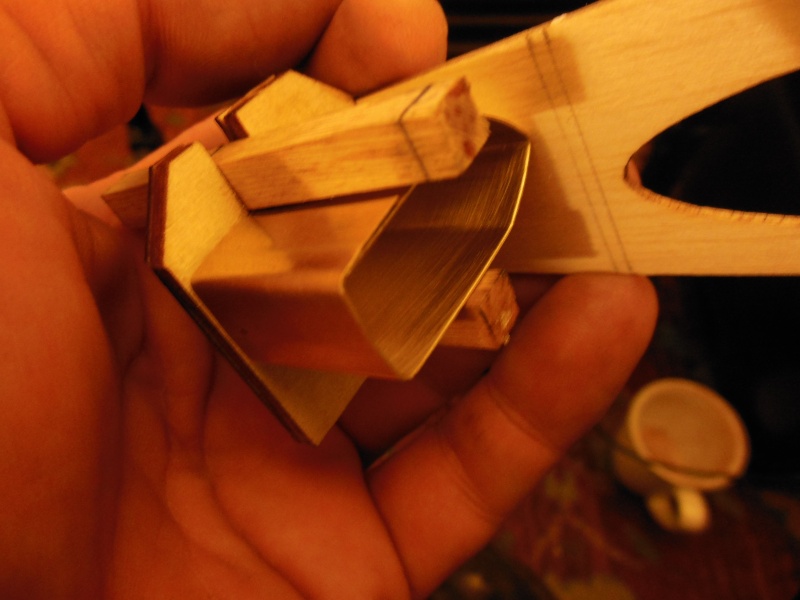
Now ready for soldering. I had used all my resin cored soft solder and so went to buy some more. You can only get "lead free" soft solder and I thought it wouldn't matter.
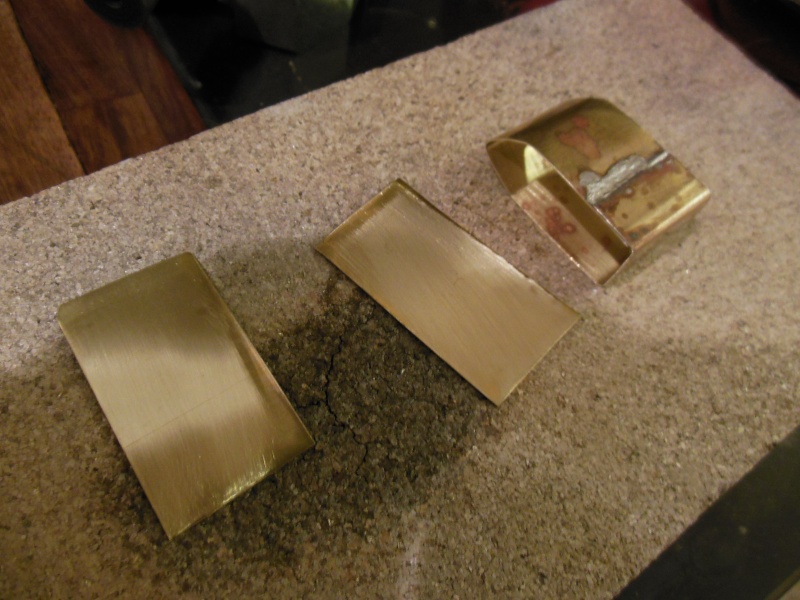
Butt joints with a fillet as usual
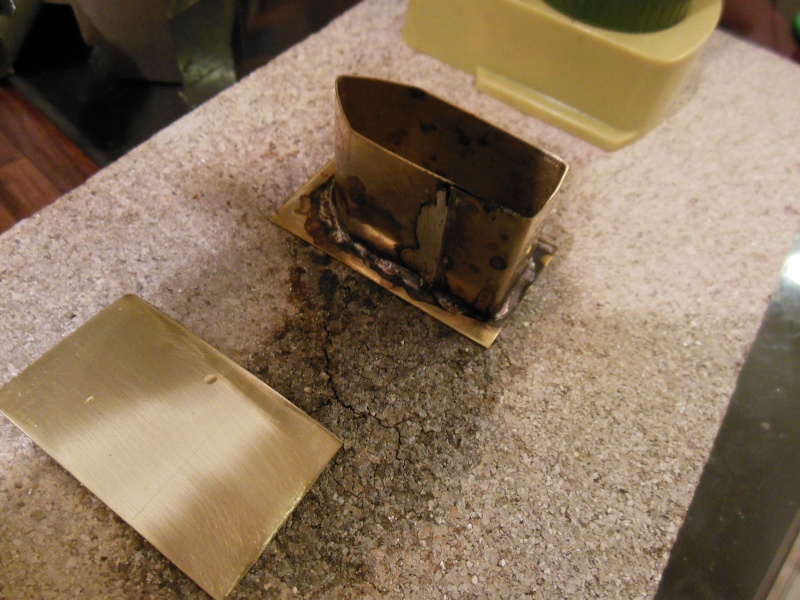
File and grind the edges, soak in citric acid to clean ............. et voila!
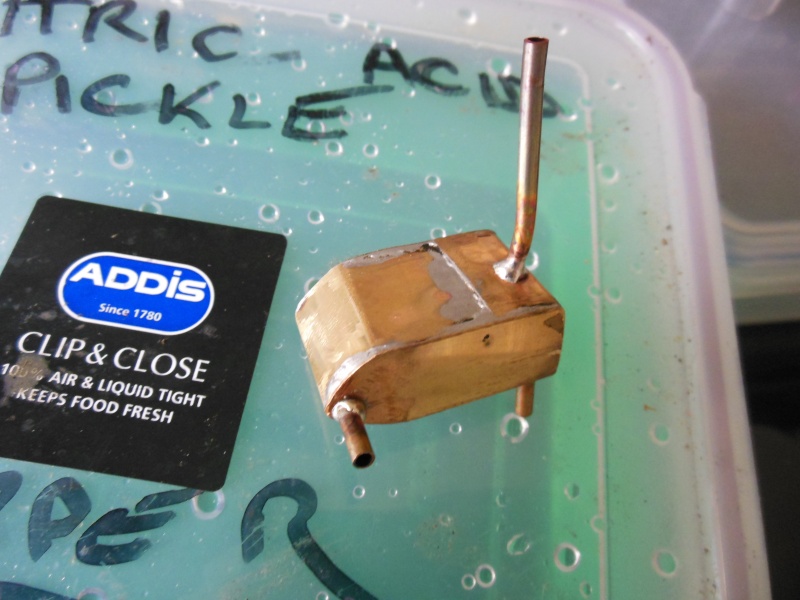
Even though I say it myself - it looks impressive but ..................
..............................
I tested it and it leaked like a sieve. Blocked off all except one tube, attached fuel pipe and blew into it under water. Bubbles everwhere! I have never experienced leaks on this scale before!
I resoldered and on the next test the bubbles, lots of them came from different places! I suddenly realised the this solder wasn't up to the job!
The original solder I used had a noticeable difference between the heat needed to melt the fresh solder and to re melt soldered joints. Here there was little difference. I also had trouble tinning the joints. The solder preferred to blob rather than flow to an even layer.
The result of my efforts to cure leaks.
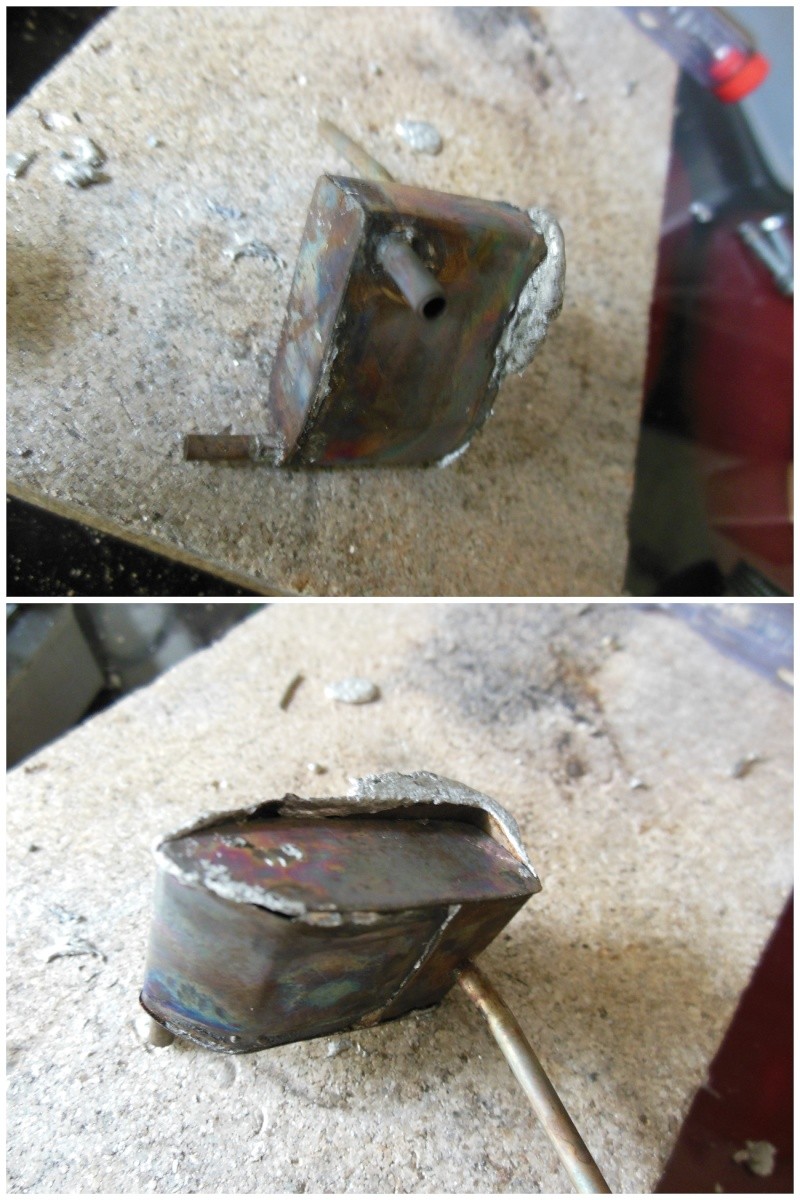
DISASTER!!!! This was a couple of hours thrown away. Not amused!
To be continued ..............................................
Why build your own? To maximise the space available, end up with pipes where to want them and how you want them.
I needed this tank to proceed with building the KK Radian so that I can continue the "Cox Flight Contest". The tank is a prerequisite for building the fuselage.
Here it started. Careful measurement - just cut a length of card and bend it to shape.

Then cut a strip of brass. Easy peezy so far!

Use the bent bit of card as a template

The carcass is ready to test fit

Now ready for soldering. I had used all my resin cored soft solder and so went to buy some more. You can only get "lead free" soft solder and I thought it wouldn't matter.

Butt joints with a fillet as usual

File and grind the edges, soak in citric acid to clean ............. et voila!

Even though I say it myself - it looks impressive but ..................
..............................
I tested it and it leaked like a sieve. Blocked off all except one tube, attached fuel pipe and blew into it under water. Bubbles everwhere! I have never experienced leaks on this scale before!
I resoldered and on the next test the bubbles, lots of them came from different places! I suddenly realised the this solder wasn't up to the job!
The original solder I used had a noticeable difference between the heat needed to melt the fresh solder and to re melt soldered joints. Here there was little difference. I also had trouble tinning the joints. The solder preferred to blob rather than flow to an even layer.
The result of my efforts to cure leaks.

DISASTER!!!! This was a couple of hours thrown away. Not amused!
To be continued ..............................................

ian1954- Diamond Member

- Posts : 2688
Join date : 2011-11-16
Age : 70
Location : England
 Re: Tank building
After the last disaster, I adopted another technique by folding over the edges to increase the soldered area rather than rely on butt joints.
This is not my preferred method for tank building as, although the result is stronger, it adds a little more weight and is time consuming.
Started by building the carcass (as before but a more complex shape) and then cutting out the sides following the shape of the carcass but a little larger.
Roughly folding over the edges ready for the next step.

Then I use Polymorph - it is a granualar plastic after placing in hot water can be moulded and shaped. It sets solid as it cools.
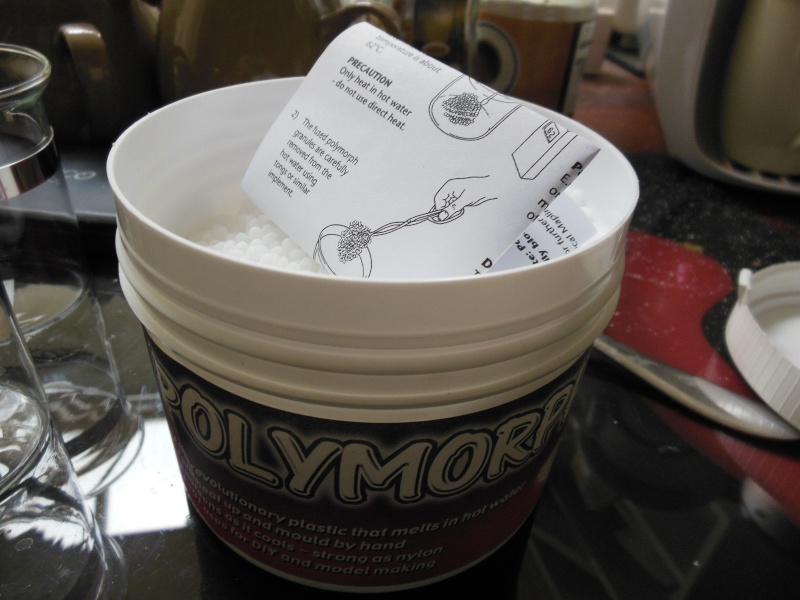
I use this to fill the carcass
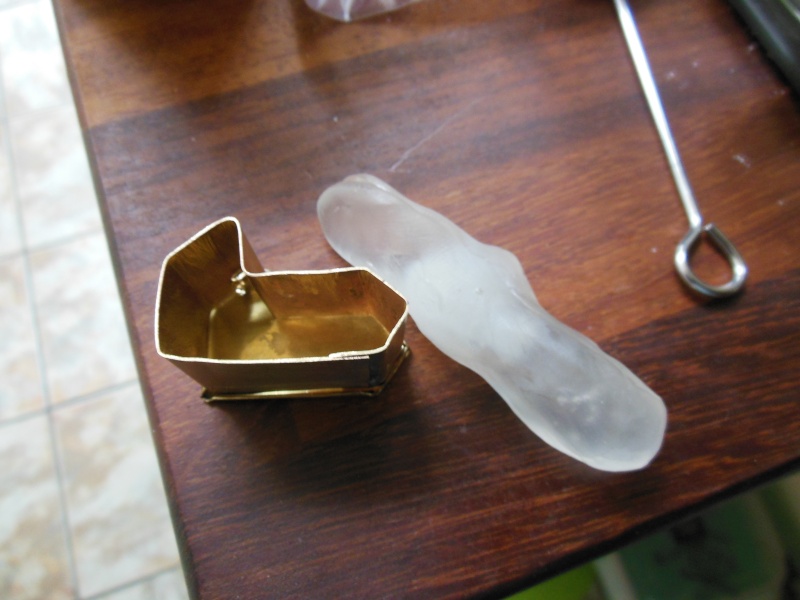
and then slice it flush
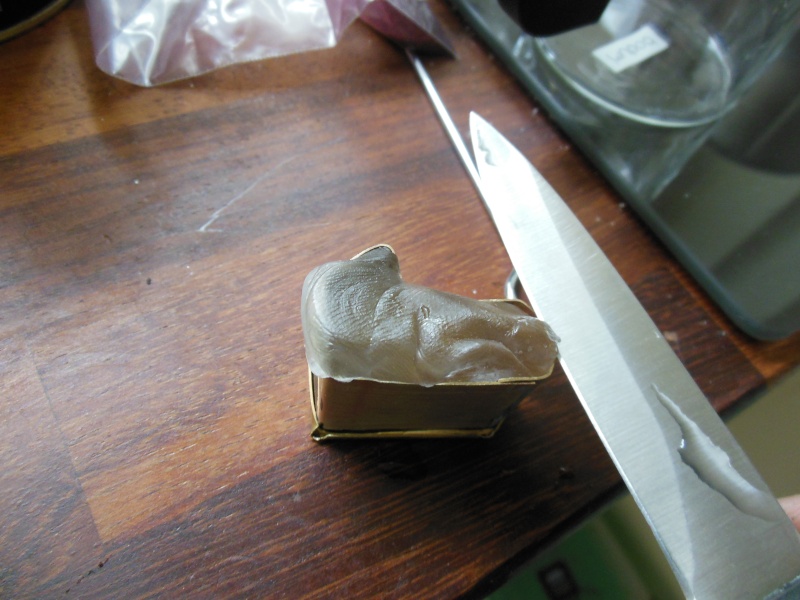
By filling the cracass, it can be used the neaten the folded edges with a little hammer and then they can be filed neatly ready for soldering with a nice tight fit.
When this is finished, the carcass is popped in hot water and the Polymorph push out (it can be reused many times)
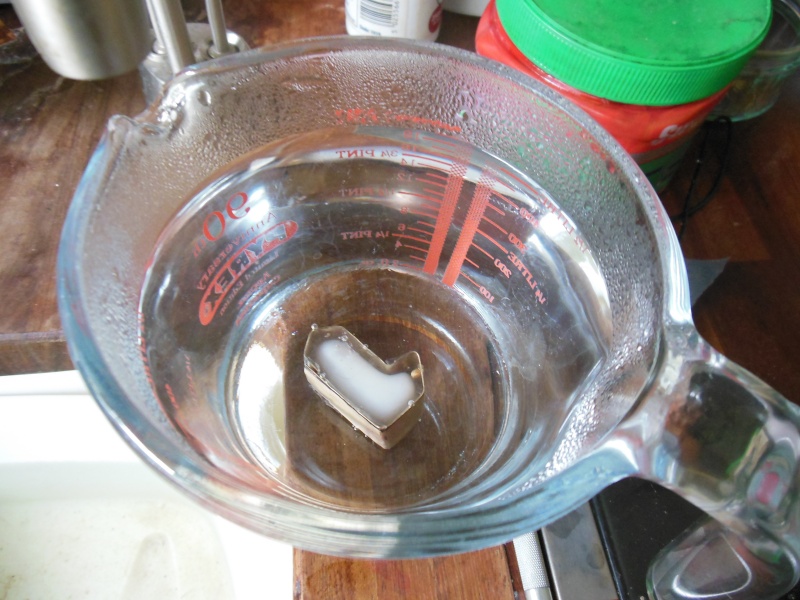
This time I only inserted one tube to test for leaks. After tinning, all that should be required is a slight pressure to make a good joint with minimal filling.
Another disaster - bubbles everywhere which no amount of resoldering cured.
How annoyed was I? Extremely!!!!!!!! Now many hours buidling a tank. The time should have been measured in minutes!
This is what the tank looked like when I gave up with it - Well not exactly! It is a pink colour because I threw it in the citric acid and left it there over night!
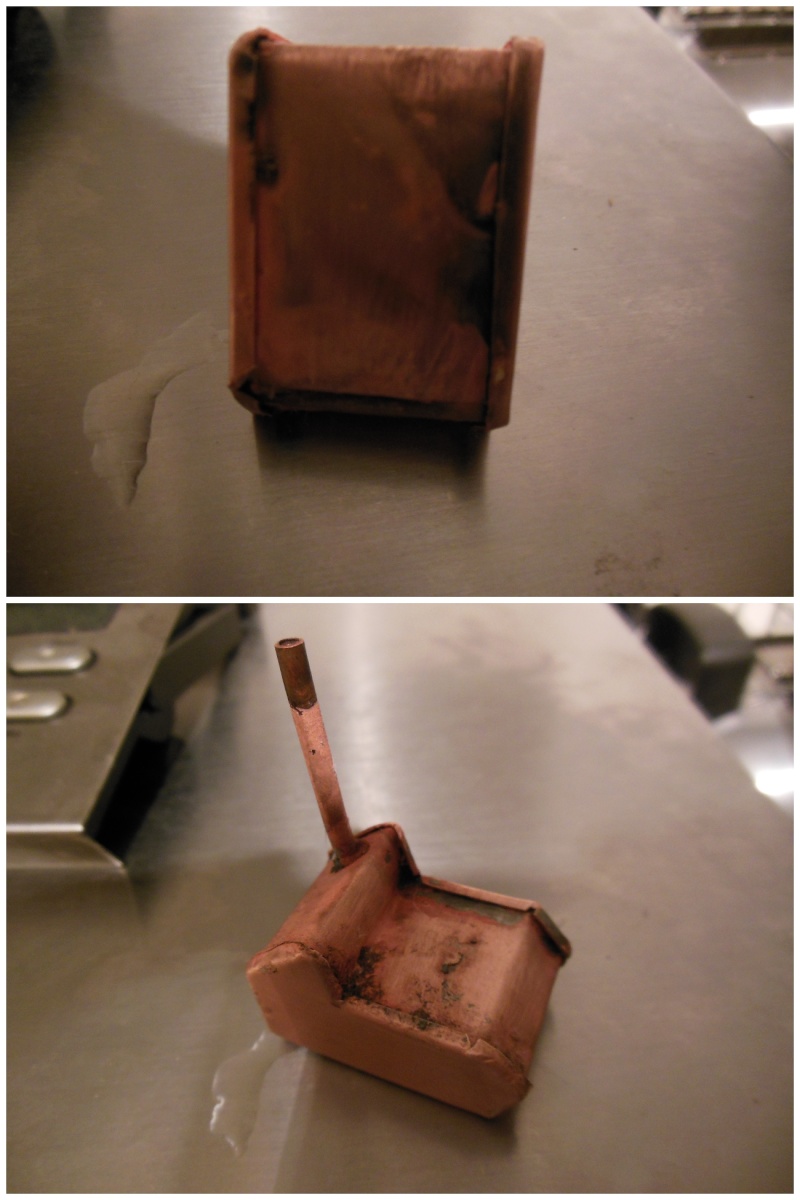
Today, I started again - I need this tank to start the Radian build!
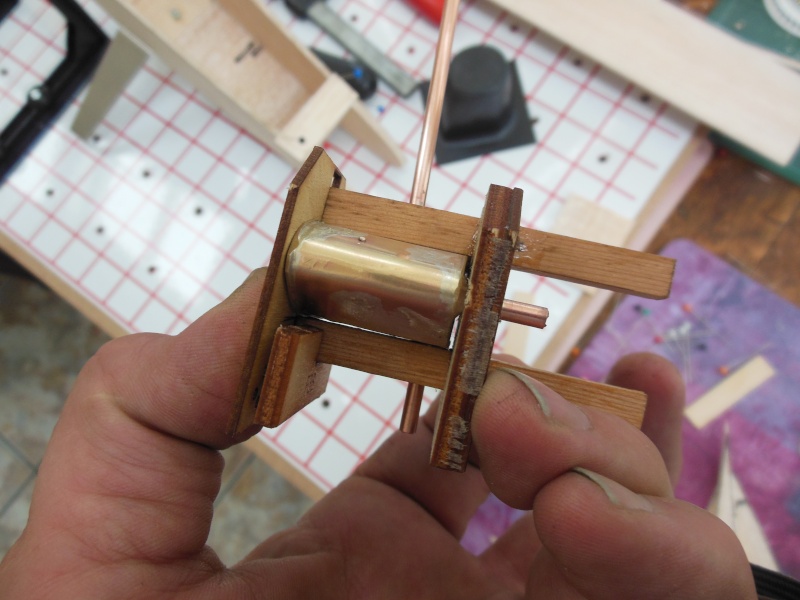
This time - butt joints - and silver solder. Expensive solder but 40 minutes start to finish.
The new "lead free" soft solder I bought has ben cast aside. It is definitely not for tanks!
There were no leaks on testing

and a perfect fit!
This is not my preferred method for tank building as, although the result is stronger, it adds a little more weight and is time consuming.
Started by building the carcass (as before but a more complex shape) and then cutting out the sides following the shape of the carcass but a little larger.
Roughly folding over the edges ready for the next step.

Then I use Polymorph - it is a granualar plastic after placing in hot water can be moulded and shaped. It sets solid as it cools.

I use this to fill the carcass

and then slice it flush

By filling the cracass, it can be used the neaten the folded edges with a little hammer and then they can be filed neatly ready for soldering with a nice tight fit.
When this is finished, the carcass is popped in hot water and the Polymorph push out (it can be reused many times)

This time I only inserted one tube to test for leaks. After tinning, all that should be required is a slight pressure to make a good joint with minimal filling.
Another disaster - bubbles everywhere which no amount of resoldering cured.
How annoyed was I? Extremely!!!!!!!! Now many hours buidling a tank. The time should have been measured in minutes!
This is what the tank looked like when I gave up with it - Well not exactly! It is a pink colour because I threw it in the citric acid and left it there over night!

Today, I started again - I need this tank to start the Radian build!
This time - butt joints - and silver solder. Expensive solder but 40 minutes start to finish.
The new "lead free" soft solder I bought has ben cast aside. It is definitely not for tanks!
There were no leaks on testing

and a perfect fit!


ian1954- Diamond Member

- Posts : 2688
Join date : 2011-11-16
Age : 70
Location : England
 Re: Tank building
Man you do some beautiful and impressive work.
Jim
Jim

JPvelo- Diamond Member

- Posts : 1972
Join date : 2011-12-02
Age : 57
Location : Colorado
 Re: Tank building
Dang Ian! Talk about perseverance!
Good job, I find brass hard to solder. I do use rosin core flux and lead solder, I have to get the brass very clean and quite hot for it to flow. I also use paste flux as well.
Ron
Good job, I find brass hard to solder. I do use rosin core flux and lead solder, I have to get the brass very clean and quite hot for it to flow. I also use paste flux as well.
Ron

Cribbs74- Moderator


Posts : 11907
Join date : 2011-10-24
Age : 50
Location : Tuttle, OK
 Re: Tank building
Needed more volume did you?
Impressive is the truth.
Phil
Impressive is the truth.
Phil

pkrankow- Top Poster

- Posts : 3025
Join date : 2012-10-02
Location : Ohio
 Re: Tank building
Beautiful work. If you are able to go a little hotter I bet brazing could be really effective. I have never brazed copper or brass before but it looks like it should work depending on what kind of stick you use. That tank looks beautiful!

fit90- Diamond Member

- Posts : 1341
Join date : 2011-08-11
Location : Naples, Florida
 very nice !
i'm knew too this....what brand of "silver soder" are you using and where can I get it ? thanks for the illusttrations 

chubbyellowcat- Moderate Poster

- Posts : 12
Join date : 2013-06-23
 Re: Tank building
I use Easy-flow silver solder - I have a stock of it but it has Cadmium in it and is no longer sold.chubbyellowcat wrote:i'm knew too this....what brand of "silver soder" are you using and where can I get it ? thanks for the illusttrations
I always bought my solder from www.cupalloys.co.uk .
For tanks you can use soft solder but make sure it is not lead free.

ian1954- Diamond Member

- Posts : 2688
Join date : 2011-11-16
Age : 70
Location : England
 Re: Tank building
That's what I want to learn how to do. I'm an expert at electronics soldering, but have no experience with this sort of project. What about 60/40 rosin core solder, would it work, or would I be wasting my time by not going with silver solder?
Rusty
Rusty
_________________
Don't Panic!
...and never Ever think about how good you are at something...
while you're doing it!
My Hot Rock & Blues Playlist
...and never Ever think about how good you are at something...
while you're doing it!
My Hot Rock & Blues Playlist

RknRusty- Rest In Peace

- Posts : 10869
Join date : 2011-08-10
Age : 68
Location : South Carolina, USA
 Re: Tank building
Rusty, 60/40 is all I ever used and I used paste flux in addition. I do however solder my pipes inside and out including end caps. Ken

Ken Cook- Top Poster

- Posts : 5637
Join date : 2012-03-27
Location : pennsylvania
 Re: Tank building
60% tin and 40% lead will be OK.
I was struggling with the lead free which is why, in this case, I silver soldered.
It is difficult to find anything that isn't lead or cadmium free in the UK but, last week, I managed to track down Tin 62%, Lead 36%, Silver 2%. It melts at 179 deg C, flows and "tins" nicely and will be ideal for tank building.
Silver soldering needs a bit of practice - the minimum temperature is 610 deg C and it doesn't gap fill.
If you normally solder wires and electrical components and only have a sub 25watt iron - it would be better to step up to a 60 watt.

ian1954- Diamond Member

- Posts : 2688
Join date : 2011-11-16
Age : 70
Location : England
 Re: Tank building
Hi Ian, Thanks for linking me to this thread for my tank build. I had read it previously a while ago. There are since; some new comments/questions/answers that I find VERY Helpful.ian1954 wrote:60% tin and 40% lead will be OK.
I was struggling with the lead free which is why, in this case, I silver soldered.
It is difficult to find anything that isn't lead or cadmium free in the UK but, last week, I managed to track down Tin 62%, Lead 36%, Silver 2%. It melts at 179 deg C, flows and "tins" nicely and will be ideal for tank building.
Silver soldering needs a bit of practice - the minimum temperature is 610 deg C and it doesn't gap fill.
If you normally solder wires and electrical components and only have a sub 25watt iron - it would be better to step up to a 60 watt.
As you know; Lead-free solder is for Plumbers... who have to use it by law, in potable water systems... it has no other practical use IMHO...
I have the 60/40 solder (.031") and also the 62/36/2 (2 being Silver... in .022" dia.) both are rosin-core. I also have x5 one-pound spools of "Kester 24-6337-7601" (63/37... in .031"/.8mm dia.) that I got out of the recycle-bin at work, when the company went in compliance with ROHS requirements. Here's some specs on it.
http://www.janelonline.com/kester-wire-no-clean-cored-solder-sn63pb37-p/kester-24-6337-7601.htm
So.. I have lots of "soft-solder" options. I recently bought a tin of "Rubyfluid" petroleum-based paste-flux. It is stated to be superior for soldering Brass, Copper, Tin, Steel and Stained-Glass work... and also states NOT for electrical use. Do you have any experience with it?
Thanks again Ian,
Roddie
 Re: Tank building
Ruby fluid is ideal - especially for tinning brass or tin. It is slightly acidic which is why it isn't recommended for electrical work. The solder runs more freely with Ruby Fluid and you get a thinner layer and use less solder.roddie wrote:Hi Ian, Thanks for linking me to this thread for my tank build. I had read it previously a while ago. There are since; some new comments/questions/answers that I find VERY Helpful.ian1954 wrote:60% tin and 40% lead will be OK.
I was struggling with the lead free which is why, in this case, I silver soldered.
It is difficult to find anything that isn't lead or cadmium free in the UK but, last week, I managed to track down Tin 62%, Lead 36%, Silver 2%. It melts at 179 deg C, flows and "tins" nicely and will be ideal for tank building.
Silver soldering needs a bit of practice - the minimum temperature is 610 deg C and it doesn't gap fill.
If you normally solder wires and electrical components and only have a sub 25watt iron - it would be better to step up to a 60 watt.
As you know; Lead-free solder is for Plumbers... who have to use it by law, in potable water systems... it has no other practical use IMHO...
I have the 60/40 solder (.031") and also the 62/36/2 (2 being Silver... in .022" dia.) both are rosin-core. I also have x5 one-pound spools of "Kester 24-6337-7601" (63/37... in .031"/.8mm dia.) that I got out of the recycle-bin at work, when the company went in compliance with ROHS requirements. Here's some specs on it.
http://www.janelonline.com/kester-wire-no-clean-cored-solder-sn63pb37-p/kester-24-6337-7601.htm
So.. I have lots of "soft-solder" options. I recently bought a tin of "Rubyfluid" petroleum-based paste-flux. It is stated to be superior for soldering Brass, Copper, Tin, Steel and Stained-Glass work... and also states NOT for electrical use. Do you have any experience with it?
Thanks again Ian,
Roddie

ian1954- Diamond Member

- Posts : 2688
Join date : 2011-11-16
Age : 70
Location : England
 Re: Tank building
Thank You again Ian... That's what I was hoping for. I've been dragging my feet doing research...  to the point where I have holes in my shoes. Your "5 minutes; to finish my tank(s)"... will take me 5 HOURS!
the "procrastinating" Roddie
 to the point where I have holes in my shoes. Your "5 minutes; to finish my tank(s)"... will take me 5 HOURS!
 the "procrastinating" Roddie
 Similar topics
» Kit building 55 yrs. later
» Cox bee tank extenders
» Scientific P-40 Red Tiger
» A building tip
» Who is Building
» Cox bee tank extenders
» Scientific P-40 Red Tiger
» A building tip
» Who is Building
Page 1 of 1
Permissions in this forum:
You cannot reply to topics in this forum

 Rules
Rules


