Log in
Search
Latest topics
» Cox films/videos...by Coxfledgling Today at 4:46 am
» Purchased the last of any bult engines from Ken Enya
by Coxfledgling Today at 4:18 am
» My N-1R build log
by roddie Today at 12:32 am
» Happy 77th birthday Andrew!
by akjgardner Today at 12:27 am
» TEE DEE Having issues
by TD ABUSER Yesterday at 9:43 pm
» Landing-gear tips
by roddie Yesterday at 6:17 pm
» Roger Harris revisited
by TD ABUSER Yesterday at 2:13 pm
» Tee Dee .020 combat model
by Ken Cook Yesterday at 1:41 pm
» Retail price mark-up.. how much is enough?
by Ken Cook Yesterday at 1:37 pm
» My latest doodle...
by roddie Yesterday at 10:43 am
» Chocolate chip cookie dough.........
by roddie Fri Nov 22, 2024 1:13 pm
» Free Flight Radio Assist
by rdw777 Fri Nov 22, 2024 9:24 am
Cox Engine of The Month
New Voodoo build
Page 1 of 1
 New Voodoo build
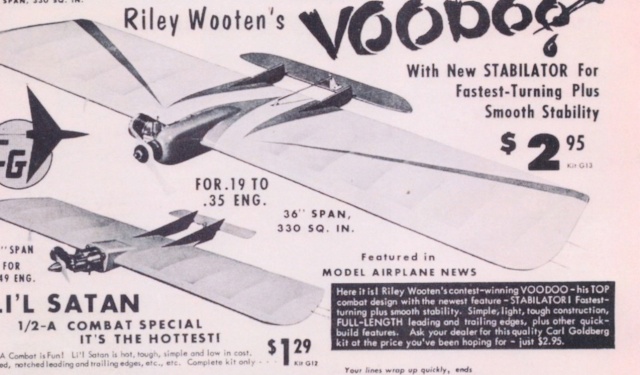
Recently the Voodoo plans were depicted here on the forum. I was fortunate in my last swap meet outing to find a extremely strong yet lightweight solid leading edge. In fact I found several. These were not only inexpensive, they were straight. Something you don't find often enough, strong , straight, light. Key items to providing the backbone of my new Voodoo. I made an aluminum template of the ribs and cut out enough to make two models. The original Voodoo with the 4" booms isn't a good flyer. It really is too close coupled. I made a long boom 6" version in my pics. The booms are 5 ply 1/8". I'm using a Super Tiger G-21.35 for power on bladder. Not a lot of room within the Voodoo wing and this was a bit of a challenge getting the bladder compartment inside of it. The engine is more weight than the engines that were available at the time of the design.The extended booms help somewhat, the additional triangular ply top and bottom of the stab and continuous hinge pin also helps. The plans call for the two 1/16" L shaped pieces which isn't a very good design. Originally, I was planning to cover in silk. I wouldn't recommend any silkspan for a combat model. It just isn't worth the aggravation and the holes it will suffer. Grass will tear it up.
I tapered the booms revealing the ply which is something Larry Scarinzi was infamous for doing and he recommended I do this as well. It just looks cool to me. One would be surprised at how much sanding it takes to do this. Plywood just doesn't sand like balsa. These booms have probably 12 coats of dope on them to achieve that shine and depth. All sanded in between and rubbed out. I only rubbed them out with 800 and polished with Brasso. I couldn't take another minute of doing so. It's a combat plane. I hate finishing and when sanding and polishing, it only makes you even more crazy. I was highly impressed how the nacelle came out. Brodak black with Sig Lite Coat clear. The initial substrate coats were Brodak nitrate followed with Lite Coat. I prefer Lite Coat due to it in my opinion having more fuel resistance than Supercote and it just provides more depth.Unfortunately, my heat gun went on the brink and I can't shrink the Monokote yet. Ken
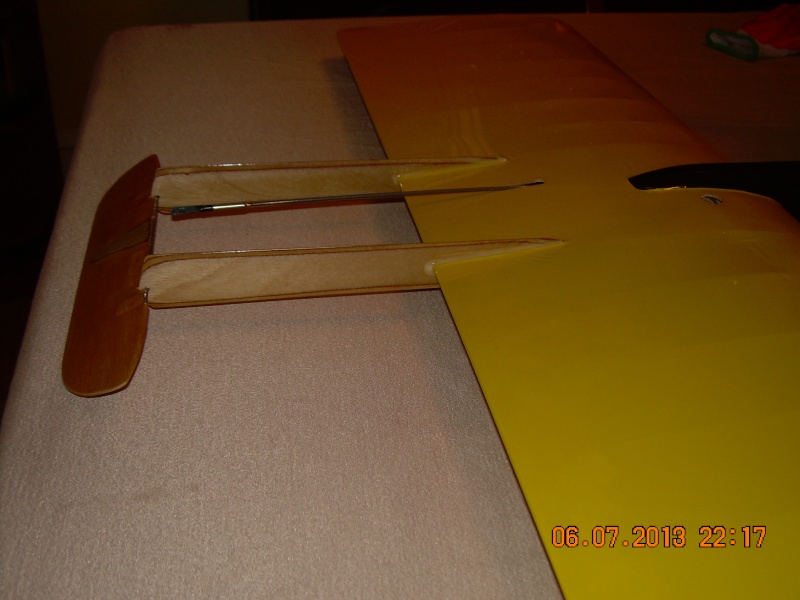
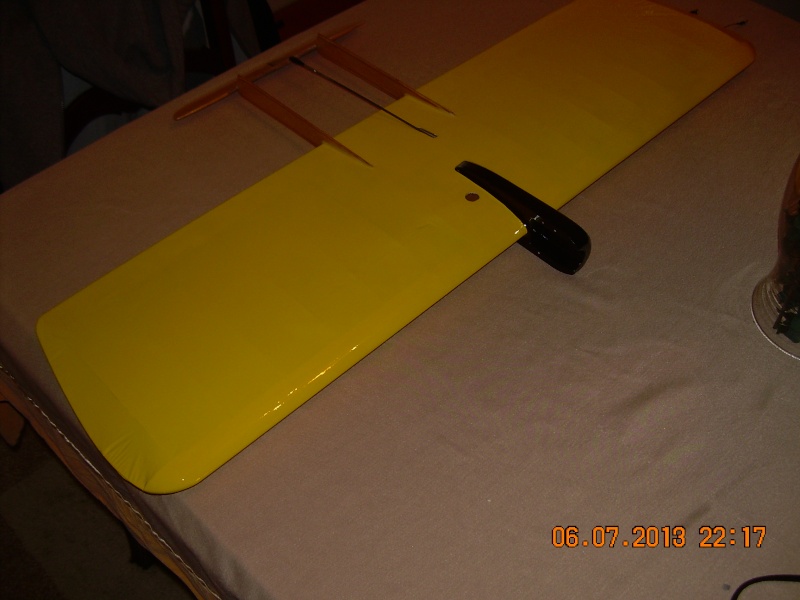
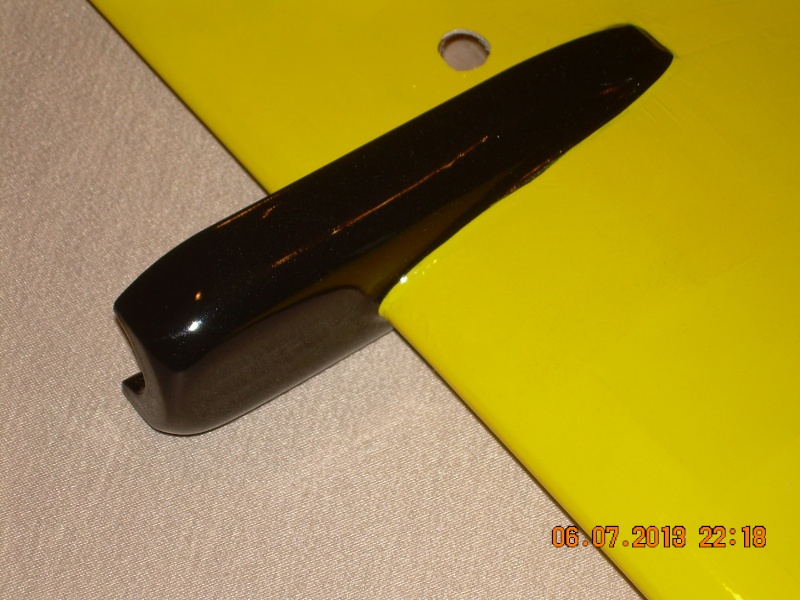
I tapered the booms revealing the ply which is something Larry Scarinzi was infamous for doing and he recommended I do this as well. It just looks cool to me. One would be surprised at how much sanding it takes to do this. Plywood just doesn't sand like balsa. These booms have probably 12 coats of dope on them to achieve that shine and depth. All sanded in between and rubbed out. I only rubbed them out with 800 and polished with Brasso. I couldn't take another minute of doing so. It's a combat plane. I hate finishing and when sanding and polishing, it only makes you even more crazy. I was highly impressed how the nacelle came out. Brodak black with Sig Lite Coat clear. The initial substrate coats were Brodak nitrate followed with Lite Coat. I prefer Lite Coat due to it in my opinion having more fuel resistance than Supercote and it just provides more depth.Unfortunately, my heat gun went on the brink and I can't shrink the Monokote yet. Ken


Last edited by Ken Cook on Sat Jun 08, 2013 1:04 pm; edited 2 times in total

Ken Cook- Top Poster

- Posts : 5640
Join date : 2012-03-27
Location : pennsylvania
 Re: New Voodoo build
Looks really nice Kim!  Did you scratch build it?
 Did you scratch build it?
duke.johnson- Diamond Member

- Posts : 1734
Join date : 2012-11-05
Age : 53
Location : Rochester, Washington
 Re: New Voodoo build
Ken,
That is way too pretty for Combat. However, if you do combat with it Bravo!!!!
Ron
That is way too pretty for Combat. However, if you do combat with it Bravo!!!!
Ron

Cribbs74- Moderator


Posts : 11907
Join date : 2011-10-24
Age : 50
Location : Tuttle, OK
 Re: New Voodoo build
Yes, it was scratchbuilt. I made some changes like the booms,and bell crank platform. Many of these older models are single floored bellcrank platform. That's truly outdated and under engineered. That would be fine for a Fox.35 or a Mccoy but aside from that, it would tear out of the plane using higher powered engines. I also used a solid trailing edge vs the sheeted style on the plans. This keeps things straight and much stronger than the sheeted version. In September I will be attending a vintage combat contest so I'm looking forward to flying this possibly tomorrow and certainly at the contest. Ken

Ken Cook- Top Poster

- Posts : 5640
Join date : 2012-03-27
Location : pennsylvania
 Re: New Voodoo build
Ken, Your Voodoo looks really nice. It's a plane that I also have on my list.
Did you modify the plane as to Carl Goldberg's later modifications? In the original article of MAN - July '61, Riley Wooten didn't use an outboard wing tip weight or any engine off-set. This was recommended later by Carl Goldberg. He also proposed to move the forward lead out cable backwards about 1/2" until just forward of the wing tip brace. Looking at the plan that I have, it seems that Carl Goldberg already lenghtened the tail booms compared to the ones from the original Wooten design. I measure 5" between the TE and the forward stab edge. On the MAN drawing, this distance is much less.
Your control horn seems to be on the bottom of the stab'. Is that a personal choice?
Enjoy the maiden flight. can you make a video or some nice action shots?
Lieven

OVERLORD- Diamond Member

- Posts : 1807
Join date : 2013-03-19
Age : 58
Location : Normandy, France
 Re: New Voodoo build
Lieven, I did move the leadouts forward. That's just something I do on all of my builds. I also have no tip weight. Reason being, My bladder tube is 5" long in the outboard wing panel.I should be able to comfortably fit 3.5-4 oz's in the tube. Tip weight isn't really needed when the plane is up to speed. The other reason, the inboard wing is 1" longer than the outboard. This is something that was done on many stunters and is really questionable. In theory, the inboard wing is going faster than the outboard due to the circumference it's flying. So from a theoretical standpoint, the larger wing area should therefore generate more lift. I find that symmetrically flying wings fly just as well. The control horn is on the top, I had removed it to polish the clear coat and it just was getting in the way.
In regards to tip weight, if you've never launched a wing, they can be a real roller coaster ride until it gets up to speed.Tip weight can assist line tension initially, but too much can also make the wing tip flop when entering and exiting a maneuver. I've only experienced this phenomena on older woodies. I never had this happen on foamies which seem to fly really stable assuming the cg is correct. Ken
In regards to tip weight, if you've never launched a wing, they can be a real roller coaster ride until it gets up to speed.Tip weight can assist line tension initially, but too much can also make the wing tip flop when entering and exiting a maneuver. I've only experienced this phenomena on older woodies. I never had this happen on foamies which seem to fly really stable assuming the cg is correct. Ken

Ken Cook- Top Poster

- Posts : 5640
Join date : 2012-03-27
Location : pennsylvania
 Re: New Voodoo build
Ken,
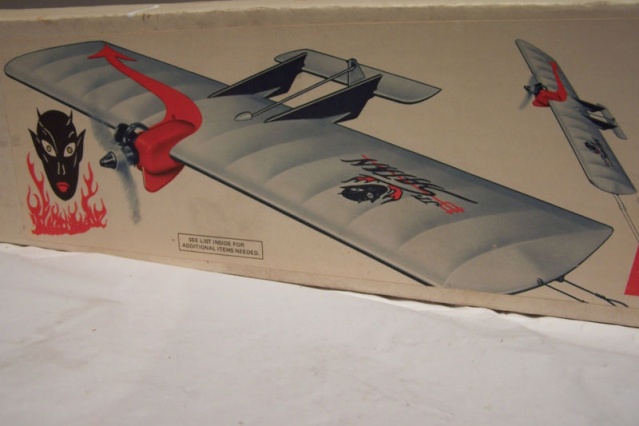
Does the position of the lead out guides (more fwd - more aft - close together) significantly influence the flight caracteristics? Also, on the drawings if the JR Satan, the forward lead out guide is fixed on top of the wing tip and the other guide is fixed on the wing tip's underside. Is this to anticipate the vertical position of the control handle? On the drawings of the Lil Satan and the Voodoo, the guides are both fixed on the underside of the wingtip.
Lieven


OVERLORD- Diamond Member

- Posts : 1807
Join date : 2013-03-19
Age : 58
Location : Normandy, France
 Re: New Voodoo build
Looks like a tough plane with a beautiful finish. As for the heat gun, I quit using one for shrinking. I just use my iron with no sock. Even on the big Shoestring wing. I might try it on the wingtips next time, as they still give me a tricky time. Thanks for sharing.
Rusty
Rusty
_________________
Don't Panic!
...and never Ever think about how good you are at something...
while you're doing it!
My Hot Rock & Blues Playlist
...and never Ever think about how good you are at something...
while you're doing it!
My Hot Rock & Blues Playlist

RknRusty- Rest In Peace

- Posts : 10869
Join date : 2011-08-10
Age : 68
Location : South Carolina, USA
 Re: New Voodoo build
Lieven, something I learned a long time ago is to not always do as the plans show. There are several reasons for this. One, the original designers of most of these planes had their ideas and designs totally revamped when it went to the kit. I personally wouldn't keep the leadout guides close to each other. Your just asking for the line clips to get tangled. Most of my wings have large surgical tubing over the clips anyhow to avoid this. This is especially true when flying combat with another person. Don't give the lines or clips ANY reason to get snagged or tangled because they will. I'm well aware of the over and under lead out guide. I find that to do nothing. I place the lead out guides on top of my wing tips. The location of them is very important. I tack glue the guides on the tips and hang the plane like a plumb bob by it's leadouts and take note as to how the plane is angled. This is where the best placement may not coincide with what the prints are telling you to do. I personally don't fly with the plane yawed to the outside of the circle. That's me though and for someone who's never flown a wing, I would highly recommend engine offset or sweep the leadouts back to the trailing edge slightly. Ken

Ken Cook- Top Poster

- Posts : 5640
Join date : 2012-03-27
Location : pennsylvania
 Re: New Voodoo build
Ken, is the Brodak black and Sig Lite Coat clear sprayed over dope... primer...other?
The reason I ask is, I've been having more trouble with Rustoleum bubbling under the clear on my last couple of projects. I used to never have this. Maybe it's the new VOC regulations, but I'm thinking of changing my recipe. I don't have airbrush equipment, so I'm stuck with rattlecans for now.
The reason I ask is, I've been having more trouble with Rustoleum bubbling under the clear on my last couple of projects. I used to never have this. Maybe it's the new VOC regulations, but I'm thinking of changing my recipe. I don't have airbrush equipment, so I'm stuck with rattlecans for now.
_________________
Don't Panic!
...and never Ever think about how good you are at something...
while you're doing it!
My Hot Rock & Blues Playlist
...and never Ever think about how good you are at something...
while you're doing it!
My Hot Rock & Blues Playlist

RknRusty- Rest In Peace

- Posts : 10869
Join date : 2011-08-10
Age : 68
Location : South Carolina, USA
 Re: New Voodoo build
Rusty
If you have a compressor, Harbor Frieght has a touch up gun for $14 that lays the dope really nice. Then I use an airbrush for trim. Airbrush $5 on ebay with free shipping. The air brush is nice for 1/2A's by itself.
If you have a compressor, Harbor Frieght has a touch up gun for $14 that lays the dope really nice. Then I use an airbrush for trim. Airbrush $5 on ebay with free shipping. The air brush is nice for 1/2A's by itself.

duke.johnson- Diamond Member

- Posts : 1734
Join date : 2012-11-05
Age : 53
Location : Rochester, Washington
 Re: New Voodoo build
Rusty, the black and clear is sprayed. All other coats are brushed. Cheap sprayers can be purchased and used successfully, but that's what you have a cheap gun so buy two. One for clear and one for color. I've brushed many dope finishes and have done a very good job at brushing them. Unfortunately, you can't brush clear correctly over color without it attacking the color and dragging colors from one to the other. Spraying works far superior and looks better. Just keep in mind, the finish I show in the pic doesn't look like that when I'm done painting. In fact it looks like sh#$. The clear has to be wet sanded carefully, then finish sanded with 800 and sometimes 1500. It then has to be aggressively rubbed and I use an old sock to polish with metal polish. I use Brasso, Gorhams, and some other liquid metal polishes.
Dope takes a lot of work. It also requires the clear to be meticulously placed in the correct areas. For instance, when I do a stunter, I go over each rib about 3 times for every single pass over the wing area. You must build up the surfaces that will be most subjected to cutting when the sanding begins. Ken
Dope takes a lot of work. It also requires the clear to be meticulously placed in the correct areas. For instance, when I do a stunter, I go over each rib about 3 times for every single pass over the wing area. You must build up the surfaces that will be most subjected to cutting when the sanding begins. Ken

Ken Cook- Top Poster

- Posts : 5640
Join date : 2012-03-27
Location : pennsylvania
 Re: New Voodoo build
For tapering the ply I use a sanding drum attachment on the Dremel. It will take only minutes as opposed to doing it by hand. Be careful not to stay in one spot too long though.
Ron
Ron

Cribbs74- Moderator


Posts : 11907
Join date : 2011-10-24
Age : 50
Location : Tuttle, OK
 Re: New Voodoo build
I should've mentioned, that the booms just have clear only no silkspan. Elevators on a combat plane should be glassed or silked. In my case here, I didn't so either. I was going to silk this plane. I opted out of it due to the time needed. I started this plane a few months ago and there it sat until I finished the other weekend, a bad habit I have. The engine nacelle on this is completely glassed with lightweight glass and finishing resin. Sounds complicated and is a bit messy, but it can easily be done in less than an hour. The engines I use are more powerful than what the plans originally called for. If the nacelle cracks from the motor mounts, it can easily forfeit 500 rpm's to vibration. It's quite important to keep the front end attached in a solid manner. My mounts on this plane have the maple bearers doweled with 2 3/16" oak dowels. Dope is a great material to use , but it does have it's drawbacks . Adhesion being the #1 problem especially if the proper precautions aren't taken to allow for it. Nothing worse than peeling your masking tape off and having the paint come with it. Ken

Ken Cook- Top Poster

- Posts : 5640
Join date : 2012-03-27
Location : pennsylvania
 Re: New Voodoo build
WOW Ken that is a sweet looking plane! I really like the Yellow and Black. Those two colors go well together.
Shawn
Shawn

sdjjadk- Platinum Member

- Posts : 640
Join date : 2012-04-07
Location : Southern Maryland
 Re: New Voodoo build
Ken
I have a VooDoo kit from a guy on e-bay...hand cut and needs much massaging for my tastes
You said "It's quite important to keep the front end attached in a solid manner. My mounts on this plane have the maple bearers doweled with 2 3/16" oak dowels."
I am having a hard time envisioning this doweling method...please teach a bit more sir
You have no idea how many of your suggestions and experience ends up in my models
I never seem to do a build log or post my projects...mostly because I am copying everyone here and it would all be redundant

fredvon4- Top Poster


Posts : 4012
Join date : 2011-08-26
Age : 69
Location : Lampasas Texas
 Re: New Voodoo build
Hi Fred,
Look at the lower left corner of the Voodoo plan on Outerzone:
http://www.outerzone.co.uk/plan_files_3/3693/voodoo_plan.pdf
It's a wooden rod that goes vertically through both hardwood engine mounts.
Lieven
Look at the lower left corner of the Voodoo plan on Outerzone:
http://www.outerzone.co.uk/plan_files_3/3693/voodoo_plan.pdf
It's a wooden rod that goes vertically through both hardwood engine mounts.
Lieven

OVERLORD- Diamond Member

- Posts : 1807
Join date : 2013-03-19
Age : 58
Location : Normandy, France
 Re: New Voodoo build
Hello Fred, many times kit manufacturers just basically provide anything to throw into the kit. For instance, the 1/2" balsa blocks that go in between the maple bearers. The front end of the Voodoo was a series of triangular pieces which were cut to receive the leading edge. Those pieces are directly in front of the leading edge in between the engine bearers. I made that piece out solid 1/2" vs the 1/4" pieces Goldberg suggests. I built mine from scratch althout I have a blown up set of Goldberg plans. Behind the leading edge they offered 1/2" balsa. I still used the balsa but I used vertical grain vs horizontal. This takes glue far better than the other way. I use a slo set epoxy T-88 here and it takes over 2 days to fully cure. With the maple engine bearers glued onto this piece of balsa which is essentially a center rib, I drilled down through the center of the bearers and through the center rib and out the opposing bearer. This is where I glued the two dowels.
The engine nacelled essentially went on as a complete unit with the balsa tripler being the last thing installed. After it was installed, the entire front end was glassed followed by the epoxy fillets around the entire nacelle. Ken
The engine nacelled essentially went on as a complete unit with the balsa tripler being the last thing installed. After it was installed, the entire front end was glassed followed by the epoxy fillets around the entire nacelle. Ken

Ken Cook- Top Poster

- Posts : 5640
Join date : 2012-03-27
Location : pennsylvania
 Re: New Voodoo build
With the plan open and Ken's excellent explanation I get it now, thank you guys very much
Note to self...must find a way to catalog all these great ideas
I am building Jeff Dawson Lite Hawk right now and have forgotten half the ideas he gave me for construction a back several months ago
Getting old and battling CRS is frustrating....
Note to self...must find a way to catalog all these great ideas
I am building Jeff Dawson Lite Hawk right now and have forgotten half the ideas he gave me for construction a back several months ago
Getting old and battling CRS is frustrating....


fredvon4- Top Poster


Posts : 4012
Join date : 2011-08-26
Age : 69
Location : Lampasas Texas
 Re: New Voodoo build
I have seen pinning like that on several models before. The mystery wing I have is done that way.
Phil
Phil

pkrankow- Top Poster

- Posts : 3025
Join date : 2012-10-02
Location : Ohio
 Re: New Voodoo build
My main reason for doing this is the engine I decided to use. Super Tigre's were the engine of choice in the 70's until Fox came out with the MK III. Many of the engines I use have really been worked over. I've had a few of them tear the engines right off the front of the plane. My Flite streak had to be totally rebuild due to this happening twice. Conventional construction methods are just not good enough for these engine. The Voodoo was designed with the Johnson's and the Fox X series engines in mind. For general plain bushed engines, I wouldn't go through the trouble on the nose as it's just not needed. Ken

Ken Cook- Top Poster

- Posts : 5640
Join date : 2012-03-27
Location : pennsylvania
 Similar topics
» Guillows Cessna 150 build circa 1970 (Build Log)
» C/L FYI: VooDoo
» Idk how to build.
» The RMH Bipe build thread
» My N-1R build log
» C/L FYI: VooDoo
» Idk how to build.
» The RMH Bipe build thread
» My N-1R build log
Page 1 of 1
Permissions in this forum:
You cannot reply to topics in this forum

 Rules
Rules


