Log in
Search
Latest topics
» My N-1R build logby roddie Yesterday at 9:29 pm
» Funny what you find when you go looking
by rsv1cox Yesterday at 3:21 pm
» Landing-gear tips
by 1975 control line guy Yesterday at 8:17 am
» Purchased the last of any bult engines from Ken Enya
by sosam117 Yesterday at 7:45 am
» Cox NaBOO - Just in time for Halloween
by rsv1cox Tue Nov 19, 2024 6:35 pm
» Canada Post strike - We are still shipping :)
by Cox International Tue Nov 19, 2024 12:01 pm
» Duende V model from RC Model magazine 1983.
by getback Tue Nov 19, 2024 6:08 am
» My current avatar photo
by roddie Mon Nov 18, 2024 9:05 pm
» My latest doodle...
by TD ABUSER Mon Nov 18, 2024 11:30 am
» Brushless motors?
by rsv1cox Sun Nov 17, 2024 6:40 pm
» Free Flight Radio Assist
by rdw777 Sun Nov 17, 2024 6:03 pm
» Tribute Shoestring build
by amurphy6812 Sun Nov 17, 2024 5:43 pm
Cox Engine of The Month
Jim Walker Firebaby
Page 1 of 6
Page 1 of 6 • 1, 2, 3, 4, 5, 6 
 Jim Walker Firebaby
Parts that I ordered came in today… The wing still has its dihedral and camber steamed in…. Pretty good for seventy year old balsa!!!….Along with a handful of metal parts for a good start…

I think some of these parts were probably purchased as replacements as indicated by the sticker on the rudder… 10 cents!!!….I’ve read that the rudders were not aluminum but magnesium…. Regardless, It’s very light….

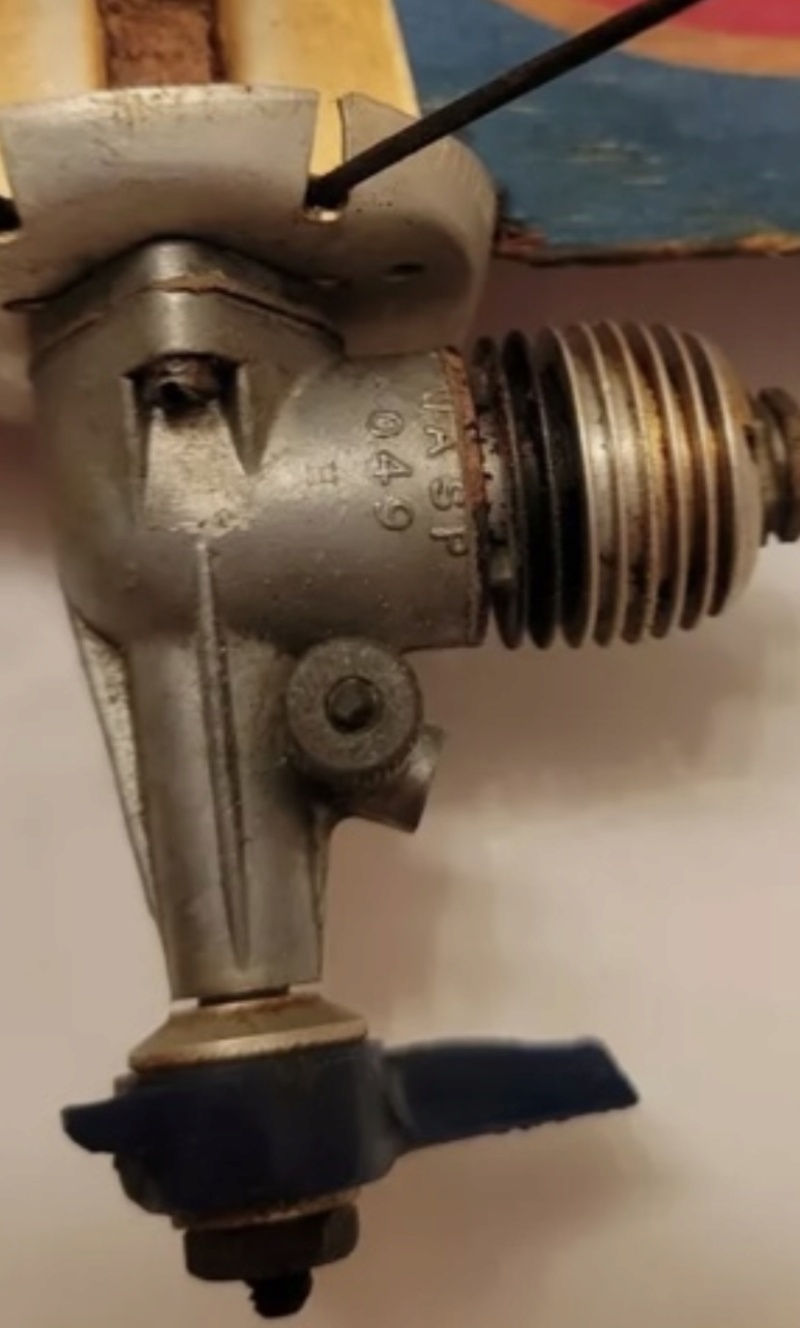
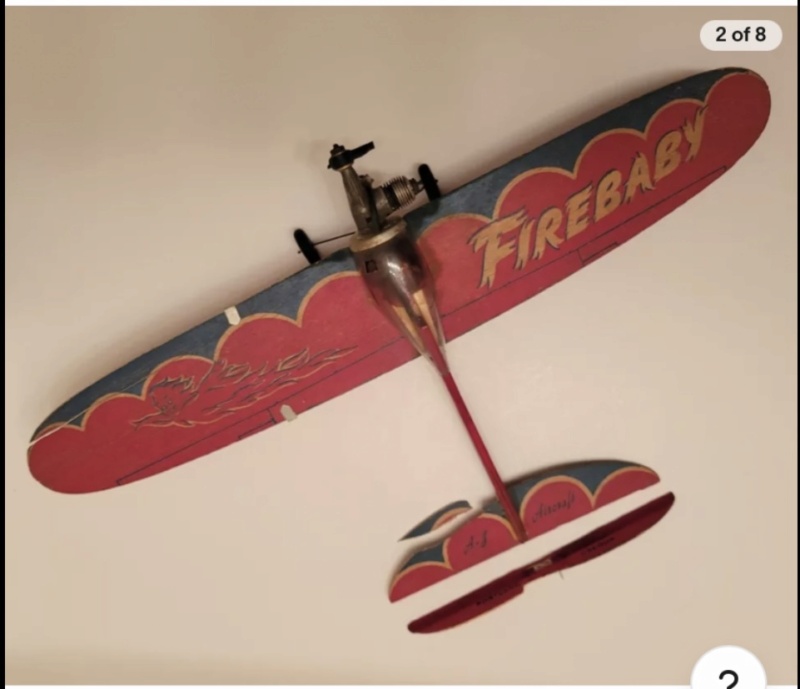
I was checking for other parts and found most of another plane for a reasonable cost although somewhat busted up…. Between the two should be able to come up with one decent one.. :Thumbs UP…….Has a Wasp engine to boot…. Seller’s photos….

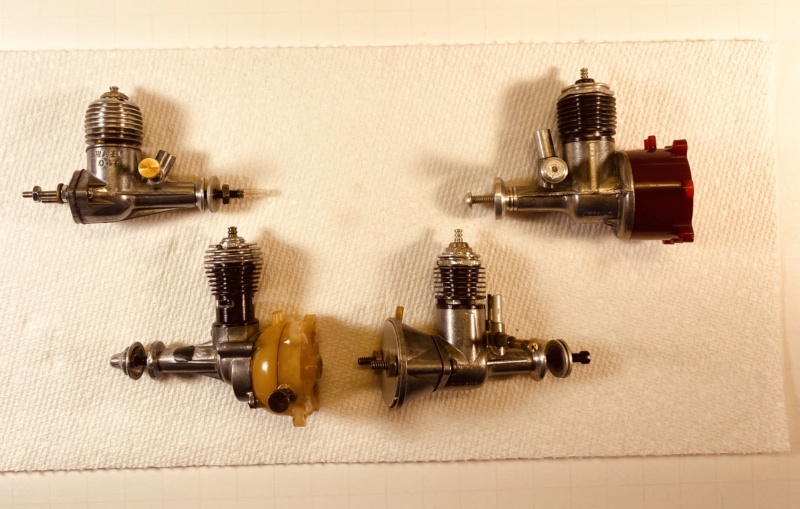
My old engines from the period that would be appropriate for it…. Atwood Wasp, Space Bug Junior, OK Cub .039, OK Cub .049….All have been gone thru and run….
I’m not really a collector but admire it from a 1/2A history standpoint…. If I think I really need to fly it will build a clone….


I think some of these parts were probably purchased as replacements as indicated by the sticker on the rudder… 10 cents!!!….I’ve read that the rudders were not aluminum but magnesium…. Regardless, It’s very light….

I was checking for other parts and found most of another plane for a reasonable cost although somewhat busted up…. Between the two should be able to come up with one decent one.. :Thumbs UP…….Has a Wasp engine to boot…. Seller’s photos….


My old engines from the period that would be appropriate for it…. Atwood Wasp, Space Bug Junior, OK Cub .039, OK Cub .049….All have been gone thru and run….

I’m not really a collector but admire it from a 1/2A history standpoint…. If I think I really need to fly it will build a clone….


rdw777- Diamond Member


Posts : 1712
Join date : 2021-03-11
Location : West Texas
 Re: Jim Walker Firebaby
rdw777 wrote:
I’m not really a collector but admire it from a 1/2A history standpoint…. If I think I really need to fly it will build a clone….
... and a nice little piece of 1/2A U-Control history it certainly is Robert.
 Re: Jim Walker Firebaby
Thanks Roddie, I’ve watched many of our talented members restore vintage orphans and come up with some unique repairs and procedures to get them back….. Kind of like restoring and old car but a lot cheaper LOL!!! …. Looks like fun to give a try 

rdw777- Diamond Member


Posts : 1712
Join date : 2021-03-11
Location : West Texas
 Re: Jim Walker Firebaby
Great find on the Wasp Firebaby Robert. Just the right amount of crispyness. Now you can have two, one authentic, the other a clone.
But, I don't see a real authentic plastic Jim Walker marked control line handle among your parts. Two extra came with my last FB purchase. I have an orange one all packed up for you ready to ship. You can't fly a Firebaby with just any old control line handle. Funny, they wrapped their included control line around a hardened cardboard piece with holes for control lines that could be used in a pinch I guess...........
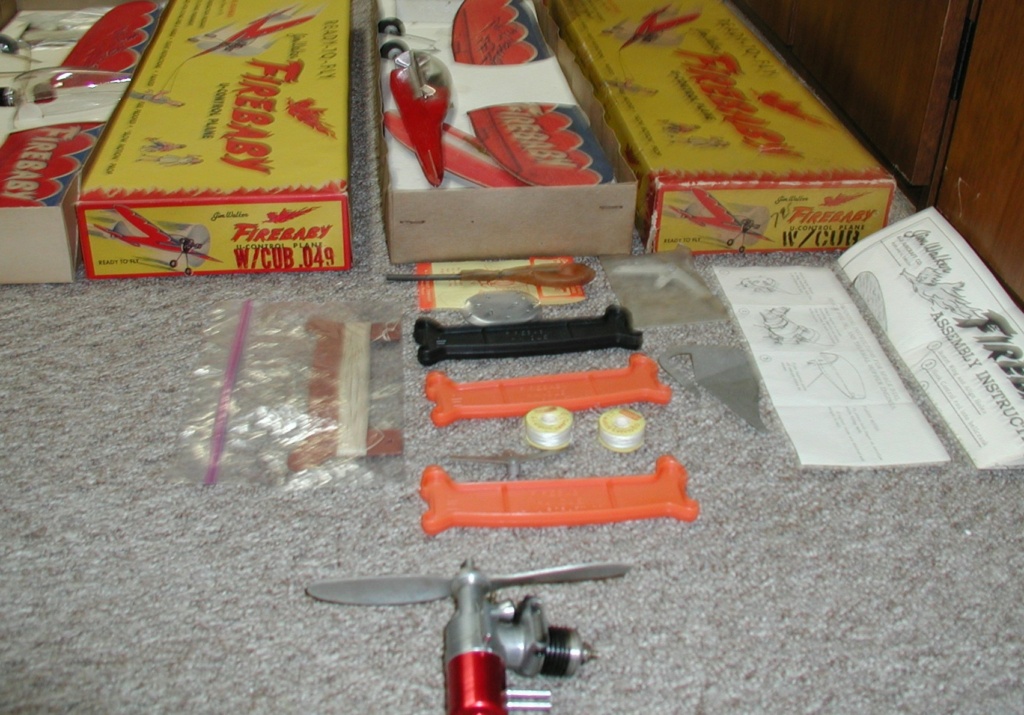
But, I don't see a real authentic plastic Jim Walker marked control line handle among your parts. Two extra came with my last FB purchase. I have an orange one all packed up for you ready to ship. You can't fly a Firebaby with just any old control line handle. Funny, they wrapped their included control line around a hardened cardboard piece with holes for control lines that could be used in a pinch I guess...........


rsv1cox- Top Poster


Posts : 11244
Join date : 2014-08-18
Location : West Virginia

rdw777- Diamond Member


Posts : 1712
Join date : 2021-03-11
Location : West Texas

rsv1cox- Top Poster


Posts : 11244
Join date : 2014-08-18
Location : West Virginia
 Re: Jim Walker Firebaby
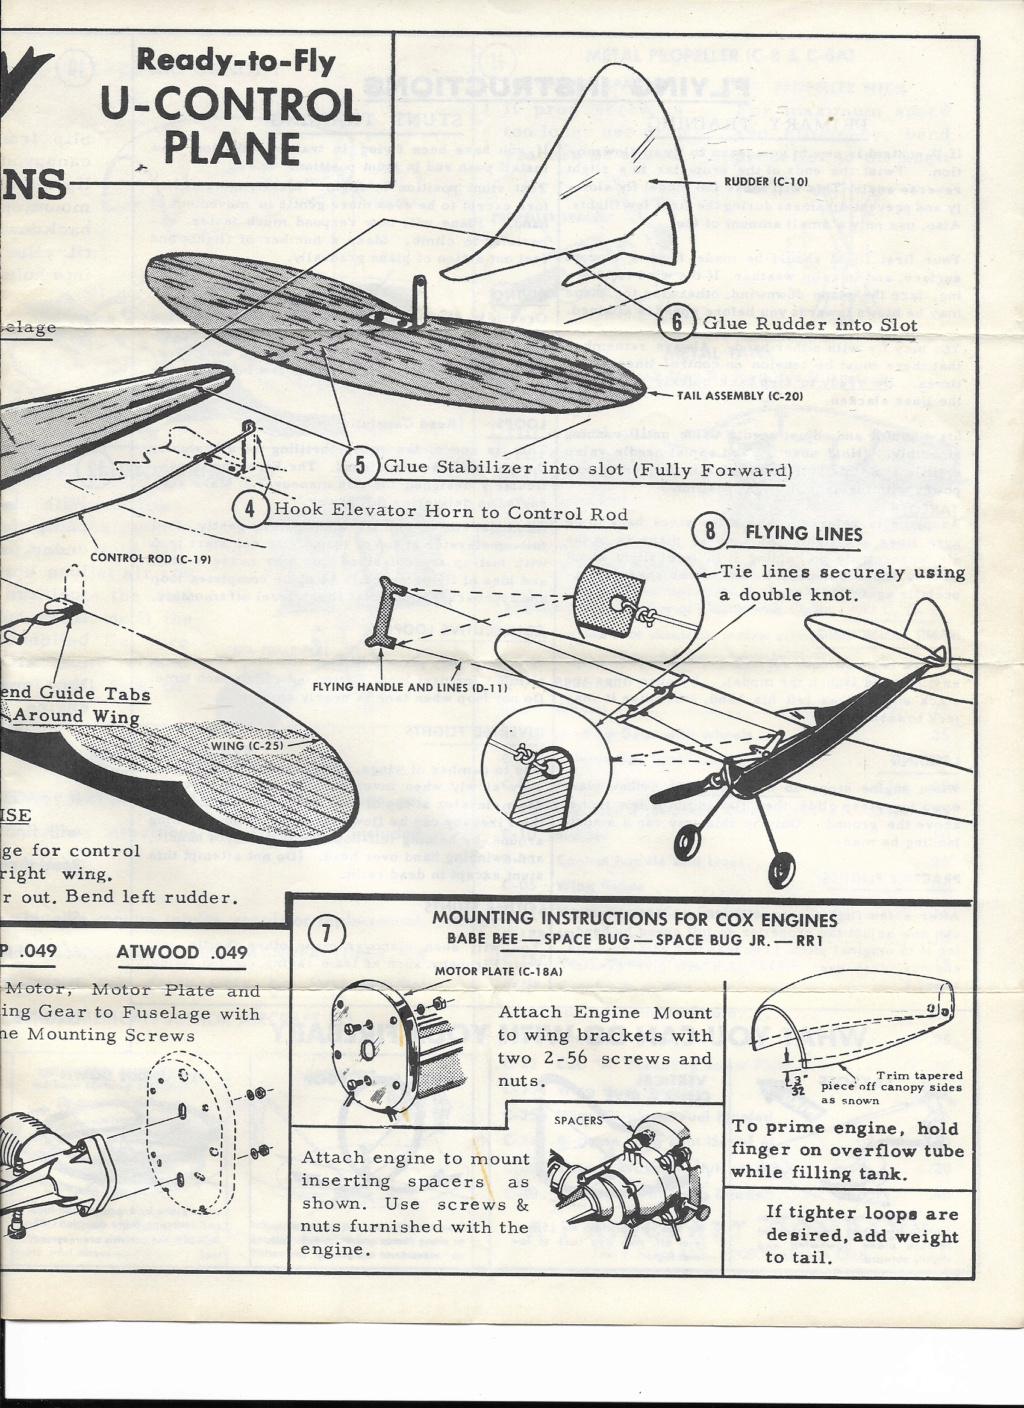
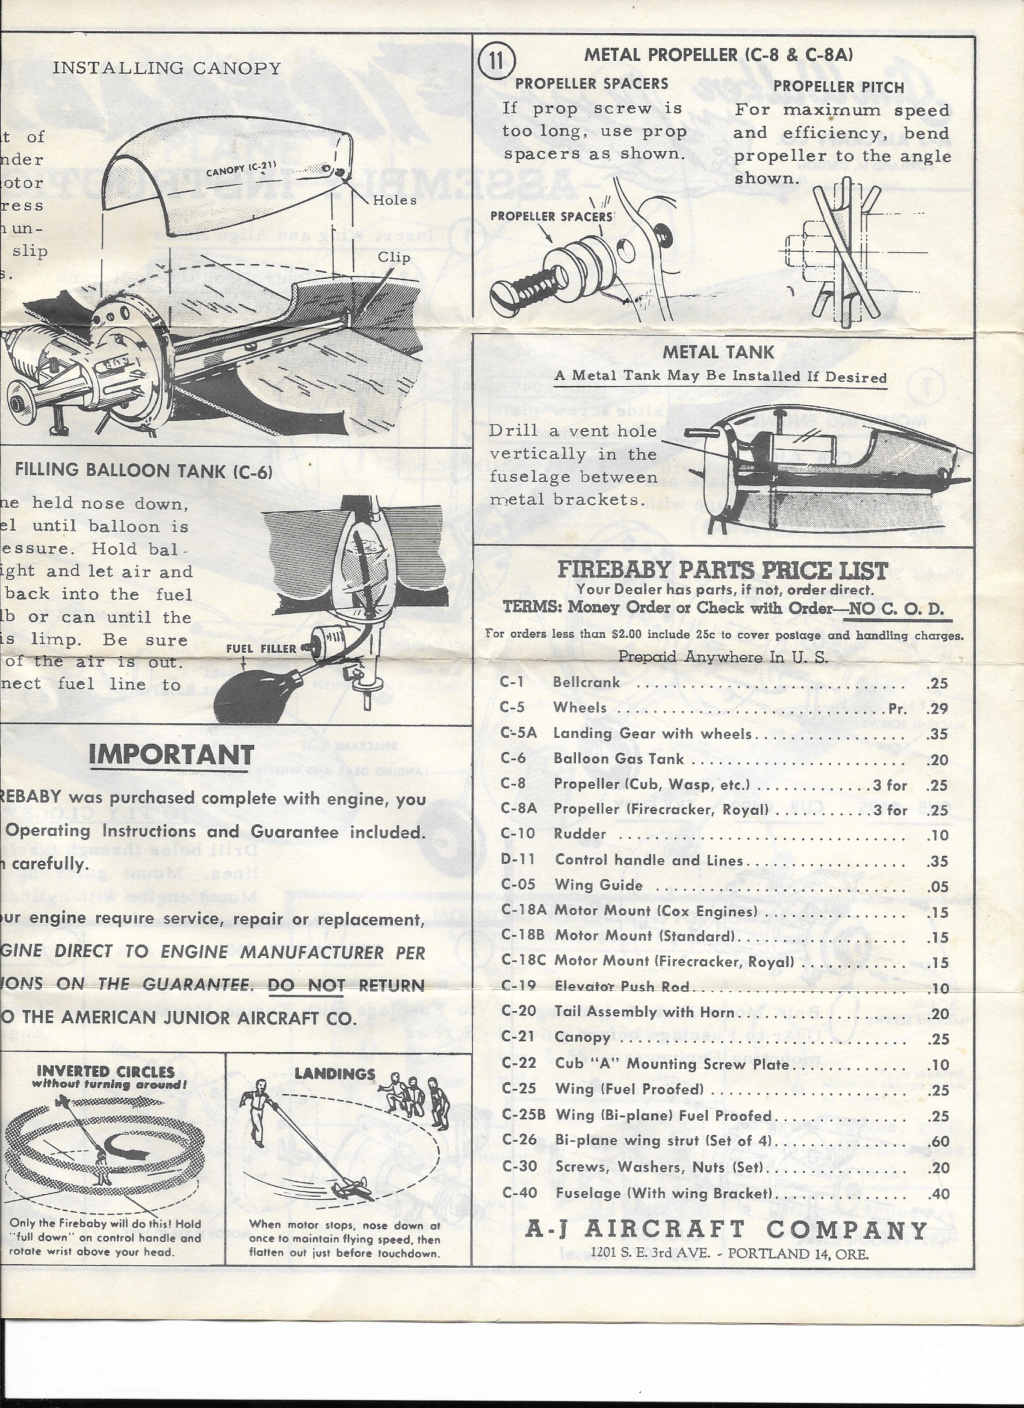
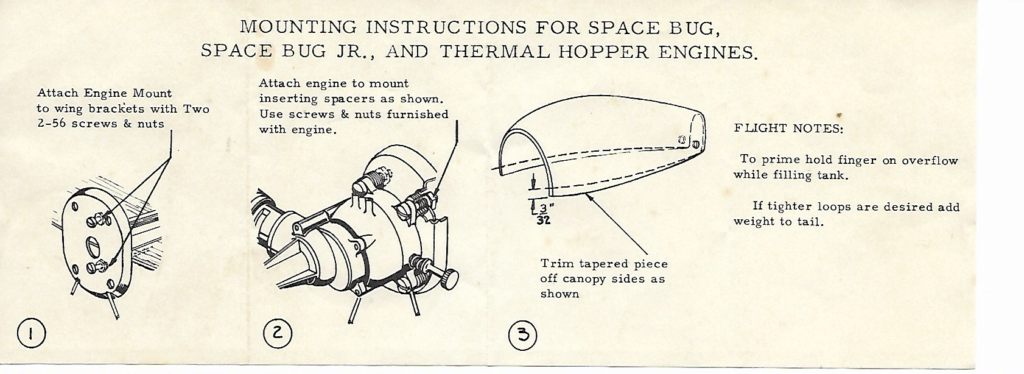
Thanks for the instructions Bob!! I only had pieces and parts saved in screen shots before…. Nice to see the addendum for the SBJ… I suspected it might have been recommended as well ….. Going into to Firebaby file 
There’s an interesting thread on the Wasp engines below…. Explains how the “H” came to be….Lots of interesting trails to chase on this project….
https://www.coxengineforum.com/t13632-atwood-wasp-049?highlight=Atwood+Wasp
Bob Holland was Bill Atwood's partner on the Wasp. They got into a big argument when Bob found Bill was designing an engine for Wen Mac. About 1953 they split up, Bob kept the WASP and the name, Bill Atwood went on to market his own designs, about identical to the original WASP. Bob put a little "H" under the wasp name on the right of the crankcase to identify it as a Holland WASP.

rdw777- Diamond Member


Posts : 1712
Join date : 2021-03-11
Location : West Texas
 Re: Jim Walker Firebaby
Great going back over that thread Robert. Ken and Gwillie (RIP) always informative contributors. I think I have a couple of Atwoods/Wasps around somewhere, I will have to find them and take a second look.
I picked up this Jim Walker U-reely (Unreely as Ken reports) for $12 on ebay. Nasty dirty thing with rusty and impacted philips heads and standoffs with daubs of red paint. I dug out the dirt from the screw heads and removed all the hardware except the aligning pins but I did not take it apart. Chicken, I did not want those lines spilling out all over then having to stuff them back in.
Sprayed it with Simple Green and scrubbed. Not satisified, I dumped it in Pine-Sol and hot water which turned the solution black. Nasty stuff came out of there. I rinsed it well then replaced the cleaned-up stand-offs and screws, blew it out with compressed air and put it on a heating vent (heat-pump barely warm air) for a couple of days. Works fine.
I especially like the perfectly bent nail, PO substitute for a broken handle.

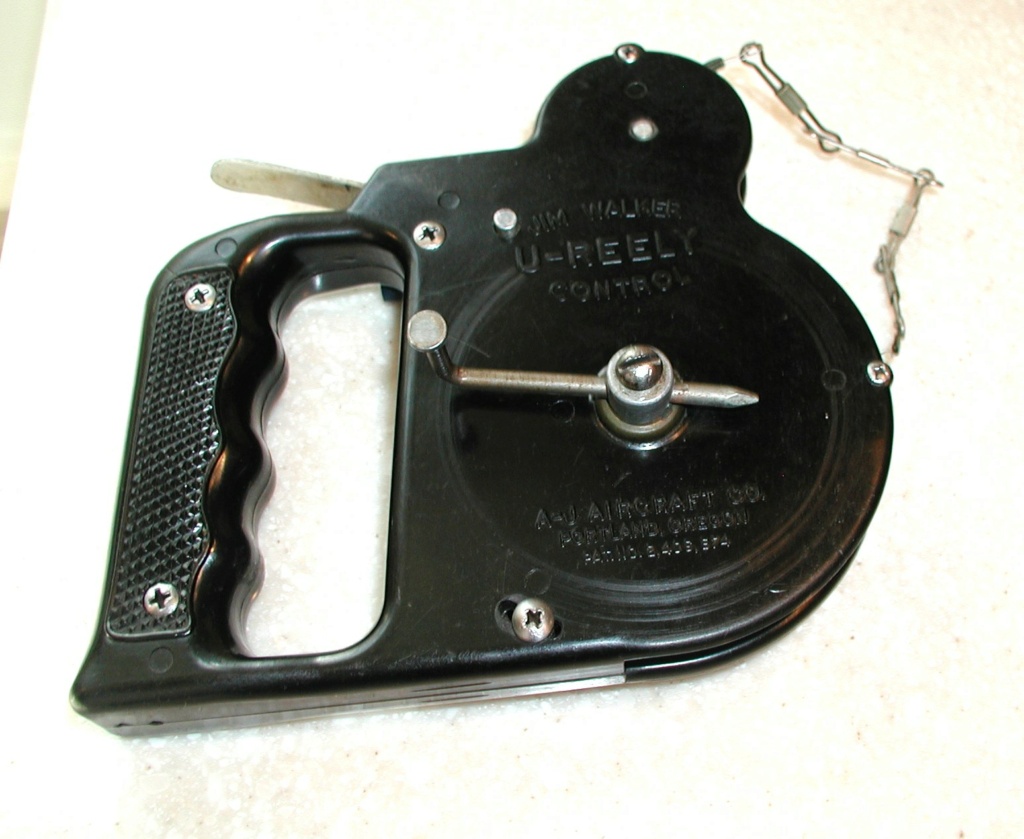
Sellers pictures:
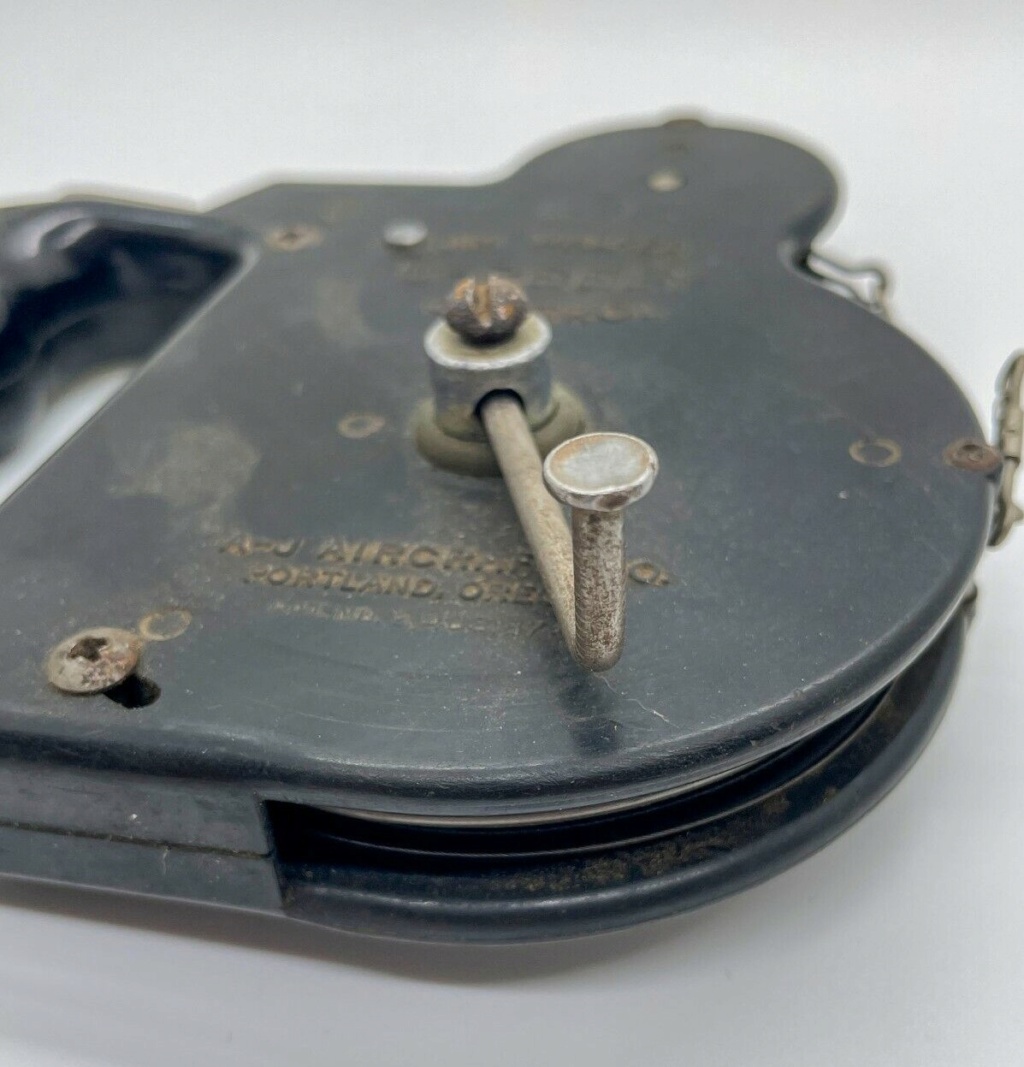
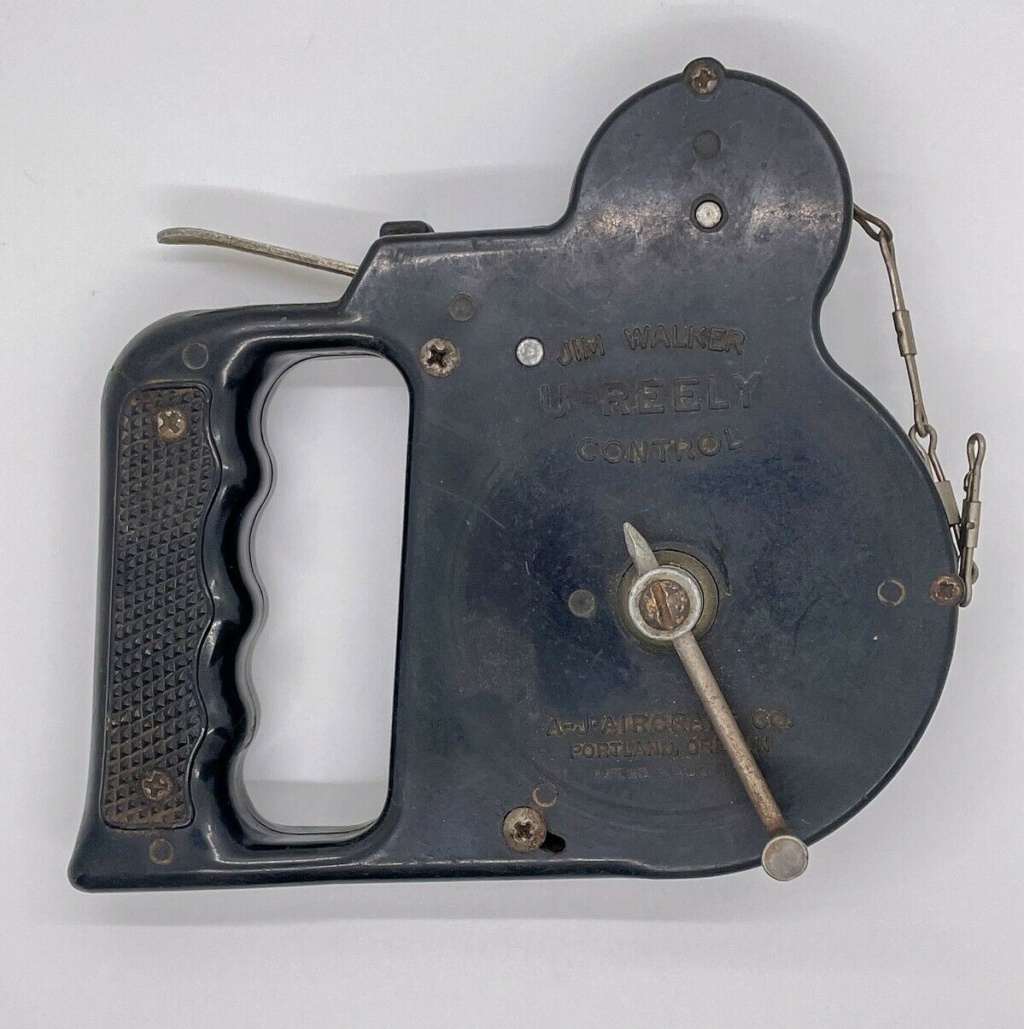
I picked up this Jim Walker U-reely (Unreely as Ken reports) for $12 on ebay. Nasty dirty thing with rusty and impacted philips heads and standoffs with daubs of red paint. I dug out the dirt from the screw heads and removed all the hardware except the aligning pins but I did not take it apart. Chicken, I did not want those lines spilling out all over then having to stuff them back in.
Sprayed it with Simple Green and scrubbed. Not satisified, I dumped it in Pine-Sol and hot water which turned the solution black. Nasty stuff came out of there. I rinsed it well then replaced the cleaned-up stand-offs and screws, blew it out with compressed air and put it on a heating vent (heat-pump barely warm air) for a couple of days. Works fine.
I especially like the perfectly bent nail, PO substitute for a broken handle.


Sellers pictures:


rsv1cox- Top Poster


Posts : 11244
Join date : 2014-08-18
Location : West Virginia
 Re: Jim Walker Firebaby
Hehehe. Bob I was watching the same one on EBay I think. But I already have 3 other types of handles that you roll up the wires or string in. Two of them are Cox and another brand. Need to read the instructions and get to it

Greenman38633- Gold Member

- Posts : 151
Join date : 2024-02-05
 Re: Jim Walker Firebaby
Neat old control handles!…. I think practical in one sense for managing the lines…. But seem to have never caught on or matured out with the CL group…. Got to give Walker credit for trying to make a go of it though …. He seemed to be a really forward thinker and pushed the edge on several things…. Of course being a businessman and trying to sell his products as well….. I like the old ad below…. Walker could pull it off being the showman he was but would be difficult and potentially dangerous for most folks…..


rdw777- Diamond Member


Posts : 1712
Join date : 2021-03-11
Location : West Texas
 Re: Jim Walker Firebaby
I would have to see it. Unless he really hand whipped it I would think that gravity would take hold before acceleration. Especially with that ultralight Firebaby hauling steel lines. They plus the connectors are quite heavy. I would never use it for anything less than a .35 powered model.
But the idea is great. Hold the release lever down and let it unwind. Then wind it back in. I am thinking Dizzy.
But the idea is great. Hold the release lever down and let it unwind. Then wind it back in. I am thinking Dizzy.

rsv1cox- Top Poster


Posts : 11244
Join date : 2014-08-18
Location : West Virginia
 Re: Jim Walker Firebaby
rsv1cox wrote:But the idea is great. Hold the release lever down and let it unwind. Then wind it back in. I am thinking Dizzy.
I agree, I think the idea was great but just wasn’t that practical…But this was still pretty early in the U-Control game and I guess a lot of exploring still to do…. I think Cox even had a similar reel/handle combo?
An odd one that came up some years later was the Mod Pod…. Supposedly could hand launched and be flown on a very long tether…. I’d have to see it to believe it…. The article is an interesting read though….
https://outerzone.co.uk/plan_details.asp?ID=8331

rdw777- Diamond Member


Posts : 1712
Join date : 2021-03-11
Location : West Texas
 Re: Jim Walker Firebaby
Here are the instructions if you don't have them for the U-reely i missed out on LOL >> https://rclibrary.co.uk/files_titles/1825/JimWalker_U-Reely_instructions.pdf 

getback- Top Poster


Posts : 10436
Join date : 2013-01-18
Age : 67
Location : julian , NC
 Re: Jim Walker Firebaby
rdw777 wrote:rsv1cox wrote:But the idea is great. Hold the release lever down and let it unwind. Then wind it back in. I am thinking Dizzy.
I agree, I think the idea was great but just wasn’t that practical…But this was still pretty early in the U-Control game and I guess a lot of exploring still to do…. I think Cox even had a similar reel/handle combo?
An odd one that came up some years later was the Mod Pod…. Supposedly could hand launched and be flown on a very long tether…. I’d have to see it to believe it…. The article is an interesting read though….
https://outerzone.co.uk/plan_details.asp?ID=8331
Yes, Kim gifted me this Cox marked handle that came with the three control Ryan ST.

When ever possible I try to work them into my displays.


rsv1cox- Top Poster


Posts : 11244
Join date : 2014-08-18
Location : West Virginia
 Re: Jim Walker Firebaby
WOW Check this out i stubbled across >> https://www.americanjuniorclassics.com/index.html 


getback- Top Poster


Posts : 10436
Join date : 2013-01-18
Age : 67
Location : julian , NC
 Re: Jim Walker Firebaby
Thanks Eric for both of those links, booked them.
My Ureely is missing that brake limiter adjustment screw, didn't know it was suppossed to have one. I still do not understand what that other screw is for, there are screws on either side that fit into some sort of slide-able object.
Yesterday I remembered that I had the Roberts handle, searched it out this morning. I even sourced the in plane line control.

and..........Robert and Eric and maybe others, if you have been following this JW FireBee on ebay...............
I didn't want to.......seriously..........I have to give up this NIB stuff. It offers no challange and gives me little enjoyment..............but curiosity always gets the better of me. I want to know how that OK Cub throttle control works, the one with the "hat" over the intake. I have one but it's missing the back half.
I made the seller an offer that was accepted.
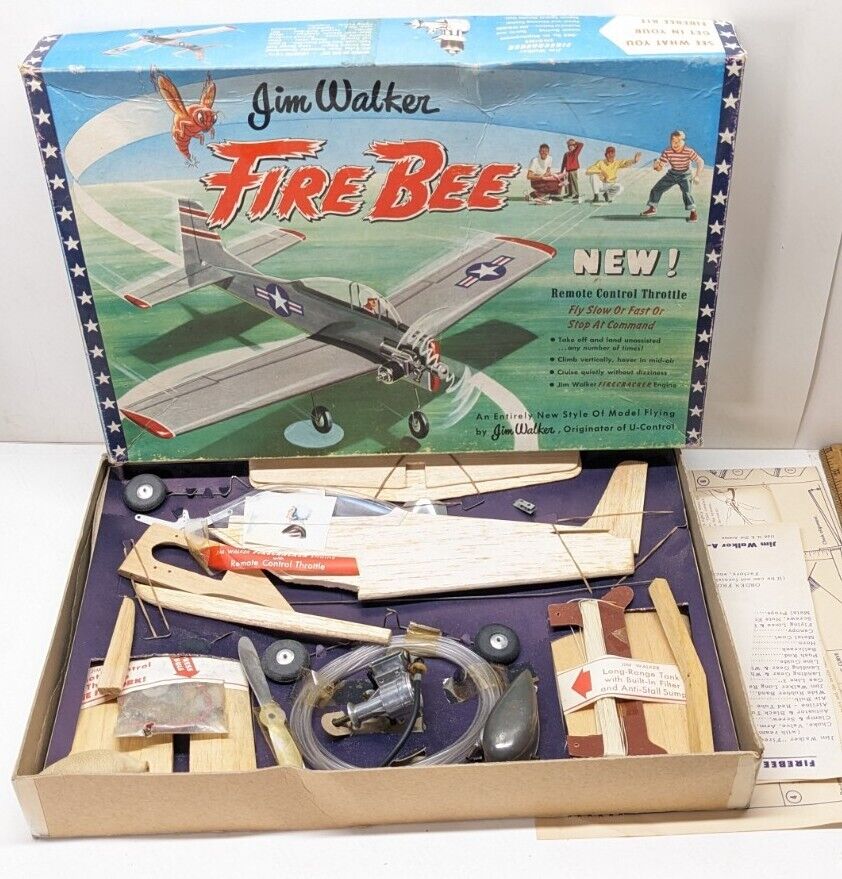


Now, like Robert I can make a FireBee clone, like the two I made of the FireBaby. Just trace the components and cut balsa. Maybe even duplicate the back half of that throttled Ok Cub.
My Ureely is missing that brake limiter adjustment screw, didn't know it was suppossed to have one. I still do not understand what that other screw is for, there are screws on either side that fit into some sort of slide-able object.
Yesterday I remembered that I had the Roberts handle, searched it out this morning. I even sourced the in plane line control.

and..........Robert and Eric and maybe others, if you have been following this JW FireBee on ebay...............
I didn't want to.......seriously..........I have to give up this NIB stuff. It offers no challange and gives me little enjoyment..............but curiosity always gets the better of me. I want to know how that OK Cub throttle control works, the one with the "hat" over the intake. I have one but it's missing the back half.
I made the seller an offer that was accepted.


Now, like Robert I can make a FireBee clone, like the two I made of the FireBaby. Just trace the components and cut balsa. Maybe even duplicate the back half of that throttled Ok Cub.

rsv1cox- Top Poster


Posts : 11244
Join date : 2014-08-18
Location : West Virginia
 Re: Jim Walker Firebaby
getback wrote:https://www.americanjuniorclassics.com/index.html
That’s a great site Eric…. Thanks for bringing it up, Lots of Jim Walker history…. Lots of good info on Firebaby and others as well… Great for reference!!!
Yes Bob, I saw that FireBee…. Glad you picked it up so you can give us the tour…. Will be expecting measurements and a clone

I downloaded the plan for this T-28…. I used to have the magazine and it was a center pull out plan….Always thought it was a neat little design Calls for an Enya .09 and I just happen to have one with throttle
Maybe after Firebaby….


rdw777- Diamond Member


Posts : 1712
Join date : 2021-03-11
Location : West Texas
 Re: Jim Walker Firebaby
Ah, an Enya Powered .09 TV T-28. Will be happy to see it get air time.
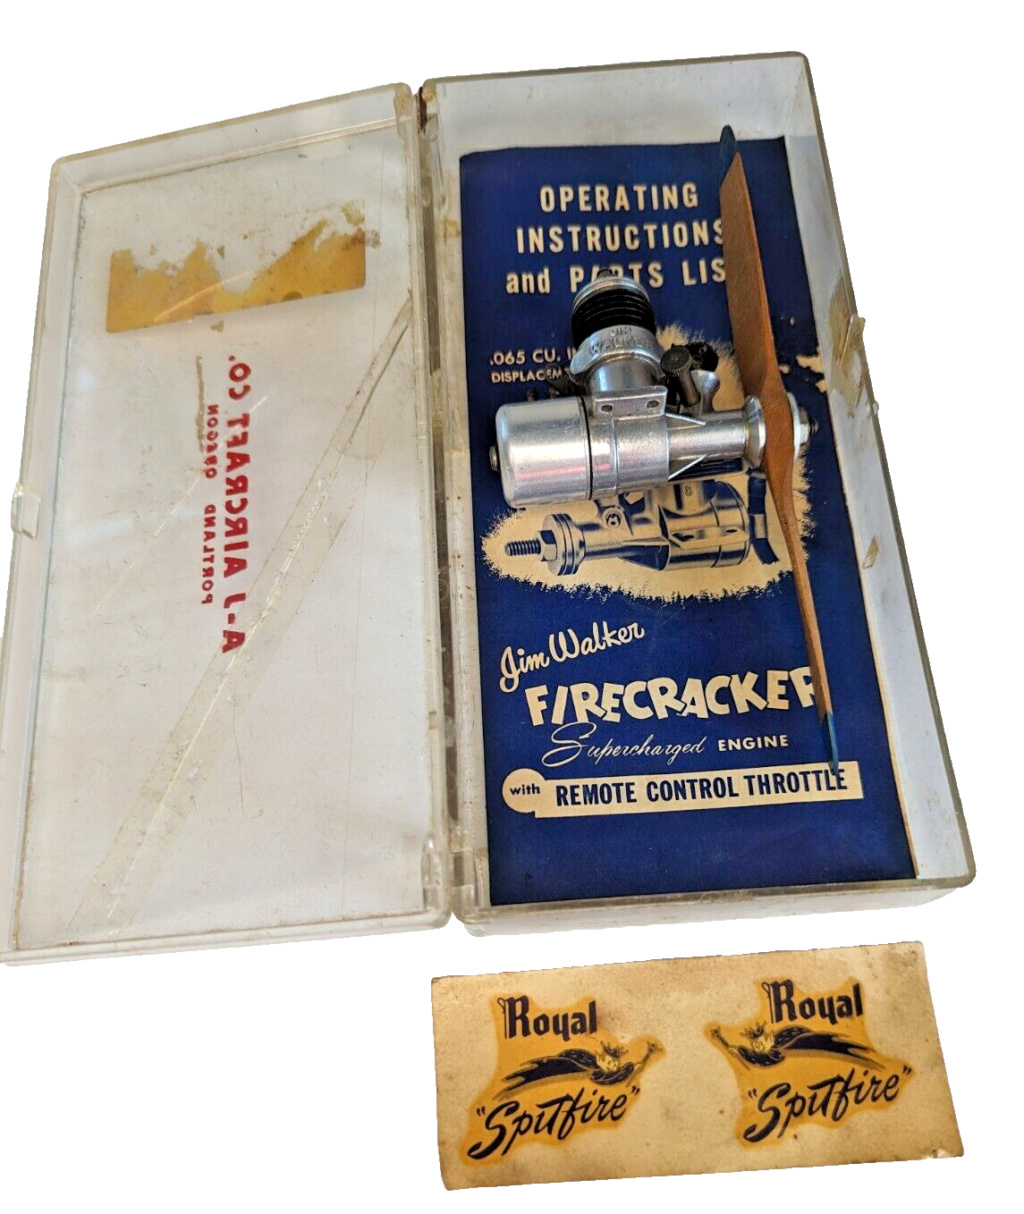
Forgot to add, I "won" this too. No soft make an offer either, I had to fight for it as another bidder was nipping at my one time proxy bid. I finally had to make a snipe bid at the end with five seconds to go.
No curiosity, just pure greed. Good subject for Levents - Save a decal technique. But, something funny. That tank and no cable.


rsv1cox- Top Poster


Posts : 11244
Join date : 2014-08-18
Location : West Virginia
 Re: Jim Walker Firebaby
Looks like a very nice example of the JW Firecracker engine Bob….. I’ve noticed these have both an exhaust restrictor and air inlet restrictor that are coupled together for throttle….Maybe a little finicky to set up but probably effective…. ….Would like to see some close up shots of this when you get it….

rdw777- Diamond Member


Posts : 1712
Join date : 2021-03-11
Location : West Texas
 Re: Jim Walker Firebaby
rdw777 wrote:Looks like a very nice example of the JW Firecracker engine Bob….. I’ve noticed these have both an exhaust restrictor and air inlet restrictor that are coupled together for throttle….Maybe a little finicky to set up but probably effective…. ….Would like to see some close up shots of this when you get it….
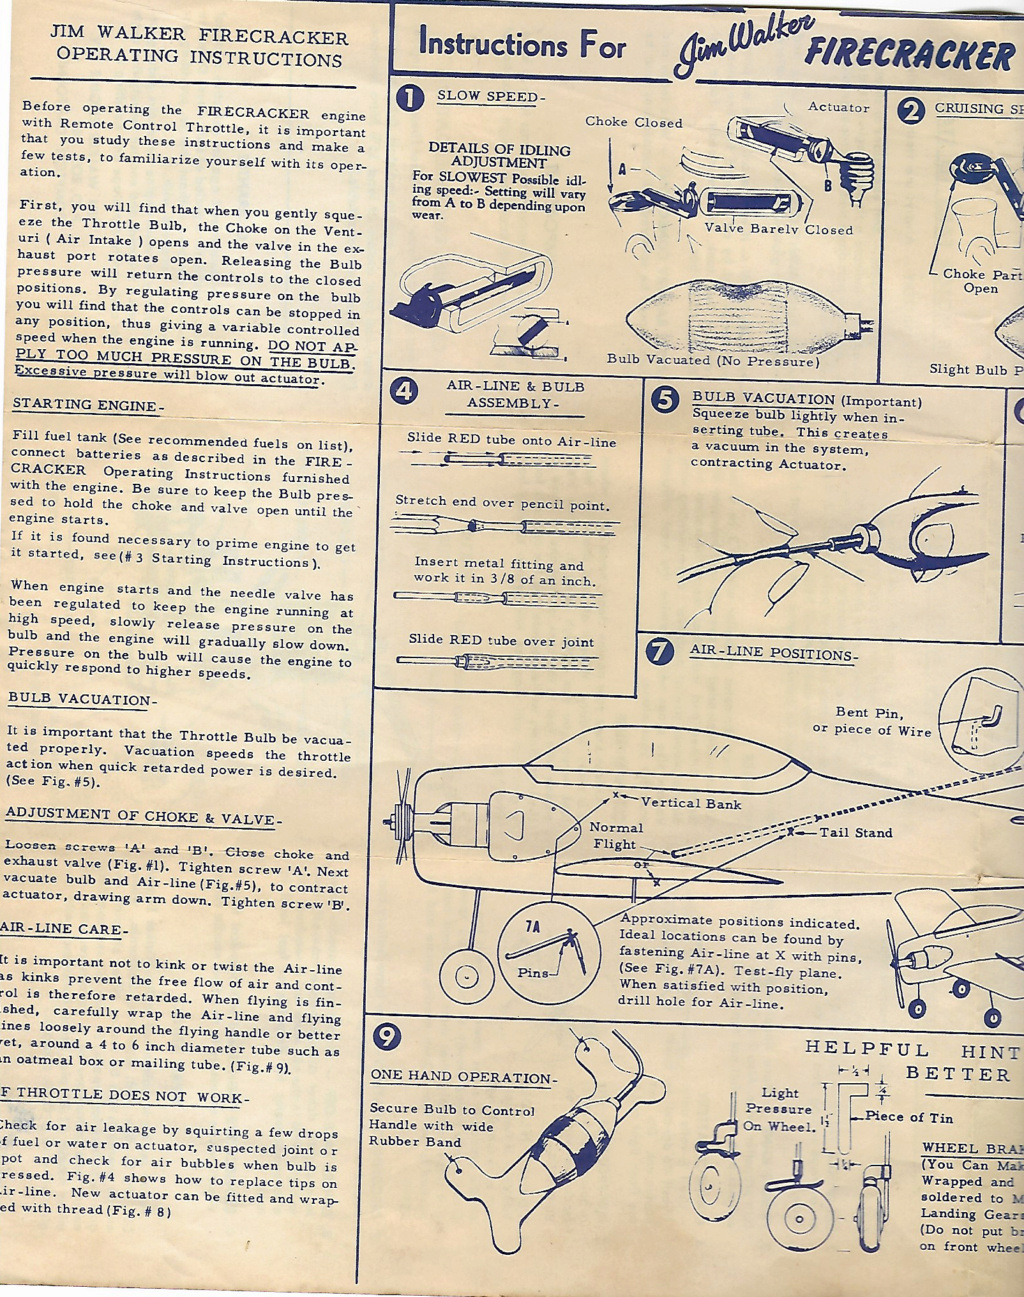
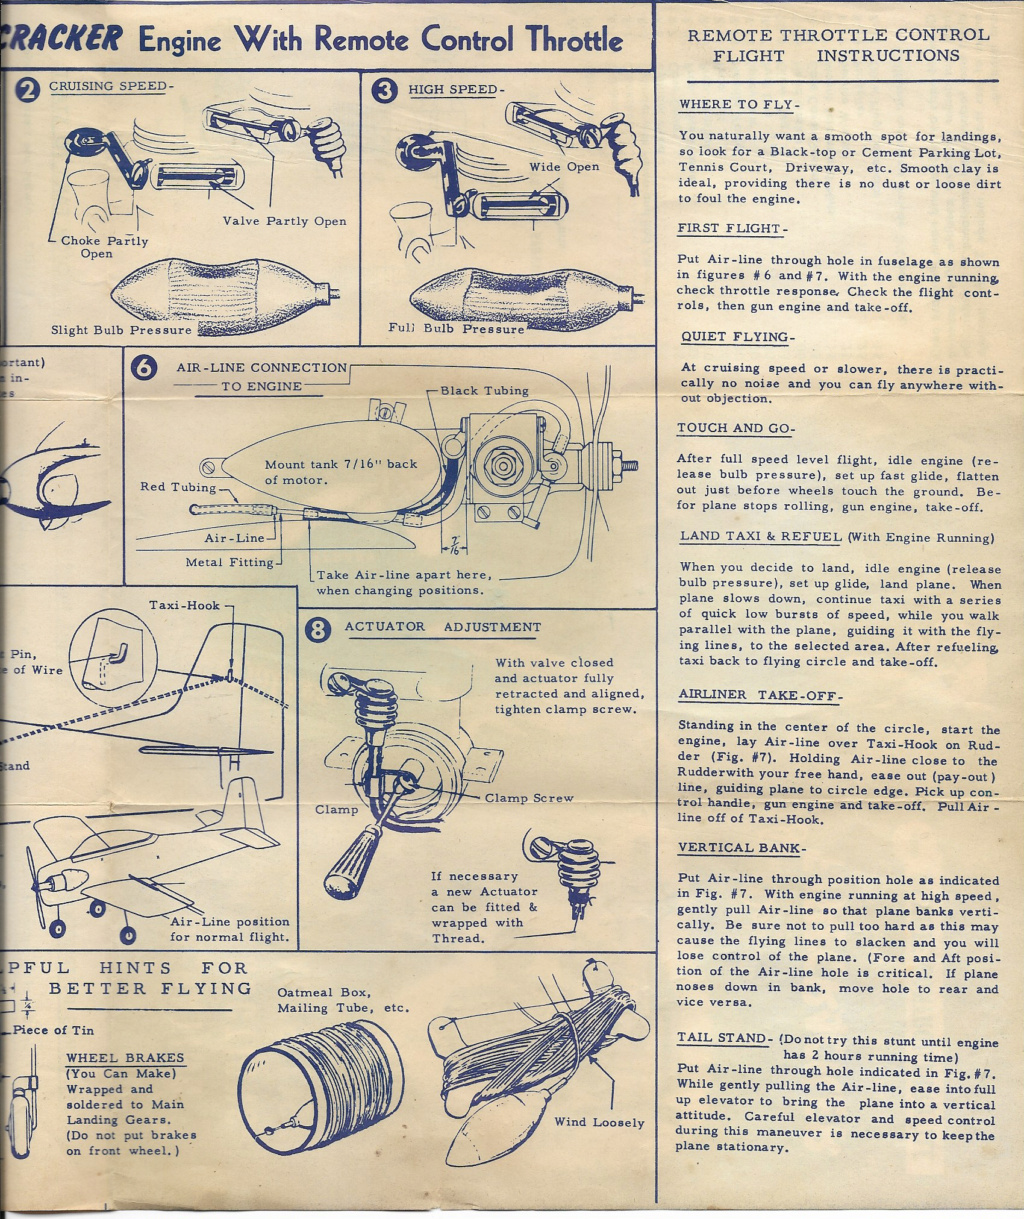
Not much to see here Robert, instructions are more informative. (Next post) "Hat" is vented, shares the needle and NVA with the Spitfire. Cylinder has seven fins, Spit has six. Head looks the same. Case very different as you would expect.
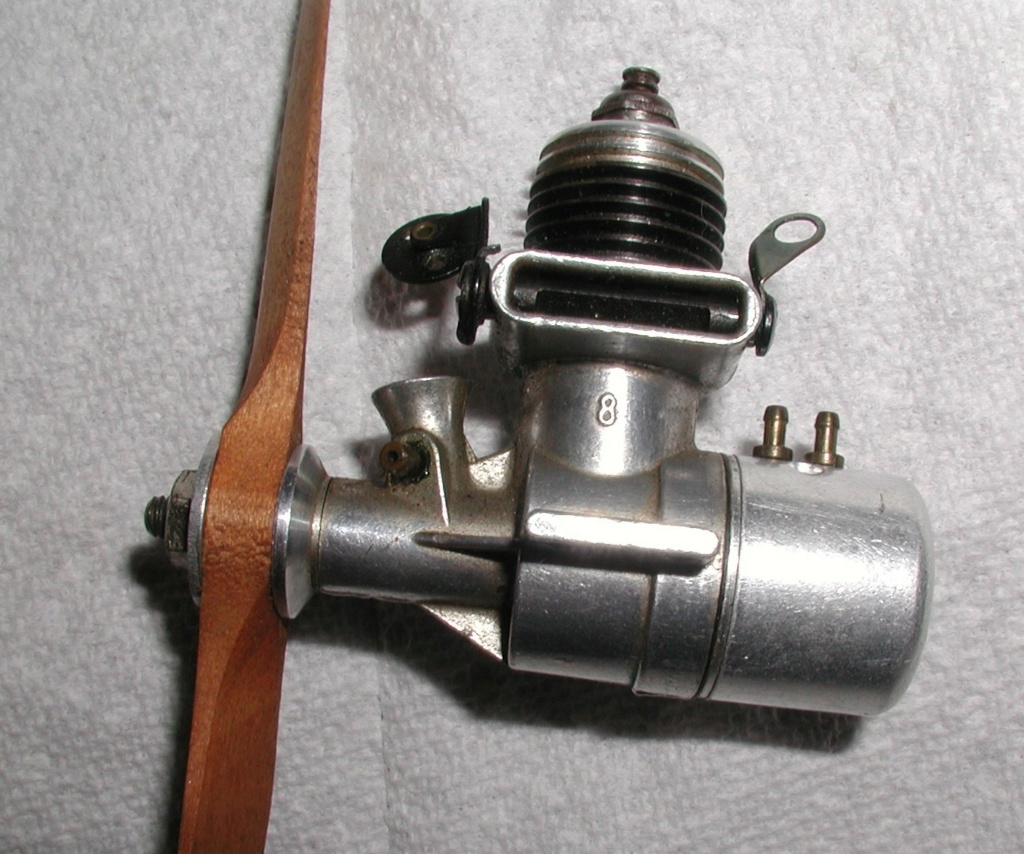
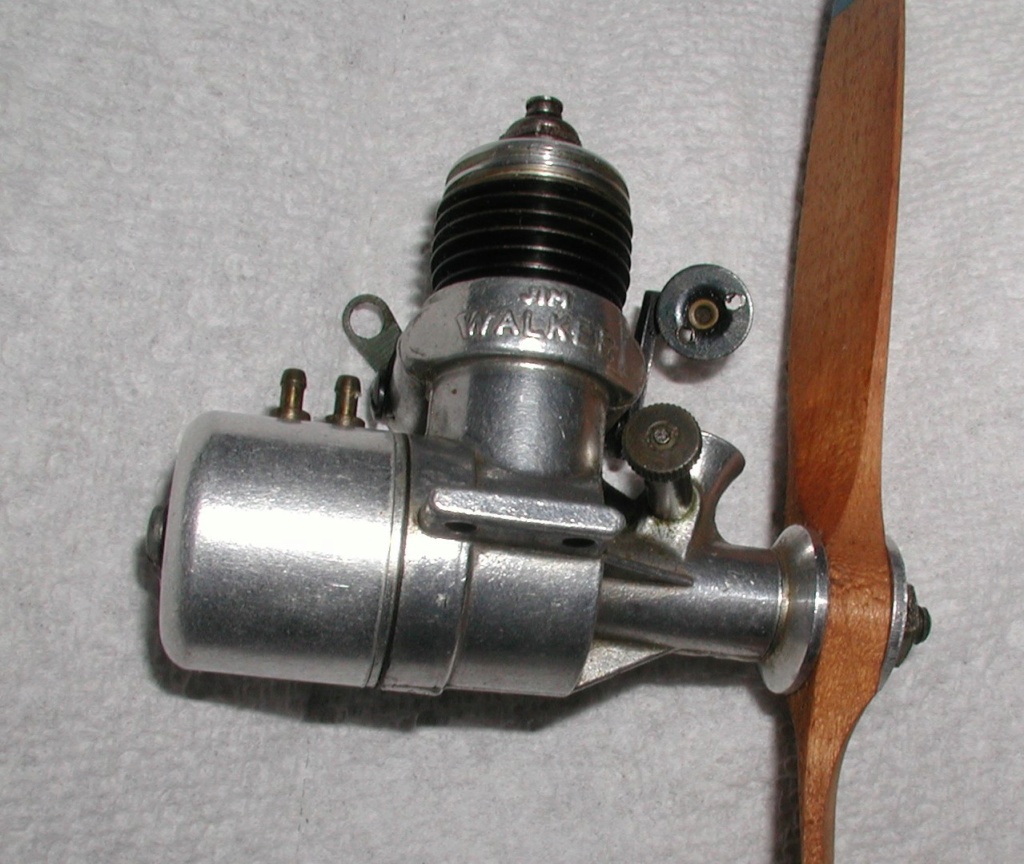

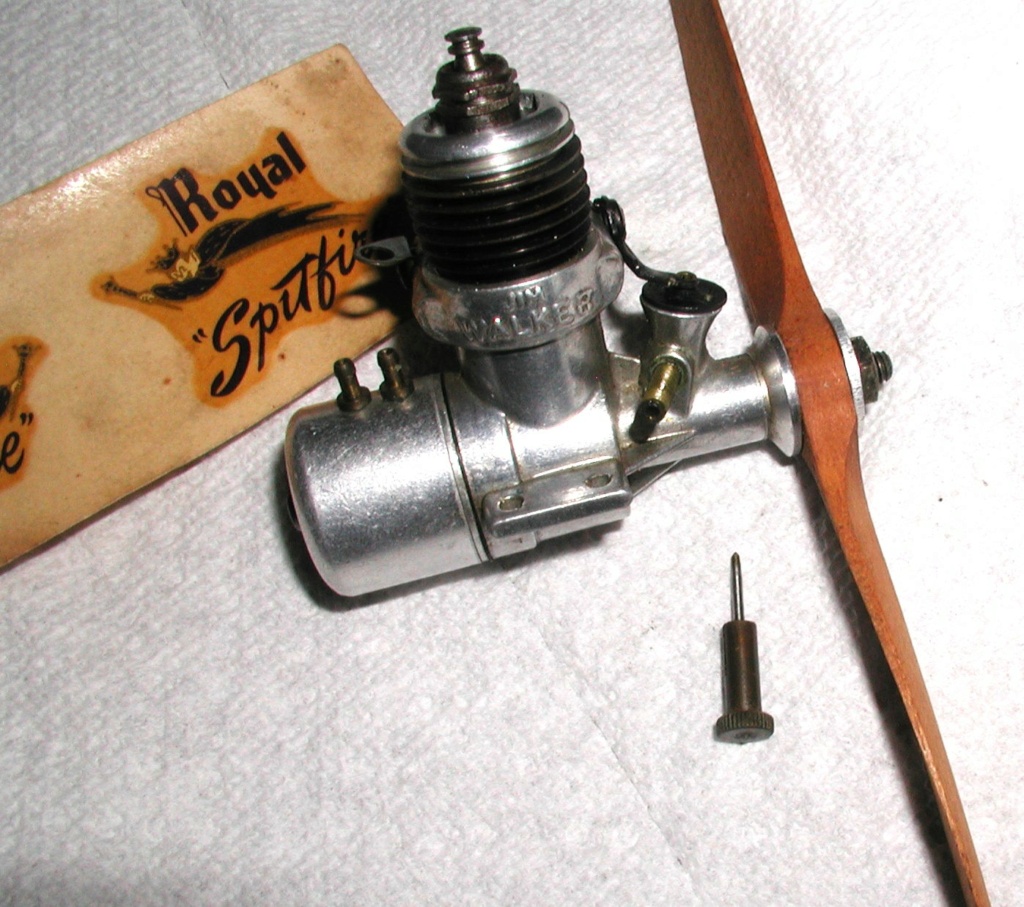


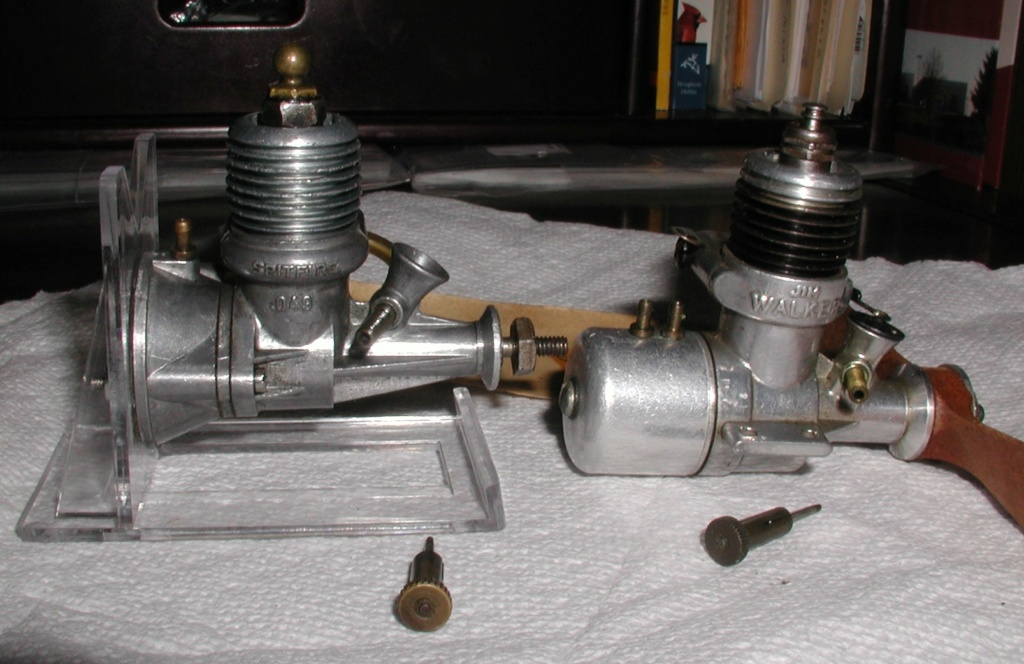
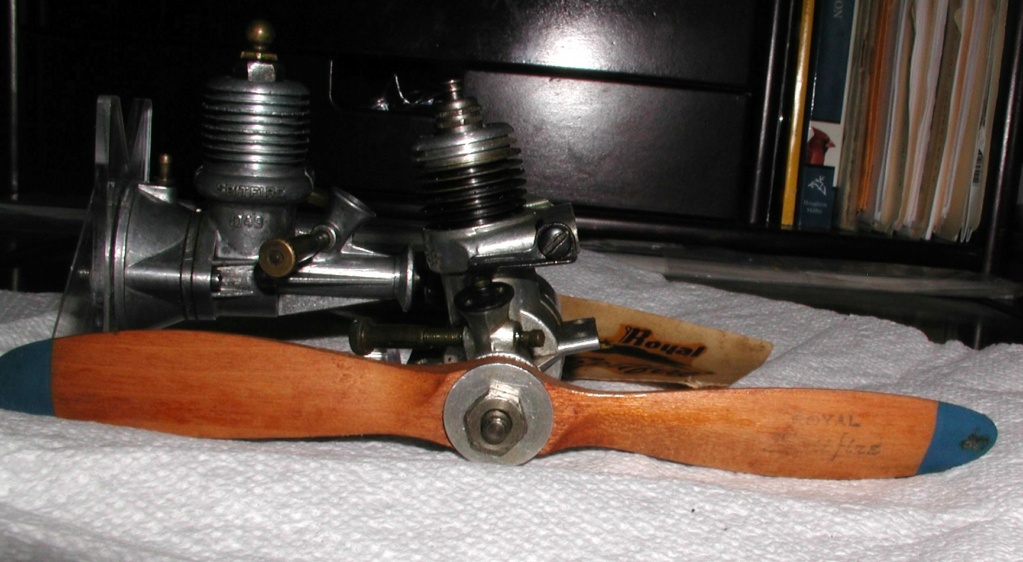
I'm splitting this up into two posts.

rsv1cox- Top Poster


Posts : 11244
Join date : 2014-08-18
Location : West Virginia

rsv1cox- Top Poster


Posts : 11244
Join date : 2014-08-18
Location : West Virginia
 Re: Jim Walker Firebaby
Nice, I was wondering if the “hat” was vented to be a rudimentary idle control…. A lot of the tech of the day went into the FireBee…. I was wondering where the squeeze bulb went for pilot control…. I guess that makes sense right on the control handle… What was the
“Actuator “ for the throttle mounted on the engine made from?…. Back in my early
HVAC days commercial buildings still had pneumatic controls…. Some of the controllers had a brass bellows in them…. Same principle as your FireBee’s throttle control…. To operate a valve or a damper remotely with air pressure…

rdw777- Diamond Member


Posts : 1712
Join date : 2021-03-11
Location : West Texas
 Re: Jim Walker Firebaby
Firebaby made it home today….. Pretty much complete except for the rudder, But I had one from a parts order I stuck on for a few photos….One of the first things I had to do was check the weight against the advertised 3 ounces….Sure enough, 3.25 oz….
Quick assessment shows a broken left wing, Maybe warped a bit too…. Stab/Elevator is in three pieces but mostly there…. Of course very dirty and needs a good cleaning….

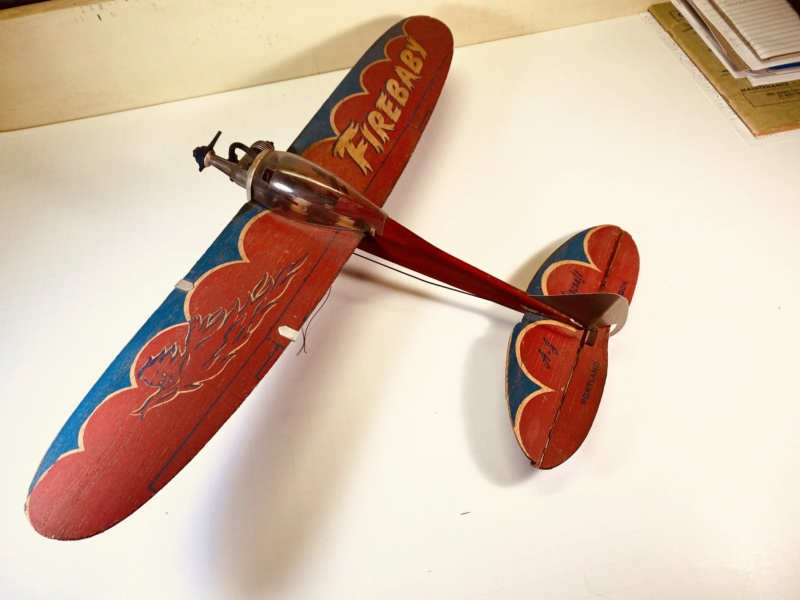
The engine is locked but I can tell the crank is free….A little staining at the firewall and the broken prop and wing hints that it flew or tried to fly and then was set aside after the last crash…. The canopy has an ugly square hole in it, Maybe I’ll try to figure out how to mould another one….Remnants of the balloon tank inside…. Will replace with the same…
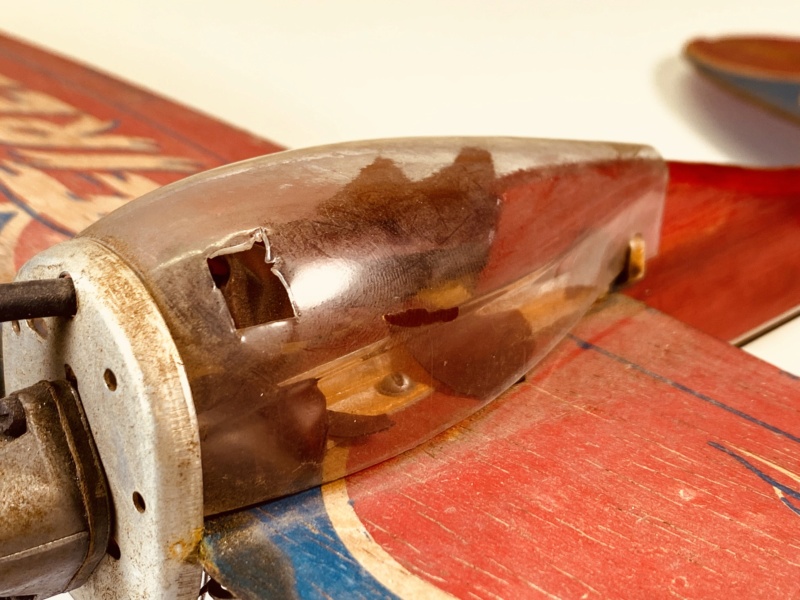
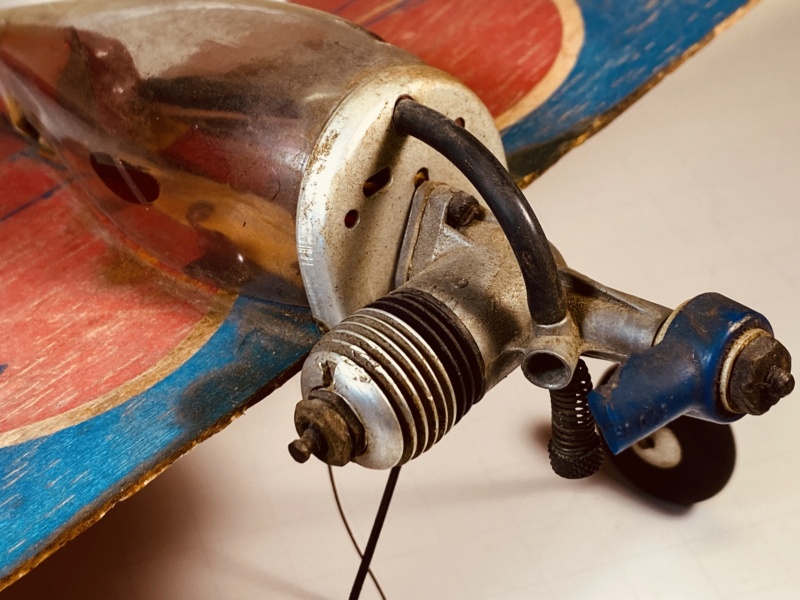
Neat little airplane, Kind of out of the norm form me but will enjoy tinkering with it
Quick assessment shows a broken left wing, Maybe warped a bit too…. Stab/Elevator is in three pieces but mostly there…. Of course very dirty and needs a good cleaning….


The engine is locked but I can tell the crank is free….A little staining at the firewall and the broken prop and wing hints that it flew or tried to fly and then was set aside after the last crash…. The canopy has an ugly square hole in it, Maybe I’ll try to figure out how to mould another one….Remnants of the balloon tank inside…. Will replace with the same…


Neat little airplane, Kind of out of the norm form me but will enjoy tinkering with it


rdw777- Diamond Member


Posts : 1712
Join date : 2021-03-11
Location : West Texas
 Re: Jim Walker Firebaby
Hello guys, congratulations Roberto on the acquisition... I'm stuck reading you guys telling impressive stories.
I am learning, like an excited child listening to grandpa's story....thank you for sharing all this.
The story of the "H" in that engine, born from the division of these historical figures, is incredible!...I guess it was a really hard and ugly moment for them...anyway, history is full of events like these .
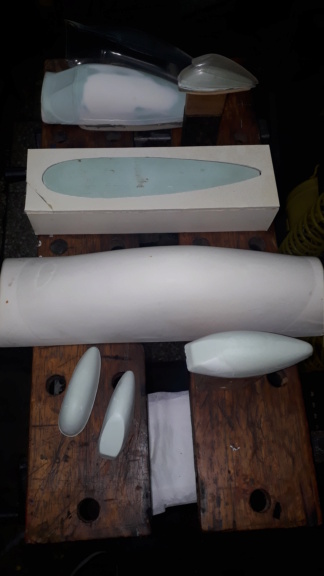
Roberto, look at the following instructions that I leave you, if you want to try it of course!
Take the cockpit of your model airplane and smooth the cut edges with some sandpaper.
Place Scotch tape (on the outside) and cover the hole.
Buy dentist's plaster, you can buy it at any orthopedics.
Prepare the dental plaster with water, generally the same orthopedic house will tell you the proportion of water.
Make a frame for your cabin and place it upside down on the frame.
Pour the dentist's plaster over the internal space of the cabin.
Let the plastering process work.
Remove the plaster from the cabin (mold) with a blow of compressed air or many times playing with your hands it is also removed.
You have the mold for your cabin!
Sand the imperfection and pretentiousness that the plaster occupies in the sector where the hole was. Use very fine sandpaper to give it a good surface.
Then you are ready to make another cabin.
With that mold, take a pet (soda) bottle, the color you like.
Assemble your cabin mold inside.
Place some type of support to keep it firm inside the soda bottle.
Apply heat with a heat gun.
The heat should be applied to the stud area (not the cabin area, first on the opposite side.
Once the pet plastic has stretched, it begins to heat up in the cabin area.
Try it several times if necessary...and you will get your new cabin dear friend!


MauricioB- Top Poster

- Posts : 3712
Join date : 2016-02-16
Age : 53
Location : ARG
 Re: Jim Walker Firebaby
Beautiful airplane Robert. I much prefer one in that condition to any NIB example. I like seeing the real thing as opposed to a drawing. The positioning of the engine/mount fuel line etc. all come alive! Any readable markings on the blue propeller? I can't wait to see what you do with it. PO has the adjustable line guide way off.
I wonder is there is a way to photo transfer that wing image, maybe in two sections over onto sticky backed Vinyl....
Mauricio's canopy tips are a great help.
I wonder is there is a way to photo transfer that wing image, maybe in two sections over onto sticky backed Vinyl....
Mauricio's canopy tips are a great help.

rsv1cox- Top Poster


Posts : 11244
Join date : 2014-08-18
Location : West Virginia
Page 1 of 6 • 1, 2, 3, 4, 5, 6 
 Similar topics
» Jim Walker Firebaby and Firebaby Clone
» Walker Firebaby Bipe
» AJ/JW .020 Firebaby Jr. Pretty neat
» Perhaps I'm wearing out my welcome with these - but Firebaby II, Ceiling Walker, & other JW stuff arrives
» Motoring the Firebaby
» Walker Firebaby Bipe
» AJ/JW .020 Firebaby Jr. Pretty neat
» Perhaps I'm wearing out my welcome with these - but Firebaby II, Ceiling Walker, & other JW stuff arrives
» Motoring the Firebaby
Page 1 of 6
Permissions in this forum:
You cannot reply to topics in this forum

 Rules
Rules


