Log in
Search
Latest topics
» Roger Harris revisitedby rsv1cox Today at 10:46 am
» Duende V model from RC Model magazine 1983.
by MauricioB Today at 10:29 am
» A Little 400 Mile Hop for Some Memory Lane Stuff, and to Hit a Swap Meet.
by getback Today at 7:48 am
» Free Flight Radio Assist
by getback Today at 6:39 am
» Happy 77th birthday Andrew!
by Kim Yesterday at 9:18 am
» Promote the forum with flyers!
by Admin Yesterday at 1:35 am
» Engine choice
by GallopingGhostler Mon Nov 25, 2024 4:03 pm
» My N-1R build log
by roddie Mon Nov 25, 2024 9:19 am
» Night flying at Walters RC park
by 1975 control line guy Sun Nov 24, 2024 7:29 pm
» Cox films/videos...
by GallopingGhostler Sun Nov 24, 2024 7:07 pm
» Cox 020 PeeWee rebuild questions
by LooseSpinner99 Sun Nov 24, 2024 6:13 pm
» Did you spot the Cox engine in this NASA research video?
by balogh Sun Nov 24, 2024 5:08 pm
Cox Engine of The Month
Pageboy Build
Page 2 of 6
Page 2 of 6 •  1, 2, 3, 4, 5, 6
 Re: Pageboy Build
Very Nice !! Your building technics are excellent, love the jig you made for the wing tips to dry . 

getback- Top Poster


Posts : 10448
Join date : 2013-01-18
Age : 67
Location : julian , NC
 Re: Pageboy Build
Humble thanks CEF FRIENDS ….. Happy birthday Andras  …. Please have a wonderful day!!!

rdw777- Diamond Member


Posts : 1723
Join date : 2021-03-11
Location : West Texas
 Re: Pageboy Build
Thank you Robert. You have a sharp eye to discover that! 


balogh- Top Poster


Posts : 4961
Join date : 2011-11-06
Age : 66
Location : Budapest Hungary
 Re: Pageboy Build
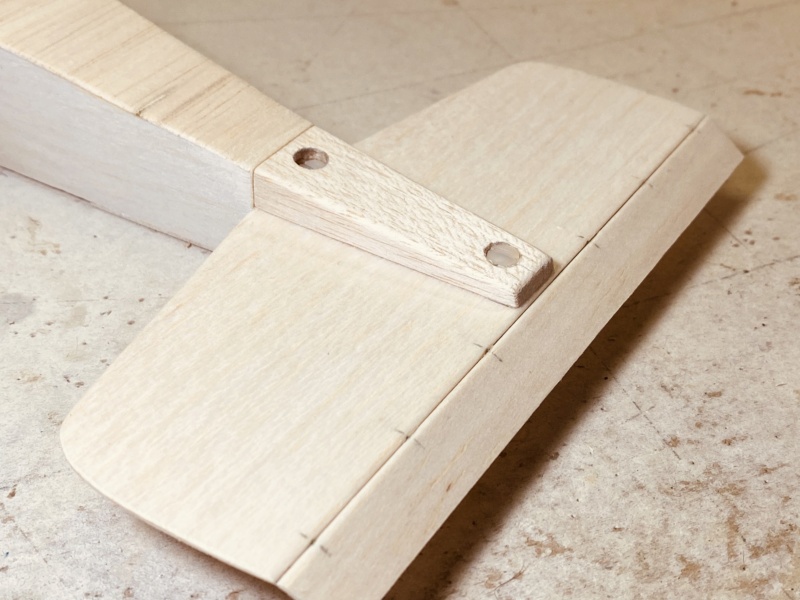
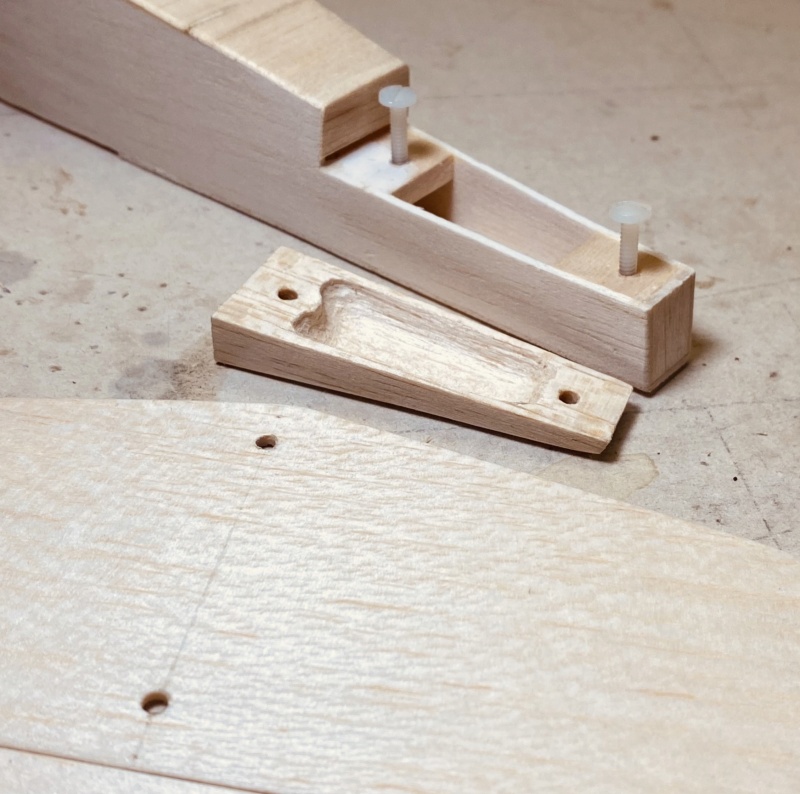
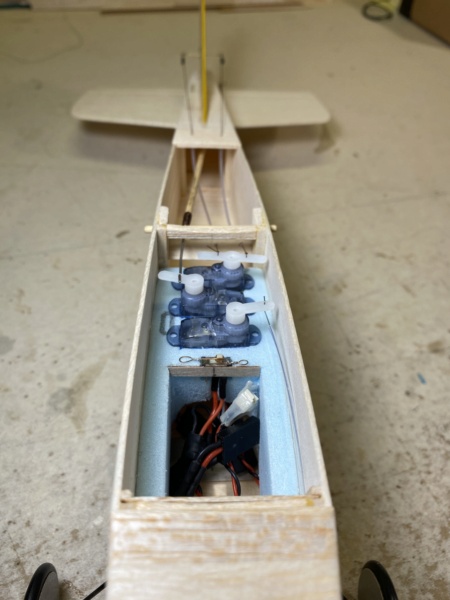
Slow but a little progress…. Made the stab bolt on… My Schoolmaster had that feature and I liked it to be able to fiddle with incidence…
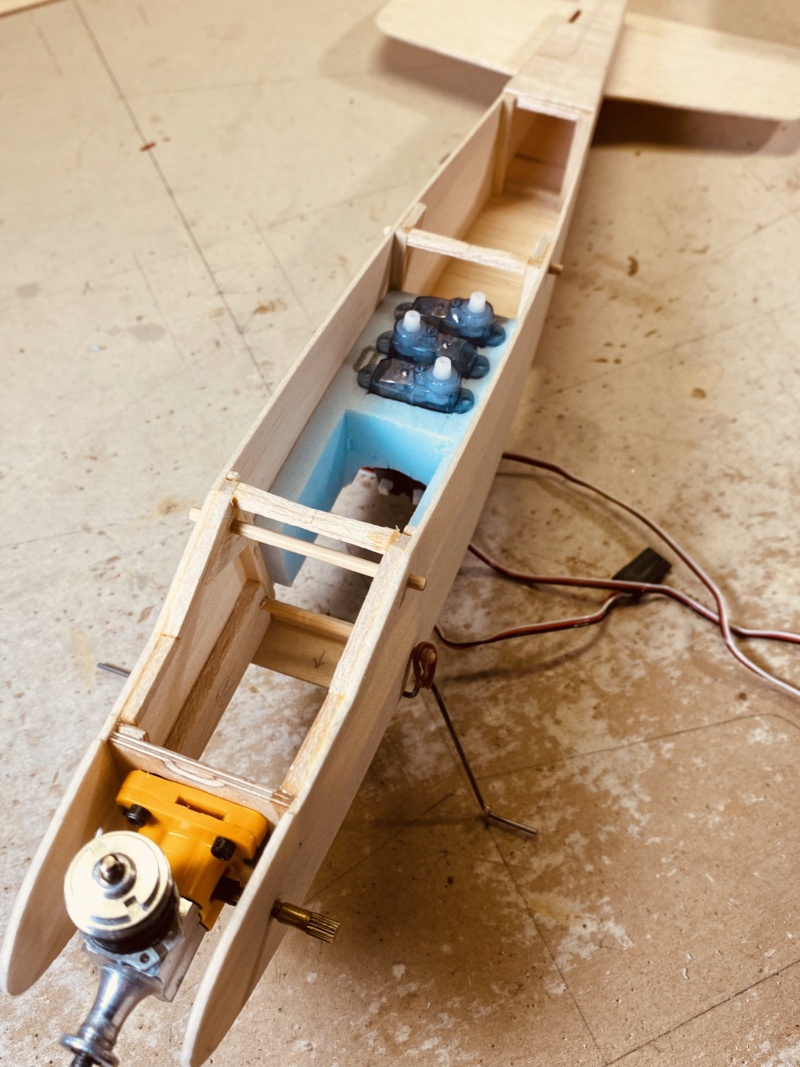
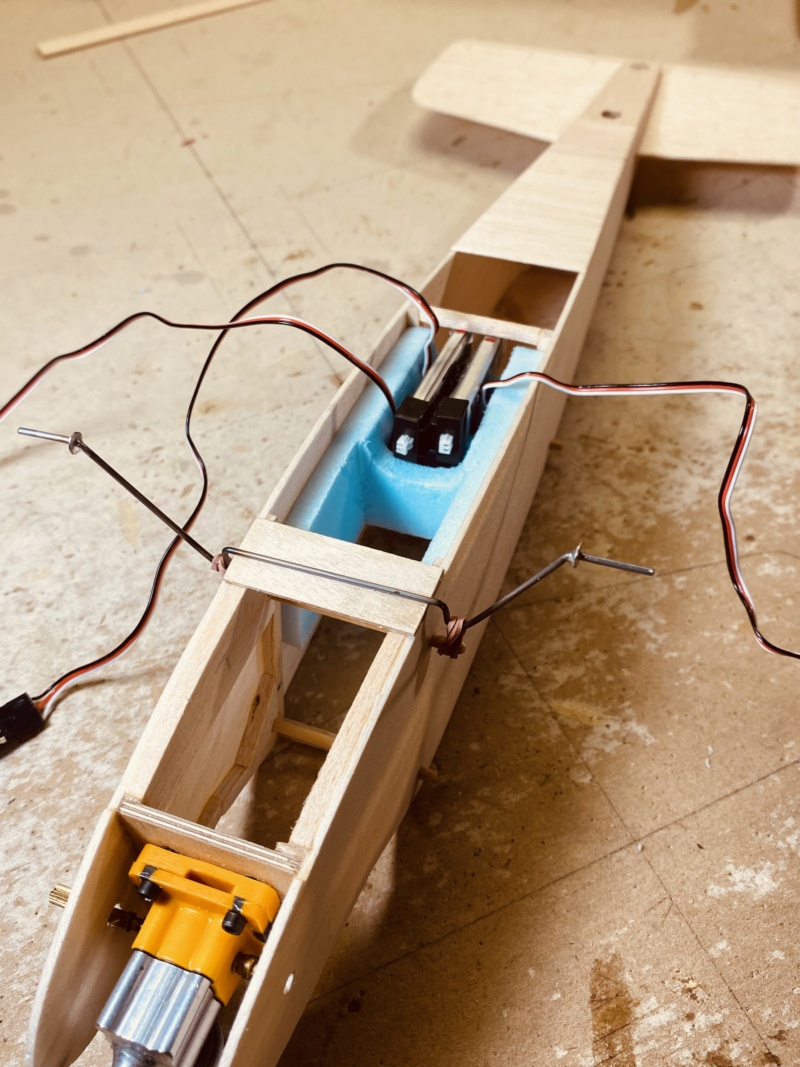
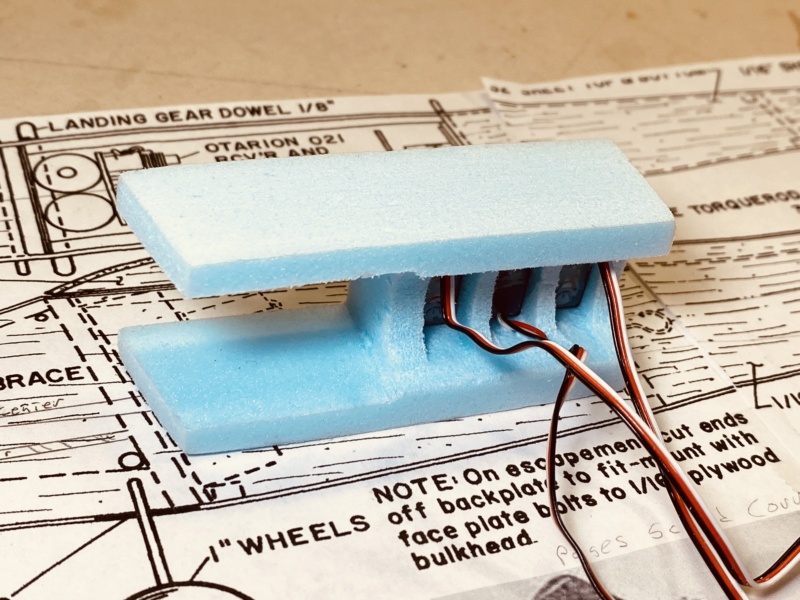
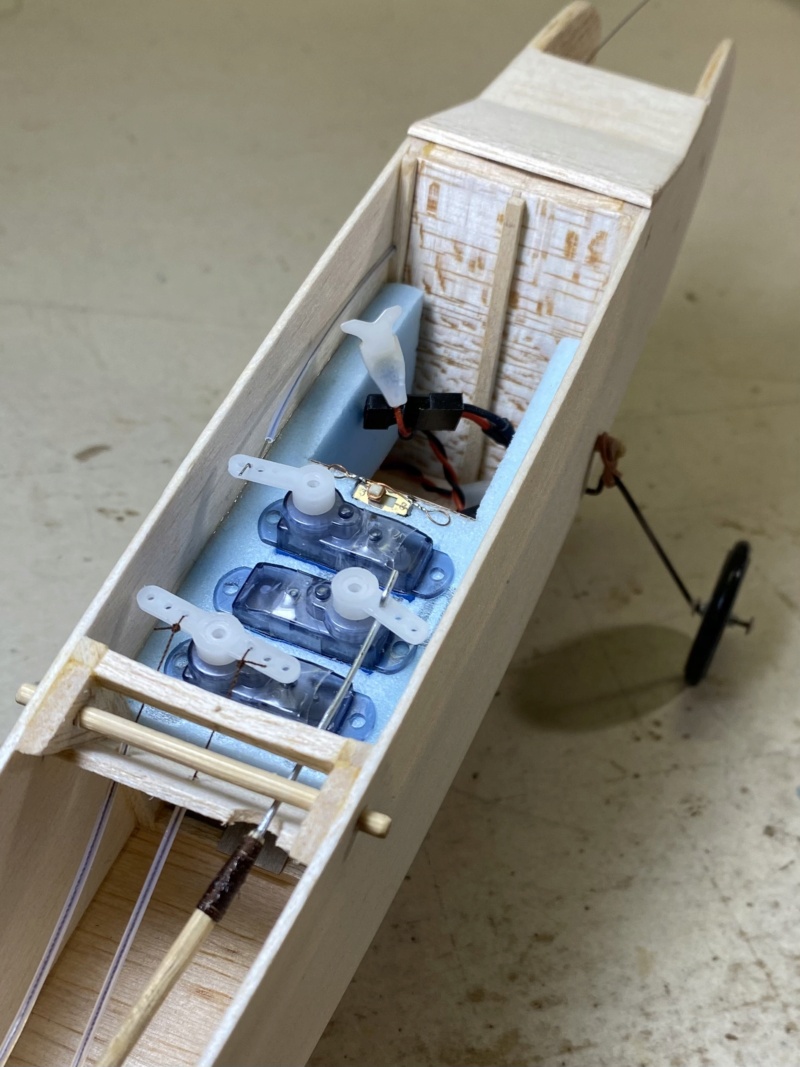
I made the servo tray from 1” insulation foam…. Left it a little long in front to help the unsupported balsa under the wing…
The two 150 mah cells need to go far back as possible to keep from being nose heavy…. Have figure out access….Right now the airplane as it sits with all its gear, wing, etc, is at 85 grams…. Hoping to finish up at 110 or so…


I made the servo tray from 1” insulation foam…. Left it a little long in front to help the unsupported balsa under the wing…


The two 150 mah cells need to go far back as possible to keep from being nose heavy…. Have figure out access….Right now the airplane as it sits with all its gear, wing, etc, is at 85 grams…. Hoping to finish up at 110 or so…

rdw777- Diamond Member


Posts : 1723
Join date : 2021-03-11
Location : West Texas
 Re: Pageboy Build
Slow but steady wins the race Robert.
Neat the bolt on stab. Allows fine adjustments on your very light floater.
Neat the bolt on stab. Allows fine adjustments on your very light floater.

rsv1cox- Top Poster


Posts : 11260
Join date : 2014-08-18
Location : West Virginia
 Re: Pageboy Build
Very neat job, Robert. Every detail is very precise!
BTW why did you fix the tail section with bolts instead of glueing it to its place? For the ease of storage and/or transport to the field?
BTW why did you fix the tail section with bolts instead of glueing it to its place? For the ease of storage and/or transport to the field?

balogh- Top Poster


Posts : 4961
Join date : 2011-11-06
Age : 66
Location : Budapest Hungary
 Re: Pageboy Build
Looking good , I got a question , are you using anything (hot glue) to keep the servos from moving ? Am sure they are tight in there and it's not a competition plane but just wondering . 
 And yes I like the way the bolt on stab / stabilizer is configured , never seen this before .


getback- Top Poster


Posts : 10448
Join date : 2013-01-18
Age : 67
Location : julian , NC
 Re: Pageboy Build
Thanks guys 
Andras, If the wing was symmetrical I would just set everything on zero and glue it in…. Just not sure how the flat bottom wing will behave when pushed a bit….. Just leaving a little wiggle room to tune incidence if needed….I have a degree or so negative in the stab to begin ….Maybe a bit of over kill but I might need a little weight in the back anyway…
Eric, I wrap the servos with blue painter’s tape then use silicone to glue them into the block of foam… Can be reversed easily if needed…Works good on my electro planes

rdw777- Diamond Member


Posts : 1723
Join date : 2021-03-11
Location : West Texas
 Re: Pageboy Build
Robert, understood. My Pageboy - as far as I remember - did not need any adjustment of the tail section, or if anything was needed, I could manage that with a slight trim of the elevator. I also leave the wing dowels a bit longer even if the rubber band is put on the front and rear dowels diagonally, because I fly over rough, grassy fields and the rubber band easily snaps off the dowel when the wing leading edge hits the weed...of course I must make almost everything a bit more sturdy than stock or the plans, like swapping the hardwood leading edge with a carbon tube or square tube, because of the tough landing conditions.
Did you finally stay with the fishing line hinges? The elevator to stab fit looks awesome..
Looking forward to your maiden flight!
Did you finally stay with the fishing line hinges? The elevator to stab fit looks awesome..
Looking forward to your maiden flight!

balogh- Top Poster


Posts : 4961
Join date : 2011-11-06
Age : 66
Location : Budapest Hungary
 Re: Pageboy Build
I also like your servo tray solution, Robert, for me, improvising the proper servo tray from plywood and/or balsa is always a pain in the neck..
For the 3 servos sitting side by side, do you have a single pit only or, 3 pits separated with some wall in between? If yes, is the wall the parent material of the insulation board, or, you wedged in some plywood as separation wall between the servos?
I also wrap the servos with scotch tape, especially those with the halves not having through-bolts to keep them together....those are the servos that drop their bottom when you push the servo arm a bit harder when mounting on the splined output shaft ..but if you glue the servo - with tape covering it - to the servo tray, how do you prevent the servo pit from being destroyed when you remove the servo and bits of the servo pit wall may be torn off?

balogh- Top Poster


Posts : 4961
Join date : 2011-11-06
Age : 66
Location : Budapest Hungary
 Re: Pageboy Build
Hi Andras,
Thanks for the heads up on the wing dowels, I will install longer ones and for landing gear mount as well…. Those I have in now were basically pins to help with assembly…Yes, planing to stay with the fishing line hinge…. I still tug on them on the workbench from time to time to convince myself and they seem to be holding tight… Still to be proven in practice though…
The servo block is all one piece with hollows for each servo …. The center walls are only about 3mm thick but when the servos are glued in should kind of bind everything together….I’ll only silicone the long sides of the servo to glue them in so if needed in the future a long thin blade like a small box cutter could be slipped in to free them…. Yes, There is some risk to damage the foam but minimal if done carefully…
The mount was roughed out with a knife then shaped with 80 grit paper glued on different shaped blocks of balsa and dowels …I plan to dope and seal the inside of the
fuse and glue the block in with silicone as well …. I’m hoping good for vibration damping and the whole thing could be peeled out if things went sour…
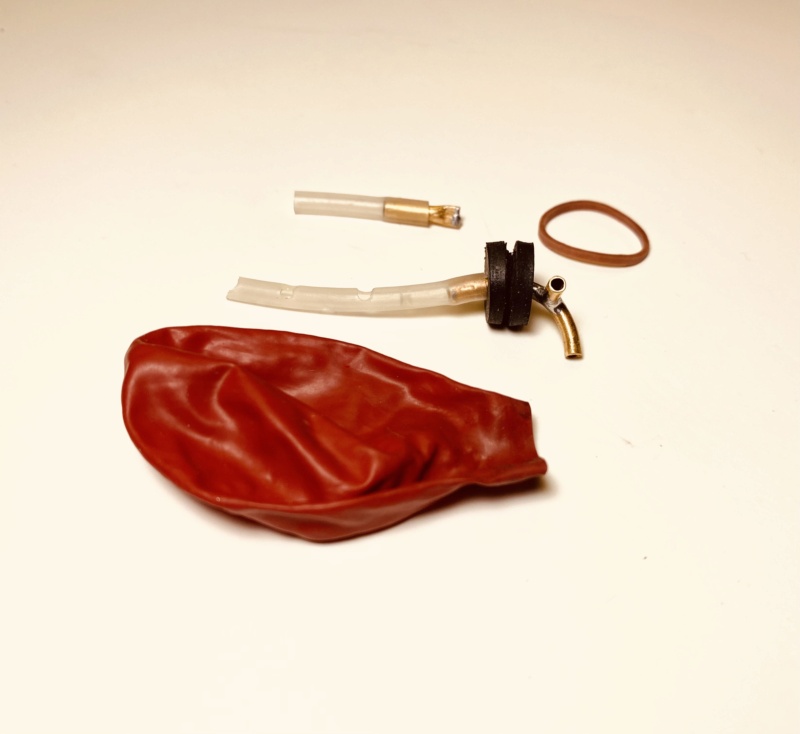
The most appropriate fuel tank for the small space is a balloon…. I’ve found your past posts on them and copied…. I’ve practiced several fillings and running the engine with it… Works great!!! Thank you sir!!


rdw777- Diamond Member


Posts : 1723
Join date : 2021-03-11
Location : West Texas
 Re: Pageboy Build
Thanks for the explanations Robert!
Nice tank assembly there!
For the balloon tank, I use a small zip tie to fix the tank neck on the stopper. The zip tie will secure the tank neck on the stopper more securely than a rubber ring, IMHO.
You may want to double the tank material on the stopper by bending back the tank lip 1/2" before you pull on the zip tie. Use filler tube of sufficient length so that you can pintch it with your fingers when you remove the filler syringe and plug it.
For tank installation I use a soft plastic wire to lead the silicone tubes through the firewall and/or fuselage openings..the wire should have a diameter allowing it to run in the tube snugly...first lead the plastic wire ends into the fuel line openings from outside until the ends appear inside the fuse where you can grab them. Lead one end deep into the filler and the other into the feed line. Push the tank forward into the tank compartment while gently pulling on the wire, which will lead the tubes out through the firewall holes. Sorry if the above is a no brainer, I learnt the best use of the tank step by step alone so the above may help you too if this is your first experience with such tanks.

balogh- Top Poster


Posts : 4961
Join date : 2011-11-06
Age : 66
Location : Budapest Hungary
 Re: Pageboy Build
Thanks for the additional notes on the balloon tank Andras…. I will put them to good use!!!…. I really like it as an option for small space or odd shape…. Plus consistent engine run…

rdw777- Diamond Member


Posts : 1723
Join date : 2021-03-11
Location : West Texas
 Re: Pageboy Build
rdw777 Robert :
magnificent work !!... admirable its construction.
Servo tray: 10
Stabilizer support: 10
The quality of the model: 10
Hinges: 10
....10
....10


magnificent work !!... admirable its construction.
Servo tray: 10
Stabilizer support: 10
The quality of the model: 10
Hinges: 10
....10
....10


MauricioB- Top Poster

- Posts : 3720
Join date : 2016-02-16
Age : 53
Location : ARG
 Re: Pageboy Build
Thank you Mauricio!!! I have found much inspiration here on
CEF!!!
CEF!!!

rdw777- Diamond Member


Posts : 1723
Join date : 2021-03-11
Location : West Texas
 Re: Pageboy Build
Well, I re-did the fishing line hinge and came out with a better result…. Bob pointed out earlier about tension on the hinge…. So I cut 1/4” off the stab and fin and made a new elevator and rudder hinged to a piece of 1/4” balsa…. Was able to put better tension on the fishing line…. Then glued the assemblies back on as a unit…. Thanks for the nudge Bob…


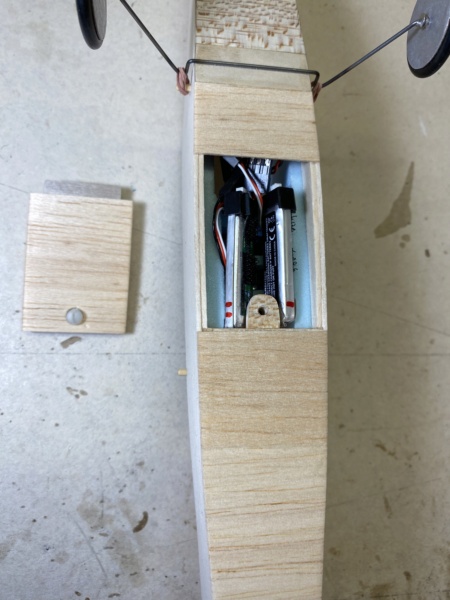
Battery compartment…Lets me get to the bottom of the receiver to plug it in as well
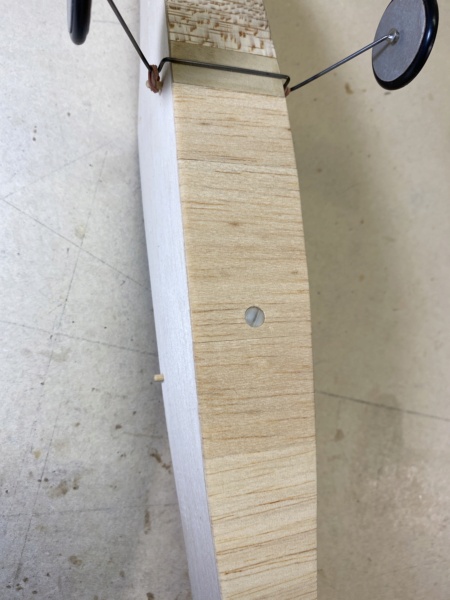
Switch mounted internally…. Activate by pull threads…. Throttle cable is a metal guitar string inside of a Teflon tube, The type that is sold for dispensing CA glue….. Same tubing for rudder pull guides…. I forgot about that rudder at an angle that might be odd for a normal control horn…. So I did a pull/pull arrangement on it….I did the same thing on the Schoolboy, You can just make them out in the photo in the beginning of this thread….The front bulkhead slides out to isolate the fuel compartment from the electronics…..
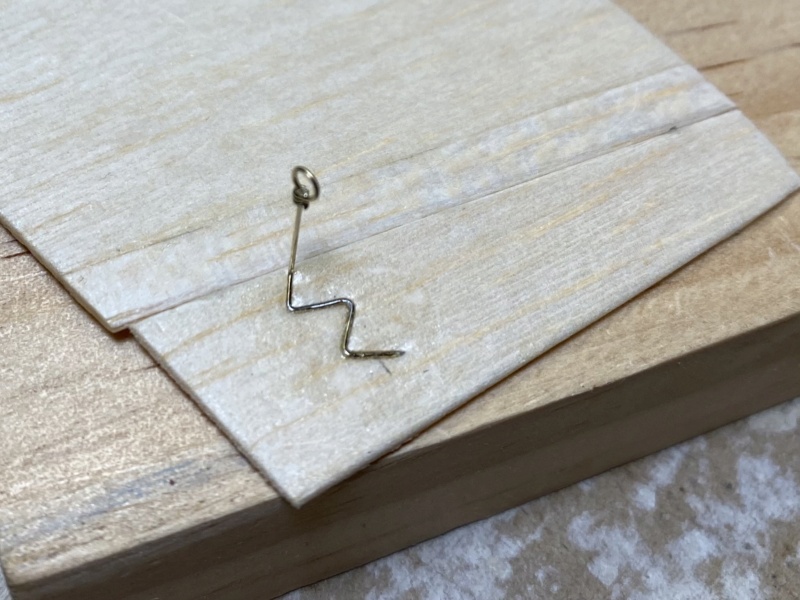
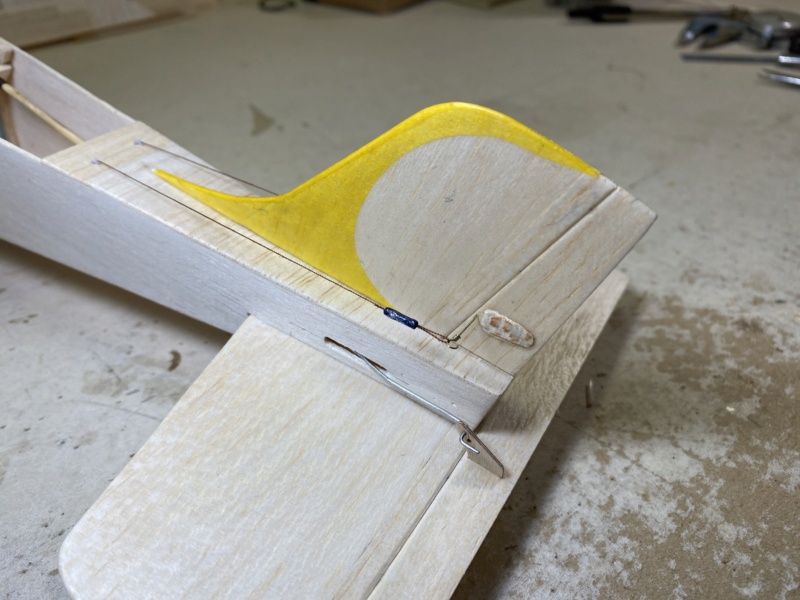
Rudder horns are guitar string…. Polyester pull threads…..Rolled tissue couplings….
What color you think it’s going to be


Battery compartment…Lets me get to the bottom of the receiver to plug it in as well


Switch mounted internally…. Activate by pull threads…. Throttle cable is a metal guitar string inside of a Teflon tube, The type that is sold for dispensing CA glue….. Same tubing for rudder pull guides…. I forgot about that rudder at an angle that might be odd for a normal control horn…. So I did a pull/pull arrangement on it….I did the same thing on the Schoolboy, You can just make them out in the photo in the beginning of this thread….The front bulkhead slides out to isolate the fuel compartment from the electronics…..


Rudder horns are guitar string…. Polyester pull threads…..Rolled tissue couplings….
What color you think it’s going to be


rdw777- Diamond Member


Posts : 1723
Join date : 2021-03-11
Location : West Texas
 Re: Pageboy Build
Blue maybe..purplish....
I love the compartment cover and the perfectly cut circle for the mounting screw. It just disappears into the fuselage.
I love the compartment cover and the perfectly cut circle for the mounting screw. It just disappears into the fuselage.

rsv1cox- Top Poster


Posts : 11260
Join date : 2014-08-18
Location : West Virginia
 Re: Pageboy Build
Very precise and patient build, Robert, packed with smart ideas for which I especially thank you..I like your small micro-switch, and batteries..could you please share with us what type of switch and batteries these are?
Does the switch have a charger harness, or, only the battery connector and another wire to plug it in the receiver?
Are the batteries Li ion, or Ni metal hybrid? What is their Voltage and capacity in mAh? In my recently built Tigercat I connected a 300mAh and 400mAh battery in parallel to have 700mAh on board for the receiver and servos.
https://www.ebay.com/itm/122165361905?var=422401772210

balogh- Top Poster


Posts : 4961
Join date : 2011-11-06
Age : 66
Location : Budapest Hungary
 Re: Pageboy Build
Blue and Red with the yellow trim LOL Looking good , glad to see you could find time to get back to it  The guitar strings are pretty cool idea
  Got some nice fits too .


getback- Top Poster


Posts : 10448
Join date : 2013-01-18
Age : 67
Location : julian , NC

Levent Suberk- Diamond Member

- Posts : 2265
Join date : 2017-12-24
Location : Türkiye
 Re: Pageboy Build
Beautiful work! I always enjoy your builds -- your precision and care are the marks of a master craftsman.
 Re: Pageboy Build
A humble thank you gentlemen…. Really enjoying the build 
Andras, I made the switch harness, the power supply is two separate 150 mah lipo’s connected in series for 7.4 volts…. Then to a step down regulator with 5 volt output …. I’ll take some photos next shop time in a day or two and some of my testing gadgets along with further explanation …
Levent, Thanks for the decal offer, This one is all tissue trim similar to some of the old Top Flite kit trim schemes….. I do need to thank you though for the Carl Goldberg graphic that I found on the forum and applied to my Stuntman 23, Thank you sir!!
Robert


rdw777- Diamond Member


Posts : 1723
Join date : 2021-03-11
Location : West Texas
 Re: Pageboy Build
Robert your close up photos on your perfectly finished and coated planes shy me away from showing close ups on my planes..they look good when naked, but when it comes to covering them, well, I sometimes say that this can still be a good plane to fly but not one to enter a beauty pageant.. 


balogh- Top Poster


Posts : 4961
Join date : 2011-11-06
Age : 66
Location : Budapest Hungary

GallopingGhostler- Top Poster


Posts : 5735
Join date : 2013-07-13
Age : 70
Location : Clovis NM or NFL KC Chiefs
 Re: Pageboy Build
Robert , are you or do you dye your silk for this application ? Thanks  Never mind found this on page 1 >> I have a good stock of Japanese tissue that holds its color well…. <<<


getback- Top Poster


Posts : 10448
Join date : 2013-01-18
Age : 67
Location : julian , NC
Page 2 of 6 •  1, 2, 3, 4, 5, 6
 Similar topics
» Pageboy in ELECTRIC!
» Another build
» 50th Anniversary Flight Video- Pageboy with Cox TD .010
» Guillows Cessna 150 build circa 1970 (Build Log)
» Help Deciding on Kit
» Another build
» 50th Anniversary Flight Video- Pageboy with Cox TD .010
» Guillows Cessna 150 build circa 1970 (Build Log)
» Help Deciding on Kit
Page 2 of 6
Permissions in this forum:
You cannot reply to topics in this forum

 Rules
Rules


