Log in
Search
Latest topics
» Roger Harris revisitedby rsv1cox Today at 10:46 am
» Duende V model from RC Model magazine 1983.
by MauricioB Today at 10:29 am
» A Little 400 Mile Hop for Some Memory Lane Stuff, and to Hit a Swap Meet.
by getback Today at 7:48 am
» Free Flight Radio Assist
by getback Today at 6:39 am
» Happy 77th birthday Andrew!
by Kim Yesterday at 9:18 am
» Promote the forum with flyers!
by Admin Yesterday at 1:35 am
» Engine choice
by GallopingGhostler Mon Nov 25, 2024 4:03 pm
» My N-1R build log
by roddie Mon Nov 25, 2024 9:19 am
» Night flying at Walters RC park
by 1975 control line guy Sun Nov 24, 2024 7:29 pm
» Cox films/videos...
by GallopingGhostler Sun Nov 24, 2024 7:07 pm
» Cox 020 PeeWee rebuild questions
by LooseSpinner99 Sun Nov 24, 2024 6:13 pm
» Did you spot the Cox engine in this NASA research video?
by balogh Sun Nov 24, 2024 5:08 pm
Cox Engine of The Month
Pageboy Build
Page 1 of 6
Page 1 of 6 • 1, 2, 3, 4, 5, 6 
 Pageboy Build
By Ken Willard
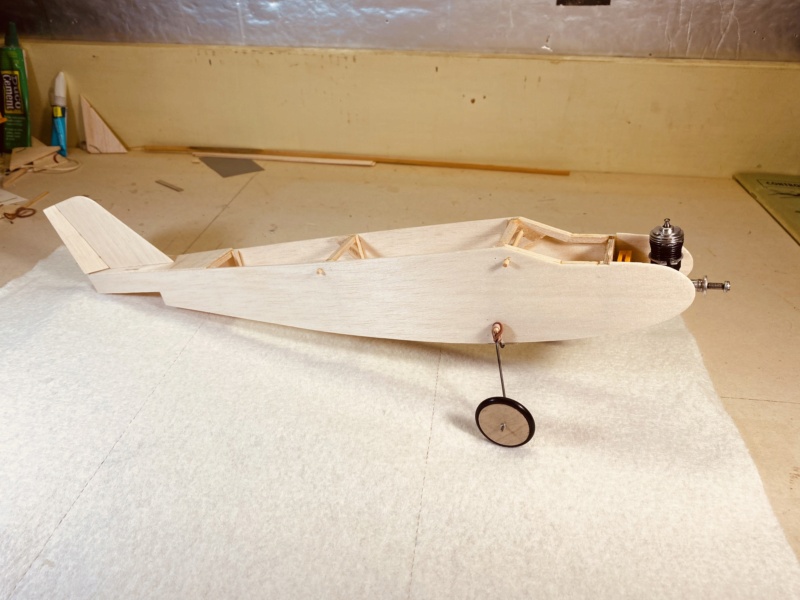
Was designed for .010 but I’m going to try it with PeeWee .020 RC with heli back plate… The .020 is only about 10 grams heavier and has the throttle ring if things get a little too spicy….
I made the following changes for three channel since it was designed as single channel:
Removed all but a scootch of negative incidence in the stab…Took out about half the engine down thrust….Left just a little right thrust…. Reduced dihedral about 25%… Added just a little area to the rudder……If anyone sees any red flags with these please let me know…
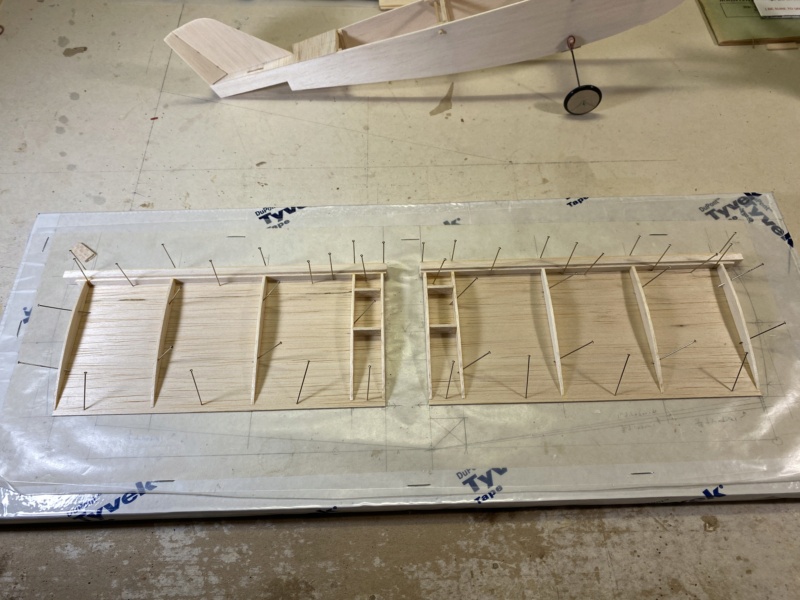
Also am giving it a Schoolboy type wing rather than the single surface wing on the plan..I also gave it one more inch of span (“16).

First time to try fishing line hinges…Seems like a neat system
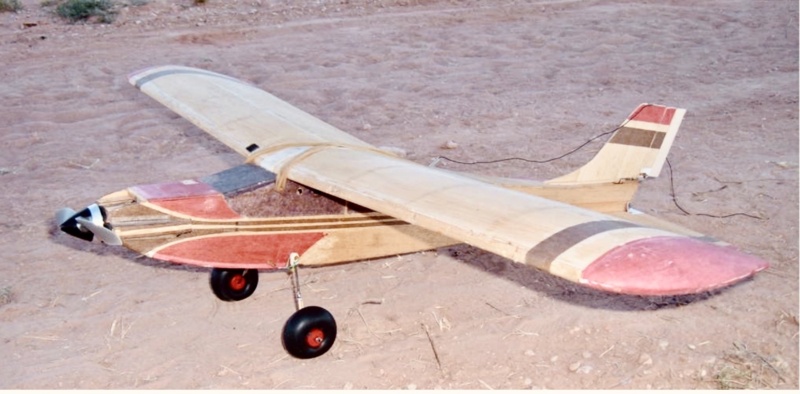
A couple more Ken Willard designs I built in the past…. Pulled some old photos from RCG….
Schoolboy and Schoolmaster….Both were great flyers which give me good confidence for the Pageboy…Just smaller and faster… More to follow as I get shop time…


Was designed for .010 but I’m going to try it with PeeWee .020 RC with heli back plate… The .020 is only about 10 grams heavier and has the throttle ring if things get a little too spicy….
I made the following changes for three channel since it was designed as single channel:
Removed all but a scootch of negative incidence in the stab…Took out about half the engine down thrust….Left just a little right thrust…. Reduced dihedral about 25%… Added just a little area to the rudder……If anyone sees any red flags with these please let me know…
Also am giving it a Schoolboy type wing rather than the single surface wing on the plan..I also gave it one more inch of span (“16).

First time to try fishing line hinges…Seems like a neat system

A couple more Ken Willard designs I built in the past…. Pulled some old photos from RCG….
Schoolboy and Schoolmaster….Both were great flyers which give me good confidence for the Pageboy…Just smaller and faster… More to follow as I get shop time…


rdw777- Diamond Member


Posts : 1723
Join date : 2021-03-11
Location : West Texas
 Re: Pageboy Build
Actually from what I understand, both the Pee Wee .020 and Tee Dee .010 produce roughly the same power. Pageboy at 12 inch wingspan is going to be a hot little flier regardless the engine.
I flew Ken Willard's 20 inch wingspan Roaring 20 (downsized Top Dawg) with a Cox Pee Wee, and it was a total blast to fly. It was the best match for the Pee Wee and 5.25x3 Top Flite white nylon prop, would do all the rudder only stunts, yet was fairly easy to manage.
You could mount the prop backwards to reduce thrust on the first couple flights until getting the hang of it, then it is peddle to the metal.

GallopingGhostler- Top Poster


Posts : 5735
Join date : 2013-07-13
Age : 70
Location : Clovis NM or NFL KC Chiefs
 Re: Pageboy Build
Looking forward to this build! I've never been drawn to planes under about 36" span, but they do have their admirers. You have a good start on getting another one together -- waiting for pics.
As an aside, until Outerzone, HPA and Aerofred became available, I had never realized that Ken Willard had designed so many float planes.
As an aside, until Outerzone, HPA and Aerofred became available, I had never realized that Ken Willard had designed so many float planes.
 Re: Pageboy Build
A little more information on the fishing line hinges Robert, a new one on me.
Love the vintage photos. 35mm or 110. I have many pictures of my old builds too slightly grainy and a bit out of focus gives them character.
Bob
Love the vintage photos. 35mm or 110. I have many pictures of my old builds too slightly grainy and a bit out of focus gives them character.
Bob

rsv1cox- Top Poster


Posts : 11260
Join date : 2014-08-18
Location : West Virginia
 Re: Pageboy Build
Robert, I like the way you build the Pageboy and cannot wait seeing or hearing of its maiden flight.
I built and flew a Pageboy with 010 TeeDee on 2 channels a couple years ago, it was a ball to fly. Mine had to retire after the cowl area, not properly proofed against fuel, got soaked in castor after the many flights it made.
I like the fishing line hinge concept. Less risk of ruining the stab and rudder with an inaccurate, off-center cut for a normal hinge. I suppose you push a needle into the balsa to make the nest for the fishing line, that you glue then in? Is that CA or epoxy glue that you use there?

balogh- Top Poster


Posts : 4961
Join date : 2011-11-06
Age : 66
Location : Budapest Hungary
 Re: Pageboy Build
So your putting the school boy wing on the pageboy is that correct ? The plans for the schoolboy are more clear for assemble to me , your off to a good run on it . 


getback- Top Poster


Posts : 10448
Join date : 2013-01-18
Age : 67
Location : julian , NC

Kim- Top Poster


Posts : 8630
Join date : 2011-09-06
Location : South East Missouri
 Re: Pageboy Build
Bob I think it comes from this tread > https://www.coxengineforum.com/t16641-simple-centering-tool-for-fishing-line-hinges?highlight=hinge+tool

getback- Top Poster


Posts : 10448
Join date : 2013-01-18
Age : 67
Location : julian , NC
 Re: Pageboy Build
Thank you for your kind support Gentlemen , Appreciated,
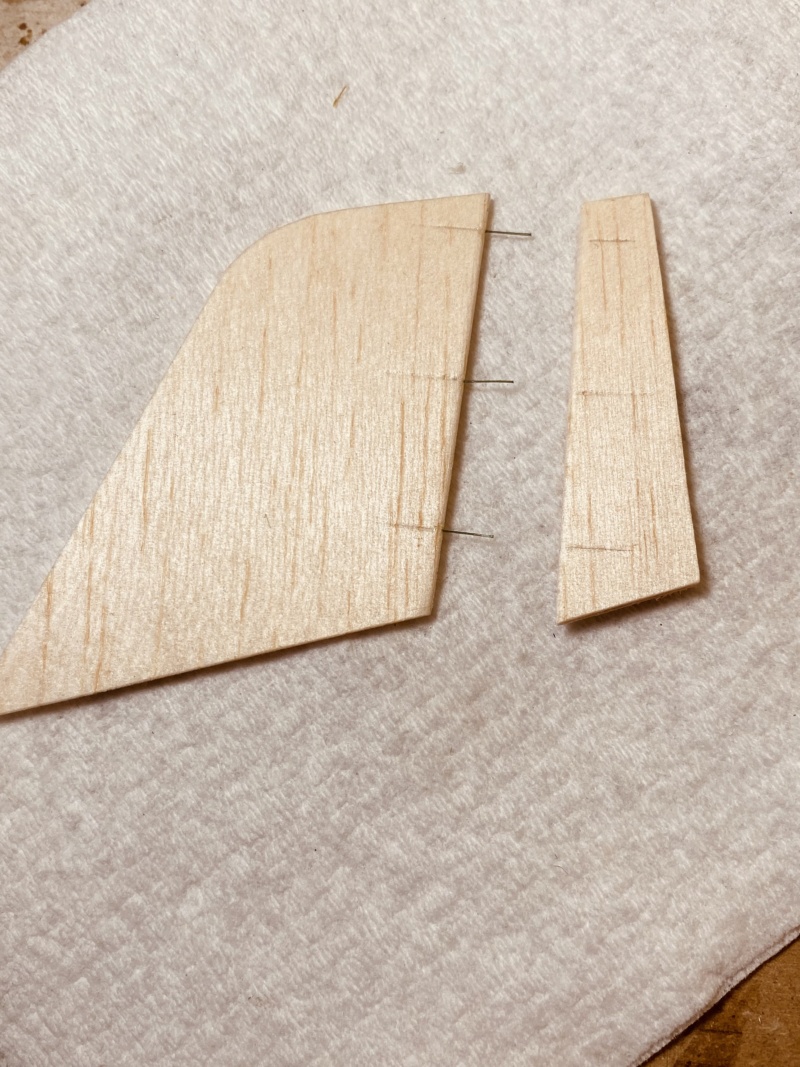
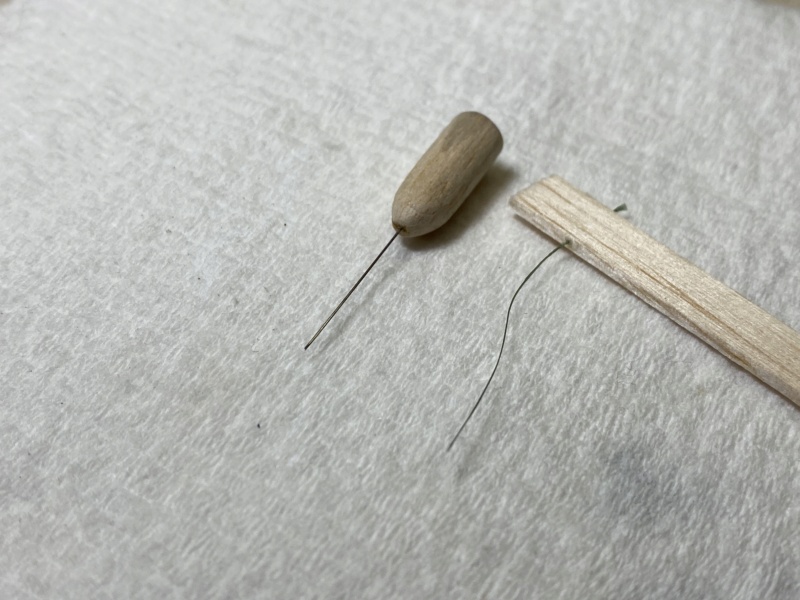
I looked at a video on the fishing line hinges and melted in my own “that seems about right” and just used what was already in the shop…. I had some 10 lb Spider Wire that measures about .005…. No small needles around so I used a piece of .010 metal guitar string and made a little drill by sharpening the end with a rotary disc…I practiced on some scrap 1/16 balsa to I got the hang of it then clean the line with alcohol and glue with thin CA…. Then satisfied myself that it was an OK bond by trying to pull it out…
So then on the fin/rudder I marked with pencil the lines to follow and drilled the parts before rounding were they will hinge, It’s easier to find center that way…I pushed in the fin side hinges first (4 or 5 mm) then glued and left them long …. Then trimmed what was hanging out to 4 mm….The line cuts most cleanly with a very sharp knife and supported by a wooden block …
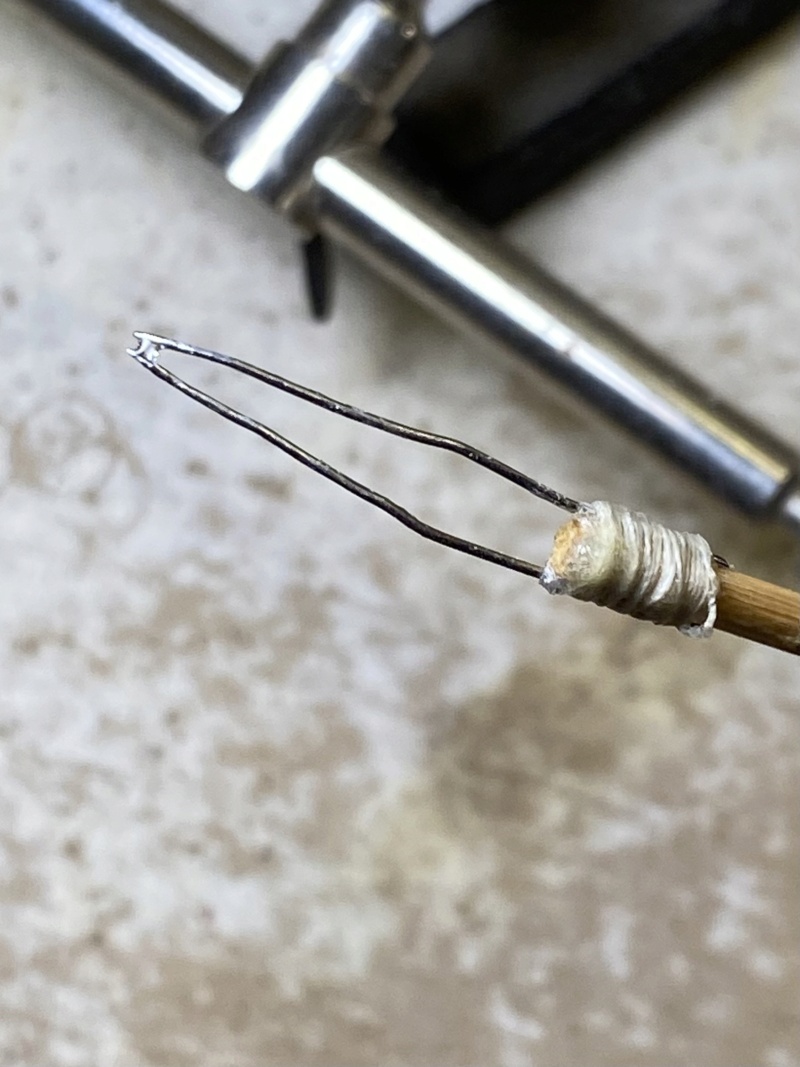
Then fit lines into the holes in the rudder and CA’d them too… The trick obviously is to not glue them together so I used a little gluing tool I learned about doing some indoor FF rubber..,It’s just a couple of straight pins bent and bound to a stick to be able to hold a tiny drop of glue… Very controllable this way..,,
I deflected the rudder about 45 degrees while gluing to have access and try and keep the gap as small as possible
 .
.
The hinge is very free and I cannot see any evidence of the CA making a hard or brittle place on the line… It’s pretty strong material…. I will keep an eye on it though…
Eric, The original wing for Pageboy is a one sheet affair with exposed ribs hanging in the breeze…. The Schoolboy type from the same designer was similar but also sheeted on the bottom and has a better leading edge… I remember my Schoolboy being able to penetrate pretty stiff breeze so I though it would be good for this one and be more warp resistant as well…
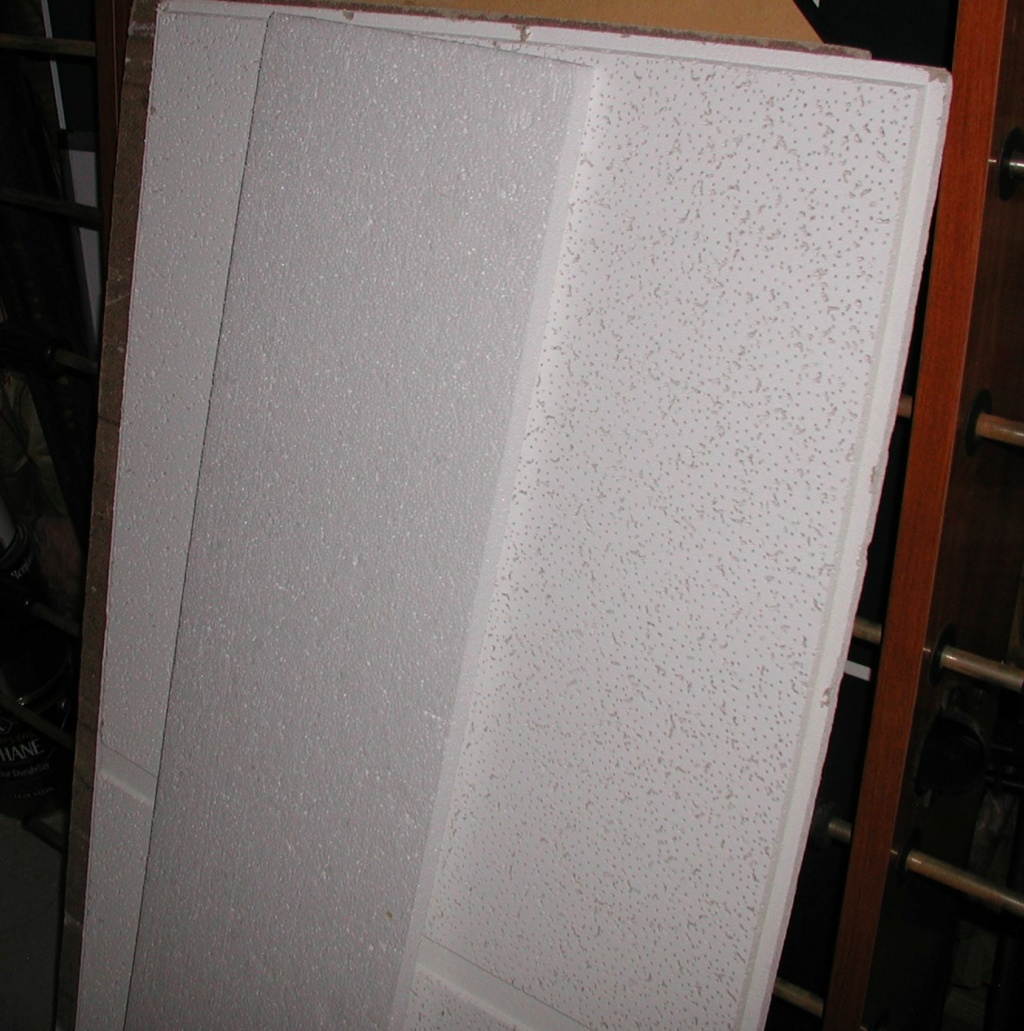
Bob, My entire work surface is just 1/2” drywall… Nice and flat and you can push a pin in anywhere although I have to use a thimble (Drome )… I have smaller pieces for glue ups so I can clear the big table while they are drying…
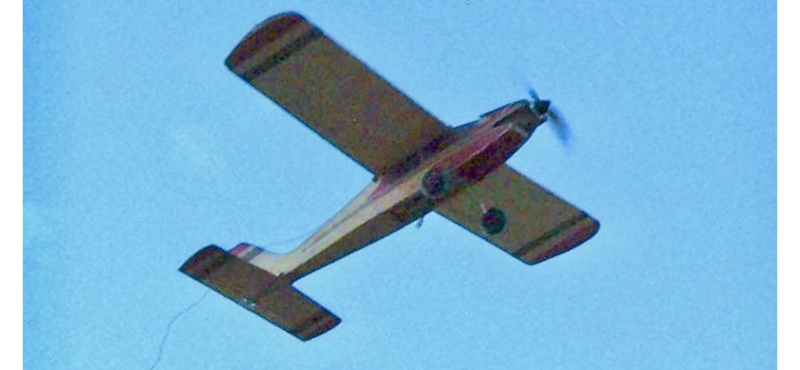
One more fly by from the Schoolmaster on a pleasant summer evening at a local schoolyard many years ago….

I looked at a video on the fishing line hinges and melted in my own “that seems about right” and just used what was already in the shop…. I had some 10 lb Spider Wire that measures about .005…. No small needles around so I used a piece of .010 metal guitar string and made a little drill by sharpening the end with a rotary disc…I practiced on some scrap 1/16 balsa to I got the hang of it then clean the line with alcohol and glue with thin CA…. Then satisfied myself that it was an OK bond by trying to pull it out…

So then on the fin/rudder I marked with pencil the lines to follow and drilled the parts before rounding were they will hinge, It’s easier to find center that way…I pushed in the fin side hinges first (4 or 5 mm) then glued and left them long …. Then trimmed what was hanging out to 4 mm….The line cuts most cleanly with a very sharp knife and supported by a wooden block …
Then fit lines into the holes in the rudder and CA’d them too… The trick obviously is to not glue them together so I used a little gluing tool I learned about doing some indoor FF rubber..,It’s just a couple of straight pins bent and bound to a stick to be able to hold a tiny drop of glue… Very controllable this way..,,

I deflected the rudder about 45 degrees while gluing to have access and try and keep the gap as small as possible
 .
. The hinge is very free and I cannot see any evidence of the CA making a hard or brittle place on the line… It’s pretty strong material…. I will keep an eye on it though…
Eric, The original wing for Pageboy is a one sheet affair with exposed ribs hanging in the breeze…. The Schoolboy type from the same designer was similar but also sheeted on the bottom and has a better leading edge… I remember my Schoolboy being able to penetrate pretty stiff breeze so I though it would be good for this one and be more warp resistant as well…
Bob, My entire work surface is just 1/2” drywall… Nice and flat and you can push a pin in anywhere although I have to use a thimble (Drome
 )… I have smaller pieces for glue ups so I can clear the big table while they are drying…
One more fly by from the Schoolmaster on a pleasant summer evening at a local schoolyard many years ago….


rdw777- Diamond Member


Posts : 1723
Join date : 2021-03-11
Location : West Texas
 Re: Pageboy Build
Thanks Robert, looks like a great way to do hinges, clean but not easy. I got on-line and watched this video:
https://www.bing.com/videos/search?q=fishing+line+hinge&view=detail&mid=D45EAE3F3A56EC67A275D45EAE3F3A56EC67A275&FORM=VIRE
It seems when installing you should maintain tension on the line, glue in one end, pull on the other. Would work fine on open-framed structures but on closed like your vertical stab? How do you maintain tension for a tight fit? It looks like something I would like to try as I'm always in a fight with them.
I use foam board or the back side of suspended ceiling tiles. Foam board works well but the fumes from CA quickly eats it.


rsv1cox- Top Poster


Posts : 11260
Join date : 2014-08-18
Location : West Virginia
 Re: Pageboy Build
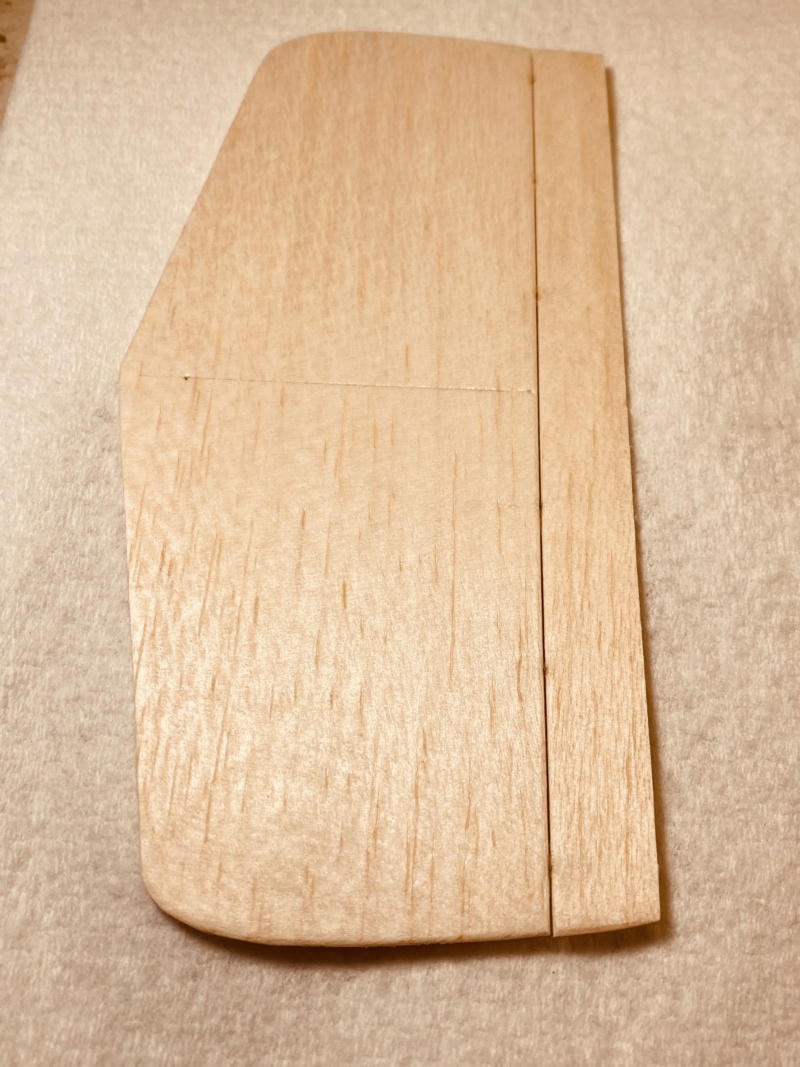
Hi Bob, Yes, That was the same video I watched…. So my work around on the final join was too push the two surfaces together and wiggle them around a bit to seat best possible…. Then deflect just enough to expose the line that needed a dot of CA… The glue applicator helps alot…. You can see it wick into the hole…. Some CA may get on the other half but it’s such a minute amount it doesn’t threaten to glue them together …. You can fiddle with it scraps of balsa if you would like to try it… Got the stab/elevator done….


rdw777- Diamond Member


Posts : 1723
Join date : 2021-03-11
Location : West Texas
 Re: Pageboy Build
Robert, very neat work on the hinges and in general!!!
I thought you first cover the rudder, stab and the elevator flaps in heat shrink material like Oracover, and apply the hinges afterwards. That way, the edges of the flaps - exposed to precipitating castor - would also be sealed by the heat shrink material. If the hinges applied first, and the heat shrink afterwards, the edges remain naked and exposed to castor, and that will seep into the balsa real quick and destroy it, as you may well know..
Of course if you fuel-proofed the balsa, then hinge application can also be done on the naked balsa surfaces before the heat shrink cover film addition.
Just my humble thoughts...

balogh- Top Poster


Posts : 4961
Join date : 2011-11-06
Age : 66
Location : Budapest Hungary
 Re: Pageboy Build
Thanks Andras, I appreciate your suggestions  …. I plan to do a dope finish with tissue trim…. Probably not as durable as film but I’ll give it a diligent cleaning after use …. I have a good stock of Japanese tissue that holds its color well….

rdw777- Diamond Member


Posts : 1723
Join date : 2021-03-11
Location : West Texas
 Re: Pageboy Build
Thanks Robert, dope and Japanese tissue make it totally fuelproof indeed. Back in the 70-s I built a full wing CL plane with dope and tissue...I remember how nice the tissue spanned between the ribs like a curved, saddle surface and how strong it held..

balogh- Top Poster


Posts : 4961
Join date : 2011-11-06
Age : 66
Location : Budapest Hungary
 Re: Pageboy Build
balogh wrote:Thanks Robert, dope and Japanese tissue make it totally fuelproof indeed. Back in the 70-s I built a full wing CL plane with dope and tissue...I remember how nice the tissue spanned between the ribs like a curved, saddle surface and how strong it held..
 Yes, I too remember for many years using dope and tissue on my planes and in my memory it was easier to do than the solarFilm type coverings that became available. I always found the joins and seems and such with the tissue easier to make nice and neat and hide. I have always found the heat shrink coverings difficult to not have the odd bits from joins and curves here and there sticking up. I also like the look of Tissue and dope better than the heat shring type coverings, but thats probably nothing more than getting old and fading memories holding on to those early teen years flying models.

Yabby

Yabby- Platinum Member


Posts : 712
Join date : 2021-06-08
Location : Yorke Peninsula South Australia
 Re: Pageboy Build
I agree with Robert on the very light finish of clear doping the balsa surfaces with color trim. There isn't much wing area on the Pageboy, so keeping it light so it flies well will be essential.
Regarding tissue covering like Essaki and Silkspan, I was never a fan of those on an R/C aircraft because it didn't take much to puncture the finish especially in rougher field conditions like we have here. My first experiences with Silkspan was my 1965 Walt Musciano Scientific stand-way-off-scale Grumman F6F Hellcat with built up fuselage and wing. First experiences with tissue was in 1964, by the time I finished 6th grade, built at least a dozen stick and tissue kits to include Ed Lidgard's 32" Comet Sparky. Best flying was Comet's 18" wingspan North American P-51A Mustang (one with the turtle deck fuselage), because it was framed very light.
Back in the late 1970's, I tried lightweight silk for the first time on the wing of my 36" Sterling Minnie Mambo. With a Pactra Solar Film covered fuselage and tail feathers in transparent yellow trimmed in color, the silk wing kept it light, was an excellent flyer. The Cox R/C Bee engine made it really move out, 3 position throttle on Ace rudder only pulse, could do all the single channel aerobatics with ease.
Lightweight is the way to go with these half-A sport models.

GallopingGhostler- Top Poster


Posts : 5735
Join date : 2013-07-13
Age : 70
Location : Clovis NM or NFL KC Chiefs
 Re: Pageboy Build
rdw777:
I am enjoying this construction!...beautiful how this work is going!
The hinges made with fishing rope is genius! I really would not have thought of it and what a great idea in itself it is!
Very applicable to small models without the risk of breaking anything, just a puncture in the center and that's it!
Great idea, thanks for sharing it!

MauricioB- Top Poster

- Posts : 3720
Join date : 2016-02-16
Age : 53
Location : ARG
 Re: Pageboy Build
Gracias Caballeros, Tus palabras son muy amables 
I have a good stock of Esaki tissue left over from rubber free flight days… The Schoolboy in the photo was Esaki trimmed….Unfortunately it’s not made anymore….Certainly not as durable as plastic film….It adds practically no weight though and maybe just a bit of strength to balsa sheet….. Trade offs….I do think it goes with the vibe of these vintage designs….
I’m glad the fishing line hinge is liked but please proceed with caution if any decide to try it….First time for me but I think it should be OK… I usually use a figure eight thread hinge on small models but the fishing line hinge appeared to me to withstand the rigors of gas powered flight better…. Yes, It was a bounce off Levent’s centering tool post, Thanks for the idea

rdw777- Diamond Member


Posts : 1723
Join date : 2021-03-11
Location : West Texas
 Re: Pageboy Build
really nicew build Robert. I very much like the high quality yet pragmatic approach you have to your build. The way you have done the hinges is excellent!  I could see myself at least giving the stiched with fishing line method try now. whereas previously I couldnt really see myself being able to do it. gtreat build and I will continue to follow and keen to see/hear how it flies when all is complete and ready. all the best with it!


Yabby


Yabby

Yabby- Platinum Member


Posts : 712
Join date : 2021-06-08
Location : Yorke Peninsula South Australia

rdw777- Diamond Member


Posts : 1723
Join date : 2021-03-11
Location : West Texas
 Re: Pageboy Build
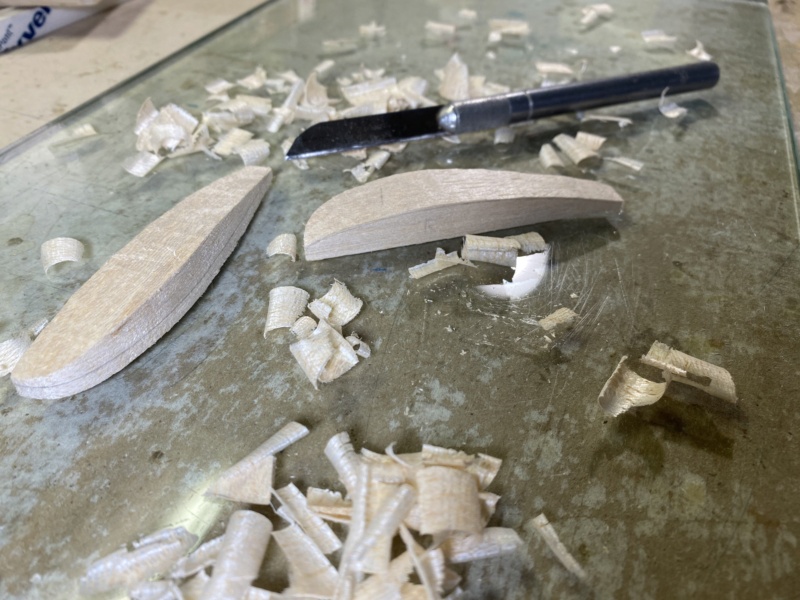
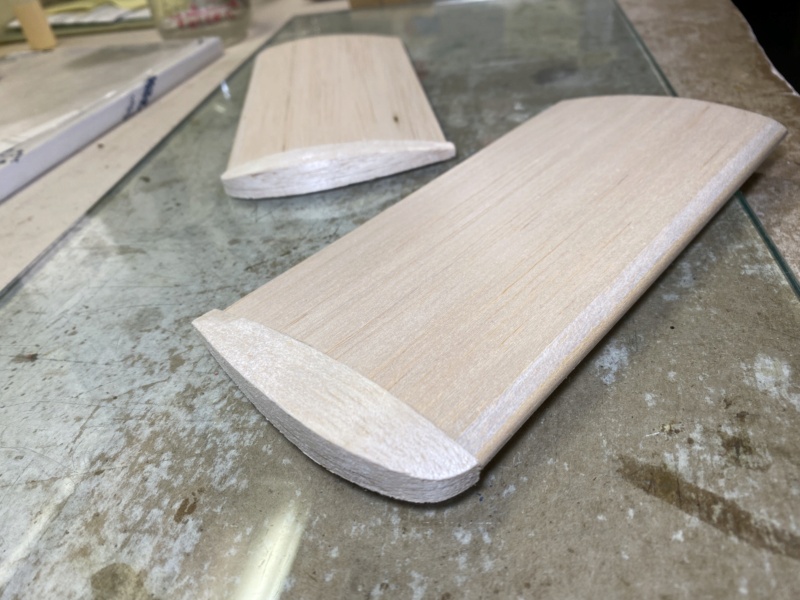
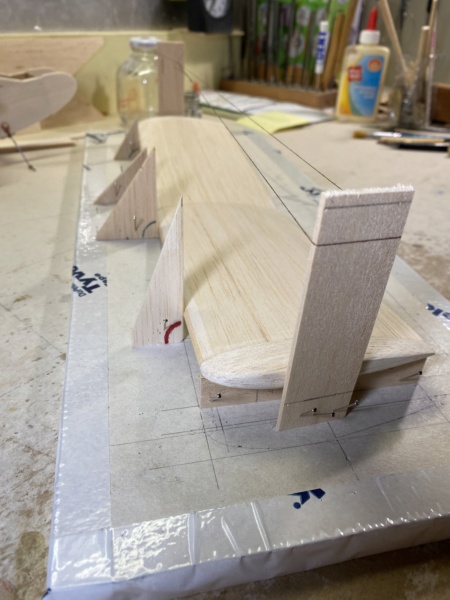
Exemplary wood craftsmanship, Robert, kudos!  Even the wing tips are hollowed out, ought be really light, with bass wood leading edge, should be able to handle the briar patches well. It looks like a downsized Schoolmaster.
 Even the wing tips are hollowed out, ought be really light, with bass wood leading edge, should be able to handle the briar patches well. It looks like a downsized Schoolmaster.
GallopingGhostler- Top Poster


Posts : 5735
Join date : 2013-07-13
Age : 70
Location : Clovis NM or NFL KC Chiefs
 Re: Pageboy Build
Norm Abram couldn't have done it better. I love the wing!!
Bob
Bob

rsv1cox- Top Poster


Posts : 11260
Join date : 2014-08-18
Location : West Virginia
 Re: Pageboy Build
This is just beautiful, Robert. Smooth and soft surfaces and contours.
I too use hard leading edges because of the rough, weedy terrain I fly on. If nothing else like hardwood is available, then I use a small diameter round or square carbon rod that well submerges into the foil contour.
I too use hard leading edges because of the rough, weedy terrain I fly on. If nothing else like hardwood is available, then I use a small diameter round or square carbon rod that well submerges into the foil contour.

balogh- Top Poster


Posts : 4961
Join date : 2011-11-06
Age : 66
Location : Budapest Hungary
Page 1 of 6 • 1, 2, 3, 4, 5, 6 
 Similar topics
» Pageboy in ELECTRIC!
» Another build
» 50th Anniversary Flight Video- Pageboy with Cox TD .010
» Guillows Cessna 150 build circa 1970 (Build Log)
» Help Deciding on Kit
» Another build
» 50th Anniversary Flight Video- Pageboy with Cox TD .010
» Guillows Cessna 150 build circa 1970 (Build Log)
» Help Deciding on Kit
Page 1 of 6
Permissions in this forum:
You cannot reply to topics in this forum

 Rules
Rules


