Log in
Search
Latest topics
» My N-1R build logby roddie Today at 12:32 am
» Happy 77th birthday Andrew!
by akjgardner Today at 12:27 am
» TEE DEE Having issues
by TD ABUSER Yesterday at 9:43 pm
» Landing-gear tips
by roddie Yesterday at 6:17 pm
» Roger Harris revisited
by TD ABUSER Yesterday at 2:13 pm
» Tee Dee .020 combat model
by Ken Cook Yesterday at 1:41 pm
» Retail price mark-up.. how much is enough?
by Ken Cook Yesterday at 1:37 pm
» My latest doodle...
by roddie Yesterday at 10:43 am
» Chocolate chip cookie dough.........
by roddie Fri Nov 22, 2024 1:13 pm
» Purchased the last of any bult engines from Ken Enya
by sosam117 Fri Nov 22, 2024 11:32 am
» Free Flight Radio Assist
by rdw777 Fri Nov 22, 2024 9:24 am
» Funny what you find when you go looking
by rsv1cox Wed Nov 20, 2024 3:21 pm
Cox Engine of The Month
BH models Mosquito build
Page 3 of 4
Page 3 of 4 •  1, 2, 3, 4
 Re: BH models Mosquito build
What happened to it, Bob?rsv1cox wrote: ...a PO of one of them really beat-up the NVA assembly...
_________________
Don't Panic!
...and never Ever think about how good you are at something...
while you're doing it!
My Hot Rock & Blues Playlist
...and never Ever think about how good you are at something...
while you're doing it!
My Hot Rock & Blues Playlist

RknRusty- Rest In Peace

- Posts : 10869
Join date : 2011-08-10
Age : 68
Location : South Carolina, USA
 Re: BH models Mosquito build
roddie wrote:Rub it in Robert....I'm messing with a swimming pool issue in freezing weather..
I thought of thatbut tried to soften the comparison.
This is rubbing it in - for both of us....
Just a few short years ago about this time of year. River emptying into the Gulf of Mexico at Clearwater beach.
That's ok... I'm enjoying reading about your build! The more photos.. the better! I like the stance with the struts/wheels installed!

rsv1cox- Top Poster


Posts : 11250
Join date : 2014-08-18
Location : West Virginia
 Re: BH models Mosquito build
RknRusty wrote:What happened to it, Bob?rsv1cox wrote: ...a PO of one of them really beat-up the NVA assembly...
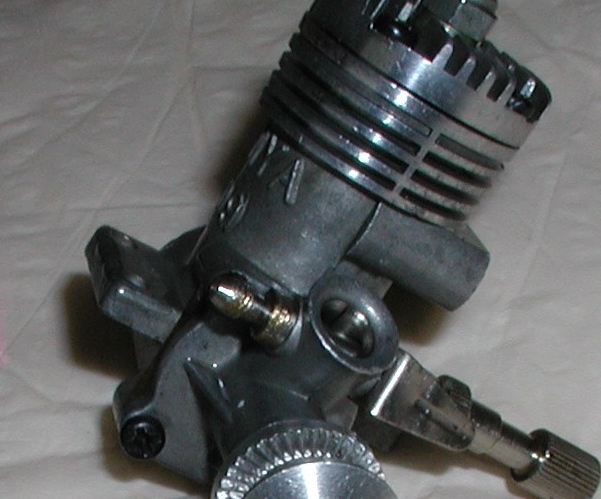
Improper use of hand tools Rusty, usually needle nose pliers on both ends. Proper is a 13/64" open end wrench on the nipple end and a 1/4" socket on the securing nut.

rsv1cox- Top Poster


Posts : 11250
Join date : 2014-08-18
Location : West Virginia
 Re: BH models Mosquito build
I just keep plugging away. Much rain here today, no football/baseball so the build goes on.
Major change, I decided to use the early Enya .09's. If I plant them, I plant them. If it's good enough for the Kimster it's good enough for me. To bad, I had the first two tuned really well, now got to do that all over again.
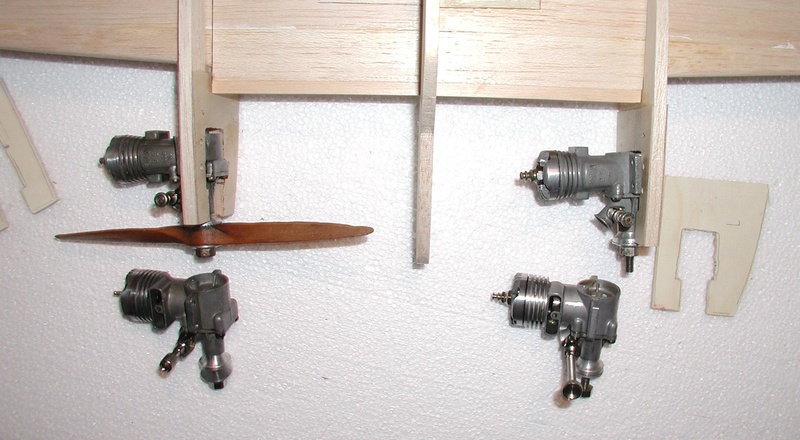

I finished the nacelles. I glued the luan reinforcements to the outside of the engines to maintain the plans thrust line. Filled in the alignment pin holes, drilled out the engine mounting/landing gear holes and slopped on another coat of sanding sealer and sanded that down.

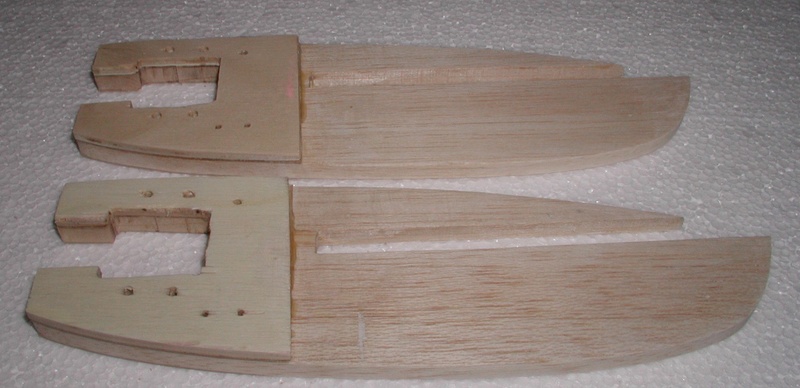
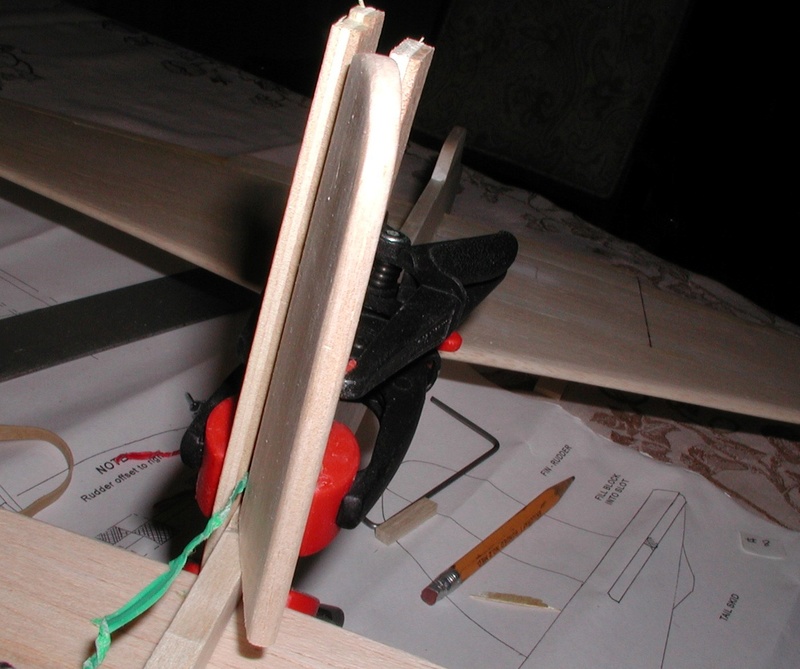
Using my overly complicated vertical stabilizer jig I epoxied on the rudder/stab. Saves pin holes and me trying to hold it steady and in proper position for five minutes or longer.
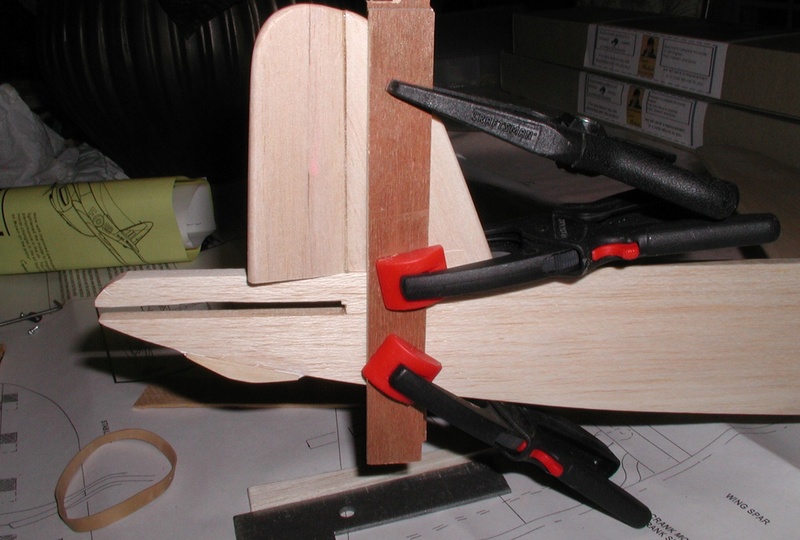
It still needed a little high tech adjustment for perfect alignment.
Finally the nacelles go on tomorrow, then primer. Might have got a tad to much off-set in the rudder. At least it will hang out on the lines.
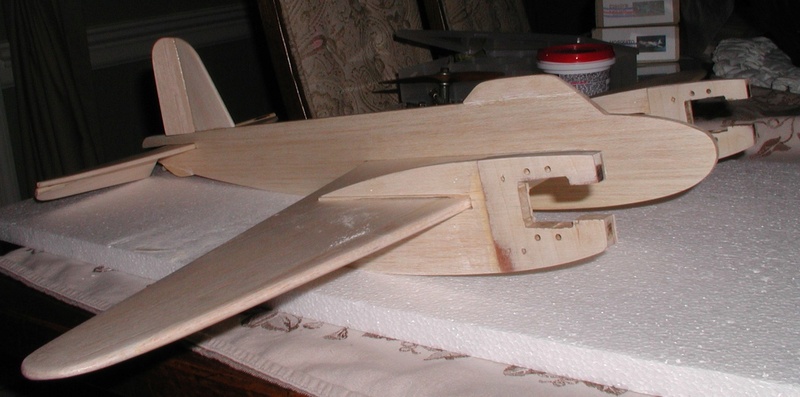
Bob
Major change, I decided to use the early Enya .09's. If I plant them, I plant them. If it's good enough for the Kimster it's good enough for me. To bad, I had the first two tuned really well, now got to do that all over again.


I finished the nacelles. I glued the luan reinforcements to the outside of the engines to maintain the plans thrust line. Filled in the alignment pin holes, drilled out the engine mounting/landing gear holes and slopped on another coat of sanding sealer and sanded that down.


Using my overly complicated vertical stabilizer jig I epoxied on the rudder/stab. Saves pin holes and me trying to hold it steady and in proper position for five minutes or longer.

It still needed a little high tech adjustment for perfect alignment.

Finally the nacelles go on tomorrow, then primer. Might have got a tad to much off-set in the rudder.

Bob

rsv1cox- Top Poster


Posts : 11250
Join date : 2014-08-18
Location : West Virginia
 Re: BH models Mosquito build
rsv1cox wrote: Might have got a tad to much off-set in the rudder.At least it will hang out on the lines.
Bob
With a nice looking plane like that, all I'd be doing is going round & round, nothing fancy. Line tension is your friend Bob.
Had you considered counter-rotating engines? 1/4 turn on the front housing for opposite running?? I guess you'd need to redisign your nacelles completely (well, one at least.)

Oldenginerod- Top Poster

- Posts : 4018
Join date : 2012-06-15
Age : 62
Location : Drouin, Victoria
 Re: BH models Mosquito build
Thanks Rod, I hadn't thought of that, but with these vertical bearers it might be a problem. With the P-38 I could just slap on RH/LH 3 bladed props and be done with it.
I'm using the old style .09's because they position the exhaust ports downward and the NVA's up. The newer 09's position the exhaust and NVA's up. Ought to result in a cleaner airplane. Also the old styles weigh considerably less.
Bob
I'm using the old style .09's because they position the exhaust ports downward and the NVA's up. The newer 09's position the exhaust and NVA's up. Ought to result in a cleaner airplane. Also the old styles weigh considerably less.
Bob

rsv1cox- Top Poster


Posts : 11250
Join date : 2014-08-18
Location : West Virginia
 Re: BH models Mosquito build
Big trouble in little China. Ran into a problem this morning, you can't always believe in the plans.
First the pivot hole for the bell crank called for a 5/32" hole, too big, too much slop. 9/64" works better. Caught that one in time. Didn't catch the pass through holes for the lead-outs and drilled them according to plan. Way off if you accept the plans location of the wing tip lead out guide on the trailing edge of the wing. I checked that against the Lockeed Electra's plans and they matched so I went with that. So out to the drill press again and drilled the relocated holes. Just a heads-up for anyone considering this build.
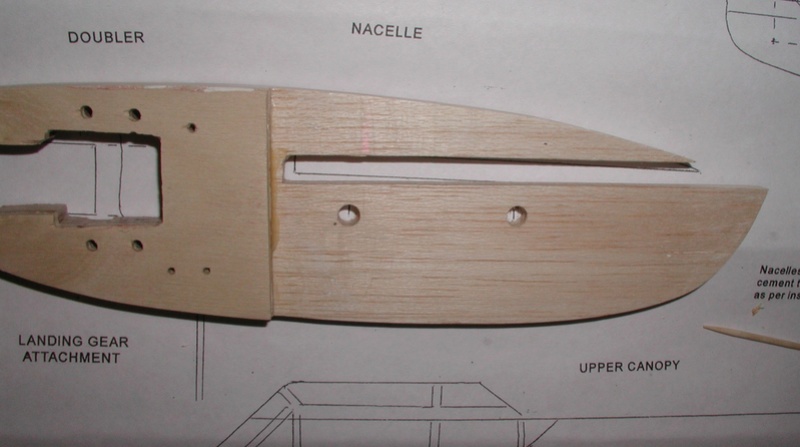


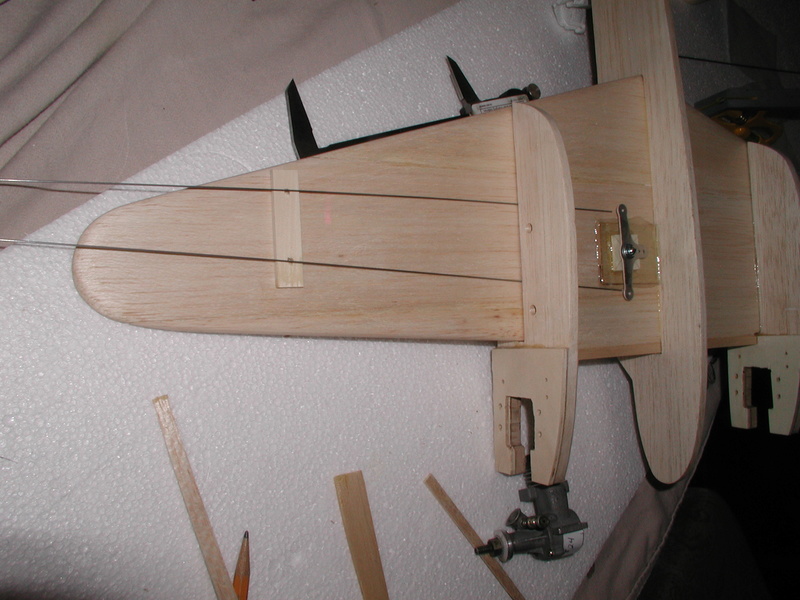
I have had fears that the fuel tank would interfere with the controls, but looks like there is plenty of room for an under wing mounting.
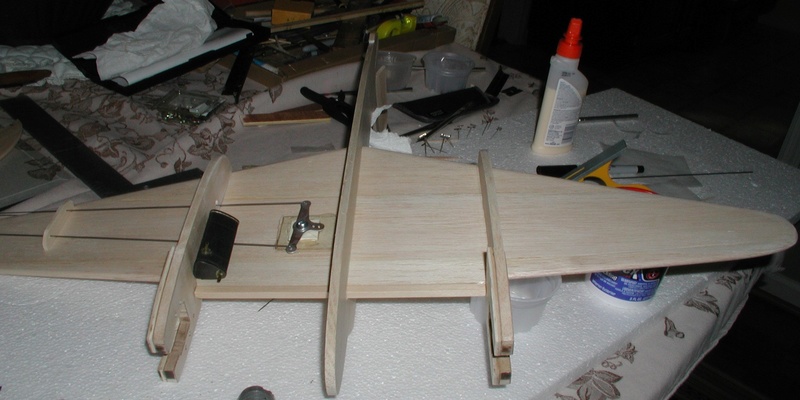
Bell crank is located aft according to plan. I was going to plug those incorrect holes, but think I will leave them. Nothing is glued up yet, so if you see an error, chime in.
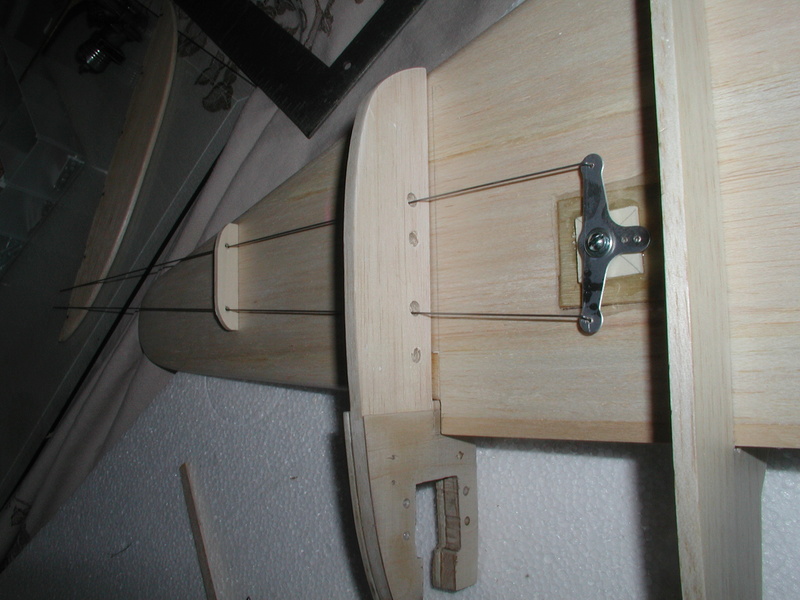
Bob
First the pivot hole for the bell crank called for a 5/32" hole, too big, too much slop. 9/64" works better. Caught that one in time. Didn't catch the pass through holes for the lead-outs and drilled them according to plan. Way off if you accept the plans location of the wing tip lead out guide on the trailing edge of the wing. I checked that against the Lockeed Electra's plans and they matched so I went with that. So out to the drill press again and drilled the relocated holes. Just a heads-up for anyone considering this build.


I have had fears that the fuel tank would interfere with the controls, but looks like there is plenty of room for an under wing mounting.

Bell crank is located aft according to plan. I was going to plug those incorrect holes, but think I will leave them. Nothing is glued up yet, so if you see an error, chime in.

Bob

rsv1cox- Top Poster


Posts : 11250
Join date : 2014-08-18
Location : West Virginia
 Re: BH models Mosquito build
rsv1cox wrote:
I was going to plug those incorrect holes, but think I will leave them. Nothing is glued up yet, so if you see an error, chime in.
Bob
Bob, I'd definitely plug the incorrect lead-out holes.. and "bush" the correct ones with some brass guide-tubes. That area is going to get fuel/oil spray.. and you don't want it to seep into the nacelle. Rough-up the guide-tubes with coarse sandpaper and glue them in securely so they stay in-place. It wouldn't hurt to bush the wingtip guide-holes as well.
 Re: BH models Mosquito build
I'm embarrassed! I've had my kit for around 10 months...All I've managed to do is research alternative plans/kits/assembled planes.
Bob,
I gotta tell you. This plane looks like it's gonna be one humdinger!
Jump over to flyinglines.org for balance/lead-outs recommendations:
flyinglinesDOTorg/orin.basiccl.html
Mr. Orin Humphries has a good primer on leadout and bellcrank positioning. His B-25 is showcased as the example.
Enviously still watching.
Jim
944_Jim- Diamond Member


Posts : 2022
Join date : 2017-02-08
Age : 59
Location : NE MS
 Re: BH models Mosquito build
It's taking that first step Jim, then it just snowballs from there.
Another thing. Just before I epoxied on the horizontal stabilizer I checked the rotation of the elevator, good thing I did. That is a very tight fit and the dowel tended to bind on the fuselage. Simple fix, just rat tail file a groove.

I did a poor job on in-letting the hinges. My excuse, the dowel that came with the kit had a distinct bend in it. I thought I could pull it true when I glued the hinges, couldn't. Usually I paint everything first then add the hinges saving paint from clogging the hinges. Now I have to find a way to avoid that, thought a wire tie would work but there has to be a better way. After letting the hinge glue sit overnight I tried to pull it apart, wouldn't budge but I pinned the center hinges anyway.
I took Jim's idea of pinning the nacelles, only I used toothpicks, three on each although only two are shown, added the third. Drilled a deep hole and leaving the pointed end on I tapped them in with a small tapping hammer. I made the mistake of snipping them off with a pair of dykes, better way is using a razor saw which is what I did on the other side.

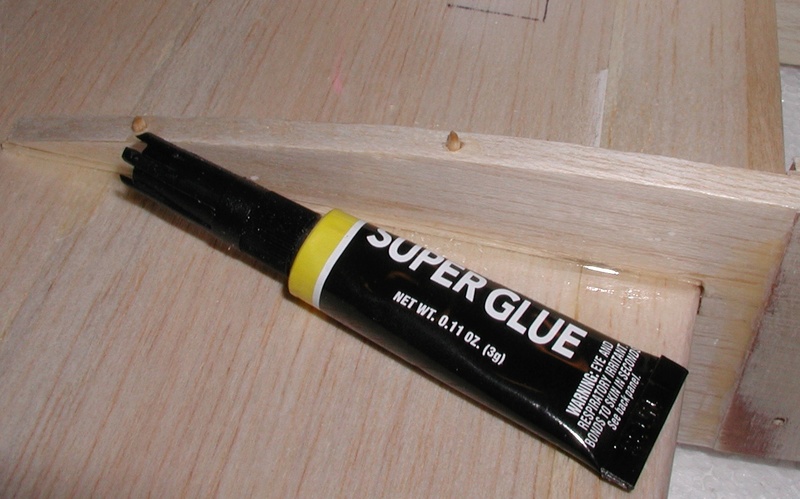
Also I took roddies suggestion and filled the excess lead-out holes with dowels CA'd in place, will fill with spackling and sand. (See I do listen:))
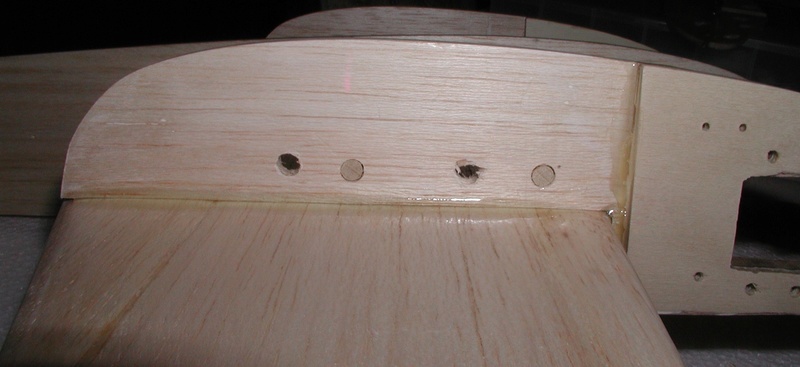
Throwing caution to the wind I epoxied the darned thing. I scribed witness lines on both sides dabbed a little epoxy there and slid it on. I will reinforce with epoxy fillets later.
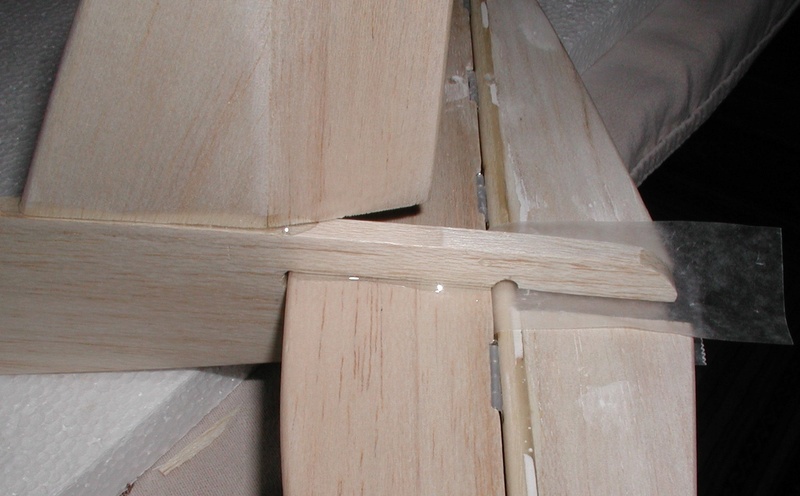
Makes a mess when you do these, but I'm almost ready to add a last coat of sanding sealer, final sand and prime.

Bob
Another thing. Just before I epoxied on the horizontal stabilizer I checked the rotation of the elevator, good thing I did. That is a very tight fit and the dowel tended to bind on the fuselage. Simple fix, just rat tail file a groove.

I did a poor job on in-letting the hinges. My excuse, the dowel that came with the kit had a distinct bend in it. I thought I could pull it true when I glued the hinges, couldn't. Usually I paint everything first then add the hinges saving paint from clogging the hinges. Now I have to find a way to avoid that, thought a wire tie would work but there has to be a better way. After letting the hinge glue sit overnight I tried to pull it apart, wouldn't budge but I pinned the center hinges anyway.
I took Jim's idea of pinning the nacelles, only I used toothpicks, three on each although only two are shown, added the third. Drilled a deep hole and leaving the pointed end on I tapped them in with a small tapping hammer. I made the mistake of snipping them off with a pair of dykes, better way is using a razor saw which is what I did on the other side.


Also I took roddies suggestion and filled the excess lead-out holes with dowels CA'd in place, will fill with spackling and sand. (See I do listen:))

Throwing caution to the wind I epoxied the darned thing. I scribed witness lines on both sides dabbed a little epoxy there and slid it on. I will reinforce with epoxy fillets later.

Makes a mess when you do these, but I'm almost ready to add a last coat of sanding sealer, final sand and prime.

Bob

rsv1cox- Top Poster


Posts : 11250
Join date : 2014-08-18
Location : West Virginia
 Re: BH models Mosquito build
Fuel tanks arrived, lots of little bits included. But, only 1/2 oz. I was hoping for at least 3/4. Oh well, less dizzy.
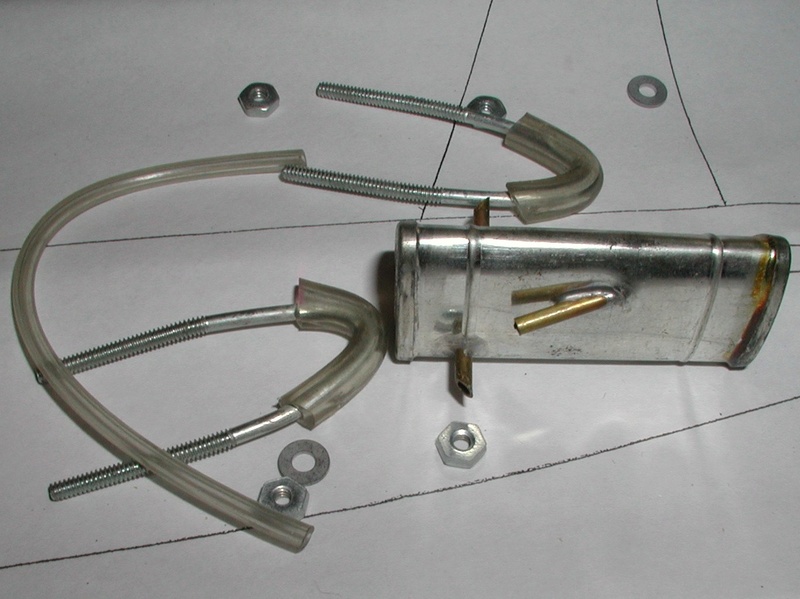
They will fit under or on top of the wing, thinking under. I like the ram air pressure cut on the filler/vent. Every little bit helps.
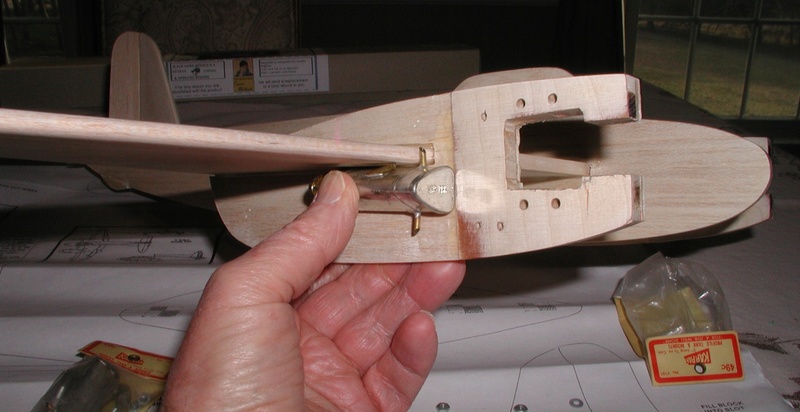
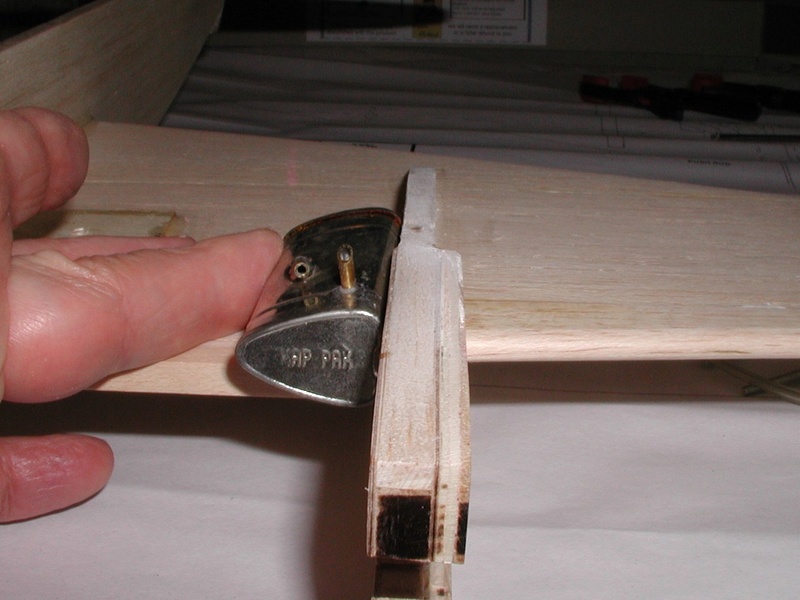
Big problem. I thought it funny they didn't supply the usual "button" support for the bell crank, instead just a square piece of ply which interfered with the motion of the bell crank. Had to fill the existing hole drill a new one closer to the fuselage and cut the corners.

Crunch time for me, I hate Z bending the elevator control rod, I have no Z pliers and they are always a sloppy fit anyway, so I got into the habit of using collets. Gives a nice no slop fit at the expense of a little more weight. I cut a sacrificial scrap of balsa the width of the BC to fuse and used that as a guide at the elevator end to get the correct spacing. Locked everything neutral and marked and 90 degree's the control rod.


Took roddies suggestion to bush the nacelles lead-out holes using tubing cutoffs that come hundreds by the package. I didn't even have to cut them to fit, now to epoxy them in.
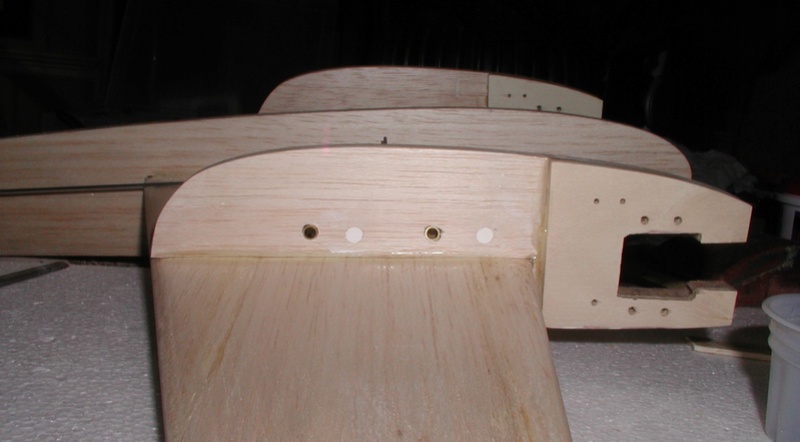
Mounted the wheels the conventional way. Beefed up the keepers with 3/48 machine screws vice the #2 wood screws supplied.


Everything is loosely test fitted and all will come apart again. I still have to cut off the excess from the landing gear, control rod and bell crank securing screw and a few other things before I'm happy with it. Hard part done, now comes the fun. Seal again, sand, prime and paint.
I imagine that I have raised more than a few (not the way I would have done it) eyebrows with this build, and could be interpreted as a "not how to do it" tutorial but despite my mistakes and the plans errors it seems to have turned out ok. But will it fly.......
Bob

They will fit under or on top of the wing, thinking under. I like the ram air pressure cut on the filler/vent. Every little bit helps.


Big problem. I thought it funny they didn't supply the usual "button" support for the bell crank, instead just a square piece of ply which interfered with the motion of the bell crank. Had to fill the existing hole drill a new one closer to the fuselage and cut the corners.

Crunch time for me, I hate Z bending the elevator control rod, I have no Z pliers and they are always a sloppy fit anyway, so I got into the habit of using collets. Gives a nice no slop fit at the expense of a little more weight. I cut a sacrificial scrap of balsa the width of the BC to fuse and used that as a guide at the elevator end to get the correct spacing. Locked everything neutral and marked and 90 degree's the control rod.


Took roddies suggestion to bush the nacelles lead-out holes using tubing cutoffs that come hundreds by the package. I didn't even have to cut them to fit, now to epoxy them in.

Mounted the wheels the conventional way. Beefed up the keepers with 3/48 machine screws vice the #2 wood screws supplied.


Everything is loosely test fitted and all will come apart again. I still have to cut off the excess from the landing gear, control rod and bell crank securing screw and a few other things before I'm happy with it. Hard part done, now comes the fun. Seal again, sand, prime and paint.
I imagine that I have raised more than a few (not the way I would have done it) eyebrows with this build, and could be interpreted as a "not how to do it" tutorial but despite my mistakes and the plans errors it seems to have turned out ok. But will it fly.......
Bob

rsv1cox- Top Poster


Posts : 11250
Join date : 2014-08-18
Location : West Virginia
 Re: BH models Mosquito build
Looking good Bob! Are you going to fit spinners?
This makes me want to build a twin too. I am a Mosquito fan, but also like the Grumman XF5F, and of course the Lightning... Lots of options!
This makes me want to build a twin too. I am a Mosquito fan, but also like the Grumman XF5F, and of course the Lightning... Lots of options!

KariFS- Diamond Member

- Posts : 2044
Join date : 2014-10-10
Age : 53

rsv1cox- Top Poster


Posts : 11250
Join date : 2014-08-18
Location : West Virginia
 Re: BH models Mosquito build
It's Coming together Nicely Bob !! Starting to look like an airplane 


getback- Top Poster


Posts : 10442
Join date : 2013-01-18
Age : 67
Location : julian , NC
 Re: BH models Mosquito build
KariFS wrote:Looking good Bob! Are you going to fit spinners?
This makes me want to build a twin too. I am a Mosquito fan, but also like the Grumman XF5F, and of course the Lightning... Lots of options!
Now there's an odd ball. At-em boys, give her the gun..
https://www.youtube.com/watch?v=xJ5AsgBZRNk
Two minutes six seconds of rockem sockem fun.

rsv1cox- Top Poster


Posts : 11250
Join date : 2014-08-18
Location : West Virginia
 Re: BH models Mosquito build
That's always the thing about even the finest kits. You still have to engineer things to get it right. If you ain't making mistakes here and there, you ain't trying hard enough.rsv1cox wrote:I imagine that I have raised more than a few (not the way I would have done it) eyebrows with this build, and could be interpreted as a "not how to do it" tutorial but despite my mistakes and the plans errors it seems to have turned out ok. But will it fly.......
If you need an alternate spinner, here's where I get mine. This is an example, you'll have to choose your size and adapter. The adapters and engines they fit are listed at the bottom of the same page as the spinner. These are made by Dave Brown.
http://www.ebay.com/itm/NEW-Great-Planes-Spinner-1-3-4-Aluminum-GPMQ4551-/331261817672?hash=item4d20be3348
_________________
Don't Panic!
...and never Ever think about how good you are at something...
while you're doing it!
My Hot Rock & Blues Playlist
...and never Ever think about how good you are at something...
while you're doing it!
My Hot Rock & Blues Playlist

RknRusty- Rest In Peace

- Posts : 10869
Join date : 2011-08-10
Age : 68
Location : South Carolina, USA
 Re: BH models Mosquito build
Geez Bob.. you're really getting a lot done quickly.. and the model looks GREAT! I like it a LOT! I'm a big fan of wedge-tanks. I've used them exclusively over the years.. as I'm sure you have too. I do see an issue though with using "those" tanks, under the wing, for this application. If you need to "raise" the height for proper draw.. you can't. There are "short" tanks that should fit between the engine and the wing's leading-edge. You may need to take that route. They would mount against your nacelle doublers. No big deal.. you can source them if it comes down to it. They're a "taller/shorter" wedge.. and it looks like there's room for at least 1/2oz. capacity there.
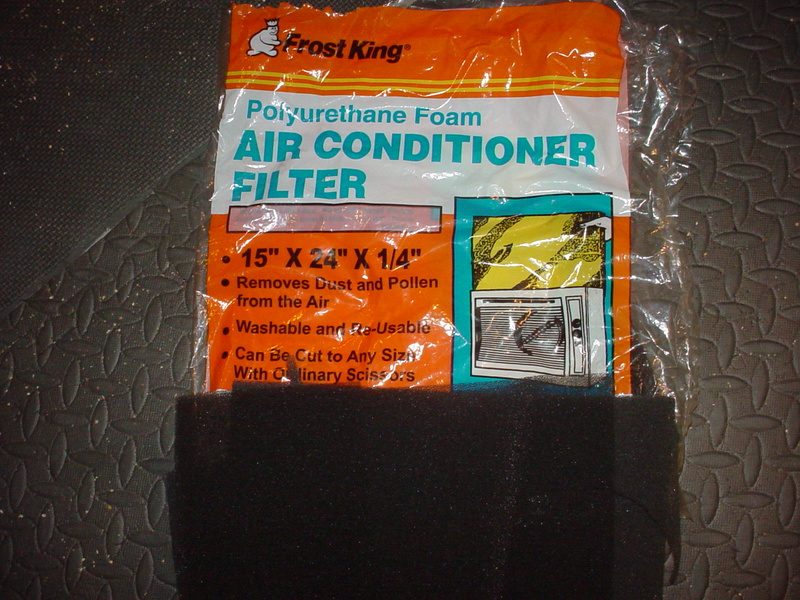
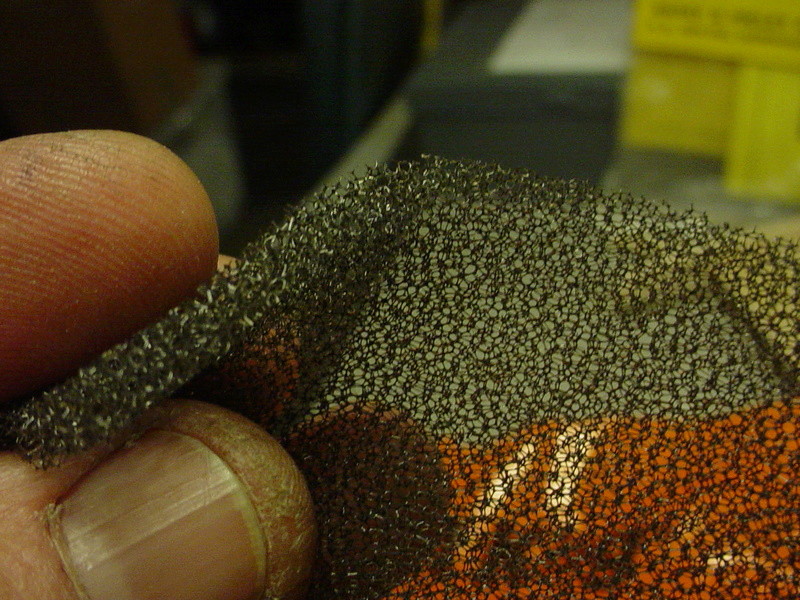
I like to put a cushion between the tank and where it's mounted. For this I use polyurethane filter-media for window-type air-conditioners. It's 1/4" thick, open-cell "spongy" foam that's sold by the sheet and cuts easily with scissors. It's impervious to glow-fuel.. and provides an anti-vibration cushion to help prevent fuel-foaming.
I like mounting my wedges with a rubber-band, stretched-over pairs of "pins" (dowels). On your model, they could be pinned (vertically) into the top/bottom of your nacelles.. just behind the engine(s). You can "box" around the tanks using 1/8" sq. stock.. once you establish their optimal operating height, so that they stay in place during flight.
Those tanks may work.. but if not.. you can use them on other airplanes where there's room for them. Try bench-running them at your planned tank-height, to see if they feed. That would be an easy test.. and would avoid having to make changes later, after the model is finished.
I like to put a cushion between the tank and where it's mounted. For this I use polyurethane filter-media for window-type air-conditioners. It's 1/4" thick, open-cell "spongy" foam that's sold by the sheet and cuts easily with scissors. It's impervious to glow-fuel.. and provides an anti-vibration cushion to help prevent fuel-foaming.


I like mounting my wedges with a rubber-band, stretched-over pairs of "pins" (dowels). On your model, they could be pinned (vertically) into the top/bottom of your nacelles.. just behind the engine(s). You can "box" around the tanks using 1/8" sq. stock.. once you establish their optimal operating height, so that they stay in place during flight.
Those tanks may work.. but if not.. you can use them on other airplanes where there's room for them. Try bench-running them at your planned tank-height, to see if they feed. That would be an easy test.. and would avoid having to make changes later, after the model is finished.
 Re: BH models Mosquito build
Ok roddie, you just blew my fuel tank mounting plans clear out of the water. But, that's ok. I post this stuff just for that reason. What most regard as innocuous incoherent ramblings on my part are actually a plea for help. 
Forgetting all about fuel foaming, my plan was to hard mount the tanks under the wing using epoxy and backed up with a balsa bulkhead at the rear of the tank and reinforced with steel wire ties through the nacelle and around the tank. To be blunt...I hate rubber bands righteous or not. I'm all about appearance, unusual for a butt ugly guy like me.
But you have me thinking. Maybe the backed up bulkhead made by tracing the end of the fuel tank with some of your foam and wire ties might work. Or..........I could use this V clamp that came with the tanks.
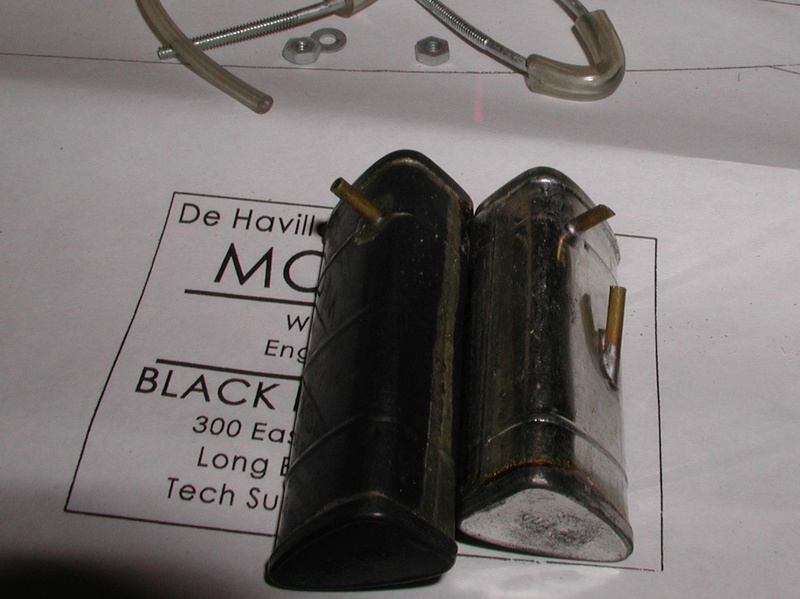
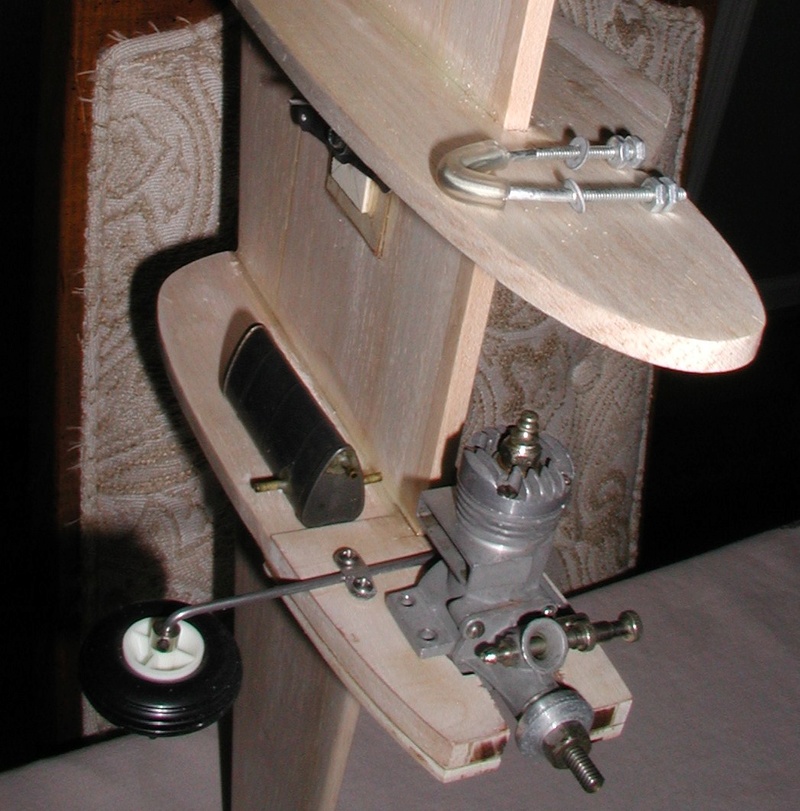
I'm not worried about those nacelles separating from the wing, or this thing coming apart in the air. It is solid as a rock and may fly like one. It is glued, pinned, and fitted together as well as any I have ever built, and I have never had even an elevator or rudder come off in flight. Hitting the ground is another story.
And Rusty, thanks for that link. I have an account with Omni and they also have that spinner in a 1 1/2" size that I think will work nicely on those .09's.
Bob
Forgetting all about fuel foaming, my plan was to hard mount the tanks under the wing using epoxy and backed up with a balsa bulkhead at the rear of the tank and reinforced with steel wire ties through the nacelle and around the tank. To be blunt...I hate rubber bands righteous or not. I'm all about appearance, unusual for a butt ugly guy like me.
But you have me thinking. Maybe the backed up bulkhead made by tracing the end of the fuel tank with some of your foam and wire ties might work. Or..........I could use this V clamp that came with the tanks.


I'm not worried about those nacelles separating from the wing, or this thing coming apart in the air. It is solid as a rock and may fly like one. It is glued, pinned, and fitted together as well as any I have ever built, and I have never had even an elevator or rudder come off in flight. Hitting the ground is another story.
And Rusty, thanks for that link. I have an account with Omni and they also have that spinner in a 1 1/2" size that I think will work nicely on those .09's.
Bob

rsv1cox- Top Poster


Posts : 11250
Join date : 2014-08-18
Location : West Virginia
 Re: BH models Mosquito build
This may drive everybody nuts, but I have decided to keep my under wing fuel tank mount but not epoxy the tank to the fuselage. Instead I'm using wire ties, and wait for it.... oh no...double sided foam tape between the tank and the fuselage stuck to the tank but not the fuselage. Actually the fuel pick-up is pretty much aligned with the NVA and the fuel line will be quite short.
I will solder the wires bitter ends and bend over making for a neat and hopefully secure installation. Maybe dot solder wire and tank mid-way. Right now they are as tight as a drum. I backed up the other side with bamboo skewers cut to length. I may strip it all down and paint, or paint as is.


I will solder the wires bitter ends and bend over making for a neat and hopefully secure installation. Maybe dot solder wire and tank mid-way. Right now they are as tight as a drum. I backed up the other side with bamboo skewers cut to length. I may strip it all down and paint, or paint as is.


rsv1cox- Top Poster


Posts : 11250
Join date : 2014-08-18
Location : West Virginia
 Re: BH models Mosquito build
Bob,
You're plane looks absolutely beautiful!
What size props are you planning on using?
You're plane looks absolutely beautiful!
What size props are you planning on using?
Last edited by 944_Jim on Thu Feb 16, 2017 8:07 pm; edited 1 time in total

944_Jim- Diamond Member


Posts : 2022
Join date : 2017-02-08
Age : 59
Location : NE MS
 Re: BH models Mosquito build
944_Jim wrote:Bob,
You're planning e looks absolutely beautiful!
What size props are you planning on using?
Thanks Jim, Enya calls for 7/3 or 4 for these early 3001 Enya's. The old prop on it now is a 7/? 5 I think. It will be replaced with new wood props before we fly it.
BTW, I only slightly "airfoiled" the wing, rudder, elevator, and horizontal stab. and left the rest of the plane as is. I like the squared off look of the fuselage. I left the "radiator's" leading edge flat too and may paint it black. The rest will be a light backgrounded camoflauge effect with olive drab not to different from the picture on the box.

rsv1cox- Top Poster


Posts : 11250
Join date : 2014-08-18
Location : West Virginia
 Re: BH models Mosquito build
Roddie covered what I forgot to include in my last post about the tank padding and shimming. I always use material from the thin type Koozies or thin mouse pads. As stout as your construction is, I doubt if foaming will be an issue at all. Hopefully, the engine can draw fuel from under the wing. This plane doesn't make it easy at all to mount the tanks.
Rusty
Rusty
_________________
Don't Panic!
...and never Ever think about how good you are at something...
while you're doing it!
My Hot Rock & Blues Playlist
...and never Ever think about how good you are at something...
while you're doing it!
My Hot Rock & Blues Playlist

RknRusty- Rest In Peace

- Posts : 10869
Join date : 2011-08-10
Age : 68
Location : South Carolina, USA
 Re: BH models Mosquito build
The engines should draw fuel fine. The problems occur when the head pressure lowers in the tank. The engine will more than likely begin going lean early on in flight. Setting the engines off very rich can keep this happening but this will take some trial runs. You could also raise the tanks by notching into the wing then build balsa fairings from the nacelles back to the wings above and below. If you don't want to go that route, the pipes inside those tanks are almost never soldered internally. You could raise the pipes higher in the rear of the tank. Do the plans offer a CG ? I have some concerns due to the weight of those engines. I have seen this plane fly with Norvel's on it. Not much wing area so adding a lot of weight can taxi a small wing. Under power things may seem fine but when the power cuts it's coming down fast. Having your doublers stop short of the wing combined with the weight of the engines can cause that forward section to break right at the back of the doublers. It looks real neat and I wish you good success. Ken

Ken Cook- Top Poster

- Posts : 5640
Join date : 2012-03-27
Location : pennsylvania
 Re: BH models Mosquito build
These early 3001's are pretty light when compared with the later Enya .09's even with a glow plug. Less than 3 ounces isn't bad.
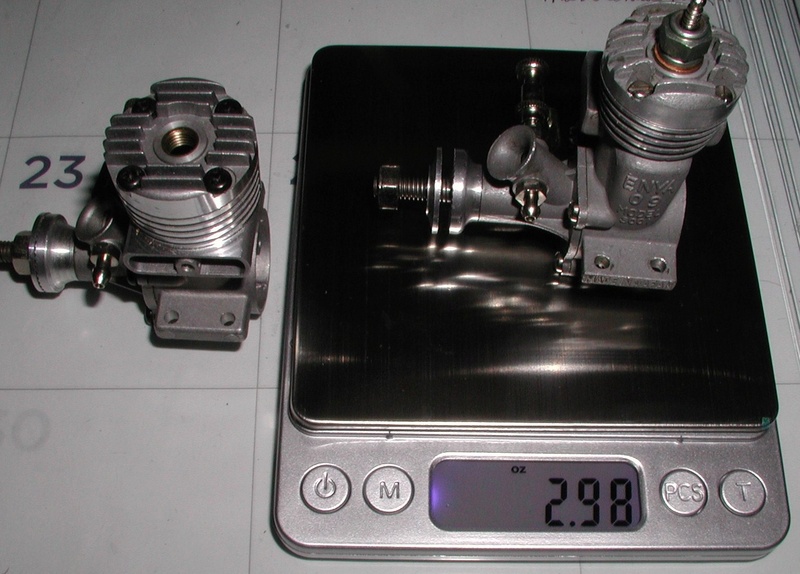

I wanted to snuggle them up under the wing but the lead out lines passing through the nacelle on the left side prevented that.
Thanks for the help. Got a lot of testing to do before we fly it with those engines.
Bob


I wanted to snuggle them up under the wing but the lead out lines passing through the nacelle on the left side prevented that.
Thanks for the help. Got a lot of testing to do before we fly it with those engines.
Bob

rsv1cox- Top Poster


Posts : 11250
Join date : 2014-08-18
Location : West Virginia
 Re: BH models Mosquito build
Bob,
I soldered tabs on the front and back plates of my FW-190 slab mouse racer's tank. I haven't regretted that yet. I will say it locked my tank into one place, no adjusting now!
Where did you get the tanks? All of mine feed out of the front plate.
I really want to see the .09s sling that plane, but thought since we know what Mike Londke's ship flies like with Norvel .061s.
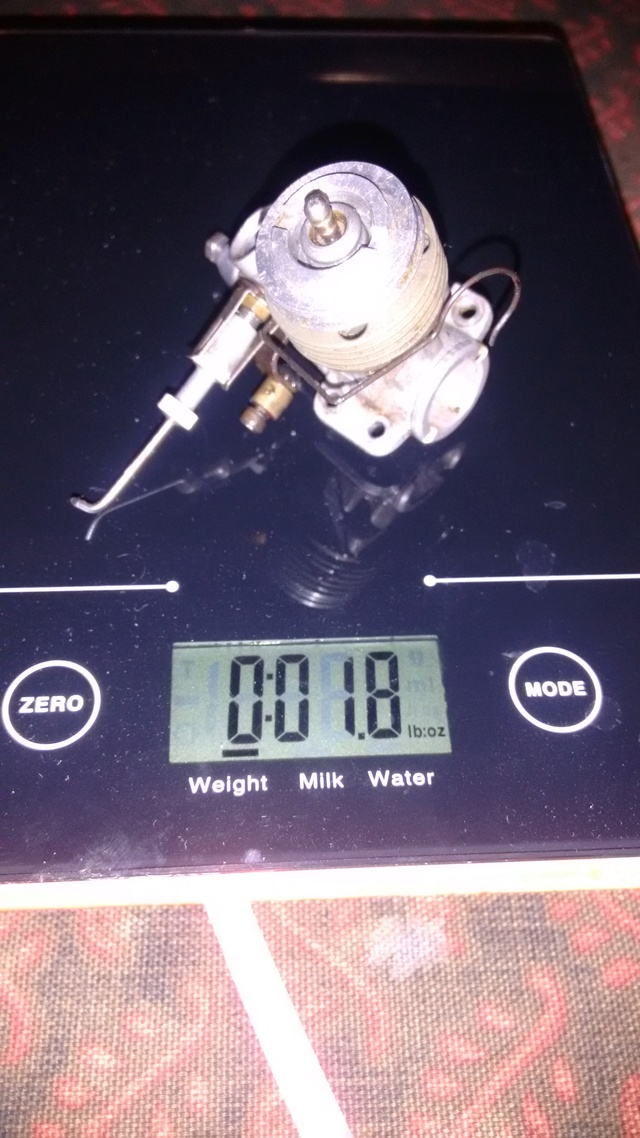
AP Wasp .061 @ 1.9 oz.
Norvel Big Mig .061 R/C (throttled) @ 1.8 oz.
I thought the Norvel was heavier since it looks like a mini Norvel .074, and the AP looks like a hot rodded Tee Dee. Both engines can take a Merlin or Cox .049 head.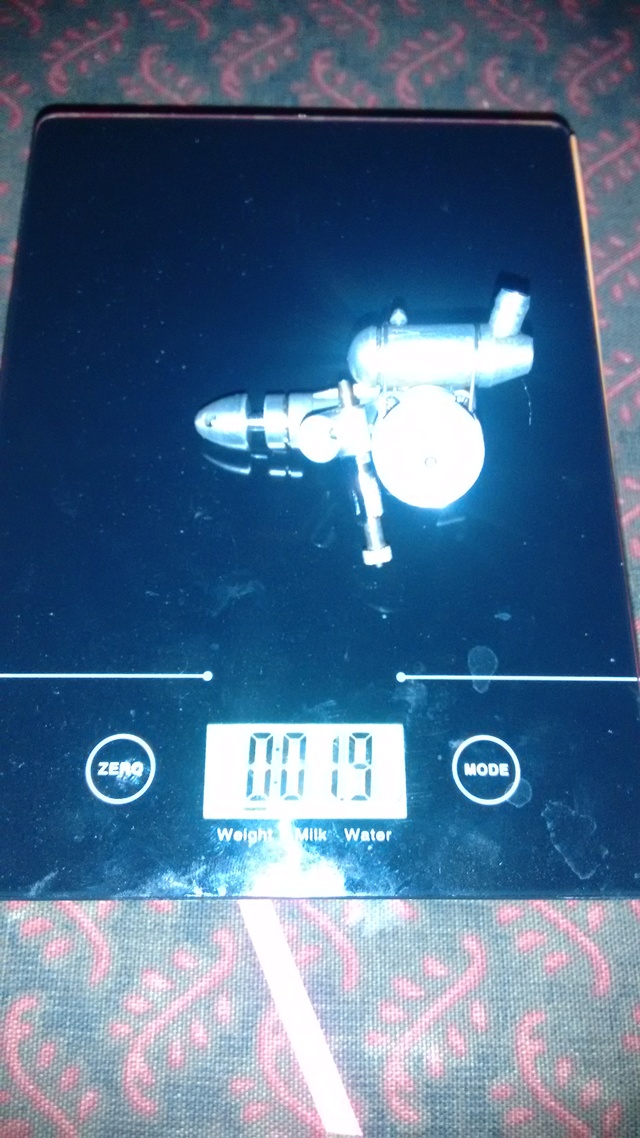


Last edited by 944_Jim on Sat Apr 22, 2017 4:13 pm; edited 1 time in total

944_Jim- Diamond Member


Posts : 2022
Join date : 2017-02-08
Age : 59
Location : NE MS
Page 3 of 4 •  1, 2, 3, 4
 Similar topics
» BHM Mosquito in MS-build
» East Build Models Commando
» Engines for Models by Berkeley Models PDF
» Twin 049 c/l Pics or plans
» Mosquito, finished
» East Build Models Commando
» Engines for Models by Berkeley Models PDF
» Twin 049 c/l Pics or plans
» Mosquito, finished
Page 3 of 4
Permissions in this forum:
You cannot reply to topics in this forum

 Rules
Rules


