Log in
Search
Latest topics
» Tee Dee .020 combat modelby getback Today at 7:14 am
» Free Flight Radio Assist
by getback Today at 7:02 am
» My latest doodle...
by batjac Yesterday at 9:47 pm
» My N-1R build log
by roddie Yesterday at 8:50 pm
» Purchased the last of any bult engines from Ken Enya
by getback Yesterday at 12:05 pm
» Funny what you find when you go looking
by rsv1cox Wed Nov 20, 2024 3:21 pm
» Landing-gear tips
by 1975 control line guy Wed Nov 20, 2024 8:17 am
» Cox NaBOO - Just in time for Halloween
by rsv1cox Tue Nov 19, 2024 6:35 pm
» Canada Post strike - We are still shipping :)
by Cox International Tue Nov 19, 2024 12:01 pm
» Duende V model from RC Model magazine 1983.
by getback Tue Nov 19, 2024 6:08 am
» My current avatar photo
by roddie Mon Nov 18, 2024 9:05 pm
» Brushless motors?
by rsv1cox Sun Nov 17, 2024 6:40 pm
Cox Engine of The Month
The RMH Bipe build thread
Page 3 of 4
Page 3 of 4 •  1, 2, 3, 4
 Re: The RMH Bipe build thread
I thought I might just add an inch wide piece of 1/16" ply along the underside of the top wing joint. I agree Bob, the fuselage should provide plenty of support for the lower wing joint. I too am a little concerned about how rigid the centre struts will be, so I'll work on that as I go.
Roger, you mention "titebond". That's not a product I'm familiar with. Is it just an epoxy glue? Here in Australia we have good old Selley's Areldite epoxy. Been around for ever. I used "Super Strength" on the wing joints rather than 5 minute. 24 hour cure.
No offense to Roger's artistic ability, but I think I may leave off the flames & just cut some plain thin ply doublers. They may look a little too racey. Also, as great as it is, the machine gun won't go on this model, but I have an old Neuport 17 I hope to rebuild some time and the gun will be perfect.
I had a similar theme in mind to Bob- I was even thinking yellow as I have some bright yellow auto spray paint (acrylic lacquer). I was thinking more along the lines of the markings of the original Sterling model on the plans. I'll round off the edges first and give all parts a couple of coats on dope before assembly, although I'm not sure if that may weaken the glue joints due to the glue not being able to soak in so much. Any thoughts?
Rod.

Oldenginerod- Top Poster

- Posts : 4018
Join date : 2012-06-15
Age : 62
Location : Drouin, Victoria
 Re: The RMH Bipe build thread
http://www.titebond.com/index.aspx white /yellow wood glue (much better than Elmer's ) looks like your lowes store should have it , it sands nice and easy not as strong as epoxy but epoxy don't sand well either . Bob is the one who has been sealing and painting his models before glueing together , I have never done this before and am up in the air about it / but since I cant paint after glueing I guess that is what I will do also . Picked up some primer I didn't have yesterday , Bob what sanding sealer did you use was it dope ? Sorry but if it could break is what it has been around here lately , need to fix my dryer to day  was thinking of flying but remembered that there's still a tree down from the storm the other week
  across my fly field ! Eric

getback- Top Poster


Posts : 10441
Join date : 2013-01-18
Age : 67
Location : julian , NC
 Re: The RMH Bipe build thread
Eric beat me to it. Titebond is a yellow carpenters glue. It's what I mostly use. I use epoxy for mounting firewalls and on the bipe, the struts as well.
I have not gone the ca route yet as I'm not real familiar with it. I like the setup time when using Titebond and pin everything together.
I can see me ending up with chunks of balsa glued to my fingers
Btw. If anyone sees something that should bee different or improved ( like the center struts), please let me know and I will incorporate it into the next ones I cut.
I have not gone the ca route yet as I'm not real familiar with it. I like the setup time when using Titebond and pin everything together.
I can see me ending up with chunks of balsa glued to my fingers

Btw. If anyone sees something that should bee different or improved ( like the center struts), please let me know and I will incorporate it into the next ones I cut.

rogermharris- Platinum Member

- Posts : 503
Join date : 2015-03-17
Age : 61
Location : Long Branch, New Jersey
 Re: The RMH Bipe build thread
Rod, yes and as Eric posted a link. Titebond is good stuff, I hadn't thought of it for my models but will keep it in mind. It's a slow cure allowing time for adjustments and there is no mixing. My SOP is to tack with CA then epoxy.
Good idea about making it more of a Stearman PT-17 look-alike from the beginning. The idea just crept up on me during the build. Had I thought I would have used "N" style outer struts and two on each side inner struts for a total of four, I am alittle concerned about my top wing going bye-bye in flight. I used the rear cockpit as a guide for the front cockpit, I just traced it then applied the trace for the forward cockpit. I allowed the width of the supplied struts between the two, but there is lee-way there.
Eric...I used Aero-gloss sanding sealer. I did not sand the wing prior, just applied the sealer to raw wood. I about ruined my second Neiuport's horz stab by sanding first, got it way to thin.
I'm with ya. My daughters washer went on the fritz last week....took valuable time away from my model building...not really, she's a peach and feeds me well. But I do sympathize. The Pine Bark beatle has gotten into my pine trees and it's killing them downing at least two a year.
Good idea about making it more of a Stearman PT-17 look-alike from the beginning. The idea just crept up on me during the build. Had I thought I would have used "N" style outer struts and two on each side inner struts for a total of four, I am alittle concerned about my top wing going bye-bye in flight. I used the rear cockpit as a guide for the front cockpit, I just traced it then applied the trace for the forward cockpit. I allowed the width of the supplied struts between the two, but there is lee-way there.
Eric...I used Aero-gloss sanding sealer. I did not sand the wing prior, just applied the sealer to raw wood. I about ruined my second Neiuport's horz stab by sanding first, got it way to thin.
I'm with ya. My daughters washer went on the fritz last week....took valuable time away from my model building...not really, she's a peach and feeds me well.

rsv1cox- Top Poster


Posts : 11245
Join date : 2014-08-18
Location : West Virginia
 Re: The RMH Bipe build thread
Thanks Bob , yea this tree pine ft. and half or so across hundred or so ft. long broke 5 ft. off the ground looks rotted but the top is good , well most of it , the tree . still 4-5 pine up rooted from ice storm 1.5 yr. ago but not in the way . Maybe get some coats on then dryer sand more sealer ..... I may even cut that sucker up today ( my field is mowed right now ) 
 Later
Later

 Later
Later 
getback- Top Poster


Posts : 10441
Join date : 2013-01-18
Age : 67
Location : julian , NC
 Re: The RMH Bipe build thread
Great going guys! These bipe-kits are really terrific! I read about concerns for the wing-strut integrity.. and in the case of Rod's export/two-piece top wing; possibly needing a center mending-plate. "Personally".. I wouldn't worry about these areas. Consider the struts/joints as "sacrificial" areas in the event of a mishap. You'll only be adding weight by beefing these areas up.. and if the model "goes-in hard".. you could end up with worse damage to the wing(s).
I think that the center support design for the top wing should be kept "as-is".. I understand why Bob changed his. It does look better on his dual-cockpit/trainer version.
Rog, I use CA almost exclusively now in my builds. Try assembling some joints using it.. and you'll understand why. It's FAST!!! You can build a model much faster than with conventional glues that require clamping and cure-time. When it first became popular (decades ago..) it was called "Hot-Stuff".. and revolutionized the way that balsa models were built. While preparing for glue-up.. it's very important to set-up a small fan beforehand; to create a cross-draft to carry away the vapors. CA-glue "kicks" when the bond occurs.. and if you can smell it, you need to provide more ventilation. You can have an allergic reaction from repeated/excessive inhalation of CA glue vapors. That said; it's relatively safe. You basically start with a tight well-fitting joint.. apply the CA and hold the pieces together for a few seconds while the bond takes place. I use wax-paper under my work (or over a plan) which doesn't generally stick to the work. If it does stick.. it can be easily sanded-off afterward. I use the cheapest CA glues I can find.. and I've never had any joint failures. I buy the .11oz. tube 4-packs for a buck. Combined with 5-minute epoxy for your load-bearing/fuel resistant joints.. you'll have a model built very quickly.
 Re: The RMH Bipe build thread
Sorry  I said that I wouldn't bore you with more Bipe pictures, but allow me a couple more to illustrate a point and to attach the last two (very important) characters in this build.
First, I haven't mentioned it as much as I would have liked to but the CG of this model had me in a panic. With my fingers well ahead of the optimum CG and at the extreme front of the wing picking it up the nose took a 90 pointing almost straight down. What have I done wrong I thought. But it has to be that 8cc tanked Black Widow with the red spinner and attachment hanging out front. But then, I believe that Roger has an 8cc tanked engine on his Bipe. ?
So being in the middle of a major Cox engine inventory (another thread) and overhaul procedure I made up an engine from scratch and mounted it on the Bipe. And like magic, an almost perfect CG balance.

I just thought I would mention it so all of you Bipe builders could make informed decisions regarding your engine selection.
The other thing.. I added the pilot then with trembling fingers put "Spike" my Dachshund in the front seat. I had to sit him up because his eyesight is so poor. (He's almost totally blind.)

I decided to leave them natural.
X2 on roddies CA analysis. The cheap stuff works as well as the more expensive, I buy the Walmart four packs. Watch your fingers, this stuff glues skin like there is no tomorrow. It wicks into the joint. Use as little as possible and it sets up right now, the more you use, the longer the cure. You can almost control the cure time, but it's never more than about 30 seconds.
BTW - that made up engine is a runner. I had a very dirty engine minus a cylinder and added an easy start slit cylinder and other parts from a QZ. The mylar reed was dusty and cloudly but cleaned up well. Filled the tank with some Cox 25% nitro and she just took off. But it only like about 1 1/2 turns on the needle.
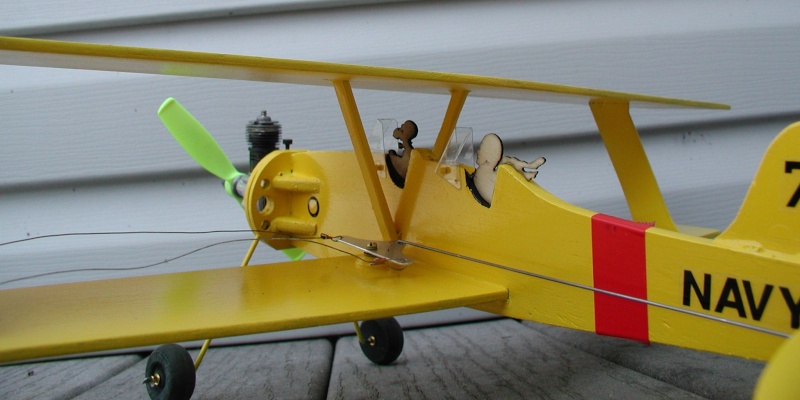
First, I haven't mentioned it as much as I would have liked to but the CG of this model had me in a panic. With my fingers well ahead of the optimum CG and at the extreme front of the wing picking it up the nose took a 90 pointing almost straight down. What have I done wrong I thought. But it has to be that 8cc tanked Black Widow with the red spinner and attachment hanging out front. But then, I believe that Roger has an 8cc tanked engine on his Bipe. ?
So being in the middle of a major Cox engine inventory (another thread) and overhaul procedure I made up an engine from scratch and mounted it on the Bipe. And like magic, an almost perfect CG balance.

I just thought I would mention it so all of you Bipe builders could make informed decisions regarding your engine selection.
The other thing.. I added the pilot then with trembling fingers put "Spike" my Dachshund in the front seat. I had to sit him up because his eyesight is so poor. (He's almost totally blind.)

I decided to leave them natural.
X2 on roddies CA analysis. The cheap stuff works as well as the more expensive, I buy the Walmart four packs. Watch your fingers, this stuff glues skin like there is no tomorrow. It wicks into the joint. Use as little as possible and it sets up right now, the more you use, the longer the cure. You can almost control the cure time, but it's never more than about 30 seconds.
BTW - that made up engine is a runner. I had a very dirty engine minus a cylinder and added an easy start slit cylinder and other parts from a QZ. The mylar reed was dusty and cloudly but cleaned up well. Filled the tank with some Cox 25% nitro and she just took off. But it only like about 1 1/2 turns on the needle.

Last edited by rsv1cox on Wed Jul 29, 2015 6:55 pm; edited 1 time in total

rsv1cox- Top Poster


Posts : 11245
Join date : 2014-08-18
Location : West Virginia
 Re: The RMH Bipe build thread
That's pretty much the engine I'm running Bob. I'm pretty sure it's a slit cylinder as well. I think it's on the tired side so I have been toying with the idea of hopping it up with a BW piston and cylinder and drilling out the intake. I may build another and use an external tank for more run time.
Are you guys using a medium viscosity CA? I will have to give it a try but need to get it in my head that parts need to bee in the correct position prior to gluing since there is pretty much no chance of adjusting the pieces with the almost instant cure time..
Are you guys using a medium viscosity CA? I will have to give it a try but need to get it in my head that parts need to bee in the correct position prior to gluing since there is pretty much no chance of adjusting the pieces with the almost instant cure time..

rogermharris- Platinum Member

- Posts : 503
Join date : 2015-03-17
Age : 61
Location : Long Branch, New Jersey
 Re: The RMH Bipe build thread
Roger when you get your CA bee sure and pick up some Debonder http://www.hobbylinc.com/ca-super-glue-debonder The great planes works fine for the price , I personally don't think all CA's are the same I have never tried super glues for balsa but would think it bee the same . Thin and Med. would bee all you will need I would think , Thin for strengthen and med for building > I have used Bob Smiths glues and they don't seem consistent with working and great planes I don't like , ZAP is what I have been using for some years now and it gets the job done ever time for me , there is also kicker to cure even faster and will make the wood smoke sometimes boil up (and this stuff don't sand ) grind yea .So you need to chose and pick what to use where , don't let your son use this stuff yet skin bonder it is best at  Eric
Eric 
 Eric
Eric 
getback- Top Poster


Posts : 10441
Join date : 2013-01-18
Age : 67
Location : julian , NC
 Re: The RMH Bipe build thread
Just to let U know I am not at a complete Ideal .... sanded 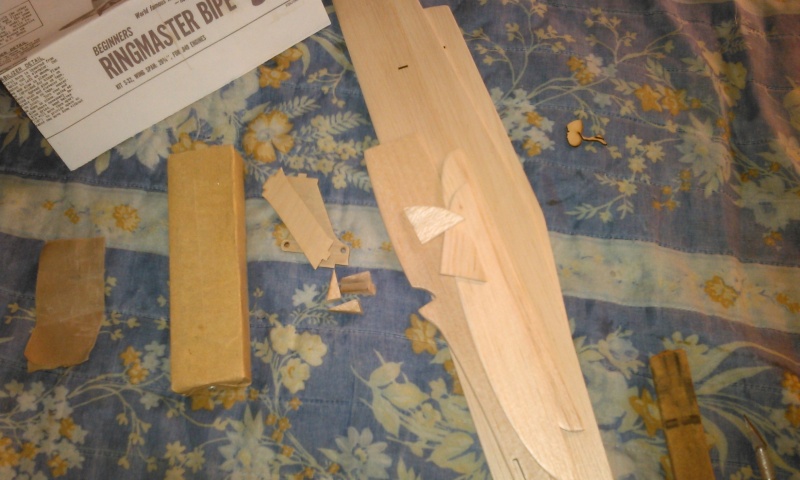 1ST. sanding primer
 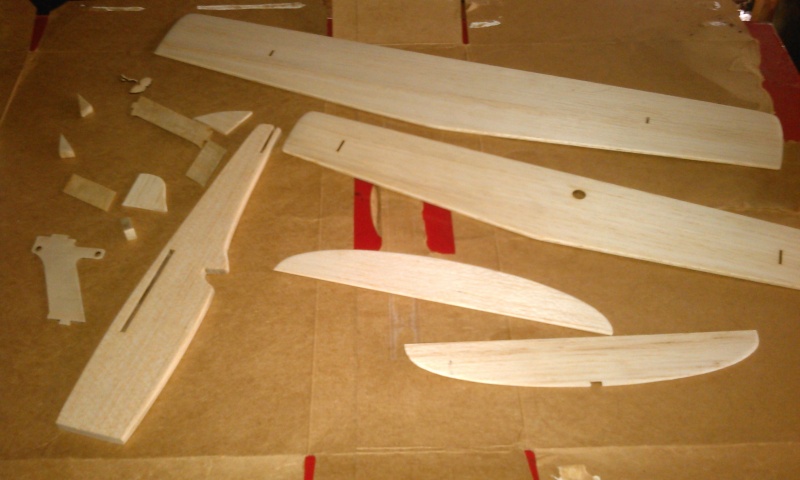 2nd. not shown
 1ST. sanding primer
  2nd. not shown

getback- Top Poster


Posts : 10441
Join date : 2013-01-18
Age : 67
Location : julian , NC
 Re: The RMH Bipe build thread
U know I like colors , and have this problem staying with just 2 ... Here is were I am at now  Thanks for the stincle Roger I can use it a few times now
  now the wing is a difft. story
 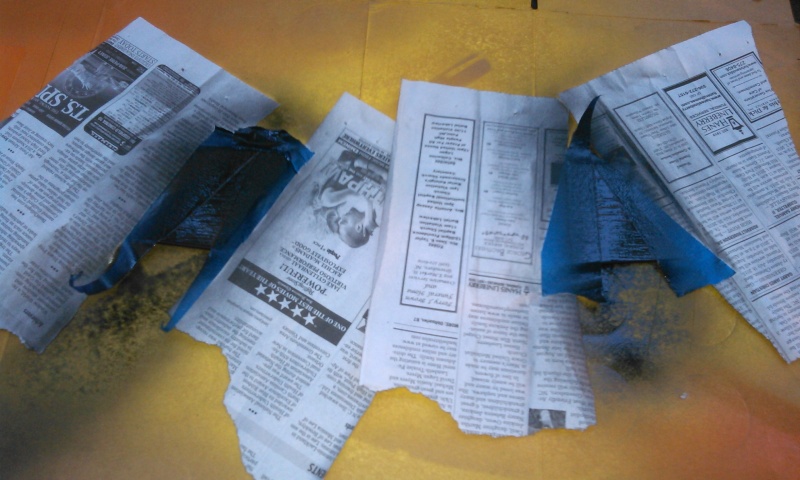 wish I would have measured it before painting
 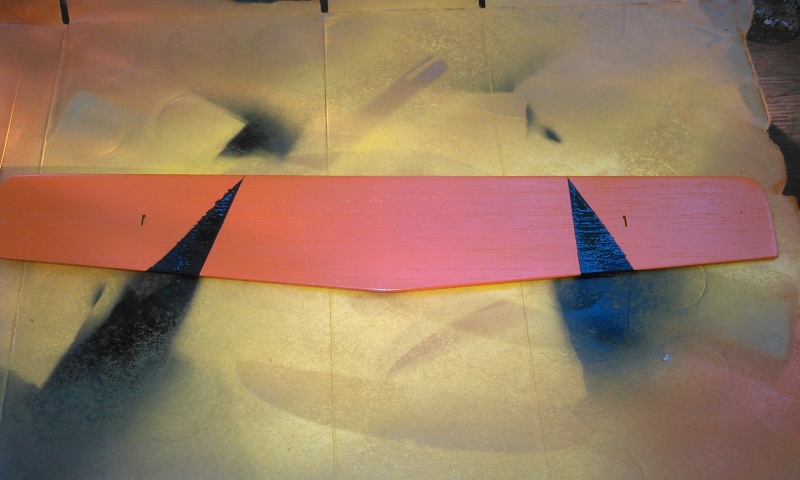 Maybee I will fix it !?!?
  Eric
Eric 
 Thanks for the stincle Roger I can use it a few times now
  now the wing is a difft. story
  wish I would have measured it before painting
  Maybee I will fix it !?!?
  Eric
Eric 
getback- Top Poster


Posts : 10441
Join date : 2013-01-18
Age : 67
Location : julian , NC
 Re: The RMH Bipe build thread
Bump this up a bit to keep you Bipe builders on your toes.  Anything happening out there in Bipe ville?
I finally got the black Babe Bee tank from Cox Int. and installed it on my Black Widow. Still have the original runner as a spare. When I get up the courage I will fly it.
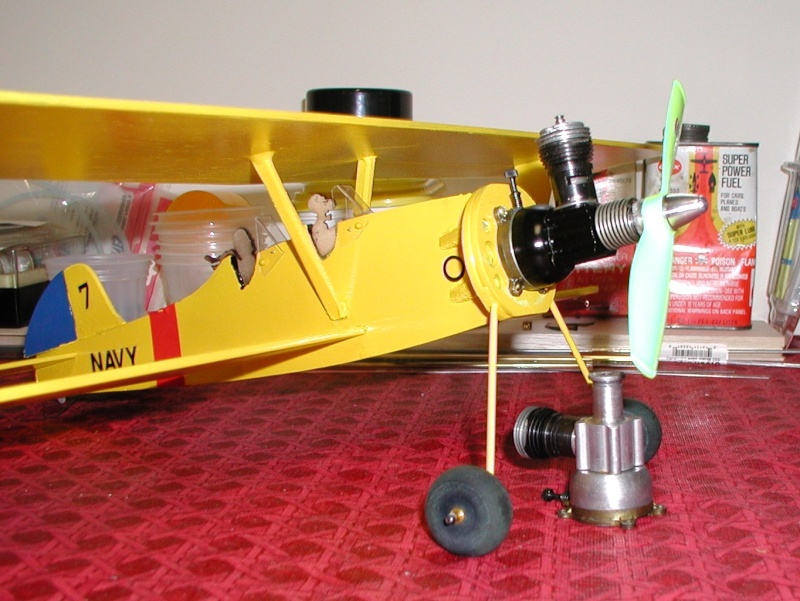
Bob
I finally got the black Babe Bee tank from Cox Int. and installed it on my Black Widow. Still have the original runner as a spare. When I get up the courage I will fly it.

Bob

rsv1cox- Top Poster


Posts : 11245
Join date : 2014-08-18
Location : West Virginia
 Re: The RMH Bipe build thread
Bob. That appears to be an unvented tank on an unvented backplate, or am I seeing it wrong?rsv1cox wrote:Bump this up a bit to keep you Bipe builders on your toes.Anything happening out there in Bipe ville?
I finally got the black Babe Bee tank from Cox Int. and installed it on my Black Widow. Still have the original runner as a spare. When I get up the courage I will fly it.
Bob
Rod.

Oldenginerod- Top Poster

- Posts : 4018
Join date : 2012-06-15
Age : 62
Location : Drouin, Victoria
 Re: The RMH Bipe build thread
Fixed it in a hurry.


rsv1cox- Top Poster


Posts : 11245
Join date : 2014-08-18
Location : West Virginia
 Re: The RMH Bipe build thread
Damn this is FUN !! Maybe its pre fueled Rod  , I have done that on a engine build before just looked at it looked at self and laughed . Eric ( like that tank )
 , I have done that on a engine build before just looked at it looked at self and laughed . Eric ( like that tank )
getback- Top Poster


Posts : 10441
Join date : 2013-01-18
Age : 67
Location : julian , NC
 Gotta get busy to make the flyathon in time
I started about a week ago and I suck at build thread and photo documentation* so this is just so folks know I really built one to log some RM flyathon flights
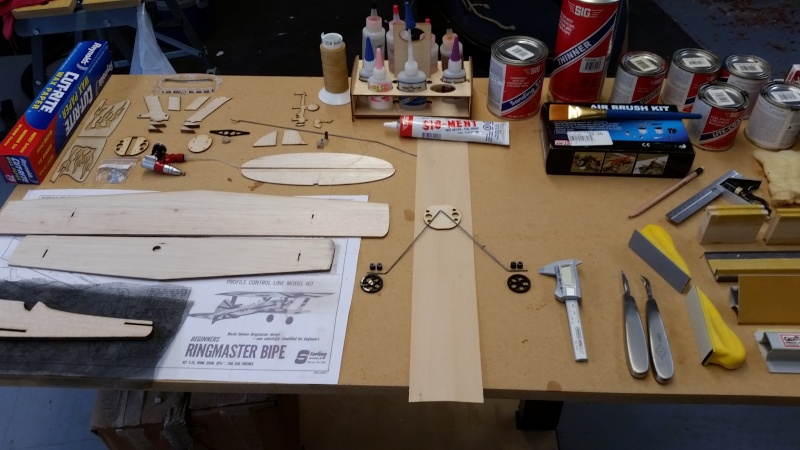
Very thin CF veil for fuselage sides
Center under LG and firewall is 1/64th Ply for reinforcing on rudder and Stab/Elev
Kevlar hinge thread was replace by carbon rod and tube

No rudder offset. I use the 1/64th and taper sand to blend and make thinner

I was going to sew hinges but remembered I got this rod and tube for a few 1/2A combat birds and thought what the hell
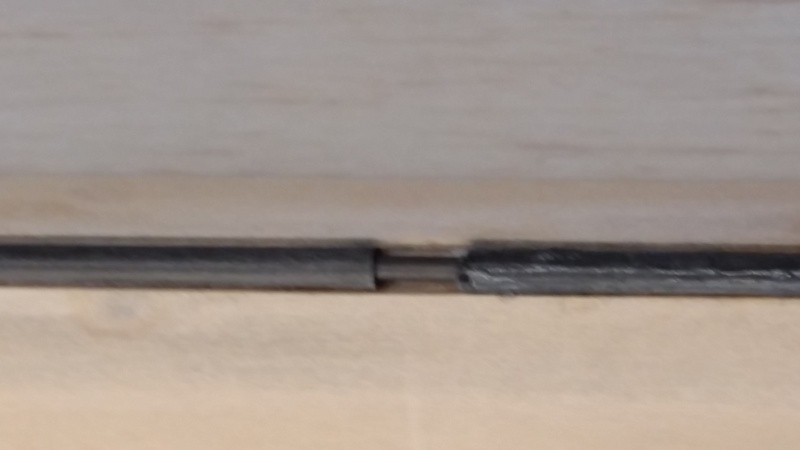
If you try this method, you must have some tube on stab and some on elevator, I used 4 2" pieces of tube
I install all at once with rod installed to keep alignment...You must use medium or thick CA to tack in place....thin CA wicks too fast and locks everything together (CA de-bonder to the rescue!)
All Balsa got sanded 220, 320, 400, round LE taper TE and two coats of Sig sanding sealer
If this works it should be my first ever Balsa plane with NO grain pattern in the paint
Probably all Dope Black, Red tail, red trim and flames
I also plan to use .037 carbon rod X fore and aft and X in and out (sort of like wire rope stringers) for top wing support of the center instead of the included Ply braces
My guess is, no matter what method, a crash means the big top wing breaks loose. This is just an experiment and for looks
* I still have no clue how to set my Galaxy S5 so the camera will focus on what I want it to

Very thin CF veil for fuselage sides
Center under LG and firewall is 1/64th Ply for reinforcing on rudder and Stab/Elev
Kevlar hinge thread was replace by carbon rod and tube

No rudder offset. I use the 1/64th and taper sand to blend and make thinner

I was going to sew hinges but remembered I got this rod and tube for a few 1/2A combat birds and thought what the hell

If you try this method, you must have some tube on stab and some on elevator, I used 4 2" pieces of tube
I install all at once with rod installed to keep alignment...You must use medium or thick CA to tack in place....thin CA wicks too fast and locks everything together (CA de-bonder to the rescue!)
All Balsa got sanded 220, 320, 400, round LE taper TE and two coats of Sig sanding sealer
If this works it should be my first ever Balsa plane with NO grain pattern in the paint
Probably all Dope Black, Red tail, red trim and flames
I also plan to use .037 carbon rod X fore and aft and X in and out (sort of like wire rope stringers) for top wing support of the center instead of the included Ply braces
My guess is, no matter what method, a crash means the big top wing breaks loose. This is just an experiment and for looks
* I still have no clue how to set my Galaxy S5 so the camera will focus on what I want it to

fredvon4- Top Poster


Posts : 4012
Join date : 2011-08-26
Age : 69
Location : Lampasas Texas
 Re: The RMH Bipe build thread
Fred, I like your elevator hinge idea and color scheme. Also the carbon rod struts. I'm eager to see the finished product.
Bob
Bob

rsv1cox- Top Poster


Posts : 11245
Join date : 2014-08-18
Location : West Virginia
 Re: The RMH Bipe build thread
Looking Good Fred , why the carbon fiber ? I like the tube /rod set up for the elev./stab , I see a .051 and bladder in the pic there Hold On to your Britches ! I need to get back on mine sew up some hinges and figure what engine mount I will use  getback
 getback
getback- Top Poster


Posts : 10441
Join date : 2013-01-18
Age : 67
Location : julian , NC
 Re: The RMH Bipe build thread
Getback asked "why the carbon fiber?"
On many of my combat planes the carbon veil put down with thinned white glue makes some structures much stronger with very little weight penalty. I use it in a lot of places we traditionally used tissue or lite glass fabric.
In this case the fuselage got it on both sides and tucked inside the wing and stab slots, likely breakage points in a crash. The stuff is extremely strong in tension (little compression value) and is a lot lighter than if I skinned the fuse in lite 1/64 ply or cross grain balsa
If you are asking about the carbon rod for the center wing bracing, it is mostly an experiment to see if I can simulate wire rope tension cables like on a real bi-plane. I got 2 3 foot long .037 rods by mistake on a rod and tube order and this looks like about the only place I can use some of it up.
I have been using tube and pin/rod hinges for combat planes so long now it is simply the fastest and easiest method to create a friction free and fairly good looking hinge

Next to the Cox Medallion is one of Texas Timers screw in the crank case radial mounts. All my TD and Medallions I collected were .051s. I only found a few .051 Cyl/Piston sets, mostly used ones. Later I got a bunch of Bernie's TD .049 assys and fount that they are just as powerful as the .051 setup. So I set aside the .051s for the future when I am less likely to have to dig a engine out of the dirt.
I plan to feed this with a red cap low pressure fuel system in a open backed aluminum cigar tube on the lower wing
On many of my combat planes the carbon veil put down with thinned white glue makes some structures much stronger with very little weight penalty. I use it in a lot of places we traditionally used tissue or lite glass fabric.
In this case the fuselage got it on both sides and tucked inside the wing and stab slots, likely breakage points in a crash. The stuff is extremely strong in tension (little compression value) and is a lot lighter than if I skinned the fuse in lite 1/64 ply or cross grain balsa
If you are asking about the carbon rod for the center wing bracing, it is mostly an experiment to see if I can simulate wire rope tension cables like on a real bi-plane. I got 2 3 foot long .037 rods by mistake on a rod and tube order and this looks like about the only place I can use some of it up.
I have been using tube and pin/rod hinges for combat planes so long now it is simply the fastest and easiest method to create a friction free and fairly good looking hinge

Next to the Cox Medallion is one of Texas Timers screw in the crank case radial mounts. All my TD and Medallions I collected were .051s. I only found a few .051 Cyl/Piston sets, mostly used ones. Later I got a bunch of Bernie's TD .049 assys and fount that they are just as powerful as the .051 setup. So I set aside the .051s for the future when I am less likely to have to dig a engine out of the dirt.
I plan to feed this with a red cap low pressure fuel system in a open backed aluminum cigar tube on the lower wing

fredvon4- Top Poster


Posts : 4012
Join date : 2011-08-26
Age : 69
Location : Lampasas Texas
 Some progress
Unless it is way too tail heavy this is the engine planed with red cap fuel delivery to a stock NVA,,,
I have ran it a few times with the red cap and the lower pressure is letting me needle just fine

Side view

Around the shop ...Braapppp, Braaaapppp

Strut out of .037 carbon rod detail..... fore and aft still a little movement but side to side is tight

Came in at 4.0 Oz with out engine...OK I hope. Should be about 6 Oz all up weight

Planning a maiden flight this week and flights by son and myself for RM Fly-A Thon this coming weekend 3&4 Oct
I have ran it a few times with the red cap and the lower pressure is letting me needle just fine

Side view

Around the shop ...Braapppp, Braaaapppp

Strut out of .037 carbon rod detail..... fore and aft still a little movement but side to side is tight

Came in at 4.0 Oz with out engine...OK I hope. Should be about 6 Oz all up weight

Planning a maiden flight this week and flights by son and myself for RM Fly-A Thon this coming weekend 3&4 Oct

fredvon4- Top Poster


Posts : 4012
Join date : 2011-08-26
Age : 69
Location : Lampasas Texas
 so much for my dope finish skills
Above I said :All Balsa got sanded 220, 320, 400, round LE taper TE and two coats of Sig sanding sealer
If this works it should be my first ever Balsa plane with NO grain pattern in the paint"
Well it is OK from a distance but up close I have a LOT of training to do..still a bunch of wood grain and sanding scratches showing
If this works it should be my first ever Balsa plane with NO grain pattern in the paint"
Well it is OK from a distance but up close I have a LOT of training to do..still a bunch of wood grain and sanding scratches showing

fredvon4- Top Poster


Posts : 4012
Join date : 2011-08-26
Age : 69
Location : Lampasas Texas
 Re: The RMH Bipe build thread
Well, the barn-stormer Fred. Love it, right out of the 30's.
Great color scheme and finish. The carbon rods are innovative and look very nice, affords great pilot visibility.
On my Nieuport 28 I strung guy wires between the struts using olive drab left over WW2 parachute thread. I drilled small homes in the struts, secured one end with CA then pulled the other end through and when taunt, CA's that end. I have been thinking about doing the same on my Bipe.
Glad to see this thread active again.
Bob

rsv1cox- Top Poster


Posts : 11245
Join date : 2014-08-18
Location : West Virginia
 beautiful
fredvon4 wrote:Unless it is way too tail heavy this is the engine planed with red cap fuel delivery to a stock NVA,,,
I have ran it a few times with the red cap and the lower pressure is letting me needle just fine
Side view
Around the shop ...Braapppp, Braaaapppp
Strut out of .037 carbon rod detail..... fore and aft still a little movement but side to side is tight
Came in at 4.0 Oz with out engine...OK I hope. Should be about 6 Oz all up weight
Planning a maiden flight this week and flights by son and myself for RM Fly-A Thon this coming weekend 3&4 Oct
Beautiful biplane. You really put a lot of work into the details. +1. I'm doing good if the plane gets fuel proofed and paint any color at all.
p.s. where did your avatar come from? When I was in the USAF some of the F-105's and F4's were called Wild Weasel because of our extra ECM gear on them. I got to sit in one when I went to ECM school in Okinawa. I also got to see, hear and feel the Blackbird, SR-71, take off in the distance of course. It was very hush, hush in the late 1960's. Very noisy, fast, beautiful plane.
p.s.p.s. how does the Medallion do with a triprop?
Happydad

happydad- Rest In Peace

- Posts : 1592
Join date : 2012-05-28
Age : 79
Location : Escondido, CA
 Wild Weasel
HappyDad
As a child I was Army dependent and one tour of my father's was to Taichung Taiwan (Formosa) where we co-existed on a housing compound with AF folks. They were mostly from the 50Th Red Devil Squadron F104s.... One Pilot/Crew was posted there from some other squadron and had the ECM variant (Anti SAM) F4 with a Wild Weasel logo I think like this

Of interest:

My avatar was taken from a model engine and airplane link that I have long forgotten where and I photo shopped out the rest of the image. When I first saw the logo, I was reminded of the time on Taiwan and my first military Jet ride in an F-104 trainer flown by my boy scout troop leader Col Dick Sierka and seeing the Phantom blow much black smoke on take off while we waited our turn on the run way.
I was 12 years old but large(Tall) for my age so they found a flight suit and helmet that fit me. Later, at a scout meeting the F4 pilot told us how he and the F-104s would ingress across the border and he would spoof Sam sites with his special ECM so the F-104s could do their thing unmolested. Funny, thinking back on that, because while he did not say how the ECM did it's thing, he did not seem to be concerned with Op Sec talking to children and parents about what they did and how from Taiwan to Viet-Nam
I had similar experiences when the USS Coral Sea or USS Enterprise came to Taiwan for fuel and ammo reload. Our scout troop got to tour each of them at Kaoshung (sp?) harbor a little south of us. We got similar "briefings" about their South China Sea mission..
Being an Army brat overseas in the late 50s, 60s, and early 70s was interesting a great learning experience culturally and militarily.
Medallion and three blade prop (5D 3P) will get tried but I suspect I will fly it with the Bernie's Yellow two blade(5D 3P) cut down a tad 4.75" as they turn up the rpm better.
That said I have flown several 1/2a planes with the three blade on the nose (I had quite a few of them) and they pulled the planes like Sig skyray or JR Satan just fine on the nose of a Reed, TD, or Medallion .049.... The Three blade looks better on some models I think
As a child I was Army dependent and one tour of my father's was to Taichung Taiwan (Formosa) where we co-existed on a housing compound with AF folks. They were mostly from the 50Th Red Devil Squadron F104s.... One Pilot/Crew was posted there from some other squadron and had the ECM variant (Anti SAM) F4 with a Wild Weasel logo I think like this

Of interest:

My avatar was taken from a model engine and airplane link that I have long forgotten where and I photo shopped out the rest of the image. When I first saw the logo, I was reminded of the time on Taiwan and my first military Jet ride in an F-104 trainer flown by my boy scout troop leader Col Dick Sierka and seeing the Phantom blow much black smoke on take off while we waited our turn on the run way.
I was 12 years old but large(Tall) for my age so they found a flight suit and helmet that fit me. Later, at a scout meeting the F4 pilot told us how he and the F-104s would ingress across the border and he would spoof Sam sites with his special ECM so the F-104s could do their thing unmolested. Funny, thinking back on that, because while he did not say how the ECM did it's thing, he did not seem to be concerned with Op Sec talking to children and parents about what they did and how from Taiwan to Viet-Nam
I had similar experiences when the USS Coral Sea or USS Enterprise came to Taiwan for fuel and ammo reload. Our scout troop got to tour each of them at Kaoshung (sp?) harbor a little south of us. We got similar "briefings" about their South China Sea mission..
Being an Army brat overseas in the late 50s, 60s, and early 70s was interesting a great learning experience culturally and militarily.
Medallion and three blade prop (5D 3P) will get tried but I suspect I will fly it with the Bernie's Yellow two blade(5D 3P) cut down a tad 4.75" as they turn up the rpm better.
That said I have flown several 1/2a planes with the three blade on the nose (I had quite a few of them) and they pulled the planes like Sig skyray or JR Satan just fine on the nose of a Reed, TD, or Medallion .049.... The Three blade looks better on some models I think

fredvon4- Top Poster


Posts : 4012
Join date : 2011-08-26
Age : 69
Location : Lampasas Texas
 way cool
fredvon4 wrote:HappyDad
As a child I was Army dependent and one tour of my father's was to Taichung Taiwan (Formosa) where we co-existed on a housing compound with AF folks. They were mostly from the 50Th Red Devil Squadron F104s.... One Pilot/Crew was posted there from some other squadron and had the ECM variant (Anti SAM) F4 with a Wild Weasel logo I think like this
Of interest:
My avatar was taken from a model engine and airplane link that I have long forgotten where and I photo shopped out the rest of the image. When I first saw the logo, I was reminded of the time on Taiwan and my first military Jet ride in an F-104 trainer flown by my boy scout troop leader Col Dick Sierka and seeing the Phantom blow much black smoke on take off while we waited our turn on the run way.
I was 12 years old but large(Tall) for my age so they found a flight suit and helmet that fit me. Later, at a scout meeting the F4 pilot told us how he and the F-104s would ingress across the border and he would spoof Sam sites with his special ECM so the F-104s could do their thing unmolested. Funny, thinking back on that, because while he did not say how the ECM did it's thing, he did not seem to be concerned with Op Sec talking to children and parents about what they did and how from Taiwan to Viet-Nam
I had similar experiences when the USS Coral Sea or USS Enterprise came to Taiwan for fuel and ammo reload. Our scout troop got to tour each of them at Kaoshung (sp?) harbor a little south of us. We got similar "briefings" about their South China Sea mission..
Being an Army brat overseas in the late 50s, 60s, and early 70s was interesting a great learning experience culturally and militarily.
Medallion and three blade prop (5D 3P) will get tried but I suspect I will fly it with the Bernie's Yellow two blade(5D 3P) cut down a tad 4.75" as they turn up the rpm better.
That said I have flown several 1/2a planes with the three blade on the nose (I had quite a few of them) and they pulled the planes like Sig skyray or JR Satan just fine on the nose of a Reed, TD, or Medallion .049.... The Three blade looks better on some models I think
Dude, how cool. When I was in Japan I was scheduled for a backseat flight in the F4-D while things were slow. Then the USS Pueblo was captured off South Korea and several of us were reassigned to South Korea, Osan Air Base I think, and the rest is history. While in Japan our EB-57-B,C flew to Taichung, Taiwan to test the Taiwan Air Force, or Self Defence Force, against foreign aircraft infiltration. I think they were flying F102's at the time and didn't have a very good radar or anti-jamming system so we had a good trip. When we went to Hawaii a couple of months later the F102 had a new radar and anti-jamming system and the EB-57's had a bad trip and my partner and I were changing ECM equipment out 2x a day so the ECM pilot would look good, but the new F102 radar was so good the antiquated jamming ECM we were using didn't stand a chance. The ECM officer was furious at us and it wasn't our fault. We were on the phone daily o Japan for help. The EB57 ECM equipment had been checked out before it left Japan and was found in perfect operation. But we were still at fault. When the planes left for Japan the ECM gear was removed and a large fuel tank was put in it's place. The planes flew home and I had to be the classified cargo courier for the cargo back to Japan. STOP, no plane available to go to Japan for 5 days. I had to sit in a waiting area next to a phone waiting for THE phone call to catch a special cargo plane, C119, large enough to carry me and my cargo back to Japan. I'M IN HAWAII.
Well 5 days of torture later I get the call. Off to Japan. I arrive in Japan at midnight at a base 20 miles from Yakota AFB and no one in site AND IT IS SNOWING. I just came from Hawaii, short sleeves, no jacket. I find a driver who will take me to Yakota AFB and off we go. We arrive at Yakota and try to deliver the classified cargo to the flight line where I work and there is no one in site and 6 inchs of snow on the ground. I just came from Hawaii. So I try to find my shop and the duty NCO, non commissioned officer who is supposed to be on duty in the shop at all times. No one there. So I look for the OD, Officer of the Day, the Officer of the entire building who is supposed to be in an office 24 hours a day. No one home. So I call the NCO club and ask for ECM shop duty NCO, no one responds. I have classified cargo I am supposed to transfer responsibility to someone else after my 2000 mile trip in a airplane without altitude compensation. I.m tired sick of the snow and freezing, and no one is here. So I go to my tiny little cubicle in the barracks about 200 yards away. When I wake up I have pneumonia, the flu and everything else, but I report for duty, and I get put on report for not transferring ownership of classified cargo. That was all I could take. I asked the CMSGT, Chief Master Sargent, our superior if I could talk to him in his office. WE talked for about 10 seconds, and he told me to go see the medic and then go home. And he would find out why the NCO and the OD were not on duty last night. He never told me, but I was sick for 2 weeks and missed a trip to the Philippines with the EB57's.
Thanks for your interesting story.
Now that's how to hijack a thread.
happydad


happydad- Rest In Peace

- Posts : 1592
Join date : 2012-05-28
Age : 79
Location : Escondido, CA
Page 3 of 4 •  1, 2, 3, 4
 Similar topics
» SIG Wonder build thread - ASP12 vs COX TD09
» Anyone have plans for the Blink?
» Dragonfly Build Thread
» "Honker" build thread
» Scratch built Sig Staggerwing build thread.. Version 3.0
» Anyone have plans for the Blink?
» Dragonfly Build Thread
» "Honker" build thread
» Scratch built Sig Staggerwing build thread.. Version 3.0
Page 3 of 4
Permissions in this forum:
You cannot reply to topics in this forum

 Rules
Rules


