Log in
Search
Latest topics
» My N-1R build logby roddie Yesterday at 9:29 pm
» Funny what you find when you go looking
by rsv1cox Yesterday at 3:21 pm
» Landing-gear tips
by 1975 control line guy Yesterday at 8:17 am
» Purchased the last of any bult engines from Ken Enya
by sosam117 Yesterday at 7:45 am
» Cox NaBOO - Just in time for Halloween
by rsv1cox Tue Nov 19, 2024 6:35 pm
» Canada Post strike - We are still shipping :)
by Cox International Tue Nov 19, 2024 12:01 pm
» Duende V model from RC Model magazine 1983.
by getback Tue Nov 19, 2024 6:08 am
» My current avatar photo
by roddie Mon Nov 18, 2024 9:05 pm
» My latest doodle...
by TD ABUSER Mon Nov 18, 2024 11:30 am
» Brushless motors?
by rsv1cox Sun Nov 17, 2024 6:40 pm
» Free Flight Radio Assist
by rdw777 Sun Nov 17, 2024 6:03 pm
» Tribute Shoestring build
by amurphy6812 Sun Nov 17, 2024 5:43 pm
Cox Engine of The Month
My First Balloon Tank Attempt
Page 1 of 1
 My First Balloon Tank Attempt
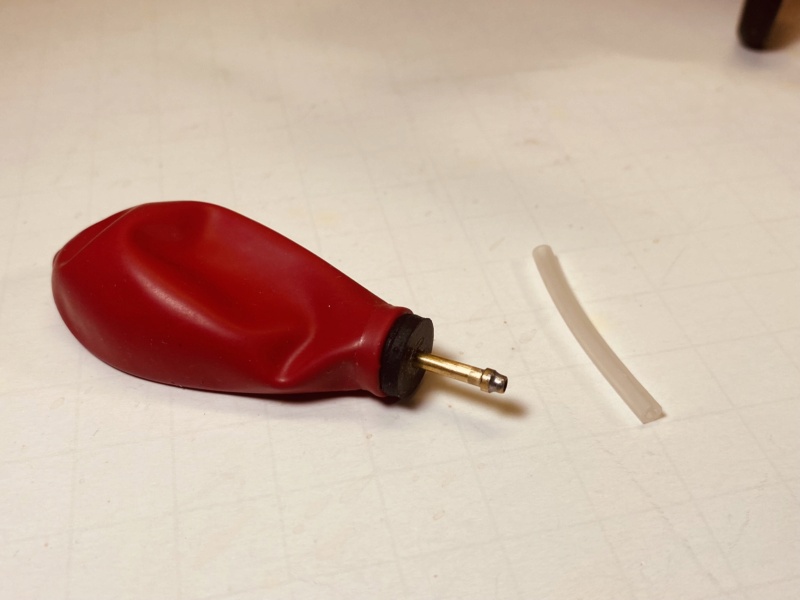
Hi all. So, as I was just relaxing, I thought I would make an attempt and try a balloon tank. So I did it. I took my balloon and cut a piece of 3/32" brass tubing approximately 1" long. I put the tubing into a piece of fuel tubing I had cut to just under the length of the balloon. I then inserted the assembly into the balloon and used a cable tie to secure the pick-up. I had left the fuel tubing a bit longer so as I secured it, I did so where there was the fuel tubing covering the brass tube. Now to only get some fuel and try it out. Anyways here are a couple of pictures. I am still just not sure if I need to secure it somehow, or would it just be fine sitting here as it is?


NEW222- Top Poster

- Posts : 3896
Join date : 2011-08-13
Age : 46
Location : oakbank, mb
 Re: My First Balloon Tank Attempt
Forgot to mention that I will have to measure how much I put in and time it to see how long it goes, as I think I would get real dizzy after a full balloon run. 


NEW222- Top Poster

- Posts : 3896
Join date : 2011-08-13
Age : 46
Location : oakbank, mb
 Re: My First Balloon Tank Attempt
I would secure it.
I use flourescent light tubing sold at Lowes or Home Depot. It's plastic and cuts easily.
Here is a poor picture of what I am talking about, disregard the limp TD. It was an interesting maiden flight.

I use flourescent light tubing sold at Lowes or Home Depot. It's plastic and cuts easily.
Here is a poor picture of what I am talking about, disregard the limp TD. It was an interesting maiden flight.


Cribbs74- Moderator


Posts : 11907
Join date : 2011-10-24
Age : 50
Location : Tuttle, OK
 Re: My First Balloon Tank Attempt
I'll bet it was an interesting flight. Thanks also for the idea and suggestion to secure this thing. I guess a film tank it will be, or maybe a fluorescent light tube as well. Off to go shopping for supplies, or dumpster diving.... 

NEW222- Top Poster

- Posts : 3896
Join date : 2011-08-13
Age : 46
Location : oakbank, mb
 Re: My First Balloon Tank Attempt
Regarding your fluorescent light tubing idea (or film tank, hotel shampoo bottle, etc). Is it just there to keep the fuel delivery device secure? Probably a stupid question, but I just gotta ask.

NEW222- Top Poster

- Posts : 3896
Join date : 2011-08-13
Age : 46
Location : oakbank, mb
 Re: My First Balloon Tank Attempt
Yes,
Just to keep it secure. There are some pretty extreme forces going on in flight and that little brass nipple is not enough to keep the balloon attached.
Just to keep it secure. There are some pretty extreme forces going on in flight and that little brass nipple is not enough to keep the balloon attached.

Cribbs74- Moderator


Posts : 11907
Join date : 2011-10-24
Age : 50
Location : Tuttle, OK
 Re: My First Balloon Tank Attempt
Yea..  you'd get a ten+ minute flight out of that balloon I would think! This is something I've been wanting to try too. I would try to make a fairing/nacelle for the balloon. I wouldn't let it flap in the breeze. I've made some un-tested prototypes using the clear-plastic tubes that single-stem flowers are shipped from the florist in. The balloons I chose, are longer.. as opposed to wider. Search your local "party" supply store.. they have a good selection of sizes/shapes. Keep in mind; you shouldn't need to inflate the balloon.. just fill it. Cut it shorter if you need to reduce the fuel capacity.
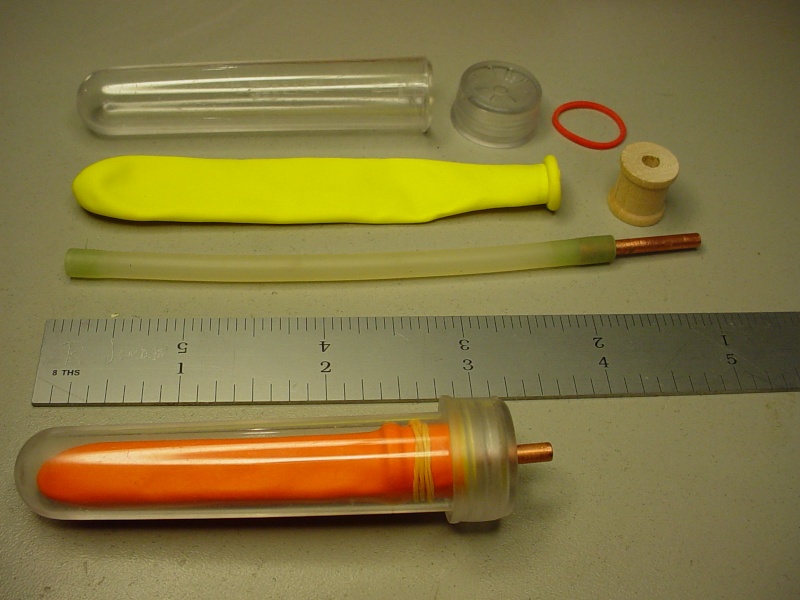
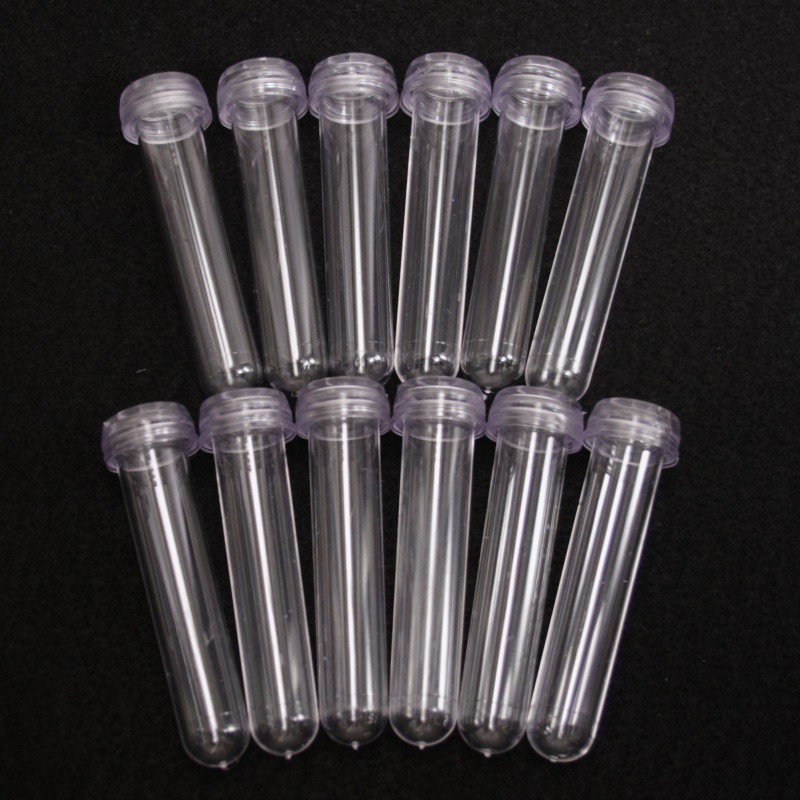
Like I said; my approach is un-tested as of yet.. but the tube affords a rigid/semi-streamlined mount and also protects the balloon. I've read that you need to fill with a syringe.. and suck all the air out of the balloon prior to filling. I would imagine this to be a reliable stunt-tank for a reed-valve engine. My silicone pick-up line is notched thru the wall in a few places. I used a small 1/8" paper hole-punch.. but you accomplish the same by cutting a couple v-notches using a razor knife. The idea is; if the balloon collapses over one fuel inlet.. there's another to provide a feed. Since there's no air in there.. you shouldn't experience an interruption in flow.


Like I said; my approach is un-tested as of yet.. but the tube affords a rigid/semi-streamlined mount and also protects the balloon. I've read that you need to fill with a syringe.. and suck all the air out of the balloon prior to filling. I would imagine this to be a reliable stunt-tank for a reed-valve engine. My silicone pick-up line is notched thru the wall in a few places. I used a small 1/8" paper hole-punch.. but you accomplish the same by cutting a couple v-notches using a razor knife. The idea is; if the balloon collapses over one fuel inlet.. there's another to provide a feed. Since there's no air in there.. you shouldn't experience an interruption in flow.
 Re: My First Balloon Tank Attempt
I agree, it needs to be secured from flopping around. You'd be fighting centrifugal force pulling the fuel away from the engine with it straight out to the side.
Here's one like I've used. This is not adequately secured, but something like Ron and Roddie mentioned work well. You can use silicone line with notches cut in it internally instead of the brass.
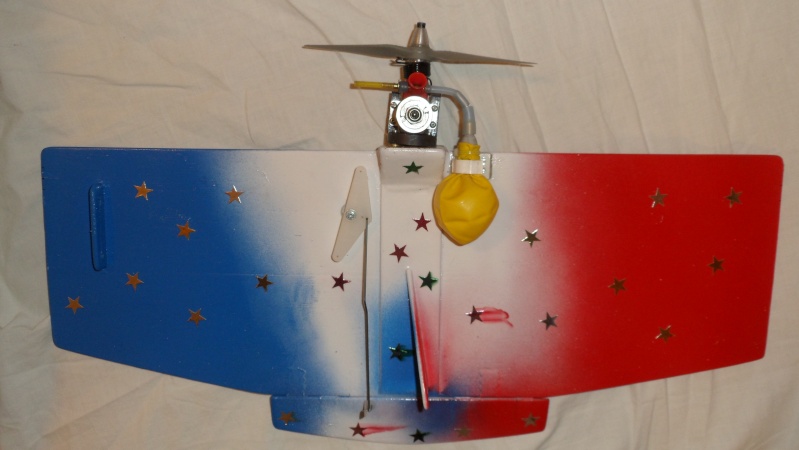
Here's one like I've used. This is not adequately secured, but something like Ron and Roddie mentioned work well. You can use silicone line with notches cut in it internally instead of the brass.


_________________
Don't Panic!
...and never Ever think about how good you are at something...
while you're doing it!
My Hot Rock & Blues Playlist
...and never Ever think about how good you are at something...
while you're doing it!
My Hot Rock & Blues Playlist

RknRusty- Rest In Peace

- Posts : 10869
Join date : 2011-08-10
Age : 68
Location : South Carolina, USA
 Re: My First Balloon Tank Attempt
Again, thanks all for the help, pictures, and advice. I now have a lot to go on. And roddie, yours is very similar to the one I made with the exception of the balloon design.

NEW222- Top Poster

- Posts : 3896
Join date : 2011-08-13
Age : 46
Location : oakbank, mb
 Re: My First Balloon Tank Attempt
Blowing the dust off this thread.... (there's a few balloon tank threads.. ) but I had posted here back 9 years ago. Still; I've yet to to try-out any of my balloon-tanks.  I think I was on the right track though.
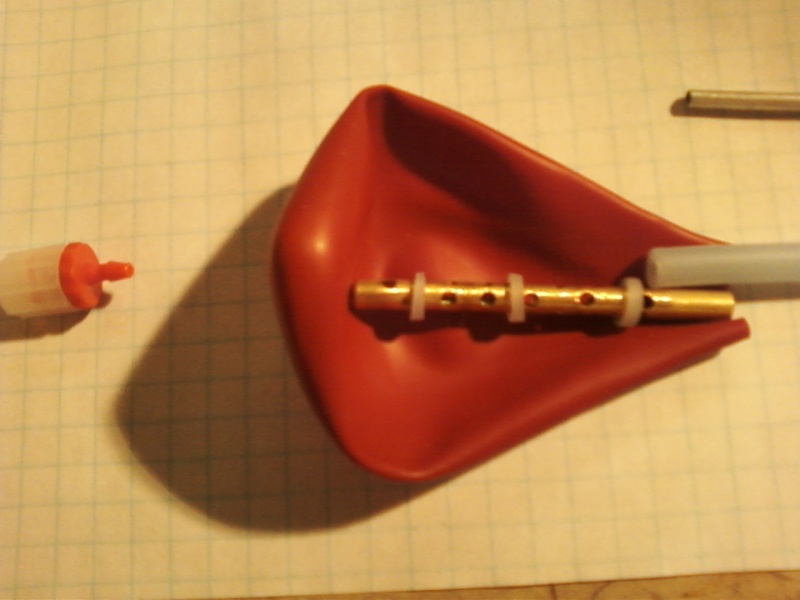
Here's a pair of very small balloon-tank systems that I just put together last night.. that I'm hoping will work-out for the boat (rigger) that I've been working on.


The Tee fittings came from McMaster Carr Co. and the silicone tubing is .062" X .093" which came from Amazon. The "tubular" red balloon has an approx. 7cc. capacity.. and the smaller round red balloon has between 3-4 cc's capacity. I'll try using a "pinch-off" on the line just downstream of the TEE (to the engine..) while evacuating air and subsequent purging with fuel. My rigger engine is equipped with a choke tube which will aid in pulling fuel into the carb.

Here's a pair of very small balloon-tank systems that I just put together last night.. that I'm hoping will work-out for the boat (rigger) that I've been working on.


The Tee fittings came from McMaster Carr Co. and the silicone tubing is .062" X .093" which came from Amazon. The "tubular" red balloon has an approx. 7cc. capacity.. and the smaller round red balloon has between 3-4 cc's capacity. I'll try using a "pinch-off" on the line just downstream of the TEE (to the engine..) while evacuating air and subsequent purging with fuel. My rigger engine is equipped with a choke tube which will aid in pulling fuel into the carb.

 Re: My First Balloon Tank Attempt
Nice Roddie…. When you go thru the testing procedure for boat use let us know how it works out…. I’ve used a single line balloon for CL application and a two line for RC…. Filling and air removal are a little different for each one but both provide steady runs all the way to the end…

rdw777- Diamond Member


Posts : 1712
Join date : 2021-03-11
Location : West Texas
 Re: My First Balloon Tank Attempt
rdw777 wrote:Nice Roddie…. When you go thru the testing procedure for boat use let us know how it works out…. I’ve used a single line balloon for CL application and a two line for RC…. Filling and air removal are a little different for each one but both provide steady runs all the way to the end…
That's what I'm counting on Robert.

 Re: My First Balloon Tank Attempt
I have been using 2-line unpressurised balloon tanks in my small RC planes for many years. One important step for proper fuel feed is to evacuate all air pockets from the balloon after filling. Hold the plane or boat vertical with the fill tube on top while the filler syringe is still attached, and pull on the syringe piston until bubbles stop rising from the balloon. Then press back to the balloon the fuel only .

balogh- Top Poster


Posts : 4958
Join date : 2011-11-06
Age : 66
Location : Budapest Hungary
 Re: My First Balloon Tank Attempt
balogh wrote:I have been using 2-line unpressurised balloon tanks in my small RC planes for many years. One important step for proper fuel feed is to evacuate all air pockets from the balloon after filling. Hold the plane or boat vertical with the fill tube on top while the filler syringe is still attached, and pull on the syringe piston until bubbles stop rising from the balloon. Then press back to the balloon the fuel only .
Hi Andras, Are there any instructional-videos on the web (YouTube)? I'm pretty sure that I understand the concept.. but I know that many people are more "visual" in the way of interpreting certain processes.
 Re: My First Balloon Tank Attempt
Roddie,
I do not have any videos on how to evacuate the balloon tank, but attach below a photo of one of the tanks, having separate filling and supply lines.

This shows the belly of my Quickie100 with the hatch removed ( many moons ago and before tens of hours of fantastic air-time, still crispy and clean with no castor infusion into the balsa...looks different today, unfortunately) . The left side line is the supply line with a filter, and the right side line with the black plug is the filler, and this line ends right after it crosses the "stopper" plug in the neck of the balloon...so the end of the filler line is flush with the top of the balloon storage space, when the plane is held nose-up (like in the photo), thereby all air bubbles will accumulate there in a nose-up position, which can be evacuated through the filler line, when its end is still attached to the filler syringe. Pulling on the syringe piston with the plane in nose-up position will draw the air pocket from the tank top..after the air evacuated - which is clearly visible if a transparent/clear syringe is used - , one can pinch the supply line with your fingers, remove the syringe, and close the line with the black plug.
I trust to have clarified..
I do not have any videos on how to evacuate the balloon tank, but attach below a photo of one of the tanks, having separate filling and supply lines.

This shows the belly of my Quickie100 with the hatch removed ( many moons ago and before tens of hours of fantastic air-time, still crispy and clean with no castor infusion into the balsa...looks different today, unfortunately) . The left side line is the supply line with a filter, and the right side line with the black plug is the filler, and this line ends right after it crosses the "stopper" plug in the neck of the balloon...so the end of the filler line is flush with the top of the balloon storage space, when the plane is held nose-up (like in the photo), thereby all air bubbles will accumulate there in a nose-up position, which can be evacuated through the filler line, when its end is still attached to the filler syringe. Pulling on the syringe piston with the plane in nose-up position will draw the air pocket from the tank top..after the air evacuated - which is clearly visible if a transparent/clear syringe is used - , one can pinch the supply line with your fingers, remove the syringe, and close the line with the black plug.
I trust to have clarified..
Last edited by balogh on Wed Oct 16, 2024 8:32 am; edited 2 times in total

balogh- Top Poster


Posts : 4958
Join date : 2011-11-06
Age : 66
Location : Budapest Hungary
 Re: My First Balloon Tank Attempt
Here’s another visual Roddie… Same tank as Andras described, … In fact, I learned these from him  …..The fill/ air evacuate line is the one that is plugged…. The brass tube is flush with the back of the stopper as described…… The other line is feed to the engine…. The brass tube is connected on the inside to a length of silicone fuel line that is perforated along its length similar to yours….. There is not a Tee fitting in this system….Interestingly, The latex balloons last a surprisingly long time….. I give them a hard vacuum at the end of a flying session to pull out anything that is left then store in a dark place….


rdw777- Diamond Member


Posts : 1712
Join date : 2021-03-11
Location : West Texas
 Re: My First Balloon Tank Attempt
Just for comparison’s sake, Here’s a single line tank I made for my Firebaby CL plane…. To be somewhat close to the original design….. The original’s were simply one piece of neoprene tubing from the engine to the back of the balloon….. I used a piece of brass tubing thru the stopper to the back of the tank with the pickup shown…..
On this one the nose of the plane is pointed down and the air goes to the back of the balloon after the fuel is injected…..Air is then pulled out with the syringe until a solid stream of fuel appears…Then connect to the engine…

On this one the nose of the plane is pointed down and the air goes to the back of the balloon after the fuel is injected…..Air is then pulled out with the syringe until a solid stream of fuel appears…Then connect to the engine…


rdw777- Diamond Member


Posts : 1712
Join date : 2021-03-11
Location : West Texas
 Re: My First Balloon Tank Attempt
Thanks again Robert! I'm testing the use of a short (approx. 1/2" length) of rigid tube inside the "neck" of my balloon.. with silicone tubing covering that rigid tube.. and using a small zip-tie around the balloon's neck to seal.. rather than using/making a stopper. (without the rigid tube, the softer silicone tubing would collapse with the tightening of the zip-tie; thus preventing flow)
This is also a weight savings; as opposed to using a conventional-type stopper inside the balloon's neck.


This is also a weight savings; as opposed to using a conventional-type stopper inside the balloon's neck.


 Re: My First Balloon Tank Attempt
I’ve tried several methods of doing a balloon tank, and the last one I came up with was my favorite for control line. Unfortunately, I don’t have a picture of it. But it’s pretty simple to explain.
I just take a round party balloon of the size I want. I think it was a 7” balloon I last used. It should be a balloon made for Helium use. What you do is get a tube of your choice, fuel tube with notches along the length for me, and cut it the length of the balloon plus about a ½ inch. You could use a small brass tube, or just plastic tube notched along the length if you'd prefer. Then you take a pair of nail clippers and nip the end of the balloon. Push the tube through the mouth of the balloon and through the small hole you nipped on the end. I used a small cable tie to cinch the mouth and the end of the balloon around the tube making it fuel tight on both ends. Attach your fuel tube from the mouth end to the engine. Attach a short piece of fuel tube that can be plugged on the other end. I just left the fuel tube open on the end so that I could plug the nipple of a syringe into it.
To fill the balloon, I clamp the fuel line between the tank and the engine, then fill the syringe most of the way with fuel. I squeeze the air out of the balloon before plugging in the tip of the syringe filler to the rear of the balloon tank. Since the syringe isn’t completely full I can pull the plunger back a little to suck the last of the air out of the balloon. Then I hold the syringe up so the air I sucked out is at the rear of the tube, and press the plunger in to fill the balloon to its natural round shape. DO NOT fill the balloon so that it is blown up under pressure with fuel. This IS NOT a pressure tank like a bladder. If I remember correctly, a 7” balloon will hold almost an ounce of fuel in its natural shape. Once the balloon is full of fuel, remove the syringe nipple from the tube and plug it by your favorite method. Voila!
The Up, Up, and Away Mark
edit: Maybe I'll make a video and put it up on YouTube. I haven't put up a How-To video in a while.
batjac- Diamond Member


Posts : 2373
Join date : 2013-05-22
Age : 61
Location : Broken Arrow, OK, USA
 Re: My First Balloon Tank Attempt
That's a good explanation Mark. It's not always an easy matter to "write" a procedure (sans photos/illustrations).. in a manner that's clear and understandable. 

 Similar topics
» Balloon Tank Made Easier?
» repurposing/recycling items for hobby-use
» Babe bee and balloon tank
» balloon tank easy-stopper
» Micro 12VDC Generator with a Cox .049 Sure Start Diesel Engine
» repurposing/recycling items for hobby-use
» Babe bee and balloon tank
» balloon tank easy-stopper
» Micro 12VDC Generator with a Cox .049 Sure Start Diesel Engine
Page 1 of 1
Permissions in this forum:
You cannot reply to topics in this forum

 Rules
Rules


