Log in
Search
Latest topics
» My N-1R build logby roddie Yesterday at 9:29 pm
» Funny what you find when you go looking
by rsv1cox Yesterday at 3:21 pm
» Landing-gear tips
by 1975 control line guy Yesterday at 8:17 am
» Purchased the last of any bult engines from Ken Enya
by sosam117 Yesterday at 7:45 am
» Cox NaBOO - Just in time for Halloween
by rsv1cox Tue Nov 19, 2024 6:35 pm
» Canada Post strike - We are still shipping :)
by Cox International Tue Nov 19, 2024 12:01 pm
» Duende V model from RC Model magazine 1983.
by getback Tue Nov 19, 2024 6:08 am
» My current avatar photo
by roddie Mon Nov 18, 2024 9:05 pm
» My latest doodle...
by TD ABUSER Mon Nov 18, 2024 11:30 am
» Brushless motors?
by rsv1cox Sun Nov 17, 2024 6:40 pm
» Free Flight Radio Assist
by rdw777 Sun Nov 17, 2024 6:03 pm
» Tribute Shoestring build
by amurphy6812 Sun Nov 17, 2024 5:43 pm
Cox Engine of The Month
W/M SNJ - Hopeless adventure or worthwhile project
Page 1 of 1
 W/M SNJ - Hopeless adventure or worthwhile project
After dumping about 12 hours into this shoulda been consigned to the dump project it better be worthwhile, one or two flights as a reward maybe.
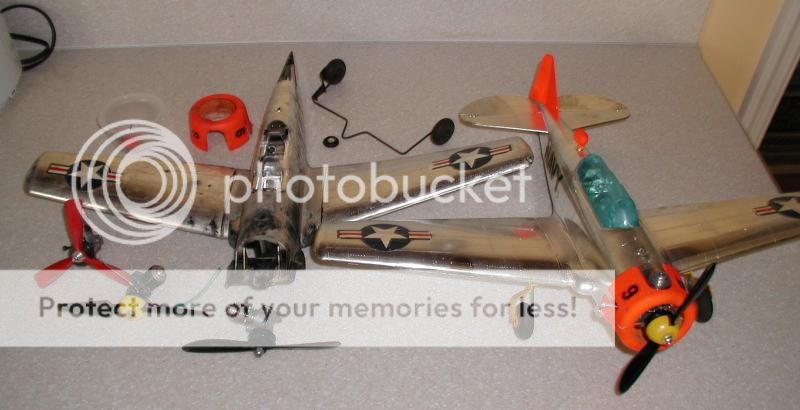
I got the sized engine to running after a bit of a fight and sand blasted the airframe to remove the existing flaking silver to some success, but those decals come off hard. Sandblasting doesn't do it although it did remove the surface paper which made it easier to peel off the backing followed by another session of blasting. Still didn't get all of the adhesive.
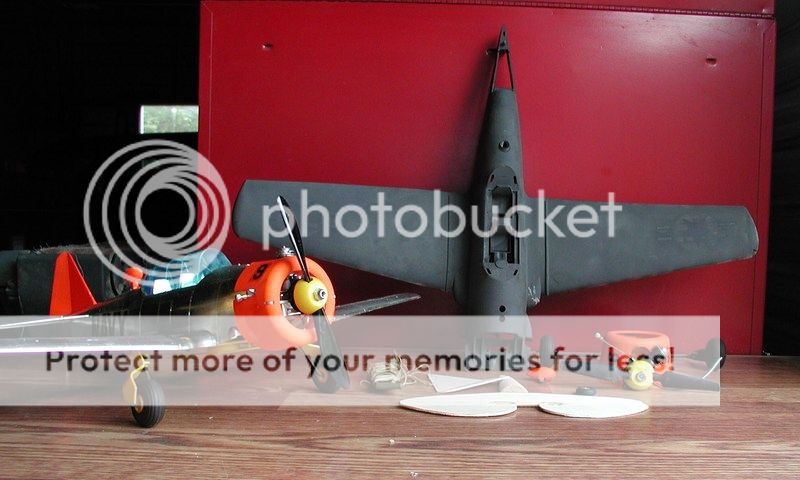
I had to build up the missing tail section from balsa using the other SNJ's tail as a template. The control horn which is located inside the fuselage still needs to be attached to the elevator. I am guessing that the balsa replacement parts will weigh about as much as the plastic originals so the CG should remain the same.
If nothing else it will show me if rattle can paint will stick.

I got the sized engine to running after a bit of a fight and sand blasted the airframe to remove the existing flaking silver to some success, but those decals come off hard. Sandblasting doesn't do it although it did remove the surface paper which made it easier to peel off the backing followed by another session of blasting. Still didn't get all of the adhesive.

I had to build up the missing tail section from balsa using the other SNJ's tail as a template. The control horn which is located inside the fuselage still needs to be attached to the elevator. I am guessing that the balsa replacement parts will weigh about as much as the plastic originals so the CG should remain the same.
If nothing else it will show me if rattle can paint will stick.

rsv1cox- Top Poster


Posts : 11244
Join date : 2014-08-18
Location : West Virginia
 Re: W/M SNJ - Hopeless adventure or worthwhile project
I think it looks pretty darn good Bob.
They make specific spray paint for plastic.
They make specific spray paint for plastic.

Cribbs74- Moderator


Posts : 11907
Join date : 2011-10-24
Age : 50
Location : Tuttle, OK
 Re: W/M SNJ - Hopeless adventure or worthwhile project
Looks like a great start to a restoration. She will be proud of you and what you are doing to her, she will just fly off the table for you. Hey, wait, I think I see her smiling for the picture.

NEW222- Top Poster

- Posts : 3896
Join date : 2011-08-13
Age : 46
Location : oakbank, mb
 Re: W/M SNJ - Hopeless adventure or worthwhile project
Love that Wen Mac T-6, so cool.
I replace missing plastic parts with styrene stock from the hobby shop. The railroaders use it a lot, keeps the plastic models all plastic.
Chris...
I replace missing plastic parts with styrene stock from the hobby shop. The railroaders use it a lot, keeps the plastic models all plastic.
Chris...
stuntflyr- Gold Member

- Posts : 266
Join date : 2012-01-18
Age : 65
Location : Tucson, Arizona
 Re: W/M SNJ - Hopeless adventure or worthwhile project
Yes, those big old radial cowls sure give a smile don't they!
I thought about using plastic Chris, but I had a lot of balsa on hand, and I didn't know how to deal with the faring that the vertical stab fits into if using plastic. I will probably re-enforce the horizontal stab with some basswood on the underside.
I would love to paint it like this:
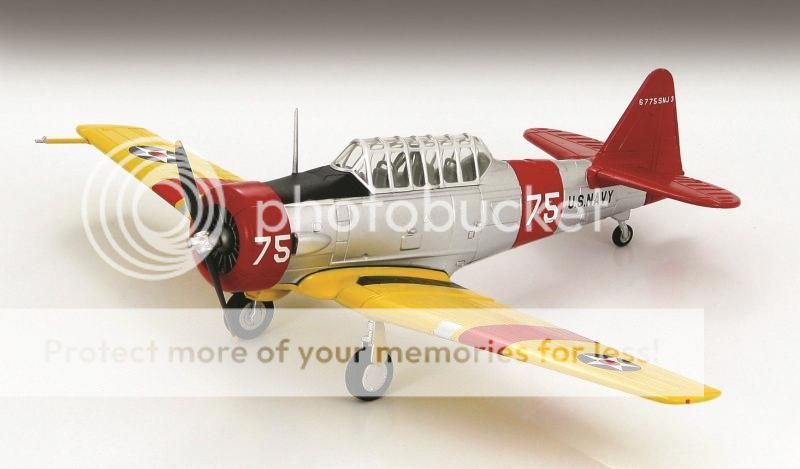
Still might, but it's complicated (for me at least) and I'm not sure that it's worth the effort on this busted up example at least. But it sure would look nice. But probably silver it will be.
Bob
I thought about using plastic Chris, but I had a lot of balsa on hand, and I didn't know how to deal with the faring that the vertical stab fits into if using plastic. I will probably re-enforce the horizontal stab with some basswood on the underside.
I would love to paint it like this:

Still might, but it's complicated (for me at least) and I'm not sure that it's worth the effort on this busted up example at least. But it sure would look nice. But probably silver it will be.
Bob

rsv1cox- Top Poster


Posts : 11244
Join date : 2014-08-18
Location : West Virginia
 Re: W/M SNJ - Hopeless adventure or worthwhile project
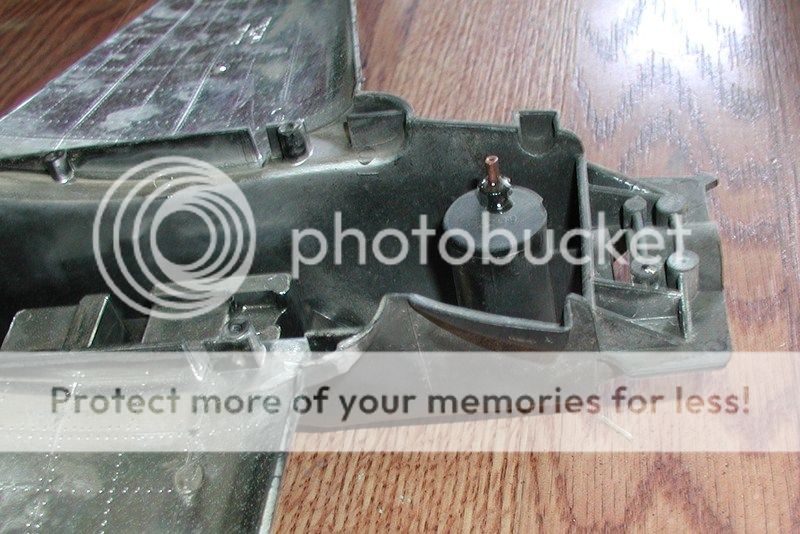
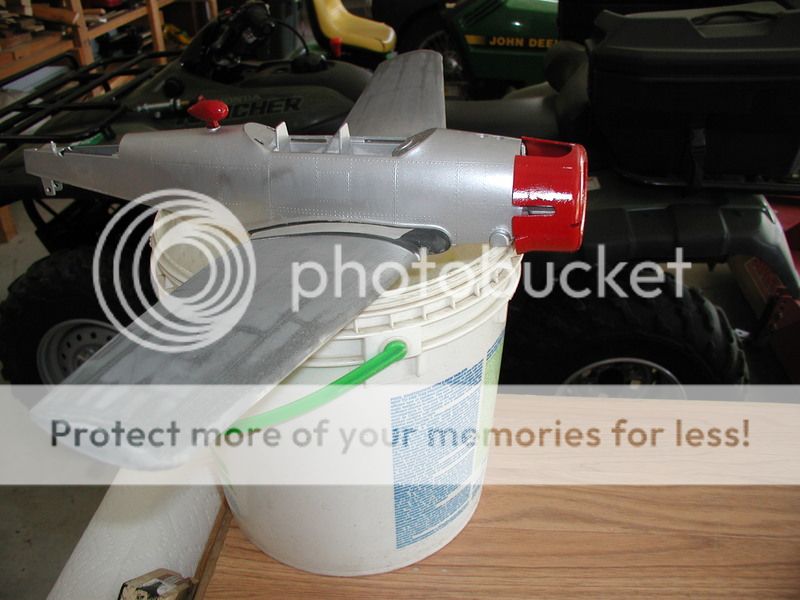
Well, I like that paint scheme so much I decided to go with it. But first I had to repair the broken off nipple on the fuel tank, common problem on these old plastic models. I found the perfect sized drill bit, just right so it took some force to seat it in the tank, then I filled the reservoir around it with epoxy.
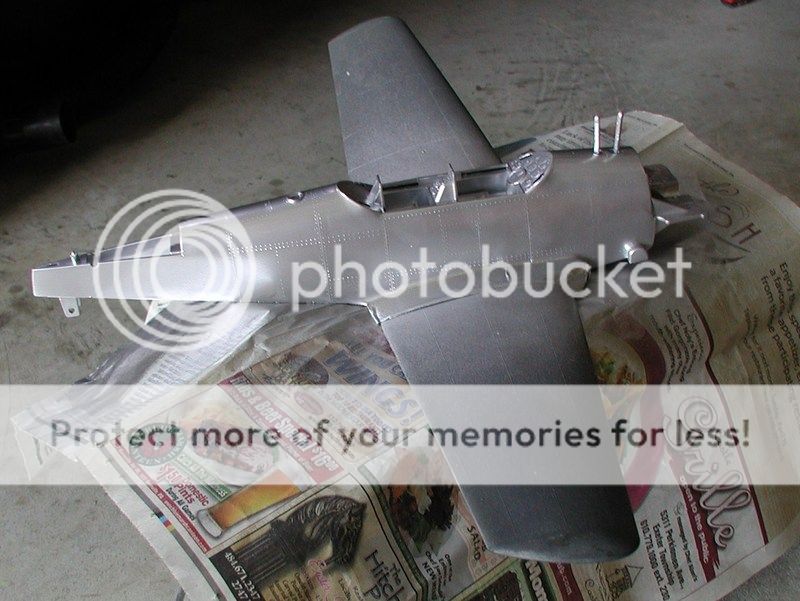
Started with metallic paint on the fuselage. Of course it's hot and humid here today and it flashed. Cooler and drier weather forecast in a couple of days, so will final coat it then. Next comes yellow on the wings and flat black on the walkways and top of fuselage forward of the cockpit.
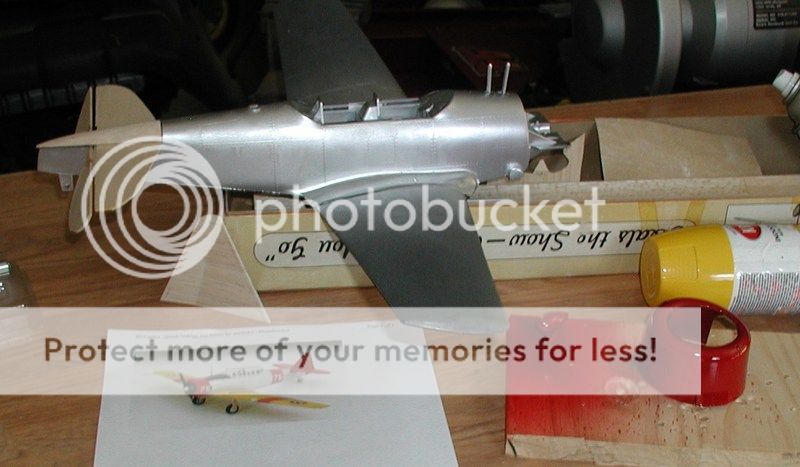
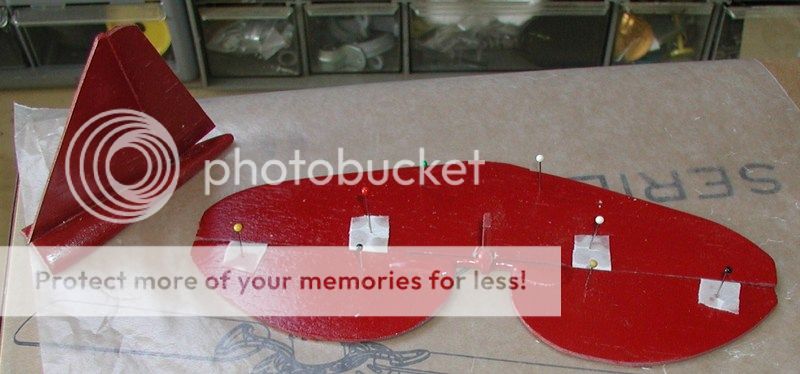
Sandblasted the cowl and dome and painted with Krylon red which didn't flash. I will assemble the tail section and paint off the plane then assemble. Thinking about over spraying the whole thing with Top Flight Lustercoat when I'm finished.

Started with metallic paint on the fuselage. Of course it's hot and humid here today and it flashed. Cooler and drier weather forecast in a couple of days, so will final coat it then. Next comes yellow on the wings and flat black on the walkways and top of fuselage forward of the cockpit.

Sandblasted the cowl and dome and painted with Krylon red which didn't flash. I will assemble the tail section and paint off the plane then assemble. Thinking about over spraying the whole thing with Top Flight Lustercoat when I'm finished.


rsv1cox- Top Poster


Posts : 11244
Join date : 2014-08-18
Location : West Virginia
 Re: W/M SNJ - Hopeless adventure or worthwhile project
can't wait to see that finished

akjgardner- Diamond Member


Posts : 1600
Join date : 2014-12-28
Age : 65
Location : Greensberg Indiana
 Re: W/M SNJ - Hopeless adventure or worthwhile project
BoB that's looking fantastic , nice rebuild 


getback- Top Poster


Posts : 10436
Join date : 2013-01-18
Age : 67
Location : julian , NC
 Re: W/M SNJ - Hopeless adventure or worthwhile project
Made some progress on the plastic W/M SNJ. I'm never happy with cloth hinges especially when you can't glue them down with dope.
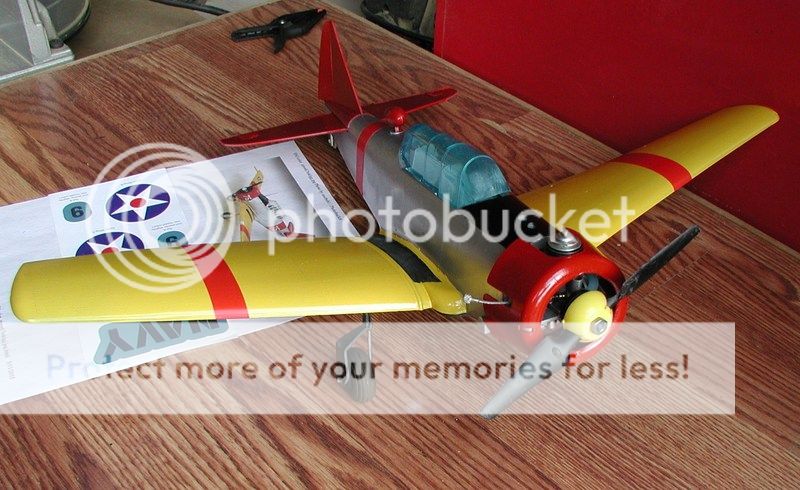
This model was painted with rattle can rustoleum metallic, Krylon semi gloss black, yellow, and red. The Krylon seems to apply much better although we had huge amounts of pollen floating in the air that didn't help with either paint.
We all do it - test fit supposedly. But I think we all just want an early look on how it's going to look.
Mostly finished, just have to slide on the decals, attach some strings and see if this lead sled will ROG.
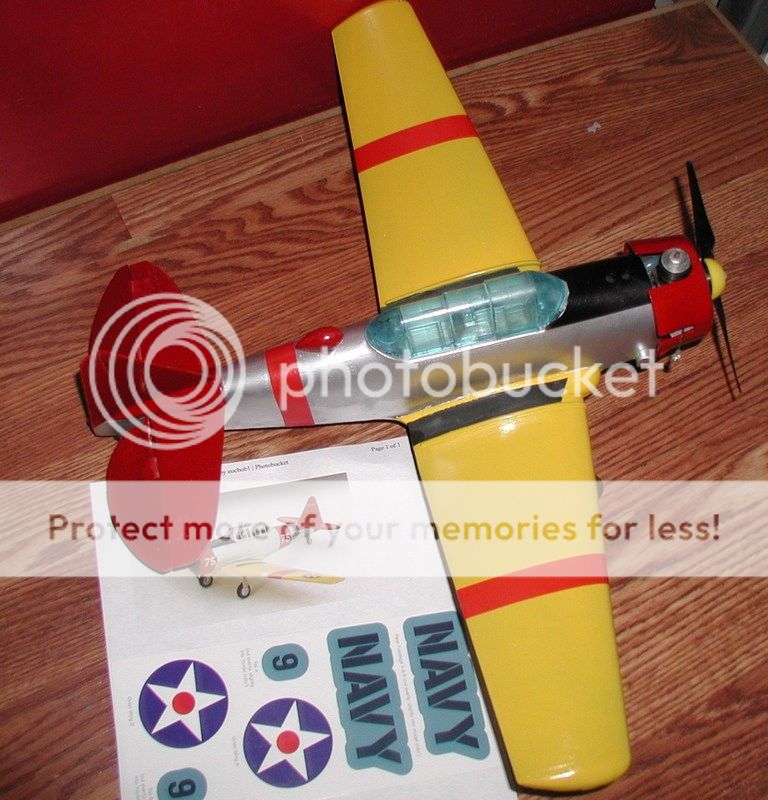
Repaired - Cracks at both wing roots
Constructed an entire tail section.
Sandblasted "chrome" finish from airframe
Rebuilt engine
Replaced the nipple on the fuel tank
Found and replaced an original tail wheel
Constructed a missing control rod
Constructed a replacement wheel pant
and probably a few more things that I have gladly forgotten....

This model was painted with rattle can rustoleum metallic, Krylon semi gloss black, yellow, and red. The Krylon seems to apply much better although we had huge amounts of pollen floating in the air that didn't help with either paint.
We all do it - test fit supposedly. But I think we all just want an early look on how it's going to look.

Mostly finished, just have to slide on the decals, attach some strings and see if this lead sled will ROG.


Repaired - Cracks at both wing roots
Constructed an entire tail section.
Sandblasted "chrome" finish from airframe
Rebuilt engine
Replaced the nipple on the fuel tank
Found and replaced an original tail wheel
Constructed a missing control rod
Constructed a replacement wheel pant
and probably a few more things that I have gladly forgotten....

rsv1cox- Top Poster


Posts : 11244
Join date : 2014-08-18
Location : West Virginia
 Re: W/M SNJ - Hopeless adventure or worthwhile project
That looks great!
Chris...
Chris...

stuntflyr- Gold Member

- Posts : 266
Join date : 2012-01-18
Age : 65
Location : Tucson, Arizona
 Re: W/M SNJ - Hopeless adventure or worthwhile project
jezz, almost too nice to fly, lol, it would be neat to see video of it going round!
 Re: W/M SNJ - Hopeless adventure or worthwhile project
Nice! Your restoration looks better to me than the original 

KariFS- Diamond Member

- Posts : 2044
Join date : 2014-10-10
Age : 53
 Re: W/M SNJ - Hopeless adventure or worthwhile project
Looking good. Nice job,I like the color scheme,Saw..........wheat

akjgardner- Diamond Member


Posts : 1600
Join date : 2014-12-28
Age : 65
Location : Greensberg Indiana
 Re: W/M SNJ - Hopeless adventure or worthwhile project
Thanks for all of your comments.
I added the wing insignias this morning. The cut out and peel type as opposed to the wet and slide off’s. I’m not sure which I like better, both have their merits. Also cut out some white pieces to simulate the landing lights as shown in the example picture. I also printed them out on decal paper.
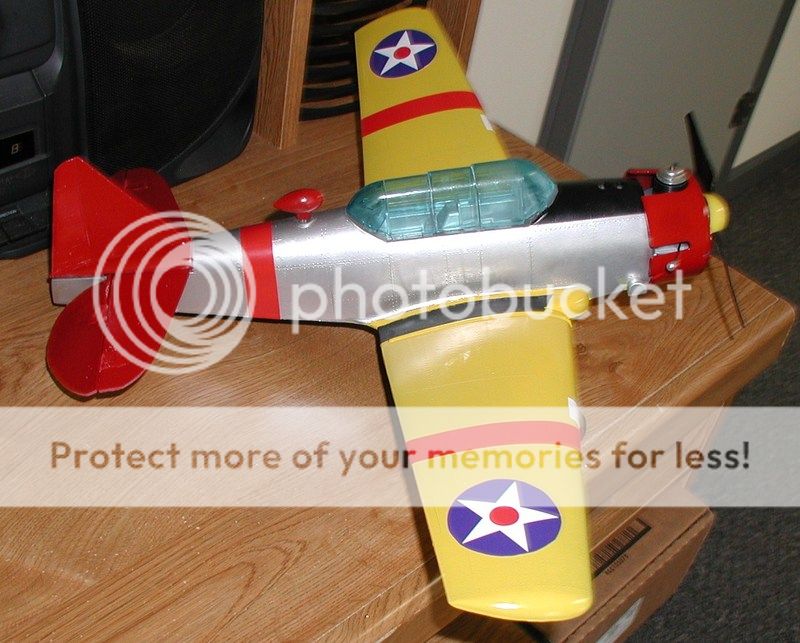
I decided not to use the NAVY decals, just too much on the fuselage but I would like to add the number 9’s just not to the cowl as they appear to be to large. The tail maybe.
Not completely done, but close.
I added the wing insignias this morning. The cut out and peel type as opposed to the wet and slide off’s. I’m not sure which I like better, both have their merits. Also cut out some white pieces to simulate the landing lights as shown in the example picture. I also printed them out on decal paper.

I decided not to use the NAVY decals, just too much on the fuselage but I would like to add the number 9’s just not to the cowl as they appear to be to large. The tail maybe.
Not completely done, but close.

rsv1cox- Top Poster


Posts : 11244
Join date : 2014-08-18
Location : West Virginia
 Re: W/M SNJ - Hopeless adventure or worthwhile project
The 9 just ahead of the fuselage stripe would look good. The model looks nice with the stickers.
Chris...
Chris...

stuntflyr- Gold Member

- Posts : 266
Join date : 2012-01-18
Age : 65
Location : Tucson, Arizona
 Re: W/M SNJ - Hopeless adventure or worthwhile project
WOW Good Job Man !!! 


getback- Top Poster


Posts : 10436
Join date : 2013-01-18
Age : 67
Location : julian , NC
 Re: W/M SNJ - Hopeless adventure or worthwhile project
Whew. thats a lottawork, but it sure looks great. I know I'd like to see a flight video, but fully understand if you just want to make it a "Hanger Queen" by hangin' it from the ceiling!! Very nice work. 


Marleysky- Top Poster


Posts : 3618
Join date : 2014-09-28
Age : 72
Location : Grand Rapids, MI
 Re: W/M SNJ - Hopeless adventure or worthwhile project
Thanks all.
How may half empty rattle can paints do you have in your workshop? If your like me, plenty.
I just couldn't see buying four more cans of plastic specific paints for this project as I already had all of the colors necessary on the shelf. So far, it looks ok but maybe next week they will all begin to peel. The Krylon red, yellow, and semi gloss black all applied great, but the rusteloum metalic "silver" tended to flash and give an uneven finish.
I decided to mount an identical in all respects Testor's engine rather than the original Wen Mac .049 as the Testors seems to run better. But I'm fooling with the W/M to improve performance and will probably remount it some time in the future.

rsv1cox- Top Poster


Posts : 11244
Join date : 2014-08-18
Location : West Virginia
 Re: W/M SNJ - Hopeless adventure or worthwhile project
Looking good. That is definitely more work than I would have done, and the rewards have paid off.

NEW222- Top Poster

- Posts : 3896
Join date : 2011-08-13
Age : 46
Location : oakbank, mb
 Re: W/M SNJ - Hopeless adventure or worthwhile project
You may want to change out the prop for flying, I have had very poor results with them. They seem to load the engine and yield little thrust.rsv1cox wrote:Thanks all.
How may half empty rattle can paints do you have in your workshop? If your like me, plenty.
I just couldn't see buying four more cans of plastic specific paints for this project as I already had all of the colors necessary on the shelf. So far, it looks ok but maybe next week they will all begin to peel. The Krylon red, yellow, and semi gloss black all applied great, but the rusteloum metalic "silver" tended to flash and give an uneven finish.
I decided to mount an identical in all respects Testor's engine rather than the original Wen Mac .049 as the Testors seems to run better. But I'm fooling with the W/M to improve performance and will probably remount it some time in the future.
On the performance I have found the same thing, the testors seem to have a performance edge for some reason. Your wen mac probably has the early glow head and will enjoy a change to the testors style with the aluminium gasket.
https://www.youtube.com/watch?v=X67pikIKj14
Check out the video, my results were similar but my rpm readings were higher. I am still working with the drop in plugs though and have to drop my nitro down to 10% with them.
Phil

chevyiron420- Gold Member

- Posts : 251
Join date : 2015-01-28
Age : 66
Location : Barney Georgia
 Similar topics
» geneology records.. a worthwhile project to consider
» My newest adventure...
» A Gilbert adventure
» On the Ramp Right Now!
» Phred's Foam adventure
» My newest adventure...
» A Gilbert adventure
» On the Ramp Right Now!
» Phred's Foam adventure
Page 1 of 1
Permissions in this forum:
You cannot reply to topics in this forum

 Rules
Rules


