Log in
Search
Latest topics
» My latest doodle...by batjac Today at 10:05 pm
» Retail price mark-up.. how much is enough?
by gkamysz Today at 9:29 pm
» Happy 77th birthday Andrew!
by roddie Today at 9:22 pm
» Roger Harris revisited
by rsv1cox Today at 3:38 pm
» My N-1R build log
by GallopingGhostler Today at 3:04 pm
» Tee Dee .020 combat model
by 1/2A Nut Today at 2:43 pm
» Chocolate chip cookie dough.........
by roddie Today at 1:13 pm
» Purchased the last of any bult engines from Ken Enya
by sosam117 Today at 11:32 am
» Free Flight Radio Assist
by rdw777 Today at 9:24 am
» Funny what you find when you go looking
by rsv1cox Wed Nov 20, 2024 3:21 pm
» Landing-gear tips
by 1975 control line guy Wed Nov 20, 2024 8:17 am
» Cox NaBOO - Just in time for Halloween
by rsv1cox Tue Nov 19, 2024 6:35 pm
Cox Engine of The Month
Mike's Reed Speed 2 Bearcat build thread...
Page 2 of 2
Page 2 of 2 •  1, 2
1, 2
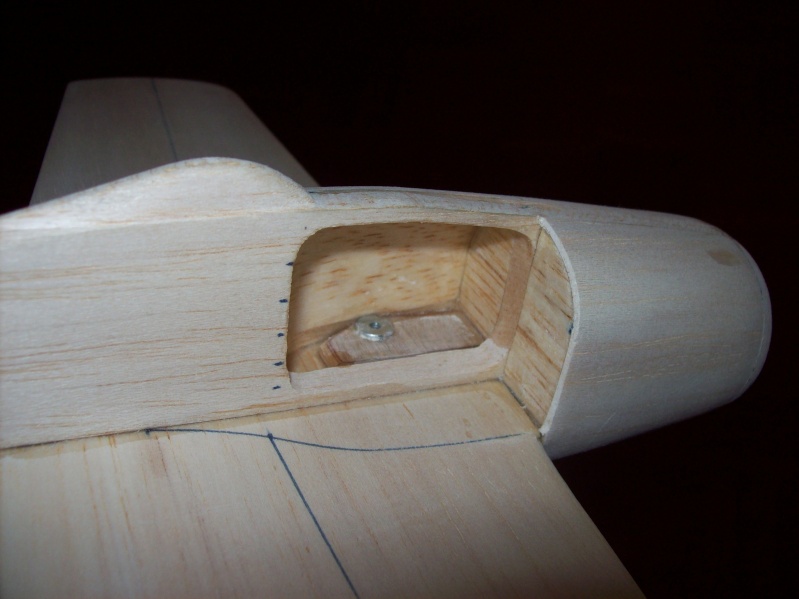
 Cheek block and tank/bladder compartment.
Bell crank mount too...
The cheek block is was carved out and sanded... sanded... sanded... sanded and sanded some more. Created enough dust to keep my whole neighborhood coughing for a week. Then the whole thing was hollowed out with the Dremel (more dust, spread even further).
Once the cheek block was glued on, I cut out the fuselage from the firewall back to where the block had been hollowed. This area is going to be the tank/bladder compartment. The other cheek block will be the same size, so there should be plenty of room for fuel, it will just be whether or not a bladder and all of it's bits will fit in there. If not, I'll have to go with a regular tank.
The bell crank mount was made like the firewall; 3/32"basswood with 1/64 ply skins. It fits against the fuse and the inside of the cheek block and sits on top of the wing, of course. The bell crank goes on the bottom of the wing. There will be a 'floor' glued across the whole area when the other block is done. That will protect the bladder from the sharp bits of the bell crank bolt and reinforce the mount.
The outer cheek block will be removable for access to the engine and tank. Planning to use magnets to hold it in place. We'll see how that works out. I'll try get some pics of that a bit later...
Pics:


 Re: Mike's Reed Speed 2 Bearcat build thread...
That's really well thought out and nice work. If you kitted that, I'd sure buy one.
Rusty
Rusty
_________________
Don't Panic!
...and never Ever think about how good you are at something...
while you're doing it!
My Hot Rock & Blues Playlist
...and never Ever think about how good you are at something...
while you're doing it!
My Hot Rock & Blues Playlist

RknRusty- Rest In Peace

- Posts : 10869
Join date : 2011-08-10
Age : 68
Location : South Carolina, USA
 Re: Mike's Reed Speed 2 Bearcat build thread...
Yeah Mike, I really dig the fuel compartment.

Cribbs74- Moderator


Posts : 11907
Join date : 2011-10-24
Age : 50
Location : Tuttle, OK
 Controls...
Thanks guys, I really appreciate it! I wouldn't know where to start on making kits Rusty, but I would be happy to do up plans if anyone was interested. (Come to think of it, plans WOULD be where to start, wouldn't they?)
Here are some pics of the control set-up.
I decided to put the bellcrank on the bottom of the wing for several reasons, some completely spurious I expect, but here they are, in no particular order:
1. Vertical C.G. - Stunt guys worry about this a lot. Basically, it is the relationship of the C.G. to the leadout guide when viewing the plane from the front.
If your leadout guide is lower than the C.G., the plane will tend to want to roll outward and vice-versa. Stunt guys try to get the C.G. right on the leadout guide so that the plane will behave the same upright or inverted. That is to say that if you hang the plane by the leadouts the wing will hang dead vertical when viewed from the front.
I thought that if the vertical C.G. was biased to cause a tendency to roll outward, it might help counter torque effects and reduce the tendency for the thing to roll into the circle and attack me. So I put the leadout guide as low as possible.
2. Clean aero. - If the bellcrank was on top of the wing, the cheek block would need to be really short to conform to the "must be visible from the top or bottom" rule. That, or the bellcrank would need to be out further on the wing and out in the breeze.
By putting it on the bottom I can put the short cheek block under the wing where it is much smaller. Also kind of tucks the bellcrank in behind the cowl.
3. Leadout drag. - I had this crazy idea that if the leadouts were to sit nice and tight against the wing's surface, they would have less drag than if they were flapping in the breeze. I recessed the bellcrank into the wing so that it is even with the surface and the leadout guide will be right on the surface of the tip. The top surface is the most critical, so leadouts on the bottom.
This is all rather geeky, isn't it?
I hope this stuff is at least somewhat interesting. If not, I hope it at least helps those who may be afflicted with insomnia.
Cheers,
Mike
Pics:
(Kind of a rotten shot, apologies for that.)
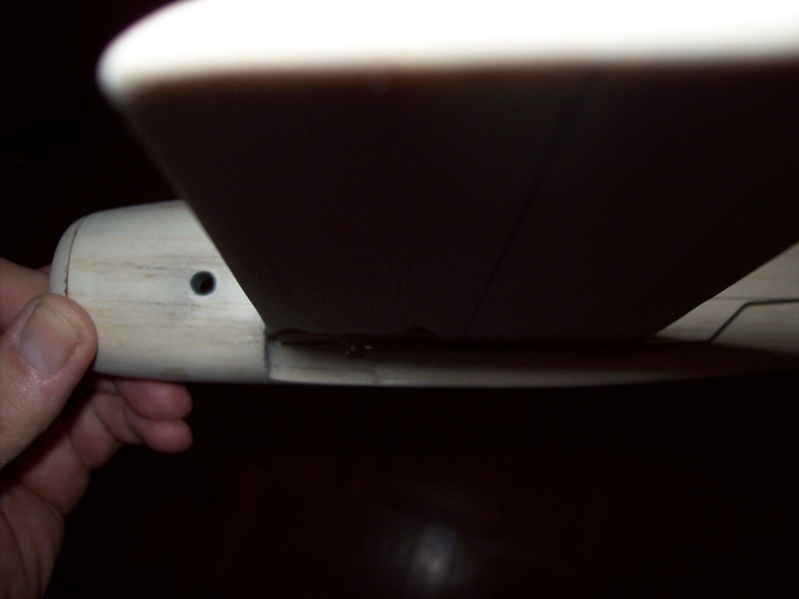

"Visible from the bottom..."


Here are some pics of the control set-up.
I decided to put the bellcrank on the bottom of the wing for several reasons, some completely spurious I expect, but here they are, in no particular order:
1. Vertical C.G. - Stunt guys worry about this a lot. Basically, it is the relationship of the C.G. to the leadout guide when viewing the plane from the front.
If your leadout guide is lower than the C.G., the plane will tend to want to roll outward and vice-versa. Stunt guys try to get the C.G. right on the leadout guide so that the plane will behave the same upright or inverted. That is to say that if you hang the plane by the leadouts the wing will hang dead vertical when viewed from the front.
I thought that if the vertical C.G. was biased to cause a tendency to roll outward, it might help counter torque effects and reduce the tendency for the thing to roll into the circle and attack me. So I put the leadout guide as low as possible.
2. Clean aero. - If the bellcrank was on top of the wing, the cheek block would need to be really short to conform to the "must be visible from the top or bottom" rule. That, or the bellcrank would need to be out further on the wing and out in the breeze.
By putting it on the bottom I can put the short cheek block under the wing where it is much smaller. Also kind of tucks the bellcrank in behind the cowl.
3. Leadout drag. - I had this crazy idea that if the leadouts were to sit nice and tight against the wing's surface, they would have less drag than if they were flapping in the breeze. I recessed the bellcrank into the wing so that it is even with the surface and the leadout guide will be right on the surface of the tip. The top surface is the most critical, so leadouts on the bottom.
This is all rather geeky, isn't it?
I hope this stuff is at least somewhat interesting. If not, I hope it at least helps those who may be afflicted with insomnia.
Cheers,
Mike
Pics:
(Kind of a rotten shot, apologies for that.)


"Visible from the bottom..."


 Re: Mike's Reed Speed 2 Bearcat build thread...
Mike.
Great design work. I have been pretty quiet during your build, but I am very impressed to say the least.
I am having a little trouble wrapping my brain around the vertical CG. I always thought the CG could be above, below or the dot itself as drawn on the plans.
Edit: I also thought that the split elevator had to be on the outboard side. That's what I have seen elsewhere.
Ron

Cribbs74- Moderator


Posts : 11907
Join date : 2011-10-24
Age : 50
Location : Tuttle, OK
 Re: Mike's Reed Speed 2 Bearcat build thread...
Like Ron, I haven't offered any input since Mike is on a roll and building a beautiful machine. I did love the movie, that was great entertainment. Fast or not this plane is going to be a keeper. Like I mentioned I plan om re-fitting the Mustang with some speedier ideas. It's such a simple plane that other than eliminating drag and balancing, I don't know of much to do. Switch from 30# test Spiderwire to something thinner. Maybe clean up some drag up front. Ditch the LG under the new rules and experiment with props. Maybe use less castor oil. I had 22% oil blend last time and that will slow it some. And I never bored my venturi, maybe that held it back too. I used a Babe Bee crank as I always thought they were faster than the KB crank.
You can see the air scoop on the inboard side. And no drag reducing cowling.
Mike you mentioned a plenum, here's mine with a little aluminum scoop.

You can see the air scoop on the inboard side. And no drag reducing cowling.
Mike you mentioned a plenum, here's mine with a little aluminum scoop.

Last edited by RknRusty on Thu Jul 31, 2014 10:53 am; edited 1 time in total
_________________
Don't Panic!
...and never Ever think about how good you are at something...
while you're doing it!
My Hot Rock & Blues Playlist
...and never Ever think about how good you are at something...
while you're doing it!
My Hot Rock & Blues Playlist

RknRusty- Rest In Peace

- Posts : 10869
Join date : 2011-08-10
Age : 68
Location : South Carolina, USA
 Re: Mike's Reed Speed 2 Bearcat build thread...
A real work of art Mike. Beautiful plane!!
I am learning a lot from your build. Thanks for taking us through the detailed build. I especially like the nose with the cowling. Really impressive.
Theo
I am learning a lot from your build. Thanks for taking us through the detailed build. I especially like the nose with the cowling. Really impressive.
Theo

Theo Kleynhans- Gold Member

- Posts : 196
Join date : 2013-12-30
Age : 43
Location : South Africa
 Re: Mike's Reed Speed 2 Bearcat build thread...
Mike , You have put a lot of craftsmanship into one fine looking ship ! Have you been involved in stick and tissue or R/C Before ? Nice build, Rusty are you just upgrading your speed entire 1 ? Didn't know this was aloud ? I don't care just wondering ...Getback 


getback- Top Poster


Posts : 10441
Join date : 2013-01-18
Age : 67
Location : julian , NC
 Re: Mike's Reed Speed 2 Bearcat build thread...
Yeah Eric, Jim wrote into the revised rules that we can use our plane from the previous contest. I think I can make this one go faster.getback wrote: Nice build, Rusty are you just upgrading your speed entire 1 ? Didn't know this was aloud ? I don't care just wondering ...Getback
I'm going to also use it before the race to test Roddie's muffler system. I've been sitting on it since last Winter. And no, I am not going to race with a muffler.
Rusty
_________________
Don't Panic!
...and never Ever think about how good you are at something...
while you're doing it!
My Hot Rock & Blues Playlist
...and never Ever think about how good you are at something...
while you're doing it!
My Hot Rock & Blues Playlist

RknRusty- Rest In Peace

- Posts : 10869
Join date : 2011-08-10
Age : 68
Location : South Carolina, USA
 Re: Mike's Reed Speed 2 Bearcat build thread...
Cribbs74 wrote:Mike.
Great design work. I have been pretty quiet during your build, but I am very impressed to say the least.
I am having a little trouble wrapping my brain around the vertical CG. I always thought the CG could be above, below or the dot itself as drawn on the plans.
Edit: I also thought that the split elevator had to be on the outboard side. That's what I have seen elsewhere.
Ron
Thanks Ron, that is very kind.
You are absolutely right in that the C.G. can be higher, lower or right on the spot drawn on the plan. The longitudinal position of the C.G. is critical, the vertical, not so much. In fact it can be ignored on virtually every flying model ever built because most of them aren't being flung around in a circle by the wingtip!
Even most of the ones that are don't need to worry about it, but control line stunt planes are trimmed to the nth degree in an effort to insure that they behave exactly the same in both inside and outside maneuvers. The obsession to achieve perfect trim led someone to examine the relationship between the placement of the vertical C.G. and the lead out guide. Thus was born a whole new strain of Obsessive Compulsive Disorder, though official Medical Association recognition is still pending.
The stunt guys will use lighter or heavier landing gear and wheels to trim the vertical C.G. so that it is dead even with the lead outs. All in an effort to get 'even' insides and outsides.
I figured that since the Bearcat was never going to be flown inverted... Well, not intentionally anyway, I could bias the vertical C.G. for extra line tension when upright (Like in the first sketch, bottom picture - "Lead out guide low").
Here are a couple of sketches that (hopfully) illustrate the concept:


As for the elevator, I have seen it on either side and don't know if there is a reason to prefer one side over the other. I put it on the inboard side because it was the same side as the bell crank and because it kept it out of the turbulence from the cylinder, for whatever that might be worth...
Cheers,
Mike
Last edited by Mike Mulligan on Thu Jul 31, 2014 11:52 pm; edited 1 time in total
 Re: Mike's Reed Speed 2 Bearcat build thread...
Rusty I think you have the right idea; take a proven winner and make it better. That is a great plane and I can't wait to see where you go with it.
Can I ask why you think the Baby Bee crank is faster? I'm still learning about hot rodding these little things and I thought the KB crank was pretty much the same, just a bit stronger.
Yep Eric, I've been doing this stuff since I was a kid. I've done RC boats and planes (still do a bit), and I find stick and tissue to be very relaxing, but control line has always been my favorite. For me building is just as much fun as flying, which works out well since I don't have much time to get out and go flying these days, but I can usually find an hour or two to create some dust!
Cheers,
Mike
 Re: Mike's Reed Speed 2 Bearcat build thread...
Beautiful Work Mike ! AND sorry for taking so so long to check in on your thread!
Looking forward to seeing that puppy when it's ready to turn circles !!!!
Looking forward to seeing that puppy when it's ready to turn circles !!!!

Kim- Top Poster


Posts : 8625
Join date : 2011-09-06
Location : South East Missouri
 Re: Mike's Reed Speed 2 Bearcat build thread...
Mike, the KB crank is stronger and would hold up longer under the demands of repeated +21krpm runs. However for a contest that requires only a few experimental runs and an official run I think the Babe Bee crank will hold up. And I have taken tach race engines and changed nothing but the crank, and the Babe crank is always faster than the KB crank. Keep in mind, the tach race is strictly a bench run, not a more punishing flight run. Maybe it's the weight difference. I don't know which one is balanced better, but I have read that all of them are under counter-weighted. For this reason I always add the heavy side of the prop hub(assuming there is one) to the position of the counter balance(-180deg.from TDC).Mike Mulligan wrote:...Can I ask why you think the Baby Bee crank is faster? I'm still learning about hot rodding these little things and I thought the KB crank was pretty much the same, just a bit stronger.
Also the point of failure is usually the splined end where the prop screw threads in, and it's been suggested by some speed guys that a full length screw or stud rather than the shorter button head Cox stock screw prevents this type of failure. So I always use a Valentine spinner with a stud that screws in for the full length, or a black oxide hex head screw that reaches all the way in as far as possible and still snugs the prop. Keep in mind, my results are not scientific and I am relying on my own guesswork.
Rusty
_________________
Don't Panic!
...and never Ever think about how good you are at something...
while you're doing it!
My Hot Rock & Blues Playlist
...and never Ever think about how good you are at something...
while you're doing it!
My Hot Rock & Blues Playlist

RknRusty- Rest In Peace

- Posts : 10869
Join date : 2011-08-10
Age : 68
Location : South Carolina, USA
 Re: Mike's Reed Speed 2 Bearcat build thread...
Mike,
I am watching this thread because of my well documented dislike of profile/silhouette fuselaged planes. I wished I had seen this before I built the "Rocking Donkey". (I am also an idea stealer!)
I really like the building up of the fuselage to give a more 3D appearance - even if only to streamline the engine but on this model it provides more than that. It is a really appealing build.
It will certainly be a looker but like all the builds in this contest - Will it be a flier? This is no criticism but a reminder that true scale and control line do not always appear to mix. Certainly for stunt - there are distinct ratios for tailplane, wing, fin and elevator.
However this is for speed so it is not meant to be a stunter or general purpose sport flyer so - who knows!?
I have seen speed models with the elevator both inboard and outboard. It is only meant to get it to and keep it at level flight.
I have mentioned this before but my biggest concern (and it is not a concern really as this is fun and a learning curve) is that we are scratch building "scale" models with no provenance or previous flight. A few of the models in the opening contest - didn't fly, didn't survive and caused considerable angst trying to trim them. All part of the fun.
Thank you again for posting your progress - also be aware, I believe there is quite a bit of closet building going on. (Secret building, testing and waiting for the opening before revealing! - all part of the competition)

ian1954- Diamond Member

- Posts : 2688
Join date : 2011-11-16
Age : 70
Location : England
 Re: Mike's Reed Speed 2 Bearcat build thread...
Ah, so you're jumping into the bloody fray too, aren't ya bloke!ian1954 wrote:... - also be aware, I believe there is quite a bit of closet building going on. (Secret building, testing and waiting for the opening before revealing! - all part of the competition)
_________________
Don't Panic!
...and never Ever think about how good you are at something...
while you're doing it!
My Hot Rock & Blues Playlist
...and never Ever think about how good you are at something...
while you're doing it!
My Hot Rock & Blues Playlist

RknRusty- Rest In Peace

- Posts : 10869
Join date : 2011-08-10
Age : 68
Location : South Carolina, USA
 Re: Mike's Reed Speed 2 Bearcat build thread...
Thanks Rusty, that's interesting stuff. I was planning to use KB cranks in everything after reading the "Gibeault Report". I'll have to try a couple of others and see what happens.
Good points all, Ian. We get to scale down the airplane but not the air molecules! I think one of the brilliant bits of Jim's rules is that the planes have to be "recognizable as the subject being modeled", but are not required to be "scale". It leaves the builder free to fudge the numbers a bit to create a (hopefully) flyable model. The Conquest Bearcat is "eyeball" scale in that I just drew it up to look like what it is supposed to be, but nothing was ever measured or anything. In fact, the wing and stab are both too big to be scale for the fuselage, and the stab is actually too big for the wing as well. We'll see what happens! That, as they say, is why we run the races.
We all take a bit of what we know, a bit of what we've learned from others, our own best guesses and wild ideas, mix it with balsa, glue, paint and a touch of nitro, and hope for the best. The shared effort is half the fun, I think. Every plane you guys built in the last contest inspired an idea or thought that went into this plane. The reason for this thread is to hopefully contribute to the shared experience and maybe, just maybe, add something to the discussion that someone will find to be helpful. So steal away Ian! That is what its there for!
Oh, and I hope you are right about loads of 'secret' projects lurking out there!
Mike
 I think it's done...
The construction phase, anyway. I could probably sand on this thing 'till
next May, but at some point you have to just stop and get on with the finishing process.
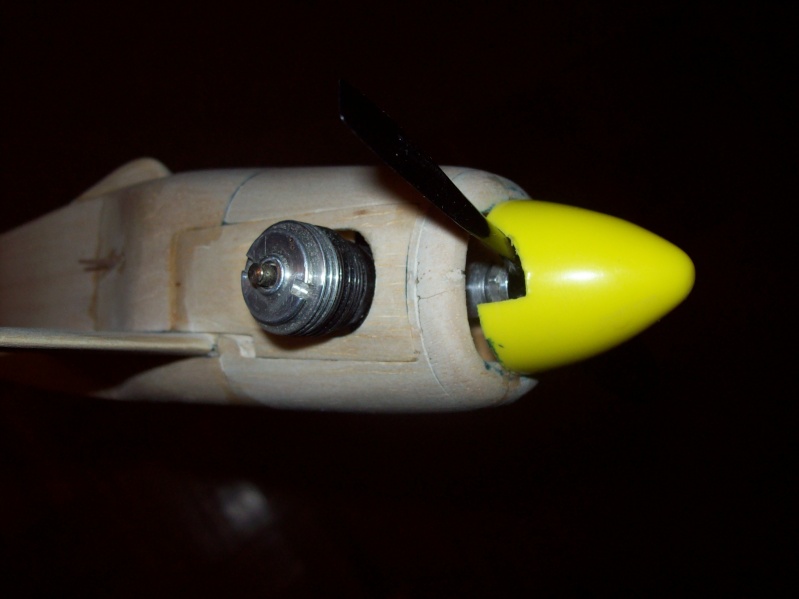
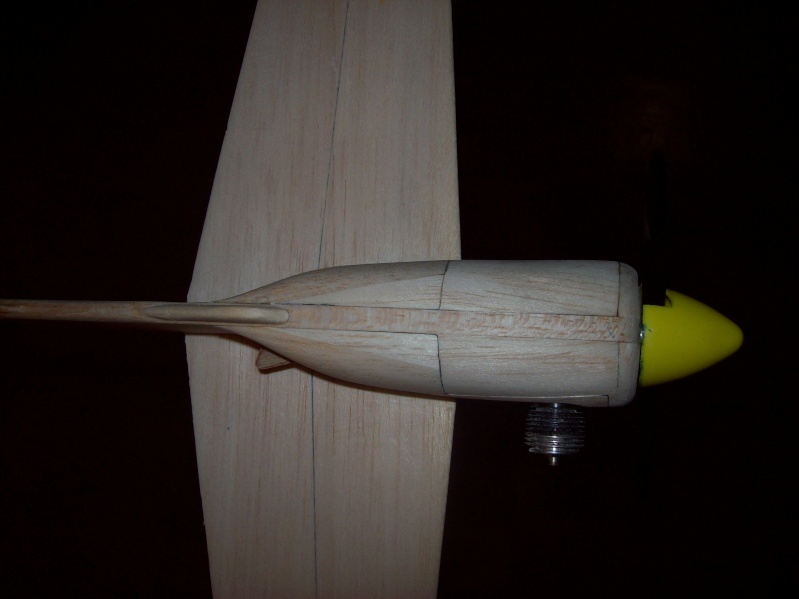
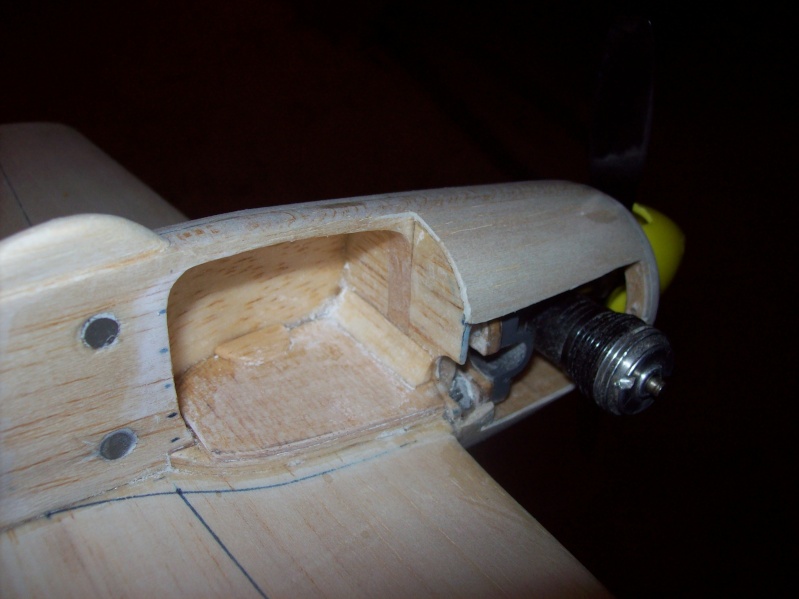
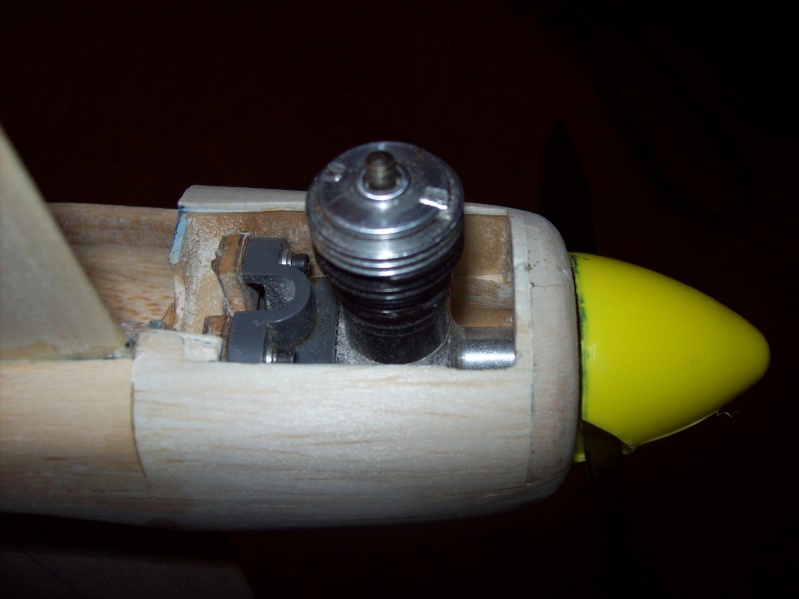
Anyway, here it is in all of it's bare-balsa glory. The outside cheek block/engine hatch is held on in front by a pin that fits in a hole in the nose ring and in the back by two magnets. The little fin on the aft end of the cheek block is a grip so it can be pulled off. Those are some pretty strong magnets!
A BUNCH off pics:


 Re: Mike's Reed Speed 2 Bearcat build thread...
Boy that's a lot of nice work. It looks like it's still pretty lightweight too. I hope she runs as good as she looks. Nice hinge job on the elevator too. Can't wait to see it in its colors.
Rusty
Rusty
_________________
Don't Panic!
...and never Ever think about how good you are at something...
while you're doing it!
My Hot Rock & Blues Playlist
...and never Ever think about how good you are at something...
while you're doing it!
My Hot Rock & Blues Playlist

RknRusty- Rest In Peace

- Posts : 10869
Join date : 2011-08-10
Age : 68
Location : South Carolina, USA
 Re: Mike's Reed Speed 2 Bearcat build thread...
Man.................... That's an example of some awesome craftsmanship.. nose to tail! You must have the patience of a Saint!
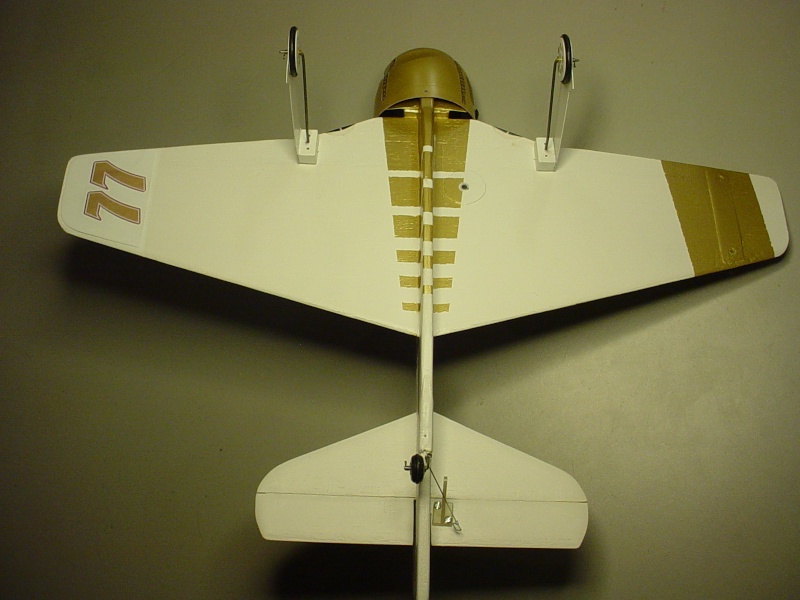
I designed my Rare Bear by eye too. A profile model builder/designer can create a more scale-like "illusion" by using slightly different radiuses on certain panels (wing-tips, canopy/belly etc.) and finish it off with paints that are a shade or two different.. forming a raked "straight" line (cowling width) gradually inward/rearward down the wing-root chord-wise.. top and bottom, using the "lighter shade" only for the outer wing panels. The rest of the model is finished with the "darker shade". This makes an illusion that the fuse is "wider".
I did something similar with the "gold" trim color on my model.


 Re: Mike's Reed Speed 2 Bearcat build thread...
Mike , looks like the exhaust ports are going to be enclosed in the cowling ? Is that not a concern as to where the heat will go ? I know its a short run and all but;  just thinking out load...the model looks really nice I see your coming right along with it there Roddie Details Details

 just thinking out load...the model looks really nice I see your coming right along with it there Roddie Details Details
getback- Top Poster


Posts : 10441
Join date : 2013-01-18
Age : 67
Location : julian , NC
 Re: Mike's Reed Speed 2 Bearcat build thread...
Just for information purposes, I have never used a KB crank on any speed or tach race engine. They will work over 20K, for how long I am not sure. I probably put around an hour on my speed plane and it was turning 21K on the ground.
I spoke with Paul G. And he said some use standard cranks with success in the racing scene.
I spoke with Paul G. And he said some use standard cranks with success in the racing scene.

Cribbs74- Moderator


Posts : 11907
Join date : 2011-10-24
Age : 50
Location : Tuttle, OK
 Re: Mike's Reed Speed 2 Bearcat build thread...
getback wrote:Mike , looks like the exhaust ports are going to be enclosed in the cowling ? Is that not a concern as to where the heat will go ? I know its a short run and all but;just thinking out load...the model looks really nice I see your coming right along with it there Roddie Details Details

Yeah Eric, I had to give that a bit of thought. If you look at the front view you will see that there is a small intake around the spinner in front of the cylinder, and baffles on the inside of the cowl hatch around the cylinder. The idea is that the air coming in the front is directed around the exhaust ports and out behind the cylinder. The inside of the cowl and especially the baffles are going to have a thin coat of JB Weld or something similar to help hold up to the heat. If it doesn't work, I promise to get good video of the fire...
 Re: Mike's Reed Speed 2 Bearcat build thread...
Mike Mulligan wrote:The inside of the cowl and especially the baffles are going to have a thin coat of JB Weld or something similar to help hold up to the heat. If it doesn't work, I promise to get good video of the fire...
You could just fuel-proof the inside of the cowl/baffles as usual.. and make spring-fit heat/exhaust shields from discs of aluminum window screen. Just insert them into the baffles by squeezing them into a curved shape, and they'll spring back to hold securely and dissipate heat.. but will still breathe. Alternately you could try either solid or perforated .005" sheet Brass. These would be lightweight and may prevent scorching of the surrounding balsa.
 Re: Mike's Reed Speed 2 Bearcat build thread...
A real work of art Mike.
I certainly hope she will fly as good as she looks.
Cant wait to see the paint job!
Theo
I certainly hope she will fly as good as she looks.
Cant wait to see the paint job!
Theo

Theo Kleynhans- Gold Member

- Posts : 196
Join date : 2013-12-30
Age : 43
Location : South Africa
Page 2 of 2 •  1, 2
1, 2
 Similar topics
» "Flying Blind" a build-thread for CEF 2018 Speed
» Fellow speed freaks, help me build a pair of speed Bees.
» Reed Speed
» Reed Speed--Best Model Poll
» Reed Speed 2014 Results!
» Fellow speed freaks, help me build a pair of speed Bees.
» Reed Speed
» Reed Speed--Best Model Poll
» Reed Speed 2014 Results!
Page 2 of 2
Permissions in this forum:
You cannot reply to topics in this forum

 Rules
Rules


