Log in
Search
Latest topics
» Tee Dee .020 combat modelby roddie Today at 1:34 pm
» Chocolate chip cookie dough.........
by roddie Today at 1:13 pm
» Purchased the last of any bult engines from Ken Enya
by sosam117 Today at 11:32 am
» Free Flight Radio Assist
by rdw777 Today at 9:24 am
» My latest doodle...
by batjac Yesterday at 9:47 pm
» My N-1R build log
by roddie Yesterday at 8:50 pm
» Funny what you find when you go looking
by rsv1cox Wed Nov 20, 2024 3:21 pm
» Landing-gear tips
by 1975 control line guy Wed Nov 20, 2024 8:17 am
» Cox NaBOO - Just in time for Halloween
by rsv1cox Tue Nov 19, 2024 6:35 pm
» Canada Post strike - We are still shipping :)
by Cox International Tue Nov 19, 2024 12:01 pm
» Duende V model from RC Model magazine 1983.
by getback Tue Nov 19, 2024 6:08 am
» My current avatar photo
by roddie Mon Nov 18, 2024 9:05 pm
Cox Engine of The Month
Ian's Cox Flight Contest progress
Page 3 of 4
Page 3 of 4 •  1, 2, 3, 4
 Re: Ian's Cox Flight Contest progress
duke.johnson wrote:Like I said, I'm good with the RTP idea. I didn't mean to start something. I like the idea and now have a reason to try RTP. I never win contests, so I'm hear for the fun and to be apart of something cool.
I don't think you have started anything but I am conscious of the fact that if someone streaks into the lead at the beginning of a contest, other contestants might give in or lose interest particularly if they feel disadvantaged. I will not let that happen.
I have also checked my "lecky" RTP and the C of G is about 1/16" ahead of the attachment point. That flies flat and true but not for much longer! The scalpel is out ready to prepare it for a Cox engine!

ian1954- Diamond Member

- Posts : 2688
Join date : 2011-11-16
Age : 70
Location : England
 Re: Ian's Cox Flight Contest progress
No flying this weekend - Garden maintenance took priority. The borders around the "lawn" / flying area collapsed.
I had 14 railway sleepers delivered, each 2.4 metres long and very heavy. Only just inside my lifting limit - although I ache after carrying them from the road in front of the house, down the side and to the bottom of the garden!

Now to tidy up the grass! I hate gardening - I could quite easily compromise and settle for green concrete!
I had 14 railway sleepers delivered, each 2.4 metres long and very heavy. Only just inside my lifting limit - although I ache after carrying them from the road in front of the house, down the side and to the bottom of the garden!

Now to tidy up the grass! I hate gardening - I could quite easily compromise and settle for green concrete!

ian1954- Diamond Member

- Posts : 2688
Join date : 2011-11-16
Age : 70
Location : England
 Re: Ian's Cox Flight Contest progress
I know how you feel about gardening, I don't like it much either. Luckily it's my wife's hobby, as she's got agricultural blood... eeewww, that sounds kind of weird. But it's a a nice little area you have, very pleasing to the senses. Especially with a 1/2A engine screaming around in it.
_________________
Don't Panic!
...and never Ever think about how good you are at something...
while you're doing it!
My Hot Rock & Blues Playlist
...and never Ever think about how good you are at something...
while you're doing it!
My Hot Rock & Blues Playlist

RknRusty- Rest In Peace

- Posts : 10869
Join date : 2011-08-10
Age : 68
Location : South Carolina, USA
 Re: Ian's Cox Flight Contest progress
The NightHawk is one tough little plane! It is getting heavier - the fin has been glued back on many times (my landings are somersaults and it uses the fin as an anchor), I have dings in it all over the place, the bellcrank has torn a chunk out of the side (I have reverted to two lines now!) and butyrate dope is not fuel proof! There were three coats in the area behind the engine!
Apart from that it is still a little beauty!
The engine needs a service - not developing full power now so that will be next on my list!
I also had a bit of a disaster trying to hover it with an onboard camera!

Mind you, the NightHawk isn't the only thing getting damaged!

Apart from that it is still a little beauty!
The engine needs a service - not developing full power now so that will be next on my list!
I also had a bit of a disaster trying to hover it with an onboard camera!

Mind you, the NightHawk isn't the only thing getting damaged!


ian1954- Diamond Member

- Posts : 2688
Join date : 2011-11-16
Age : 70
Location : England
 Re: Ian's Cox Flight Contest progress
Now for my little catastrophe.
I fitted the camera that Kim recommended - it is all his fault! - again, I considered the position, effect on C of G very carefully giving it a great deal of thought as to how I would construct a mounting.
2 seconds later, I came up with this
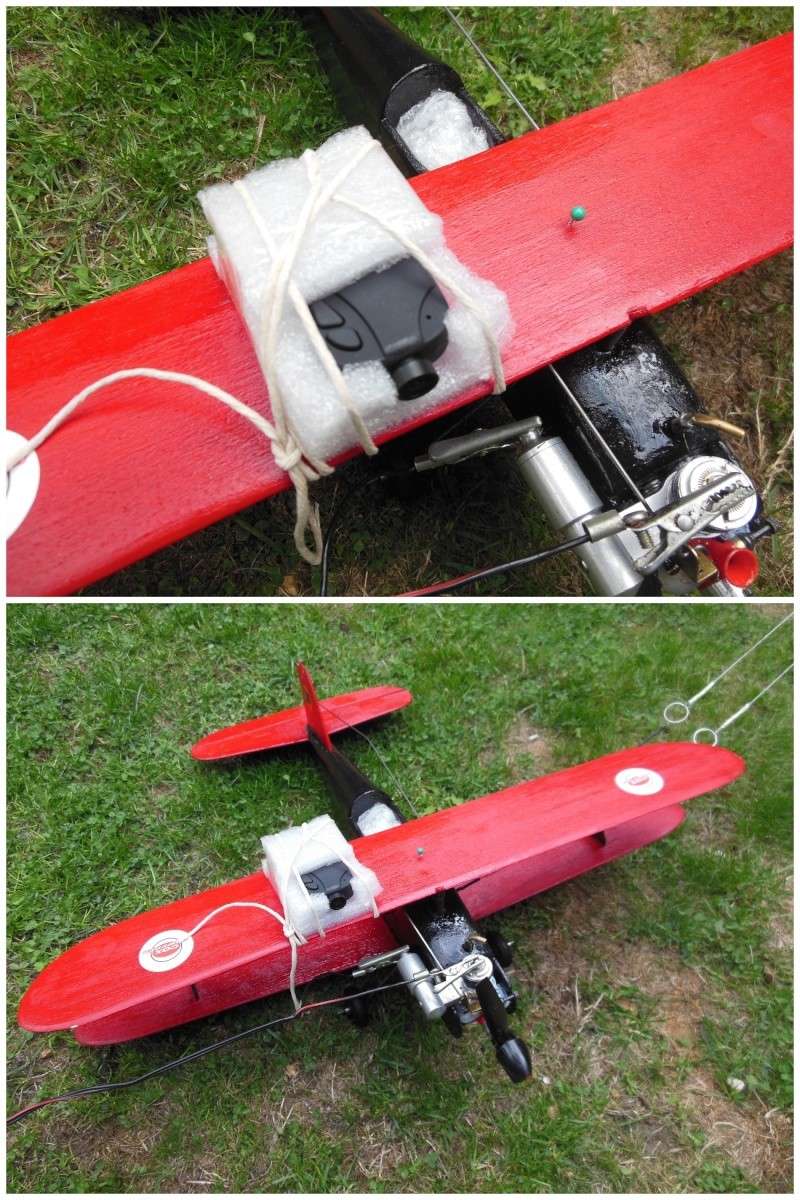
Magnificent workmanship methinks!
Then ............................the plane was all over the place but OK until I slowed it down to attempt a hover! Another somersault!.
Don't watch this if you are prone to dizzyness!
I fitted the camera that Kim recommended - it is all his fault! - again, I considered the position, effect on C of G very carefully giving it a great deal of thought as to how I would construct a mounting.
2 seconds later, I came up with this

Magnificent workmanship methinks!
Then ............................the plane was all over the place but OK until I slowed it down to attempt a hover! Another somersault!.
Don't watch this if you are prone to dizzyness!

ian1954- Diamond Member

- Posts : 2688
Join date : 2011-11-16
Age : 70
Location : England
 Re: Ian's Cox Flight Contest progress
That's hilarious! Good stuff Ian now standby while I go throw up 
Seriously though that was pretty cool. Thanks for the video.
Ron

Seriously though that was pretty cool. Thanks for the video.
Ron

Cribbs74- Moderator


Posts : 11907
Join date : 2011-10-24
Age : 50
Location : Tuttle, OK
 Re: Ian's Cox Flight Contest progress
Yeah, saw Ian zoom by every 2 seconds. Pretty cool.
_________________
Don't Panic!
...and never Ever think about how good you are at something...
while you're doing it!
My Hot Rock & Blues Playlist
...and never Ever think about how good you are at something...
while you're doing it!
My Hot Rock & Blues Playlist

RknRusty- Rest In Peace

- Posts : 10869
Join date : 2011-08-10
Age : 68
Location : South Carolina, USA
 Re: Ian's Cox Flight Contest progress
Nice job Ian. Every thing looks like it going very well, except the landing.

duke.johnson- Diamond Member

- Posts : 1734
Join date : 2012-11-05
Age : 53
Location : Rochester, Washington
 Re: Ian's Cox Flight Contest progress
You must have very mice neighbours.

JanPar- Moderate Poster

- Posts : 12
Join date : 2013-07-08
Location : England
 Re: Ian's Cox Flight Contest progress
Mice tend to not argue about noise or much of anything else. They are also usually quiet. Some days I wish some of my neighbors were mice too.JanPar wrote:You must have very mice neighbours.
Phil

pkrankow- Top Poster

- Posts : 3025
Join date : 2012-10-02
Location : Ohio
 Re: Ian's Cox Flight Contest progress
Great vid Ian.
On board, RTP video. That's got to be a first.
In our little corner of the world, this is historic.

Thanks, I'm eying my side yard differently now.
Bob
On board, RTP video. That's got to be a first.
In our little corner of the world, this is historic.

Thanks, I'm eying my side yard differently now.
Bob

dckrsn- Diamond Member

- Posts : 2750
Join date : 2010-10-21
Age : 71
Location : Long Island, New York
 Re: Ian's Cox Flight Contest progress
My progress has now come to a halt.
I have had several issues and not really posted anything about one of them as I couldn't resolve it. I mentioned previously that the engine was a little down on power and I would take it out and strip it down.
I removed it, bench mounted it, ran it and it was perfect - despite around 4 hours on the clock! I checked the tank and fuel line - nothing to be found. Remounted the engine and then got intermittent performance. Head scratcher!
I ignored this and continued. The NightHawk is ONE VERY TOUGH LITTLE PLANE! It has survived many a crash landing, collision with me, clipping bushes and a vertical "tail drop" from four feet. I was trying to hover it and the engine cut!
However, the little aeroplane has now increased in weight by an ounce. Nothing broken but I have lost count of the amount of times I have glued the fin back on and the tailplane has been reattached three times. That with the weight added to the front to balance out (and a wing reattachment) has brought the weight up.
I also have had problems with take offs. I only managed three or four from the ground - I have had numerous attempts resulting in no flight log as it never left the gound before tipping over!
Landings!!!!!!!! Mostly tip overs but some somersaults and one triple somersault. Should enter this for the Olympics!
My last flight was a disaster - totally out of control but I discovered what had been causing my engine issues!
Any way, time to retire the NightHawk! I will let it rest before giving it a Viking funeral!
As you will be aware - my flight area is limited but I spent a few hours yesterday top dressing the "lawn", levelling it and following this by reseeding.
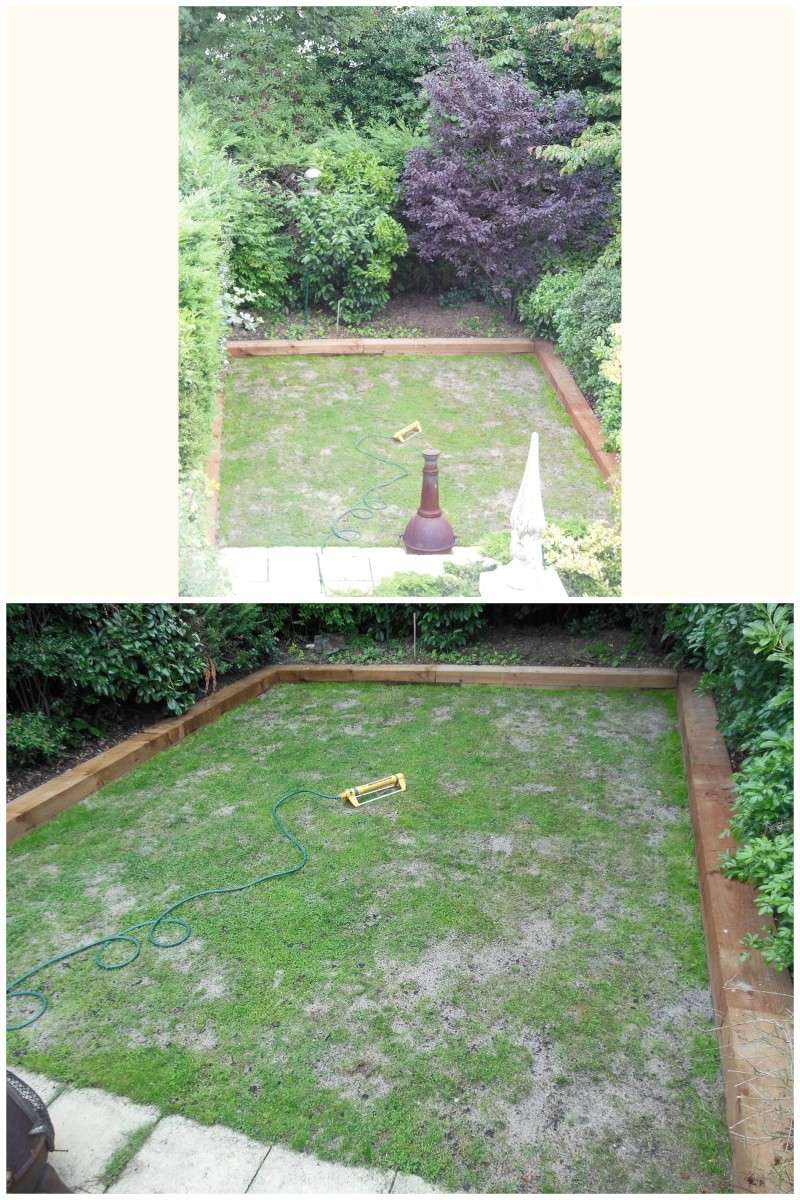
You can see that a lot of the dips, now dressed with a sand/soil/peat mixture are in the flight circle. I wonder if my landings did that!
Back to my engine issues - they weren't anything to do with the engine! It was my radio gear!
I have been using a Spektrum AR400 receiver and a couple of tiny analogue servos but I made a big mistake in the setup which only came to light following my hammering the servos trying to do wing overs (best result 70 degrees and a near miss with the ground!). Also, I made things worse hovering it while flapping the tailplane. (Looked good though but alas no video!).
Can you spot my mistake? Clue - this photo has replacement digital servos. Also, it shows how small the equiment is - you can install it almost anywhere!
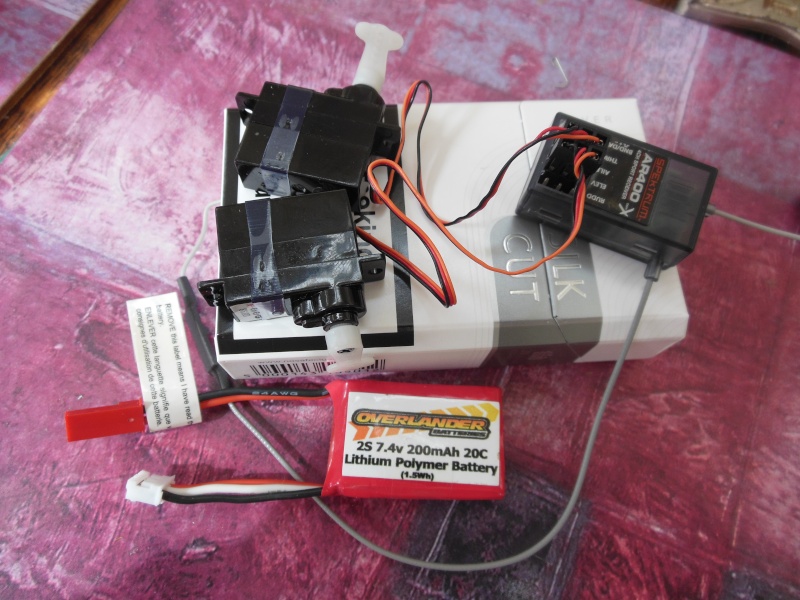
I will let you peruse the photo a while befor answering this for you!
I will digress now.
I had planned to replace the NightHawk with a Sig Hummer. I realised I could program "flaperons" so slow it down (perfect my take offs and landings?) and have the elevator and aerolons linked. However, I posted this in the Models section and Ron hinted that it would be too big.
Too big? What is he talking about? Too big??? A liitle large! It is a 1/2 A aeroplane! Anyway, I ignored this until I opened the box to plan building it.
A little large! It is bloody enormous!
So I have opted for the Keil Kraft Radian and am back to converting control line to radio control and not the other way round.
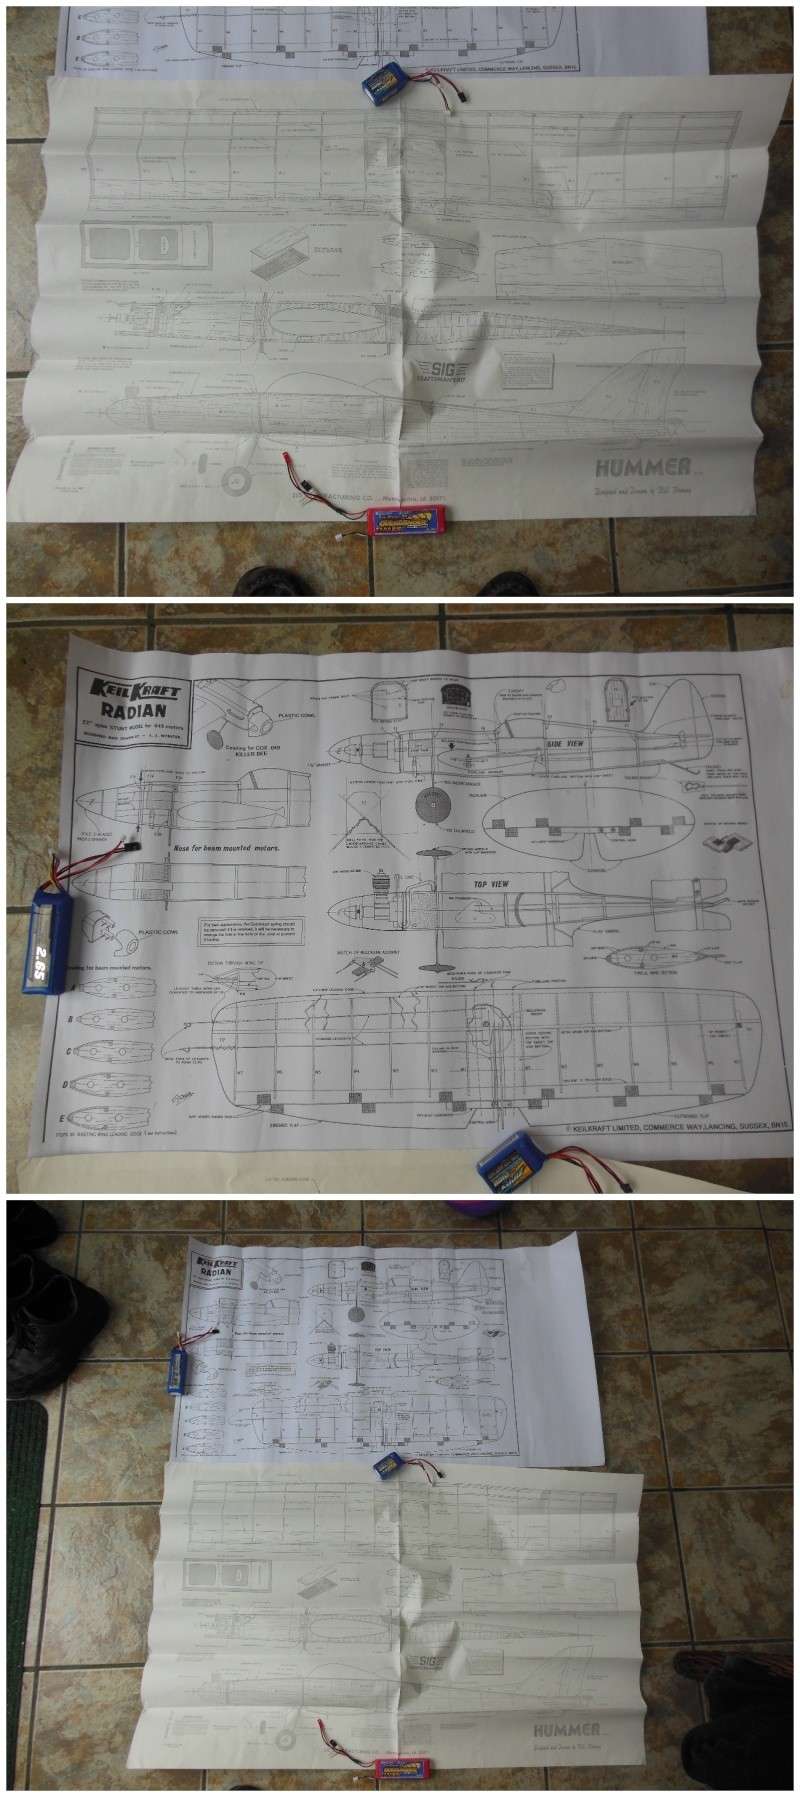
The Hummer is twice the size of the Radian!
Back to the engine issue.
Did you guess? Top marks if you did!
I selected the battery based on weight and size. I checked the receiver could handle this and that told me 3.5 to 9.6 volts. The battery indicates 7.4v. So I thought - no problem. I realised during the course of charging the battery that, fully charged, it hit 8.4v - still no problem, methinks!
But oh dear! My last flight was on a fuly charged battery and ..............the servos. They are limited to 6.0 volts and they haven't been taking well to my increased stick waggling. On the last flight they did their own thing - the throttle servo had obviously been backing off for some time.
Hey ho! You live and learn. I now have a stepper down to reduce the voltage and will be using digital servos.
The build has started!
I have had several issues and not really posted anything about one of them as I couldn't resolve it. I mentioned previously that the engine was a little down on power and I would take it out and strip it down.
I removed it, bench mounted it, ran it and it was perfect - despite around 4 hours on the clock! I checked the tank and fuel line - nothing to be found. Remounted the engine and then got intermittent performance. Head scratcher!
I ignored this and continued. The NightHawk is ONE VERY TOUGH LITTLE PLANE! It has survived many a crash landing, collision with me, clipping bushes and a vertical "tail drop" from four feet. I was trying to hover it and the engine cut!
However, the little aeroplane has now increased in weight by an ounce. Nothing broken but I have lost count of the amount of times I have glued the fin back on and the tailplane has been reattached three times. That with the weight added to the front to balance out (and a wing reattachment) has brought the weight up.
I also have had problems with take offs. I only managed three or four from the ground - I have had numerous attempts resulting in no flight log as it never left the gound before tipping over!
Landings!!!!!!!! Mostly tip overs but some somersaults and one triple somersault. Should enter this for the Olympics!
My last flight was a disaster - totally out of control but I discovered what had been causing my engine issues!
Any way, time to retire the NightHawk! I will let it rest before giving it a Viking funeral!
As you will be aware - my flight area is limited but I spent a few hours yesterday top dressing the "lawn", levelling it and following this by reseeding.

You can see that a lot of the dips, now dressed with a sand/soil/peat mixture are in the flight circle. I wonder if my landings did that!
Back to my engine issues - they weren't anything to do with the engine! It was my radio gear!
I have been using a Spektrum AR400 receiver and a couple of tiny analogue servos but I made a big mistake in the setup which only came to light following my hammering the servos trying to do wing overs (best result 70 degrees and a near miss with the ground!). Also, I made things worse hovering it while flapping the tailplane. (Looked good though but alas no video!).
Can you spot my mistake? Clue - this photo has replacement digital servos. Also, it shows how small the equiment is - you can install it almost anywhere!

I will let you peruse the photo a while befor answering this for you!
I will digress now.
I had planned to replace the NightHawk with a Sig Hummer. I realised I could program "flaperons" so slow it down (perfect my take offs and landings?) and have the elevator and aerolons linked. However, I posted this in the Models section and Ron hinted that it would be too big.
Too big? What is he talking about? Too big??? A liitle large! It is a 1/2 A aeroplane! Anyway, I ignored this until I opened the box to plan building it.
A little large! It is bloody enormous!
So I have opted for the Keil Kraft Radian and am back to converting control line to radio control and not the other way round.

The Hummer is twice the size of the Radian!
Back to the engine issue.
Did you guess? Top marks if you did!
I selected the battery based on weight and size. I checked the receiver could handle this and that told me 3.5 to 9.6 volts. The battery indicates 7.4v. So I thought - no problem. I realised during the course of charging the battery that, fully charged, it hit 8.4v - still no problem, methinks!
But oh dear! My last flight was on a fuly charged battery and ..............the servos. They are limited to 6.0 volts and they haven't been taking well to my increased stick waggling. On the last flight they did their own thing - the throttle servo had obviously been backing off for some time.
Hey ho! You live and learn. I now have a stepper down to reduce the voltage and will be using digital servos.
The build has started!

ian1954- Diamond Member

- Posts : 2688
Join date : 2011-11-16
Age : 70
Location : England
 Re: Ian's Cox Flight Contest progress
Although I said that the build had started - it didn't get very far.
The KK Radian beam mounts were designed to accommodate British diesels. These are wider than the Medallion (broader in the beam) and so I had to do a bit of fiddling to make the necessary adjustments while keeping the engine in line.
The main event though was because I had narrowed the gap between the engine bearers - the standard tank wouldn't fit. The tank has also got to be built into the fuselage between the bearers - it cannot be dropped in.

The build started for real today.
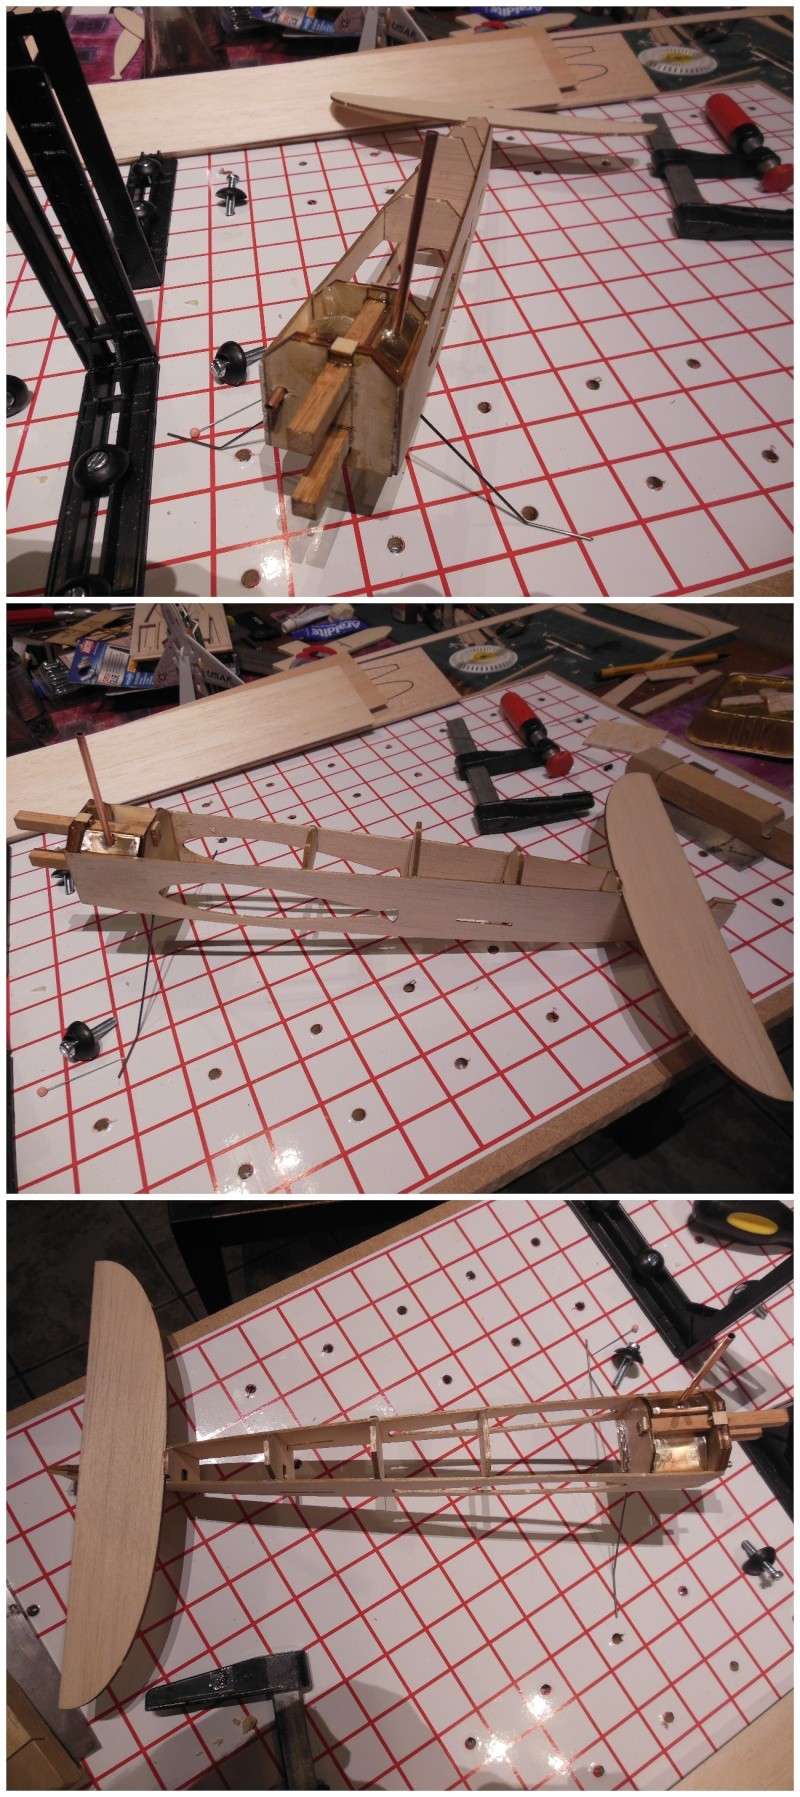
The KK Radian beam mounts were designed to accommodate British diesels. These are wider than the Medallion (broader in the beam) and so I had to do a bit of fiddling to make the necessary adjustments while keeping the engine in line.
The main event though was because I had narrowed the gap between the engine bearers - the standard tank wouldn't fit. The tank has also got to be built into the fuselage between the bearers - it cannot be dropped in.

The build started for real today.


ian1954- Diamond Member

- Posts : 2688
Join date : 2011-11-16
Age : 70
Location : England
 Re: Ian's Cox Flight Contest progress
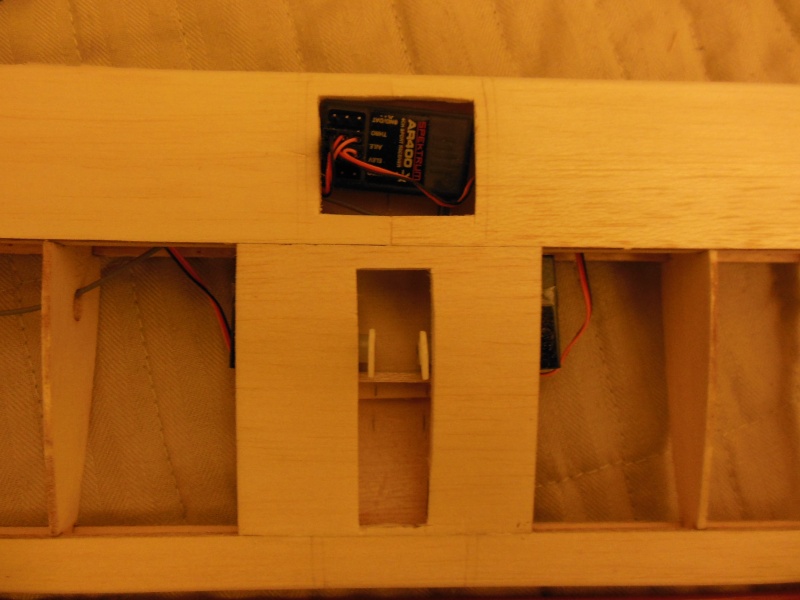
After stalling with the tank, I hit another stalling point. With the fuselage carcass completed - I realised there wasn't going to be much room for the radio equipment. Three servos, receiver, e.t.c.....
So after much careful thought (at least three seconds) - I decided that I would need to butcher the wing during construction.

Then I started to cover it. I decided to use ""Lightex" and bought one of those little irons with a stick for a handle. I spent and hour wondering why I couldn't get the stuff to stick, messed around with the temperature, collected a few burns and then decided to read the destructions.
Oh I see, you have to remove the backing! The backing on this stuff is clear - no wonder I couldn't see it!
Anyway, after several hours of fiddling, stretching, attempts at wrinkle removal ............ it started to come together.


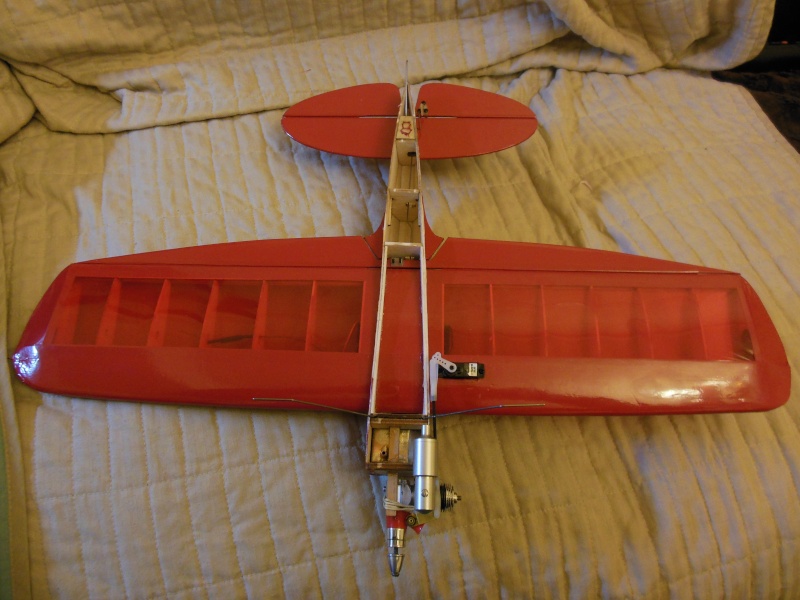

The radio gear - well part of it is carved into the wing.
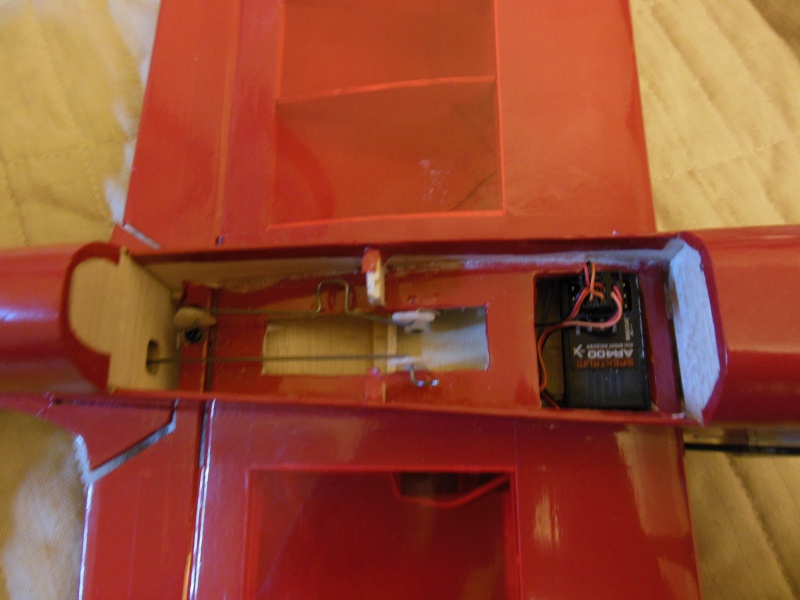
It is still far from finished. I still have to squeeze the following into the plane but I am now in a position to adjust the balance with it.

I have also been able to test the RC as installed. It now has throttle, flaps and elevator and independent control of flaps (for slow flying?!!)
Another control line/RC plane is on the way for the contest engine!
So after much careful thought (at least three seconds) - I decided that I would need to butcher the wing during construction.


Then I started to cover it. I decided to use ""Lightex" and bought one of those little irons with a stick for a handle. I spent and hour wondering why I couldn't get the stuff to stick, messed around with the temperature, collected a few burns and then decided to read the destructions.
Oh I see, you have to remove the backing! The backing on this stuff is clear - no wonder I couldn't see it!
Anyway, after several hours of fiddling, stretching, attempts at wrinkle removal ............ it started to come together.


The radio gear - well part of it is carved into the wing.

It is still far from finished. I still have to squeeze the following into the plane but I am now in a position to adjust the balance with it.

I have also been able to test the RC as installed. It now has throttle, flaps and elevator and independent control of flaps (for slow flying?!!)
Another control line/RC plane is on the way for the contest engine!

ian1954- Diamond Member

- Posts : 2688
Join date : 2011-11-16
Age : 70
Location : England
 Re: Ian's Cox Flight Contest progress
Your linked rate might be off. The flaps usually move much less than the elevator. Otherwise pretty darn cool!
RTP/RC is crazy isn't it?
Could you sacrifice the weight and do separate servos for the flaps, and later go full on RC? Make the rudder adjustable and no servo if you like offset. If you like rudder, then you need 2 more servos...
Phil
RTP/RC is crazy isn't it?
Could you sacrifice the weight and do separate servos for the flaps, and later go full on RC? Make the rudder adjustable and no servo if you like offset. If you like rudder, then you need 2 more servos...
Phil

pkrankow- Top Poster

- Posts : 3025
Join date : 2012-10-02
Location : Ohio
 Re: Ian's Cox Flight Contest progress
The Radian is an all out control line kit. The inboard wing is longer than the outboard side and so I think it would make a wobbly RC plane.
I haven't a clue on settings for flaps or flaps and elevator ratios.
I do, however, have an advantage over pure control line in that (assuming it flies!) I can adjust everything in flight.
If I had have mirrored the bellcrank with a single servo throwing the flaps and elevator at the same time - I would probably have the right settings.
I did it this way so I could use the flaps to slow it down. Very small flying area - the Night Hawk whizzed around a little too fast and although I could throttle the engine back - it wasn't a happy little plane when slowed!
All this is experimental - trial and error but I will be well miffed if I bust it with the amount of time it has taken to build it so far.
Still, nothing ventured - nothing gained!

ian1954- Diamond Member

- Posts : 2688
Join date : 2011-11-16
Age : 70
Location : England
 Re: Ian's Cox Flight Contest progress
I would maiden without linking the flaps. You planning to do RTP stunt pattern?
Phil
Phil

pkrankow- Top Poster

- Posts : 3025
Join date : 2012-10-02
Location : Ohio
 Re: Ian's Cox Flight Contest progress
WOW... I just read this entire thread for the 1st time. Ian... "hats off to you"!!! Not an easy thing to accomplish! I have been interested in trying RTP C/L flight for years... and "set out" to do it once; years ago... and never followed through on my plan.
I wanted to try a 2 line non-RC set-up with one "fixed" line to one side of the bell-crank, and one "floating" line, to the other. The "floating" line was proposed to run "inside" the pole; exiting through the top... while the "fixed" line hook was held at a "captive" height on the pole using upper/lower bushings (4-6" dia. plastic lids from tubs of margarine, held by hose clamps) Pulling and releasing "one line" from outside the circle, would control the flight... (no throttle control, of course...)
You may want to try "bushing" your pole in this way... It will keep your line(s) up at a constant level throughout the flight... which I think "might" help. If your hook is allowed to "slip" up/down the pole while climbing/diving... it's adding a good amount of "lag" in your controls.
Just a thought... I THOUGHOUGHLY enjoyed reading your comments and watching the videos you posted!!! KUDOS!!!!!!!!!!!
 Re: Ian's Cox Flight Contest progress
Hi Roddie,
Sorry my reply is delayed but I like your comments.
Everything is experimental - I would like to mount the line on the pole with a bearing but I have found that height is crucial!
The flying area is tiny and so if the line is fixed too high a ground take off is difficult because of the resulting angle the aeroplane would be forced into. One wing much higher than the other.
If I am to attempt "wing overs" then the line will also need the be secured at the top of the pole - otherwise the pole above where the line is pivoting will get in the way!
There will be more trial and error. All ideas are welcome!

ian1954- Diamond Member

- Posts : 2688
Join date : 2011-11-16
Age : 70
Location : England
 Re: Ian's Cox Flight Contest progress
No apology is needed Ian... You had quite a stressful week, so I read. Glad you're ok.
I see what you mean about the height of the lines being critical. This has always been something I've wanted to try... and I'm fascinated that you're doing it.
I think you could still mount a "lower-bearing" of the type I mentioned (5"-6" dia. round plastic margarine lid) with a hole in the center; the size of your pole's O.D. with a hose-clamp "stop" below it... at a height on the pole that will permit R.O.G. Then your hook can "raise" up the pole from that bottom set-point, as the model gains altitude.
What are you using for a "stop" at the top of the pole? I was trying to visualize something like a "swivel" that would permit "stunting" without binding (kind of makes you really appreciate your arm and wrist... doesn't it?) If you build a "bail" (like on a spin-casting fishing reel) as your "hook"... once it gets to the top of the pole, it can flip over... ... ...
 Re: Ian's Cox Flight Contest progress
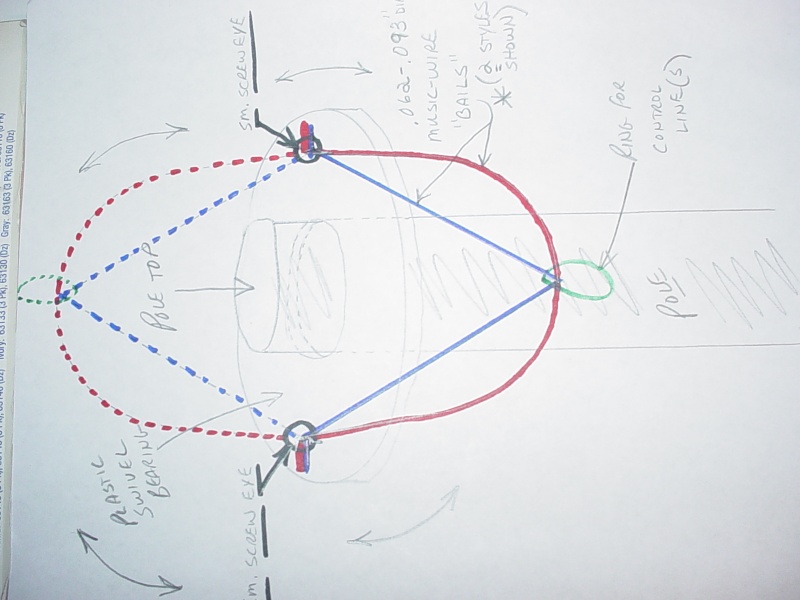
Hello again Ian, I thought all day about how to go about making an RTP "stunt-bearing" using the bail idea I mentioned. You know how we make "V" shaped landing gear legs out of music wire, and put short "bends" on the ends for axles? Picture that in your mind while I explain my idea.
If you make a disc out of lightweight mat'l. lets say; 3" to 5" in dia. with a center hole, the size of your pole... and attach 2 sm. screw-eyes 180 deg. apart...close to the edges of the disc, you could then "squeeze" the gear legs together and insert the "axle" bends through the holes in the screw-eyes. This would enable the "bail" to swivel 180 degrees. When the disc/bearing reaches the top of the pole, the "bail" is free to "flip" over the pole.
Ideally; the "bail" should be mounted "on center" to prevent binding. Suggesting the screw-eyes was more for a "visualization"... Inverting the axle bends, and drilling holes in the sides of a bearing to accept them, and "spreading" the bail open to insert it, would work better I think.
The music-wire bail "itself"... could be more of a "radius"... rather than a "V" shape. Either way; as long as there's clearance at the top of the pole, for the bail to flip over... you'd have the 360/180 you'd need to stunt.
I had concerns about "pole-flexing"... but the more I thought about it, this action could be advantageous if it got breezy; by providing a shock absorbing action when the line(s) tighten after going a little slack... instead of the plane "tugging hard" at a rigid pole.
I made a drawing... but it's not great. It may help you to visualize the concept though... both the "V" and "U" shaped bails are shown. Let me know if this seams unclear.

 Re: Ian's Cox Flight Contest progress
It took me a minute because the pencil is so light I didn't see the bearing disk, but that's a workable piece of engineering. Good thinking, Roger.
_________________
Don't Panic!
...and never Ever think about how good you are at something...
while you're doing it!
My Hot Rock & Blues Playlist
...and never Ever think about how good you are at something...
while you're doing it!
My Hot Rock & Blues Playlist

RknRusty- Rest In Peace

- Posts : 10869
Join date : 2011-08-10
Age : 68
Location : South Carolina, USA
 Re: Ian's Cox Flight Contest progress
Thanks Rusty. Lots of designs look good on paper... but will they actually work with dynamic forces induced? This one's been tough to get out of my head. "I wanna' build it now"... but I don't have a RTF R/C plane; let alone, one set up for RC/RTP. The next best thing right now, is to make a bearing-sleeve for the pole, with the 2 diff. style bails and a non-binding "stop-cap" for the top of the pole. I'm thinking 1" PVC pipe for the pole may work, with an inner-rod of something stiffer, to limit the flex and keep it from breaking. The bearing-sleeve could be made from 1-1/4" PVC pipe and a 1" PVC pipe-cap for the poles' top.
Using all PVC plumbing pipe/fittings would "simplify" the building process, be easy/cheap to obtain... and should exhibit the "low-friction" characteristics necessary for this concept to work smoothly.
The "bail" I would make a mock-up from clothes-hanger wire (approx. 3/32" dia. and easy to bend) in both; a "V" style and a "U" style as I mentioned; with the ends bent "inward" 90 deg. to fit into holes drilled in the side of the sleeve, 180 deg. apart. If this works smoothly and clears the "cap-stop" at the pole's top; I will make-up music-wire bails afterward.
When I get a prototype built, I'll post pics which will help to visualize the concept for Ian, and anyone else who may want to try it.
 Re: Ian's Cox Flight Contest progress
Roddie
I hadn't seen the videos before but, as you had spotted, the layout restricts any stunt flying and, although I have cranked up some contest time, it is a little boring flying round and round - especially when I don't have to do anything! I have left the NightHawk unattended!
After seeing your drawing, I thought I would adapt the idea but as I am not keen on "plastic" but the mention of plumbing fittings sparked it further.
So here we go! Not plastic but a 28mm brass fitting - actually the centre piece of a 28mm compression joint.
Mounted in the lathe ready to machine. Parting tool at the ready behind the threads.

First thread removed and ready to bore and enlarge the centre.
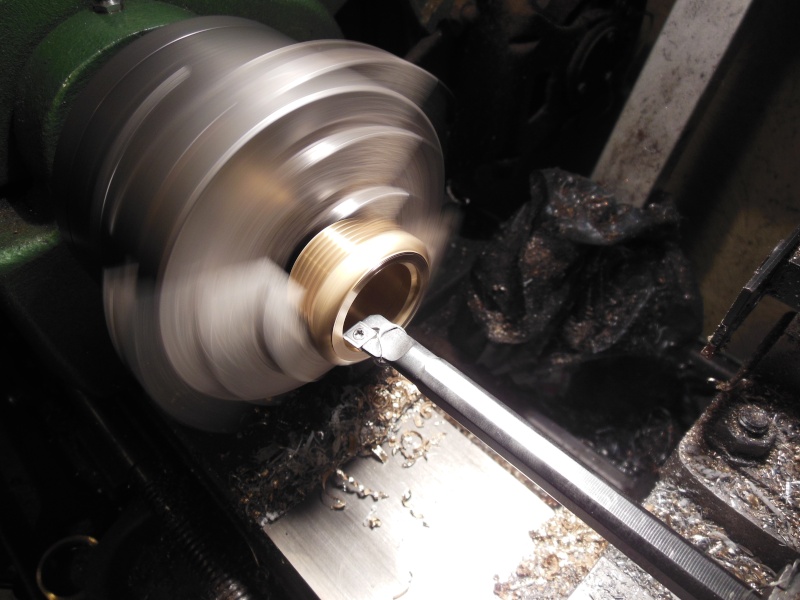
Reversed and ready to remove the second thread.

Parting off the second thread
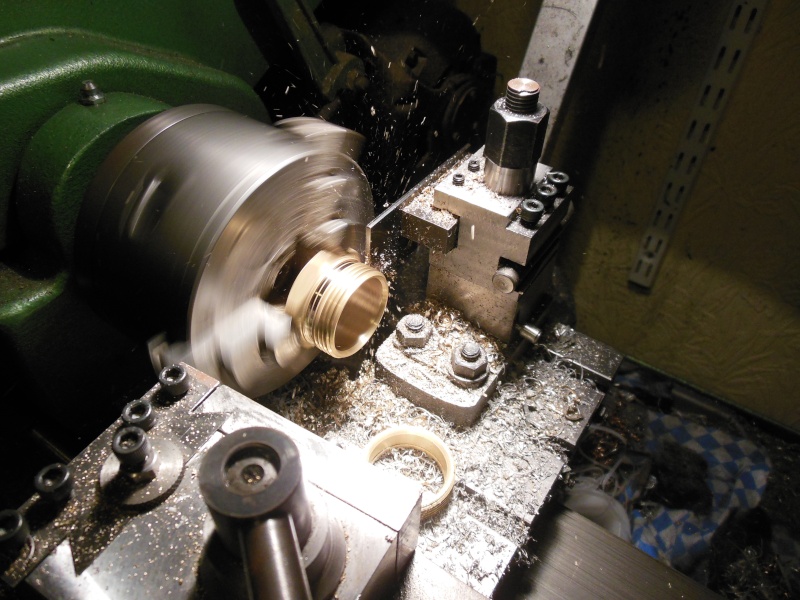
Lathe work finished! Five minutes so far!
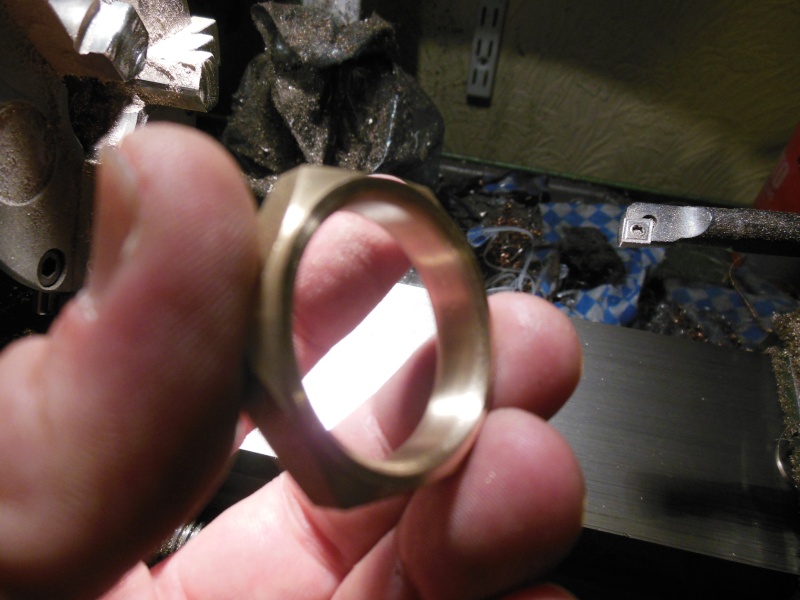
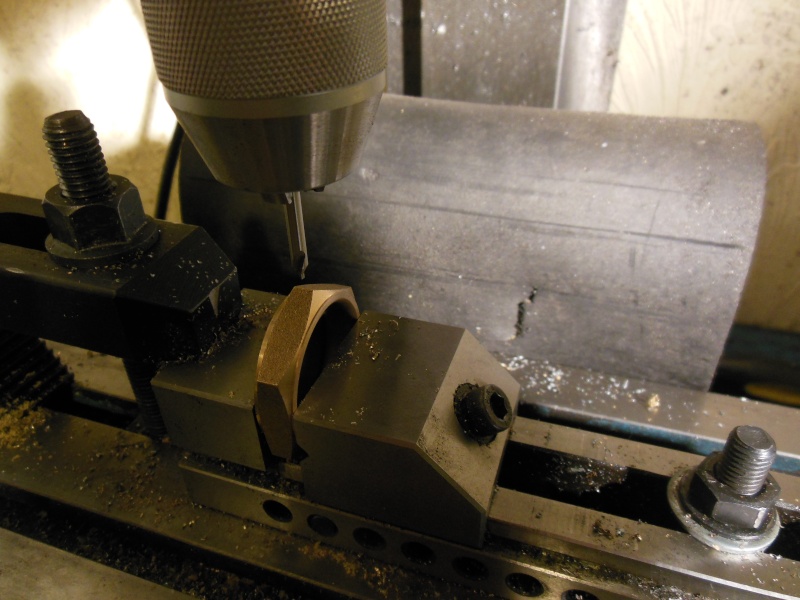
Ready for drilling
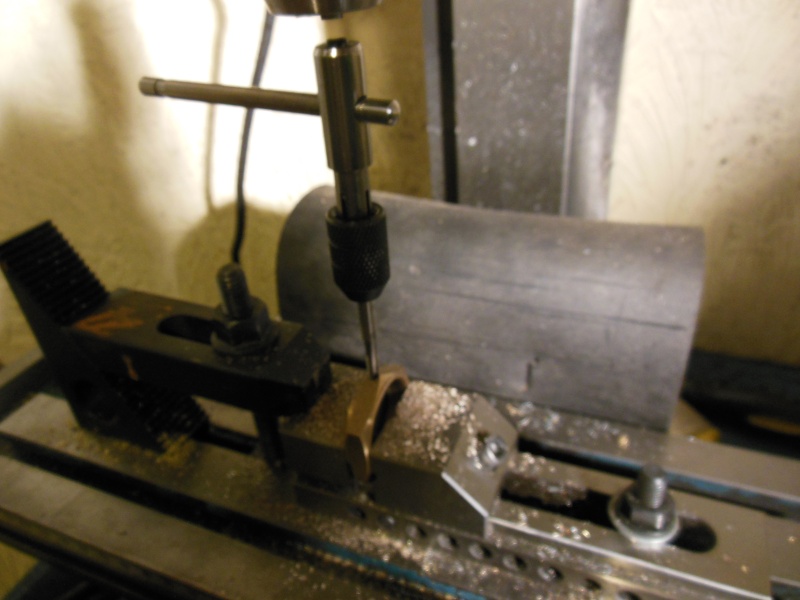
and tapping
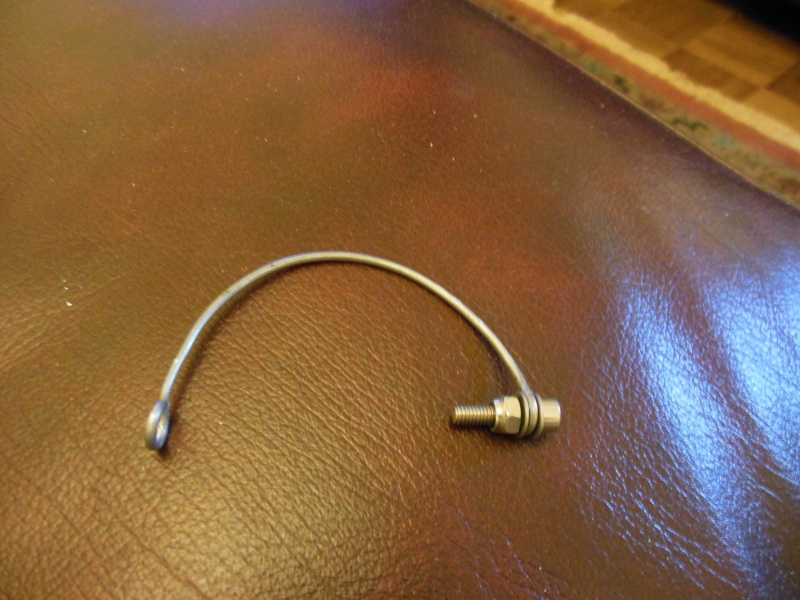
a bit of wire bending
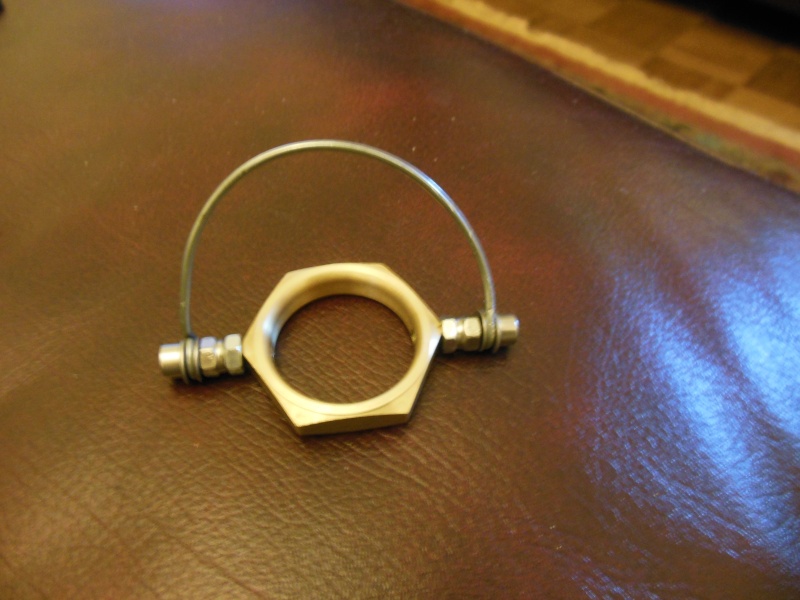
assembly
on the pole. My version of your drawing! 15 minutes - start to finish. (It has taken 30 minutes to post this)
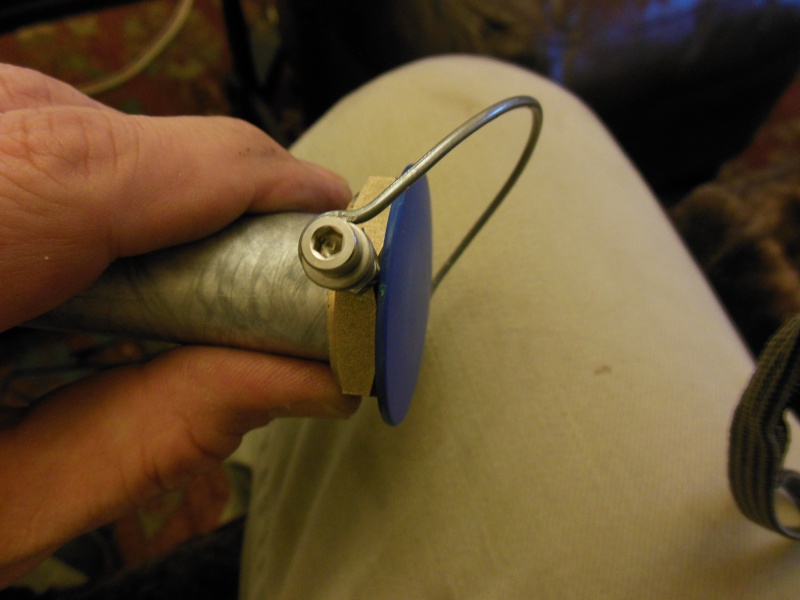
Thanks.
I hadn't seen the videos before but, as you had spotted, the layout restricts any stunt flying and, although I have cranked up some contest time, it is a little boring flying round and round - especially when I don't have to do anything! I have left the NightHawk unattended!
After seeing your drawing, I thought I would adapt the idea but as I am not keen on "plastic" but the mention of plumbing fittings sparked it further.
So here we go! Not plastic but a 28mm brass fitting - actually the centre piece of a 28mm compression joint.
Mounted in the lathe ready to machine. Parting tool at the ready behind the threads.

First thread removed and ready to bore and enlarge the centre.

Reversed and ready to remove the second thread.

Parting off the second thread

Lathe work finished! Five minutes so far!

Ready for drilling

and tapping

a bit of wire bending

assembly

on the pole. My version of your drawing! 15 minutes - start to finish. (It has taken 30 minutes to post this)

Thanks.

ian1954- Diamond Member

- Posts : 2688
Join date : 2011-11-16
Age : 70
Location : England
Page 3 of 4 •  1, 2, 3, 4
 Similar topics
» Second flight contest
» CEF 2016 flight contest
» COX Flight Contest: What's Your Entry?
» My flight contest entry
» New Plane for Flight Contest
» CEF 2016 flight contest
» COX Flight Contest: What's Your Entry?
» My flight contest entry
» New Plane for Flight Contest
Page 3 of 4
Permissions in this forum:
You cannot reply to topics in this forum

 Rules
Rules


