Log in
Search
Latest topics
» Purchased the last of any bult engines from Ken Enyaby sosam117 Today at 11:32 am
» Chocolate chip cookie dough.........
by rsv1cox Today at 10:20 am
» Tee Dee .020 combat model
by rsv1cox Today at 10:07 am
» Free Flight Radio Assist
by rdw777 Today at 9:24 am
» My latest doodle...
by batjac Yesterday at 9:47 pm
» My N-1R build log
by roddie Yesterday at 8:50 pm
» Funny what you find when you go looking
by rsv1cox Wed Nov 20, 2024 3:21 pm
» Landing-gear tips
by 1975 control line guy Wed Nov 20, 2024 8:17 am
» Cox NaBOO - Just in time for Halloween
by rsv1cox Tue Nov 19, 2024 6:35 pm
» Canada Post strike - We are still shipping :)
by Cox International Tue Nov 19, 2024 12:01 pm
» Duende V model from RC Model magazine 1983.
by getback Tue Nov 19, 2024 6:08 am
» My current avatar photo
by roddie Mon Nov 18, 2024 9:05 pm
Cox Engine of The Month
"Honker" build thread
Page 2 of 2
Page 2 of 2 •  1, 2
1, 2
 Re Honker build thread
Very nice job, the Jedelsky wing looks spot on. Too late I know but I
now remember how I carved mine for The Honker Rocket (the smaller
TD 0.020 version). Draw lines spanwise to define all the bits that
you can plane/sand flat, then it's only necessary to blend in bits
that are not flat. Love these build threads, John
now remember how I carved mine for The Honker Rocket (the smaller
TD 0.020 version). Draw lines spanwise to define all the bits that
you can plane/sand flat, then it's only necessary to blend in bits
that are not flat. Love these build threads, John

proctor- Gold Member

- Posts : 199
Join date : 2012-01-31
Location : Scottish Highlands
 Re: "Honker" build thread
Finally the Honker is finished! I just need to adjust the batteries to get the CG in a more reasonable position, and we are ready to rock!
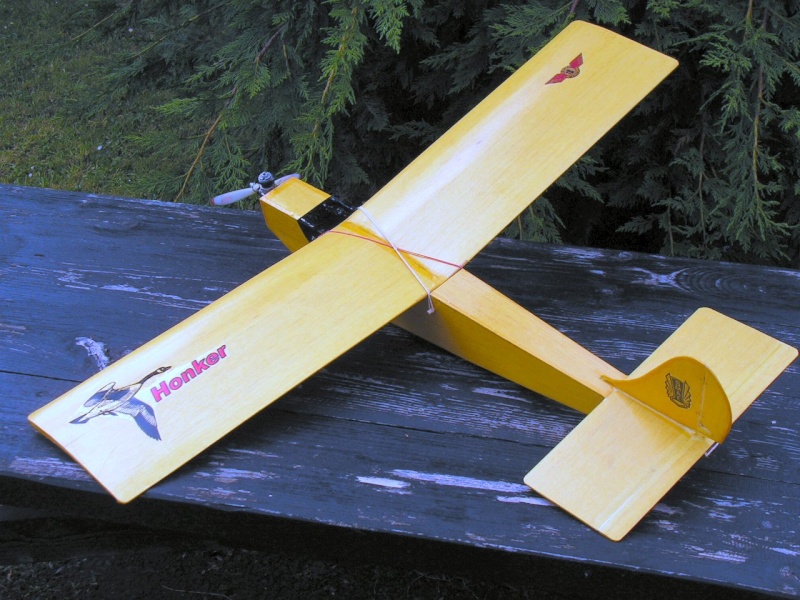
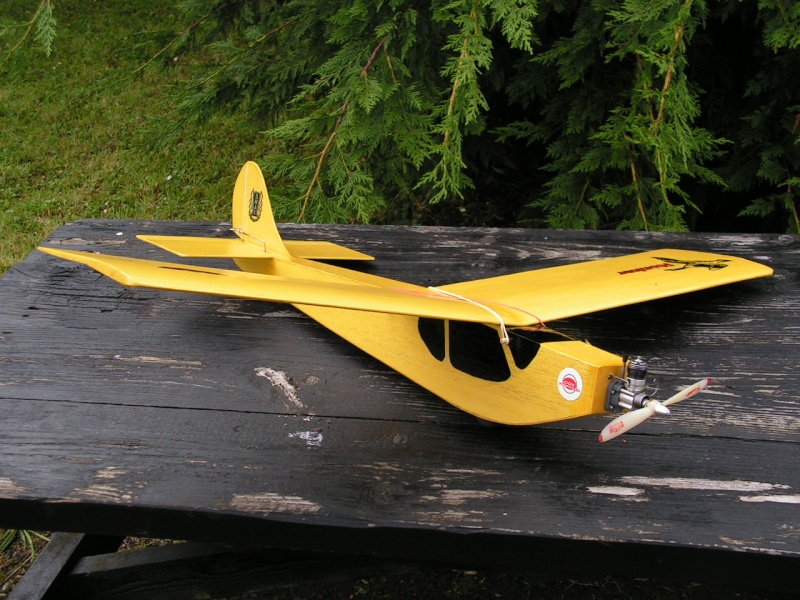
All I need now is for it to stop raining and/or blowing a gale, and we'll see if it flies!


All I need now is for it to stop raining and/or blowing a gale, and we'll see if it flies!

Ivanhoe- Diamond Member

- Posts : 1752
Join date : 2011-09-30
Location : Northern Ireland
 Re: "Honker" build thread
HONK ON !!!!!!!!!!!

Kim- Top Poster


Posts : 8625
Join date : 2011-09-06
Location : South East Missouri
 Re: "Honker" build thread
Great job, Wilf. Your Honker decal on the wing really sets it off.
I toss mine off almost level and let it build up a little speed before adding any inputs. With a BW on it, it was pretty sedate; I re-engined it later with a NORVEL .061 and the performance stepped up quite a bit, but it lightened the nose. With full up elevator and full right rudder, it will snap pretty violently and has ended up in a spin several times. Mine will spin almost completely flat and sometimes I could get it out, but several times it pancaked with hardly any forward motion -- the fuselage has a compression fracture running lengthwise. Because of my lack of success in exiting spins, I try to avoid getting into one.
Looking forward to hearing about the maiden.
andrew
PS: How about a shot of the innards?
 Re: "Honker" build thread
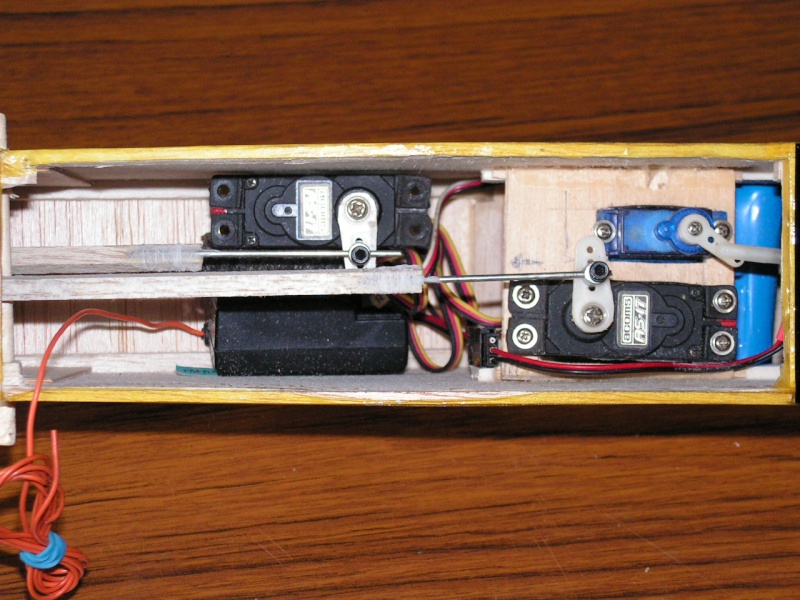
Here's the radio installation. If I find the flying speed is high I may change the full-sized servos for mini ones to reduce weight, although I prefer F/S if possible because I find them more reliable.
The throttle servo is at the full throttle position, in case you wondered about the arm angle!
Wilf

Ivanhoe- Diamond Member

- Posts : 1752
Join date : 2011-09-30
Location : Northern Ireland
 Re: "Honker" build thread
Cracking result Wilf.
As for servos, it's difficult to buy truly awful one's these
Days. In the O/T I'm only running plastic geared mini's
They seem fine so far.

As for servos, it's difficult to buy truly awful one's these
Days. In the O/T I'm only running plastic geared mini's
They seem fine so far.

John Goddard- Diamond Member

- Posts : 2447
Join date : 2011-11-24
Age : 60
Location : Leyton North East London
 Re: "Honker" build thread
Beautiful build Wilf! I like the lines on that one. Very unique.

Cribbs74- Moderator


Posts : 11907
Join date : 2011-10-24
Age : 50
Location : Tuttle, OK
 Re: "Honker" build thread
Disaster has struck, even before it's maiden!
I was running the engine up, to check the throttle settings, when it started to viabrate like mad, I stopped it VERY quickly and discovered that the engine mounting screws were pulling out of the firewall!
What is REALLY annoying is that I had my doubts about screwing the engine just to a 1/8" ply firewall when I was building it, and I intended to double-up on the thickness, then promptly forgot to do it!
So, quite extensive surgery is taking place on the nose, I've had to cut the top decking back to get at the back of the firewall, I could have stuck a piece on the outside, but that would have affected my carefully adjusted throttle linkage, so, out came the balsa knife!

Ivanhoe- Diamond Member

- Posts : 1752
Join date : 2011-09-30
Location : Northern Ireland
 Re: "Honker" build thread

Oh well, could be worse I suppose!

You can see here where the top left screw pulled out, I'm just glad it didn't happen in flight!

Reinforcement going in, if I'd done that during the build I could have saved all this!

Ivanhoe- Diamond Member

- Posts : 1752
Join date : 2011-09-30
Location : Northern Ireland
 Re: "Honker" build thread
Wilf ---
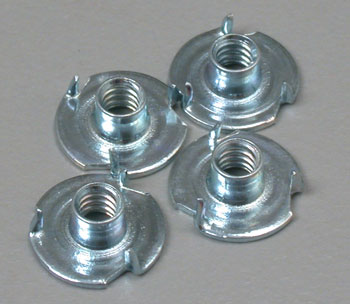
That's a real shame. Were you using birch plywood or bass plywood or liteply? Birch is usually sufficiently strong, but I still always use sockethead screws and blind nuts.
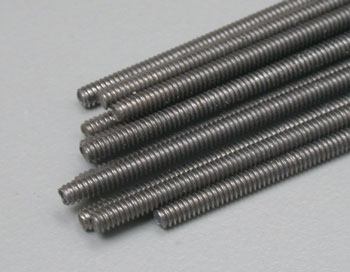
Although you've already done surgery on your plane, here's a technique I use to retrofit or replace a blind nut that may have popped loose.
1) Drill the firewall so the shank of the blind nut fits snugly in the hole. If the shank is too long and would protrude, file it so it will be flush with the firewall when seated. If the firewall is thicker so the shank does not come all the way thru, I cut a donut from a piece of silicon fuel tubing and push into the hole -- when the engine is mounted, the tubing serves as a seal and keeps oil from penetrating the firewall.
2) Remove any obstructions between the firewall and first accessible bay in the fuselage.
3) Depending on your mounting screw size, insert a piece of all-thread rod from the front far enough in until you can thread on a blind nut. I usually epoxy my blind nuts in place, so adding a little petroleum jelly to the rod will keep the nut from sticking to the all-thread. Lather up the flange on the nut with your adhesive of choice and pull it up against the firewall using the rod. To ensure the nut is fully seated, I slide on a washer and nut from the front and tighten down until the shank is either flush with the firewall or the ears on the nut are seated. Generally I leave the rod in place until the epoxy has set. Unscrew the rod and you have a blind nut in a location that cannot be easily reached.
I also use this approach to fish fuel line from inside the tank compartment thru holes in the firewall if the tank or line needs to be replaced. Adding a tad bit of castor to the end of the line helps get it started thru the hole.


 Re: "Honker" build thread
Thanks, Andrew, I prefer to use blind nuts but unfortunately I have difficulty buying them and suitable bolts in sizes small enough for Cox engines, all the suppliers over here seem to think no-one uses engines smaller than a .40 these days!
Hence my use of screws, I don't really trust them, but needs must!
Oh, yes, the firewall is Birch ply.
Wilf
Hence my use of screws, I don't really trust them, but needs must!
Oh, yes, the firewall is Birch ply.
Wilf

Ivanhoe- Diamond Member

- Posts : 1752
Join date : 2011-09-30
Location : Northern Ireland
 Re: "Honker" build thread
I'm confused we're not talking self tappers here are we....?
BTW Wilf talk to Christine, not the cheapest vendor you'll ever come across but pleasant, efficient,
genuine next day service,
http://www.modelfixings.co.uk/
I use their M2.5 cap heads, nylocs and washers for mounting all my cox'x.
In fact I'm lying I've got M3's on the 09

BTW Wilf talk to Christine, not the cheapest vendor you'll ever come across but pleasant, efficient,
genuine next day service,
http://www.modelfixings.co.uk/
I use their M2.5 cap heads, nylocs and washers for mounting all my cox'x.
In fact I'm lying I've got M3's on the 09

John Goddard- Diamond Member

- Posts : 2447
Join date : 2011-11-24
Age : 60
Location : Leyton North East London
 Re: "Honker" build thread
Repairs and alterations completed, the engine is now secured with blind nuts, (now that I have some!), I pushed the battery right forward, and the CG is now spot-on to the plan position, as seen here with the model in my incredibly high-tech CG setting jig!

Now I just have to wait for the weather to be even remotely suitable for the maiden (could be a LONG wait!)

Now I just have to wait for the weather to be even remotely suitable for the maiden (could be a LONG wait!)

Ivanhoe- Diamond Member

- Posts : 1752
Join date : 2011-09-30
Location : Northern Ireland
 Re: "Honker" build thread
Ivanhoe wrote:Repairs and alterations completed, the engine is now secured with blind nuts, (now that I have some!), I pushed the battery right forward, and the CG is now spot-on to the plan position, as seen here with the model in my incredibly high-tech CG setting jig!
Now I just have to wait for the weather to be even remotely suitable for the maiden (could be a LONG wait!)
great plane Wilf, i might try it sometime once i clear up my work table in my room
p.s. what does the bird weigh?

mitchg95- Diamond Member

- Posts : 2103
Join date : 2011-12-19
Age : 29
Location : Geneva, mn, USA
 Re: "Honker" build thread
She has come in at 20 ozs a/u. The maximum weight quoted on the plan is 22 ozs, so I'm happy at that. Should the airspeed prove to be high I can always fit mini-servos in place of the full-size ones, and loose the odd ounce or two.
Wilf
Wilf

Ivanhoe- Diamond Member

- Posts : 1752
Join date : 2011-09-30
Location : Northern Ireland
 Re: "Honker" build thread
Ivanhoe wrote:She has come in at 20 ozs a/u. The maximum weight quoted on the plan is 22 ozs, so I'm happy at that. Should the airspeed prove to be high I can always fit mini-servos in place of the full-size ones, and loose the odd ounce or two.
Wilf
sounds good

mitchg95- Diamond Member

- Posts : 2103
Join date : 2011-12-19
Age : 29
Location : Geneva, mn, USA
 2nd Honker build
I am new th this forum and thought I might comment. I built a Honker in 1976 from magazine plans. At that time I had built many many U/C and freeflight planes and was getting into R/C. I had built two Ace warbird kits p51 and ME109. Both of those flew better without me ending in splinters. So then on to the Honker which also ended in splinters in the middle of the street by my house on the first flight. I dropped out of modeling until 1987. I was still building and crashing until one day the wind was blowing very hard and I just had to fly. That plane was a high wing trainer type of my own design all foam. I started the EZ-start w/ 1oz tank no throttle, elevator and ailerons. Quick launch into the wind and it stayed right there in front of me. It would rise and drift backward if I gave up elevator, it would slowly move ahead if put in a dive. I learned to fly that day. A Cox .049 will run an eternity on 1 ounce of fuel. I learned that the wind is not a problem, matter of fact the wind is my friend.
Sorry I got off Honker and into history. I have built many many planes some as big as .60 and 6' span. Now I am back to the Honker,That sucker is going to fly this time!
Sorry I got off Honker and into history. I have built many many planes some as big as .60 and 6' span. Now I am back to the Honker,That sucker is going to fly this time!
Last edited by hdorris on Sun Sep 02, 2012 8:29 am; edited 1 time in total (Reason for editing : correct typos)

hdorris- New Member

- Posts : 3
Join date : 2012-08-22
 Re: "Honker" build thread
Good luck on your build. Welcome to CEF.
Rusty
Rusty
_________________
Don't Panic!
...and never Ever think about how good you are at something...
while you're doing it!
My Hot Rock & Blues Playlist
...and never Ever think about how good you are at something...
while you're doing it!
My Hot Rock & Blues Playlist

RknRusty- Rest In Peace

- Posts : 10869
Join date : 2011-08-10
Age : 68
Location : South Carolina, USA
 Re: "Honker" build thread
hdorris wrote:I am new th this forum and thought I might comment.
Welcome to the forum, hope you enjoy your time here as much as the rest of us do
Wilf

Ivanhoe- Diamond Member

- Posts : 1752
Join date : 2011-09-30
Location : Northern Ireland
 New Honker old Td 051, old converted cannon 2.4 ghz radio
My new Yellow Honker almost ready to fly. Now how to post a photo.

hdorris- New Member

- Posts : 3
Join date : 2012-08-22
 Re: "Honker" build thread
Here is a good step by step on how to post a photo.
https://www.coxengineforum.com/t367-how-to-post-an-image-in-a-topic
Rolla
https://www.coxengineforum.com/t367-how-to-post-an-image-in-a-topic
Rolla

Godsey3.0- Platinum Member

- Posts : 970
Join date : 2011-09-21
Age : 29
Location : Metamora, Indiana
 Re: "Honker" build thread
Still trying to post photo


Last edited by hdorris on Mon Sep 03, 2012 7:44 pm; edited 2 times in total (Reason for editing : trying to post photo.)

hdorris- New Member

- Posts : 3
Join date : 2012-08-22
 Re: "Honker" build thread
Just finished one here in Ohio from an LDS laser kit.
http://www.thebuildingboard.com/search?q=honker
http://www.thebuildingboard.com/search?q=honker

RyanNX211- Beginner Poster

- Posts : 6
Join date : 2012-07-17
 Re: "Honker" build thread
RyanNX211 wrote:Just finished one here in Ohio from an LDS laser kit.
http://www.thebuildingboard.com/search?q=honker
That's a very nice looking airplane! Thanks for sharing!
Page 2 of 2 •  1, 2
1, 2
 Similar topics
» Anyone have plans for the Blink?
» SIG Wonder build thread - ASP12 vs COX TD09
» Dragonfly Build Thread
» The RMH Bipe build thread
» Scratch built Sig Staggerwing build thread.. Version 3.0
» SIG Wonder build thread - ASP12 vs COX TD09
» Dragonfly Build Thread
» The RMH Bipe build thread
» Scratch built Sig Staggerwing build thread.. Version 3.0
Page 2 of 2
Permissions in this forum:
You cannot reply to topics in this forum

 Rules
Rules


