Log in
Search
Latest topics
» Free Flight Radio Assist by GallopingGhostler Today at 12:54 pm
» My N-1R build log
by akjgardner Today at 12:39 pm
» Purchased the last of any bult engines from Ken Enya
by getback Today at 12:05 pm
» Funny what you find when you go looking
by rsv1cox Yesterday at 3:21 pm
» Landing-gear tips
by 1975 control line guy Yesterday at 8:17 am
» Cox NaBOO - Just in time for Halloween
by rsv1cox Tue Nov 19, 2024 6:35 pm
» Canada Post strike - We are still shipping :)
by Cox International Tue Nov 19, 2024 12:01 pm
» Duende V model from RC Model magazine 1983.
by getback Tue Nov 19, 2024 6:08 am
» My current avatar photo
by roddie Mon Nov 18, 2024 9:05 pm
» My latest doodle...
by TD ABUSER Mon Nov 18, 2024 11:30 am
» Brushless motors?
by rsv1cox Sun Nov 17, 2024 6:40 pm
» Tribute Shoestring build
by amurphy6812 Sun Nov 17, 2024 5:43 pm
Cox Engine of The Month
Cox .049 Thermal Hopper - a never ending story
Page 2 of 2
Page 2 of 2 •  1, 2
1, 2
 Re: Cox .049 Thermal Hopper - a never ending story
GallopingGhostler wrote:
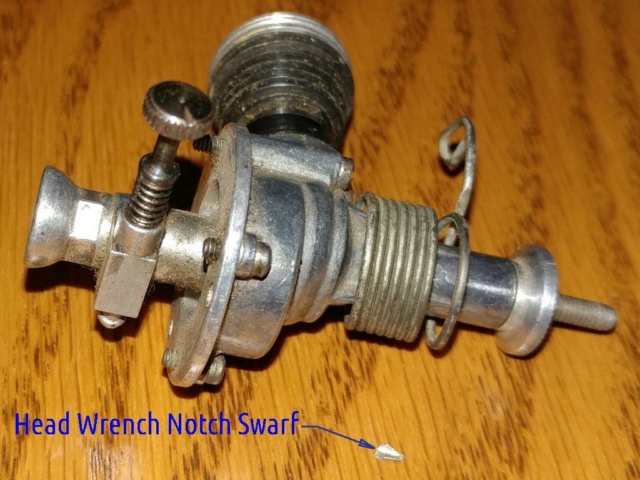
The rear venturi screen is intact and clean. This engine apparently has very little use if any. The 5-40 prop shaft is missing the prop nut, but I can use a Cox spinner nut to secure a prop in place, then cover it with a spinner.
I basically have not a worn out battle hardened relic, but an NOS 1955 or earlier Thermal Hopper. It looks like I really scored big!


GallopingGhostler,
You can get an original Thermal Hopper hex shaped spinner nut from MECOA?
Below is a screen capture from their website:

This link below will send you right there:
Thermal Hopper Hex Shaped Spinner Nut

sosam117- Diamond Member

- Posts : 1349
Join date : 2016-03-23
Location : Suburb of Chicago, Illinois
 Re: Cox .049 Thermal Hopper - a never ending story
Thanks, sosam117. Regarding a prop nut source, also thanks. I'm going to wait a little, until I can identify parts for other engines, to offset shipping. Quick question, my 4 crankcase/back screws are longer by 1/16 to 3/32 of an inch. Did your screws require trimming to fit the mount cage?sosam117 wrote:I hope you get it. It would be a fine addition to your Thermal Hopper!
András, peering into the combustion chamber with piston at bottom, it has two of the largest bypass ports I have ever seen. Now I can understand why even the slightest mishandling of the cylinder can result in its ruin. The boost port machining is immaculate! The top has very nice, smooth, elliptical radiused edges even to its depth, a work of art. Now I can understand why it was considered one of the most powerful .049 engines of its time.

GallopingGhostler- Top Poster


Posts : 5722
Join date : 2013-07-13
Age : 70
Location : Clovis NM or NFL KC Chiefs
 Re: Cox .049 Thermal Hopper - a never ending story
The only alternative I see to trimming the screws would be to drill holes in the birdcage to accommodate the screws.

pman1111- Silver Member

- Posts : 96
Join date : 2022-01-15
 Re: Cox .049 Thermal Hopper - a never ending story
Good luck on the mount George, Rootin for you on that one to compliment you fine engine….. Have you tried the head yet?…. With the general good shape of the engine it may have even never been used…. I’m sure you’ve had the same thought I’ve had on these that are of interest, I’m sure a few Thermal Hoppers powered some early single channel RC types….
I did a little investigating and got some interesting feed back on thin wall cylinders… May be of interest….
https://www.coxengineforum.com/t16250-thin-wall-cylinders?highlight=Thin+Wall
I did a little investigating and got some interesting feed back on thin wall cylinders… May be of interest….
https://www.coxengineforum.com/t16250-thin-wall-cylinders?highlight=Thin+Wall

rdw777- Diamond Member


Posts : 1714
Join date : 2021-03-11
Location : West Texas
 Re: Cox .049 Thermal Hopper - a never ending story
There is a good possibility that these screws are not the original ones. I cannot imagine that Cox would make a fine engine and have mismatched screws with uneven protrusions beyond the tank back. (Top two are slightly longer than bottom two.) Fortunately, Bernie has a set specifically for this engine, which would be to factory lengths.pman1111 wrote:The only alternative I see to trimming the screws would be to drill holes in the birdcage to accommodate the screws.
Thanks, Robert. With the vulnerability of the engine in its finely machined mount cage, I wouldn't want to nose it in on a hard landing and possibly damage the cage. Perhaps it would be best mounted up high like in a power pod for a glider or airplane that used one.rdw777 wrote:Good luck on the mount George, Rootin for you on that one to compliment you fine engine….. Have you tried the head yet?…. With the general good shape of the engine it may have even never been used…. I’m sure you’ve had the same thought I’ve had on these that are of interest, I’m sure a few Thermal Hoppers powered some early single channel RC types….
I did a little investigating and got some interesting feed back on thin wall cylinders… May be of interest….
https://www.coxengineforum.com/t16250-thin-wall-cylinders?highlight=Thin+Wall
I thought of rear engine, but wouldn't want to put too much time in that mode because the aluminum prop thrust plate against the crankcase would wear more quickly. (This is why there are brass or steel thrust plates, or brass or steel thin washer between the two, to mitigate wear.)
Pulled the back off, it is very clean inside.

Upon reassembling I rotated the back so the one cage mount screw hole was no longer adjacent to the cylinder, now all are accessible. Later when I win and receive the mount cage,
 I'll loosen the NVA and rotate it away from the cylinder exhaust ports. With needle in the path of the exhaust is a good way to singe finger tips.


GallopingGhostler- Top Poster


Posts : 5722
Join date : 2013-07-13
Age : 70
Location : Clovis NM or NFL KC Chiefs
 Re: Cox .049 Thermal Hopper - a never ending story
GallopingGhostler wrote:Thanks, sosam117. Regarding a prop nut source, also thanks. I'm going to wait a little, until I can identify parts for other engines, to offset shipping. Quick question, my 4 crankcase/back screws are longer by 1/16 to 3/32 of an inch. Did your screws require trimming to fit the mount cage?sosam117 wrote:I hope you get it. It would be a fine addition to your Thermal Hopper!
András, peering into the combustion chamber with piston at bottom, it has two of the largest bypass ports I have ever seen. Now I can understand why even the slightest mishandling of the cylinder can result in its ruin. The boost port machining is immaculate! The top has very nice, smooth, elliptical radiused edges even to its depth, a work of art. Now I can understand why it was considered one of the most powerful .049 engines of its time.
When I 1st looked at my bird cage mount, when I got the engine, I was wondering how it was on the engine?
I was surprised to find out that Allen drilled and threaded the holes of the mount to line up with the crankcase.
So, when I had to reassemble the engine, I had to make sure that the mount and backplate were together or the threads will feel tight.
So, with that done, the engine is really part of the mount without any nuts on the screws.
I asked Allan how he tapped it?
He told me that he clamped the mount to the back plate then using a tap started from the backplate side and completely tapped both the backplate and the mount together as one piece.
What you could do is drill the holes (a little oversized) so that when they line up they will clear the mount?
I ordered from Burnie "two" Cox Thermal hopper replacement screw set (4 in a set) and "two" Thermal Hopper crankcase gaskets.
Just in case.

sosam117- Diamond Member

- Posts : 1349
Join date : 2016-03-23
Location : Suburb of Chicago, Illinois
 Re: Cox .049 Thermal Hopper - a never ending story
sosam117, I think I have found the answer. The screws installed apparently aren't the original ones it came with. Per photo by H.R. Warring in Feb. 1954 Aeromodeller:
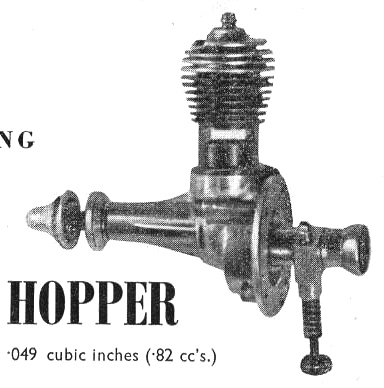
The screws are neatly flush or slightly recessed in the aluminum backplate. This is also verified in Adrian's website,
https://www.mh-aerotools.de/airfoils/cox_earlyengines.htm
According to Adrian, it sold for $6.96 in 1953, which now would be $78.42, about what we'd pay for a performance Cox reed valve engine today.

GallopingGhostler- Top Poster


Posts : 5722
Join date : 2013-07-13
Age : 70
Location : Clovis NM or NFL KC Chiefs
 Re: Cox .049 Thermal Hopper - a never ending story
GallopingGhostler wrote:sosam117, I think I have found the answer. The screws installed apparently aren't the original ones it came with. Per photo by H.R. Warring in Feb. 1954 Aeromodeller:
The screws are neatly flush or slightly recessed in the aluminum backplate. This is also verified in Adrian's website,
https://www.mh-aerotools.de/airfoils/cox_earlyengines.htm
According to Adrian, it sold for $6.96 in 1953, which now would be $78.42, about what we'd pay for a performance Cox reed valve engine today.
The screws I got from Burnie (Cox International); they stuck out as far as the ones that were on the engine already.
The original screw heads were buggered up, so I replaced them with the one from Cox Int.
I think the originals that was flush with the backplate were done special to "clean" up the look of the engine?
If they are flush with the backplate then the bottom screws will be no longer than abut 1/8" long?
On another Thermal Hopper I received, both of the bottom screws were missing.
Probably vibrated out because of them being so short and the other top screws are almost flush with the backplate.
Last edited by sosam117 on Sun Apr 09, 2023 6:12 am; edited 1 time in total (Reason for editing : spelling mistakes)

sosam117- Diamond Member

- Posts : 1349
Join date : 2016-03-23
Location : Suburb of Chicago, Illinois
 Re: Cox .049 Thermal Hopper - a never ending story
That is interesting, sosam117, so having some excess length is helpful.sosam117 wrote:The screws I got from Burnie (Cox International); they stuck out as far as the ones that were on the engine already. The original screw heads were buggered up, so I replaced them with the one from Cox Int.
I think the originals that was flush with the backplate were done special to "clean" up the look of the engine?
If they are flush with the backplate then the bottom screws will be no longer than abut 1/8" long?
On another Thermal Hopper I received, both of the bottom screws were missing.
Probably vibrated out because of them being so short and the other top screws are almost flush with the backplate.
I think on the cage, when it comes in, I'll carefully mark, drill, and tap with cage bolted to backplate continue thread from the crankcase. Then, the screws will have more "meat" to bite into, so they don't back out so easily. The very think backplate doesn't give much thread for the screws to grasp. Also, I'm wondering if a little thread lock like Locktite might be useful for the engine back screws.

GallopingGhostler- Top Poster


Posts : 5722
Join date : 2013-07-13
Age : 70
Location : Clovis NM or NFL KC Chiefs
 Re: Cox .049 Thermal Hopper - a never ending story
GallopingGhostler wrote:That is interesting, sosam117, so having some excess length is helpful.sosam117 wrote:The screws I got from Burnie (Cox International); they stuck out as far as the ones that were on the engine already. The original screw heads were buggered up, so I replaced them with the one from Cox Int.
I think the originals that was flush with the backplate were done special to "clean" up the look of the engine?
If they are flush with the backplate then the bottom screws will be no longer than abut 1/8" long?
On another Thermal Hopper I received, both of the bottom screws were missing.
Probably vibrated out because of them being so short and the other top screws are almost flush with the backplate.
I think on the cage, when it comes in, I'll carefully mark, drill, and tap with cage bolted to backplate continue thread from the crankcase. Then, the screws will have more "meat" to bite into, so they don't back out so easily. The very think backplate doesn't give much thread for the screws to grasp. Also, I'm wondering if a little thread lock like Locktite might be useful for the engine back screws.
Have the screws long enough so that you can thread a nut and washer on the backside of the engine and something for the mount to hang onto?
That way you can unscrew the nuts and remove the mount without taking the engine apart?

sosam117- Diamond Member

- Posts : 1349
Join date : 2016-03-23
Location : Suburb of Chicago, Illinois
 Re: Cox .049 Thermal Hopper - a never ending story
Looks like you're the proud owner of a new birdcage mount! Now if the shipping gods are on your side...... 


pman1111- Silver Member

- Posts : 96
Join date : 2022-01-15
 Re: Cox .049 Thermal Hopper - a never ending story
Interesting, I was the only bidder, but then have found the best time to buy stuff is during major holidays. This is not considered holiday by some employers, but still a lot of people visit family and travel away.pman1111 wrote:Looks like you're the proud owner of a new birdcage mount! Now if the shipping gods are on your side......
Thanks @pman1111 for pointing this listing out. It does appear to be a quality reproduction. Now, just waiting for it to ship. So far, have had success from that direction in NorCal. If ships right away, should take about a week.

GallopingGhostler- Top Poster


Posts : 5722
Join date : 2013-07-13
Age : 70
Location : Clovis NM or NFL KC Chiefs
 Re: Cox .049 Thermal Hopper - a never ending story
GallopingGhostler wrote:Interesting, I was the only bidder, but then have found the best time to buy stuff is during major holidays. This is not considered holiday by some employers, but still a lot of people visit family and travel away.pman1111 wrote:Looks like you're the proud owner of a new birdcage mount! Now if the shipping gods are on your side......
Thanks @pman1111 for pointing this listing out. It does appear to be a quality reproduction. Now, just waiting for it to ship. So far, have had success from that direction in NorCal. If ships right away, should take about a week.
Sometimes that blind squirrel, he finds that nut!


sosam117- Diamond Member

- Posts : 1349
Join date : 2016-03-23
Location : Suburb of Chicago, Illinois
 Re: Cox .049 Thermal Hopper - a never ending story
@pman1111 pointed the waysosam117 wrote:Sometimes that blind squirrel, he finds that nut!
 for my walking stick.
GallopingGhostler- Top Poster


Posts : 5722
Join date : 2013-07-13
Age : 70
Location : Clovis NM or NFL KC Chiefs
 Re: Cox .049 Thermal Hopper - a never ending story
You might want to hang out close to the mailbox when it arrives, if the Postman lets go of it, you'll have to chase it clear to Lubbock 

Don

Don

pman1111- Silver Member

- Posts : 96
Join date : 2022-01-15
 Re: Cox .049 Thermal Hopper - a never ending story
sosam117 wrote:GallopingGhostler wrote:Interesting, I was the only bidder, but then have found the best time to buy stuff is during major holidays. This is not considered holiday by some employers, but still a lot of people visit family and travel away.pman1111 wrote:Looks like you're the proud owner of a new birdcage mount! Now if the shipping gods are on your side......
Thanks @pman1111 for pointing this listing out. It does appear to be a quality reproduction. Now, just waiting for it to ship. So far, have had success from that direction in NorCal. If ships right away, should take about a week.
Sometimes that blind squirrel, he finds that nut!
From - The legend of Bagger Vance. Perhaps the best golfer movie ever.

rsv1cox- Top Poster


Posts : 11245
Join date : 2014-08-18
Location : West Virginia
 Re: Cox .049 Thermal Hopper - a never ending story
Bob, you and sosam117 know some trivia that I would never even come close to wondering where that saying originated.rsv1cox wrote:From - The legend of Bagger Vance. Perhaps the best golfer movie ever.sosam117 wrote:Sometimes that blind squirrel, he finds that nut!
The mount came by USPS today, the item looks much better than the photo will ever show, a very nice job the machinist did to create it. Interesting, it is thread 2-56 for the 3 mount holes matching the engine back plate.

I will have to either trim the back screws or drill clearance holes for the protruding screw threaded ends. sosam117 suggested drilling then cutting threads by chasing the original back threads, then nut the ends. This can be done, but I will need to get some 2-56 socket head screws first. But, this would have an added advantage. Haven't mic'd it, but the backplate appears to be a touch under 1/16th of an inch thick, which is not much. More threading plus a nut would be like double nutting, be very vibration resistant to come loose.

GallopingGhostler- Top Poster


Posts : 5722
Join date : 2013-07-13
Age : 70
Location : Clovis NM or NFL KC Chiefs
 Re: Cox .049 Thermal Hopper - a never ending story
Glad you won the mount George…. I see a future engine of the month candidate when you get it put together!!!….I have a little 2-56 hardware set with socket head cap screws from 3/8 to 1”, nuts, etc. …. Would be glad to send you a few if you go the route sosam mentioned…. PM if interested 


rdw777- Diamond Member


Posts : 1714
Join date : 2021-03-11
Location : West Texas

rsv1cox- Top Poster


Posts : 11245
Join date : 2014-08-18
Location : West Virginia
 Re: Cox .049 Thermal Hopper - a never ending story
I think I have my answer on length of screws. Apparently on some, screws were trimmed by factory, for example this pre-1956 version, which is the same that I have:
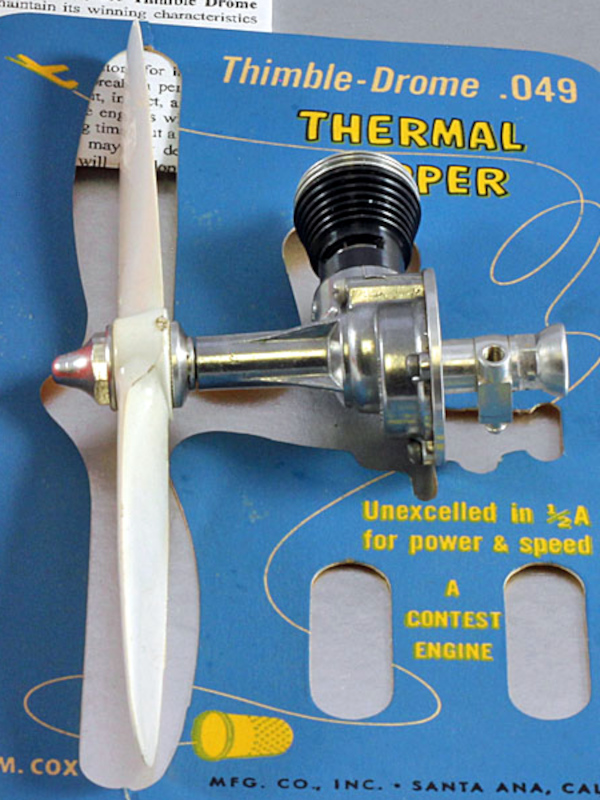
Cropped Cox International CA photo from
https://coxengines.ca/oem-cox-boxed-engines/-21-cox-049-thermal-hopper.html
Rather than installing longer screws, I think I am better off not modifying the excellently crafted, machined aluminum engine mount and simply trimming mine, use a little Locktite on the threads so they don't vibrate loose.

GallopingGhostler- Top Poster


Posts : 5722
Join date : 2013-07-13
Age : 70
Location : Clovis NM or NFL KC Chiefs
 Re: Cox .049 Thermal Hopper - a never ending story
GallopingGhostler wrote:I think I have my answer on length of screws. Apparently on some, screws were trimmed by factory, for example this pre-1956 version, which is the same that I have:
Cropped Cox International CA photo from
https://coxengines.ca/oem-cox-boxed-engines/-21-cox-049-thermal-hopper.html
Rather than installing longer screws, I think I am better off not modifying the excellently crafted, machined aluminum engine mount and simply trimming mine, use a little Locktite on the threads so they don't vibrate loose.
If you do use Loctite, remember to use the "light blue" stuff.
The blue stuff is able to take it apart "IF" you have to?
Ok now for my Thermal Hopper and the screws used:
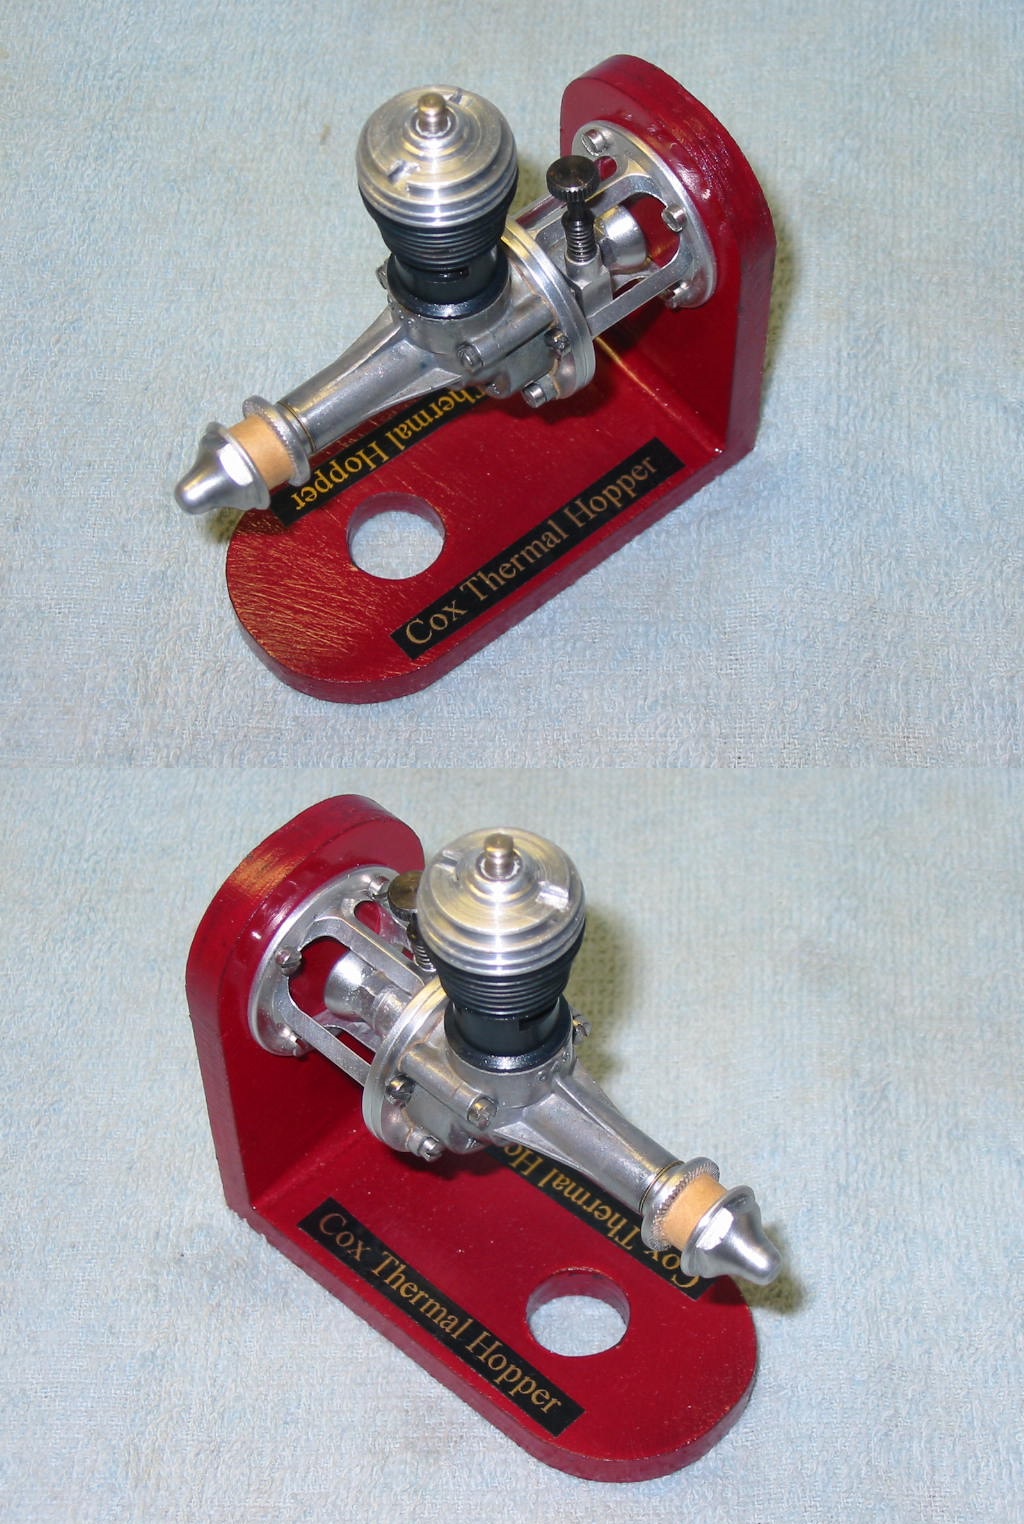
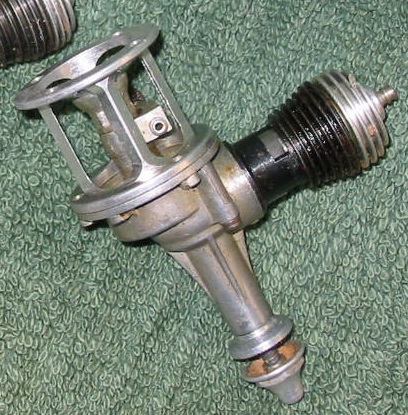
When I received the Thermal Hopper from Allan Laycock, the engine was missing one screw (2-56") on the bottom of the engine and that "little" screw holds the backplate on.
All the other screws were there. The two long 2-56 screws on the upper hole in the crankcase and the only other "little" screw that was still there on the bottom of the crankcase (though it was loose and probably would have been lost with a few more runs?)
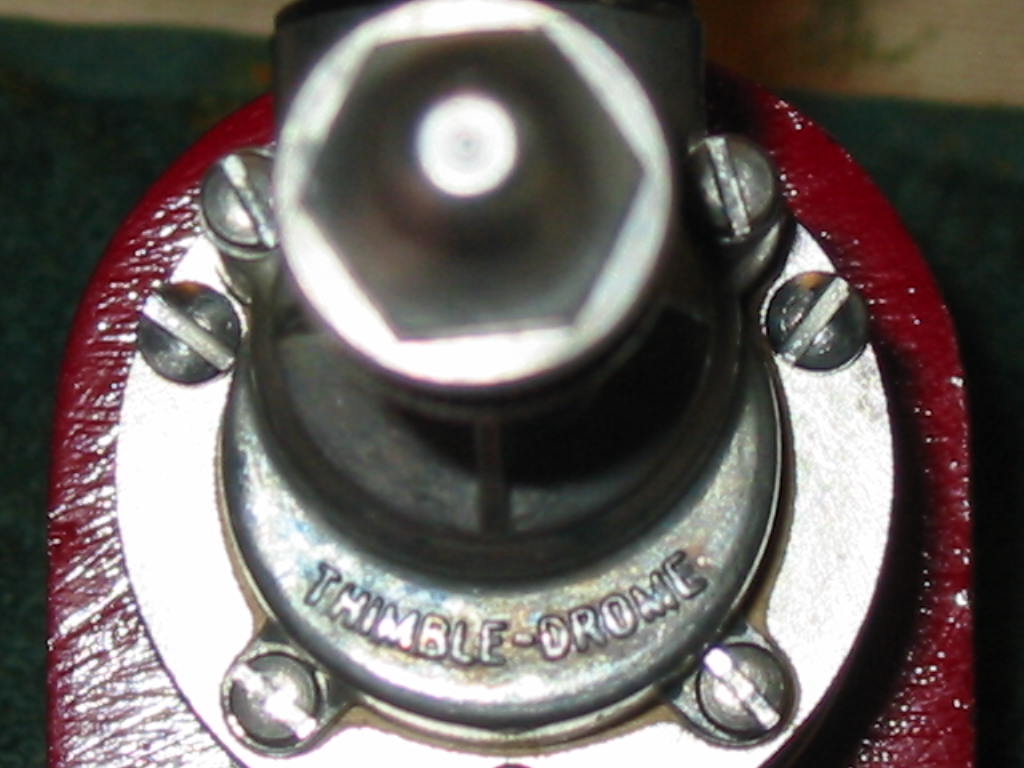
Now for the cage screws.
All three were there but it seems they looked slightly bigger?
The engine's 2-56" screws really didn't screw into those holes very well?
I measured them and they were 3-56" screws?
I don't know if the holes were originally 2-56" or not, and they got stripped out and Allan just tapped them bigger and drilled and tapped the holes to fit the 3-56' screws?
Anyway, they were almost flush mounted and were there, so I decided to use them as there was no problems.
As for the engine screws, I purchased them from McMaster-Carr some 2-56" Filister (cheese head) screws that were 3/4" long.
Their warehouse is only 20 minute drive from my home and I can look over and select the correct screws.
I did trim them down to where all four stick out 1/16" from the cage mount.

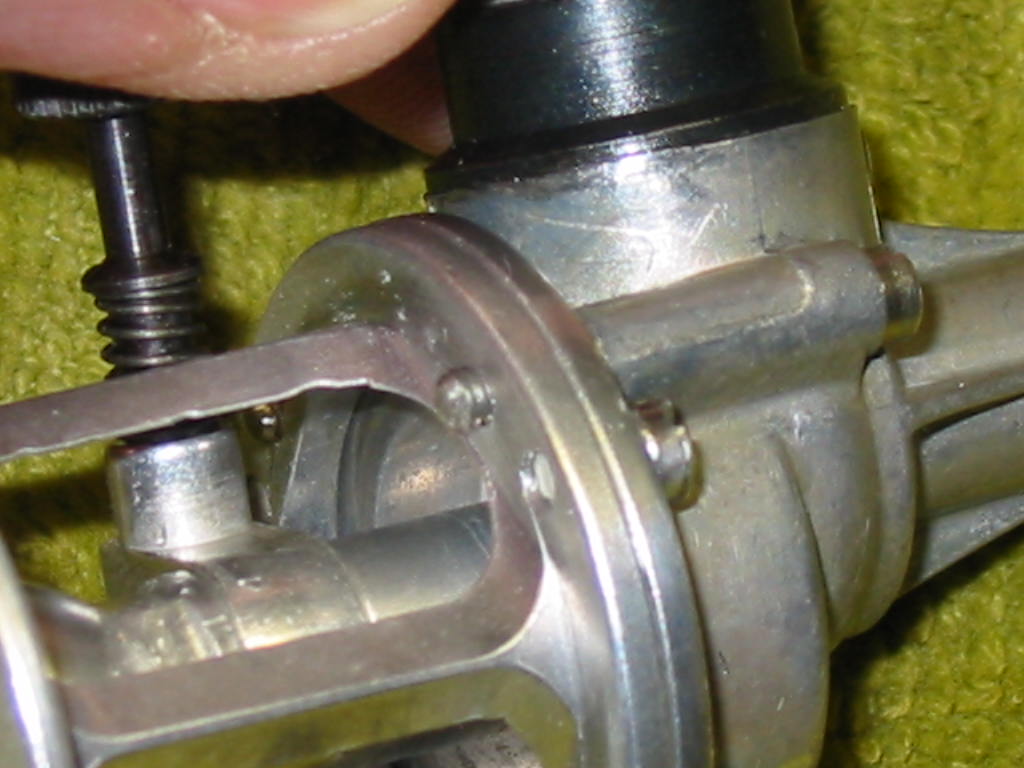
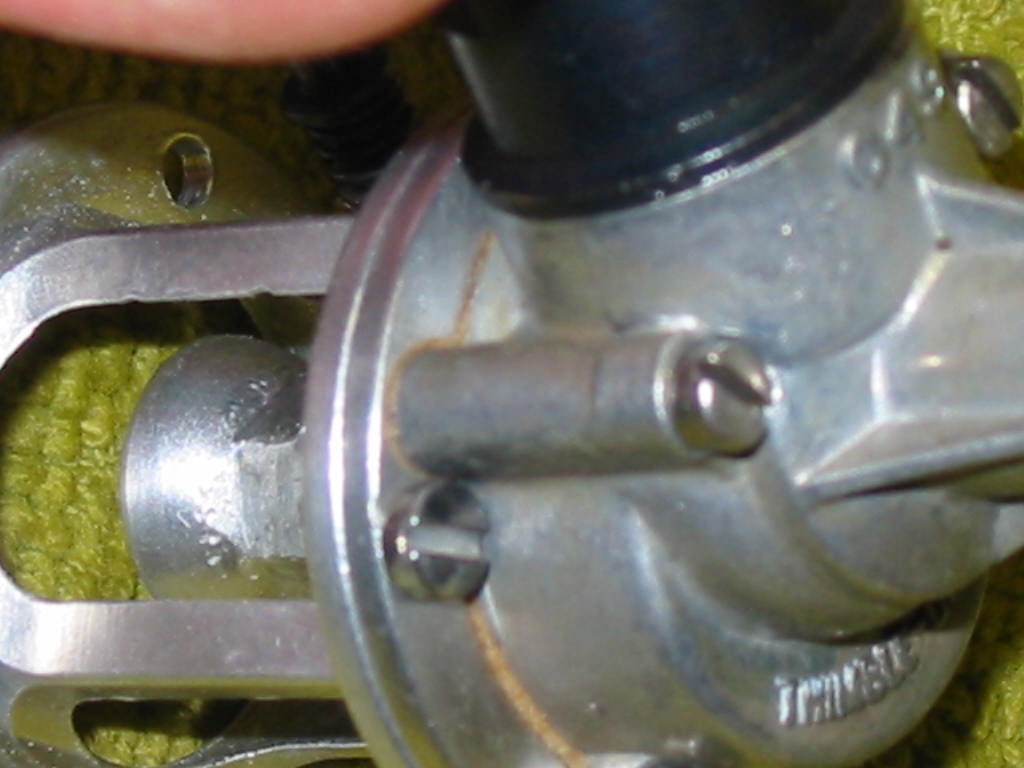
Now for the last part:
I screwed the backplate with the 3-56" screws to the cage mount so now both were together.
From there, I drilled (carefully) the four holes where the engine's 2-56" screws are at on the backplate through the cage mount.
Then while the backplate and cage mount were still together, I tapped the freshly drilled holes in the cage mount, starting from the backplate side so that the treads continue from the backplate through to the cage mount.
So, when I screwed the crankcase to the backplate, I have enough threads to really keep the engine together.
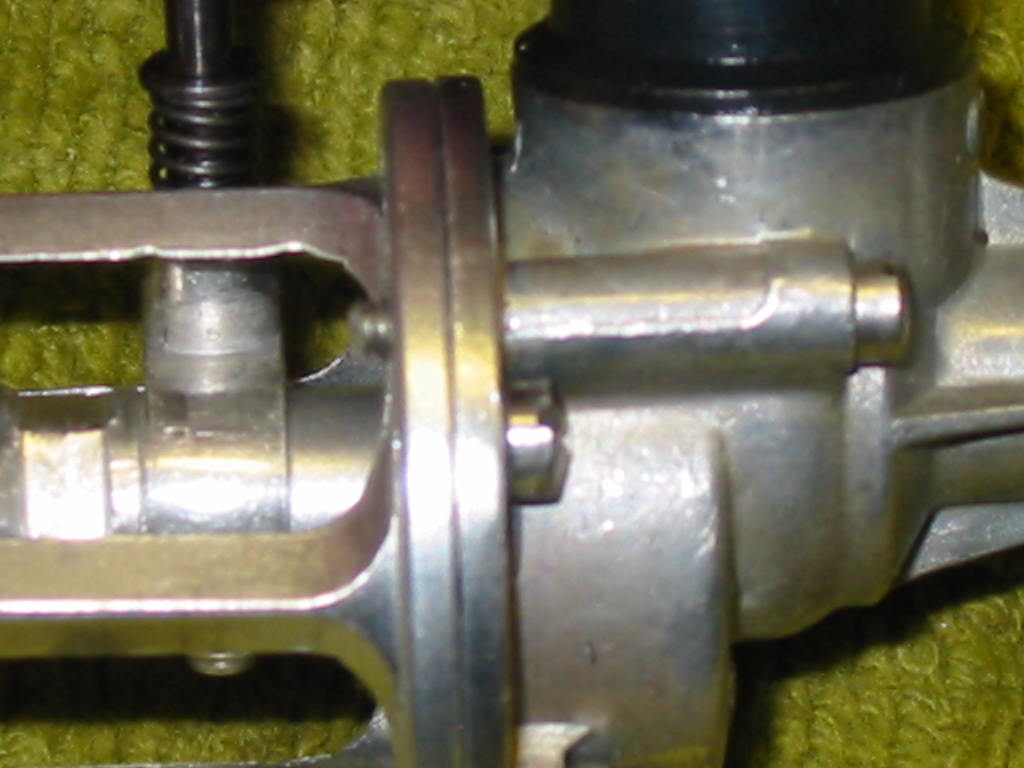

And that is how my cage mount is screwed to the Thermal Hopper.
Thank you for reading.

sosam117- Diamond Member

- Posts : 1349
Join date : 2016-03-23
Location : Suburb of Chicago, Illinois
 Re: Cox .049 Thermal Hopper - a never ending story
Thanks, sosam117 on the details for your particular TH mount setup. The mount is such a fine piece of work, and as such, since this is also a collector engine albeit a runner as well, I've decided to take a path that is a little less invasive for now.sosam117 wrote:Now for the last part: I screwed the backplate with the 3-56" screws to the cage mount so now both were together. From there, I drilled (carefully) the four holes where the engine's 2-56" screws are at on the backplate through the cage mount.
Then while the backplate and cage mount were still together, I tapped the freshly drilled holes in the cage mount, starting from the backplate side so that the treads continue from the backplate through to the cage mount. So, when I screwed the crankcase to the backplate, I have enough threads to really keep the engine together.
(I've had my share of hole drilling
 screw ups

 )
)It is fairly easy to trim the screws, and thanks for the Locktite Blue advice, makes sense for screws that will be later removed for servicing, but provide additional leverage to prevent them from backing out during run time.
If the mount plus engine had a certain amount of scarring, I would not be afraid to drill the additional holes. But, I don't have a drill press, just scribes and hand tools. Most of my repairs have been rudimentary.
You see, I can successfully run the engine just by carefully trimming and Locktiting the screws. If I notice during runs, tendency for screws to loosen, then I can go an extra mile. For other more common engines, they can be run until the cylinders, crankcases, etc. need replacement. Parts are still available. With reasonable care, even those last a while (unless I fly on paved circles).

So, there is a little madness in my reasoning.

GallopingGhostler- Top Poster


Posts : 5722
Join date : 2013-07-13
Age : 70
Location : Clovis NM or NFL KC Chiefs
 Re: Cox .049 Thermal Hopper - a never ending story
GallopingGhostler wrote:Thanks, sosam117 on the details for your particular TH mount setup. The mount is such a fine piece of work, and as such, since this is also a collector engine albeit a runner as well, I've decided to take a path that is a little less invasive for now.sosam117 wrote:Now for the last part: I screwed the backplate with the 3-56" screws to the cage mount so now both were together. From there, I drilled (carefully) the four holes where the engine's 2-56" screws are at on the backplate through the cage mount.
Then while the backplate and cage mount were still together, I tapped the freshly drilled holes in the cage mount, starting from the backplate side so that the treads continue from the backplate through to the cage mount. So, when I screwed the crankcase to the backplate, I have enough threads to really keep the engine together.
(I've had my share of hole drillingscrew ups


)
It is fairly easy to trim the screws, and thanks for the Locktite Blue advice, makes sense for screws that will be later removed for servicing, but provide additional leverage to prevent them from backing out during run time.
If the mount plus engine had a certain amount of scarring, I would not be afraid to drill the additional holes. But, I don't have a drill press, just scribes and hand tools. Most of my repairs have been rudimentary.
You see, I can successfully run the engine just by carefully trimming and Locktiting the screws. If I notice during runs, tendency for screws to loosen, then I can go an extra mile. For other more common engines, they can be run until the cylinders, crankcases, etc. need replacement. Parts are still available. With reasonable care, even those last a while (unless I fly on paved circles).
So, there is a little madness in my reasoning.
Yes, I am a little lucky.
I have a drill press, a bandsaw and a Unimat lathe/mill, 20" disc sander, and many other tools at my disposal.
All this and more, passed on by my dad to me.
My dad and I usually purchased the items together because as he put it "they'll be yours someday anyway.

sosam117- Diamond Member

- Posts : 1349
Join date : 2016-03-23
Location : Suburb of Chicago, Illinois
 Re: Cox .049 Thermal Hopper - a never ending story
Following is a possible candidate for the Thermal Hopper. I checked the fit of the aluminum cage mount on the firewall. It fits well except for the mount holes on the plastic engine mount. However, with 4 newly drilled holes, can be mounted using 2-56 screws, washers and nut. The Cox tank mount pattern has reinforcement behind, but this is to ensure enough material can properly contain the sheet metal screws used to hold the engine.
Since the engine will not be run frequently and hard, I don't need to really do anything with the aluminum prop thrust plate to aluminum crankcase interface, which would suffer heavier wear without mitigation. However, I did slide a Killer Bee stainless steel washer in between, there is enough room for it to fit without binding, if I want to pop loose the prop thrust plate and insert it (provided inner diameter matches, which I think it does.


The engine will mount as a side winder. This model with diminutive wingspan of only 10 inches (254 mm) will be a fast flyer with very little stunt-ability (up and down, wing-overs questionable, no inverted flight).
Since the engine will not be run frequently and hard, I don't need to really do anything with the aluminum prop thrust plate to aluminum crankcase interface, which would suffer heavier wear without mitigation. However, I did slide a Killer Bee stainless steel washer in between, there is enough room for it to fit without binding, if I want to pop loose the prop thrust plate and insert it (provided inner diameter matches, which I think it does.


The engine will mount as a side winder. This model with diminutive wingspan of only 10 inches (254 mm) will be a fast flyer with very little stunt-ability (up and down, wing-overs questionable, no inverted flight).

GallopingGhostler- Top Poster


Posts : 5722
Join date : 2013-07-13
Age : 70
Location : Clovis NM or NFL KC Chiefs
Page 2 of 2 •  1, 2
1, 2
 Similar topics
» A Thermal Hopper Story - Thanks Levent Suberk!
» Thermal Hopper Question.
» Space Hopper .049/Thermal Hopper .049
» Thermal Hopper
» thermal hopper
» Thermal Hopper Question.
» Space Hopper .049/Thermal Hopper .049
» Thermal Hopper
» thermal hopper
Page 2 of 2
Permissions in this forum:
You cannot reply to topics in this forum

 Rules
Rules


