Log in
Search
Latest topics
» My latest doodle...by batjac Today at 9:47 pm
» My N-1R build log
by roddie Today at 8:50 pm
» Tee Dee .020 combat model
by rdw777 Today at 5:07 pm
» Free Flight Radio Assist
by rdw777 Today at 4:51 pm
» Purchased the last of any bult engines from Ken Enya
by getback Today at 12:05 pm
» Funny what you find when you go looking
by rsv1cox Yesterday at 3:21 pm
» Landing-gear tips
by 1975 control line guy Yesterday at 8:17 am
» Cox NaBOO - Just in time for Halloween
by rsv1cox Tue Nov 19, 2024 6:35 pm
» Canada Post strike - We are still shipping :)
by Cox International Tue Nov 19, 2024 12:01 pm
» Duende V model from RC Model magazine 1983.
by getback Tue Nov 19, 2024 6:08 am
» My current avatar photo
by roddie Mon Nov 18, 2024 9:05 pm
» Brushless motors?
by rsv1cox Sun Nov 17, 2024 6:40 pm
Cox Engine of The Month
Finally got to this FrankenTD
Page 1 of 1
 Finally got to this FrankenTD
When I was digging out the parts for a Babe Bee for another person, I came across a baggie of parts. These are leftovers from an RCG buy from a couple of years ago for an abused TD .051 and other broken parts. I fixed the mostly there TD .051 and threw the rest of the parts in the baggie for later. Lately I’ve been in a pressurized TD mood, so I figured I’d get to this as soon as I finished what I was doing for the other fellers. The case is the infamous #2 case for the .051, and everything else was just parts. I had to destroy the red venturi body to get it off, but it was broken anyway. Here’s what I had to work with:
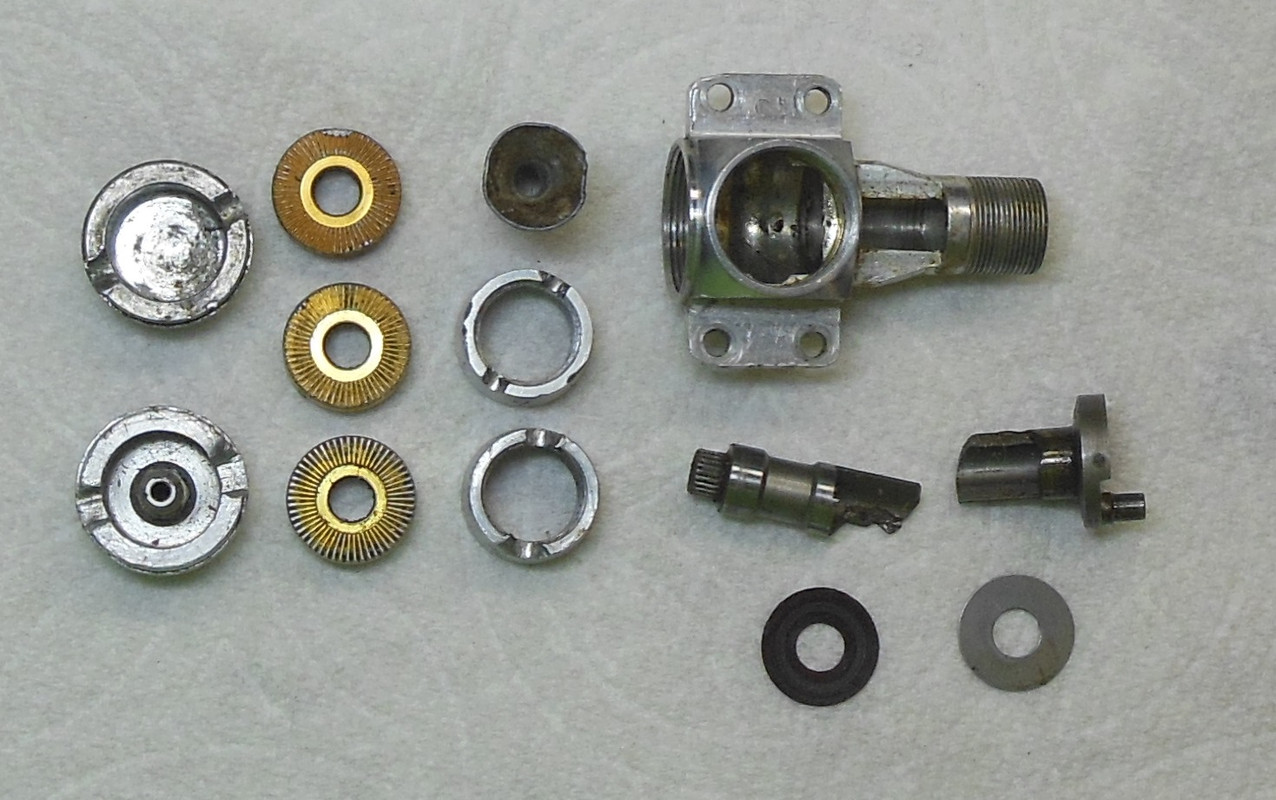
The crank, as you can see, was broken somehow. The venturi looks like someone used a pair of pliers on it. I don’t have a spare venturi so I needed to fix the smashed one. Thinking for a while, I figured that if I use this prop nut and tap it a few times into the venturi would return it to a round(ish) shape.
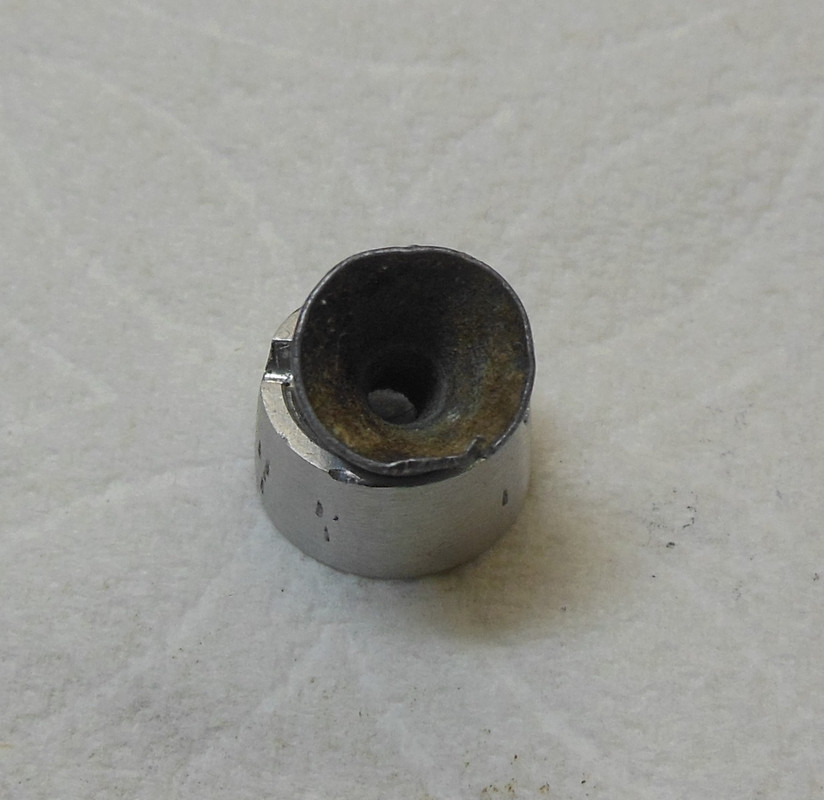
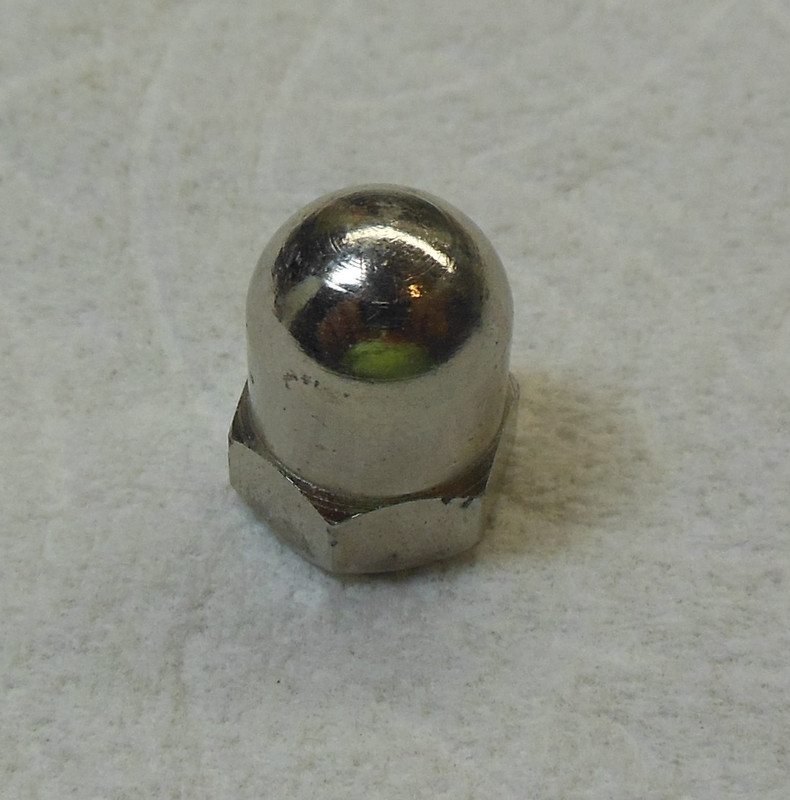
Then I dug out the other spares I had, a new venturi body, a spare needle valve assembly, a spare #4 piston/cylinder set, and a used but good high compression glow head. Look though I might, I could not find a crankshaft. Ah, well. I’ve been looking for a reason to build a TD with a left handed crank so I could build some twin engine planes, so this is the time.

Since this is a FrankenTD, I started thinking about drilling out the venturi since I plan on using bladder pressure. I thought about it for a couple of hours, but decided against it for now. But I did have a fine NVA from a different project, and decided I’d do the conversion on the stock NVA. I looked up the previous thread here on the CEF about converting a TD with a postage stamp fine needle here: https://www.coxengineforum.com/t11875-fine-thread-nv-assembly-for-a-td
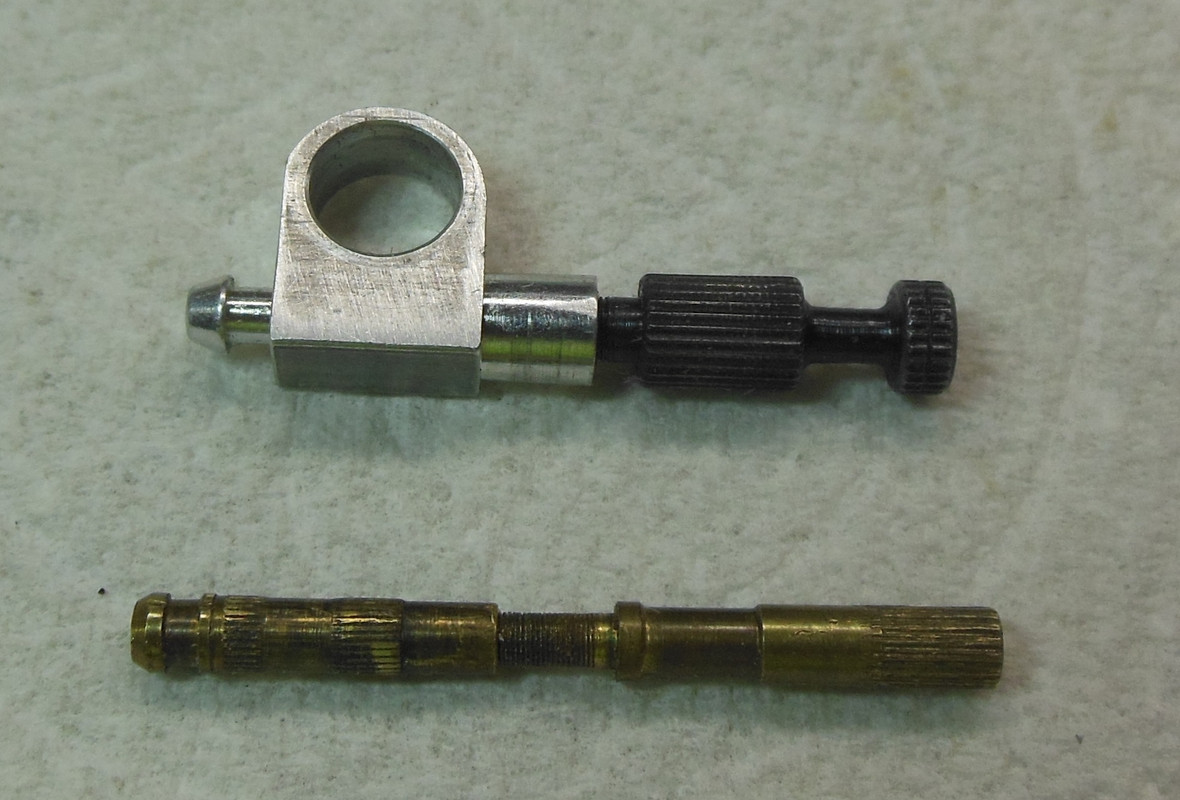
I have everything I need to do the conversion, except using JB Weld instead of epoxy as described in the article. But, again I thought about it for a while. Do I really need to go to all that trouble? That stock needle is awfully thick. Even. Almost the same as the fine NVA barrel? Time for the calipers.
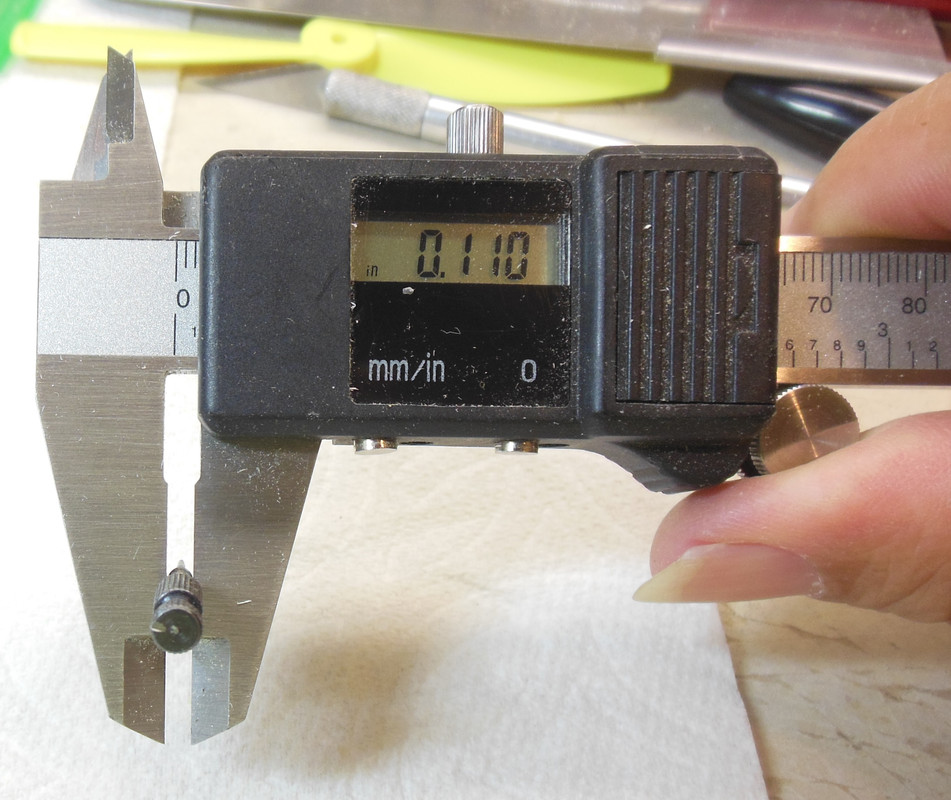
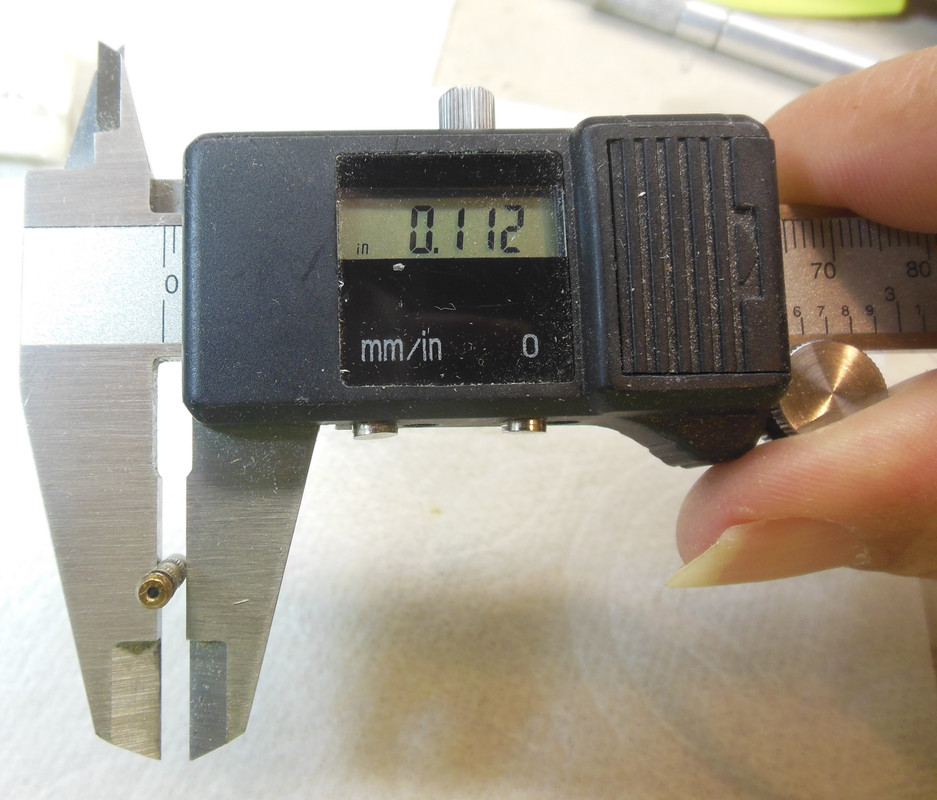
Well whaddayknow. The needle diameter is 0.11 inch, and the barrel of the fine NVA is 0.112. Hmmm… The knurled portion of the NVA is slightly larger in diameter at 0.119 inch. Hmmm ²… Why can’t I just drill out the existing NVA body and press in the fine NVA? Not even mess with the 5/32 tube and JB Weld? I have that expensive drill index with every size bit known to man that I’ve never used. Looking at the index tells me that a #32 drill bit at 0.116 should be just about perfect.
I cut off the fuel nipple to expose the small hole, but left the threaded side of the NVA so I could use that as a drill guide so as not to drill the hole off center. I drilled the hole stepping up the size of drill bit until I got to the #32 bit. Came out just perfect for the fine NVA. Then I cut off the threaded side of the stock NVA. Just the right size.
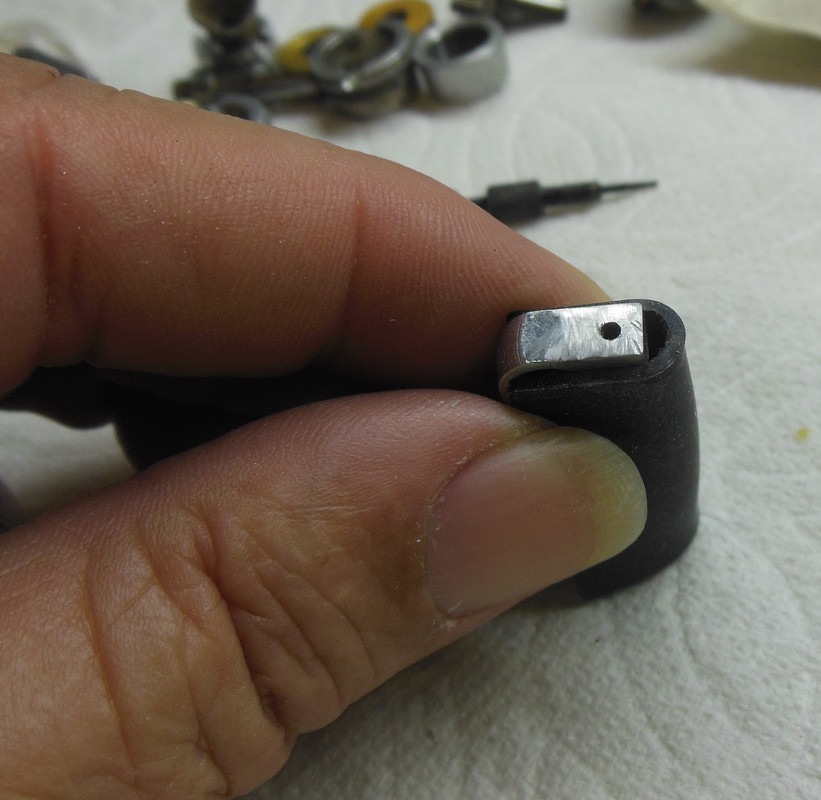
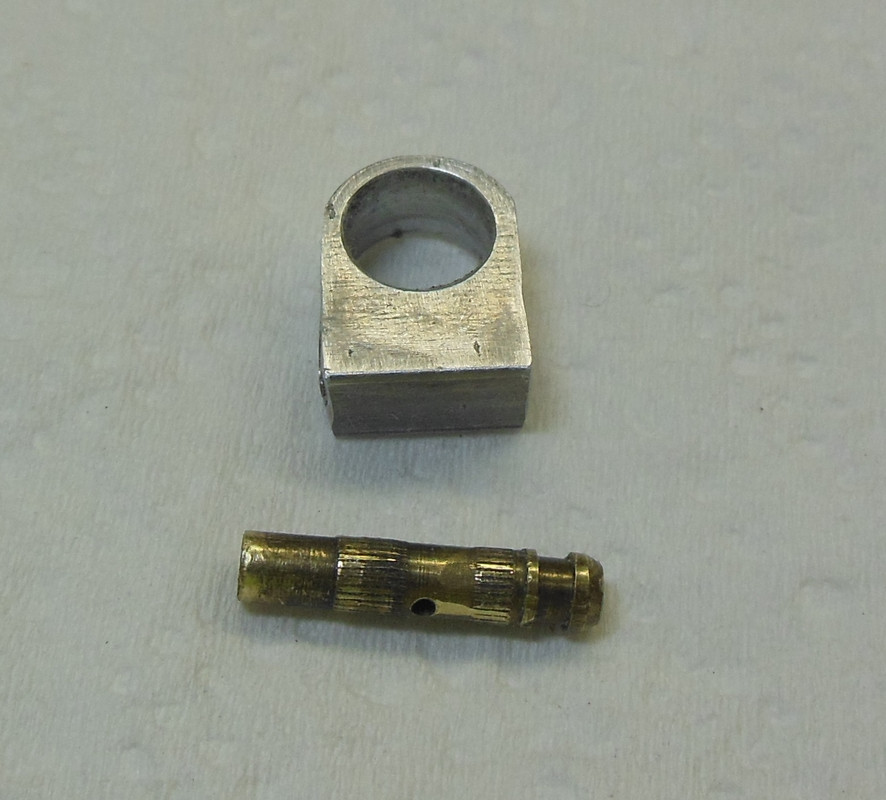
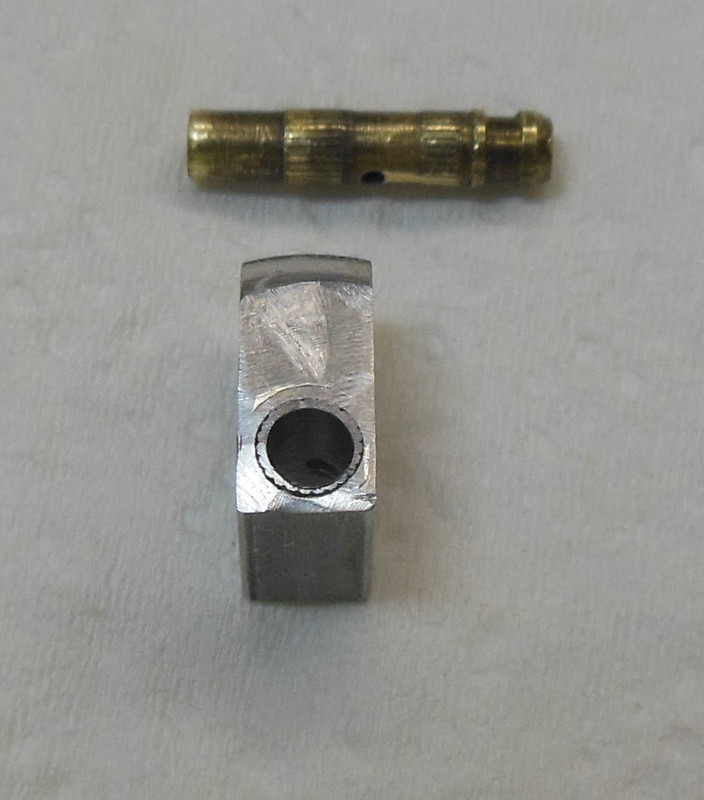
Then I pressed the fine NVA into the stock NVA, and made sure it was seated using an auto-center punch. Lining up the hole in the fine NVA with the hole in the stock NVA requires a lot of care. After drilling out the stock NVA and looking inside, it answered a question I’d had for a long time. I wondered how they drilled that tiny hole straight through the stock NVA exactly centered. The answer is that they drill it off centered. The factory drill bit comes in at an angle, so that with the hole centered in the inner face of the NVA, the other side of the hole is off center in the barrel. Not a problem with the stock needle, but a big problem for me. If I pressed the fine NVA with the hole facing directly centered with the hole in the inner face of the stock NVA, the holes would not align and the fuel wouldn’t flow. I had to be careful to press the fine NVA in at the proper offset for the holes to line up.
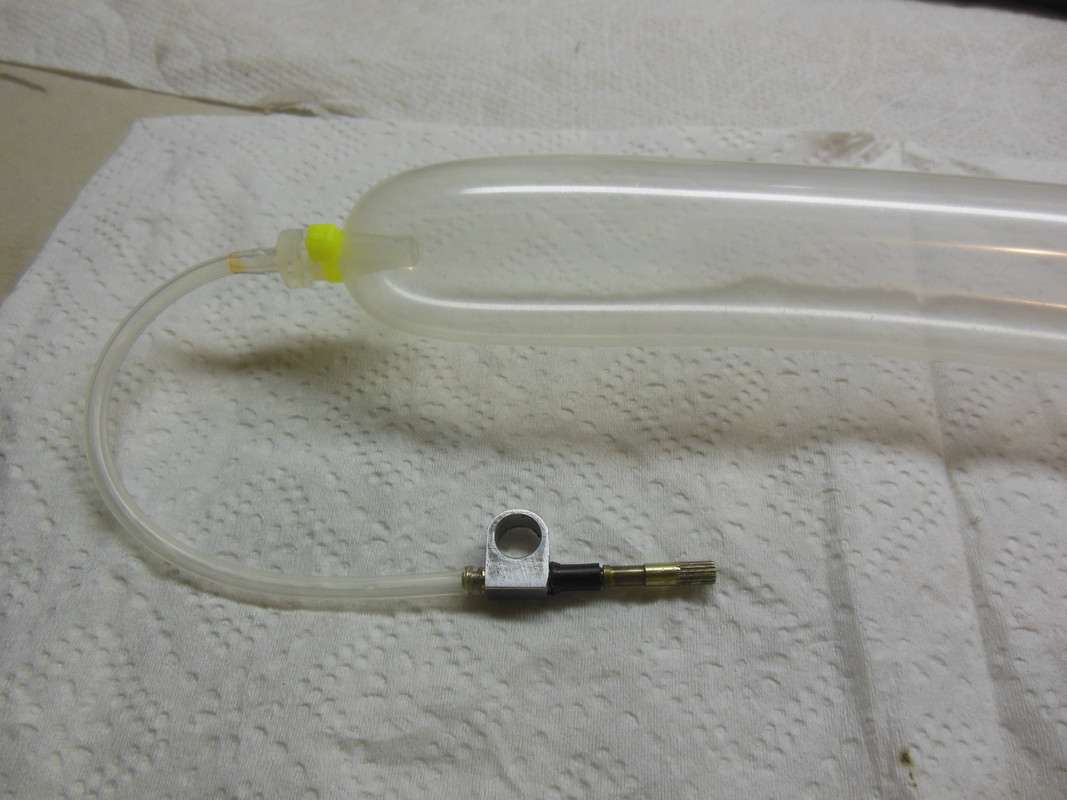
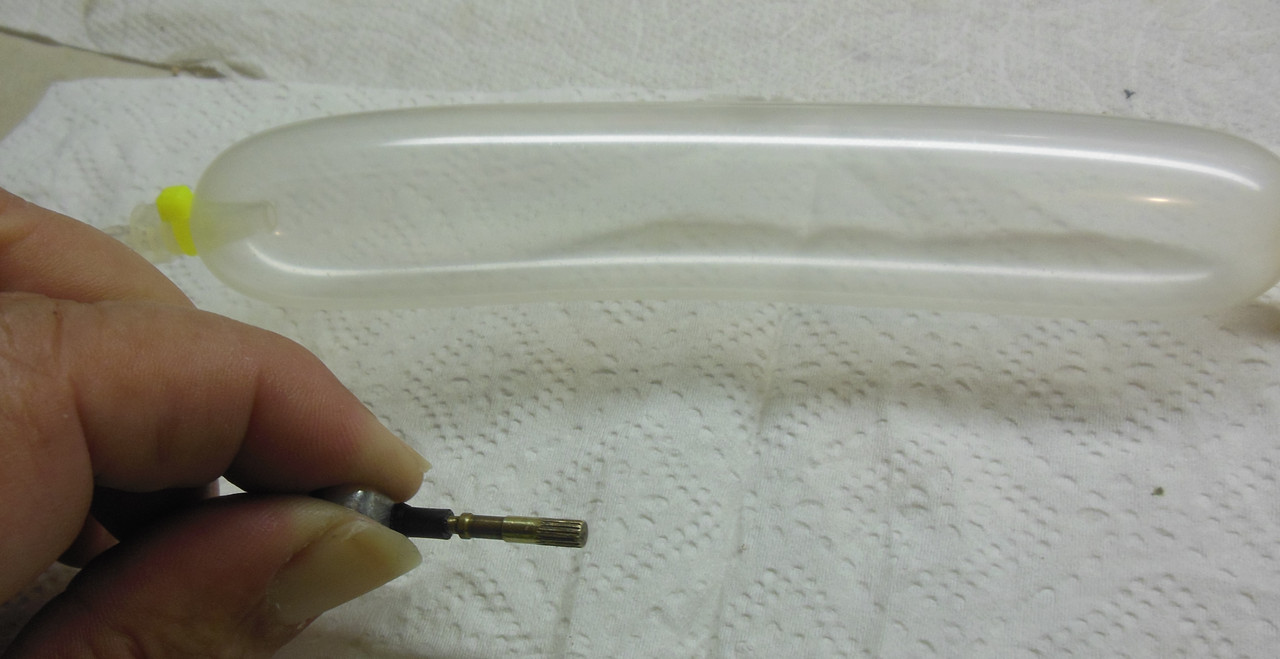
After seating the fine NVA in the old, stock NVA, it was time to see if I’d screwed up and wasted a good NVA. I made up a bladder tube and hooked it up to the new NVA. With the needle closed, I filled the bladder with air and then watched to see if there was any leakage. Huzza!!! No leak! But, would fuel flow when I open the needle? I opened the needle and the air flowed out of the bladder through the NVA setup. But, did it leak when the needle was open? I filled the bladder again with air, and then put my thumb and finger on each side of the NVA, then opened the needle. A very small leak. Okay, no biggie. A little leak around the needle threads is expected. So I dug out a product engine backplate spray bar seal (https://coxengines.ca/cox-.049-.074-spray-bar-seal-10.html) from my spares and inserted it on the NVA barrel. A second leak check with the needle open showed no leak. Huzzahs and Hosannas!
Now to find a left-handed prop to run. Digging around showed that the only 1/2A sized left handed (pusher) props I have are 1) the Curtiss Pusher prop, 2) a couple of speed props, 3) a Cox 6x2 plastic prop, and 4) some three bladed pusher props. The 6x2 is the only one I could use for sport flying, so I’ll try that while I search for a better option for matching left and right handed props.
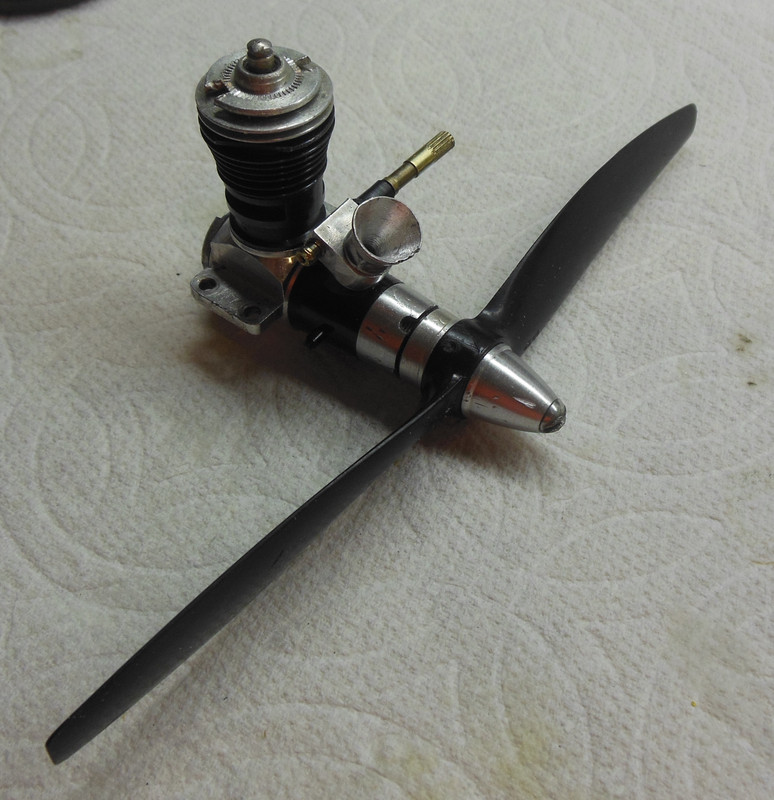
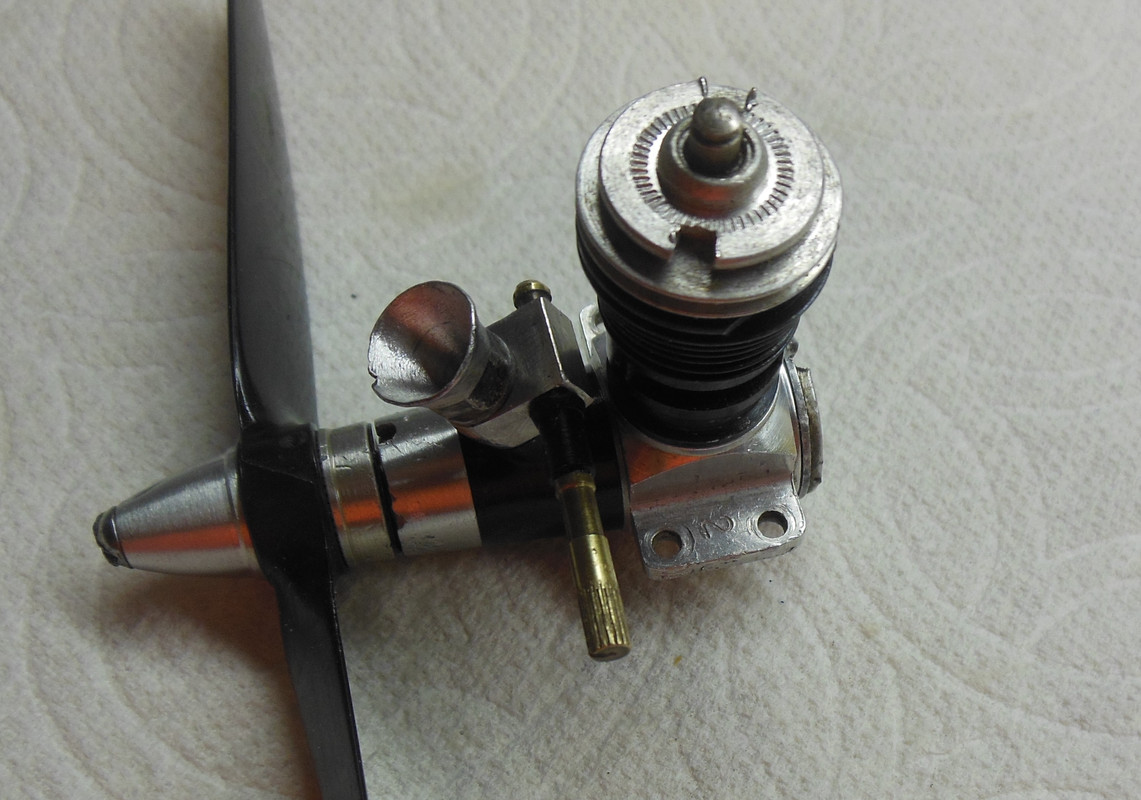
The Doctor Fronkensteen Mark

The crank, as you can see, was broken somehow. The venturi looks like someone used a pair of pliers on it. I don’t have a spare venturi so I needed to fix the smashed one. Thinking for a while, I figured that if I use this prop nut and tap it a few times into the venturi would return it to a round(ish) shape.


Then I dug out the other spares I had, a new venturi body, a spare needle valve assembly, a spare #4 piston/cylinder set, and a used but good high compression glow head. Look though I might, I could not find a crankshaft. Ah, well. I’ve been looking for a reason to build a TD with a left handed crank so I could build some twin engine planes, so this is the time.

Since this is a FrankenTD, I started thinking about drilling out the venturi since I plan on using bladder pressure. I thought about it for a couple of hours, but decided against it for now. But I did have a fine NVA from a different project, and decided I’d do the conversion on the stock NVA. I looked up the previous thread here on the CEF about converting a TD with a postage stamp fine needle here: https://www.coxengineforum.com/t11875-fine-thread-nv-assembly-for-a-td

I have everything I need to do the conversion, except using JB Weld instead of epoxy as described in the article. But, again I thought about it for a while. Do I really need to go to all that trouble? That stock needle is awfully thick. Even. Almost the same as the fine NVA barrel? Time for the calipers.


Well whaddayknow. The needle diameter is 0.11 inch, and the barrel of the fine NVA is 0.112. Hmmm… The knurled portion of the NVA is slightly larger in diameter at 0.119 inch. Hmmm ²… Why can’t I just drill out the existing NVA body and press in the fine NVA? Not even mess with the 5/32 tube and JB Weld? I have that expensive drill index with every size bit known to man that I’ve never used. Looking at the index tells me that a #32 drill bit at 0.116 should be just about perfect.
I cut off the fuel nipple to expose the small hole, but left the threaded side of the NVA so I could use that as a drill guide so as not to drill the hole off center. I drilled the hole stepping up the size of drill bit until I got to the #32 bit. Came out just perfect for the fine NVA. Then I cut off the threaded side of the stock NVA. Just the right size.


Then I pressed the fine NVA into the stock NVA, and made sure it was seated using an auto-center punch. Lining up the hole in the fine NVA with the hole in the stock NVA requires a lot of care. After drilling out the stock NVA and looking inside, it answered a question I’d had for a long time. I wondered how they drilled that tiny hole straight through the stock NVA exactly centered. The answer is that they drill it off centered. The factory drill bit comes in at an angle, so that with the hole centered in the inner face of the NVA, the other side of the hole is off center in the barrel. Not a problem with the stock needle, but a big problem for me. If I pressed the fine NVA with the hole facing directly centered with the hole in the inner face of the stock NVA, the holes would not align and the fuel wouldn’t flow. I had to be careful to press the fine NVA in at the proper offset for the holes to line up.
After seating the fine NVA in the old, stock NVA, it was time to see if I’d screwed up and wasted a good NVA. I made up a bladder tube and hooked it up to the new NVA. With the needle closed, I filled the bladder with air and then watched to see if there was any leakage. Huzza!!! No leak! But, would fuel flow when I open the needle? I opened the needle and the air flowed out of the bladder through the NVA setup. But, did it leak when the needle was open? I filled the bladder again with air, and then put my thumb and finger on each side of the NVA, then opened the needle. A very small leak. Okay, no biggie. A little leak around the needle threads is expected. So I dug out a product engine backplate spray bar seal (https://coxengines.ca/cox-.049-.074-spray-bar-seal-10.html) from my spares and inserted it on the NVA barrel. A second leak check with the needle open showed no leak. Huzzahs and Hosannas!


Now to find a left-handed prop to run. Digging around showed that the only 1/2A sized left handed (pusher) props I have are 1) the Curtiss Pusher prop, 2) a couple of speed props, 3) a Cox 6x2 plastic prop, and 4) some three bladed pusher props. The 6x2 is the only one I could use for sport flying, so I’ll try that while I search for a better option for matching left and right handed props.


The Doctor Fronkensteen Mark
batjac- Diamond Member


Posts : 2374
Join date : 2013-05-22
Age : 61
Location : Broken Arrow, OK, USA
 Re: Finally got to this FrankenTD
I am going to open this up for 1 NO body replied 2 got a question or two ,,, first off Good work on the repair and replacement of the NVA and testing . Did you run this yet ? And i know we have had this discussion before but ,, do you have to have one LF and one RT. hand turning engine to fly twin engine planes ?? 


getback- Top Poster


Posts : 10439
Join date : 2013-01-18
Age : 67
Location : julian , NC
 Re: Finally got to this FrankenTD
Don’t know how I missed this earlier. LH crank would be great for a small speed ship too. And I agree with Eric, good job on the conversion!
0.116 in is about 2.95mm. I wonder if a 3mm bit would be too big Maybe I need to test on a scrap piece of aluminum first. Or try to grind ”a hair” off the diameter of a 3mm bit?
0.116 in is about 2.95mm. I wonder if a 3mm bit would be too big
 Maybe I need to test on a scrap piece of aluminum first. Or try to grind ”a hair” off the diameter of a 3mm bit?
KariFS- Diamond Member

- Posts : 2044
Join date : 2014-10-10
Age : 53
 Re: Finally got to this FrankenTD
Eric, the engine runs great. But I haven't built a twin for this yet. I've looked around, but haven't seen a twin that I want to build at this time. I'm looking for a plane that is: a) rare and obscure, b) a delight to my eyes, and c) proportioned well for a good flying/stunting plane. I do have one I started a couple of years ago, but it looks like it will be too heavy for TDs. I'll either have to redesign the fuselages, or re-engine with .061 Norvels (Heresy!!!)
Kari, I have a Cox magnesium speed pan that I look at occasionally for a left hand crank TD. There's just no one around here that does speed with these engines. There's 1/2A Speed using reed engines, but no one does rotary engines. Not against the rules. Just nobody does it. Also, the guys in the local club are all old guys like me, so getting someone to kneel down to pit for me is pretty much out.
I wouldn't try the 3mm bit myself. Then you're back to epoxy again, I think. If you had a cheap bit that you could grind down, I'd say go for it. Alternatively, an investment in a decent drill index is just that, an investment. You never know when you'll need that odd diameter drill bit for a project. This is the set I went with (Irwin Drill Bit Set, 60-Piece). It only cost me around $60 when I ordered it. It seemed like a lot at the time. But I've been telling myself that for various tools over the years, and when I finally do buy the tool I always say, "Why didn't I buy this years ago!" I'm sure if you looked around over there you'd probably find a cheaper set somewhere.
Then Penny-Wise Mark
edit: The 3mm isn't as much over as I thought. It comes out to 0.118. I guess I might try that. The only thing I'd do first is mic the flanged part on the fuel nipple end that will butt up with side of the NVA. If that will make a good seal, the other side would probably be okay to seal with a standard Cox spray bar seal or a piece of fuel tubing. I'd just be afraid that there was not enough meat for the splines on the spray bar to lock into. If not, maybe a thin film of epoxy or JB Weld might help. I can't say either way, and you'd have to do the experiment on a NVA you're willing to sacrifice. I don't know if I have another fine needle assembly to measure, but I'll do a quick look a little later. If I do, I'll measure the flange. PM me if you're going to do this and we can iron out what you're going to do. Heck, if I have a spare fine needle, maybe I'll try this with a 3mm bit just to see for myself how it works. Then more people might be tempted to do this. But, I'd still suggest getting a good drill index with all the different bits. You don't have to go overboard, but the index with bit sizes from 0-60 has been good for me. And I'm much older than you, I think, so you'd have many more years to utilize yours.
The "It" Mark
Last edited by batjac on Thu Mar 18, 2021 4:45 pm; edited 1 time in total

batjac- Diamond Member


Posts : 2374
Join date : 2013-05-22
Age : 61
Location : Broken Arrow, OK, USA
 Re: Finally got to this FrankenTD
Oops! sorry Eric, I mis-read your previous post. No, you don't have to have opposite direction rotating engines to fly a twin. I've built a couple of twins in the past with both engines turning right-handed props. I just add a couple of degrees to the outboard engine and they fly fine. For the plane I built with reed engines using the Brodak plastic mount, I just shaved off the tabs giving right thrust to the engine and used that for the inboard side. That left 0 degrees right thrust on the inboard engine, and a couple of degrees of right thrust on the outboard engine. In the video below, the inboard engine shut off first, so the plane flew the last 40 seconds on the outboard engine. No problems with line tension.
The Reading Challenged Mark
The Reading Challenged Mark

batjac- Diamond Member


Posts : 2374
Join date : 2013-05-22
Age : 61
Location : Broken Arrow, OK, USA
 Similar topics
» They finally got me!
» Now Complete : New Build And New Hinge Technique, Pics Now Added
» *Cox Engine of The Month* Submit your pictures! -July 2019-
» I can't believe I finally own one!!!!!!!!!!!!!!!
» Lying cheating scumbag
» Now Complete : New Build And New Hinge Technique, Pics Now Added
» *Cox Engine of The Month* Submit your pictures! -July 2019-
» I can't believe I finally own one!!!!!!!!!!!!!!!
» Lying cheating scumbag
Page 1 of 1
Permissions in this forum:
You cannot reply to topics in this forum

 Rules
Rules


