Log in
Search
Latest topics
» Tee Dee .020 combat modelby TD ABUSER Today at 12:38 am
» My latest doodle...
by batjac Yesterday at 9:47 pm
» My N-1R build log
by roddie Yesterday at 8:50 pm
» Free Flight Radio Assist
by rdw777 Yesterday at 4:51 pm
» Purchased the last of any bult engines from Ken Enya
by getback Yesterday at 12:05 pm
» Funny what you find when you go looking
by rsv1cox Wed Nov 20, 2024 3:21 pm
» Landing-gear tips
by 1975 control line guy Wed Nov 20, 2024 8:17 am
» Cox NaBOO - Just in time for Halloween
by rsv1cox Tue Nov 19, 2024 6:35 pm
» Canada Post strike - We are still shipping :)
by Cox International Tue Nov 19, 2024 12:01 pm
» Duende V model from RC Model magazine 1983.
by getback Tue Nov 19, 2024 6:08 am
» My current avatar photo
by roddie Mon Nov 18, 2024 9:05 pm
» Brushless motors?
by rsv1cox Sun Nov 17, 2024 6:40 pm
Cox Engine of The Month
Sanding ideas..add yours too please
Page 1 of 1
 Sanding ideas..add yours too please
Back a year or three Rusty had a good idea:
Get one or more of the Longer Great planes sanding bars and cut them to desired lengths

http://www3.towerhobbies.com/cgi-bin/wti0001p?&I=LXK317&P=SM
As is my Karma; I had just that week bought the 3 most common sizes ( 5" 11" and 22") from Tower along with a bunch of the PSA sand paper in 150 and 220 grits
Relatively, speaking very good tools--- but fairly over priced
I have since added to my kit of sanding tricks, many various shapes using the PSA sand paper


These are not the full kit of shapes and sanders I have or made ----but the ones I USE a lot
That said, the Tower price for a Roll of 80, 150 or 220 grit PSA @12' long, so roughly 10$ or $0.84 per foot
I did a search (and I am sure there are even cheaper places) and found 25Yrd (75 foot) rolls of PSA sand paper in 80 grit, 120, 150, 180, 220, 320, and 400 for $18.19 a roll, or roughly $0.25 per foot
http://www.autobodytoolmart.com/norton-gold-reserve-psa-sheet-rolls-p-18828.aspx
Yes the longer rolls are NOT the same width as the Tower product (they are wider) ---and this is actually a good thing, because the long cut off strip can be used all sorts of ways. Like stuck to a Popsicle stick or dowel rod to get into tight areas
Get one or more of the Longer Great planes sanding bars and cut them to desired lengths

http://www3.towerhobbies.com/cgi-bin/wti0001p?&I=LXK317&P=SM
As is my Karma; I had just that week bought the 3 most common sizes ( 5" 11" and 22") from Tower along with a bunch of the PSA sand paper in 150 and 220 grits
Relatively, speaking very good tools--- but fairly over priced
I have since added to my kit of sanding tricks, many various shapes using the PSA sand paper


These are not the full kit of shapes and sanders I have or made ----but the ones I USE a lot
That said, the Tower price for a Roll of 80, 150 or 220 grit PSA @12' long, so roughly 10$ or $0.84 per foot
I did a search (and I am sure there are even cheaper places) and found 25Yrd (75 foot) rolls of PSA sand paper in 80 grit, 120, 150, 180, 220, 320, and 400 for $18.19 a roll, or roughly $0.25 per foot
http://www.autobodytoolmart.com/norton-gold-reserve-psa-sheet-rolls-p-18828.aspx
Yes the longer rolls are NOT the same width as the Tower product (they are wider) ---and this is actually a good thing, because the long cut off strip can be used all sorts of ways. Like stuck to a Popsicle stick or dowel rod to get into tight areas

fredvon4- Top Poster


Posts : 4012
Join date : 2011-08-26
Age : 69
Location : Lampasas Texas
 Re: Sanding ideas..add yours too please
I had a SR moment there. Could not remember what PSA was standing for. Certainly NOT what my Dr checks for, wasn't a Public Service Announcement, (well, maybe regarding sand papers! safety first) http://encyclopedia.thefreedictionary.com/Pharmaceutical+Society+of+Australia
5th on the list of acronyms: Pressure Sensitive Adhesive!! Ah Ha! Sticky stuff. Yup, got that in 180 and 220 5" discs on rolls. Don't have all the fancy shapes, yet. I did buy an battery powered tooth brush that I plan on "hot glueing" a small disc or triangle of sandpaper to the brush part and getting into tight spaces with it ? I also have a 24" belt of really rough 80 grit that was left over from renting a floor sander for our hardwood floors sanded and refinished. I've cut 7" rounds out of it ( with tin snips) and used on my disc grinder to sharpen law mower blades......Tim Taylor style! rRRRRrRrR
5th on the list of acronyms: Pressure Sensitive Adhesive!! Ah Ha! Sticky stuff. Yup, got that in 180 and 220 5" discs on rolls. Don't have all the fancy shapes, yet. I did buy an battery powered tooth brush that I plan on "hot glueing" a small disc or triangle of sandpaper to the brush part and getting into tight spaces with it ? I also have a 24" belt of really rough 80 grit that was left over from renting a floor sander for our hardwood floors sanded and refinished. I've cut 7" rounds out of it ( with tin snips) and used on my disc grinder to sharpen law mower blades......Tim Taylor style! rRRRRrRrR

Marleysky- Top Poster


Posts : 3618
Join date : 2014-09-28
Age : 72
Location : Grand Rapids, MI
 Re: Sanding ideas..add yours too please
Nothing spectacular for sure but it represents my best effort. It did take a lot of sanding. The wing and appendages are built up but the cockpit section is carved from a solid block of balsa and hollowed out. The whole thing took a lot of sanding. But my most sophisticated sanding tool was probably just a piece of sandpaper wrapped around a pencil or some other shaped object. No plans, I just found a drawing of an original J model and scaled it down. Lot's of calipers etc. Fly's pretty well too on the straight and level. 
Edit: I knew I had a picture with the blue spinners on it.

Bob
Edit: I knew I had a picture with the blue spinners on it.

Bob
Last edited by rsv1cox on Sat Jan 28, 2017 12:36 pm; edited 1 time in total

rsv1cox- Top Poster


Posts : 11245
Join date : 2014-08-18
Location : West Virginia
 Re: Sanding ideas..add yours too please
This is the start of a good thread. Remember, on those aluminum Great Planes bars, use a heat gun to remove the labels and there's your flat sanding bar. There's not a surface on mine that's not covered. Yes, the rolls of sticky paper are priced by pirates. I'll check out those links. I like the electric toothbrush idea too. You compulsive sanders, please refrain from sanding your center sheeting any more than blending flush joints. Little dents and dings are permanently removed with a little drop of water on your fingertip or a light spray.
Rusty
Rusty
_________________
Don't Panic!
...and never Ever think about how good you are at something...
while you're doing it!
My Hot Rock & Blues Playlist
...and never Ever think about how good you are at something...
while you're doing it!
My Hot Rock & Blues Playlist

RknRusty- Rest In Peace

- Posts : 10869
Join date : 2011-08-10
Age : 68
Location : South Carolina, USA
 Re: Sanding ideas..add yours too please
Also, if you forget to use heat (unlike caster glued engine damage) and just get half of it off, a quick hit with brake cleaner (my 21st century solvent in a can) will quickly soften glue for quick removal.
 Re: Sanding ideas..add yours too please
rsv1cox wrote:The most sophisticated build that I ever did Fred was my scratched P-38 shown in this old photo hot off the drawing board and at least 40 years old.
And as it looks today after many trips around the circle, albeit also many years ago.
Nothing spectacular for sure but it represents my best effort. It did take a lot of sanding. The wing and appendages are built up but the cockpit section is carved from a solid block of balsa and hollowed out. The whole thing took a lot of sanding. But my most sophisticated sanding tool was probably just a piece of sandpaper wrapped around a pencil or some other shaped object. No plans, I just found a drawing of an original J model and scaled it down. Lot's of calipers etc. Fly's pretty well too on the straight and level.
Edit: I knew I had a picture with the blue spinners on it.
I posted this picture before in a thread I think titled "Mini me."
Bob
Well, what a very nice looking model you have there. Impressive that it is also that old. If only the plane could tell us what you had put it through....

NEW222- Top Poster

- Posts : 3896
Join date : 2011-08-13
Age : 46
Location : oakbank, mb
 Re: Sanding ideas..add yours too please
Yes.. great thread Phred. (say that 3 times fast!)..  I've neglected my sanding tools. I started a re-face-project.. and removed the paper from most of my blocks/shapes. That's where I stopped.
I have some PVC blocks (Sintra/Kometex) and also some pine-blocks. Either will take a paper-staple for securing the sandpaper. I also use Tesa double-sided tape extensively.
There is a notching-tool that I'd like to make. It's for cutting/spacing equidistant rib-slots to a set-depth. Very cool for balsa scratch-building.
I've always used standard NAB (non-adhesive backed.. ) sandpaper-sheets. Remnant-sheets are kept in a 3-ring binder.

I organized several packages of assorted types/grits by "grit".. (coarse/med./fine) and keep full-sheets in legal envelopes.

Here's where my sandpaper lives..

Just a little nook I chose. The other envelopes contain thin plywood and 1/16" balsa-sheet cut-offs. There's also a pad of graph-paper.
I've mentioned my having rough-cut balsa in bulk. It's all 1.75" wide, in 1/8", 3/16" and 1/4" over-thicknesses.. and in lengths varying between 18" to 30".
I built fixtures to sand the sheets into finish-thicknesses. Using two-sided tape and steel-strips.. I made three beds for the three finish-sizes. It's also useful (if not wasteful..) for making thinner stock.. from thicker stock.


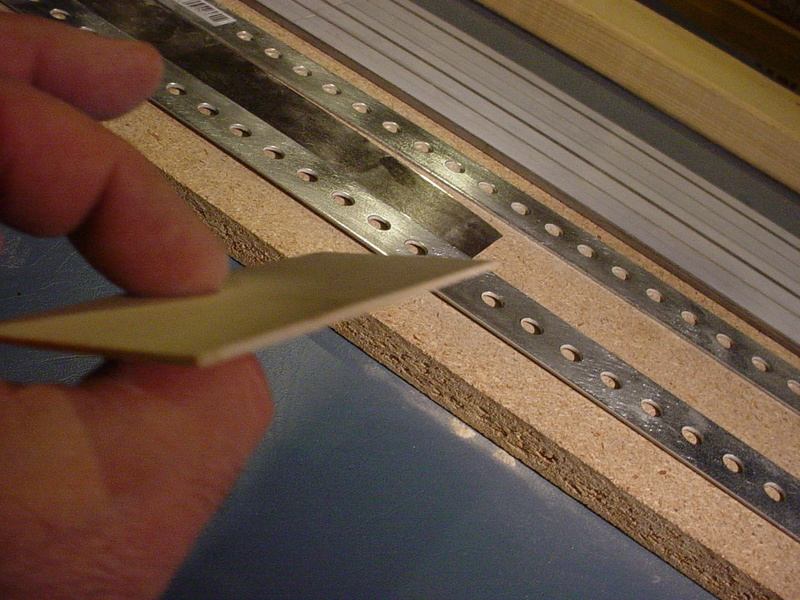
This was a test for making 1/16" sheet. An alternative to out-sourcing.. especially in a pinch.
I have some PVC blocks (Sintra/Kometex) and also some pine-blocks. Either will take a paper-staple for securing the sandpaper. I also use Tesa double-sided tape extensively.
There is a notching-tool that I'd like to make. It's for cutting/spacing equidistant rib-slots to a set-depth. Very cool for balsa scratch-building.
I've always used standard NAB (non-adhesive backed..

I organized several packages of assorted types/grits by "grit".. (coarse/med./fine) and keep full-sheets in legal envelopes.

Here's where my sandpaper lives..

Just a little nook I chose. The other envelopes contain thin plywood and 1/16" balsa-sheet cut-offs. There's also a pad of graph-paper.
I've mentioned my having rough-cut balsa in bulk. It's all 1.75" wide, in 1/8", 3/16" and 1/4" over-thicknesses.. and in lengths varying between 18" to 30".
I built fixtures to sand the sheets into finish-thicknesses. Using two-sided tape and steel-strips.. I made three beds for the three finish-sizes. It's also useful (if not wasteful..) for making thinner stock.. from thicker stock.


This was a test for making 1/16" sheet. An alternative to out-sourcing.. especially in a pinch.
 Re: Sanding ideas..add yours too please
1/4" and 1/8" steel music wire can be used as guides to sand flaps.
 Re: Sanding ideas..add yours too please
roddie wrote:Yes.. great thread Phred. (say that 3 times fast!)..I've neglected my sanding tools. I started a re-face-project.. and removed the paper from most of my blocks/shapes. That's where I stopped.
I have some PVC blocks (Sintra/Kometex) and also some pine-blocks. Either will take a paper-staple for securing the sandpaper. I also use Tesa double-sided tape extensively.
There is a notching-tool that I'd like to make. It's for cutting/spacing equidistant rib-slots to a set-depth. Very cool for balsa scratch-building.
I've always used standard NAB (non-adhesive backed..) sandpaper-sheets. Remnant-sheets are kept in a 3-ring binder.
I organized several packages of assorted types/grits by "grit".. (coarse/med./fine) and keep full-sheets in legal envelopes.
Here's where my sandpaper lives..
Just a little nook I chose. The other envelopes contain thin plywood and 1/16" balsa-sheet cut-offs. There's also a pad of graph-paper.
I've mentioned my having rough-cut balsa in bulk. It's all 1.75" wide, in 1/8", 3/16" and 1/4" over-thicknesses.. and in lengths varying between 18" to 30".
I built fixtures to sand the sheets into finish-thicknesses. Using two-sided tape and steel-strips.. I made three beds for the three finish-sizes. It's also useful (if not wasteful..) for making thinner stock.. from thicker stock.
This was a test for making 1/16" sheet. An alternative to out-sourcing.. especially in a pinch.
How are you Roodie ?, long time no contact! I send you a big hug and read your messages in the forum! ...

MauricioB- Top Poster

- Posts : 3712
Join date : 2016-02-16
Age : 53
Location : ARG
 Re: Sanding ideas..add yours too please
I keep a 4" 'x 6" x 1/4" glass pane on the table with a fine and coarse sheet spray-glued to it. Locktite medium strength adhesive spray is great stuff. I also have a 1/8" x 1/2" x 5" bar with 220 grit wrapped around it. Also my 220 grit hinge recess tool. I do need a long bar for wing LE shaping. I need to see if I can get an aluminum T-bar at Lowes. I like bamboo skewers for small sanding sticks.
I like your dial caliper, Roddie. Sadly, I dropped mine on the concrete floor and busted a tooth in the sliding mechanism. I bought a cheap digital one and don't like it near as much, though it does switch between metric inches. But I constantly have to re-zero it. The old one was dependable and stayed zeroed and there was no battery to die.
Rusty
_________________
Don't Panic!
...and never Ever think about how good you are at something...
while you're doing it!
My Hot Rock & Blues Playlist
...and never Ever think about how good you are at something...
while you're doing it!
My Hot Rock & Blues Playlist

RknRusty- Rest In Peace

- Posts : 10869
Join date : 2011-08-10
Age : 68
Location : South Carolina, USA
 Re: Sanding ideas..add yours too please
I make sanding sticks from 4x24 sanding belts.I use a lot of 36-40 grit for rough shaping. I cut blocks of wood to fit inside the belt. This takes repeated attempts due to getting the fit just right. Once you have the correct length, record the size. The belt should take a bit of time to slide onto the block otherwise it's too loose. These work well for me seeing I get belts by the dozens Certain belts will tear into thin straight strips allowing for narrower sanding sticks. Cheap but works well.

Ken Cook- Top Poster

- Posts : 5636
Join date : 2012-03-27
Location : pennsylvania
 Re: Sanding ideas..add yours too please
When I finished the drywall in the loft I used these foam based drywall sanding blocks. They did an excellent job and have various angled beveled edges. They are quite fine in texture and may work well sanding some hard to get at areas. I haven't tried one, but think I will on my next attempt.
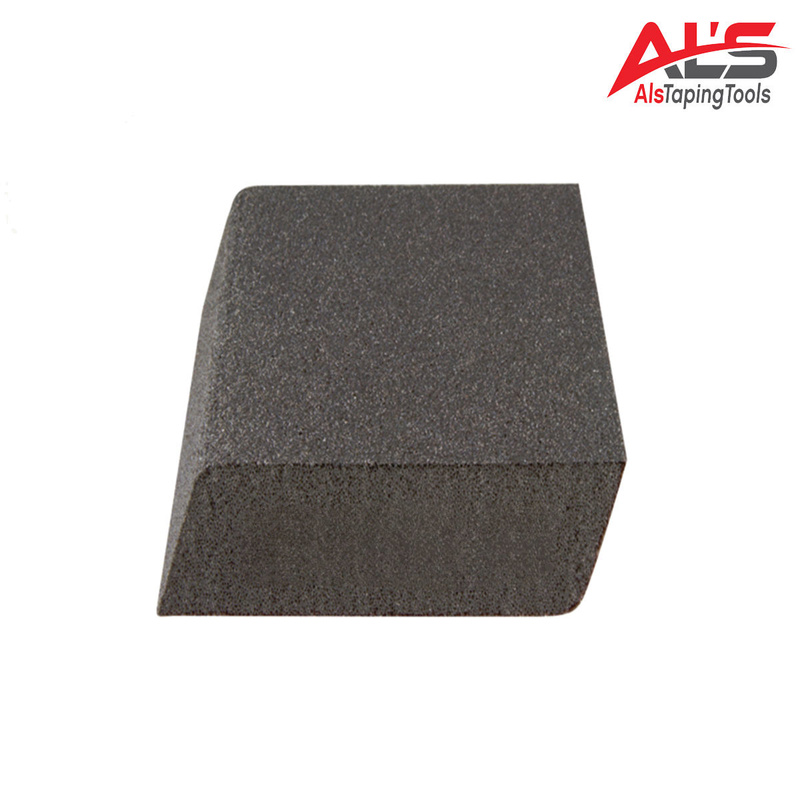
http://www.ebay.com/itm/Dual-Angle-Fine-Fine-Grit-Drywall-Sanding-Block-Sponge-Bulk-box-of-100-NEW-/152080147864?hash=item2368aee598:g:aUIAAOSwEzxYd9nY

http://www.ebay.com/itm/Dual-Angle-Fine-Fine-Grit-Drywall-Sanding-Block-Sponge-Bulk-box-of-100-NEW-/152080147864?hash=item2368aee598:g:aUIAAOSwEzxYd9nY

rsv1cox- Top Poster


Posts : 11245
Join date : 2014-08-18
Location : West Virginia
 Re: Sanding ideas..add yours too please
RknRusty wrote:
I like your dial caliper, Roddie. Sadly, I dropped mine on the concrete floor and busted a tooth in the sliding mechanism. I bought a cheap digital one and don't like it near as much, though it does switch between metric inches. But I constantly have to re-zero it. The old one was dependable and stayed zeroed and there was no battery to die.
Rusty
I've been fortunate to have some nice tools given to me. I worked in a metal-machining job-shop for a year or so.. but was laid-off when things got slow. The owner gave me the caliper.. along with a small Kennedy tool-box with some other assorted items. I use that caliper extensively.. It's pictured in this thread because I needed to shim the steel-strip heights for my sheet-sanding fixture. The double-sided tape that I use, has a liner that's .003" thick. The steels were slightly under-thickness, so I checked various thicknesses of plastic-sheet to gage-up to where I needed to be. When close, I cut strips and stuck them to the bottom-side of the steels. The 1/8" steel was actually .118".. so taping .005" plastic strips brought the thickness to .126".. close enough for me.
I bought the pairs of steels in 36" lengths at Home Depot in the hardware section. The 1/8" steel is about 3/4" wide. The thicker steels are a little wider. My bulk-supply of 1.75" width rough-cut balsa stock varies in lengths from 18" to 30".. so my fixtures needed to be at least that long.
Although I used sanding hand-blocks in the tests.. the fixtures are all set for production-runs using an orbital power-sander. There will be a lot of dust created.. which is the next issue I want to address. I'm thinking about making a skirt that fits around the base of my vibrating-sander with a fitting for a std. shop-vac hose. Open on the ends; it would straddle the steels without contacting the stock. Basically a floating box that fits-on over the tool, with vacuum-suction.
May as well talk dust-control in a thread on sanding-ideas.. right?
 Re: Sanding ideas..add yours too please
Brother Ken the belt sander idea is good ...but for some reason I never wear out and replace a good belt... Some times (in a hurry) I tend to get too aggressive and over heat the belt and then it separates at the glue joint, then I have a long and still good section of sand paper... mostly 60 to 80 grit
This is rather rare.
Usually I get very long life out of a belt and do wish the crepe rubber conditioning sticks were not so expensive as I use them a lot
Like Rusty, and others do I take the remnants of the belt, and re-use by; either gluing to a area on a building board or stick to a home made sanding block....
Back to your idea...Recently I cut a 4X36 80 grit belt with a bur on the angle iron piece I was edge dulling ----and have two separate belts one about 3/4" wide and the other the rest of the belt....
I am going to try and do your method for the narrow belt and have an idea how to make a two part block with middle form wedges to keep it all square and tight but allowing easy removal and resetting the belt to an unused section for the working area...
Note to self....
Two distinct projects this year:
A real down draft sanding table I put off for too many years now
Some decent workstation for Wet sanding...still trying to design (In my head) a way to have running water and an area to flush the paper and NOT make a big mess...with big enough work area to deal with a full wing/ fuselage assy, or even whole airplane

fredvon4- Top Poster


Posts : 4012
Join date : 2011-08-26
Age : 69
Location : Lampasas Texas
 Re: Sanding ideas..add yours too please
Another sanding tool that I thought about, would be for making T/E stock.. and various other types of tapers. It would utilize a continuous-hinge to form a stationary long adjustable "V". Mount one side rigidly to a base-board and set the desired angle of the movable -side, using a long stop-block.
I know it might be hard to visualize this concept.. but Rusty mentioned being ISO a sanding-tool to form leading-edges. I think it would be possible to form a "trough" using cloth-backed paper (a sanding-belt like Ken mentioned) adhered into a V-trough using a long piece of L/E stock with the abrasive wrapped around it, to establish the profile. Again; the fixture is stationary.. and the stock is moved back/forth within it. Exerting equal-pressure would entail making a narrow hardwood-block to bear-on the top edge.. with stops to lock the ends of the balsa for feeding. You could also use two dowels through the feed-block.. and into the balsa-stock to hold it while sanding back and forth. Make the feed block long enough to bear-on height-blocks at the ends of the fixture.. and when the feed-block squarely contacts them; your piece is complete and symmetrical.
You can make your own "PSA" sheets, if you use the double-sided tape like the Tesa brand that I have. It has a strong/thin acrylic liner and sticks very well to both; smooth and semi-porous materials. Although the tape is considered permanent, it "will" peel-off when needed without any scraping. It has a paper-backing.. so it can be smoothed/pressed firmly in place prior to exposing the adhesive on the other side.

Facing the bottom of a hard-block with it, provides a terrific quick-clamp/fence that will not move once stuck-down. Removal generally requires prying-off using another block and a flat-blade screwdriver. I can't stress enough; how convenient and useful that this can be.
Sorry for getting off-track a bit.. but fixturing is so important and worth considering for accuracy and repeatability.
I know it might be hard to visualize this concept.. but Rusty mentioned being ISO a sanding-tool to form leading-edges. I think it would be possible to form a "trough" using cloth-backed paper (a sanding-belt like Ken mentioned) adhered into a V-trough using a long piece of L/E stock with the abrasive wrapped around it, to establish the profile. Again; the fixture is stationary.. and the stock is moved back/forth within it. Exerting equal-pressure would entail making a narrow hardwood-block to bear-on the top edge.. with stops to lock the ends of the balsa for feeding. You could also use two dowels through the feed-block.. and into the balsa-stock to hold it while sanding back and forth. Make the feed block long enough to bear-on height-blocks at the ends of the fixture.. and when the feed-block squarely contacts them; your piece is complete and symmetrical.
You can make your own "PSA" sheets, if you use the double-sided tape like the Tesa brand that I have. It has a strong/thin acrylic liner and sticks very well to both; smooth and semi-porous materials. Although the tape is considered permanent, it "will" peel-off when needed without any scraping. It has a paper-backing.. so it can be smoothed/pressed firmly in place prior to exposing the adhesive on the other side.

Facing the bottom of a hard-block with it, provides a terrific quick-clamp/fence that will not move once stuck-down. Removal generally requires prying-off using another block and a flat-blade screwdriver. I can't stress enough; how convenient and useful that this can be.
Sorry for getting off-track a bit.. but fixturing is so important and worth considering for accuracy and repeatability.
 Re: Sanding ideas..add yours too please
Like Bob mentioned, these soft washable ones are handy, and when they wear out I just wrap them with 220 and 320 secured on one side with a row of ball end sewing pins. Just pay attention and don't accidentally rub the pinned end on your project. That'll make you cuss. Lol. Who, me... nah, I've never done that. I have a 12" long one too.

I have a pack of 120 grit belts. I'm going to spray glue one to my 36" carpenter's level for starting the 1/2" square dowel wing LE I'm working on. That'll make sure there are no dips along the front of it before I do the shaping. I do the final shaping with the aforementioned soft blocks. I use a light and exact angular pushing motion, counting the strokes as I work down the LE, and check the shape at each rib station with the plywood shape guide that came in the kit.

I have a pack of 120 grit belts. I'm going to spray glue one to my 36" carpenter's level for starting the 1/2" square dowel wing LE I'm working on. That'll make sure there are no dips along the front of it before I do the shaping. I do the final shaping with the aforementioned soft blocks. I use a light and exact angular pushing motion, counting the strokes as I work down the LE, and check the shape at each rib station with the plywood shape guide that came in the kit.
_________________
Don't Panic!
...and never Ever think about how good you are at something...
while you're doing it!
My Hot Rock & Blues Playlist
...and never Ever think about how good you are at something...
while you're doing it!
My Hot Rock & Blues Playlist

RknRusty- Rest In Peace

- Posts : 10869
Join date : 2011-08-10
Age : 68
Location : South Carolina, USA
 Re: Sanding ideas..add yours too please
I find sanding time consuming but enjoyably relaxing. Everything shown so far I use with the exception of the Great Planes stuff. If you think it is overpriced in the USA - try the UK!!!
If I have a lot of sanding to do or think that this will be repeated on another model(s) then I do not hesitate to make a "tool"
This makes a snap of making hinge pockets. I got this from a "Windy" video

For rounding off edges - I route the "U" shape into a spruce or hardwood strip and glue in the abrasive material. This makes profiling edges a very quick job with quite accurate results.
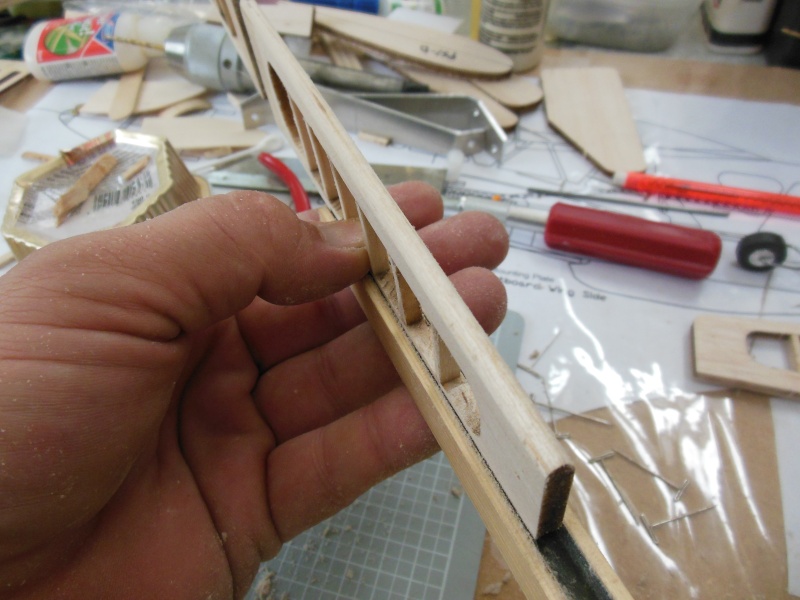
I often have trouble shaping the leading edge of a wing. I got this idea from an RSM kit and have now copied it several times. Make it slightly more bell mouthed than the final profile unless you like repairing ribs. Again it makes it easier to get a truly symmetrical shape rather than relying on my poor eyesight.
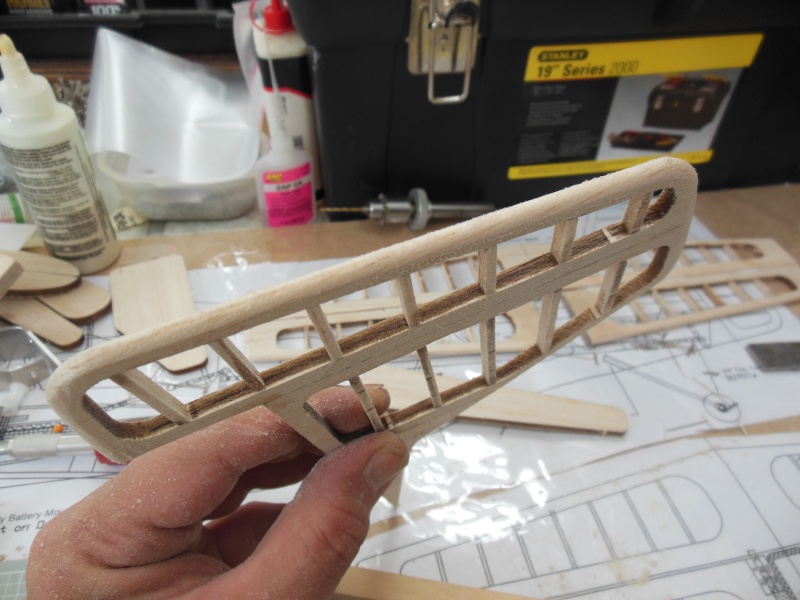

Here are my equivalents of the great planes stuff. Coarse one side and medium the other - tungsten carbide grit. You wouldn't use the coarse on balsa - tis a bit too rough but for ply and hardwood - it sands a treat.

Now here we come to the "boy's toys" for rapid removal of excess wood.
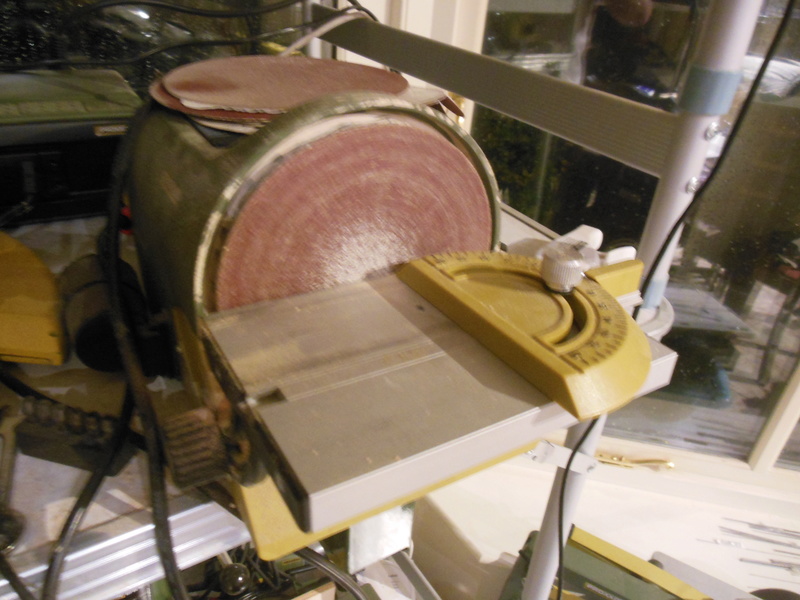
The disc sander. This is the easiest way to square edges, shape wingtips ....... I use this for many jobs involving balsa, ply, hardwood bearers, paxolin, aluminium, tin sheet and carbon fibre sheet.I also use it for polishing flat steel parts.
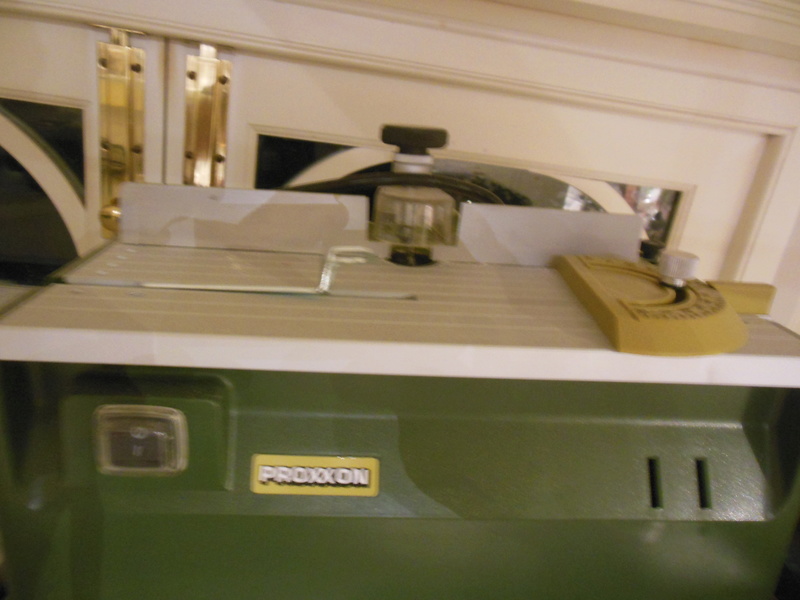
Then there is the miniature router. This is ideal for grooves, cutting profiled edges rapidly and making profile sanding tools. Like the disk sander - it also sqaures and angles edges.
The drill grinder. I had a Dremel for many years and wore it out. Literally. I replaced it with another Dremel and had nothing but problems with it and gave up. The first one out of the box only ran at one speed - I took it back and exchanged it and after a couple of minutes it became far too hot to handle and then decided to run at a single speed. I returned it under warranty - it wasn't fixed but replaced. I can,t fault the service but a drill doesn't run true in it. I use it now for polishing.
However, Proxxon came to the rescue. These are horrendously expensive in the UK but I got mine shipped from Italy.
I use this for cutting piano wire, metal strip ...........drilling holes, all sorts of shape and sizes of burrs - mounted in a stand - router attachment ......

and for sanding with a variety of sanding tubes

Now the wood ripper

and the delicate sanding tipped gadget. It has a variety of shapes for getting into edges, corners ...........

If I have a lot of sanding to do or think that this will be repeated on another model(s) then I do not hesitate to make a "tool"
This makes a snap of making hinge pockets. I got this from a "Windy" video

For rounding off edges - I route the "U" shape into a spruce or hardwood strip and glue in the abrasive material. This makes profiling edges a very quick job with quite accurate results.

I often have trouble shaping the leading edge of a wing. I got this idea from an RSM kit and have now copied it several times. Make it slightly more bell mouthed than the final profile unless you like repairing ribs. Again it makes it easier to get a truly symmetrical shape rather than relying on my poor eyesight.


Here are my equivalents of the great planes stuff. Coarse one side and medium the other - tungsten carbide grit. You wouldn't use the coarse on balsa - tis a bit too rough but for ply and hardwood - it sands a treat.

Now here we come to the "boy's toys" for rapid removal of excess wood.
The disc sander. This is the easiest way to square edges, shape wingtips ....... I use this for many jobs involving balsa, ply, hardwood bearers, paxolin, aluminium, tin sheet and carbon fibre sheet.I also use it for polishing flat steel parts.

Then there is the miniature router. This is ideal for grooves, cutting profiled edges rapidly and making profile sanding tools. Like the disk sander - it also sqaures and angles edges.

The drill grinder. I had a Dremel for many years and wore it out. Literally. I replaced it with another Dremel and had nothing but problems with it and gave up. The first one out of the box only ran at one speed - I took it back and exchanged it and after a couple of minutes it became far too hot to handle and then decided to run at a single speed. I returned it under warranty - it wasn't fixed but replaced. I can,t fault the service but a drill doesn't run true in it. I use it now for polishing.
However, Proxxon came to the rescue. These are horrendously expensive in the UK but I got mine shipped from Italy.
I use this for cutting piano wire, metal strip ...........drilling holes, all sorts of shape and sizes of burrs - mounted in a stand - router attachment ......

and for sanding with a variety of sanding tubes

Now the wood ripper

and the delicate sanding tipped gadget. It has a variety of shapes for getting into edges, corners ...........


ian1954- Diamond Member

- Posts : 2688
Join date : 2011-11-16
Age : 70
Location : England
 Re: Sanding ideas..add yours too please
Now that's a tutorial. I like your hand made hinge pocket tool, sets width and depth.
I share your feelings regarding Dremel tools. IMHO they are pooly designed and manufactured with tolerances only a mother could love. The switches are so bad I usually give up on them. I have Harbor Freight types that work better.
Bob
I share your feelings regarding Dremel tools. IMHO they are pooly designed and manufactured with tolerances only a mother could love. The switches are so bad I usually give up on them. I have Harbor Freight types that work better.
Bob

rsv1cox- Top Poster


Posts : 11245
Join date : 2014-08-18
Location : West Virginia
 Hey Admin
First I would like Jason to add a new Topic Icon... a "Thank You" button
Ian...perfect and great post and photos
Edited in.... Thanks to ALL other CEFers for contributing ... we all can take away new ways to do a thing--- IF we can hear, read, or see other god/great IDEAS... !!
IAN: If YOU think the Great Planes extruded aluminum sanding bars are big cost for you... I think the great tool you showed..
The PermaGrit bars; are the same problem for me... hard to find, and selection is usually limited when found, but my oh my are the folks who have and sell them proud
I do think I am going to bite the bullet and get the various different PermaGrit sets, this year...
More so for my real wood working shop. The use in the airplane factory would be limited. Only because I already have a large kit of purpose built sanders and shapers
BTW, I too, use the same method you showed for LE and TE shapes... and I would dearly LOVE to be able to afford sending a unique LE profile to a Custom Router bit service for many of those shapes...The service is out there ---but custom tooling is pretty high $$$ for one off shapes
Side thought...if SigMfg, GreatPlanes, Horizon Hobby, or any other company with large audience produced a set of LE typical SHAPE sanding bars for PSA sandpaper in 6, 12, or 18 inch lengths...I would certainly buy a set

fredvon4- Top Poster


Posts : 4012
Join date : 2011-08-26
Age : 69
Location : Lampasas Texas
 Similar topics
» Another proposed design by Roddie
» A Sanding Tip
» "Rodd-O-Gyro"
» Dope, Sanding Sealer, And The Like......
» Sanding bars and other hints
» A Sanding Tip
» "Rodd-O-Gyro"
» Dope, Sanding Sealer, And The Like......
» Sanding bars and other hints
Page 1 of 1
Permissions in this forum:
You cannot reply to topics in this forum

 Rules
Rules


