Log in
Search
Latest topics
» Free Flight Radio Assist by rdw777 Today at 4:51 pm
» Tee Dee .020 combat model
by Ken Cook Today at 4:42 pm
» My N-1R build log
by akjgardner Today at 12:39 pm
» Purchased the last of any bult engines from Ken Enya
by getback Today at 12:05 pm
» Funny what you find when you go looking
by rsv1cox Yesterday at 3:21 pm
» Landing-gear tips
by 1975 control line guy Yesterday at 8:17 am
» Cox NaBOO - Just in time for Halloween
by rsv1cox Tue Nov 19, 2024 6:35 pm
» Canada Post strike - We are still shipping :)
by Cox International Tue Nov 19, 2024 12:01 pm
» Duende V model from RC Model magazine 1983.
by getback Tue Nov 19, 2024 6:08 am
» My current avatar photo
by roddie Mon Nov 18, 2024 9:05 pm
» My latest doodle...
by TD ABUSER Mon Nov 18, 2024 11:30 am
» Brushless motors?
by rsv1cox Sun Nov 17, 2024 6:40 pm
Cox Engine of The Month
Cox Hyper Viper *** And Chipmunk, now
Page 1 of 2
Page 1 of 2 • 1, 2 
 Cox Hyper Viper *** And Chipmunk, now
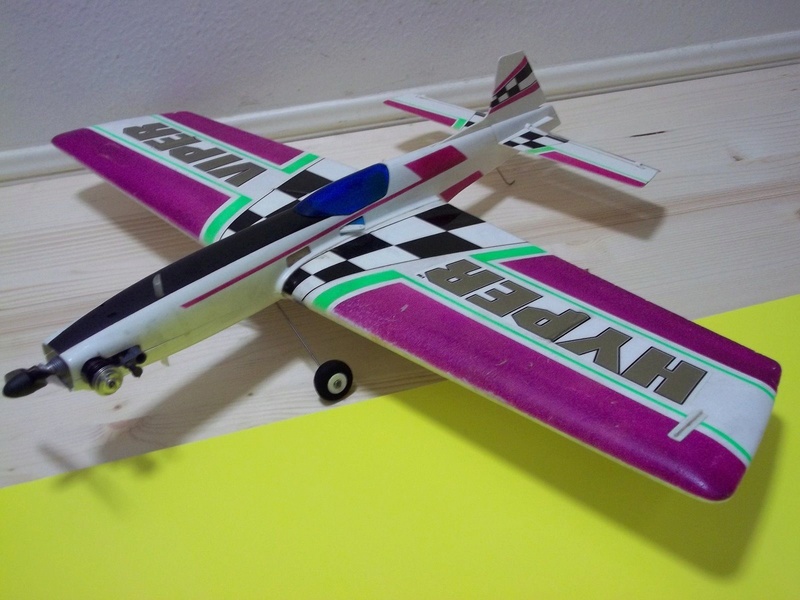
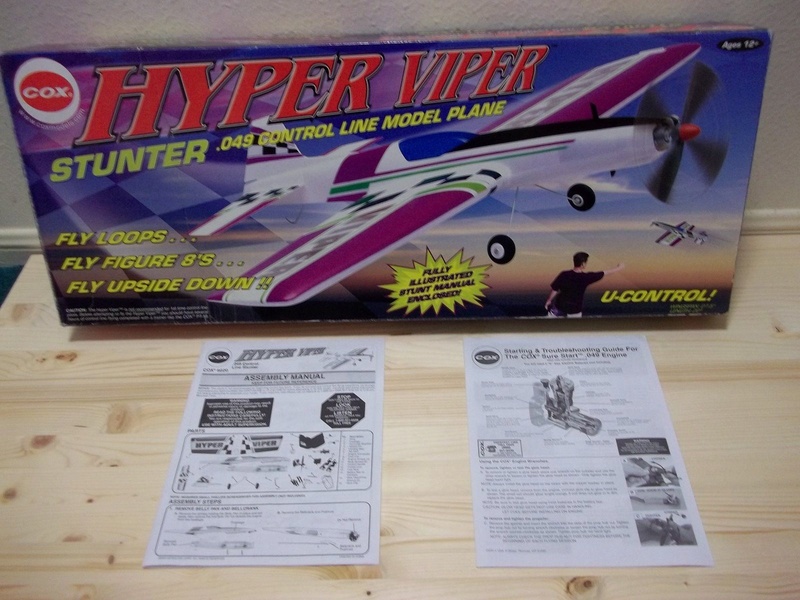
I just had to try a Cox Hyper Viper so I put in the min bid on one on eBay and ended up winning it. It is now in transit, maybe I will have it to be able to fly this Saturday. It is not in pristine new condition but that is ok by me because I do look for museum pieces but rather very flyable used planes. I was surprised this plane had only a SureStart in it, would have thought by the looks of the design Cox would have put in a TD for more power. I watched a few Youtube videos and I guess the SureStart does a good job of hauling the plane around in circles and even overhead.


Last edited by PeterJGregory on Sat Dec 03, 2016 4:21 pm; edited 1 time in total

PeterJGregory- Gold Member

- Posts : 144
Join date : 2014-07-28
Age : 61
Location : Hudson Valley, New York
 Re: Cox Hyper Viper *** And Chipmunk, now
yes! they fly awesome!
don't forget the tip weight and the sure start is easy to flood because it is mounted horizontally.
also, DONT FORGET TO RUN THE ENGINE IN!
don't forget the tip weight and the sure start is easy to flood because it is mounted horizontally.
also, DONT FORGET TO RUN THE ENGINE IN!


cox24711- Platinum Member

- Posts : 722
Join date : 2014-01-18
Age : 21
Location : Noosa Queensland Australia
 Re: Cox Hyper Viper *** And Chipmunk, now
cox24711 wrote:yes! they fly awesome!
don't forget the tip weight and the sure start is easy to flood because it is mounted horizontally.
also, DONT FORGET TO RUN THE ENGINE IN!
Cool, great tip!


BUZZZ003- AUjack2003

- Posts : 13
Join date : 2016-11-14
Age : 21
Location : Noosa, Queensland, Australia
 Re: Cox Hyper Viper *** And Chipmunk, now
The Hyper Viper has landed. I hope to give it a whirl tomorrow. The engine is very clean, the plane has seen action. A bit of repair on the firewall, and that's ok. I wanted one to fly, not become a shelf queen 

PeterJGregory- Gold Member

- Posts : 144
Join date : 2014-07-28
Age : 61
Location : Hudson Valley, New York
 Re: Cox Hyper Viper *** And Chipmunk, now
Cool good luck! They do fly well. I have a super chipmunk which is pre-surestart and also flies pretty good, the surestart has a little more power out of the box than the older product engines especially if you remove the restrictor in the intake. another option if you want more power is a killer bee which will slide right into it!  (Bandit)

TDbandit- Platinum Member

- Posts : 897
Join date : 2014-12-01
Age : 53
Location : Riverdale Georgia
 Re: Cox Hyper Viper *** And Chipmunk, now
TDbandit wrote:Cool good luck! They do fly well. I have a super chipmunk which is pre-surestart and also flies pretty good, the surestart has a little more power out of the box than the older product engines especially if you remove the restrictor in the intake. another option if you want more power is a killer bee which will slide right into it!(Bandit)
or take the restrictor out (as bandit said) and put a better cylinder and piston in it like a tee dee or a black widow. also, high compression head and it will bomb it around!

what i do is when a high compression head goes bust i drill and tap it for a glow plug

cox24711- Platinum Member

- Posts : 722
Join date : 2014-01-18
Age : 21
Location : Noosa Queensland Australia
 Re: Cox Hyper Viper *** And Chipmunk, now
Great advice on the Killer Bee and TD mod, both new ideas to me. The only engine whine I heard today was from my leaf blower, however. We had a beautiful weather today here in the Mid Hudson Valley but I figured I better take care of business before getting to the HV. My afternoon was filled with completing a model airplane project - finishing the refinishing I started back in July on a stable shop table for a CNC machine I bought. Daylight ran out well before I would have had a chance to fly, but the CNC will up my shop game quite a bit. It is a StepCraft 840 here's a video, from somebody else (not me): https://www.youtube.com/watch?v=0n-PhggxBp0
High winds and 40 Degrees F tomorrow so I will be doing other things than flying - hopefully working on the SC840...
Cheers,
Peter
High winds and 40 Degrees F tomorrow so I will be doing other things than flying - hopefully working on the SC840...
Cheers,
Peter

PeterJGregory- Gold Member

- Posts : 144
Join date : 2014-07-28
Age : 61
Location : Hudson Valley, New York
 Re: Cox Hyper Viper *** And Chipmunk, now
Looks like a nice machine Pete. Is there a vacuum-table or an option for adding one? I used to run Gerber Scientific Sabre 408's with 53" x 102" tables. I'd love to have a bench-top machine.
 Re: Cox Hyper Viper *** And Chipmunk, now
I got a great deal on this machine. It does not have vacuum, it comes with simple clamps for holding down sheet material and all other clamping is up to your imagination/budget. This system does have add-ons for laser and 3D printing, but I won't use this for either of those uses. One thing, I don't want the laser starting fires... Mine has the factory spindle. You can opt to use off-the-shelf rotary tools but they don't have the control the factory setup has. It's just a matter of time to get it up and going - I will have a couple weeks of vacation after about the 16th of Dec. to play with it.

PeterJGregory- Gold Member

- Posts : 144
Join date : 2014-07-28
Age : 61
Location : Hudson Valley, New York
 Re: Cox Hyper Viper *** And Chipmunk, now
Cool !! Peter looks like you will be showing us some of your projects in the future  What do you mean fire from balsa/ply ? got temp. control don't it ? I dont know but i am sure someone here does , start a new thread when you get going or have time .


getback- Top Poster


Posts : 10439
Join date : 2013-01-18
Age : 67
Location : julian , NC
 Re: Cox Hyper Viper *** And Chipmunk, now
The laser cutters do have a habit of starting fires with materials like wood. You have to constantly watch to make sure things are kept under control. I don't have that kind of patience! But I guess you could sit there watching your LiPo batteries charge at the same time, making sure they don't catch on fire, too.
Fortunately the US HQ for StepCraft is only a nice country ride into Northwestern Connecticut from where I live, so I need to get over there and get some fast-tracking as to getting my CNC up and running. I did get to the point with the CAD software to do some basic shapes - now it's go time...
I will keep posting about progress. So many projects, so little time!
Cheers - Poughkeepsie Pete

PeterJGregory- Gold Member

- Posts : 144
Join date : 2014-07-28
Age : 61
Location : Hudson Valley, New York
 Re: Cox Hyper Viper *** And Chipmunk, now
I have had a Stepcraft for over two years now and use it regularly.
https://www.coxengineforum.com/t6810-skyray-35-wings?highlight=skyray
I reread the thread but failed to mention that I run this with a parallel driver and Mach 3 software and a home made CNC controller.
The router on this is a Proxxon IBS/E. I started off with this because I already had one and didn't want to spend a fortune on a router specially for this.
However, I used it so much - I replaced the Proxxon with the Stepcraft HS spindle
https://www.stepcraft-systems.com/en/accessories/systemheld-tools/hf-spindle-500
It cost more than the Stepcraft 840 kit but I can use it for much longer periods and more aggressively. I restricted the Proxxon to 15 minute runs. I also already had the ER11 collets that I use on another of my "gadgets".
I use quite a few differing CAD applications and often prototype using the Stepcraft with wood before using my CNC mill with metal. Door signs, Crankcases, cylinder heads, bellcranks ............
The package I use for wing ribs is DevWing
http://www.devcad.com/eng/devwing.asp
I have seen the options for the laser cutter and the 3D printing head but they are quite expensive compared to a dedicated machine.
I am very happy with my Stepcraft
Extracted from the posting mentioned above
It now runs much quicker but noisier.

ian1954- Diamond Member

- Posts : 2688
Join date : 2011-11-16
Age : 70
Location : England
 Re: Cox Hyper Viper *** And Chipmunk, now
Stupid question, what holds the cut piece in place for the final cut? Seems like it would move around without some tabs uncut?

crankbndr- Top Poster

- Posts : 3109
Join date : 2011-12-10
Location : Homestead FL
 Re: Cox Hyper Viper *** And Chipmunk, now
crankbndr wrote:Stupid question, what holds the cut piece in place for the final cut? Seems like it would move around without some tabs uncut?
Not a stupid question - On this example I have used a double sided not so sticky, sticky tape. I have also done it with tabs and have no real preference but using tape means that I don't have to come up with a clamping arrangement and program around clamps.
Also, sometimes I layer and cut the sheets three deep - and double side tape them together - that wouldn't work with tabs.
The tape works with balsa, ply, plastics and other light materials but aluminum, brass ...... needs clamping as well. The metal heats up, the glue softens .........
Sometimes, I have to pause a job and move the clamps around but try and avoid this.
One of the longest jobs in building a wing is cutting out the ribs- especially plywood ribs. This makes it easy and the DevWing software makes lightening ribs very easy.

ian1954- Diamond Member

- Posts : 2688
Join date : 2011-11-16
Age : 70
Location : England
 Re: Cox Hyper Viper *** And Chipmunk, now
Cool machine you guys have, thanks for the how-to.

crankbndr- Top Poster

- Posts : 3109
Join date : 2011-12-10
Location : Homestead FL
 Re: Cox Hyper Viper *** And Chipmunk, now
Ian and all - Really, really great info. You answered a number of questions I have as I just start into this. Mine has the SC spindle motor. My main interest right now is exactly what you mention, cutting ribs, especially for tapered wings(!) I don't mind cutting by hand but I noticed how long it is taking me to do it by hand.
This is basically a brand new system that I picked up from RCGroups - a gent had bought it at the WRAM show last year and realized he had a baby at home that takes real attention(!) and turned it around for sale. Funny how that works. He is an engineer so I trusted he assembled it fine.
I will have a MakerBot at work by January, solely for playing with and showing capabilities. I won't need the 3d print head.
You've got me motivated to get the SC up and running over Thanksgiving - I might have be stealthy doing that around family obligations - ha...
Cheers Peter

PeterJGregory- Gold Member

- Posts : 144
Join date : 2014-07-28
Age : 61
Location : Hudson Valley, New York
 Adding the Cox Chipmunk to the lineup
Just so happens I came across a new-in-the-box Cox Chipmunk at a good price (not ebay prices!)
After some errands today I ended up with just about an hour of sunlight - no flying as we had 10-20 mph winds with gusts to 30, today.
I was able to fire up the rebuilt Ringmaster Jr. and also a Carl Goldberg Buster that I haven't flown yet.
I hope to have enough sunlight after tomorrow's family time to get both the Cox planes flight-line ready for the next good flying day.
Here's a couple of pics of the pristine Chipmunk.

PeterJGregory- Gold Member

- Posts : 144
Join date : 2014-07-28
Age : 61
Location : Hudson Valley, New York
 Re: Cox Hyper Viper *** And Chipmunk, now
Sorry, but unfortunately no pictures are shown. Would definitely like pictures... They are good. 

NEW222- Top Poster

- Posts : 3896
Join date : 2011-08-13
Age : 46
Location : oakbank, mb
 Re: Cox Hyper Viper *** And Chipmunk, now
?? 

Missing man i was ready too !!Here's a couple of pics of the pristine Chipmunk. wrote:


getback- Top Poster


Posts : 10439
Join date : 2013-01-18
Age : 67
Location : julian , NC
 Re: Cox Hyper Viper *** And Chipmunk, now
Man! you guys have really got me wanting one of those Stepcraft routers. A laser cutter is way outside my budget, but if I could only find a used Stepcraft. I'd be able to make my silly ideas in an afternoon. Planes, boats, and cars. Oh My! I'd even have to pay for a booth at the local farmer's market downtown for selling little stuff.
If only I didn't have a mortgage and kid in college...
The Jealous Mark
If only I didn't have a mortgage and kid in college...
The Jealous Mark

batjac- Diamond Member


Posts : 2373
Join date : 2013-05-22
Age : 61
Location : Broken Arrow, OK, USA
 Re: Cox Hyper Viper *** And Chipmunk, now
Ok, was more of an ordeal getting the photos from my phone to my computer than I thought it would be, but here they are, batch one. I took a bunch while it is still pristine - but not for long.
Chipmunk box

Chipmunk box with scale

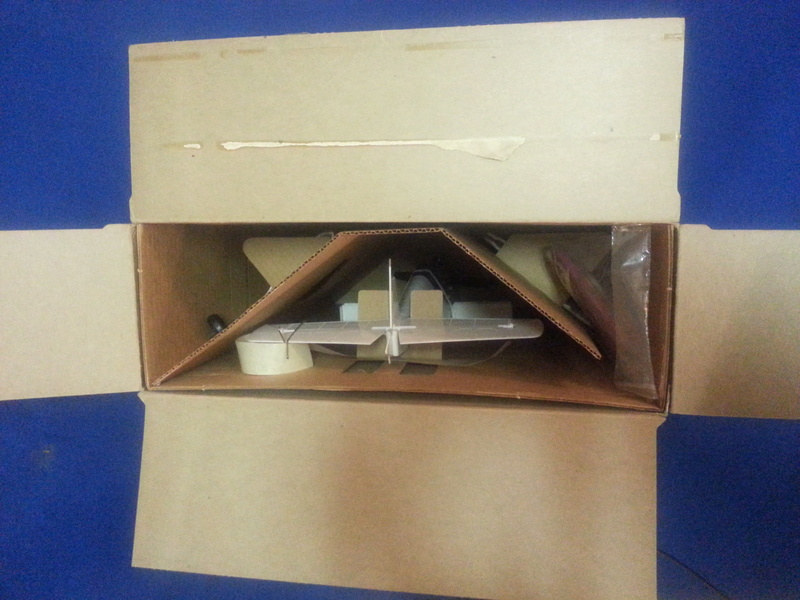
Internal product packing
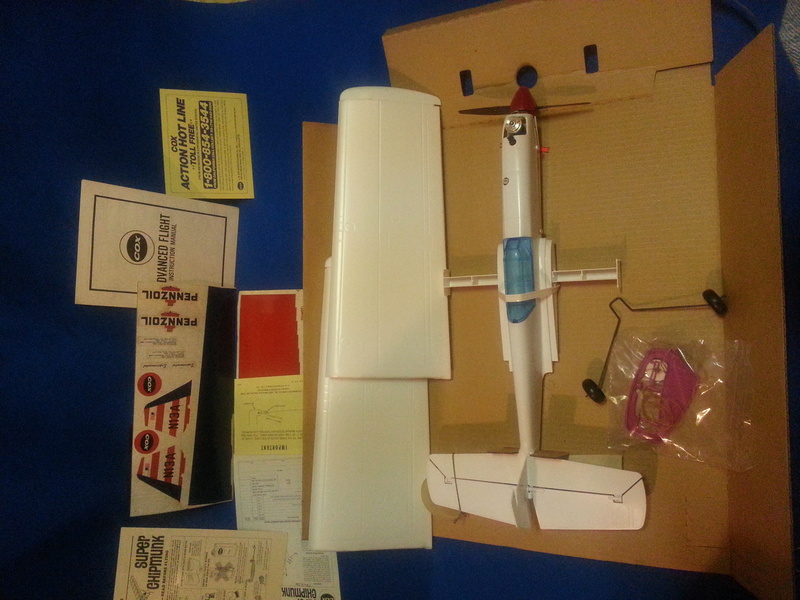
Parts and papers
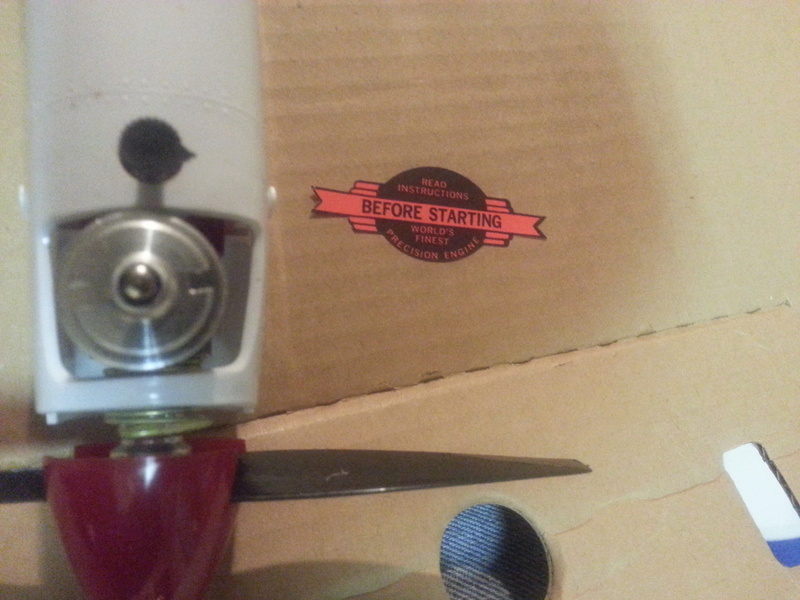
Cute: "World's Finest Precision Engine"
Stickers (not decals) and and parts

Chipmunk box

Chipmunk box with scale

Internal product packing

Parts and papers

Cute: "World's Finest Precision Engine"

Stickers (not decals) and and parts


PeterJGregory- Gold Member

- Posts : 144
Join date : 2014-07-28
Age : 61
Location : Hudson Valley, New York
 Re: Cox Hyper Viper *** And Chipmunk, now
Chipmunk photos batch 2 - how the site loads pictures is beyond me - I had all the shots oriented differently but the forum rotates some of them.
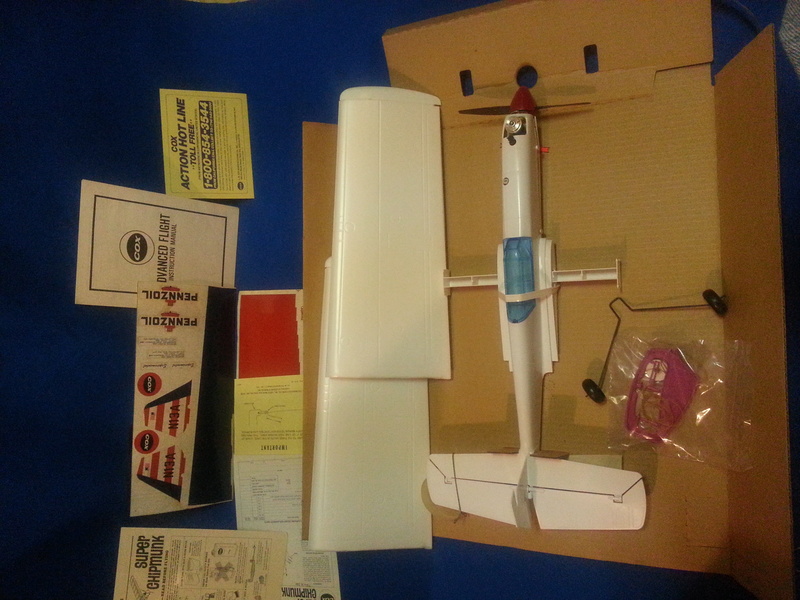
Another shot before starting assembly
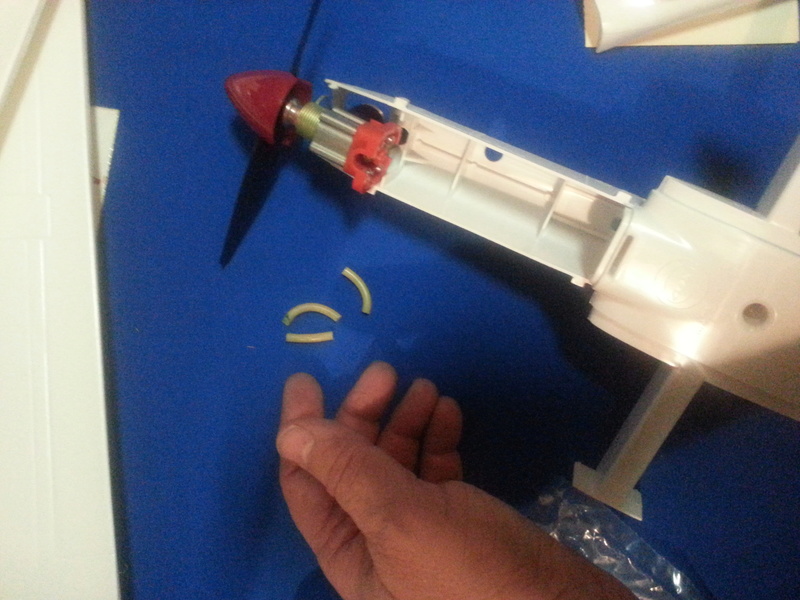
Rotten fuel line that looked like macaroni. The silicon has become a different material, just broke in rubbery pieces.
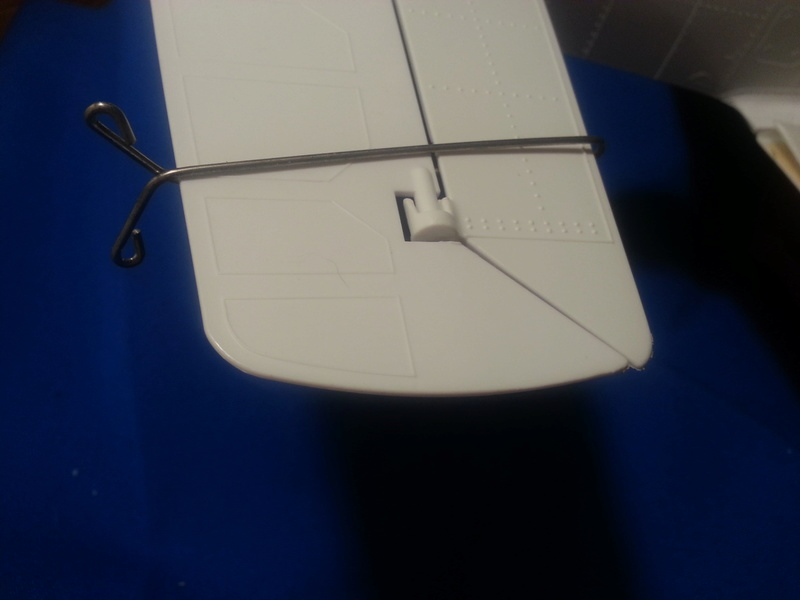
Interesting elevator restrictor for use by newbies. The spring restricts elevator throw to just about 0 I would estimate.
Simple slot trap for the backplate. That and rubber banding the hatch holds the engine in place. Really. We'll see.
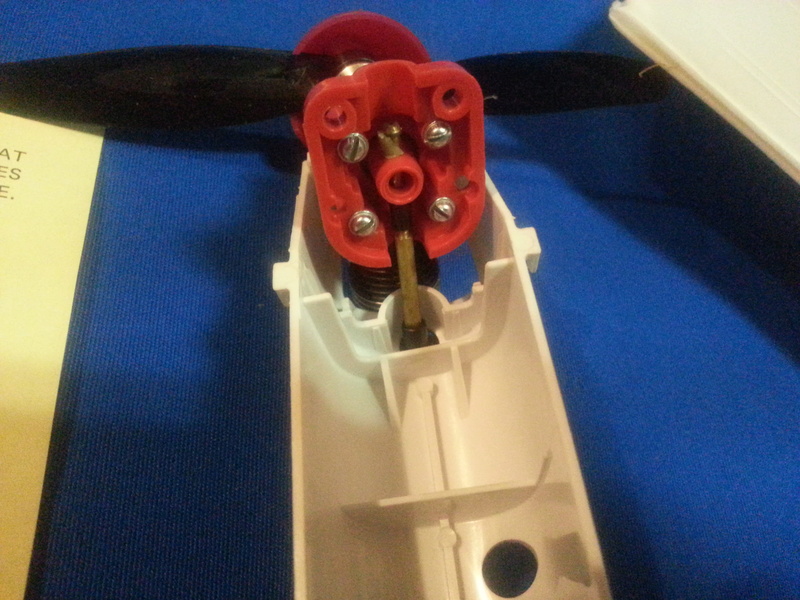
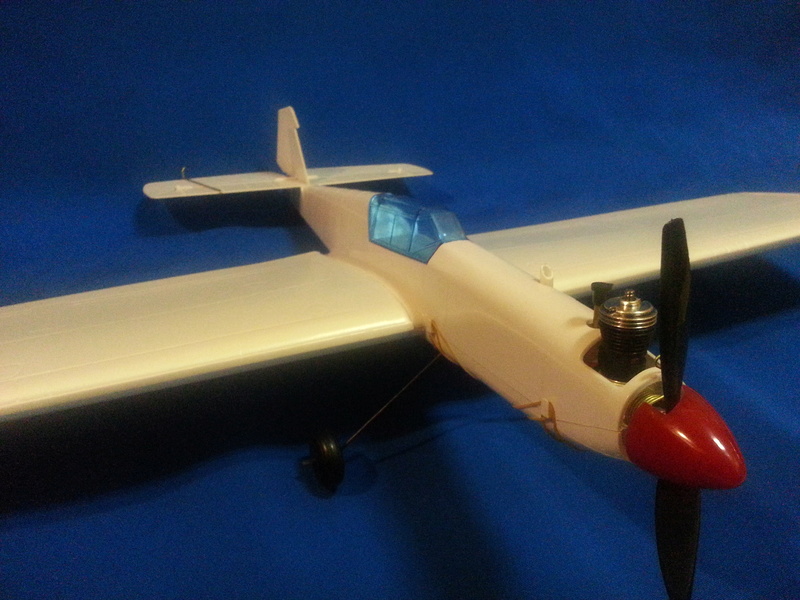
Pre-decoration shots. The wings are taped on - yes, taped. One wing had a fairly large gap from where it was supposed to mate with the hard plastic center section. I used some hot glue to fill the gap.
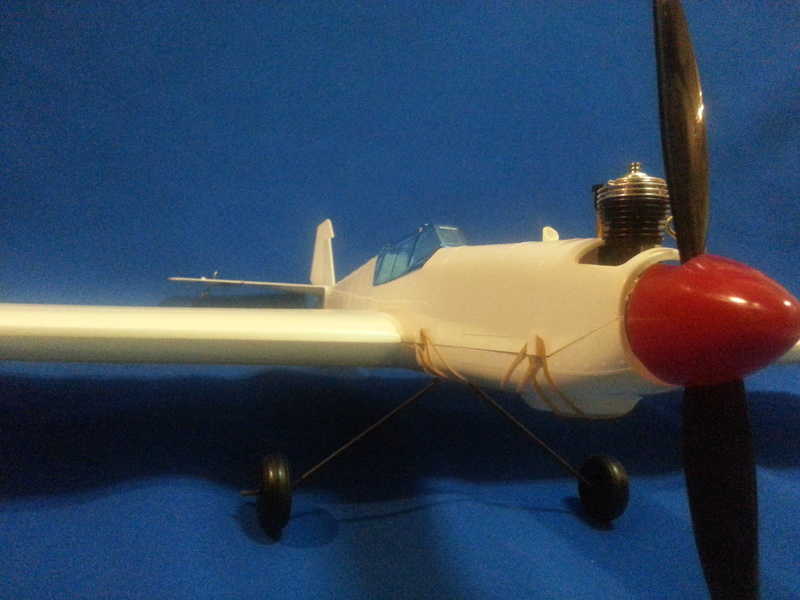
Showing the hook and rubber band arrangement that holds the underside hatch on , trapping the engine in the slot by its backplate.
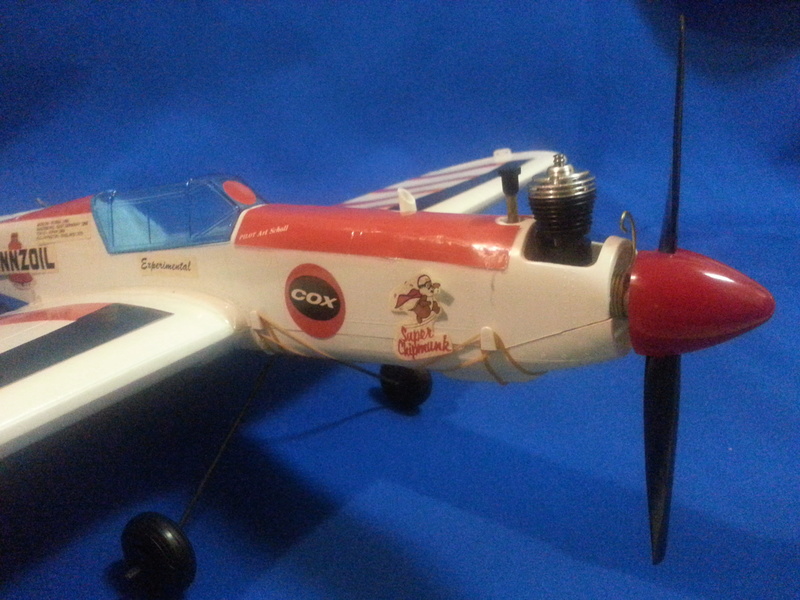
All dressed up. Stickers won't last one circuit, you can see them peeling. 45 year old glue! They won't last one circuit in the ring. That's ok, it will be lighter without them.



Another shot before starting assembly

Rotten fuel line that looked like macaroni. The silicon has become a different material, just broke in rubbery pieces.

Interesting elevator restrictor for use by newbies. The spring restricts elevator throw to just about 0 I would estimate.

Simple slot trap for the backplate. That and rubber banding the hatch holds the engine in place. Really. We'll see.

Pre-decoration shots. The wings are taped on - yes, taped. One wing had a fairly large gap from where it was supposed to mate with the hard plastic center section. I used some hot glue to fill the gap.

Showing the hook and rubber band arrangement that holds the underside hatch on , trapping the engine in the slot by its backplate.

All dressed up. Stickers won't last one circuit, you can see them peeling. 45 year old glue! They won't last one circuit in the ring. That's ok, it will be lighter without them.


PeterJGregory- Gold Member

- Posts : 144
Join date : 2014-07-28
Age : 61
Location : Hudson Valley, New York
 Re: Cox Hyper Viper *** And Chipmunk, now
Yea.. I'd love to have one too! (in reply to the Jealous Mark..)
Pete, keep an eye-out for film or "filmatic" tape" (double-sided) which may be similar to what Ian suggested. "Tesa" is a brand that that I have experience with. We used it extensively when I worked at the sign company.
link to comparable product
Tesa webpage
I have Tesa #4970 in 5/16", 1/2" and 3/4" width rolls. It's approx. .005" thickness. You can use it to tack-down common 3/16" foam-board to your machine's table, as your sacrificial "spoil-board" and tack your material to be cut, to the spoil-board.. including balsa sheet.
Once you get more proficient with the CAD/CAM software, you can write a program to mill a sheet-PVC spoil-board perfectly flat using a small-dia. fly-cutter/shell-miller. The spoil-board size (sq. in. area) and the diameter of the tool will dictate the amount of time and the "step-over" per-pass needed respectively, to mill the spoil-board. If you're careful when setting the spindle's "Z-axis" (vertical-travel) when running your jobs, your spoil-board will last quite a while. You can probably program the spindle for use with a gage-plate of a certain thickness. I use to use a small rectangular (3" x 6") .125" thick piece of acrylic-sheet to initialize my cutter to the surface. The surface can be the spoil-board itself.. or the top surface of the material being cut. The material to be cut can vary in thickness though. A properly-milled spoil-board will be near perfectly level. Care must be exercised in programming your cutting depth-parameters; depending on where you set your Z-axis. You can practice initially by programming a single drill-point and setting your plunge feed-rate LOW.....(10-20 IPM) Use a test-block of 2" Styrofoam; assuming that you have at least 2" of travel in your Z-axis with a tool in the spindle. You're less likely to have a damaging Z-axis crash, if you set/initialize well above the spoil-board on your first trials. You'll also have more time to react and stop the machine if the plunge is going too deep.
Your Z-lift between cuts, must clear the work-piece. I used to set this parameter to .250" above the total thickness of the material to be cut, which saves time vs. the spindle completely retracting after every cut. There should be a parameter for setting.. and possibly a fail-safe point above the programmed total-depth.
I have cutters that may interest you. They fit a 1/8" collet. They are not new.. but most have good life left in them.
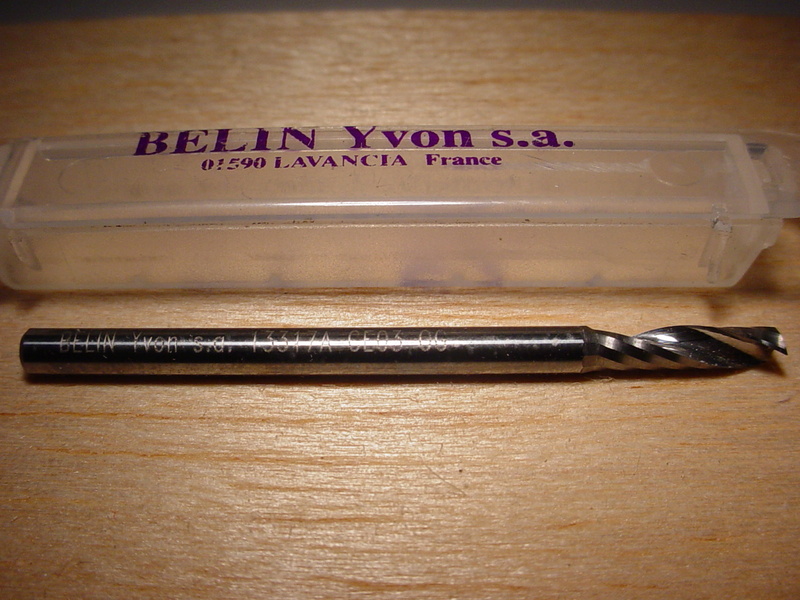
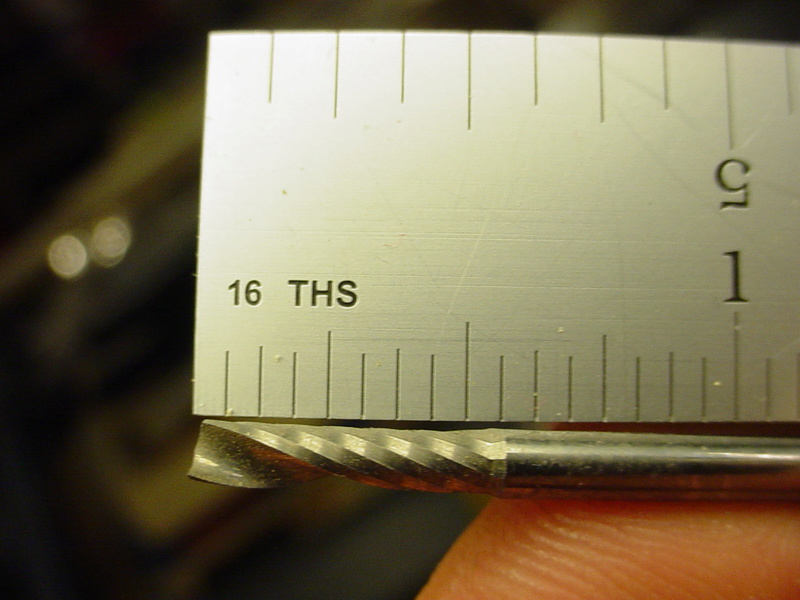
They're a single-flute hybrid up-spiral. I typically ran them at 20K rpm in Perske 7HP high-frequency spindles. We found this tool superior to Gerber's "Gold" (Titanium-Nitride coated) solid-carbide 2-flute up-spiral, particularly when cutting PVC. The hybrid tool cut cleaner and lasted longer. Cleaner meant less labor-time in sanding "fuzz" off the cut edges. All cutting was done dry. Feed-rates depend obviously on the material being cut and the depth of cut. These endmills will cut mild Aluminum, acrylic, MDF, plywood.. and many other materials. The key is in holding the material in place. Keeping your feed-rate low can prevent the work-piece from slipping out from under clamps. When using clamps; run a simulation/animation of the program before spooling the job to the router. This will show you were clamps can be placed so that the spindle safely clears them. The "home" and "park" positions of the spindle on your machine can be customized.. I would think.
A trick for securing material.. is cutting blocks the same thickness or less of your material.. and facing one side with the double-stick tape. Place the blocks around the perimeter of your work-piece and stick them down on the spoil-board snugly to prevent any movement. Set the depth of cut .005" or more above the spoil-board.. and your pieces won't move while cutting. This leaves a .005" web of retaining-material that easily breaks-free when you remove the work-piece from the table. This works particularly well with balsa. You don't want to have to pick/pry balsa parts off, that have been taped-down to a spoil-board.
Vacuum-tables are nice. Making your own isn't out of the question. A pump, manifold-box and valve is about it. PVC spoil-pads for it, can be made on your machine with a simple drill/pocket grid-program. The valve controls the suction and is sized/adjusted to keep the pump from overheating during continued operation. I'll elaborate more if that interests you.
I hope this wasn't over-load.. I'm really psyched that you got this machine! PM me if you're interested in trying the cutters.
P.S. Cool Chipmunk!!!!!
Pete, keep an eye-out for film or "filmatic" tape" (double-sided) which may be similar to what Ian suggested. "Tesa" is a brand that that I have experience with. We used it extensively when I worked at the sign company.
link to comparable product
Tesa webpage
I have Tesa #4970 in 5/16", 1/2" and 3/4" width rolls. It's approx. .005" thickness. You can use it to tack-down common 3/16" foam-board to your machine's table, as your sacrificial "spoil-board" and tack your material to be cut, to the spoil-board.. including balsa sheet.
Once you get more proficient with the CAD/CAM software, you can write a program to mill a sheet-PVC spoil-board perfectly flat using a small-dia. fly-cutter/shell-miller. The spoil-board size (sq. in. area) and the diameter of the tool will dictate the amount of time and the "step-over" per-pass needed respectively, to mill the spoil-board. If you're careful when setting the spindle's "Z-axis" (vertical-travel) when running your jobs, your spoil-board will last quite a while. You can probably program the spindle for use with a gage-plate of a certain thickness. I use to use a small rectangular (3" x 6") .125" thick piece of acrylic-sheet to initialize my cutter to the surface. The surface can be the spoil-board itself.. or the top surface of the material being cut. The material to be cut can vary in thickness though. A properly-milled spoil-board will be near perfectly level. Care must be exercised in programming your cutting depth-parameters; depending on where you set your Z-axis. You can practice initially by programming a single drill-point and setting your plunge feed-rate LOW.....(10-20 IPM) Use a test-block of 2" Styrofoam; assuming that you have at least 2" of travel in your Z-axis with a tool in the spindle. You're less likely to have a damaging Z-axis crash, if you set/initialize well above the spoil-board on your first trials. You'll also have more time to react and stop the machine if the plunge is going too deep.
Your Z-lift between cuts, must clear the work-piece. I used to set this parameter to .250" above the total thickness of the material to be cut, which saves time vs. the spindle completely retracting after every cut. There should be a parameter for setting.. and possibly a fail-safe point above the programmed total-depth.
I have cutters that may interest you. They fit a 1/8" collet. They are not new.. but most have good life left in them.


They're a single-flute hybrid up-spiral. I typically ran them at 20K rpm in Perske 7HP high-frequency spindles. We found this tool superior to Gerber's "Gold" (Titanium-Nitride coated) solid-carbide 2-flute up-spiral, particularly when cutting PVC. The hybrid tool cut cleaner and lasted longer. Cleaner meant less labor-time in sanding "fuzz" off the cut edges. All cutting was done dry. Feed-rates depend obviously on the material being cut and the depth of cut. These endmills will cut mild Aluminum, acrylic, MDF, plywood.. and many other materials. The key is in holding the material in place. Keeping your feed-rate low can prevent the work-piece from slipping out from under clamps. When using clamps; run a simulation/animation of the program before spooling the job to the router. This will show you were clamps can be placed so that the spindle safely clears them. The "home" and "park" positions of the spindle on your machine can be customized.. I would think.
A trick for securing material.. is cutting blocks the same thickness or less of your material.. and facing one side with the double-stick tape. Place the blocks around the perimeter of your work-piece and stick them down on the spoil-board snugly to prevent any movement. Set the depth of cut .005" or more above the spoil-board.. and your pieces won't move while cutting. This leaves a .005" web of retaining-material that easily breaks-free when you remove the work-piece from the table. This works particularly well with balsa. You don't want to have to pick/pry balsa parts off, that have been taped-down to a spoil-board.
Vacuum-tables are nice. Making your own isn't out of the question. A pump, manifold-box and valve is about it. PVC spoil-pads for it, can be made on your machine with a simple drill/pocket grid-program. The valve controls the suction and is sized/adjusted to keep the pump from overheating during continued operation. I'll elaborate more if that interests you.
I hope this wasn't over-load..
P.S. Cool Chipmunk!!!!!

 Re: Cox Hyper Viper *** And Chipmunk, now
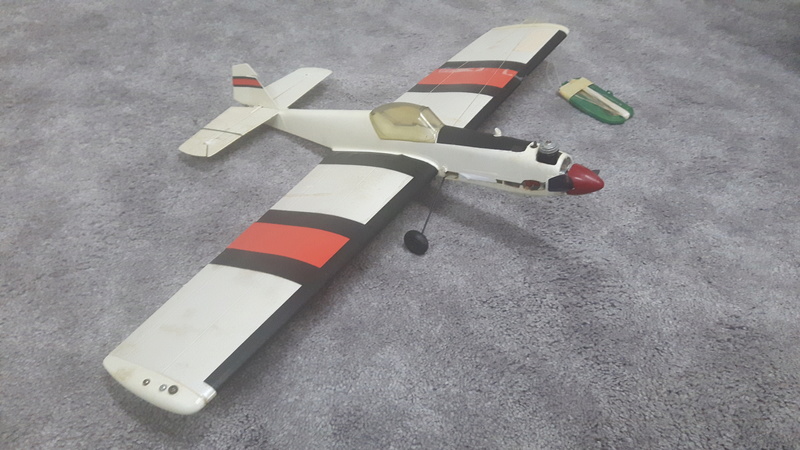
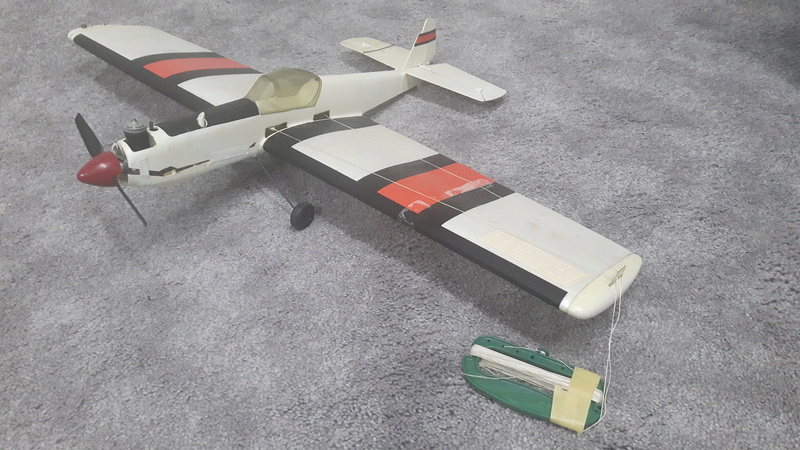
Love the plane. I had scored this one at a swap meet a little while ago but had not flown it. It is definitely in ok condition and had been flown hard in my opinion as I now know why the belly does not stay put. I had assumed that it had just broken at mounting locations, but thanks to you, I now know that there were 4 mounts for rubber bands to hold the lower belly on. I just took these pictures and see that only 1 of my mounts are there, hence the 3 'holes'. But, surprisingly, it came with the metal elevator doohickey. Anyways, thanks for sharing.


NEW222- Top Poster

- Posts : 3896
Join date : 2011-08-13
Age : 46
Location : oakbank, mb
 Re: Cox Hyper Viper *** And Chipmunk, now
P.S. My stickers are stuck down...lol... 

NEW222- Top Poster

- Posts : 3896
Join date : 2011-08-13
Age : 46
Location : oakbank, mb
Page 1 of 2 • 1, 2 
 Similar topics
» Cox me-109 stunt measures - for a friend - he wants to build one again !
» Hyper Viper #3
» Southridge CNC Hyper Viper
» **Black Lynx Engine Giveaway** Cox Engine of the Month (2022)
» Hyper Viper's 1st Flights
» Hyper Viper #3
» Southridge CNC Hyper Viper
» **Black Lynx Engine Giveaway** Cox Engine of the Month (2022)
» Hyper Viper's 1st Flights
Page 1 of 2
Permissions in this forum:
You cannot reply to topics in this forum

 Rules
Rules


