Log in
Search
Latest topics
» Cox films/videos...by Coxfledgling Today at 4:46 am
» Purchased the last of any bult engines from Ken Enya
by Coxfledgling Today at 4:18 am
» My N-1R build log
by roddie Today at 12:32 am
» Happy 77th birthday Andrew!
by akjgardner Today at 12:27 am
» TEE DEE Having issues
by TD ABUSER Yesterday at 9:43 pm
» Landing-gear tips
by roddie Yesterday at 6:17 pm
» Roger Harris revisited
by TD ABUSER Yesterday at 2:13 pm
» Tee Dee .020 combat model
by Ken Cook Yesterday at 1:41 pm
» Retail price mark-up.. how much is enough?
by Ken Cook Yesterday at 1:37 pm
» My latest doodle...
by roddie Yesterday at 10:43 am
» Chocolate chip cookie dough.........
by roddie Fri Nov 22, 2024 1:13 pm
» Free Flight Radio Assist
by rdw777 Fri Nov 22, 2024 9:24 am
Cox Engine of The Month
Twister Wing - Maiden Flight Report from the Zaerodrome
Page 2 of 5
Page 2 of 5 •  1, 2, 3, 4, 5
 Re: Twister Wing - Maiden Flight Report from the Zaerodrome
That's a pretty darn cool tool just like it is. Maybe I'll consult with Santa this Christmas about it.
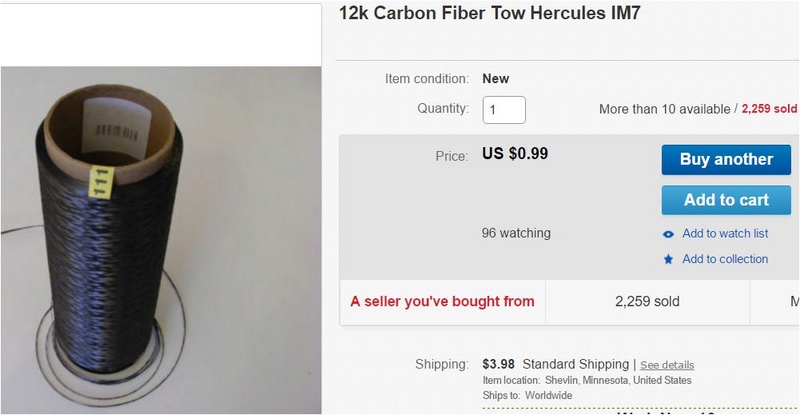
Meanwhile, I talked to Bob Z. today and he told me a good way to join my spars and other broken parts without having to cut an angle. After tacking the butt ends, cut a slot with a dremel cutoff wheel. Rather than stuffing it with a biscuit, use this Carbon Tow, pack it tightly, then soak it with thin CA. I watched him do this on a similar repair once and it really works great. It's like making a magic CF rod inside the spar.
This tow can be stripped into smaller threads well into sub-millimeter size strands, and only costs $.99 for 10 feet and $3.98 shipping. 30 feet will be here by Tuesday.

_________________
Don't Panic!
...and never Ever think about how good you are at something...
while you're doing it!
My Hot Rock & Blues Playlist
...and never Ever think about how good you are at something...
while you're doing it!
My Hot Rock & Blues Playlist

RknRusty- Rest In Peace

- Posts : 10869
Join date : 2011-08-10
Age : 68
Location : South Carolina, USA
 Re: Twister Wing - Maiden Flight Report from the Zaerodrome
Thank you Rusty, you've made me realize reassembling my twister wing won't be as bad as I thought. The rebuild with a reimagined fuselage starts tomorrow!
Jim
Jim

JPvelo- Diamond Member

- Posts : 1972
Join date : 2011-12-02
Age : 57
Location : Colorado
 Re: Twister Wing - Maiden Flight Report from the Zaerodrome
JP, I'd love to see your beautiful Twister fly again.
The best news is Walter mailed me a brand new wing kit. So my new plan is, I'll build the new one for the Twister, and later fix the old one and install in my old wrecked Osprey, another good small stunter. It's a Skyray bashed into a Streak. Look it up in the modeling section.
Jim, just make the slots for the tow thread in a side rather than the top or bottom of the spars for best strength. I'm also going to cover the center sheeting with veil, since I found it too easy to put compression cracks in with my knotty thumb knuckles.
This is a great surprise, arranged by my friend Fredvon4. I just have to await clearance from the flight surgeon to stand on cold comcrete hunched over my work table whenever my recent injury heals enough. Some of my fingers and toes are still paralyzed, but seem to be starting to wake up.
I'm bored stiff and impatient, but luckily hammered on narcotics and prednisone... and frequently smiling out of context lol.
I got the card table out today and mostly finished my 1/4-A Micro Ringmaster. That helped my boredom a bit.
Gimpy Rusty
_________________
Don't Panic!
...and never Ever think about how good you are at something...
while you're doing it!
My Hot Rock & Blues Playlist
...and never Ever think about how good you are at something...
while you're doing it!
My Hot Rock & Blues Playlist

RknRusty- Rest In Peace

- Posts : 10869
Join date : 2011-08-10
Age : 68
Location : South Carolina, USA
 Re: Twister Wing - Maiden Flight Report from the Zaerodrome
MAn i didn't know it was that bad Glad they are starting to come around and hope you get all the feeling back , well at least what you had ? With this weather change  my auther and neck/hip pain have been giving me a fit . You want the bugs from summer to go away but then it's wood time and my dad 78 likes it 85* 24/7 that burns up some wood being free pouplar is about all i have got sucks too . Glad your working on the micro ring to help with the boredom !! MAybe some funnies .. http://www.toon.is/looney-tunes-ali-baba-bunny-video_31e2989cb.html

 my auther and neck/hip pain have been giving me a fit . You want the bugs from summer to go away but then it's wood time and my dad 78 likes it 85* 24/7 that burns up some wood being free pouplar is about all i have got sucks too . Glad your working on the micro ring to help with the boredom !! MAybe some funnies .. http://www.toon.is/looney-tunes-ali-baba-bunny-video_31e2989cb.html


getback- Top Poster


Posts : 10442
Join date : 2013-01-18
Age : 67
Location : julian , NC
 Re: Twister Wing - Maiden Flight Report from the Zaerodrome
I don't want to hijack Rustys thread but I will say that it has begun:

The Long Way To Go Jim

The Long Way To Go Jim

JPvelo- Diamond Member

- Posts : 1972
Join date : 2011-12-02
Age : 57
Location : Colorado
 Re: Twister Wing - Maiden Flight Report from the Zaerodrome
That is one long looking wing  I don't remember what it was after the crash but is coming along nicely !!
 I don't remember what it was after the crash but is coming along nicely !!

getback- Top Poster


Posts : 10442
Join date : 2013-01-18
Age : 67
Location : julian , NC
 Re: Twister Wing - Maiden Flight Report from the Zaerodrome
Hijack away, Jim. Suits me to talk wings
It's an average size 35-40 size wing Eric. It is 48-1/2" long with a good wide chord and full length flaps. Mine has half ribs in between each bay and a Sig 3" bellcrank. Jim, what bellcrank does yours have?
When it was hanging on the lanyard out on the up line turning loops, I was astounded at how tight they were, and they were not growing that I noticed. I have obviously never pulled full up or down before because I had no idea it could turn so tight... granted, it was tail heavier that day, so that added to it, but damn. It looked like a big 1/2A out there doing circles the size of a beachball. I have been advised to put a 4" crank in it, but I think I'll leave it alone. The flaps are near 1:1, maybe slightly less. Next stunt ship I build will have a 4" crank though. But this time I'm putting it in backward so the rod can exit on the inboard side to help avoid exhaust stream.
I was proud of the 41.7 oz. It had been up to almost 48 at one time, but clearly needed less. I think I'll shoot for 43-45 this time, which is only a muffler swap. The .fp35 couldn't quite do 48 without a perfect needle on a mild day, but the 40 has enough horsepower in reserve, so a much more forgiving needle for a good stunt run even on a breezy day. Same prop so far, 10.5 x 4.5. If I'd kept the .35 I had planned to try some different props. 10x6 or 11x4. But the .40 could have handled 48 oz., and I'm sure the wing loading could've too. Moot now, as I'm 100% sold on the John Tate FP.40.
This time I'm going to add more 1/4" backing to the inside of TE butt strip for more hinge gluing area. Some of the hinges just pulled out. It came with 1/16" TE shear webs again, rather that 1/32, but that makes them easier to install by face mounting them. No webs in the front spars. I may add 1/32" in the first 4 bays. I'm also planning to cover the center sheeting with veil. This is getting weighty, but I'm also considering making the middle third of the spars out of 1/4" basswood rather than balsa. I know, this is just over-enthusiastic Rusty blabbing, but it's still on my list of possibilities. If I do use bass in that area, I can skip the front shear webs. There was never any indication they were needed anyway. I don't have 1/4" spruce and also don't know anything about basswood, so we'll just wait and see.
Ah, I'm getting excited now, gotta twist the flight surgeon's arm. And get off of this computer, I'm not supposed to be doing this either.
Winging it with Rusty and Jim Lol.
getback wrote:That is one long looking wingI don't remember what it was after the crash but is coming along nicely !!

It's an average size 35-40 size wing Eric. It is 48-1/2" long with a good wide chord and full length flaps. Mine has half ribs in between each bay and a Sig 3" bellcrank. Jim, what bellcrank does yours have?
When it was hanging on the lanyard out on the up line turning loops, I was astounded at how tight they were, and they were not growing that I noticed. I have obviously never pulled full up or down before because I had no idea it could turn so tight... granted, it was tail heavier that day, so that added to it, but damn. It looked like a big 1/2A out there doing circles the size of a beachball. I have been advised to put a 4" crank in it, but I think I'll leave it alone. The flaps are near 1:1, maybe slightly less. Next stunt ship I build will have a 4" crank though. But this time I'm putting it in backward so the rod can exit on the inboard side to help avoid exhaust stream.
I was proud of the 41.7 oz. It had been up to almost 48 at one time, but clearly needed less. I think I'll shoot for 43-45 this time, which is only a muffler swap. The .fp35 couldn't quite do 48 without a perfect needle on a mild day, but the 40 has enough horsepower in reserve, so a much more forgiving needle for a good stunt run even on a breezy day. Same prop so far, 10.5 x 4.5. If I'd kept the .35 I had planned to try some different props. 10x6 or 11x4. But the .40 could have handled 48 oz., and I'm sure the wing loading could've too. Moot now, as I'm 100% sold on the John Tate FP.40.
This time I'm going to add more 1/4" backing to the inside of TE butt strip for more hinge gluing area. Some of the hinges just pulled out. It came with 1/16" TE shear webs again, rather that 1/32, but that makes them easier to install by face mounting them. No webs in the front spars. I may add 1/32" in the first 4 bays. I'm also planning to cover the center sheeting with veil. This is getting weighty, but I'm also considering making the middle third of the spars out of 1/4" basswood rather than balsa. I know, this is just over-enthusiastic Rusty blabbing, but it's still on my list of possibilities. If I do use bass in that area, I can skip the front shear webs. There was never any indication they were needed anyway. I don't have 1/4" spruce and also don't know anything about basswood, so we'll just wait and see.
Ah, I'm getting excited now, gotta twist the flight surgeon's arm. And get off of this computer, I'm not supposed to be doing this either.
Winging it with Rusty and Jim Lol.
_________________
Don't Panic!
...and never Ever think about how good you are at something...
while you're doing it!
My Hot Rock & Blues Playlist
...and never Ever think about how good you are at something...
while you're doing it!
My Hot Rock & Blues Playlist

RknRusty- Rest In Peace

- Posts : 10869
Join date : 2011-08-10
Age : 68
Location : South Carolina, USA
 Re: Twister Wing - Maiden Flight Report from the Zaerodrome
Rusty, your idea of swapping out the spars is a very good idea. In fact it was pretty much the norm for the stock Twister. Spruce was substituted for balsa. I can say with almost 100% certainty that your wing wouldn't of sheared off if they were spruce. It could of caused a lot of other damage but the wing would still be intact. Basswood would also work, not as strong as spruce but it would be stronger than balsa. Covering the center section with veil in my opinion isn't going to do much in terms of strength. The main strong points in that area is the bellcrank platforms glued to the spars. On many of the profiles I have built, I go with a larger than spec center rib. It gives the profile body more stability on the platform itself and more glue area to the center sheeting. If the wing is flexing prior to covering, add shear webs. If not, move on. Many of the laser cut kits I have witnessed require shear webs due to the lighter wood needed for laser cutting. I don't agree to the wood selections most kit makers use and while the wood may not weigh a lot it can seriously compromise the strength. Walter's kits are a bit of an exception here. I have 5 kits currently built and one that Walter built. Trailing edges for example are generally very poor and this is critical due to it being the controlling factor of what can dictate a wing warp chord wise. While many suggest building on a deal flat level table or on rods, this may get your ribs in alignment, glue a trailing or leading edge on with a crown in it and this now has a very negative impact on how straight the wing is. I wouldn't sweat weight concerns. While it's nice to be able to get a light model the FP .40 can easily handle a 500+ squares and 50 ounces without issue. As you mentioned, your not utilizing all the power from the engine.

Ken Cook- Top Poster

- Posts : 5640
Join date : 2012-03-27
Location : pennsylvania
 Re: Twister Wing - Maiden Flight Report from the Zaerodrome
RknRusty wrote:But this time I'm putting it in backward so the rod can exit on the inboard side to help avoid exhaust stream.
Rusty, there is at least one way to totally avoid exhaust stream. I think you would find it electrifying.
In another thread somewhere the topic of pushrod exit shrouds came up. Since then I have wandered through a 'Party Store' and found a couple of products that have good potential to be made into shrouds. I'm going to do some tinkering and see what I can come up with. More to follow...

JMynes- Moderate Poster

- Posts : 25
Join date : 2016-07-02
Location : Mt Dora, FL
 Re: Twister Wing - Maiden Flight Report from the Zaerodrome
Jim, I've had enough electric activity lately Lol.
I'm going to carve my leadout shroud from a light balsa block. And get it in the right position this time. I made it too far aft before and had to lengthen the slot in the sheeting. I framed the unused part with balsa strips . I was worried about it folding there with all the messing around I did.
Rusty
_________________
Don't Panic!
...and never Ever think about how good you are at something...
while you're doing it!
My Hot Rock & Blues Playlist
...and never Ever think about how good you are at something...
while you're doing it!
My Hot Rock & Blues Playlist

RknRusty- Rest In Peace

- Posts : 10869
Join date : 2011-08-10
Age : 68
Location : South Carolina, USA
 Re: Twister Wing - Maiden Flight Report from the Zaerodrome
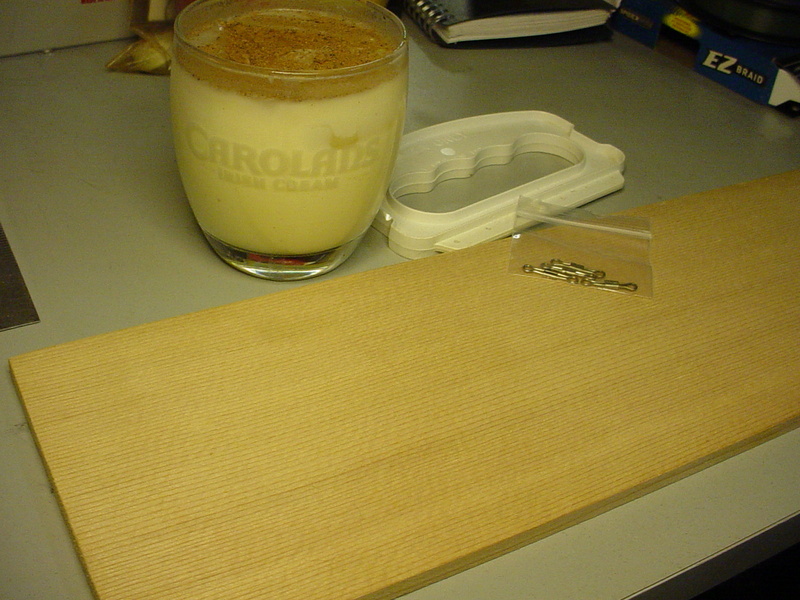
I have a small sheet (1/4" x 4.5" x 24.5") of Sitka-Spruce that would make beautiful spars. I should look into having it laser-cut into square-stock if it's feasible. Where I have 4.5" width sheets; there'd be a better yield when comparing to the kerf-cut of a table-saw blade. Did you ask Santa for a table-saw? A friend of mine built a replica Scandinavian stringed-instrument called a Nyckelharpa. He needed the Sitka for part of it. He gave me two pieces of leftover scrap. The other is 1/2". Making spar/square-stock out of it, seems the most practical use for my purposes. It's not wood that you'd want to use for just anything. Sitka is widely used in full-scale applications for it's superior strength to weight ratio. You will notice the straight grain and clarity in the photo below.. (that's E & J brandy and eggnog with a sprinkle of nutmeg.. yummy)
This is a Nyckelharpa.
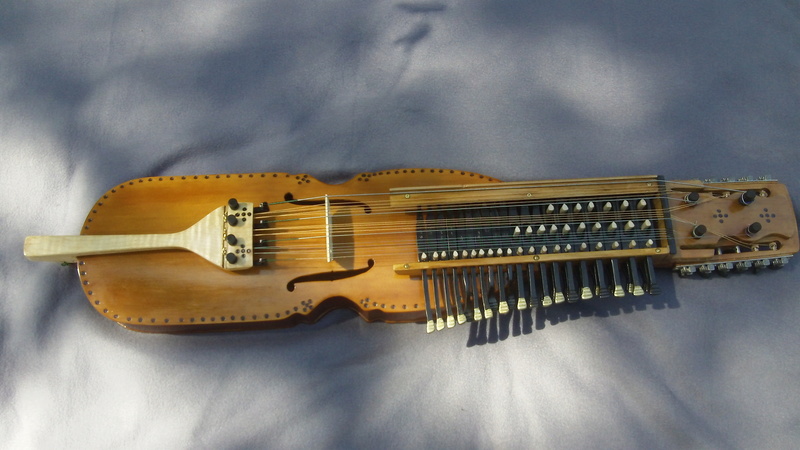
The Sitka may have been used in the tailpiece and the key-rails. Lot's of exotic wood-types used in its construction.
Are Wayne and them still flying this late in the season? Does anyone do any cold-weather flying? It's a beautiful 50 degrees and calm here in N. Smithfield this Thanksgiving day. Hope that you're enjoying yours!

This is a Nyckelharpa.

The Sitka may have been used in the tailpiece and the key-rails. Lot's of exotic wood-types used in its construction.
Are Wayne and them still flying this late in the season? Does anyone do any cold-weather flying? It's a beautiful 50 degrees and calm here in N. Smithfield this Thanksgiving day. Hope that you're enjoying yours!
 Re: Twister Wing - Maiden Flight Report from the Zaerodrome
Wow, that is a pretty piece of spruce, good catch. And quite a beautiful string instrument too.
Six of them went to Triple Tree Wednesday and got a lot of good out of the day. I wish I could've been there, because, with my holiday schedule, I dialyzed on Sunday and Tuesday, so I would have been free, but I'm still grounded. A fender bender or airbag to the face was not worth the risk of a 90-minute ride to have driven up to watch them fly.
A guy came to the house Wednesday and tried some physical therapy on me, but it was a Bad BAD idea. I ended up with a sore shoulder. And today when I accidentally raised my head turning a can of Coke up too high to take a sip, my legs and feet jolted with electricity again, so that's a setback, minor I hope, but still a scary warning. No more PT for me. That damn spinal cord is just all tangled up in there. The good news is, my toes and left fingers are all moving again, not without pain, but as I always say; that's how I can tell I'm still alive.
I had a great TG dinner at my Sister's house today. Hope y'all did too.
Take care Rod. Thanks for posting.
Rusty
_________________
Don't Panic!
...and never Ever think about how good you are at something...
while you're doing it!
My Hot Rock & Blues Playlist
...and never Ever think about how good you are at something...
while you're doing it!
My Hot Rock & Blues Playlist

RknRusty- Rest In Peace

- Posts : 10869
Join date : 2011-08-10
Age : 68
Location : South Carolina, USA
 Re: Twister Wing - Maiden Flight Report from the Zaerodrome
BUMP! 
It's been a while so I didn't want y'all to think I've been slacking. I put a good 8 hours in on that Twister wing last weekend. I decided to expedite the build by going primarily to thin CA. I have never used that stuff in an extended application before. It's thinner than water I think, so you must use the extension tubes to apply it. My LHS was selling them for $.45 cents each... piracy! And only had 5 of them. All went well till I ran out and just started squirting it straight of the bottle tip and getting a little messy. However I have gotten pretty far along, but at the expense of a hella case of CA Nose. It's like having a cold, all stopped up, but clears up in a day or two. So after Sunday I took a break. I'll probably continue tomorrow.
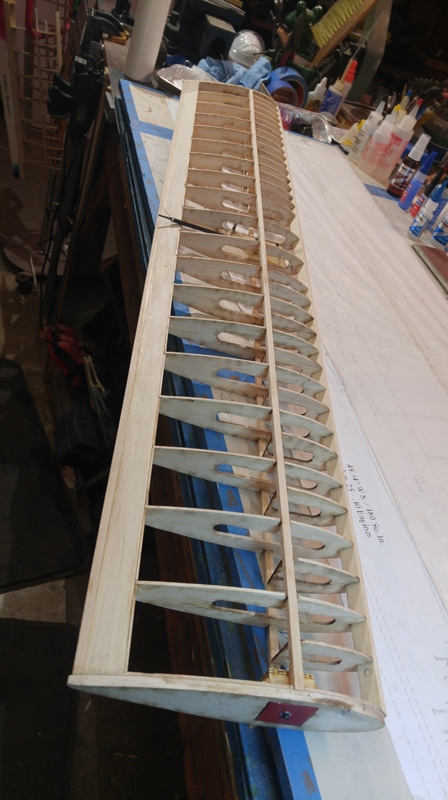
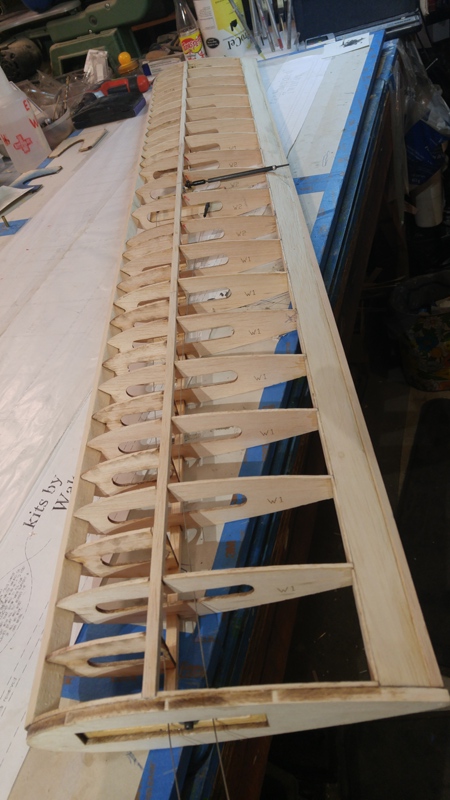
What's taking so long? Well my replacement spars were a smidge narrower so the rib to spar joints were not all tight. So I had to cut strips of 1/64" ply and tighten the gaps, which was tedious work. There were a couple of joints needing shims on the LE too, but it basically fit pretty accurately, though I had to straighten the outboard one. Because it was bowed, I left the shear webs only lightly tacked in place on their short sides against the ribs. To straighten the LE, I wet the concave sides with Windex, and when it dried it had pulled amazingly straight. Once it was straight, I immediately locked the shear webs in place on all four sides, and installed the half-ribs. I've got a good straight framework now
Here is how I shimmed any gaps with the 64th ply:
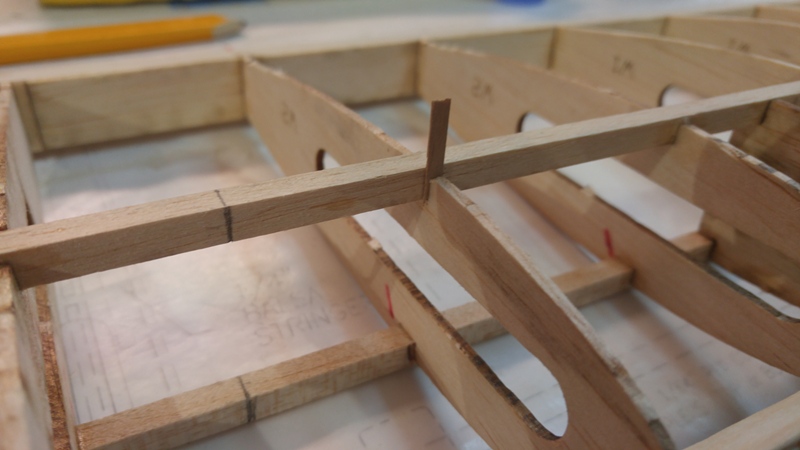
There were a bunch of them, and that's how I caught the case of CA Nose.
After finishing that chore, I went all around the wing with 320 paper and flushed up all the rib/spar and joints at the LE and TE. I bought a 36" aluminum angle, 1" x 1/16" for a straight edge and checked all the rib heights and everything that must be straight. It's looking like a high quality wing, straight and true.
Since this picture was taken, I've fit up the weight box and leadout guide in the wingtips and will glue them in place in my next session. After that will be the bellcrank and center sheeting and I can move on to cleaning out the fuselage cutout. I'll get the flaps ready after I install the wing.
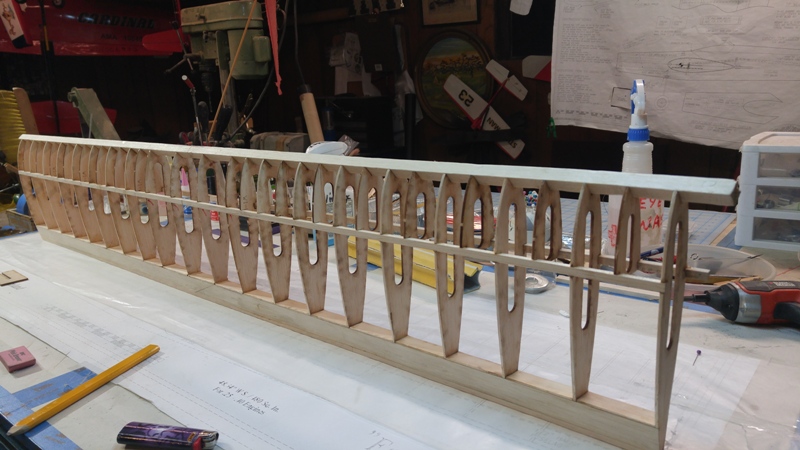
That's it for now.
Rusty

It's been a while so I didn't want y'all to think I've been slacking. I put a good 8 hours in on that Twister wing last weekend. I decided to expedite the build by going primarily to thin CA. I have never used that stuff in an extended application before. It's thinner than water I think, so you must use the extension tubes to apply it. My LHS was selling them for $.45 cents each... piracy! And only had 5 of them. All went well till I ran out and just started squirting it straight of the bottle tip and getting a little messy. However I have gotten pretty far along, but at the expense of a hella case of CA Nose. It's like having a cold, all stopped up, but clears up in a day or two. So after Sunday I took a break. I'll probably continue tomorrow.
What's taking so long? Well my replacement spars were a smidge narrower so the rib to spar joints were not all tight. So I had to cut strips of 1/64" ply and tighten the gaps, which was tedious work. There were a couple of joints needing shims on the LE too, but it basically fit pretty accurately, though I had to straighten the outboard one. Because it was bowed, I left the shear webs only lightly tacked in place on their short sides against the ribs. To straighten the LE, I wet the concave sides with Windex, and when it dried it had pulled amazingly straight. Once it was straight, I immediately locked the shear webs in place on all four sides, and installed the half-ribs. I've got a good straight framework now
Here is how I shimmed any gaps with the 64th ply:

There were a bunch of them, and that's how I caught the case of CA Nose.
After finishing that chore, I went all around the wing with 320 paper and flushed up all the rib/spar and joints at the LE and TE. I bought a 36" aluminum angle, 1" x 1/16" for a straight edge and checked all the rib heights and everything that must be straight. It's looking like a high quality wing, straight and true.
Since this picture was taken, I've fit up the weight box and leadout guide in the wingtips and will glue them in place in my next session. After that will be the bellcrank and center sheeting and I can move on to cleaning out the fuselage cutout. I'll get the flaps ready after I install the wing.

That's it for now.
Rusty
_________________
Don't Panic!
...and never Ever think about how good you are at something...
while you're doing it!
My Hot Rock & Blues Playlist
...and never Ever think about how good you are at something...
while you're doing it!
My Hot Rock & Blues Playlist

RknRusty- Rest In Peace

- Posts : 10869
Join date : 2011-08-10
Age : 68
Location : South Carolina, USA
 Re: Twister Wing - Maiden Flight Report from the Zaerodrome
Looks great Rusty, let us know how that fuse cleans up.

Cribbs74- Moderator


Posts : 11907
Join date : 2011-10-24
Age : 50
Location : Tuttle, OK
 Re: Twister Wing - Maiden Flight Report from the Zaerodrome
I was wondering what you were doing out there  Did you use the Carbon Tow U got that seems a real easy and strong way to fix . And did you use straight Windex ? The wing is looking good Rusty !!
 Did you use the Carbon Tow U got that seems a real easy and strong way to fix . And did you use straight Windex ? The wing is looking good Rusty !!
Last edited by getback on Thu Feb 09, 2017 6:58 am; edited 1 time in total (Reason for editing : more Q)

getback- Top Poster


Posts : 10442
Join date : 2013-01-18
Age : 67
Location : julian , NC
 Re: Twister Wing - Maiden Flight Report from the Zaerodrome
_________________
Don't Panic!
...and never Ever think about how good you are at something...
while you're doing it!
My Hot Rock & Blues Playlist
...and never Ever think about how good you are at something...
while you're doing it!
My Hot Rock & Blues Playlist

RknRusty- Rest In Peace

- Posts : 10869
Join date : 2011-08-10
Age : 68
Location : South Carolina, USA
 Re: Twister Wing - Maiden Flight Report from the Zaerodrome
Looks like serious work Rusty.
Are they already, or are you going to bush the bell cranks lead-out holes if their not? I worry about wear. In the past I have put a drop of epoxy on each wired hole in the hope that will reduce any wear through.
Bob
Are they already, or are you going to bush the bell cranks lead-out holes if their not? I worry about wear. In the past I have put a drop of epoxy on each wired hole in the hope that will reduce any wear through.
Bob

rsv1cox- Top Poster


Posts : 11250
Join date : 2014-08-18
Location : West Virginia
 Re: Twister Wing - Maiden Flight Report from the Zaerodrome
_________________
Don't Panic!
...and never Ever think about how good you are at something...
while you're doing it!
My Hot Rock & Blues Playlist
...and never Ever think about how good you are at something...
while you're doing it!
My Hot Rock & Blues Playlist

RknRusty- Rest In Peace

- Posts : 10869
Join date : 2011-08-10
Age : 68
Location : South Carolina, USA
 Re: Twister Wing - Maiden Flight Report from the Zaerodrome
Nicely done Rusty, you've certainly done a superb job there. Smooth I bet. I have a Vector that I've been working on and off of which seems forever. I got it into polyspan ( I just put a nice hole in it moving some metal) and one coat of dope but it's been hanging for nearly a year. The job I'm currently on hasn't allowed for much free time. When I do manage to get some time, it goes to everything but the plane. Flying Models featured a rework for the Vector stuffing a LA 46 into the nose. It looks pretty darn cool I must say.

Ken Cook- Top Poster

- Posts : 5640
Join date : 2012-03-27
Location : pennsylvania
 Re: Twister Wing - Maiden Flight Report from the Zaerodrome
Sorry Rusty, I missed it. Two recent eye surgeries haven't helped my declining vision.
Bob
Bob

rsv1cox- Top Poster


Posts : 11250
Join date : 2014-08-18
Location : West Virginia
 Re: Twister Wing - Maiden Flight Report from the Zaerodrome
Sorry about the eyes, Bob. Of all the senses, vision is certainly the one I could least do without. Those brass bushings, though it can't be seen, are also vertical with no curve in the part that passes through the hole. This makes the operation as smooth as possible and more importantly, prevents them from flopping down when not under tension. That way, when the lines go slack during flight, there's no chance of it grabbing as you pull them straight again. And it keeps the edge of the heat shrink from catching on the edge of the cutout, so nothing prevents it from going to neutral during a slack-line event.rsv1cox wrote:Sorry Rusty, I missed it. Two recent eye surgeries haven't helped my declining vision.
Bob
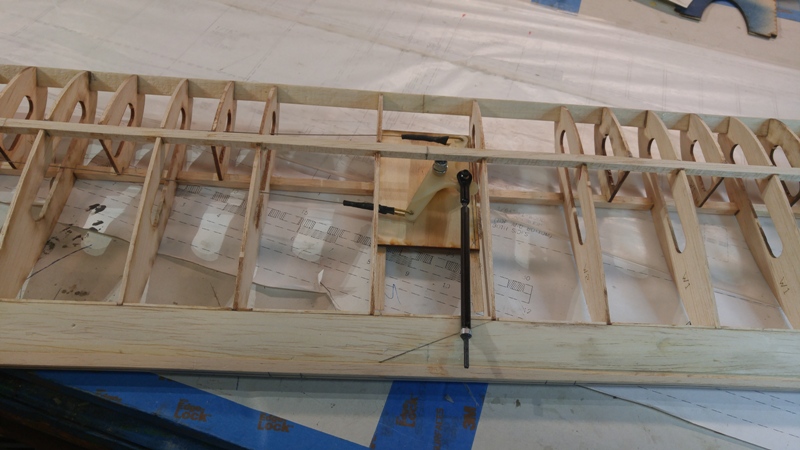
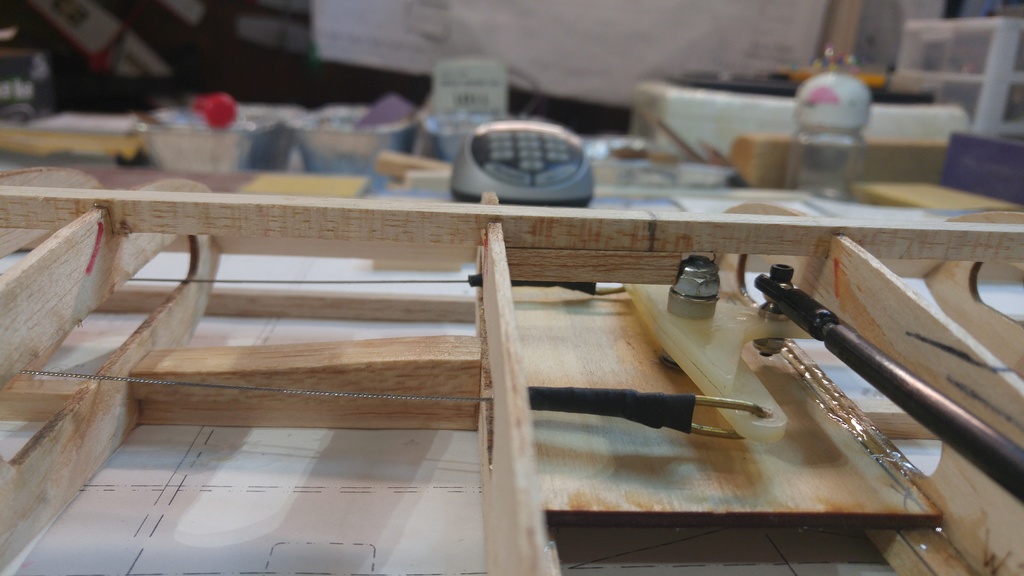
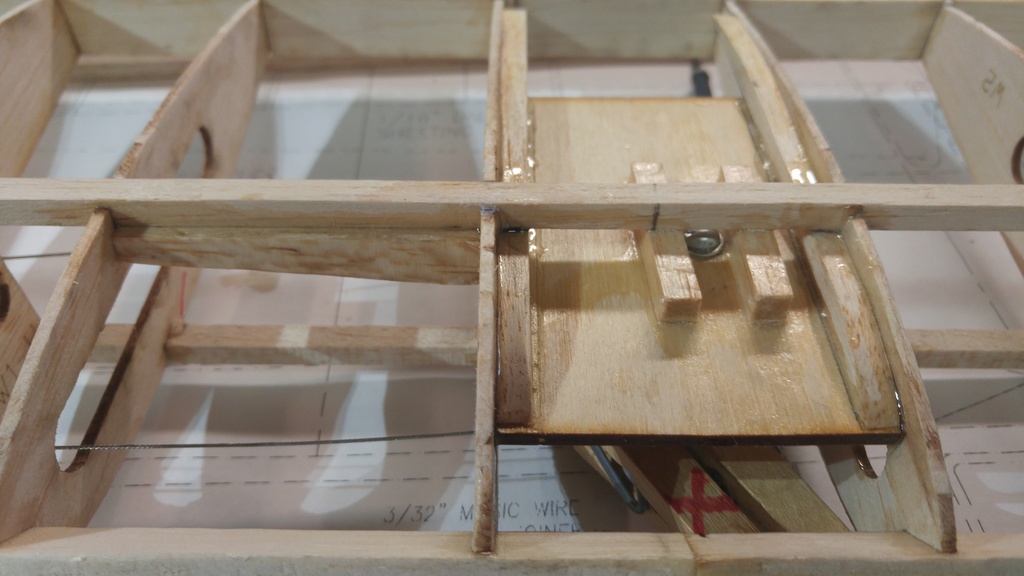
Thanks, Ken. Yep I like to call it "slicker'n owlshit. Smooth operation and maximum strength are tied at #1 for the most important part of a bellcrank. Note my braces in the next pictures. The top has a hard block epoxied to the spar and between the rib and nut, preventing any flexing in the inboard direction. See in the left rib bay a 1/2" hard block bracing the plate to the bottom spar for the same reason. The underside has braces between the plate and spar to help prevent it from cracking and pulling the bolt out. I drilled the pivot bushing to accept a #8(5/32") machine screw for added strength. All this may or may not be as good as the traditional suspended crank, but it works for me.Ken Cook wrote:Nicely done Rusty, you've certainly done a superb job there. Smooth I bet. I have a Vector that I've been working on and off of which seems forever. I got it into polyspan ( I just put a nice hole in it moving some metal) and one coat of dope but it's been hanging for nearly a year. The job I'm currently on hasn't allowed for much free time. When I do manage to get some time, it goes to everything but the plane. Flying Models featured a rework for the Vector stuffing a LA 46 into the nose. It looks pretty darn cool I must say.
Wayne is flight trimming a new Vector that he built as a conversion to e-power. It seems to be a really good handling ship.
Here are some pictures of all the stuff I mentioned above.
Top and middle braces
.
Bottom braces
I don't really know if these do any good, but I usually add them.
.
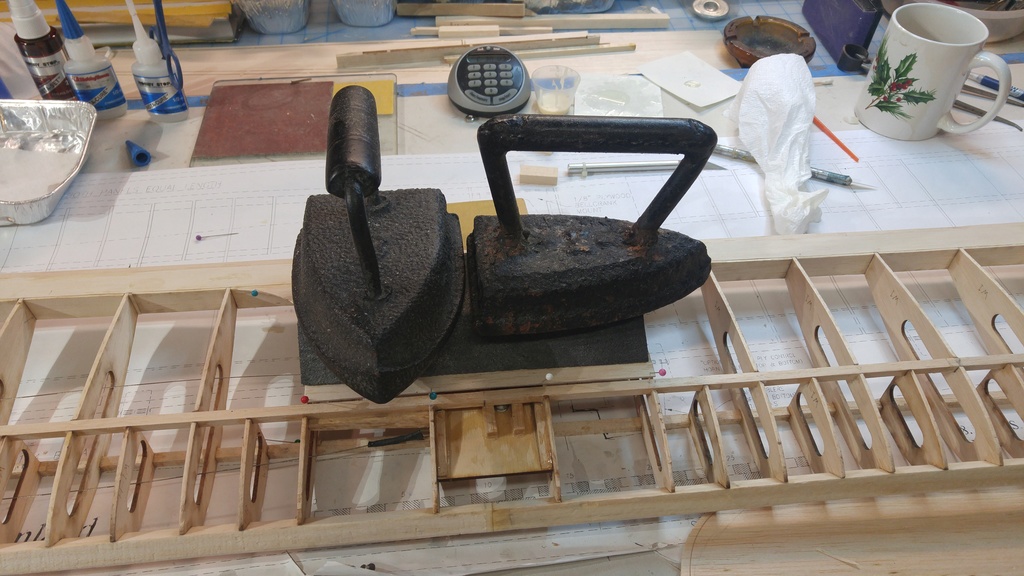
Gluing the center sheeting with my hi-tech weights
_________________
Don't Panic!
...and never Ever think about how good you are at something...
while you're doing it!
My Hot Rock & Blues Playlist
...and never Ever think about how good you are at something...
while you're doing it!
My Hot Rock & Blues Playlist

RknRusty- Rest In Peace

- Posts : 10869
Join date : 2011-08-10
Age : 68
Location : South Carolina, USA
 Re: Twister Wing - Maiden Flight Report from the Zaerodrome
I coulda' sworn I'd posted a progress report since that last one, but it's getting along. I've been slowed by cold temps which are just plain uncomfortable for shop work. But the main wing has been finished for a week or two, and I spent an hour on it today slotting and recessing the flaps for the hinges. I'll cover them with Carbon veil and paint before installing them after the wing is glued into the fuse.
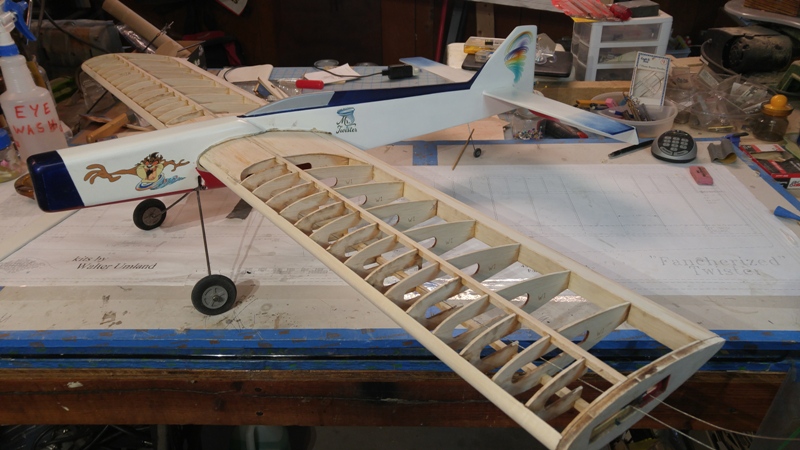
Cleaning out the root in the fuselage was done with a razor knife and finished with a Dremel sanding drum. I'm being careful not to induce any incidence, and it looks like it lines up nicely so far. The LE and TE mate tightly right into their old positions. To make for good epoxy joints, I'm lining the inside of the root in the fuse with 1/64" ply, which will be epoxied in place and will make for an even fit all the way around. It'll need some minor shimming underneath where I got a bit wild with the Dremel, but I think it's going to be indistinguishable from its pre-wrecked condition. Fillets will cover any minor roughage.
Here it is dry-fit

_________________
Don't Panic!
...and never Ever think about how good you are at something...
while you're doing it!
My Hot Rock & Blues Playlist
...and never Ever think about how good you are at something...
while you're doing it!
My Hot Rock & Blues Playlist

RknRusty- Rest In Peace

- Posts : 10869
Join date : 2011-08-10
Age : 68
Location : South Carolina, USA
 Re: Twister Wing - Maiden Flight Report from the Zaerodrome
Yeah buddy! Looks good! How about some wing tips this go around?

Cribbs74- Moderator


Posts : 11907
Join date : 2011-10-24
Age : 50
Location : Tuttle, OK
 Re: Twister Wing - Maiden Flight Report from the Zaerodrome
Cribbs74 wrote:Yeah buddy! Looks good! How about some wing tips this go around?
I probably don't have enough leadout wire to add tips. it's the only blunt tipped plane I own so I better not mess with success.
I decided to try slotting the hinges with a Dremel cutoff wheel, but its gap is too wide at .039". So I did it with the wide Exacto blade and little cleanout saw blade I made. The recesses came out nicely too. I thought some of our guys were using the Dremel. Maybe there's a thinner wheel than I used on my practice stock. It was the thinnest wheel I have.
Thanks for the greenie.
Rusty
_________________
Don't Panic!
...and never Ever think about how good you are at something...
while you're doing it!
My Hot Rock & Blues Playlist
...and never Ever think about how good you are at something...
while you're doing it!
My Hot Rock & Blues Playlist

RknRusty- Rest In Peace

- Posts : 10869
Join date : 2011-08-10
Age : 68
Location : South Carolina, USA
 Re: Twister Wing - Maiden Flight Report from the Zaerodrome
The cut off wheel I use most often is 0.02375", it is not the thinnest but not as "delicate" as the thinner ones.
May be a little late in the topic but I am slowly catching up. My eye surgery wasn't successful and I have been having injections in my eye every week and a gazillion drops to apply. Added to that, I have managed to tear my calf muscle. Enough of that!
I see a few now - instead of using spruce strips - are making up balas and carbon tow sandwiches. I have tried this and it results in a very strong but still light spar that can still be sanded in.

ian1954- Diamond Member

- Posts : 2688
Join date : 2011-11-16
Age : 70
Location : England
Page 2 of 5 •  1, 2, 3, 4, 5
 Similar topics
» Baby Ringmaster build (Maiden flight report!)
» Super Clown build thread (Maiden Report)
» And yet another Baby Ringmaster (Maiden Report)
» PDQ-ak Baby Clown Maiden report (now with video!)
» Maiden flight
» Super Clown build thread (Maiden Report)
» And yet another Baby Ringmaster (Maiden Report)
» PDQ-ak Baby Clown Maiden report (now with video!)
» Maiden flight
Page 2 of 5
Permissions in this forum:
You cannot reply to topics in this forum

 Rules
Rules


