Log in
Search
Latest topics
» My N-1R build logby roddie Today at 12:32 am
» Happy 77th birthday Andrew!
by akjgardner Today at 12:27 am
» TEE DEE Having issues
by TD ABUSER Yesterday at 9:43 pm
» Landing-gear tips
by roddie Yesterday at 6:17 pm
» Roger Harris revisited
by TD ABUSER Yesterday at 2:13 pm
» Tee Dee .020 combat model
by Ken Cook Yesterday at 1:41 pm
» Retail price mark-up.. how much is enough?
by Ken Cook Yesterday at 1:37 pm
» My latest doodle...
by roddie Yesterday at 10:43 am
» Chocolate chip cookie dough.........
by roddie Fri Nov 22, 2024 1:13 pm
» Purchased the last of any bult engines from Ken Enya
by sosam117 Fri Nov 22, 2024 11:32 am
» Free Flight Radio Assist
by rdw777 Fri Nov 22, 2024 9:24 am
» Funny what you find when you go looking
by rsv1cox Wed Nov 20, 2024 3:21 pm
Cox Engine of The Month
Cox Powered Airboat
Page 1 of 3
Page 1 of 3 • 1, 2, 3 
 Cox Powered Airboat
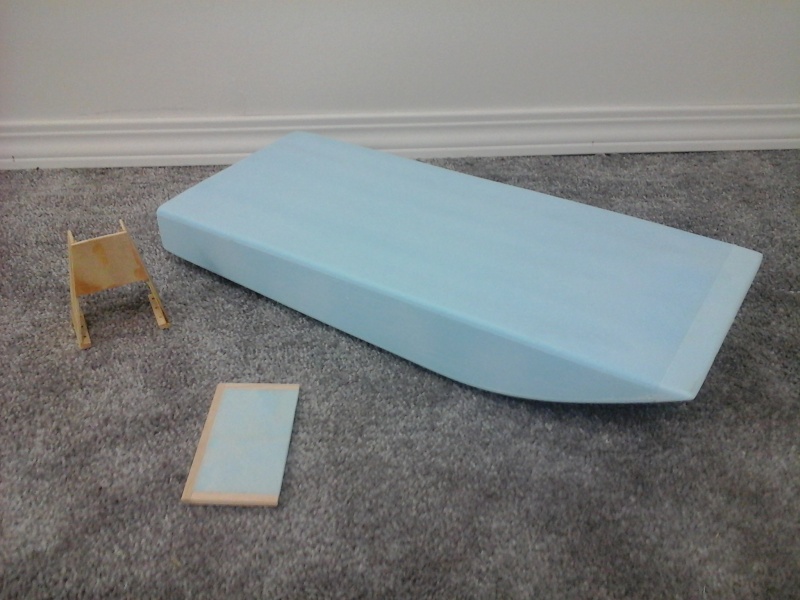
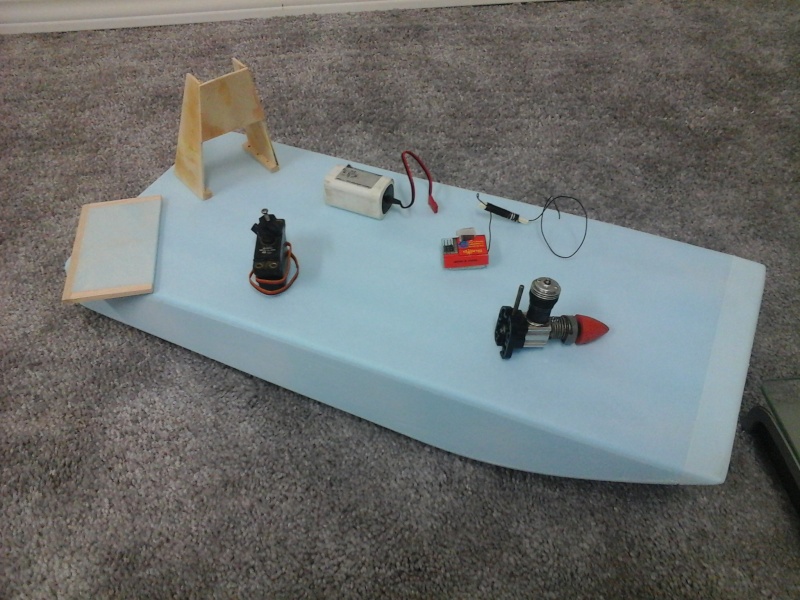
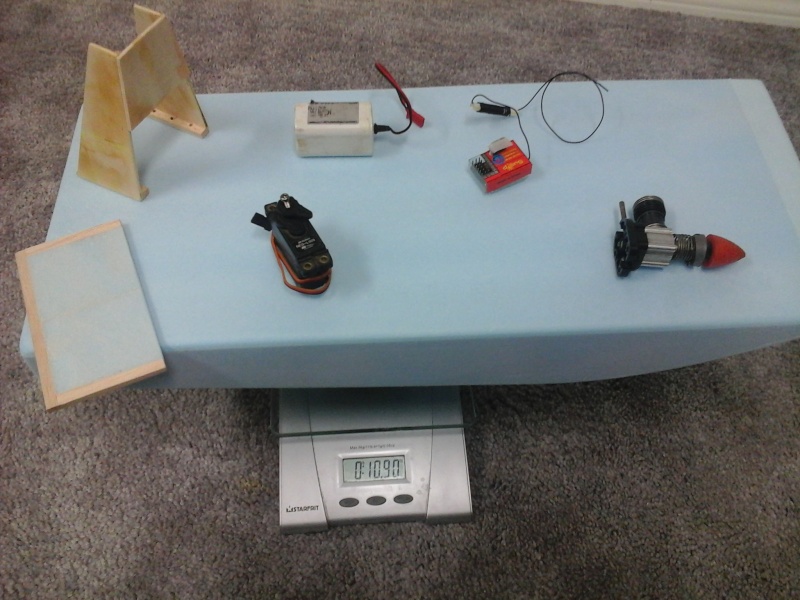
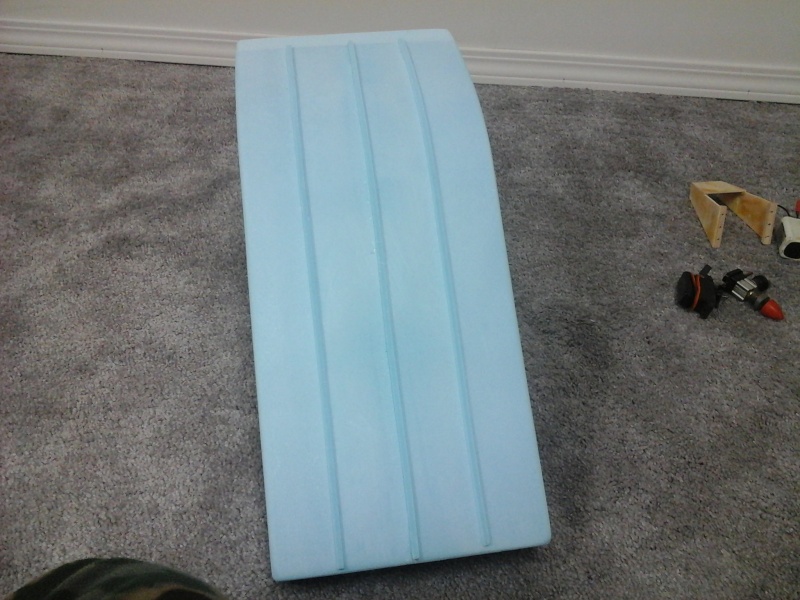
Hi there. I finally got around to taking a few pictures from deep inside my own SkunkWorks Factory. This is what I have been working on in the last week. It is a Fan Fold Foam version of the Lil' Swamp Buggy. I have yet to make and install the air rudder block, and a couple of braces in the main hull where the electronics will go, along with the hatch as well. So far, it is all foam with the exception of the front, top, and bottom of the air rudder. Also noted are 1" foam blocks inside the rear of the hull where the engine pod will be mounted. I will be using epoxy for mounting the engine pod, as well, I have 3 holes in each lower pod support in which I will make holes to the deck and install wood picks for extra mounting support and strength. Also noted is that the whole build so far is using Gorilla White Polyurethane glue. Exceptions are the engine pod is all epoxy, and the air rudder surround is CA at the wood joints before adding the foam. After the rudder block is installed, I will use lightweight spackling on the whole body where needed, followed by coating in dollar store tissue applied with Minwax Polyurethane to seal it so I can make it waterproof and paint should I desire. I think I may just give it a few coats of varnish and leave it as is, as it is a beta model. I am not sure how it will go, but I am guessing by its current weight of just shy of 11 oz without finishing, and rudder block, it should go pretty good. Or at least I hope so. If the others I have watched with Bee type engines and Sure Start's go as well as they do, mine should go just as well. The only concern I do now have is with the runners on the bottom as they are also foam, and I was not thinking of 'wear' as I epoxied them in place. So I will make sure they are well coated. I did a test on scrap foam using Polyester Fiberglass resin, and it truly ate it up! Anyways, here are a few pictures for your enjoyment.


Last edited by NEW222 on Fri Jan 08, 2016 7:36 pm; edited 2 times in total

NEW222- Top Poster

- Posts : 3896
Join date : 2011-08-13
Age : 46
Location : oakbank, mb
 Re: Cox Powered Airboat
I had a 40 size dumas swap buggy. Went like a scalded cat on the snow till it caught air and went up 100' then down like a lawn dart.
Nice build. going to cover with low temp covering or paint?
Nice build. going to cover with low temp covering or paint?

Jason_WI- Top Poster


Posts : 3123
Join date : 2011-10-09
Age : 49
Location : Neenah, WI
 Re: Cox Powered Airboat
I will be covering with dollar store tissue applied with Minwax Polyurethane, then I am not sure if I will paint it or leave it as it ends up. My original intentions were to paint it, and use the above just to seal the foam for painting.

NEW222- Top Poster

- Posts : 3896
Join date : 2011-08-13
Age : 46
Location : oakbank, mb
 Re: Cox Powered Airboat
Looking good. Hope we can see a video when shes runnin.

akjgardner- Diamond Member


Posts : 1602
Join date : 2014-12-28
Age : 65
Location : Greensberg Indiana
 Re: Cox Powered Airboat
That will be a very good possibility. Just have to wait till springtime here and I am at the cottage so I have a rescue boat handy. I may do a winter run to check it out.

NEW222- Top Poster

- Posts : 3896
Join date : 2011-08-13
Age : 46
Location : oakbank, mb
 Re: Cox Powered Airboat
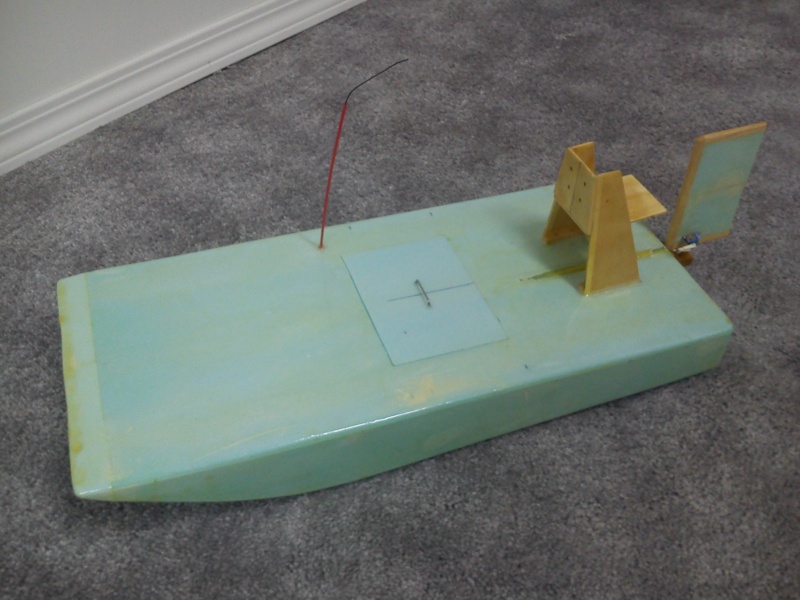
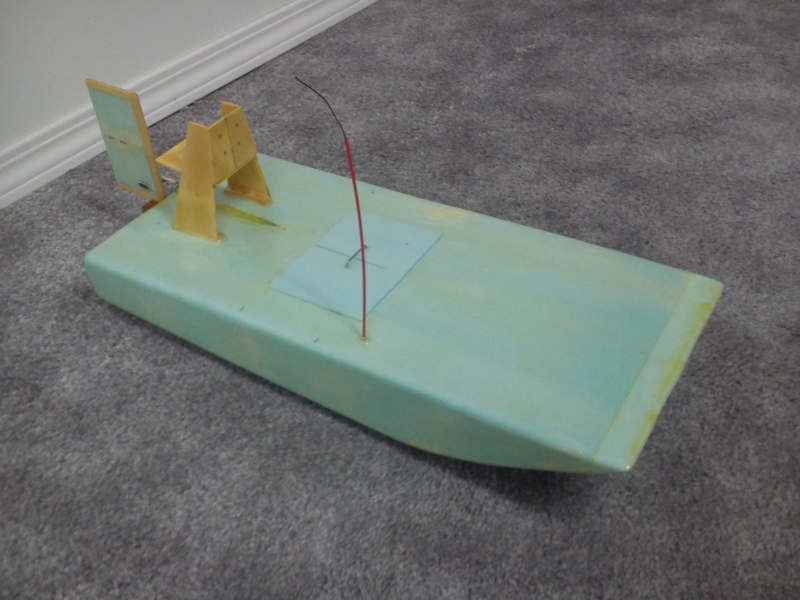
Ok. So it is now finished up. 3 good coats of Minwax Polyurethane clear which gave it a slight yellow tinge, but am just going to leave it as it is. All electronics are installed, and now just awaiting the engine. AUW complete minus engine and fuel is at 13.9 oz right now, and this includes the weight of my other product engine from the plane. Anyways, here are a couple of pictures completed.


NEW222- Top Poster

- Posts : 3896
Join date : 2011-08-13
Age : 46
Location : oakbank, mb
 Re: Cox Powered Airboat
Looking good. You plan to use a throttle on it?

Jason_WI- Top Poster


Posts : 3123
Join date : 2011-10-09
Age : 49
Location : Neenah, WI
 Re: Cox Powered Airboat
Nope, do not have throttle ring. Go wide open!  What is the worst that can happen? I will time the engine and add enough for only about a minute of run time to see how it handles. For safety sakes, I will more than likely try it on snow first if and when it warms up here. I am also a bit glad the weight is up a couple ounces from where I thought it would be as I have seen a few planes with decent weight being flown by a Cox engine and they still move. I was and still possibly worried that this airboat may yet fly, and was already prepared to add a 'wing on front to keep it down should I need it to be.

NEW222- Top Poster

- Posts : 3896
Join date : 2011-08-13
Age : 46
Location : oakbank, mb
 Re: Cox Powered Airboat
And yes, in advance in case you notice. Those ARE Polyurethane drips on the nose. I only noticed after coating the bottom one night and letting it harden. Just adds character.

NEW222- Top Poster

- Posts : 3896
Join date : 2011-08-13
Age : 46
Location : oakbank, mb
 Re: Cox Powered Airboat
Looks Good New222 should make a nice skimmer , videos will be nice if you can ! Should be interesting to see how that rudder fin works , Hope it works as planned .Eric 

getback- Top Poster


Posts : 10442
Join date : 2013-01-18
Age : 67
Location : julian , NC
 Re: Cox Powered Airboat
I would like to see a better view of the air rudder and attachment....hard time envisioning how you car managing the top of rudder torque on the transom
Wish I had Ice/snow or close swatter cuz I love boats and air driven models
Wish I had Ice/snow or close swatter cuz I love boats and air driven models

fredvon4- Top Poster


Posts : 4012
Join date : 2011-08-26
Age : 69
Location : Lampasas Texas

akjgardner- Diamond Member


Posts : 1602
Join date : 2014-12-28
Age : 65
Location : Greensberg Indiana
 Re: Cox Powered Airboat
Thanks all for the support and kind words. I will most definately try to video the maiden at least. Sink or swim. That is why i may try it out on the snow first, but I have a bit of testing to do with the crystalized snow and the coating to make sure it doesnt just chew it up. 

NEW222- Top Poster

- Posts : 3896
Join date : 2011-08-13
Age : 46
Location : oakbank, mb
 Re: Cox Powered Airboat
fredvon4 wrote:I would like to see a better view of the air rudder and attachment....hard time envisioning how you car managing the top of rudder torque on the transom
Wish I had Ice/snow or close swatter cuz I love boats and air driven models
Please bear with me as I just got in from work and am exercising at the moment. As soon as I am done, I will take a few pictures for you.

NEW222- Top Poster

- Posts : 3896
Join date : 2011-08-13
Age : 46
Location : oakbank, mb
 Re: Cox Powered Airboat
These are a blast, my boys and I built a couple proto types a year or so ago. We wanted to build a couple more (better versions), but the pond at our RC field won't hold water lately. We drove ours in the pond, on the back deck (yet a little small), a buddies pool, wet grass (went very well), and down the road in front of our house (this chewed up the bottom a little). You might inspire me to build the new one. I like the inverted keel ridges, they have tracking problems in the water. I fixed mine in the field with ice sticks/tounge depressors. I aslo made mine with an adjustable motor mount, to slide it back and forth to get the best CG. They seemed to like to be tail heavy. I can't wait to see the video.

duke.johnson- Diamond Member

- Posts : 1734
Join date : 2012-11-05
Age : 53
Location : Rochester, Washington
 Re: Cox Powered Airboat
fredvon4 wrote:I would like to see a better view of the air rudder and attachment....hard time envisioning how you car managing the top of rudder torque on the transom
Wish I had Ice/snow or close swatter cuz I love boats and air driven models
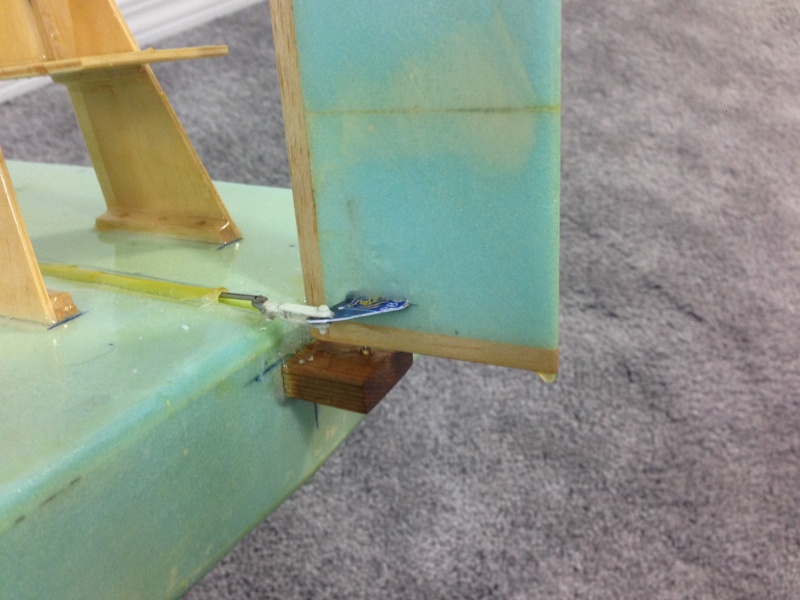
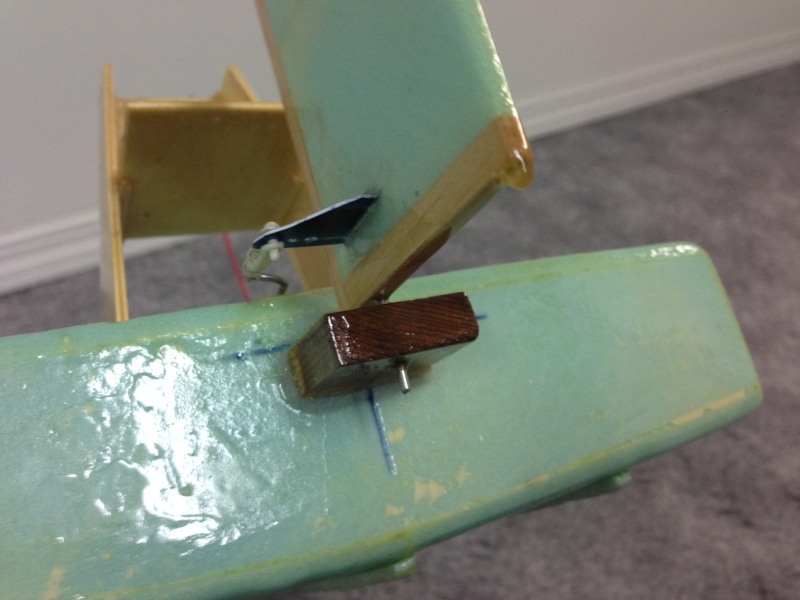
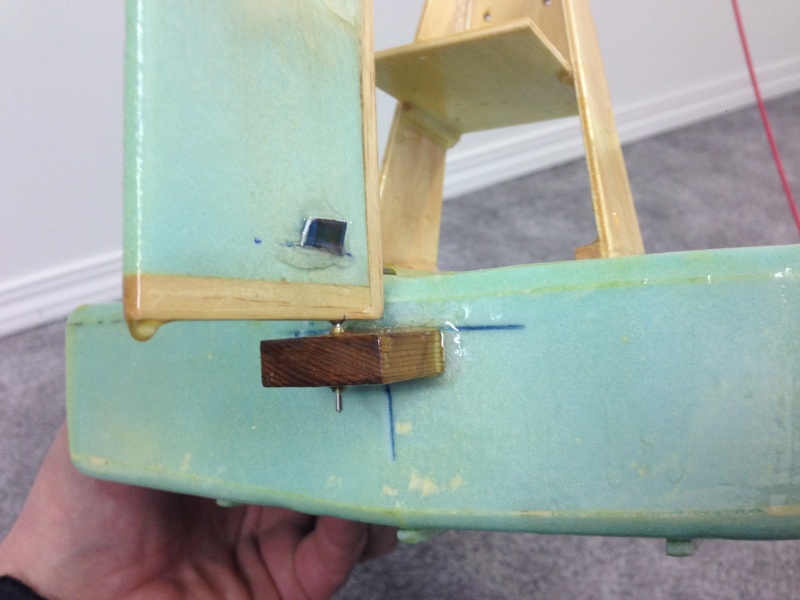
Ok, it is like this. There is a 3/8" thick by approximately 1" square piece of hardwood epoxied to the transom(foam). Prior to the installation, I poked several small holes in the foam, and using a 'T-pin' also in the wood. I epoxied it in place and had a bit of pressure on it to keep it secure. Prior to the installation, I had drilled a 3/32" hole in the wood and inserted a piece of brass tubing into the hole, again, sanded and installed with epoxy. The air rudder was going to be all foam, but was a bit concerned, so I used 1/4" balsa on the top, bottom, and leading edge. I then drilled a 1/16" hole through the wood and into the foam a specified distance then installed a 1/16" piece of rod, again sanded and installed using epoxy. The whole design and sizes were copied from that of the original Lil' Swamp Buggy, with the exception of the triangular reinforcements on the sides. The control horn was an old credit card cut and bent into shape using heat and yep, you guessed it, installed with epoxy.... Hope this helps with your questions. I too was a bit concerned for the functionality and torque, but I thought why mess with a proven design. Ok, the original materials, but that can be modified.

NEW222- Top Poster

- Posts : 3896
Join date : 2011-08-13
Age : 46
Location : oakbank, mb
 Re: Cox Powered Airboat
And again. Nope, that is NOT a water rudder on the back edge. Just another drop of polyurethane again. It is pretty thin, and it was applied before going to bed. 

NEW222- Top Poster

- Posts : 3896
Join date : 2011-08-13
Age : 46
Location : oakbank, mb
 Re: Cox Powered Airboat
You may have rounded the trailing edge of the hull a bit much. A sharp edge parts water off for planing better than a curved edge. I have almost no experience with model boats, full size only, so I could be wrong.
Phil
Phil

pkrankow- Top Poster

- Posts : 3025
Join date : 2012-10-02
Location : Ohio
 Re: Cox Powered Airboat
Well, thanks for the tip. I had actually never thought of that. At least the good thing is that I can add, cough, cough, epoxy to square it back up if needed.

NEW222- Top Poster

- Posts : 3896
Join date : 2011-08-13
Age : 46
Location : oakbank, mb
 Re: Cox Powered Airboat
Nice job on the air-boat. I've always admired them. No fouling a prop.. unless you hit weeds above the surface! Have you thought about trim-tabs for the transom? I bought a pair of aluminum tabs to help lift the stern and balance a Dumas Deep Vee 10 (aka "Short-Stuff"). I got them from Hobby Lobby. What I really liked was that they also had a fin on the edge. This helped the boat to track straighter on-plane and the transom from sliding in tight turns. They mount even/flush with the step.. and can be easily bent/trimmed downward to lower the bow. It would help with your concerns about it flying off the water. For running on snow, they could be set to zero.. and the fins would really help keep it from spinning-out.
Easy to make from light-guage sheet-metal and tin-snips. Mine are made from a single small rectangular piece.. cut and bent as shown in this photo. With your foam transom.. you'd need to epoxy mounting plates on, made from plywood..
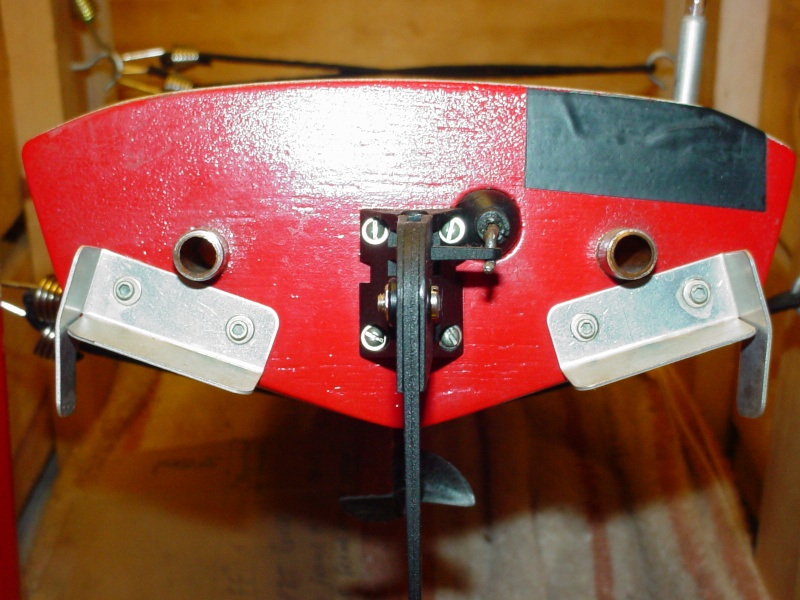
Easy to make from light-guage sheet-metal and tin-snips. Mine are made from a single small rectangular piece.. cut and bent as shown in this photo. With your foam transom.. you'd need to epoxy mounting plates on, made from plywood..

 Re: Cox Powered Airboat
Ok. I had not thought of that. I like it, simple, yet practical. I may just make a set up and keep on hand if it needs them. Now to get back to the shop, err room, and get designing.

NEW222- Top Poster

- Posts : 3896
Join date : 2011-08-13
Age : 46
Location : oakbank, mb
 Re: Cox Powered Airboat
Plus, I am now wondering about putting epoxy over the polyurethane? Is that doable, or would I have to pin them in place so I can have a bond directly with the foam?

NEW222- Top Poster

- Posts : 3896
Join date : 2011-08-13
Age : 46
Location : oakbank, mb
 Re: Cox Powered Airboat
NEW222 wrote:Plus, I am now wondering about putting epoxy over the polyurethane? Is that doable, or would I have to pin them in place so I can have a bond directly with the foam?
That would be a safe way to do it. I would drill two dowel-holes through each plywood mounting plate for pinning into the foam with 1/4" dia. dowels.. maybe an inch long. Is there thick enough foam in the transom to pin into? If you have a sheet-foam transom you might be better-off making a transom template and skinning it entirely with a veneer that you can glue mounts to. Phil mentioned the radius in the step.. and this is one way that you could square it off.. with a little filling-sanding before final sealing.
I'm not sure,, but I would think that epoxy would stick to your existing finish.. provided you de-gloss the area first. When I say de-gloss.. I mean "lightly sand". You don't want to generate heat from friction. I hope this helps..
 Re: Cox Powered Airboat
Yes sir, it certainly does make sense. There is not much back there. Just 1/4" Fan Fold Foam. However there is a couple blocks centrally located for the pinning in of the engine 'pylon'. I will make up a couple of tin ones tomorrow and then rough them up good. I will sand the fuse and epoxy them on and see what happens, but I may run it on snow without them first as a trial anyways.

NEW222- Top Poster

- Posts : 3896
Join date : 2011-08-13
Age : 46
Location : oakbank, mb
 Re: Cox Powered Airboat
NEW222 wrote:Yes sir, it certainly does make sense. There is not much back there. Just 1/4" Fan Fold Foam. However there is a couple blocks centrally located for the pinning in of the engine 'pylon'. I will make up a couple of tin ones tomorrow and then rough them up good. I will sand the fuse and epoxy them on and see what happens, but I may run it on snow without them first as a trial anyways.
Yes.. no harm in trying a set. They're light.. and if they're light enough.. you might be able to bend/trim them, without breaking the glue-joint. Something like .008" tin-sheet might work. It's fairly rigid.. and your craft is light in weight. You could install them flush with the step.. (zero deflection) for running on a hard surface.. and bend them down for trimming in the water.
I really enjoyed RC boating for a time. On my "to do" list.. was and still is; a retrieval/assist boat. A utility tug with a submerged net below a pair of buoyant outriggers for rescuing a stalled racer.
Page 1 of 3 • 1, 2, 3 
 Similar topics
» Cox powered airboat outrigger
» R/C airboats
» RC Airboat Engine
» Check out my custom Airboat. Cox .049
» Cox powered R/C car!
» R/C airboats
» RC Airboat Engine
» Check out my custom Airboat. Cox .049
» Cox powered R/C car!
Page 1 of 3
Permissions in this forum:
You cannot reply to topics in this forum

 Rules
Rules


