Log in
Search
Latest topics
» TEE DEE Having issuesby balogh Today at 2:42 pm
» Retail price mark-up.. how much is enough?
by rsv1cox Today at 2:36 pm
» Cox films/videos...
by Coxfledgling Today at 11:46 am
» Purchased the last of any bult engines from Ken Enya
by Coxfledgling Today at 11:18 am
» My N-1R build log
by roddie Today at 7:32 am
» Happy 77th birthday Andrew!
by akjgardner Today at 7:27 am
» Landing-gear tips
by roddie Today at 1:17 am
» Roger Harris revisited
by TD ABUSER Yesterday at 9:13 pm
» Tee Dee .020 combat model
by Ken Cook Yesterday at 8:41 pm
» My latest doodle...
by roddie Yesterday at 5:43 pm
» Chocolate chip cookie dough.........
by roddie Fri Nov 22, 2024 8:13 pm
» Free Flight Radio Assist
by rdw777 Fri Nov 22, 2024 4:24 pm
Cox Engine of The Month
Cox powered airboat outrigger
Page 1 of 2
Page 1 of 2 • 1, 2 
 Cox powered airboat outrigger
I started the build of a propeller driven outrigger. The outrigger is a Hobbyking kit made of laser cut plywood parts for tub and sponsons and carbon fiber rods for the booms.
https://www.youtube.com/watch?v=K39LMN8pX98
The kit is packed in plastic with instructions written in , let’s call it, self-made English. I decided to have it powered by 2 Cox engines in push pull. They will be high up, mounted into a pod fixed on 2 brackets. For weeks, I searched Outerzone to find a drawing of a suitable pod as I imagined it and yes, I found one (without the wing of course):
http://www.outerzone.co.uk/plan_details.asp?ID=357
And why not try to make both engines throttle controlled with an Ace throttle needle. There should be enough room for that and a servo. I started glueing the tub. The transom is made of 2 pre drilled parts of plywood for rudder and strut and with holes for cooling pipe and rudder control rod. As the rudder will be in the centre, I made a new transom of 3mm plywood as a replacement. The forward transversal bulkhead was not hollowed out for strength. This will be near the location of the engines. Also, the passage in the bottom for the stern tube will be filled in.
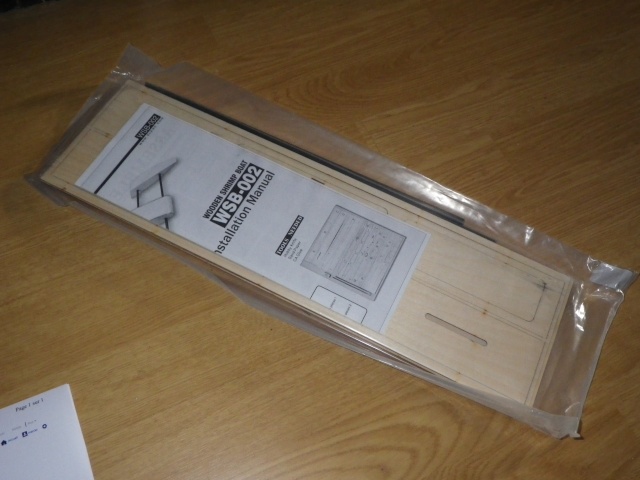
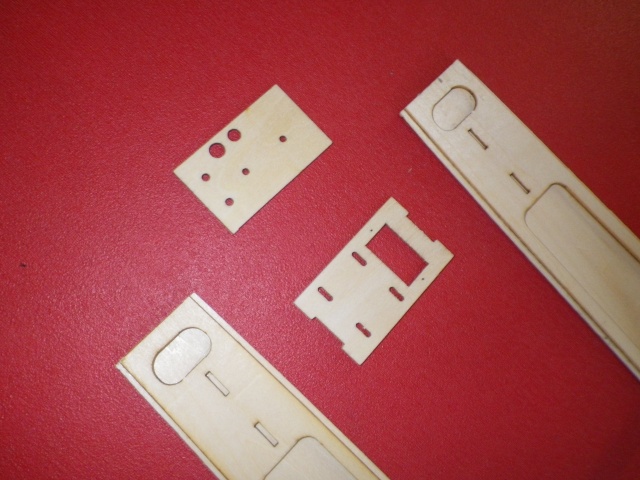

A water prop driven outrigger runs on 3 points being the 2 sponson transom lower edges and the prop. On my model, there is no prop, so it will be replaced by an airplane like tail with a wing for lifting the stern out of the water.
Lieven
https://www.youtube.com/watch?v=K39LMN8pX98
The kit is packed in plastic with instructions written in , let’s call it, self-made English. I decided to have it powered by 2 Cox engines in push pull. They will be high up, mounted into a pod fixed on 2 brackets. For weeks, I searched Outerzone to find a drawing of a suitable pod as I imagined it and yes, I found one (without the wing of course):
http://www.outerzone.co.uk/plan_details.asp?ID=357
And why not try to make both engines throttle controlled with an Ace throttle needle. There should be enough room for that and a servo. I started glueing the tub. The transom is made of 2 pre drilled parts of plywood for rudder and strut and with holes for cooling pipe and rudder control rod. As the rudder will be in the centre, I made a new transom of 3mm plywood as a replacement. The forward transversal bulkhead was not hollowed out for strength. This will be near the location of the engines. Also, the passage in the bottom for the stern tube will be filled in.


A water prop driven outrigger runs on 3 points being the 2 sponson transom lower edges and the prop. On my model, there is no prop, so it will be replaced by an airplane like tail with a wing for lifting the stern out of the water.
Lieven

OVERLORD- Diamond Member

- Posts : 1807
Join date : 2013-03-19
Age : 58
Location : Normandy, France
 Re: Cox powered airboat outrigger
Lieven
Considering your snow car build I expect this project will be a lot of fun and turn out way cool.....wish I had a good pond close
Considering your snow car build I expect this project will be a lot of fun and turn out way cool.....wish I had a good pond close

fredvon4- Top Poster


Posts : 4012
Join date : 2011-08-27
Age : 69
Location : Lampasas Texas
 Re: Cox powered airboat outrigger
I like that. We've talked about swamp buggies on the forums, and I was surprised to learn that they're tricky to balance and trim, in some ways more than an air plane. Water planes. That will look great with a racy paint job.
Rusty
Rusty
_________________
Don't Panic!
...and never Ever think about how good you are at something...
while you're doing it!
My Hot Rock & Blues Playlist
...and never Ever think about how good you are at something...
while you're doing it!
My Hot Rock & Blues Playlist

RknRusty- Rest In Peace

- Posts : 10869
Join date : 2011-08-11
Age : 68
Location : South Carolina, USA
 Re: Cox powered airboat outrigger
I like that pod Lieven. The "Ace" plunger-needles are 1.125"L. (29mm) and only need approx. 1/4" (6-7mm) of throw (length of taper). The engines could be mounted quite close together for your back-to-back configuration. The inner-most holes on a "cross-style" servo-horn may provide enough push-rod travel. If you mount the throttle-servo "sideways" you can mount the engines even closer together.. and the pushrod links would be very short.
I had an idea that might really help you to synchronize the throttles. Ace supplied a short piece of fuel tubing for an adjustable link between the plunger-needle and a pushrod. If your pushrods were threaded.. (or had threaded extensions..) The fuel line coupling could be advanced/retarded.. like a conventional needle adjustment for "tweaking". The threaded pushrod is held captive in the servo-horn.. so only the "plunger" moves when twisting the coupling. Sort of like a "clevis".. except simpler. As long as the plunger passes through the guide/firewall with zero resistance.. there is no real force applied to the coupling/linkage. As a bonus.. the silicone couplings will flex enough to mix the linkages' linear movement through the guide.. with it's radial movement at the servo-horn.
I made my own firewall/guide from sheet PVC. Plywood could be used.. but if the wood swells from moisture, your plunger will bind. You could drill a larger guide-hole and install an alloy-tube "sleeve" which would take care of that.. as well as ensuring accurate linear movement of the plunger. A homemade guide must have it's hole drilled exactly on center to the tank-mount pattern. Mine were made using CNC.
Your model is going to be very interesting!
 Re: Cox powered airboat outrigger
I've looked at those for quite a while now. Airboats are what I do. Check out this site for all the clues about what to do http://www.rcairboats.net/phpBB/index.php. Believe me, you won't need to be artificially lifting the stern.
However, it'll be so underpowered with a pair of .o49 reedies that you'll be really disappointed. That hull, adapted as an airboat, will need at least .21 and a little more would be more fun. I had been considering doing an insane one with a.46 I have 2 models with .049s on 'em (sorry, I lie. 1 of them now has a Cox electric on it for my grandson). The Challenger and the Dictator on this page http://www.rcairboats.net/phpBB/index.php are the way to go to convert as single engine .049 airboats if you change your mind about power plants. Here's a link to a bloke who's doing an in-line twin engine airboat http://www.rcairboats.net/phpBB/viewtopic.php?f=50&t=2808
There are plenty of plans and ideas on the airboat forum, but don't make the mistake of many. viz: making them far, far too heavy. Use balsa where you can and some 1/16" to 3/32" ply in the engine mount area - for .049s that is..
There glow powered airboats out there doing 100mph!

dinsdale- Account Deactivated by Owner
- Posts : 317
Join date : 2012-02-22
 Re: Cox powered airboat outrigger
There are some vids of outrigger airboats one had a gps onboard was getting some very high numbers on his passes. A .09 would hual arse up front. Most of the tether types use the prop up front for max speed and control less wiggle that way. 


1/2A Nut- Top Poster

- Posts : 3538
Join date : 2013-10-20
Age : 61
Location : Brad in Texas
 Re: Cox powered airboat outrigger
Thanks for all your comments!!
I know the RC airboat forum and the post of Gary Hooten's fast airboat rigger. He did a great job. I tried to become a forum member and send several mails to the admin. I never received any reply. To me, the forum seems to be as dead as a dodo!! I don't know why because it's a great subject with lots of possibilities.
Dinsdale, the Pacific Balsa models are tunnel hulls. As far as I know, they don't raise out of the water s a rigger does which create a different kind of resistance due to the water. If a wing is not needed to lift the stern, this action is then only caused by the momentum of the engine power and the distance of the engine to the hull. That would make the hull pivot around the sponson transom lower edges and lift the stern out of the water.
A .21 seems to be massif to me! Wouldn't it sink?

OVERLORD- Diamond Member

- Posts : 1807
Join date : 2013-03-19
Age : 58
Location : Normandy, France
 props for inline twin
Maybe think about putting a higher pitch prop on whichever engine is downstream from the other.

706jim- Gold Member

- Posts : 472
Join date : 2013-11-30
 Re: Cox powered airboat outrigger
706jim wrote:Maybe think about putting a higher pitch prop on whichever engine is downstream from the other.
Yes, the rear engine will have a prop with different pitch or bigger diameter or more blades.
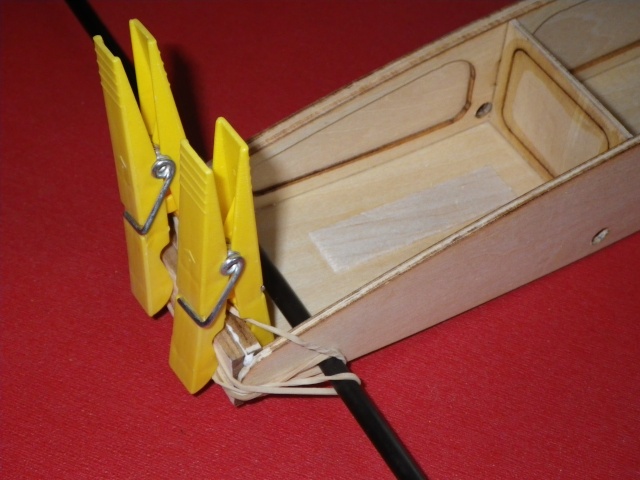
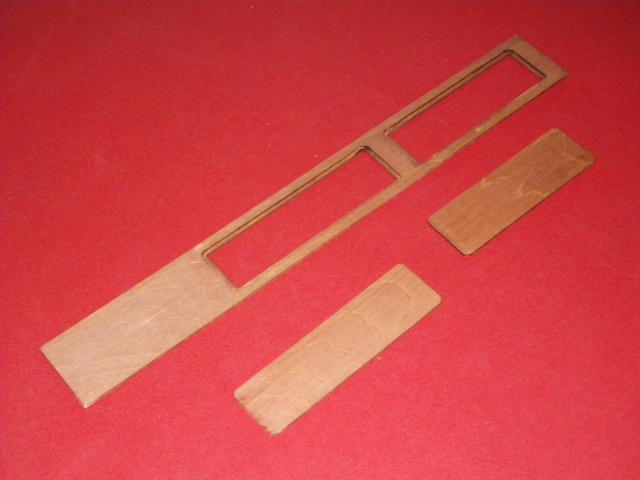
A small update. I glued the stern and bottom panels. The nose block is drying at the moment. To fit the sponson booms, I had to pass again trough the tub holes with a 6mm drill. I coloured the deck and hatch panels with mahogany wood stain.

OVERLORD- Diamond Member

- Posts : 1807
Join date : 2013-03-19
Age : 58
Location : Normandy, France
 Re: Cox powered airboat outrigger
OVERLORD wrote:Dinsdale, the Pacific Balsa models are tunnel hulls. As far as I know, they don't raise out of the water s a rigger does which create a different kind of resistance due to the water. If a wing is not needed to lift the stern, this action is then only caused by the momentum of the engine power and the distance of the engine to the hull. That would make the hull pivot around the sponson transom lower edges and lift the stern out of the water.
A .21 seems to be massif to me! Wouldn't it sink?
You can be sure that whatever design you use there will be precious little of it in the water. I must admit though, one standard Surestart is all the Pacific model can handle. They must be run in "millpond" conditions - but sure do get up and boogey
What's your .21 made of? Lead? My el cheapo ASP .21 hardly lowers one of the Pacific Balsa models when I gently just sit it on one. That's 2 engines, Rx, 1 oz fuel tank, 2 6g servos and batteries. I might try just adding equal weight to one and see how it goes. I wouldn't expect much drop in performance. As I said, I'd been considering putting a .46 on one of those outriggers.

dinsdale- Account Deactivated by Owner
- Posts : 317
Join date : 2012-02-22
 Re: Cox powered airboat outrigger
I will do a weight test as well when the boat is ready to float.
This week I glued a sponson together. This is not an easy job as the outer panel and longitudinal bulkhead need to turn inward and the bottom panel goes up. At the start, the 3 internal bulkheads are glued together. They are slotted and fit like a puzzle. Than the inner side panel with the boom holes is glued against it, with a flush top side. After drying, I noticed that the side panel wasn't flat anymore so I braced it with a carbon fibre boom so I could glue the bottom panel. This panel was glued in 3 stages. first I fixed the aft part which is rather flat. After drying, I curved the bottom to match the inner side panel. The longitudinal bulkhead was also glued where it remains straight.
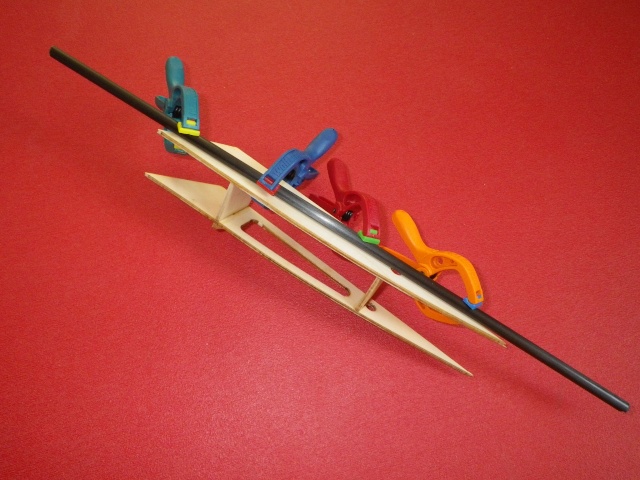
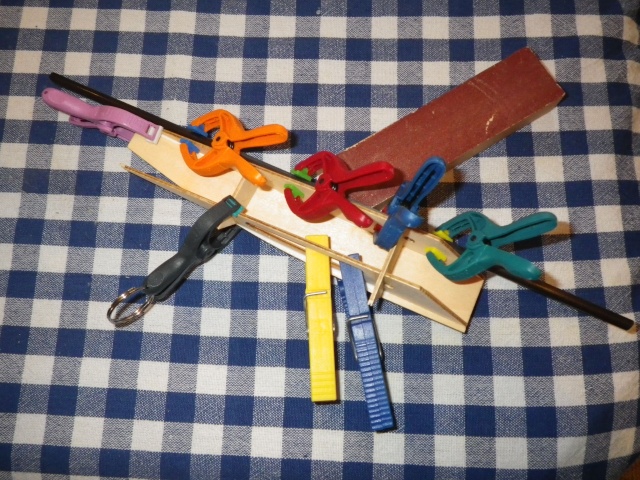
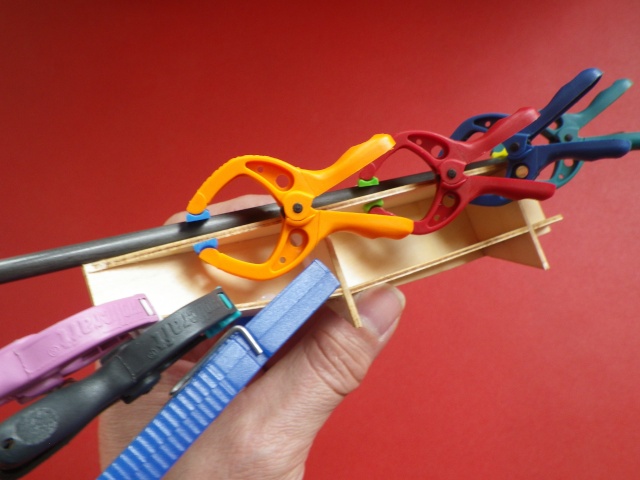
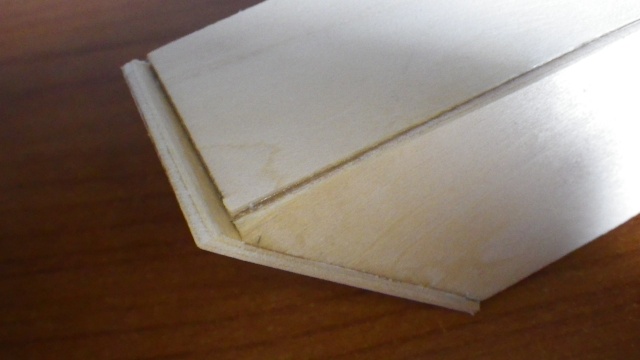
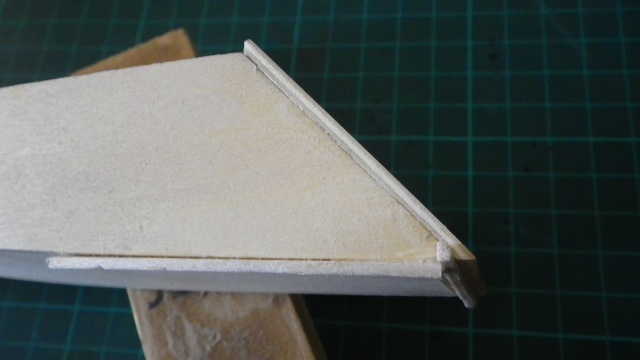
When dry, the bulkhead is bent and glued on the bottom panel. The outer edge of the bottom panel was sanded to obtain a bevel for easy glueing the outer side panel. Then I shaped the outer side panel by hand to more or less match the shape it will have. Finally, the transom was glued on. This was very difficult to hold in place with pressure applied as it wanted to slide away. When dry, I sanded all the edges flush.
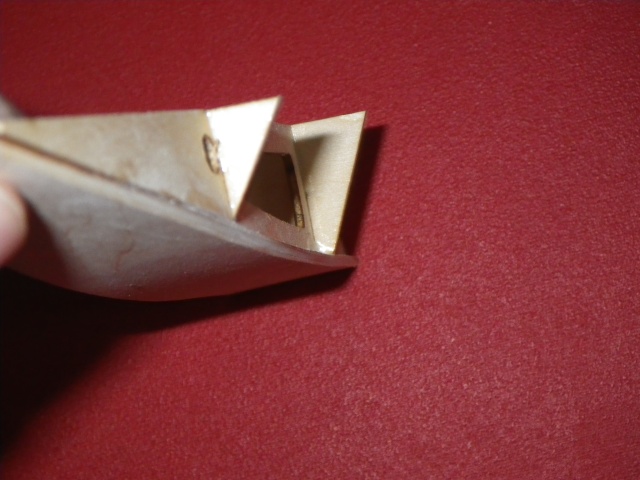
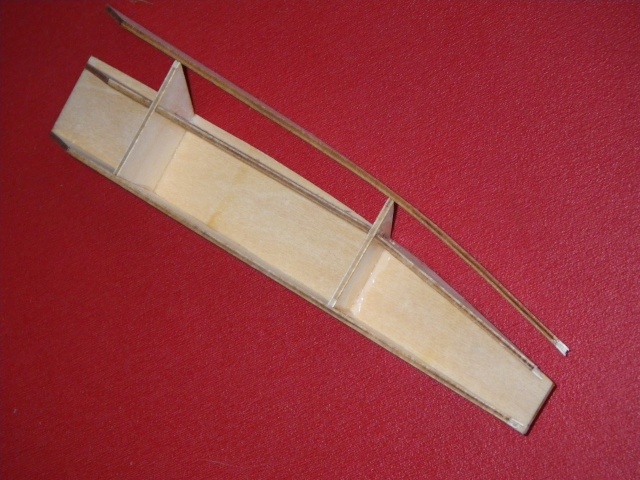
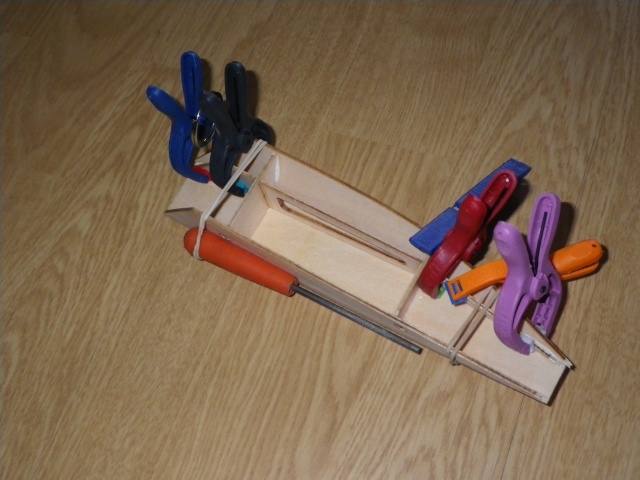
Because of the sharp and other strange angles, plenty of gaps remained at the joints. I glued in some scrap balsa and sanded that flush to get perfect edges
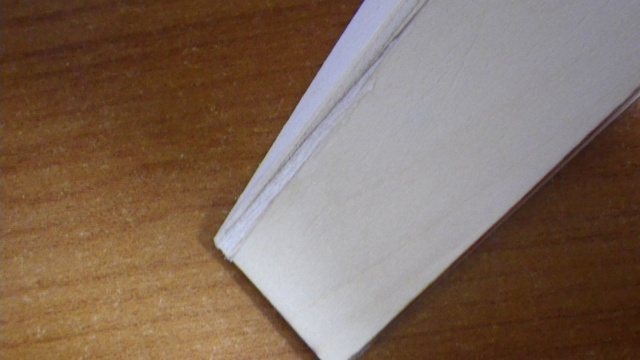
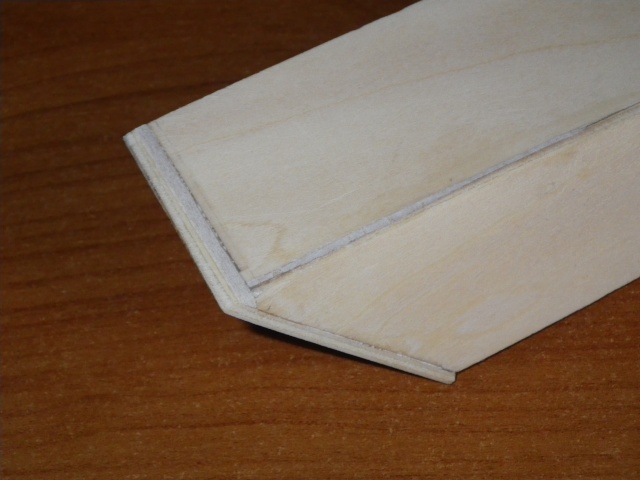
This week I glued a sponson together. This is not an easy job as the outer panel and longitudinal bulkhead need to turn inward and the bottom panel goes up. At the start, the 3 internal bulkheads are glued together. They are slotted and fit like a puzzle. Than the inner side panel with the boom holes is glued against it, with a flush top side. After drying, I noticed that the side panel wasn't flat anymore so I braced it with a carbon fibre boom so I could glue the bottom panel. This panel was glued in 3 stages. first I fixed the aft part which is rather flat. After drying, I curved the bottom to match the inner side panel. The longitudinal bulkhead was also glued where it remains straight.


When dry, the bulkhead is bent and glued on the bottom panel. The outer edge of the bottom panel was sanded to obtain a bevel for easy glueing the outer side panel. Then I shaped the outer side panel by hand to more or less match the shape it will have. Finally, the transom was glued on. This was very difficult to hold in place with pressure applied as it wanted to slide away. When dry, I sanded all the edges flush.


Because of the sharp and other strange angles, plenty of gaps remained at the joints. I glued in some scrap balsa and sanded that flush to get perfect edges


OVERLORD- Diamond Member

- Posts : 1807
Join date : 2013-03-19
Age : 58
Location : Normandy, France
 Re: Cox powered airboat outrigger
LOOKING GOOD !! This is very interesting to watch you bringing it together . Thanks for sharing , Eric 

getback- Top Poster


Posts : 10442
Join date : 2013-01-18
Age : 67
Location : julian , NC
 Re: Cox powered airboat outrigger
Hi Lieven
A piece of CF tube to hold it straight, good idea. Next time I see those small clamps, I'm going to buy a pack of them. This looks like a fun project, I look forward to seeing it zipping across a glassy pond.
Rusty
A piece of CF tube to hold it straight, good idea. Next time I see those small clamps, I'm going to buy a pack of them. This looks like a fun project, I look forward to seeing it zipping across a glassy pond.
Rusty
_________________
Don't Panic!
...and never Ever think about how good you are at something...
while you're doing it!
My Hot Rock & Blues Playlist
...and never Ever think about how good you are at something...
while you're doing it!
My Hot Rock & Blues Playlist

RknRusty- Rest In Peace

- Posts : 10869
Join date : 2011-08-11
Age : 68
Location : South Carolina, USA
 Re: Cox powered airboat outrigger
Rusty
Harbor Freight out here has them (small plastic clamps) on sale all the time...I think it was under $5 for a tube full of them
http://www.harborfreight.com/22-piece-spring-clamp-set-69374.html
Harbor Freight out here has them (small plastic clamps) on sale all the time...I think it was under $5 for a tube full of them
http://www.harborfreight.com/22-piece-spring-clamp-set-69374.html

fredvon4- Top Poster


Posts : 4012
Join date : 2011-08-27
Age : 69
Location : Lampasas Texas
 Re: Cox powered airboat outrigger
Ah, good, I forget about them. Next time I go out that way I'll pick them up.fredvon4 wrote:Rusty
Harbor Freight out here has them (small plastic clamps) on sale all the time...I think it was under $5 for a tube full of them
http://www.harborfreight.com/22-piece-spring-clamp-set-69374.html
Fred, was it you that sent me some 1/2A fuel tubing to try, maybe 6 months or so ago? I finally got around to using it. I'd been thinking it was the same as my ultra small stuff(too small), bit it's one size larger and perfect for my bladder fed baby fleet. I like the way it grips the fuel nipple really well, and easier to pinch off with my thumb against the fuselage. I haven't flown it yet, but re-plumbed my Baby Streaks with it.
If it wasn't you, thanks to whoever it was. I'm pretty sure though, but my old PMs have long been dropped off the bottom of the list.
Rusty
_________________
Don't Panic!
...and never Ever think about how good you are at something...
while you're doing it!
My Hot Rock & Blues Playlist
...and never Ever think about how good you are at something...
while you're doing it!
My Hot Rock & Blues Playlist

RknRusty- Rest In Peace

- Posts : 10869
Join date : 2011-08-11
Age : 68
Location : South Carolina, USA
 Re: Cox powered airboat outrigger
Ha..sorry brother twas not me,
Reminded me while waiting for glue to dry that I could be making up a few sets of bladders
Gonna experiment this spring with the red cap rodent condoms.
I got a bunch of bladder tube from Phil Cartier with the Hacker II kits that I want to try. Mostly been using Texas Timer stuff for the 1/2a
But here I go hijacking a great thread... Love seeing OVERLORD's constructing photos, he does such neat and efficient work
OK back to your regularly scheduled high speed low drag boat build...


fredvon4- Top Poster


Posts : 4012
Join date : 2011-08-27
Age : 69
Location : Lampasas Texas
 Re: Cox powered airboat outrigger
Those sponsons look like a tough assignment. I give you a lot of credit. The other 3 may be easier now though. Have you thought about spraying-in some expanding-foam for floatation before you cap them off? Trimming flush afterward using a razor-blade and sanding-block would be easy. Possibly glue the booms in place prior to spraying in the foam? Other than the plywood itself; there isn't much floatation. The two engines, radio and hdwe. may be enough to sink the model if it takes on water.
The engine-pod's throttle servo should be enclosed in a small waterproof box or capsule (preferably transparent) with pushrod seals frt. and rear. You may be able to make your own pushrod seals using silicone fuel-tubing inserted through slightly smaller holes drilled in the box. Twisting them in.. would seal the holes as well as hold the tube in place. They would be flexible and the pushrods could be sized to snugly fit the tubing's ID. Greasing the pushrods would prevent binding.. and further protects from water getting in. Run the servo-plug/harness through a hole in the bottom and seal with caulking.
Just some food for thought.. I know I'm always making suggestions in our member's build/re-build threads.. but it's only meant to provoke some additional thinking in areas of a design that might be challenging to figure out. I am very psyched about this airboat's progress.. and I definitely admire your craftsmanship Lieven!

 Re: Cox powered airboat outrigger
roddie wrote:Those sponsons look like a tough assignment. I give you a lot of credit. The other 3 may be easier now though. Have you thought about spraying-in some expanding-foam for floatation before you cap them off? Trimming flush afterward using a razor-blade and sanding-block would be easy. Possibly glue the booms in place prior to spraying in the foam? Other than the plywood itself; there isn't much floatation. The two engines, radio and hdwe. may be enough to sink the model if it takes on water.
The engine-pod's throttle servo should be enclosed in a small waterproof box or capsule (preferably transparent) with pushrod seals frt. and rear. You may be able to make your own pushrod seals using silicone fuel-tubing inserted through slightly smaller holes drilled in the box. Twisting them in.. would seal the holes as well as hold the tube in place. They would be flexible and the pushrods could be sized to snugly fit the tubing's ID. Greasing the pushrods would prevent binding.. and further protects from water getting in. Run the servo-plug/harness through a hole in the bottom and seal with caulking.
Just some food for thought.. I know I'm always making suggestions in our member's build/re-build threads.. but it's only meant to provoke some additional thinking in areas of a design that might be challenging to figure out. I am very psyched about this airboat's progress.. and I definitely admire your craftsmanship Lieven!
Spray foam is heavy compared to empty air. However spray foam, closed cell polyurethane foam ideally, will not fill with water like an empty cavity will in case of damage.
Spray foam is also unbelievably powerful stuff at the expansion game, even the canned stuff can build enough pressure to do some damage in an overfilled cavity. (I believe regular Great Stuff is closed cell polyurethane foam)
Phil

pkrankow- Top Poster

- Posts : 3025
Join date : 2012-10-02
Location : Ohio
 Re: Cox powered airboat outrigger
Well damn, now I'm embarrassed. Maybe it was Phil or Duke. I bet one of them is who my mystery gifter is.fredvon4 wrote:Ha..sorry brother twas not me,...
Rusty
_________________
Don't Panic!
...and never Ever think about how good you are at something...
while you're doing it!
My Hot Rock & Blues Playlist
...and never Ever think about how good you are at something...
while you're doing it!
My Hot Rock & Blues Playlist

RknRusty- Rest In Peace

- Posts : 10869
Join date : 2011-08-11
Age : 68
Location : South Carolina, USA
 Re: Cox powered airboat outrigger
Sorry, I wasn't listening again. What did I maybe do?RknRusty wrote:Well damn, now I'm embarrassed. Maybe it was Phil or Duke. I bet one of them is who my mystery gifter is.fredvon4 wrote:Ha..sorry brother twas not me,...
Rusty

duke.johnson- Diamond Member

- Posts : 1734
Join date : 2012-11-06
Age : 53
Location : Rochester, Washington
 Re: Cox powered airboat outrigger
duke.johnson wrote:...Sorry, I wasn't listening again. What did I maybe do?
Lol, this:
RknRusty wrote:
Fred, was it you that sent me some 1/2A fuel tubing to try, maybe 6 months or so ago? I finally got around to using it. I'd been thinking it was the same as my ultra small stuff(too small), bit it's one size larger and perfect for my bladder fed baby fleet. I like the way it grips the fuel nipple really well, and easier to pinch off with my thumb against the fuselage. I haven't flown it yet, but re-plumbed my Baby Streaks with it.
If it wasn't you, thanks to whoever it was. I'm pretty sure though, but my old PMs have long been dropped off the bottom of the list.
Rusty
_________________
Don't Panic!
...and never Ever think about how good you are at something...
while you're doing it!
My Hot Rock & Blues Playlist
...and never Ever think about how good you are at something...
while you're doing it!
My Hot Rock & Blues Playlist

RknRusty- Rest In Peace

- Posts : 10869
Join date : 2011-08-11
Age : 68
Location : South Carolina, USA
 Re: Cox powered airboat outrigger
I don't remember, I''m getting older and have to have a list for everything anymore. I do have some nice tube for the bladders. Whoever gave it to you, you deserved it. You are always doing nice things for others.

duke.johnson- Diamond Member

- Posts : 1734
Join date : 2012-11-06
Age : 53
Location : Rochester, Washington
 Re: Cox powered airboat outrigger
duke.johnson wrote:I don't remember, I''m getting older and have to have a list for everything anymore. I do have some nice tube for the bladders. Whoever gave it to you, you deserved it. You are always doing nice things for others.
Wait til' you young whipper-snappers (including you Lieven
 Re: Cox powered airboat outrigger
It's amazing how fast it happens. Now don't forget to post more pictures of this boat project. Looks like a fun project. I wish our pond would hold water this year, I really need to walk up the dry creek and see why we only get water at the club house when it rain really hard for days. Maybe a beaver hunt is in my future.

duke.johnson- Diamond Member

- Posts : 1734
Join date : 2012-11-06
Age : 53
Location : Rochester, Washington
 Re: Cox powered airboat outrigger
I made the 2nd sponson the same way as the first one. All was painted and varnished. The sponsons are now glued to the 6mm carbon booms and to the main tub.
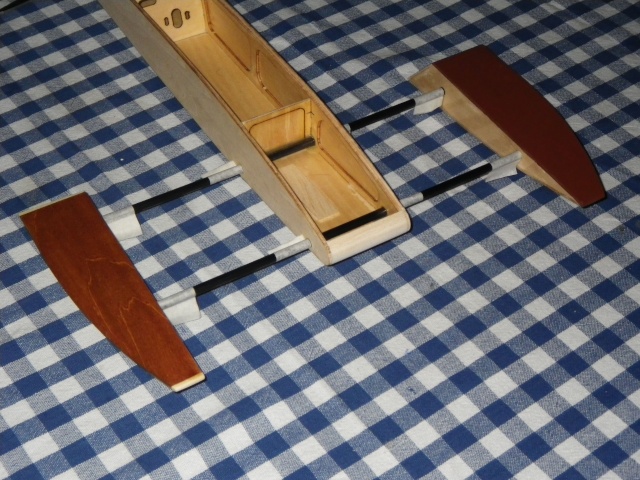
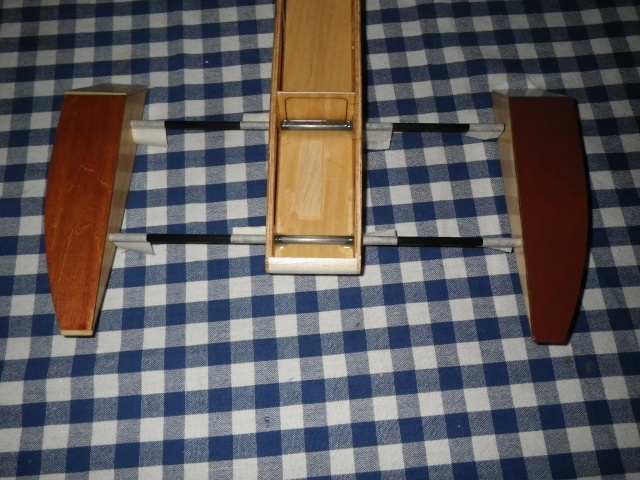
Next is to prepare the tub. I need to find an efficient way to lock the hatches. 1 hatch will be curved. Also, before glueing the deck, both the engine mount rail positions have to be located. I want to glue some additional frames to the sides in the area where the rails go.
Lieven


Next is to prepare the tub. I need to find an efficient way to lock the hatches. 1 hatch will be curved. Also, before glueing the deck, both the engine mount rail positions have to be located. I want to glue some additional frames to the sides in the area where the rails go.
Lieven

OVERLORD- Diamond Member

- Posts : 1807
Join date : 2013-03-19
Age : 58
Location : Normandy, France
Page 1 of 2 • 1, 2 
Page 1 of 2
Permissions in this forum:
You cannot reply to topics in this forum

 Rules
Rules


