Log in
Search
Latest topics
» Cox films/videos...by Coxfledgling Today at 4:46 am
» Purchased the last of any bult engines from Ken Enya
by Coxfledgling Today at 4:18 am
» My N-1R build log
by roddie Today at 12:32 am
» Happy 77th birthday Andrew!
by akjgardner Today at 12:27 am
» TEE DEE Having issues
by TD ABUSER Yesterday at 9:43 pm
» Landing-gear tips
by roddie Yesterday at 6:17 pm
» Roger Harris revisited
by TD ABUSER Yesterday at 2:13 pm
» Tee Dee .020 combat model
by Ken Cook Yesterday at 1:41 pm
» Retail price mark-up.. how much is enough?
by Ken Cook Yesterday at 1:37 pm
» My latest doodle...
by roddie Yesterday at 10:43 am
» Chocolate chip cookie dough.........
by roddie Fri Nov 22, 2024 1:13 pm
» Free Flight Radio Assist
by rdw777 Fri Nov 22, 2024 9:24 am
Cox Engine of The Month
Gas tank second thoughts
Page 1 of 2
Page 1 of 2 • 1, 2 
 Gas tank second thoughts
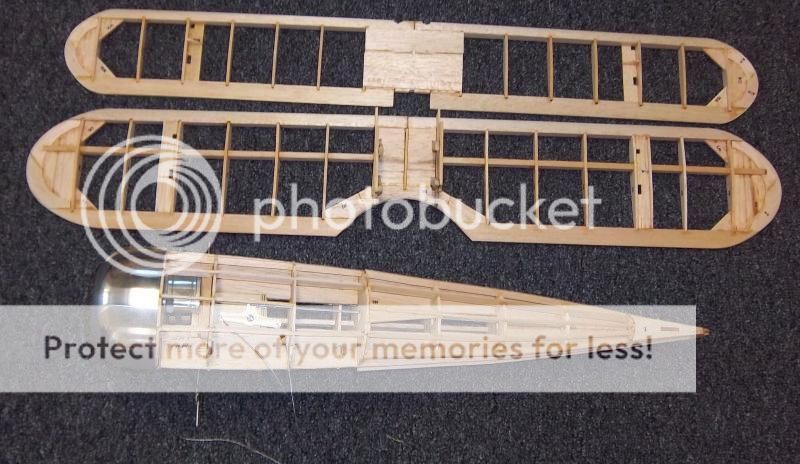
After installing a 3/4 oz tank in my .35 powered Nieuport 28 I'm having second thoughts.
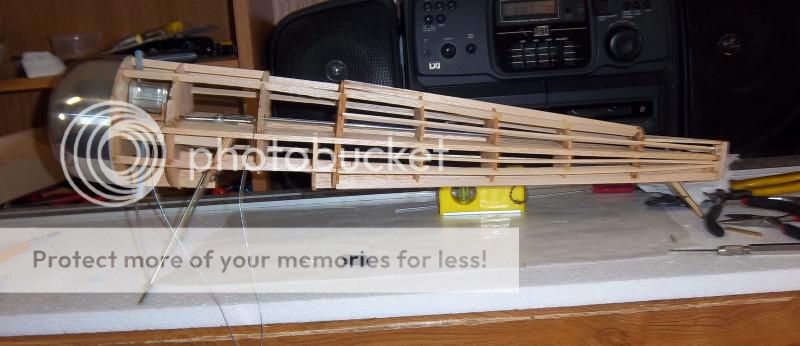
While 35 to 40 years ago going up and down and all around for five to six minutes was no problem, today it might be a bit different hence the 3/4 oz tank which should give me about three to five minutes of flight depending on how much the engine is leaned out.
I'm at a point now where I need to button this thing up and once I do changing the tank won't be an option. What do you think? Bigger tank but put in less gas, or just top this one off before letting go?


rsv1cox- Top Poster


Posts : 11250
Join date : 2014-08-18
Location : West Virginia
 Re: Gas tank second thoughts
3/4 oz is pretty small for a .35.
I use 3/4oz to 1oz or more for 1/2A. Not sure what .35 you plan on going with, but my Fox will eat up 4oz in around 8 minutes.
I would at least put in a 3oz tank and if it's too much then short tank it. If you find that you are getting dizzy it would be better to play with pitch and line length to slow things down. 5 sec lap times are pretty leisurely. Since it's not going to be a stunter you can get away with longer lines.
Just my thoughts.
Ron

Cribbs74- Moderator


Posts : 11907
Join date : 2011-10-24
Age : 50
Location : Tuttle, OK
 Re: Gas tank second thoughts
I'll second that i was thinking 2 1/2 to 3 least to get things going like Ron said if it is a fox they like some fuel / i have to get mine almost flooded to get mine started ....but i am no one to say , have only bench ran a couple, I know my 29 enya shoestring was 4 oz ...Getback  (Talking a pain to get broken in )
  O Yeah nice looking airplane!!!
Last edited by getback on Wed Oct 08, 2014 2:53 pm; edited 1 time in total (Reason for editing : cant spell)

getback- Top Poster


Posts : 10442
Join date : 2013-01-18
Age : 67
Location : julian , NC
 Re: Gas tank second thoughts
+3 on that. ^^^
_________________
Don't Panic!
...and never Ever think about how good you are at something...
while you're doing it!
My Hot Rock & Blues Playlist
...and never Ever think about how good you are at something...
while you're doing it!
My Hot Rock & Blues Playlist

RknRusty- Rest In Peace

- Posts : 10869
Join date : 2011-08-10
Age : 68
Location : South Carolina, USA
 Re: Gas tank second thoughts
Yes, I have to agree. But finding a U/C wedge tank that will fit into that short space behind the engine is becoming a problem. I guess I could cut a hole in the back bulkhead and sneak it in that way. Best I could come up with is a 1 1/4 oz perfect tank which is on it's way. I must have used a larger tank in my original Nieuport, 5/6 minute runs were no problem....
Dumb me, I sold most of my U/C stuff on ebay years ago, buying it all back now at inflated prices.....

Dumb me, I sold most of my U/C stuff on ebay years ago, buying it all back now at inflated prices.....

rsv1cox- Top Poster


Posts : 11250
Join date : 2014-08-18
Location : West Virginia
 Re: Gas tank second thoughts
Building models with the tank permanently built in is not a very good idea. I personally wouldn't use any Perfect brand tank without soldering every joint on the tank. That includes inside the tank as well. I would also cutout the firewall and re pipe the vents to the end cap on the front of the tank. This way you could unbolt the engine and slide the tank into the airframe. Pieces of foam can retain the tank within the cutout. A 2.5-3 oz tank would provide a decent amount of flytime. Anything smaller is very small.
Looking at your pic, it appears that you have cable leadouts passing through a metal bellcrank. This can saw through the cable if not bushed properly. I've seen this happen with less than 5 flights on a plane. Ken
Looking at your pic, it appears that you have cable leadouts passing through a metal bellcrank. This can saw through the cable if not bushed properly. I've seen this happen with less than 5 flights on a plane. Ken

Ken Cook- Top Poster

- Posts : 5640
Join date : 2012-03-27
Location : pennsylvania
 Re: Gas tank second thoughts
Thanks for the advice Ken, I have never had that happen but I sure can see the possibilities. However it's an aluminum bell crank and five strand steel wire. Still, I have lead-out line coming from Omini and will probably replace it. Right now it's just picture hanging wire that I had on-hand.

rsv1cox- Top Poster


Posts : 11250
Join date : 2014-08-18
Location : West Virginia
 Re: Gas tank second thoughts
That's what Ken was talking about, steel cables in an aluminum bellcrank won't last long.

Cribbs74- Moderator


Posts : 11907
Join date : 2011-10-24
Age : 50
Location : Tuttle, OK
 Re: Gas tank second thoughts
You mentioned cutting out a bulkhead to fit a larger tank. Ken's advice on making your tank "serviceable" is a good idea.. as well as providing room for a larger tank if you want more fly-time. I never knew about the hazards involved with bell-crank/lead-out connections until Ken mentioned it in a post several months ago. I've always liked "solid-wire" lead-outs myself.. but it takes time, patience and a good set of needle-nose pliers to make a set. I am not sure what's involved with properly bushing a bell-crank for stranded-steel lead-outs... but it would probably be a LOT less work to switch to solids.
My most recent model is a tiny 1/2A control-line speed ship.. which I bent-up solids for. Here's a couple a pics.
The bell-crank/bearing is a unit that I custom made. The "solids" I believe are .025" diameter music-wire.


and my line-spacing at the handle...

My most recent model is a tiny 1/2A control-line speed ship.. which I bent-up solids for. Here's a couple a pics.
The bell-crank/bearing is a unit that I custom made. The "solids" I believe are .025" diameter music-wire.


and my line-spacing at the handle...

 Re: Gas tank second thoughts
Neat job roddie. I see that your bell crank lead-outs are bushed also. I had thought about building my own crank but gave in to expediency.
I wonder if I could adapt this tank to my Nieuport, except that I don't know where the fuel pick-up is. Looks like it would fit perfectly between the two bulkheads.
http://www.ebay.com/itm/NEW-Hayes-Regular-Fuel-Tank-2-oz-080-NIB-/331304991811?pt=Radio_Control_Parts_Accessories&hash=item4d2350fc43
I wonder if I could adapt this tank to my Nieuport, except that I don't know where the fuel pick-up is. Looks like it would fit perfectly between the two bulkheads.
http://www.ebay.com/itm/NEW-Hayes-Regular-Fuel-Tank-2-oz-080-NIB-/331304991811?pt=Radio_Control_Parts_Accessories&hash=item4d2350fc43

rsv1cox- Top Poster


Posts : 11250
Join date : 2014-08-18
Location : West Virginia
 Re: Gas tank second thoughts
Another thing....
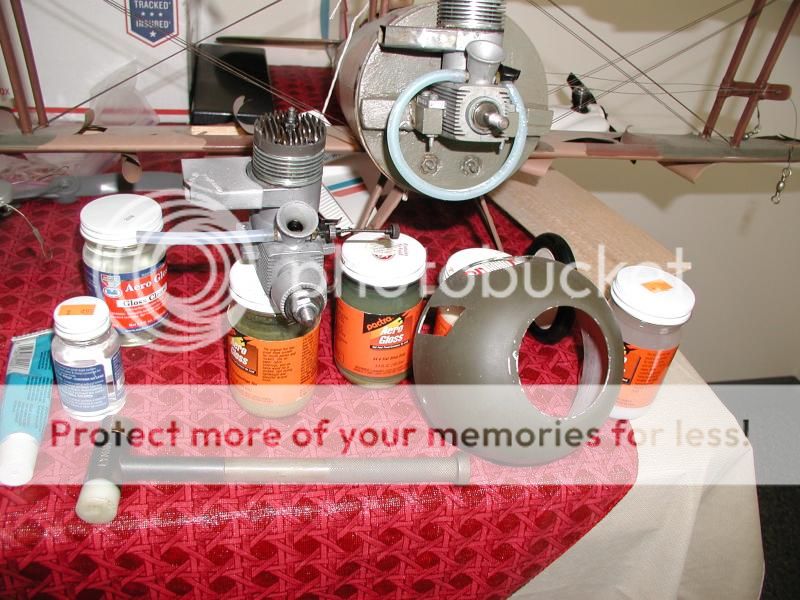
Where does everybody get their fuel proof paint? The LHS's only carry aero gloss in sanding sealer and gloss, no colors? I don't want to use monocoat. Silkspan and errr dope only.
I'm so behind the times......
Where does everybody get their fuel proof paint? The LHS's only carry aero gloss in sanding sealer and gloss, no colors? I don't want to use monocoat. Silkspan and errr dope only.
I'm so behind the times......

rsv1cox- Top Poster


Posts : 11250
Join date : 2014-08-18
Location : West Virginia
 Re: Gas tank second thoughts
Wouldn't this fly fine on a TD .09 ?

1/2A Nut- Top Poster

- Posts : 3538
Join date : 2013-10-20
Age : 61
Location : Brad in Texas
 Re: Gas tank second thoughts
1/2A Nut wrote:Wouldn't this fly fine on a TD .09 ?
But whats the fun in that?
It be like one of those underpowered plastic RTFs... Only bigger and more fragile.

Waffleman- Gold Member

- Posts : 141
Join date : 2012-07-18
Age : 25
Location : Fl, USA
 Re: Gas tank second thoughts
I've built the C-series kits from Sterling. They're actually really cool. I used silkspan on the fuse and Sig Koverall on the wings. As far as dope is concerned. I prefer Sig. I like it for a few reasons. One, it dries the slowest out of the dopes available. This allows for a easier finish using a brush and it yields a better shine. In addition, Sig Lite Coat is a very clear dope. Sig Supercoat clear is used for heavier structures and is used to shrink the covering. It keeps on shrinking with age. Lite Coat is a clear used for lightweight structures and when used as a top coat it prevents the dope from over shrinking your covering and surfaces. As I mentioned above, it also makes your colors really stand out due to it being very clear. I don't like the yellow tinge that some of the other dopes have which can really change your base coat finish. Blue tends to take on a greenish hue . Brodak sells dope as well with a lot more colors available over Sig. However, in my experience I found it works better when sprayed opposed to brushing. Brodak uses a medium drying thinner which can blush if not sprayed in the proper humidity. Best insurance against this is to use the retarder. This takes a bit of experimenting. Sig seems to be fool proof and I've brushed and sprayed Sig in some very humid conditions. Faster drying thinner traps the moisture within it when used in humid conditions thus giving the finish a extremely milkish appearance. Ken

Ken Cook- Top Poster

- Posts : 5640
Join date : 2012-03-27
Location : pennsylvania
 Re: Gas tank second thoughts
rsv1cox wrote:Neat job roddie. I see that your bell crank lead-outs are bushed also. I had thought about building my own crank but gave in to expediency.
I wonder if I could adapt this tank to my Nieuport, except that I don't know where the fuel pick-up is. Looks like it would fit perfectly between the two bulkheads.
http://www.ebay.com/itm/NEW-Hayes-Regular-Fuel-Tank-2-oz-080-NIB-/331304991811?pt=Radio_Control_Parts_Accessories&hash=item4d2350fc43
The lead-out holes in my aluminum bell-crank (prev. picture) are just drilled. They aren't bushed. Here's another pic that might show it better. This is the first set I made.. which I later replaced, but neither set was bushed.

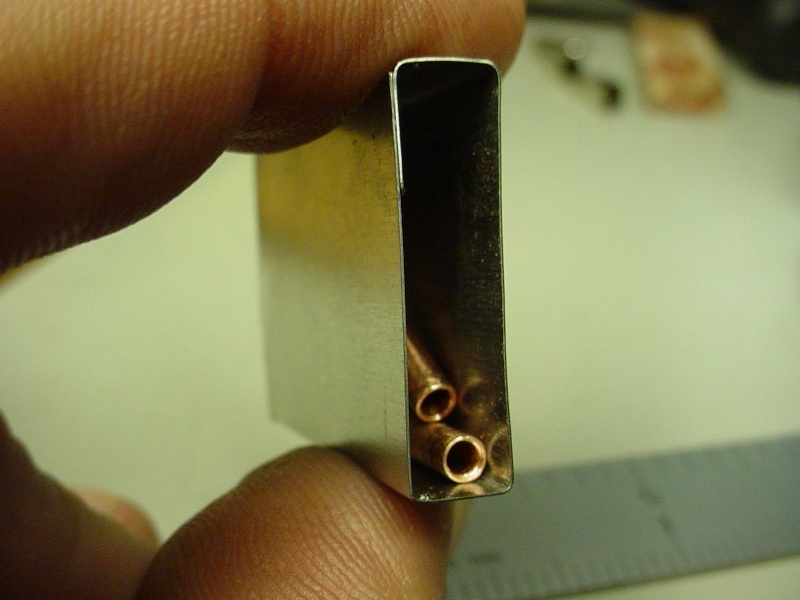
I built my own fuel tank for the model. It was my first attempt at building a hard-tank.. and I found it to be really enjoyable; once I got the correct soldering technique down. Not saying you should try this for the Nieuport.. but maybe for a future build. This tank is a "uni-flow" of 6.15cc capacity and measures .25"W x 1.0"H x 1.5"L. It's made of .008" Tin-sheet and is plumbed with .125" OD Copper tube. It's a control-line Speed-tank designed for level flight only.


Sullivan sells "Flex-Tanks" that might be an option for your Nieuport. Their shape can be altered by using a heat-gun.
http://www.sullivanproducts.com/FuelTanksMainContent.htm
 Re: Gas tank second thoughts
1/2A Nut wrote:Wouldn't this fly fine on a TD .09 ?
Lot's of drag on these old girls. Guy wires, struts, open cockpit, big wheels, and two wings. The .35 pulls real well though and loops are possible.
It's a fun plane to fly and take-offs and landings are just routine. I would think I have 20-25 flights on my first one with no accidents. Time is it's enemy though. If I ever fly it again it will require some recovering.
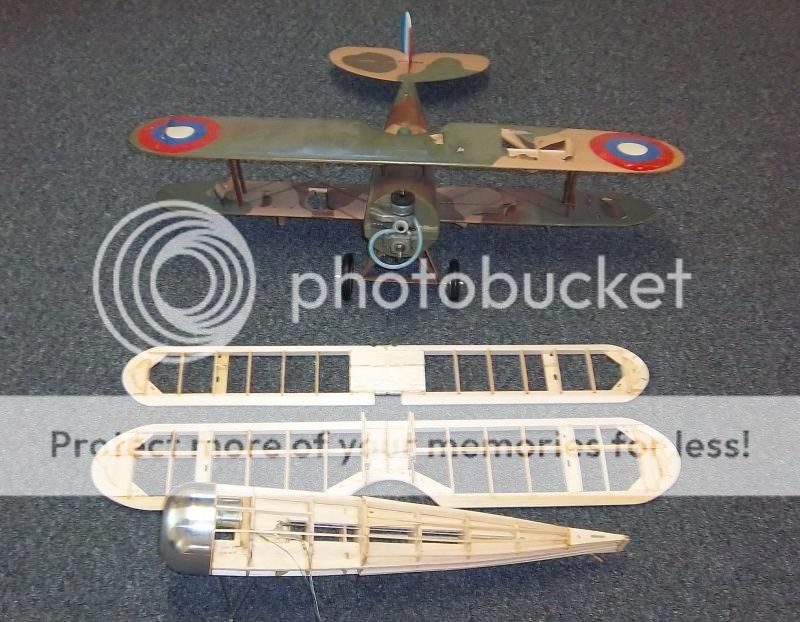
I have two more complete kits, don't know if I will ever build them though.

rsv1cox- Top Poster


Posts : 11250
Join date : 2014-08-18
Location : West Virginia
 Re: Gas tank second thoughts
I's guessing that you used a torch to solder that tank roddie instead of an iron? Puddle and paddle maybe? I used an iron to do the exhaust mainfold on the Nieuport, functional if not pretty.
Looked like small bushings on your bell crank, my eyes plays tricks on me sometimes.
Looked like small bushings on your bell crank, my eyes plays tricks on me sometimes.

rsv1cox- Top Poster


Posts : 11250
Join date : 2014-08-18
Location : West Virginia
 Re: Gas tank second thoughts
Ken Cook wrote:I've built the C-series kits from Sterling. They're actually really cool. I used silkspan on the fuse and Sig Koverall on the wings. As far as dope is concerned. I prefer Sig. I like it for a few reasons. One, it dries the slowest out of the dopes available. This allows for a easier finish using a brush and it yields a better shine. In addition, Sig Lite Coat is a very clear dope. Sig Supercoat clear is used for heavier structures and is used to shrink the covering. It keeps on shrinking with age. Lite Coat is a clear used for lightweight structures and when used as a top coat it prevents the dope from over shrinking your covering and surfaces. As I mentioned above, it also makes your colors really stand out due to it being very clear. I don't like the yellow tinge that some of the other dopes have which can really change your base coat finish. Blue tends to take on a greenish hue . Brodak sells dope as well with a lot more colors available over Sig. However, in my experience I found it works better when sprayed opposed to brushing. Brodak uses a medium drying thinner which can blush if not sprayed in the proper humidity. Best insurance against this is to use the retarder. This takes a bit of experimenting. Sig seems to be fool proof and I've brushed and sprayed Sig in some very humid conditions. Faster drying thinner traps the moisture within it when used in humid conditions thus giving the finish a extremely milkish appearance. Ken
Thanks Ken, I found Brodaks web site and they have the colors that I need to complete this Sterling Nieuport. They are rather close too, just up from us in Pa.
I looked for their Nobler kit too, always a favorite of mine but one I have never built. I'm more impressed by their "Cobra" kit though, much more streamlined than the Nobler. Problem is it's a "short kit".

rsv1cox- Top Poster


Posts : 11250
Join date : 2014-08-18
Location : West Virginia
 Re: Gas tank second thoughts
John Brodak is the owner. John is a very very nice person. If you get a chance to talk with him, by all means do so. Patty works in the hobby shop and can answer all of your needs. Seeing that you relatively close, John holds a very large contest in his backyard the week of father's day. John mentioned last year that they will only be doing this another few years. If you can make it, I highly recommend it. Your plane would fit in real nicely on the scale circle. The guys would love it. You know the old saying, the more the merrier. Ken

Ken Cook- Top Poster

- Posts : 5640
Join date : 2012-03-27
Location : pennsylvania
 Re: Gas tank second thoughts
rsv1cox wrote:I's guessing that you used a torch to solder that tank roddie instead of an iron? Puddle and paddle maybe? I used an iron to do the exhaust mainfold on the Nieuport, functional if not pretty.
Looked like small bushings on your bell crank, my eyes plays tricks on me sometimes.
:lol!:yea.. I'm 54 years old.. and just got a new eyeglass prescription. I left the new glasses on my dashboard in the sun.. and melted two holes in the dash! (just kidding.. but they're a LOT thicker than the pair I got just two years ago..
I contemplated using a torch on my tanks.. but actually used a small "pencil" type 25-30w iron. I used .022" dia. 62/36/2 Silver-bearing LEAD solder from Radio Shack.. and "Ruby-Fluid" paste flux. I also used some wood wedges/shims to hold the Copper tubes in position; where alligator-clips tended to "sink" heat away from the metals to be joined. When making the holes in the tank-body for the Copper tubes.. I drilled small (1/16" dia.) holes.. and gradually opened them up using an awl. This forms a "fillet" for solder to flow into; making a much stronger and "tighter" joint.. as well as being able to form an "angled" hole for the uni-flow vent, which runs diagonally within the tank. The tank bodies/endcaps were formed using small aluminum blocks.. and a nylon-headed hammer. The .008" Tin-sheet bends fairly easily. I didn't use any fancy seams.. just lap-joints that were fitted square and snug.. with minimal gaps. A uni-flow vented tank MUST be airtight to function properly.. so a leak test is imperative. This was done by submerging the tank with two of it's three tubes capped.. in a small glass of water, and attaching a short length of fuel line to the remaining open tube, and pressurizing it using a syringe. As I mentioned.. I found building the tanks to be very enjoyable. When you can get one to work right.. there's just something "cool-looking" about an exposed shiny-metal hard-tank on a profile model.
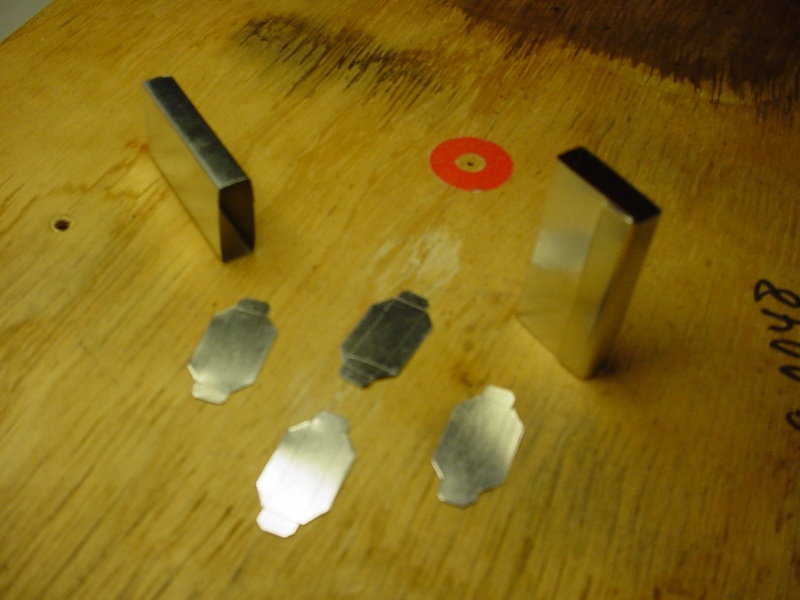
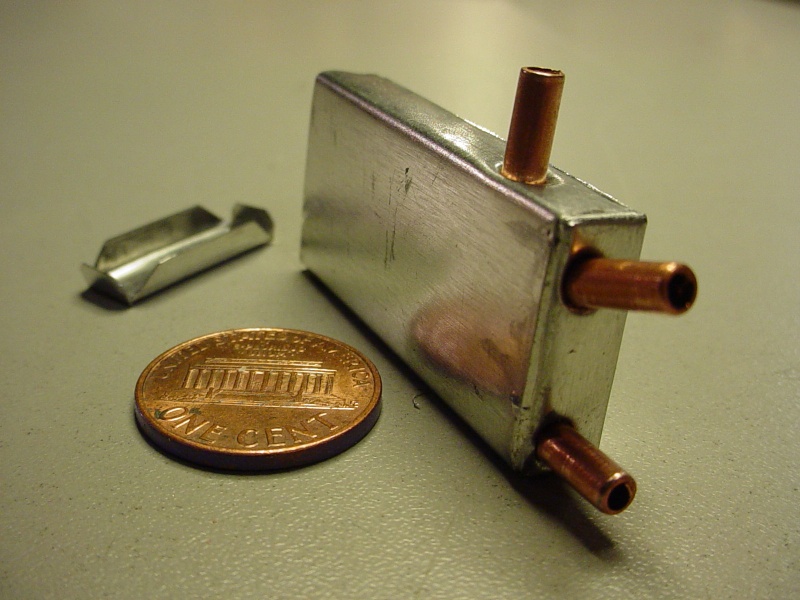
My Grumman F8F-2 "Rare-Bear" that I built for the first CEF Reed Speed Profile-Scale contest. It is shown here with the 6.15cc tank.

 Re: Gas tank second thoughts
So nice roddie. I love that "Rare bear", the unbroken line from cockpit to tail embracing the vertical stab is nothing short of fantastic. Love that plane. Also the wheels, and the applications.
I'm guessing the engine narcille is spun aluminum. How did you cut the hole for the engine? I cut holes for the engine, exhaust manifold, and needle valve on my original Nieuport and they came out perfect, but that was about 35 years ago and I have forgotten how I did it.
Now I have to cut the same holes on my "new" Nieuport and I'm searching this old gray matter for answers without joy.


rsv1cox- Top Poster


Posts : 11250
Join date : 2014-08-18
Location : West Virginia
 Re: Gas tank second thoughts
A hole saw would be a good choice running in reverse. The main thing is that you need to keep something within the cowling to prevent it from collapsing when drilling. If you can find a small can that fits tight inside the cowling it can be pushed up hard to the radius on the inside until it can't go in anymore. I generally use a pair of scribes to lay it out, I use a smaller then normal hole saw. I can then file, Dremel or do whatever I need to in order to cut back to my line. I then wrap a large cylindrical object with sandpaper glued to it to do the finish. Personally, I would cut out a U rather than a O . This allows easier engine access if need be.
Another option is to layout the cut and drill small holes as close as you can drill them together just inside the line of cut. Snips can just nibble between the holes and you will then need to clean up back to the layout line with a file of sandpaper like I mentioned. The bottom line is taking your time.
Is the Mccoy the engine of choice here? Don't make the needle valve too long by adding a extension to it. The harmonics of running usually changes your needle not to mention destroys the inside of the spraybar. The needle valve will act like a tuning fork so keeping it as small as possible is certainly a good thing. Supporting it by making it pass through the cowling via a piece of fuel tubing is also a good choice.

Ken Cook- Top Poster

- Posts : 5640
Join date : 2012-03-27
Location : pennsylvania
 Re: Gas tank second thoughts
rsv1cox wrote:So nice roddie. I love that "Rare bear", the unbroken line from cockpit to tail embracing the vertical stab is nothing short of fantastic. Love that plane. Also the wheels, and the applications.
I'm guessing the engine narcille is spun aluminum. How did you cut the hole for the engine? I cut holes for the engine, exhaust manifold, and needle valve on my original Nieuport and they came out perfect, but that was about 35 years ago and I have forgotten how I did it.
Now I have to cut the same holes on my "new" Nieuport and I'm searching this old gray matter for answers without joy.
I was writing this reply as Ken was writing his.. and some of my points are the same. (BTW.. thanks for the compliments! The cowling on my Rare-Bear is a plastic cap from an "Airwick" automatic air freshener aerosol cartridge.)
I took my measurements (with the engine mounted) from where the rear edge of the cowling would locate on the model.. forward; to the center of the engine cylinder.. and cut the two large holes I needed, using a hole-saw. I didn't do this for the needle.. because I didn't have my mind made up on the back-plate's radial orientation yet. As it was; the "cylinder's" orientation was changed from vertical to horizontal midway in the build... but this did not effect the location of the two large holes. I later "slotted" the cowling for the needle-valve and used a rubber grommet to support the needle where it exits the cowl.
My advice on your Nieuport; would be to take your measurements as I described above.. and double check them before cutting into your cowl. Cutting up a clear plastic soda-pop bottle; having a little larger diameter than your cowl's, might be a good idea. It's already "tube-shaped.. and you can cut it lengthwise to adjust it's diameter smaller to match your cowl's. Use tape to hold that diameter. Being "transparent".. you could mark exactly where the hole-centers should be.. and use those measurements. Is your planned-engine's glow-plug centered in the cylinder head? If so; mark a dot there with a sharpie pen.. and also at the needle-valve location.
As far as "cutting" the larger hole for the cylinder goes.. there's several ways you could do it. It all depends on what tools you have.. The "safest" way.. is to drill a small hole; well-inside the edge marked.. enough for a fine-toothed "coping" saw blade to fit through.. and cut just inside the line using that. Cut the blade to around 2-3" long and leave the "pins on one end. Fashion a handle from a hardwood dowel. Cut a "T-slot" into the side of the dowel at one end, for the blade and pins to lock into, and secure it with quick setting epoxy. Now you have a handy little saw that will cut a tight radius too. Finish-off to your hole's line using medium to fine sandpaper wrapped around a dowel/pipe.. slightly smaller than your hole's diameter using reciprocating strokes.. and checking the cut frequently. If you can find a large enough cardboard tube (or possibly a PVC pipe coupler) to fit just inside the cowl.. you could tape the cowl around it to help prevent deforming during the drilling/sawing processes.
This will all take some time obviously.. but if your cowl is thin-gage aluminum.. it's safer than using power tools. Hope this was of some help.
 Re: Gas tank second thoughts
An Airwick Air Freshener bottle, who would have guessed.... Sounds like a great name for an airplane Airwick.
Either way it's a beautiful model.
Either way it's a beautiful model.

rsv1cox- Top Poster


Posts : 11250
Join date : 2014-08-18
Location : West Virginia
 Re: Gas tank second thoughts
rsv1cox wrote:An Airwick Air Freshener bottle, who would have guessed.... Sounds like a great name for an airplane Airwick.
Either way it's a beautiful model.
Thanks VERY much! I find the building process to be the most enjoyable. Maybe because 1/2A models are so small.. it's the challenge of making things work in small scale to achieve the look and performance of a larger model that I enjoy so much. That's really what it is. If they made a controllable "pocket" airplane.. I'd probably want to attempt to build one. Years ago.. I bought some model stuff from a guy who had impeccably built a tiny low-wing 1/4A (?) R/C scale model.. I want to say it was a "Harvard" or a PT19... It was blue and yellow.. built-up construction throughout.. with about a 14-16" w/s.. hinged ailerons, elev./rudder (with accessible linkages) and a Cox Tee Dee .010 for power. He told me that he knew that someday there'd be a small enough radio system for it. At that time (1993?) nano-servos weren't commonly available...and Lipo packs for models didn't exist. I should try to contact him again.. (it's been 20+ years..) because it was a model for the future.. and he knew it. I could totally imagine it now as a functional flying R/C micro Pylon-racer! BTW.. there's some WICKED video here on the forum of a "slightly" larger "screamer" of an R/C model.. powered by a massaged Cox Conquest .15 that's just amazing to watch!
This is a link to the thread.. "Old Dad" is the builder/pilot.. and he's the original poster.
https://www.coxengineforum.com/t6588-conquest-powered-cosmic-wind-electric-to-glow-conversion-ha?highlight=conquest+++15
and here's the same pilot flying his Conquest .15 powered Sig "Wonder".. (I like this vid.. because you can hear that awesome screamer of an engine!!
Page 1 of 2 • 1, 2 
 Similar topics
» Scientific P-40 Red Tiger
» Cox bee tank extenders
» Drone registration
» NZ here we come.
» Me and the Bean (progress!)
» Cox bee tank extenders
» Drone registration
» NZ here we come.
» Me and the Bean (progress!)
Page 1 of 2
Permissions in this forum:
You cannot reply to topics in this forum

 Rules
Rules


