Log in
Search
Latest topics
» Landing-gear tipsby roddie Today at 6:17 pm
» Roger Harris revisited
by TD ABUSER Today at 2:13 pm
» Tee Dee .020 combat model
by Ken Cook Today at 1:41 pm
» Retail price mark-up.. how much is enough?
by Ken Cook Today at 1:37 pm
» Happy 77th birthday Andrew!
by getback Today at 11:52 am
» My latest doodle...
by roddie Today at 10:43 am
» My N-1R build log
by GallopingGhostler Yesterday at 3:04 pm
» Chocolate chip cookie dough.........
by roddie Yesterday at 1:13 pm
» Purchased the last of any bult engines from Ken Enya
by sosam117 Yesterday at 11:32 am
» Free Flight Radio Assist
by rdw777 Yesterday at 9:24 am
» Funny what you find when you go looking
by rsv1cox Wed Nov 20, 2024 3:21 pm
» Cox NaBOO - Just in time for Halloween
by rsv1cox Tue Nov 19, 2024 6:35 pm
Cox Engine of The Month
049 reed valve venturi throttle
Page 1 of 1
 049 reed valve venturi throttle
Hi all,
"Ace RC" used to sell a throttle for the baby bee, designed by "Ralph Cooney"... If you fly RC... you can simply make one yourself; as they are no longer available. Items needed: a pc. of .062" (1/16") hard music wire (common to our hobby and gen. available) approx. 1.5"L. and a Cox 049 Baby Bee reed valve engine.
Tools required: Safety glasses, a sewing needle or sharp pin, an elec. drill, a vise, a dremel rotary-tool with non-reinforced cut-off wheel/mandrel, a sm. metal file and sandpaper.
Wear your safety glasses... and cut music wire to 1.5"L. (cut several pcs.) and deburr all of them. "Chuck" one pc. in your elec. drill 1/2 way. (make sure the music wire is straight and spins true) Clamp your Dremel tool in a vise (soft jaws) and run both; drill and Dremel at moderate speeds. While holding your drill steadily; move it slowly toward the "side" of the dremel's cut-off wheel. Using very light pressure; grind a blunt (not pointed) taper approx. 3/8"L. This will be your needle's profile. Light pressure... or you will shatter the cut-off wheel. Make a few more... and then sand the tapers with sandpaper while spinning ea. in the drill.
Using the sewing needle/sharp pin, remove the venturi screen from the engine's backplate. (no engine disassembly is required) This exposes the venturi for your needle to enter.
The Ace kit came with a "centering guide" for the needle... but you can incorporate a guide into your model's firewall by marking the 4 engine mounting holes and drawing an "X" diagonally through them. (the venturi hole is on center with the mounting hole pattern) Drill through the center of the "X" mark with a 1/16" drill bit or "slightly" larger; considering factors such as engine mount offset and thickness of firewall beforehand.
Linking to a "nano-servo" is simple straight forward. I used a 1/2"L. pc. of sm. silicone fuel line in between the needle and servo linkage for adjustability.
A muffler helps with low idle.
This is very lightweight and simple... and it gives you the advantage of "throttling down"/stopping the engine. Nothing worse than having to "fly out" a tank of fuel if a problem arises.
video attached... Muffler is my design. A servo would have made the transitions smoother, and note that the glow driver is attached throughout the test.
Last edited by roddie on Wed Sep 25, 2013 8:44 pm; edited 3 times in total (Reason for editing : addl. info. pic of engine/muffler)
 Re: 049 reed valve venturi throttle
Nice work! Thank you for posting the details. By chance, do you have any tach numbers?
Thanks,
KP
Thanks,
KP
kpriddle- Bronze Member

- Posts : 35
Join date : 2012-05-29
Location : Maine
 Re: 049 reed valve venturi throttle
That's a pretty cool muffler, nice work.
My shockwave crashed about the time you were trying to tell the wife what you were doing. I'm making a Movie, honey!
Gotta go. I'll come back this evening and watch the whole thing. Finally somebody besides me that narrates their videos.
Rusty
My shockwave crashed about the time you were trying to tell the wife what you were doing.
 I'm making a Movie, honey!
Gotta go. I'll come back this evening and watch the whole thing. Finally somebody besides me that narrates their videos.
Rusty
_________________
Don't Panic!
...and never Ever think about how good you are at something...
while you're doing it!
My Hot Rock & Blues Playlist
...and never Ever think about how good you are at something...
while you're doing it!
My Hot Rock & Blues Playlist

RknRusty- Rest In Peace

- Posts : 10869
Join date : 2011-08-10
Age : 68
Location : South Carolina, USA
 Re: 049 reed valve venturi throttle
That is food for thought, I must try that out. Very neat slow running.
Do you turn down the voltage to avoid burning the plug out?
Do you turn down the voltage to avoid burning the plug out?

ian1954- Diamond Member

- Posts : 2688
Join date : 2011-11-16
Age : 70
Location : England
 Re: 049 reed valve venturi throttle
very cool,i just might have to see if i can do that,do you have any close up photos of the building process 



bullit132- Gold Member

- Posts : 197
Join date : 2013-04-11
Age : 63
Location : charleston,sc
 Re: 049 reed valve venturi throttle
will it run without the glow head clip hooked up?

looperdude- Silver Member

- Posts : 83
Join date : 2013-07-30
Age : 26
Location : High Point. NC
 Re: 049 reed valve venturi throttle
I got one of the Ace throttles in a lot of engine parts a while back, was going to sell it but my cat ripped the bag all up.
The parts are all there, if anyone can use it Ill send it for cost of postage.
The throttle is off to bullit123, but more are hidden on eBay in a parts lot.
The parts are all there, if anyone can use it Ill send it for cost of postage.
The throttle is off to bullit123, but more are hidden on eBay in a parts lot.
Last edited by crankbndr on Mon Aug 26, 2013 4:15 pm; edited 2 times in total

crankbndr- Top Poster

- Posts : 3109
Join date : 2011-12-10
Location : Homestead FL
 Re: 049 reed valve venturi throttle
Forgive me for asking the question I did in my first post. I didn't watch all of your video before yapping. 2,900 RPM is darn impressive!
KP
KP

kpriddle- Bronze Member

- Posts : 35
Join date : 2012-05-29
Location : Maine
 Re: 049 reed valve venturi throttle
Thanks Rusty. Yes... even "with" the muffler, she thought it was too loud.RknRusty wrote:That's a pretty cool muffler, nice work.
My shockwave crashed about the time you were trying to tell the wife what you were doing.I'm making a Movie, honey!
Gotta go. I'll come back this evening and watch the whole thing. Finally somebody besides me that narrates their videos.
Rusty
BTW... the muffler consists of a pc. of aluminum tubing lg. enough (in i.d.) to fit over the glowhead (approx. 7/8") and about 3/8"L. with a 1/4" hole drilled in it's side. Through this side-hole, I installed a "header pipe" which is merely a .22cal. shell casing. The flange (flare) on the shell casing holds it in place on the inside. What holds it all together are 2 discs (2.5" in dia.) of bicycle tire inner-tube. I punched out 1/2" dia. holes in the centers of ea. and "stapled" the discs together 3/4 of the way around; leaving room for the "header pipe" to exit. The aluminum "ring" is then inserted/sandwiched (just "stretch it open" a little...) in between the two discs with the ring's side-hole aligned with where the discs "aren't" stapled (for the header pipe/shell casing to exit) Install the header pipe from the inside and you have a muffler/silencer, that "pushes right on" over the cylinder, without any engine disassembly... and does not impede needle valve adjustments. It's a "red neck" design... but it's cheap and effective. You can experiment with dif. sz./amt. of header pipes too.
Thanks for your interest Rusty!
 Re: 049 reed valve venturi throttle
Hello Ian,ian1954 wrote:That is food for thought, I must try that out. Very neat slow running.
Do you turn down the voltage to avoid burning the plug out?
The glow driver was running in the "green" on the meter during the vid. I kept the "juice on" because I knew I'd be re-starting the engine while trying to reach a "consistent" low idle for the video.
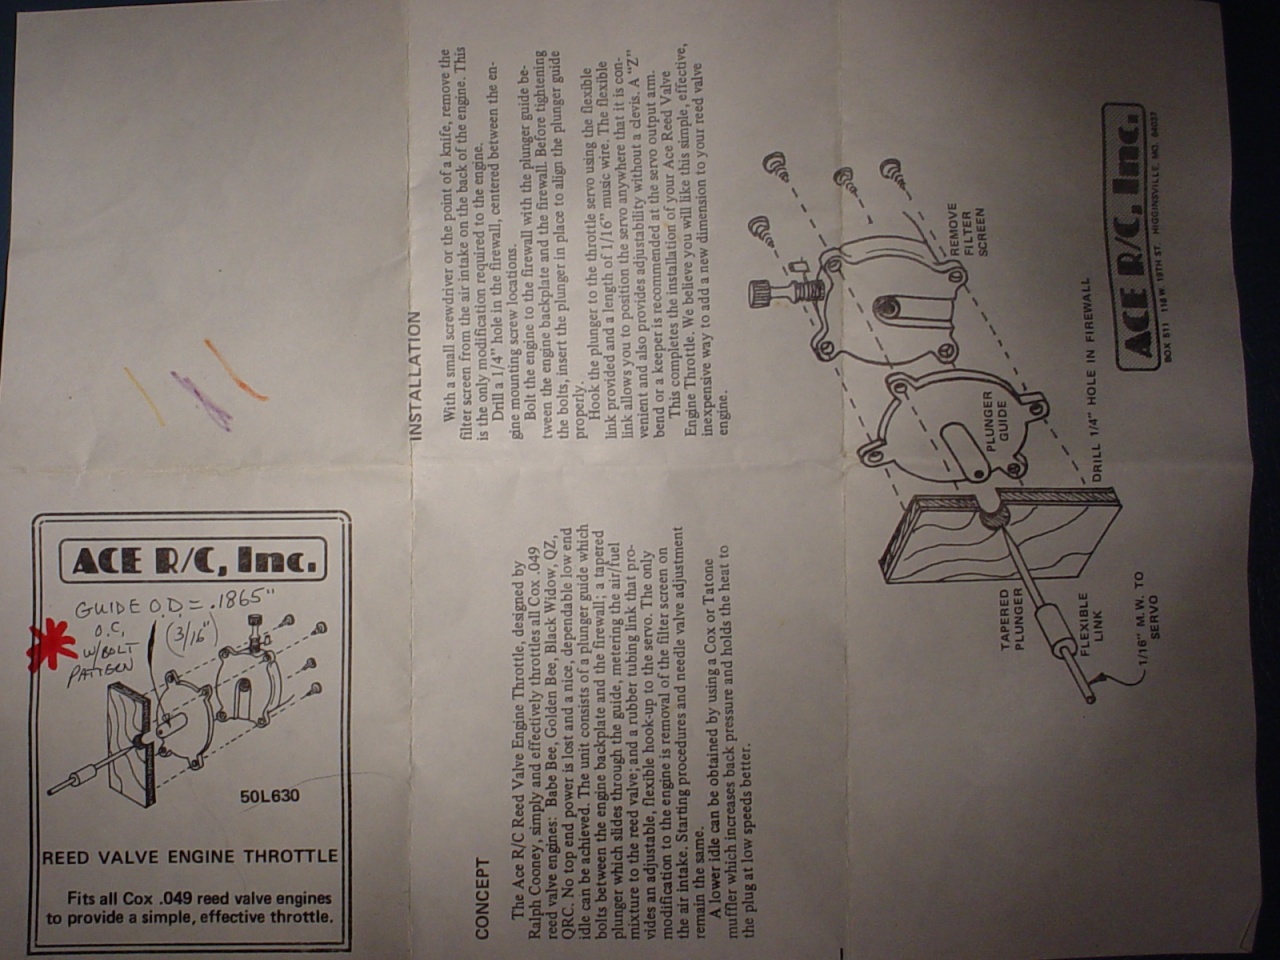
The "instructions" that came with the Ace RC (p/n 630) reed valve engine throttle state; "A lower idle can be obtained by using a Cox or Tatone muffler which increases back pressure and holds the heat to the plug at low speeds better." I assume this to be correct; although I haven't tried either of those. I make my own mufflers which seem to work well with this throttle.
I have "bench-ran" this throttle/muffler set-up with a servo connected and without the glow driver connected... it put a smile on my face!
Thanks for your interest... and good luck!
Roger
 Re: 049 reed valve venturi throttle
[img]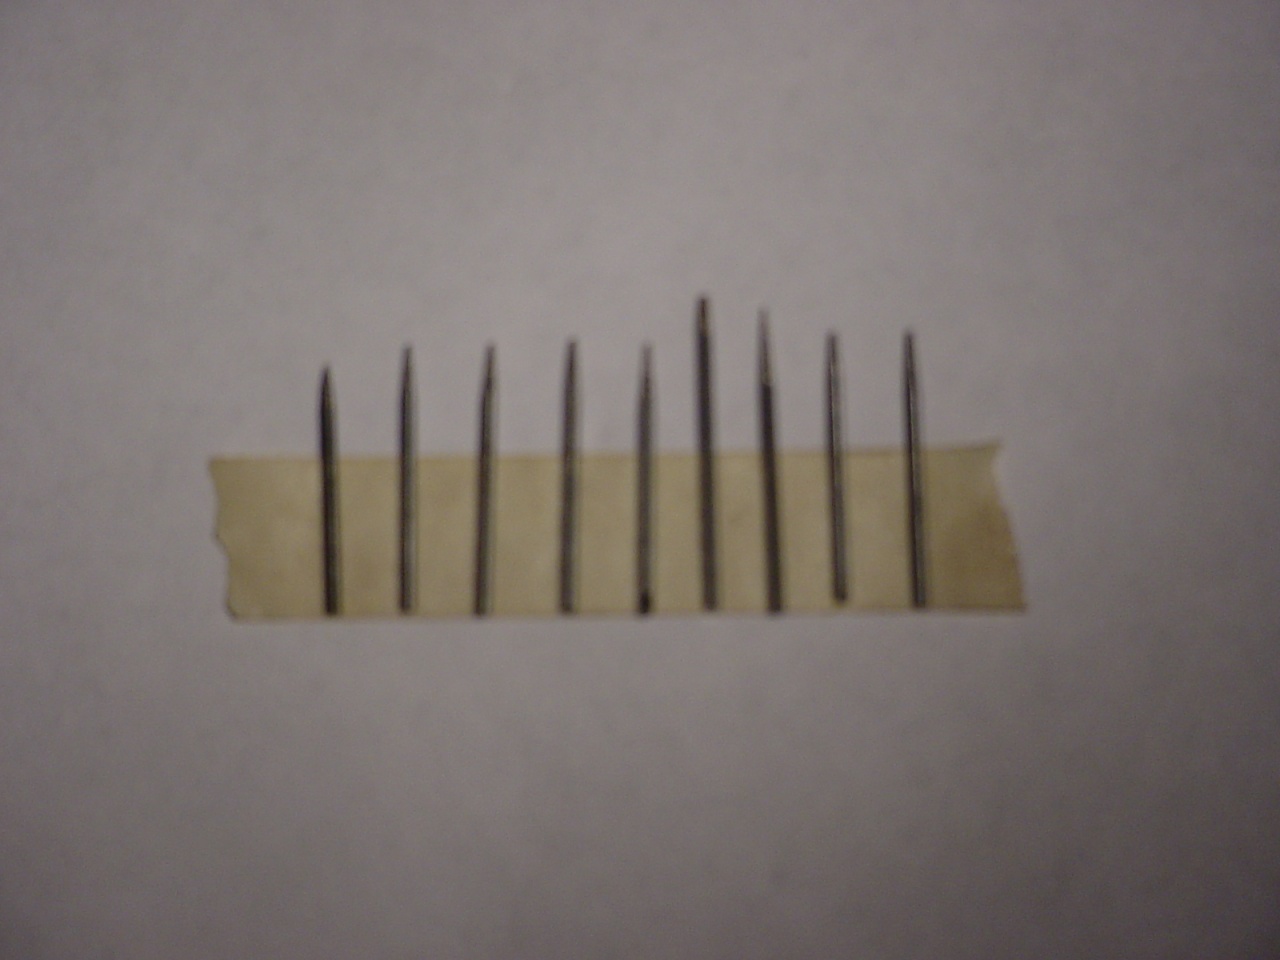 [/img]
 " />
" />
 " />
" />
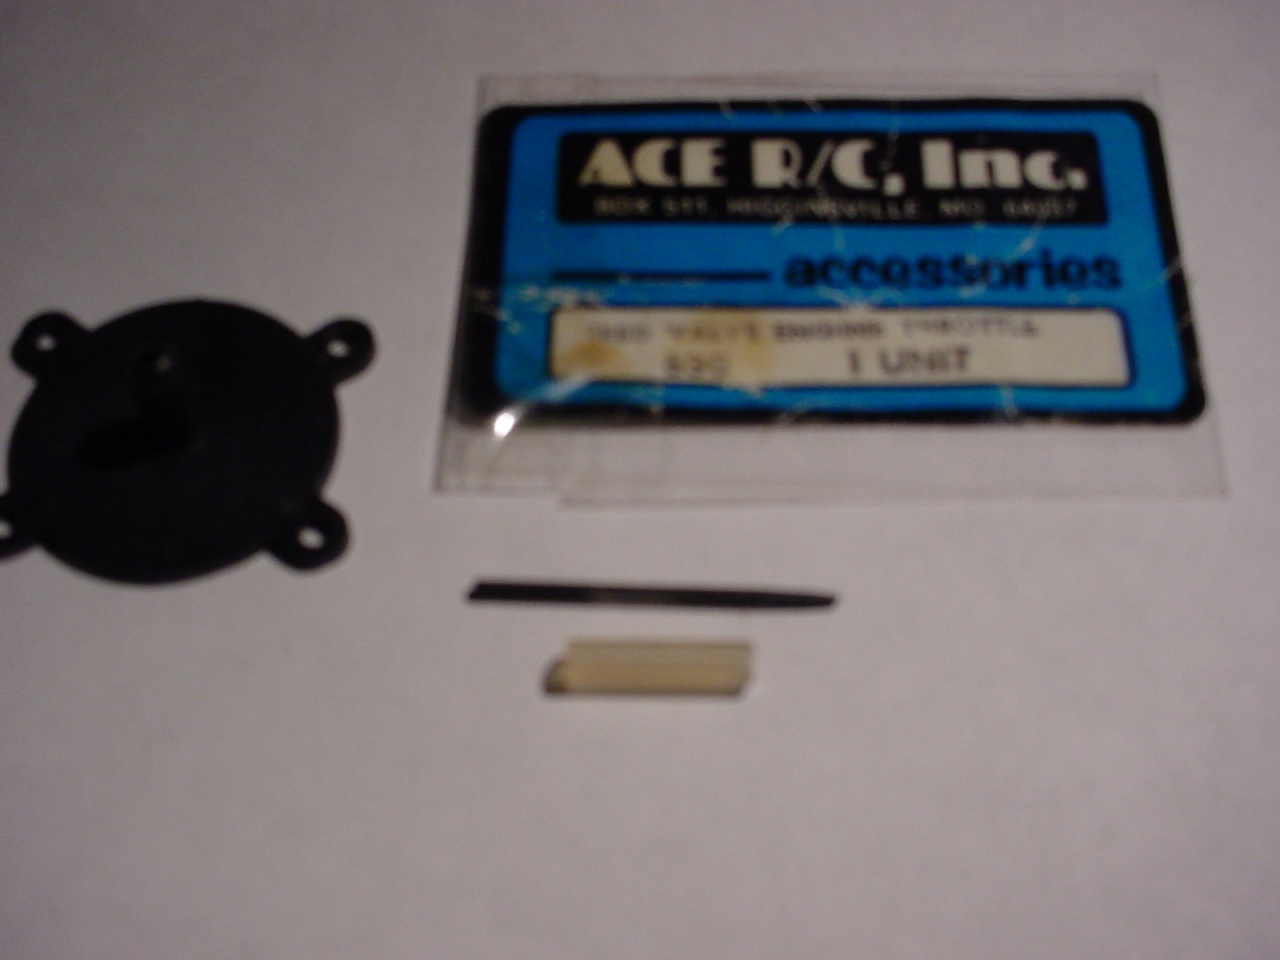
I don't have any photos/vids of how I fabricated my needles... but I can shoot a photo of the Ace throttle kit parts/instructions if that helps. Although I went into detail on my orig. post on this topic, it's quite easy to make a needle. It's function is to simply meter fuel/air through the back of the venturi... and even a "crude" taper on the end of the 1/16" music wire will produce results.
I should note that you need to use a Baby Bee/Golden Bee type engine with integral tank/metal backplate for this... NOT a prod. engine with plastic backplate. If you have both type engines and the "Bee" is worn out/for parts; you can swap it's tank/backplate to your prod. engine. I have several Cox "Bee's" and lots of parts. One of my backplates' venturi holes is smaller than the others... and the music wire won't fit "through it". Check yours before you try to do anything. This condition can still work though... you just need to grind the needles "taper" to fit. DON'T try drilling out the backplate... this could/will produce a "burr" where the fuel enters the venturi.
And don't forget... the use of a muffler is recommended for this application; to increase back pressure and keep the glowplug HOT at lower engine speeds.
Thanks for your interest,
Roger
 [/img]
 " />
" /> " />
" />Hello bullit,bullit132 wrote:very cool,i just might have to see if i can do that,do you have any close up photos of the building process
I don't have any photos/vids of how I fabricated my needles... but I can shoot a photo of the Ace throttle kit parts/instructions if that helps. Although I went into detail on my orig. post on this topic, it's quite easy to make a needle. It's function is to simply meter fuel/air through the back of the venturi... and even a "crude" taper on the end of the 1/16" music wire will produce results.
I should note that you need to use a Baby Bee/Golden Bee type engine with integral tank/metal backplate for this... NOT a prod. engine with plastic backplate. If you have both type engines and the "Bee" is worn out/for parts; you can swap it's tank/backplate to your prod. engine. I have several Cox "Bee's" and lots of parts. One of my backplates' venturi holes is smaller than the others... and the music wire won't fit "through it". Check yours before you try to do anything. This condition can still work though... you just need to grind the needles "taper" to fit. DON'T try drilling out the backplate... this could/will produce a "burr" where the fuel enters the venturi.
And don't forget... the use of a muffler is recommended for this application; to increase back pressure and keep the glowplug HOT at lower engine speeds.
Thanks for your interest,
Roger
Last edited by roddie on Tue Aug 20, 2013 5:46 pm; edited 3 times in total (Reason for editing : insert pics of Ace RC reed valve throttle instruction page and homemade needles)
 Re: 049 reed valve venturi throttle
Hello looperdude,looperdude wrote:will it run without the glow head clip hooked up?
Yes... See my reply to "Ian" regarding your question. To expand on this; Use FRESH fuel and a muffler. I was using Sig Champion 25 fuel and a Cox grey 6 x 3 prop in the vid.
Thanks for your interest,
Roger
Last edited by roddie on Sun Aug 25, 2013 11:26 am; edited 2 times in total (Reason for editing : I mis-stated prop size again... it)
 Re: 049 reed valve venturi throttle
Hello KP,kpriddle wrote:Forgive me for asking the question I did in my first post. I didn't watch all of your video before yapping. 2,900 RPM is darn impressive!
KP
No worries!!! I've had that vid posted on YouTube for a year now, and not one comment there. Your comments are MORE than welcome!!!
When I first tried the throttle, I was amazed. There are others I've seen recently; for the prod. engines, but this approach appears to be the lightest as far as weight is concerned. With the new generation "nano" servos and LiFe receiver packs; it's now possible to build a nice little half-A "throttled" R.O.G. gas plane for RC.
"Thanks" for your interest,
Roger
 "Ace" style venturi throttle-note
Thanks much; to all of you who showed interest in this topic! I appreciate it very much. YouTube wasn't showing me any "love" LOL
A note worth mentioning... As I stated in the orig. post; The only modification to the engine is the removal of the tiny mesh screen on the backplate. This is for "Bee" type metal backplates only... NOT the plastic one's used on prod. engines. Also; the screen is there for a reason... to keep dirt out. Removing it makes the venturi vulnerable to dirt entering... which you DON'T want. A pc. of even the tiniest grit between the reed and seat will cause erratic engine operation. To prevent this; a small pc. (1" sq.) of polyurethane "air conditioner filter" mat'l. is placed between the engine and firewall. The polyurethane is impervious to glow fuel, and the needle will pass right through it.
I also use this filter mat'l. as a "cushion" for my wedge style fuel tanks when flying C/L, to prevent "fuel foaming" from vibration.
Finally... a "muffler" of some sort (I make my own) is recommended for this type of throttle; to produce back pressure and hold heat to the glow plug at lower engine speeds.
Roger
 Re: 049 reed valve venturi throttle
PM sent to crankbndr for the throttle system.
Shawn
Shawn

sdjjadk- Platinum Member

- Posts : 640
Join date : 2012-04-07
Location : Southern Maryland
 Re: 049 reed valve venturi throttle
Shawn, if you can't find the Ace kit on ebay (I believe that "CrankBender's" orig. Ace kit went to member "Bullit 132") you can simply "make" the needle... You need a pc. of .062" dia. (1/16") hard music wire; which "is" the main component... cut to about 1-1/4"L. "Taper" one end; from about a 1/4 of an inch from the end... down to 1/2 the dia. (.031") "at" the end; by "chucking" in an elec. drill and "pinching" the exposed end of the wire with fine sandpaper; while running the drill. (use gloves or pliers... it will take a while... and it WILL get HOT!) or run a belt sander/D.A. sander/grinding wheel; while running the drill at a slight angle to the face of the abrasive. A "consistent smooth taper" is desired... BUT... even a "crude" taper will produce results in throttle transition.sdjjadk wrote:PM sent to crankbndr for the throttle system.
Shawn
I measured the needle that comes in the orig. Ace kit, with a precision vernier caliper... The needle is made from .062" dia. music wire... is 1.187"( 1-3/16") long... has a 1/4"L. taper... and is .031" (1/32") at it's "rounded blunt" point. Shoot for "close" to these dimensions if you make a needle.
When the needle slides into the backplate's venturi hole "past the taper"... it will completely restrict the venturi hole and stop the engine quickly, from lack of air... therefore; you can set a throttle servos' "trim" to adjust for this point. You can set a "low idle speed" of whatever low rpm# you can "consistently" achieve; using a muffler... and then "trim" the servo (i.e. after landing) to stop the engine.
Linking to a servo is achieved by using a short length (5/8") of sm. silicone fuel tubing placed over the needles' other "un-tapered" end... (a drop of solder on this end of the needle, is a good idea to hold the fuel tubing in place). Connect the other end of the fuel tubing to a clevis; with a 3/4"L. pc. of 2-56 threaded rod; CA glued into the clevis, to keep it from turning "in" or "out" from vibration. You want "zero-slop" in this connection... and you don't want the fuel tubing to "slip"... yet... with this arrangement; it can be "fine-tuned" for length-of-travel; by gently pulling/pushing either; the "needle" or the "threaded rod" in or out of the fuel tubing; which acts as a "flexible" coupling. (Ace RC supplied/recommended the "fuel tubing coupling" in their kit)
One further note: This throttle concept was primarily designed for 1/2-A RC ships; utilizing a "built-up" fuselage and a dedicated throttle servo. A little experimentation could produce a C/L 3-line "carrier" model; by designing the proper firewall with space rearward for the needle/linkage to travel and placing a 1/16" wheel retainer/collar; as a "stop" on the needles' "shaft"... adjusted for slowest practical engine speed. The extreme "opposite direction of travel" (i.e. needle completely "out" of the back-plate/venturi opening) yields w.o.t. operation. A 3rd line, sm. 90 deg. bellcrank, and lightweight spring/linkage is all you need. "Fail-safe" it for w.o.t. where "pulling on the 3rd line" tensions the spring to slow the engines' speed.
A half-A Carrier model was built; using "Bernie's" throttle... on "Duke Johnson's" model... see this thread:
https://www.coxengineforum.com/t3865p20-throttle-backplate?highlight=throttle
If you have any questions whatsoever Shawn... I'll be glad to help you.
Roger
Last edited by roddie on Tue Aug 27, 2013 12:31 am; edited 2 times in total (Reason for editing : 3rd line "fail-safe" note)
 throttle-stop
An old thread here... but I continue to mess around with this throttle design. During bench-tests; I'd been opening/closing the throttle manually. This makes it difficult to achieve a consistent low-idle speed.
The plunger-needle is made from 1/16" diameter music-wire with a taper ground on the end that enters the engine's air-intake. A 1/2A wheel-collar/retainer can be used as a "stop" to set a low idle-speed. A servo-saver can and should be used for a final installation in a model. That would be the simple way to set up this throttle. One could alternately omit the throttle-stop.. and use "trim-function" on the throttle-channel on their transmitter to further advance the plunger "in".. to kill the engine if they wanted.
Here's two examples using a spring-style wheel retainer.. and a set-screw type wheel-collar made for 1/16" diameter music-wire. (shown below; passing through the firewall of my jet-pump test fixture.)


I'll make a vid.. and post here to show the function soon.
The plunger-needle is made from 1/16" diameter music-wire with a taper ground on the end that enters the engine's air-intake. A 1/2A wheel-collar/retainer can be used as a "stop" to set a low idle-speed. A servo-saver can and should be used for a final installation in a model. That would be the simple way to set up this throttle. One could alternately omit the throttle-stop.. and use "trim-function" on the throttle-channel on their transmitter to further advance the plunger "in".. to kill the engine if they wanted.
Here's two examples using a spring-style wheel retainer.. and a set-screw type wheel-collar made for 1/16" diameter music-wire. (shown below; passing through the firewall of my jet-pump test fixture.)


I'll make a vid.. and post here to show the function soon.
 Re: 049 reed valve venturi throttle
Just a heads up that we have been stocking the "Ace" throttle since 2015: https://coxengines.ca/back-end/throttle-for-cox-049-engine-bee-style.html
 Similar topics
» Venturi Size .049
» Ace Cox Reed Valve Throttle
» What's the Best Reed for Cox Reed Valve Engines.
» Babe Bee venturi throttle
» Tee Dee Throttle Bodies and Venturi
» Ace Cox Reed Valve Throttle
» What's the Best Reed for Cox Reed Valve Engines.
» Babe Bee venturi throttle
» Tee Dee Throttle Bodies and Venturi
Page 1 of 1
Permissions in this forum:
You cannot reply to topics in this forum

 Rules
Rules


