Log in
Search
Latest topics
» My N-1R build logby roddie Today at 12:32 am
» Happy 77th birthday Andrew!
by akjgardner Today at 12:27 am
» TEE DEE Having issues
by TD ABUSER Yesterday at 9:43 pm
» Landing-gear tips
by roddie Yesterday at 6:17 pm
» Roger Harris revisited
by TD ABUSER Yesterday at 2:13 pm
» Tee Dee .020 combat model
by Ken Cook Yesterday at 1:41 pm
» Retail price mark-up.. how much is enough?
by Ken Cook Yesterday at 1:37 pm
» My latest doodle...
by roddie Yesterday at 10:43 am
» Chocolate chip cookie dough.........
by roddie Fri Nov 22, 2024 1:13 pm
» Purchased the last of any bult engines from Ken Enya
by sosam117 Fri Nov 22, 2024 11:32 am
» Free Flight Radio Assist
by rdw777 Fri Nov 22, 2024 9:24 am
» Funny what you find when you go looking
by rsv1cox Wed Nov 20, 2024 3:21 pm
Cox Engine of The Month
Power Pod for my 3-Meter Bird of Time Sailplane
Page 1 of 1
 Power Pod for my 3-Meter Bird of Time Sailplane
I was gonna copy Travis on the details of the engine pod I made for my 3 Meter Bird of Time Sailplane, but decided to just post it here in case someone else could also make use of it. So far, I've used it equipped with Medallion and Olympic .15's (which pull it to altitude with authority, even when packing cameras), and my trio of Cox RR-1's.
Enlarging the drawing to get the tips of the base 5 1/2 inches apart will get you the size I use on the Big B.O.T.
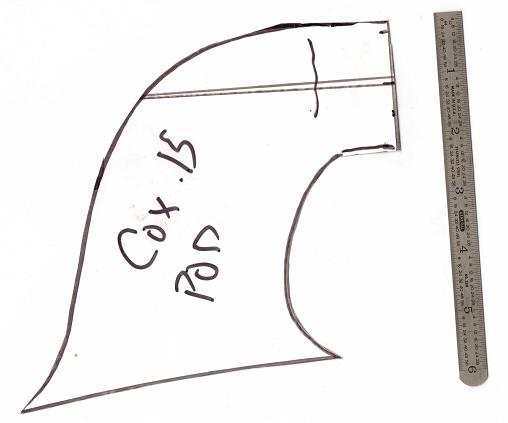
The skins are 1/16th ply, as are the base plates, and have been plenty strong for their purpose.
The core is 1/2" balsa (a great opportunity to use up stray chunks of balsa that are bouncing around in the bottom of your scrap box). You can use odd-shaped pieces arranged to fit closely together and epoxied to the left skin. Let them extend beyond the ply side and, then trim them back when it's all glued together. The top engine bearer contours to the shape of the top of the pylon.

I moved the pylon back to provide elbow room for all the cameras I'd intended the B.O.T. to carry. It could be redesigned and moved forward, but I often fly it with the cameras replaced by ballast, and have had extended thermaling flights right at the limits of my eyesight. I don't know the angle of the engine verses the wing, but just employed TLAR (That Looks About Right) principles which have mostly served me well over the decades. Besides, I believe that is why God created elevator trim !
The rear of the pylon is secured by the stock wing bolts that come with the kit. The base is cut out to accept the ply plate on the top of the trailing edge, with another piece of ply capping it.
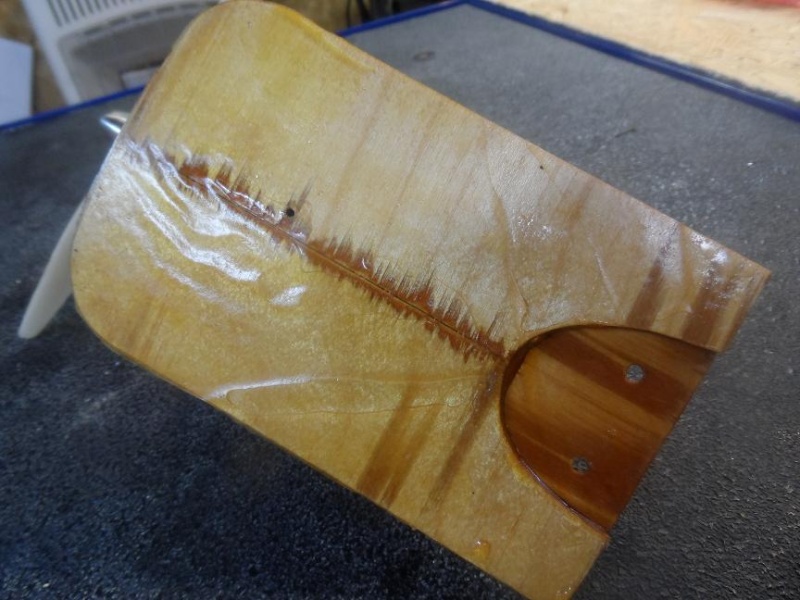
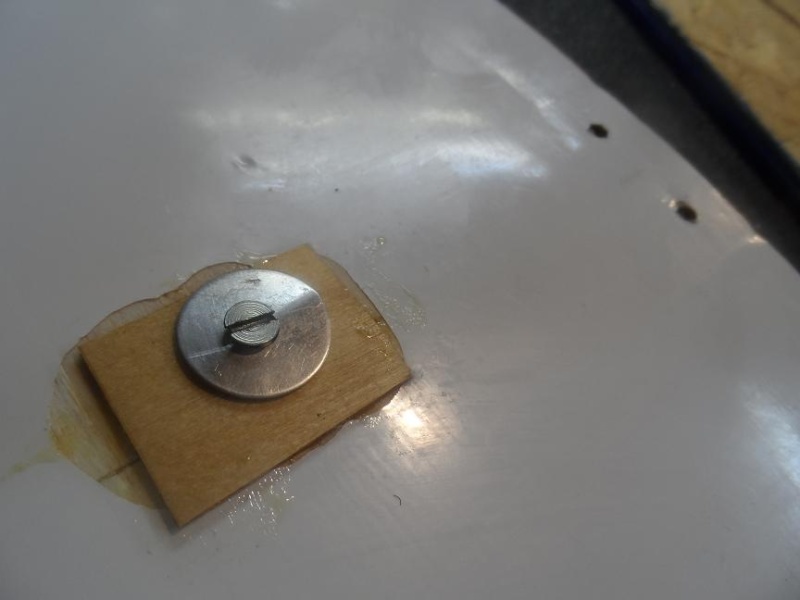
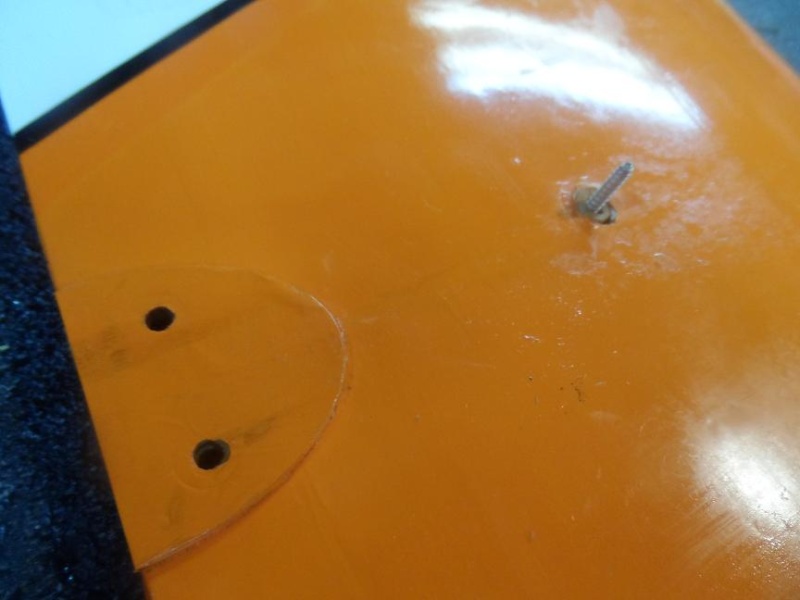
The front is secured by internally epoxying a dowel to the side of the wing's center ribs, with a hole large enough for a wood screw long enough to pass through and catch the pylon base (probably be a good idea to imbed a receiving dowel here, but I haven't done it yet). It's capped on the bottom with a piece of ply, and uses a slightly bent fender washer to match the wing's dihedral. (make sure that this will all fit inside the B.O.T.'s narrow fuse opening.)
Of course, the whole thing can be "prettied up" with some paint and streamlining instead of troweling on epoxy and hanging the tank out in the breeze with rubber bands, but I like seeing the wood, and getting at the tank and other stuff with ease.

Enlarging the drawing to get the tips of the base 5 1/2 inches apart will get you the size I use on the Big B.O.T.

The skins are 1/16th ply, as are the base plates, and have been plenty strong for their purpose.
The core is 1/2" balsa (a great opportunity to use up stray chunks of balsa that are bouncing around in the bottom of your scrap box). You can use odd-shaped pieces arranged to fit closely together and epoxied to the left skin. Let them extend beyond the ply side and, then trim them back when it's all glued together. The top engine bearer contours to the shape of the top of the pylon.

I moved the pylon back to provide elbow room for all the cameras I'd intended the B.O.T. to carry. It could be redesigned and moved forward, but I often fly it with the cameras replaced by ballast, and have had extended thermaling flights right at the limits of my eyesight. I don't know the angle of the engine verses the wing, but just employed TLAR (That Looks About Right) principles which have mostly served me well over the decades. Besides, I believe that is why God created elevator trim !
The rear of the pylon is secured by the stock wing bolts that come with the kit. The base is cut out to accept the ply plate on the top of the trailing edge, with another piece of ply capping it.

The front is secured by internally epoxying a dowel to the side of the wing's center ribs, with a hole large enough for a wood screw long enough to pass through and catch the pylon base (probably be a good idea to imbed a receiving dowel here, but I haven't done it yet). It's capped on the bottom with a piece of ply, and uses a slightly bent fender washer to match the wing's dihedral. (make sure that this will all fit inside the B.O.T.'s narrow fuse opening.)


Of course, the whole thing can be "prettied up" with some paint and streamlining instead of troweling on epoxy and hanging the tank out in the breeze with rubber bands, but I like seeing the wood, and getting at the tank and other stuff with ease.


Kim- Top Poster


Posts : 8625
Join date : 2011-09-06
Location : South East Missouri
 Re: Power Pod for my 3-Meter Bird of Time Sailplane
Wow what a great in-flight photo, not to mention countryside

daddyo- Gold Member

- Posts : 139
Join date : 2012-11-26
Age : 56
Location : California
 Re: Power Pod for my 3-Meter Bird of Time Sailplane
I'd like to see the camera mount too, please.
Phil
Phil

pkrankow- Top Poster

- Posts : 3025
Join date : 2012-10-02
Location : Ohio
 Re: Power Pod for my 3-Meter Bird of Time Sailplane
Thank You! It's a frame-capture from one of those tiny, High Def Key Chain Video Cameras.

Kim- Top Poster


Posts : 8625
Join date : 2011-09-06
Location : South East Missouri
 Re: Power Pod for my 3-Meter Bird of Time Sailplane
pkrankow wrote:I'd like to see the camera mount too, please.
Phil
Sorry I missed your post Phil,
Here are photos of the camera I used to get the inflight photo. It's mounted to an Icon servo, which is in turn mounted to an aluminum arrow shaft. The servo is plugged into the unused throttle channel on my transmitter.
Of course, the plane has to be balanced back to it's original CG ( I use small ziplock bags with lead shot, taped where they are needed). Another caution is to make sure that the wing structure will not twist under the load of the shaft and camera.


Kim- Top Poster


Posts : 8625
Join date : 2011-09-06
Location : South East Missouri
 Re: Power Pod for my 3-Meter Bird of Time Sailplane
That is really neat! Simple too.
Phil
Phil

pkrankow- Top Poster

- Posts : 3025
Join date : 2012-10-02
Location : Ohio
 Similar topics
» Top Flight 3 Meter "Bird of Time" Sailplane & Cox Medallion .15
» Bad Day for the B.O.T. (Bird of Time Sailplane)
» Link to video of Cox .15-powered "Bird of Time" sailplane.
» GoPro Camera on My 3 Meter Bird of Time....
» An Evening Flight of my 2-Meter Bird of Time back in 2017
» Bad Day for the B.O.T. (Bird of Time Sailplane)
» Link to video of Cox .15-powered "Bird of Time" sailplane.
» GoPro Camera on My 3 Meter Bird of Time....
» An Evening Flight of my 2-Meter Bird of Time back in 2017
Page 1 of 1
Permissions in this forum:
You cannot reply to topics in this forum

 Rules
Rules


