Log in
Search
Latest topics
» Cox films/videos...by Coxfledgling Today at 4:46 am
» Purchased the last of any bult engines from Ken Enya
by Coxfledgling Today at 4:18 am
» My N-1R build log
by roddie Today at 12:32 am
» Happy 77th birthday Andrew!
by akjgardner Today at 12:27 am
» TEE DEE Having issues
by TD ABUSER Yesterday at 9:43 pm
» Landing-gear tips
by roddie Yesterday at 6:17 pm
» Roger Harris revisited
by TD ABUSER Yesterday at 2:13 pm
» Tee Dee .020 combat model
by Ken Cook Yesterday at 1:41 pm
» Retail price mark-up.. how much is enough?
by Ken Cook Yesterday at 1:37 pm
» My latest doodle...
by roddie Yesterday at 10:43 am
» Chocolate chip cookie dough.........
by roddie Fri Nov 22, 2024 1:13 pm
» Free Flight Radio Assist
by rdw777 Fri Nov 22, 2024 9:24 am
Cox Engine of The Month
My Swap-Meet Ringmaster ! Smack Down!!!! The Resurrection Begins!!
Page 3 of 7
Page 3 of 7 •  1, 2, 3, 4, 5, 6, 7
 Re: My Swap-Meet Ringmaster ! Smack Down!!!! The Resurrection Begins!!
Mine is well painted in that area, even on the inside. I might need to pull the tank to replace the hoses, since they are hard and crusty. I can probably cover the hatch seams with monokote and have the best of both worlds as a result: easy access with minimal effort needed, and sealed against exhaust and fuel.
Phil
Phil

pkrankow- Top Poster

- Posts : 3025
Join date : 2012-10-02
Location : Ohio
 Goop Control !!!
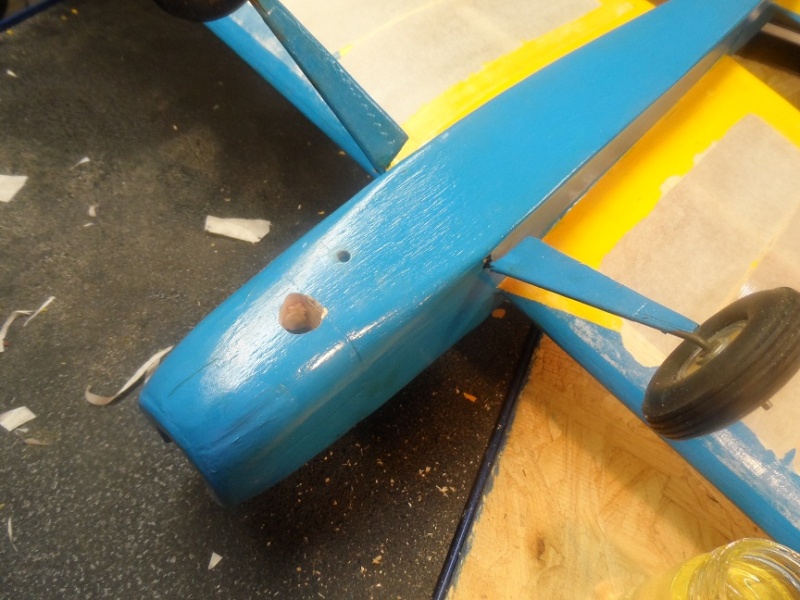
While the shop was warming up this morning, I decided to bore a "Goop Chute" in the nose block under the Ringmaster's engine. The original plan makes no allowance to rid this trough-like of area of castor oil, so I'm arraigning it to dump out the bottom.
Alongside the same subject, there is nothing to keep castor from blowing back all the way to the gear plate, so I'm gonna have to cut the top hatch into two pieces and permanently glue the rear part of it to the body, epoxying in a full bulkhead behind the engine.
I'd like to have it ready to rock this weekend, but it's more likely going to be the next one at least.

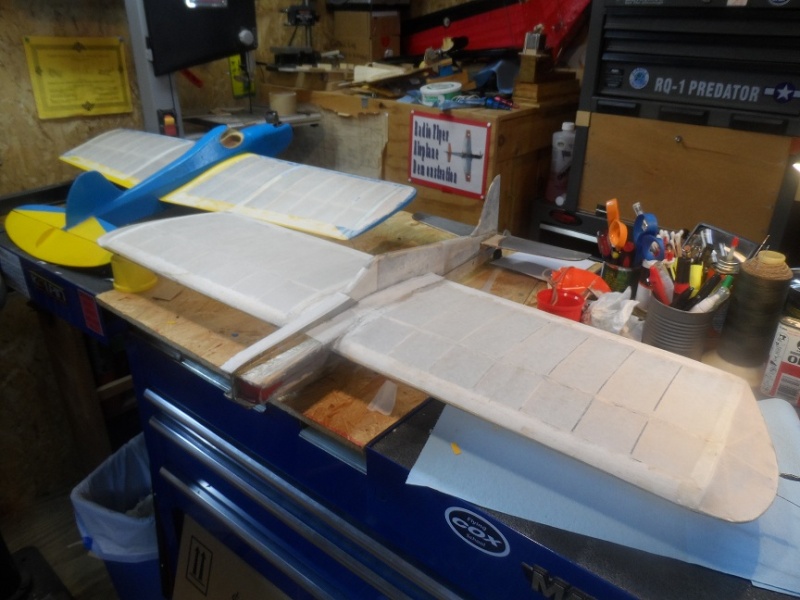
Wayne's Wittman Buster is also getting doped up, and coming along nicely, so we ought to have a couple classics turning circles before too long !
Alongside the same subject, there is nothing to keep castor from blowing back all the way to the gear plate, so I'm gonna have to cut the top hatch into two pieces and permanently glue the rear part of it to the body, epoxying in a full bulkhead behind the engine.
I'd like to have it ready to rock this weekend, but it's more likely going to be the next one at least.


Wayne's Wittman Buster is also getting doped up, and coming along nicely, so we ought to have a couple classics turning circles before too long !


Kim- Top Poster


Posts : 8625
Join date : 2011-09-06
Location : South East Missouri
 Re: My Swap-Meet Ringmaster ! Smack Down!!!! The Resurrection Begins!!
Don't sell yourself short! Knock it out Kim. World step aside! I got paint and dope to do!
I really hope you can video that thing. It's a beautiful model. The Buster too!
At least get pictures of it all dirty.
I really hope you can video that thing. It's a beautiful model. The Buster too!
At least get pictures of it all dirty.

Cribbs74- Moderator


Posts : 11907
Join date : 2011-10-24
Age : 50
Location : Tuttle, OK
 Castor soaked balsa
Best thing to remove castor from balsa is a product called K2R, it's in a spray can and you can buy it at Ace hardware. Kinda pricey, around 8 bucks a can. Works great though, spray it on the affected areas and then wipe it away after it turns white when it dries out. Two or three applications and the oil is gone, will help with the stinky smell too. Be warned!!!! do it out in the garage, wife was [bleep] when I used it near the house.
Jim Hayes
AMA 988835
Jim Hayes
AMA 988835

jhaye- Silver Member

- Posts : 89
Join date : 2012-09-08
Age : 60
Location : Albuquerque, NM
 Re: My Swap-Meet Ringmaster ! Smack Down!!!! The Resurrection Begins!!
Thanks Ron!
Well, I AM gonna stay after it, but I got other spinning plates to tend to that I've neglected for a couple weeks.
I GOT to go visit my shooting bud, Ed, who is laid up in the veterans hospital in St.Louis, and I haven't checked in on my Uncle Wayne for three weeks...so...the HHR is gonna keep the roads warm this weekend! I MIGHT be able to swerve up to the Decatur Swap Meet on my run to see ED (that's quite a swerve...with a 100+ mile radius!)
I figure to hide out on the hill all of next week, and MAYBE have myself two flying machines by that next weekend. My social life may be shutting down, but I AM getting excited at the prospect of getting these two oldsters in the air. !!!

Kim- Top Poster


Posts : 8625
Join date : 2011-09-06
Location : South East Missouri
 Re: My Swap-Meet Ringmaster ! Smack Down!!!! The Resurrection Begins!!
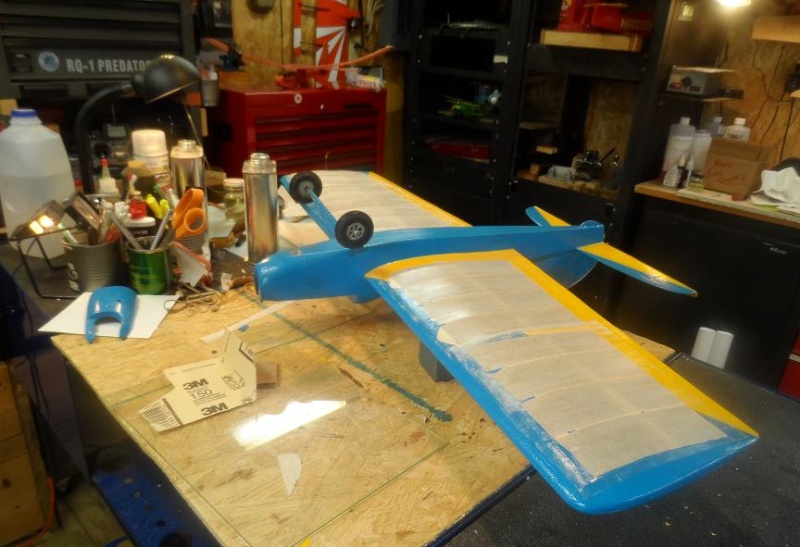
The Ringmaster gets it's final coats of clear. The next time you see it...she'll have some color ! (Hopefully a fair match with the original paint!)


Kim- Top Poster


Posts : 8625
Join date : 2011-09-06
Location : South East Missouri
 Re: My Swap-Meet Ringmaster ! Smack Down!!!! The Resurrection Begins!!
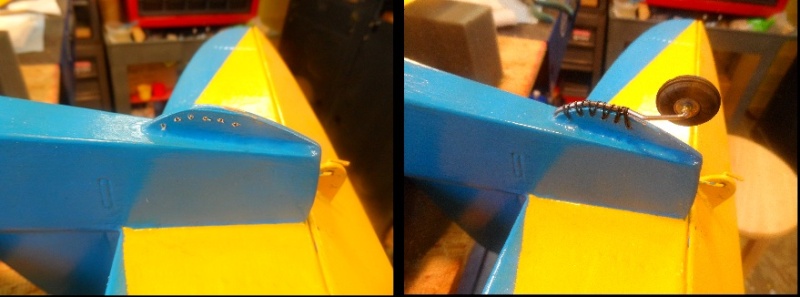
A concession to pavement flying : The Ringmaster gets a tailwheel !


Kim- Top Poster


Posts : 8625
Join date : 2011-09-06
Location : South East Missouri
 Re: My Swap-Meet Ringmaster ! Smack Down!!!! The Resurrection Begins!!
Classy fix.
Being lazy, I probably would have just added a wire skid, but the tailwheel looks a lot better.
Being lazy, I probably would have just added a wire skid, but the tailwheel looks a lot better.
 Re: My Swap-Meet Ringmaster ! Smack Down!!!! The Resurrection Begins!!
There ya go, you just solved my problem for me. I need skids on the re-Bean's booms to protect the control horn. I was pondering the best way to attach them.  Sew them on and slather with epoxy.
 Sew them on and slather with epoxy.
The wheel sounds better landing on pavement too. I always hated that clackity dragging sound that betrayed the realism of the model and its flight.andrew wrote:Classy fix.
Being lazy, I probably would have just added a wire skid, but the tailwheel looks a lot better.
_________________
Don't Panic!
...and never Ever think about how good you are at something...
while you're doing it!
My Hot Rock & Blues Playlist
...and never Ever think about how good you are at something...
while you're doing it!
My Hot Rock & Blues Playlist

RknRusty- Rest In Peace

- Posts : 10869
Join date : 2011-08-10
Age : 68
Location : South Carolina, USA
 Re: My Swap-Meet Ringmaster ! Smack Down!!!! The Resurrection Begins!!
Nice tail wheel setup. I might have to think on that.
So on the way back from vacation I stopped by the LHS since it is sorta on the way home from the airport and spent the last of my vacation mad cash on a roll of red ultracote and yellow monokote. I need the monokote to match my jumping bean, and this ammonia activation sounds pretty nifty so I am going to shoot for matching trim as the original dope.
Speaking of dope I only have my jar of TiO2 loaded dope that is now flat white for fuel proofing. I knew I forgot something. (fresh jar of clear dope) The wife and daughter were in the car so I did not have time to hang out and browse.
Phil

pkrankow- Top Poster

- Posts : 3025
Join date : 2012-10-02
Location : Ohio
 Re: My Swap-Meet Ringmaster ! Smack Down!!!! The Resurrection Begins!!
They say... you know, them that know everything... that Windex brand regular is the best for applying Monokote overlays. It should stick on top of any type of shrink type covering. On my latest project I traced the edges of the flame overlays with clear fingernail polish since it had so many pointy edges that could lift up. But on my previous job, the day after the glue had set, I just traced the edges with an acetone wet Q-tip. I don't know if it helped or not but so far, no lifting. And it's been flown and tested pretty well now. They said it would work.pkrankow wrote:...this ammonia activation sounds pretty nifty so I am going to shoot for matching trim as the original dope...
_________________
Don't Panic!
...and never Ever think about how good you are at something...
while you're doing it!
My Hot Rock & Blues Playlist
...and never Ever think about how good you are at something...
while you're doing it!
My Hot Rock & Blues Playlist

RknRusty- Rest In Peace

- Posts : 10869
Join date : 2011-08-10
Age : 68
Location : South Carolina, USA
 Re: My Swap-Meet Ringmaster ! Smack Down!!!! The Resurrection Begins!!
Bump --
Hey, Kim --
How's the Buster and Ringmaster coming along. The weather's still holding on this side of the river, so I'm guessing you should still have some good days to get those badboys into the air.
Hey, Kim --
How's the Buster and Ringmaster coming along. The weather's still holding on this side of the river, so I'm guessing you should still have some good days to get those badboys into the air.
 Re: My Swap-Meet Ringmaster ! Smack Down!!!! The Resurrection Begins!!
andrew wrote:Bump --
Hey, Kim --
How's the Buster and Ringmaster coming along. The weather's still holding on this side of the river, so I'm guessing you should still have some good days to get those badboys into the air.
Yo Andrew!
Gonna try to get some more dope on them tomorrow. Buster still needs another dose of clear, but the Super is ready for me to shoot color at him.
Had a busy week, with overtime keeping me here 'till dark on several days...on the bright side, we've moved enough kerosine fill a small lake! I just now got Happydad's dragonfly clunk in the mail, and the Lazy Bee going and the rebuild on Patrick's Skyray started. Tomorrow will be "Shop Day" unless the wind gives us a break and we get to fly !
Yeah, we've had some great days this past week, but things haven't lined up well for me to take advantage of them! So...I've been compensating by buying all manner of stuff from the internet !!!!!
There shall be more photos shortly!

Kim- Top Poster


Posts : 8625
Join date : 2011-09-06
Location : South East Missouri
 Re: My Swap-Meet Ringmaster ! Smack Down!!!! The Resurrection Begins!!
Between my neighbor (Mr.ARF-dressed-as-close-to-scale-as-possible) and a number of the people here, I tried making the wings look original with the yellow burst detail
I can honestly say it is the best job of decorating using film that I have ever done...although only because I never really tried decorating using film before.
I used Ultracote to skin the wings, and yellow Monokote for the detail put down with ammonia spray. I couldn't find Windex so I mixed 1:4 laundry/household sudsy ammonia and water. It seems to be doing the job. I'll iron them down tomorrow, it has blue painters tape keeping them from sliding.
Pictures after I finish ironing.
Phil

pkrankow- Top Poster

- Posts : 3025
Join date : 2012-10-02
Location : Ohio
 Re: My Swap-Meet Ringmaster ! Smack Down!!!! The Resurrection Begins!!
All good Phil, always keen to learn
Ways to keep the sticky stuff stuck.

Ways to keep the sticky stuff stuck.

John Goddard- Diamond Member

- Posts : 2447
Join date : 2011-11-24
Age : 60
Location : Leyton North East London
 Re: My Swap-Meet Ringmaster ! Smack Down!!!! The Resurrection Begins!!
For those that aren't aware, Ultracote's adhesive doesn't activate using the Windex method like Monokote does. In addition, Ultrakote is a low temp covering. It does have a higher shrink rate that Monokote. The two products tend to have a tug of war match going on. Ironing Monokote over Ultracote is something I would be careful in doing. It will work but Monokote really needs a higher temp to stick down correctly. I would just make sure that the underlying Ultracote doesn't shrink back especially near the wing root where it meets the fuse. The majority of iron on users including myself seem to agree on the fact the Ultracote takes to compound curves easier than the Monokote. I like the fact that Ultracote has many more color choices. Ken

Ken Cook- Top Poster

- Posts : 5640
Join date : 2012-03-27
Location : pennsylvania
 Re: My Swap-Meet Ringmaster ! Smack Down!!!! The Resurrection Begins!!
Phil, you should NOT use any heat on the overlays. They will form air bubbles underneath, pull, wrinkle and deform and ruin the whole thing. The ammonia should have the glue stuck as tight as it's going to get. Only if you have a stubborn corner that won't stay down, you can touch it quickly with the tip of the iron, but that's all. I was advised to use a q-tip wet with acetone and trace the edges to help stick the glue better. I don't know if it helped but I didn't have any separation on the Flite Streak. I did dot the sharp points with some epoxy after I had flown it a few times. If you thoroughly squeezed the liquid out, you shouldn't need tape, at least on top. It may be a good idea to tack it on the bottom.pkrankow wrote:Between my neighbor (Mr.ARF-dressed-as-close-to-scale-as-possible) and a number of the people here, I tried making the wings look original with the yellow burst detail
I can honestly say it is the best job of decorating using film that I have ever done...although only because I never really tried decorating using film before.
I used Ultracote to skin the wings, and yellow Monokote for the detail put down with ammonia spray. I couldn't find Windex so I mixed 1:4 laundry/household sudsy ammonia and water. It seems to be doing the job. I'll iron them down tomorrow, it has blue painters tape keeping them from sliding.
Pictures after I finish ironing.
Phil
On the Bean, I traced the overlays with clear fingernail polish. I had a problem with that. I chose base coat at the beauty supply store. I don't know if that was my mistake, but every time I clean the plane with alcohol it turns white. Acetone takes the white back off... along with the polish, and it slightly mars the sheen of the Monokote.
_________________
Don't Panic!
...and never Ever think about how good you are at something...
while you're doing it!
My Hot Rock & Blues Playlist
...and never Ever think about how good you are at something...
while you're doing it!
My Hot Rock & Blues Playlist

RknRusty- Rest In Peace

- Posts : 10869
Join date : 2011-08-10
Age : 68
Location : South Carolina, USA
 Re: My Swap-Meet Ringmaster ! Smack Down!!!! The Resurrection Begins!!
There are bubbles and puckers all over the place this morning  I spent a good bit of time smoothing it last night too... It all peeled off when I pulled the blue tape too.
Yellow Monokote has a color change when the glue activates from heat, it gets a LOT darker (much more than other colors) it goes back when it cools. I used this to my advantage and found that the glue activates at a temperature just a little over the recommended glue temperature for the Ultracote.
I worked carefully and slowly drawing small circles with the iron as I worked the film down. It is not perfectly bubble free, but pretty good.
I might make an iron bootee out of some t-shirt rag.
My daughter cooperating and posing.
https://i.servimg.com/u/f44/17/84/87/39/12060210.jpg
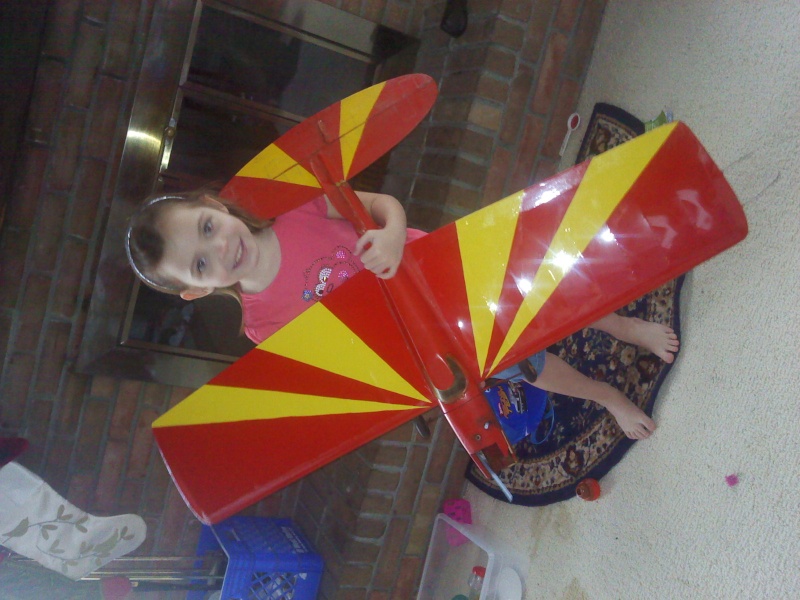
All the damage to the tail section has been sealed with Testors wood and metal cement. I don't have matching paints.
Phil
Yellow Monokote has a color change when the glue activates from heat, it gets a LOT darker (much more than other colors) it goes back when it cools. I used this to my advantage and found that the glue activates at a temperature just a little over the recommended glue temperature for the Ultracote.
I worked carefully and slowly drawing small circles with the iron as I worked the film down. It is not perfectly bubble free, but pretty good.
I might make an iron bootee out of some t-shirt rag.
My daughter cooperating and posing.
https://i.servimg.com/u/f44/17/84/87/39/12060210.jpg

All the damage to the tail section has been sealed with Testors wood and metal cement. I don't have matching paints.
Phil

pkrankow- Top Poster

- Posts : 3025
Join date : 2012-10-02
Location : Ohio
 Re: My Swap-Meet Ringmaster ! Smack Down!!!! The Resurrection Begins!!
YEA !!!!!!!!! Looks Great !
We GOT to get these suckers going! I'm doing nose surgery on mine right now. Must get that front-end sealed better or I'll be flying a castor-sponge!
It's not real easy to see, but the F-2 Bulkhead ends just above the fuselage side. The wood in there will get a steady spray of fuel if I don't close it off.
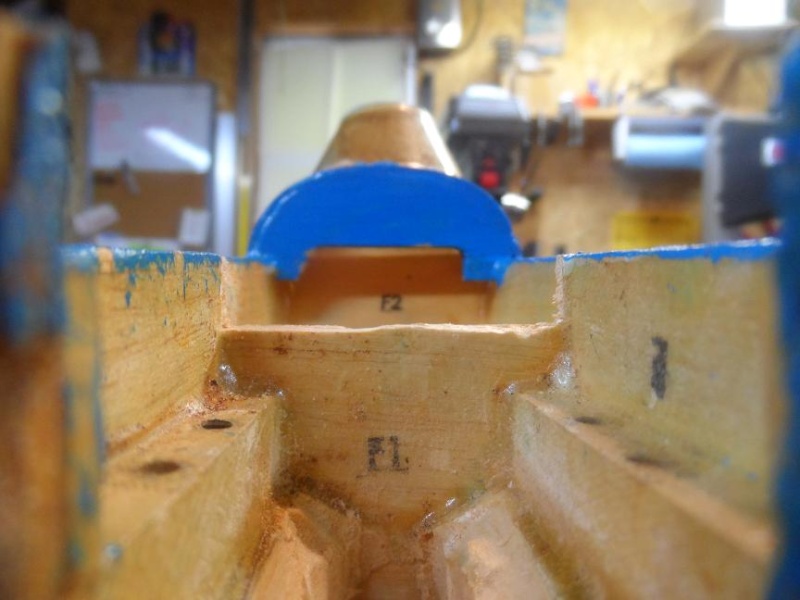
So, I've guillotined that beautiful, shaped cowling, and am gonna isolate the engine compartment just past F-1 by gluing and sealing everything from there back.
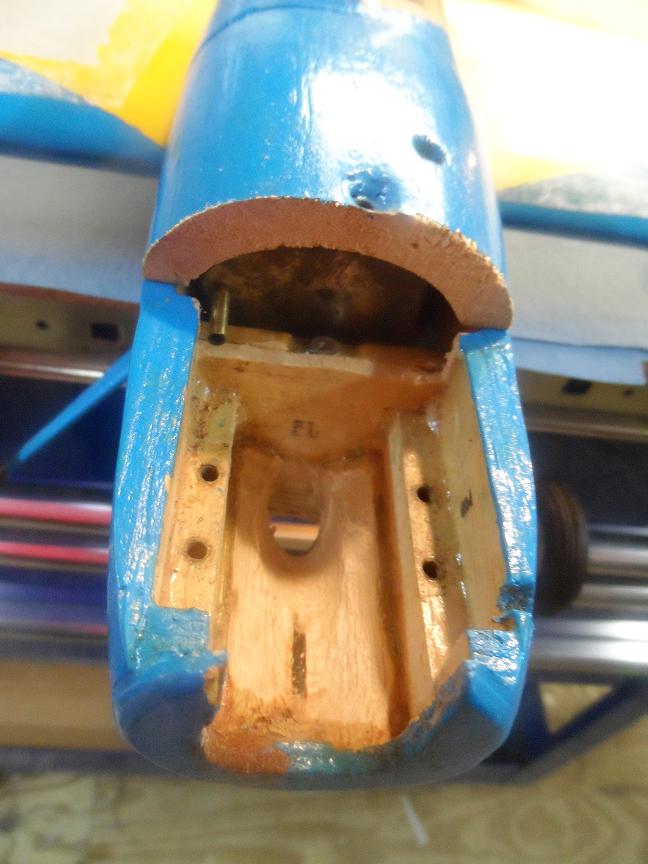
I know I should have done this before...but I was in a "Covering and Painting" mood at the time!
We GOT to get these suckers going! I'm doing nose surgery on mine right now. Must get that front-end sealed better or I'll be flying a castor-sponge!
It's not real easy to see, but the F-2 Bulkhead ends just above the fuselage side. The wood in there will get a steady spray of fuel if I don't close it off.

So, I've guillotined that beautiful, shaped cowling, and am gonna isolate the engine compartment just past F-1 by gluing and sealing everything from there back.

I know I should have done this before...but I was in a "Covering and Painting" mood at the time!

Kim- Top Poster


Posts : 8625
Join date : 2011-09-06
Location : South East Missouri
 Re: My Swap-Meet Ringmaster ! Smack Down!!!! The Resurrection Begins!!
The entire compartment is painted in my plane. The fuel tank is sealed in with glue. The only reason for the hatch on mine is to get at the fuel lines and motor mounts.
I will be making sure that the exhaust blows outside the fuselage when I get the motor, hopefully this weekend.
Phil
I will be making sure that the exhaust blows outside the fuselage when I get the motor, hopefully this weekend.
Phil

pkrankow- Top Poster

- Posts : 3025
Join date : 2012-10-02
Location : Ohio
 Re: My Swap-Meet Ringmaster ! Smack Down!!!! The Resurrection Begins!!
pkrankow wrote:The entire compartment is painted in my plane. The fuel tank is sealed in with glue. The only reason for the hatch on mine is to get at the fuel lines and motor mounts.
I will be making sure that the exhaust blows outside the fuselage when I get the motor, hopefully this weekend.
Phil
Great !!! Photos...if possible...Please !!!!!!!!!!!!!

Kim- Top Poster


Posts : 8625
Join date : 2011-09-06
Location : South East Missouri
 Re: My Swap-Meet Ringmaster ! Smack Down!!!! The Resurrection Begins!!
Nice work Phil, can't wait to hear about the shakedown flight. Go get em!

Cribbs74- Moderator


Posts : 11907
Join date : 2011-10-24
Age : 50
Location : Tuttle, OK
 Re: My Swap-Meet Ringmaster ! Smack Down!!!! The Resurrection Begins!!
Ringmaster's are so fun to fly. I just ordered the hardware to build a new one over the winter from Brodak's today.
Jim Hayes
Jim Hayes

jhaye- Silver Member

- Posts : 89
Join date : 2012-09-08
Age : 60
Location : Albuquerque, NM
 Re: My Swap-Meet Ringmaster ! Smack Down!!!! The Resurrection Begins!!
Phil, yours looks great. If you want to, you can take a sharp sewing needle and puncture the bubbles and press them out. But after a flight or two I usually quit fretting over the little things, and everyone doesn't see the flaws that I do. You probably already said, but what size is yours? Is there a Ringmaster that would work well with a Tee Dee .09? I have one I need a plane for. If it's as fun to fly as you mention, then it might be what I want.
_________________
Don't Panic!
...and never Ever think about how good you are at something...
while you're doing it!
My Hot Rock & Blues Playlist
...and never Ever think about how good you are at something...
while you're doing it!
My Hot Rock & Blues Playlist

RknRusty- Rest In Peace

- Posts : 10869
Join date : 2011-08-10
Age : 68
Location : South Carolina, USA
 Re: My Swap-Meet Ringmaster ! Smack Down!!!! The Resurrection Begins!!
One thing I would certainly do is to not secure your tank in until you get the height correct. As I've stated many times on here, tanks can be most problematic. The plumbing needs to be inspected and all tanks should be pressure tested. Even when all is good, the engine run can go rich or lean when inverted. This is especially true with a Fox.35 as they like the centerline of the tank to be slightly higher. I make shims of balsa to sit on the beams under the tank. Sometimes I even use playing cards stacked up to get the height correct. Seeing that most tanks were usually epoxied in, this can be impossible to alter tank height. I build all of my planes with removable tanks. If it's not leaking or giving you problems, eventually it will. SO why not build it removable.
Here is a current pic of my Veco Warrior. This is a Brodak tank. The solder used is not quality solder that I use so all joints were taken apart, wire wheeled and resoldered and cleaned. The tubing has also been replaced with K&S copper. On this particular tank so that I could remove it and reinstall it, I opted to put a bushing through the center of the tank. My hatch screw now passes through the center and foam rubber shims hold the tank firmly in place. I can easily and readily remove the tank. This kind of mod would be most beneficial for a design like the one you guys show in your pic. Ken


Here is a current pic of my Veco Warrior. This is a Brodak tank. The solder used is not quality solder that I use so all joints were taken apart, wire wheeled and resoldered and cleaned. The tubing has also been replaced with K&S copper. On this particular tank so that I could remove it and reinstall it, I opted to put a bushing through the center of the tank. My hatch screw now passes through the center and foam rubber shims hold the tank firmly in place. I can easily and readily remove the tank. This kind of mod would be most beneficial for a design like the one you guys show in your pic. Ken


Ken Cook- Top Poster

- Posts : 5640
Join date : 2012-03-27
Location : pennsylvania
Page 3 of 7 •  1, 2, 3, 4, 5, 6, 7
 Similar topics
» Swap Meet!
» My first swap meet
» Belleville Swap Meet Finds
» Swap meet box o engines
» Going flying @ AMA
» My first swap meet
» Belleville Swap Meet Finds
» Swap meet box o engines
» Going flying @ AMA
Page 3 of 7
Permissions in this forum:
You cannot reply to topics in this forum

 Rules
Rules


