Log in
Search
Latest topics
» My N-1R build logby roddie Today at 12:32 am
» Happy 77th birthday Andrew!
by akjgardner Today at 12:27 am
» TEE DEE Having issues
by TD ABUSER Yesterday at 9:43 pm
» Landing-gear tips
by roddie Yesterday at 6:17 pm
» Roger Harris revisited
by TD ABUSER Yesterday at 2:13 pm
» Tee Dee .020 combat model
by Ken Cook Yesterday at 1:41 pm
» Retail price mark-up.. how much is enough?
by Ken Cook Yesterday at 1:37 pm
» My latest doodle...
by roddie Yesterday at 10:43 am
» Chocolate chip cookie dough.........
by roddie Fri Nov 22, 2024 1:13 pm
» Purchased the last of any bult engines from Ken Enya
by sosam117 Fri Nov 22, 2024 11:32 am
» Free Flight Radio Assist
by rdw777 Fri Nov 22, 2024 9:24 am
» Funny what you find when you go looking
by rsv1cox Wed Nov 20, 2024 3:21 pm
Cox Engine of The Month
Cox Sky Cruisers Viper RC conversion build
Page 1 of 1
 Cox Sky Cruisers Viper RC conversion build
I have been waiting for parts for the Cox Gravity Warbirds F4-U Corsair build so i will start the conversion of the Cox Sky Cruiser Viper freeflight plane to 2/3 channel RC.
my original idea was to try to fit the RC equipment i already had into the small foam plane and live with the consequences. i soon realized the consequences were a non-flying piece of overweight junk.
you may have seen other modifications of similar planes from the cox sky cruisers series as they made several models. my favorite was the P-40 or the P-51. the Viper looks like a P-51, except with a purple fuselage and a yellow wing and elevator assembly. this modification will follow the format of the Cox Gravity Warbirds F4-U Corsair i started last week.
as with the F4-U Corsair it is easier to start with the easiest parts first.
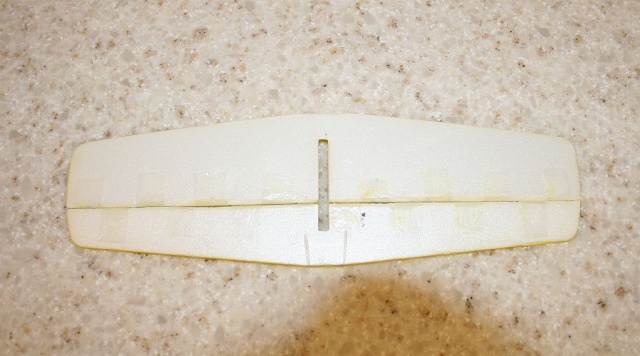
first the Viper elevator stabilizer before modification.
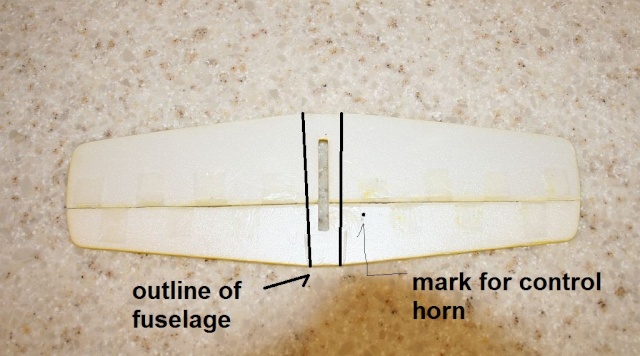
next the elevator stab with control horn marked in proper location. abrade area around horn top and bottom.
next install control horn and glue.
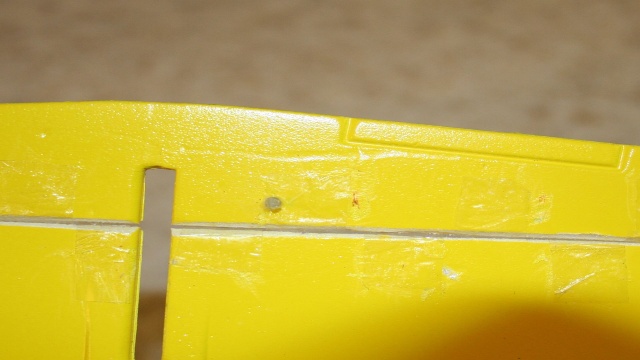
cutoff extra control horn on opposite side and carefully heat rod with soldering iron tip.
set asside for now
Viper rudder assembly before modification.

Viper rudder assembly with control horn hole marked and abraded.
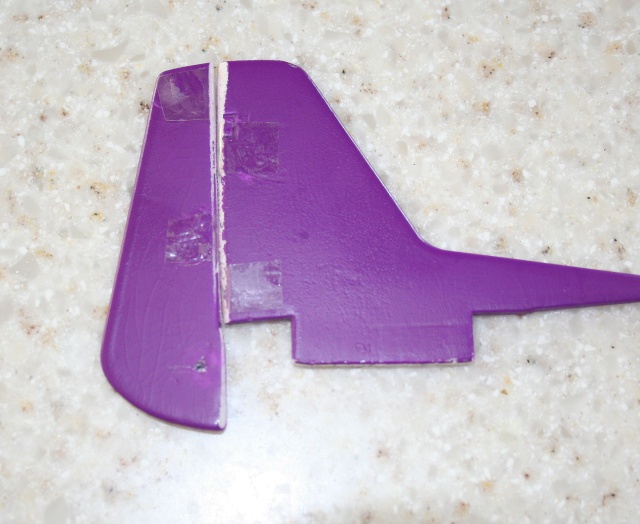
Viper rudder assembly with control horn glued in.
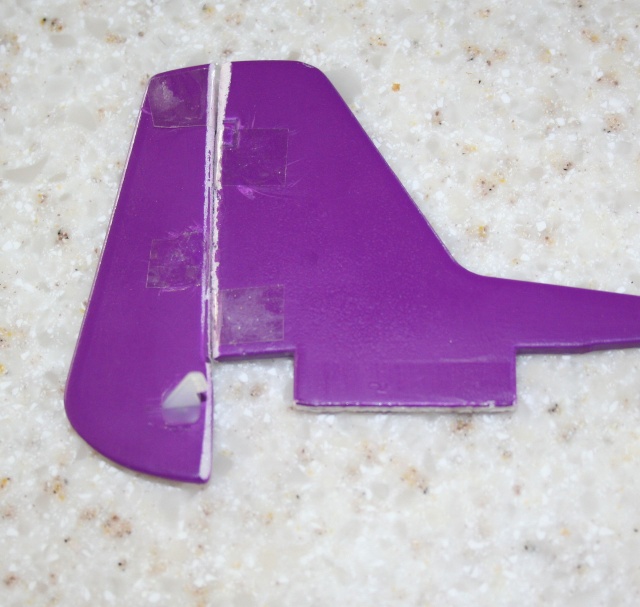
cutoff extra control horn on backside and carefully heat with soldering iron tip.
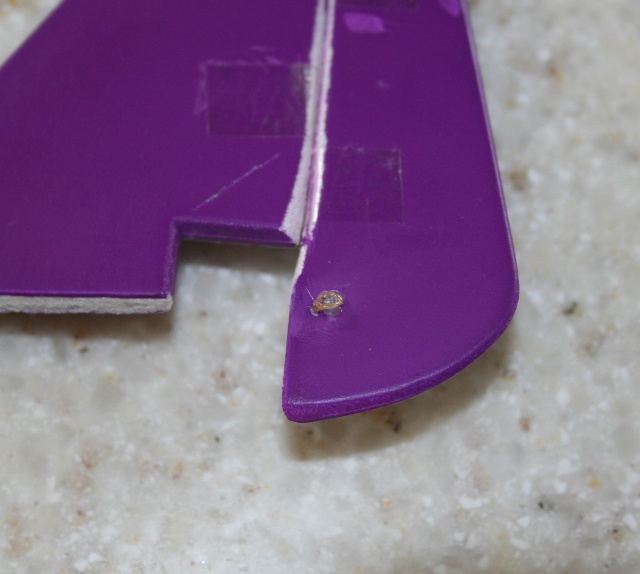
that's all for now. untill the other parts come in.
edited 9-12-12 10:26p.m. PST
I have a few minutes to update the Cox sky cruiser Viper conversion so i thought i would finish the elevator assembly first.
When last seen the elevator assembly looked something like this:
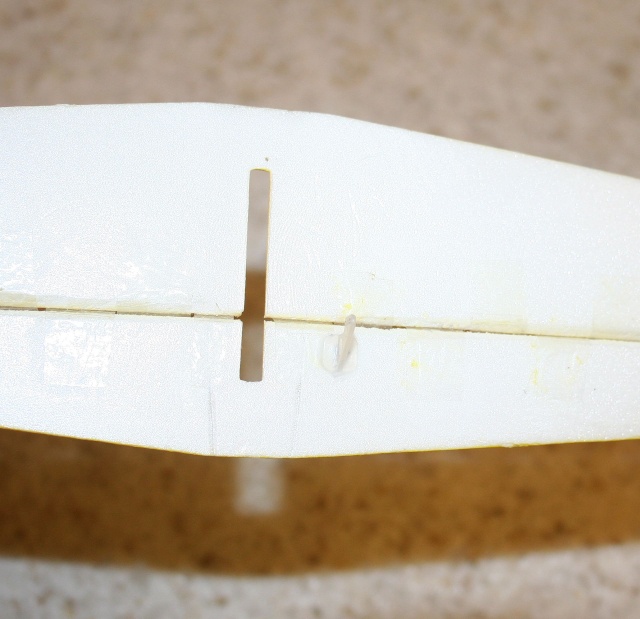
Place the elevator assembly on the fuselage, view from the bottom and draw a pair of lines allowing clearance of the moveable part of the elevator to avoid touching the fuselage.
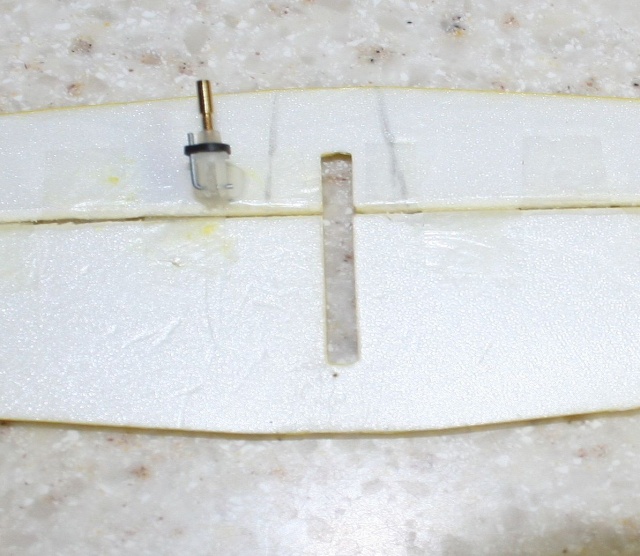
Cut the moveable part of the elevator along these lines. The elevator assembly should look like this with each part of the moveable elevator loose and moveable on its own. We will fix this later.
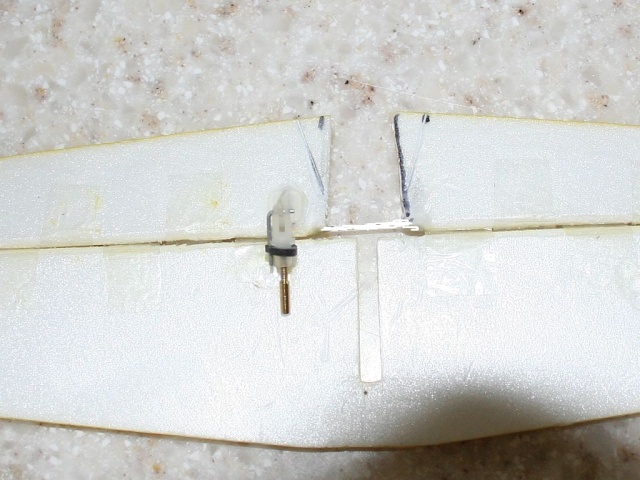
Place elevator assembly on the fuselage again and view from the bottom. This time note the interference between the moveable elevator and the rudder and rudder control horn. mark the moveable elevator for clearance and carefully cutoff the foam piece as noted. The elevator assembly should now look like this:

Make sure that the moveable elevator part of the elevator assembly clears the rudder and rudder control horn on both sides of the rudder. More next time. and we'll also figure out how to make both moveable elevator surfaces move at the same time.
happydad


my original idea was to try to fit the RC equipment i already had into the small foam plane and live with the consequences. i soon realized the consequences were a non-flying piece of overweight junk.
you may have seen other modifications of similar planes from the cox sky cruisers series as they made several models. my favorite was the P-40 or the P-51. the Viper looks like a P-51, except with a purple fuselage and a yellow wing and elevator assembly. this modification will follow the format of the Cox Gravity Warbirds F4-U Corsair i started last week.
as with the F4-U Corsair it is easier to start with the easiest parts first.
first the Viper elevator stabilizer before modification.

next the elevator stab with control horn marked in proper location. abrade area around horn top and bottom.

next install control horn and glue.

cutoff extra control horn on opposite side and carefully heat rod with soldering iron tip.
set asside for now
Viper rudder assembly before modification.

Viper rudder assembly with control horn hole marked and abraded.

Viper rudder assembly with control horn glued in.

cutoff extra control horn on backside and carefully heat with soldering iron tip.

that's all for now. untill the other parts come in.
edited 9-12-12 10:26p.m. PST
I have a few minutes to update the Cox sky cruiser Viper conversion so i thought i would finish the elevator assembly first.
When last seen the elevator assembly looked something like this:

Place the elevator assembly on the fuselage, view from the bottom and draw a pair of lines allowing clearance of the moveable part of the elevator to avoid touching the fuselage.

Cut the moveable part of the elevator along these lines. The elevator assembly should look like this with each part of the moveable elevator loose and moveable on its own. We will fix this later.

Place elevator assembly on the fuselage again and view from the bottom. This time note the interference between the moveable elevator and the rudder and rudder control horn. mark the moveable elevator for clearance and carefully cutoff the foam piece as noted. The elevator assembly should now look like this:

Make sure that the moveable elevator part of the elevator assembly clears the rudder and rudder control horn on both sides of the rudder. More next time. and we'll also figure out how to make both moveable elevator surfaces move at the same time.
happydad


Last edited by happydad on Thu Sep 13, 2012 12:38 am; edited 1 time in total (Reason for editing : added another section)
happydad- Rest In Peace

- Posts : 1592
Join date : 2012-05-28
Age : 79
Location : Escondido, CA
 re: Cox sky cruiser Viper RC modification
Sorry for the long delay between posts. volunteer work can take up a lot of time.
when last seen the Viper elevator assembly looked like this:
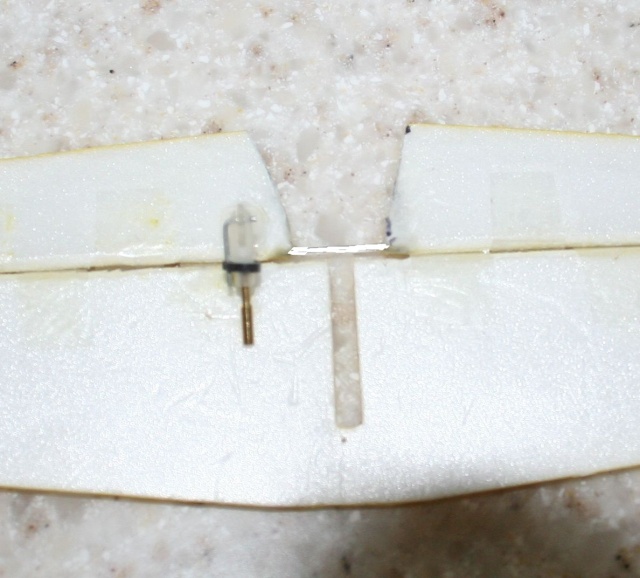
we still need to connect the 2 pieces of the elevator so they move together.
Mark 2 holes on elevator parts to add a “U” wire for the elevator pieces to work together.
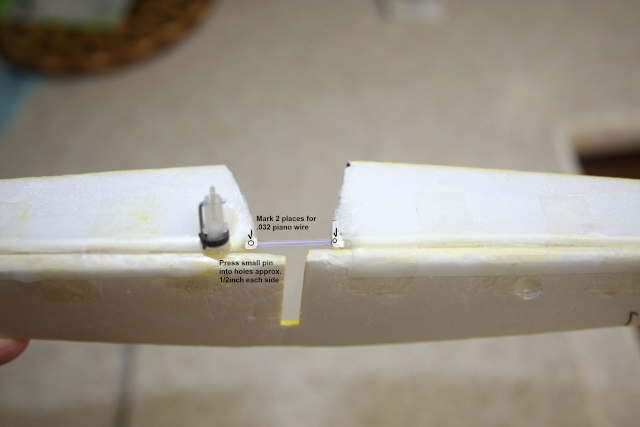
Press a small pin into the elevator pieces approximately 1/2inch for the “U” wire.
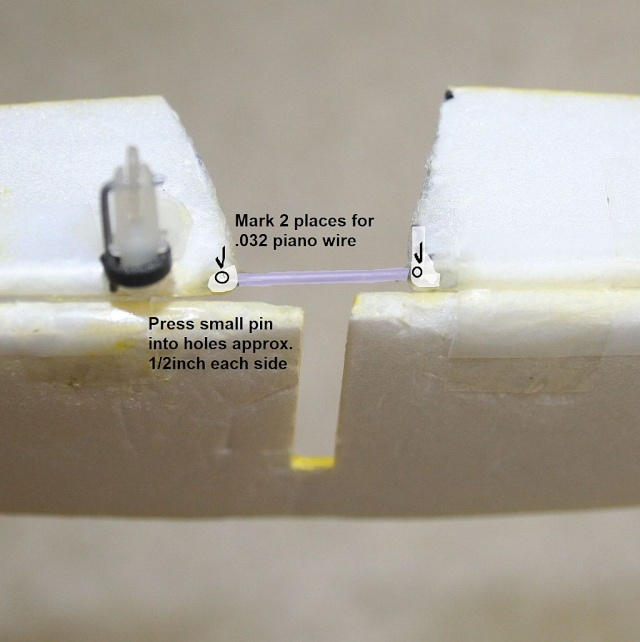
Form a “U” wire to fit between the two holes. Make a small notch in the elevator edge for the round wire to fit into. Abrade ends of piano wire so CA glue will adhere better. Add “U” wire to elevator, put wire into pin holes in 2 places for U wire. CA glue in place making sure both elevator surfaces are flat and even with each other. Add CA glue into holes and into slot so the wire does not stick out and interfere with the elevator movement.
** Be sure the "U" wire is inserted parallel to the moving elevator surface and does not penetrate the elevator surfaces **
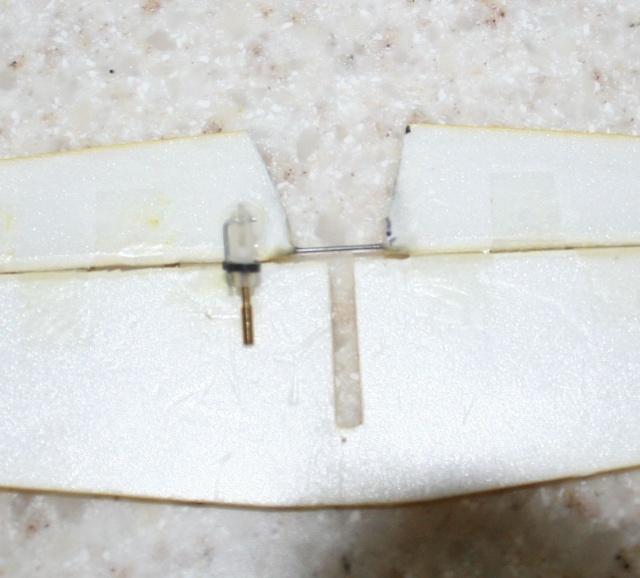
Place elevator assembly again on fuselage, add rudder temporarily and temporarily and mark on fuselage where the control wires will enter the fuse for both rudder and elevator. Cut thin long cutouts for the control wire tubes to lay into the fuselage without bending too much. Cut control wires about 1/2inch longer than needed to reach the position of the appropriate servo, previously mounted in fuselage.
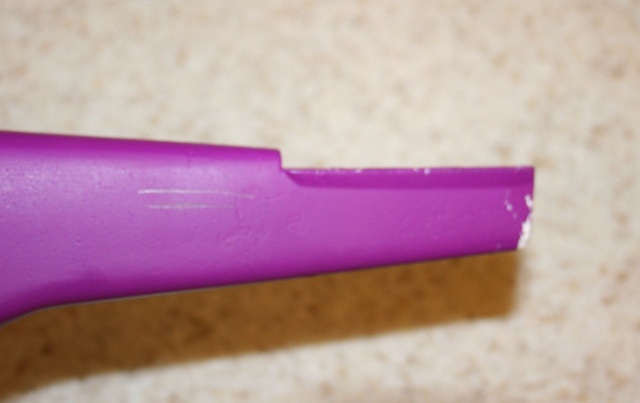
Let's look at the wing and the wing re-inforcements next. this is one wing half with the plastic wing re-inforcement removed.
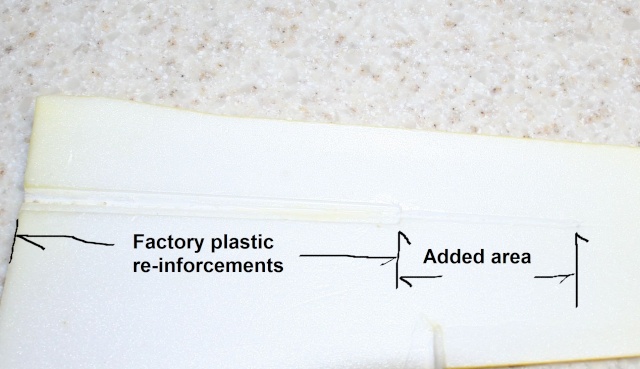
Place small graphite rod on one half of the wing and put a drop of foam safe CA on it to hold in place. I used .040 rod. Press the rod firmly down into the slot from the old wing stiffener and place one or 2 dots of foam safe glue on top and around the sides of the rod to hold it in place. Make a dam at the center of the wing half with paper tape to keep epoxy from running over the end, mix a medium size batch of epoxy thoroughly and add to the space between the graphite rod and the wing slot. Use just enough epoxy to come even with the bottom side of the wing, (NOTE: wing is now upside down). Let the epoxy harden. The wing should now look like this.

that's all i have time for right now. we still need to mount the elevator and rudder assemblies onto the fuselage and figure out exactly where tthe servos need to sit to have the correct CG for this small plane. hd


when last seen the Viper elevator assembly looked like this:

we still need to connect the 2 pieces of the elevator so they move together.
Mark 2 holes on elevator parts to add a “U” wire for the elevator pieces to work together.

Press a small pin into the elevator pieces approximately 1/2inch for the “U” wire.

Form a “U” wire to fit between the two holes. Make a small notch in the elevator edge for the round wire to fit into. Abrade ends of piano wire so CA glue will adhere better. Add “U” wire to elevator, put wire into pin holes in 2 places for U wire. CA glue in place making sure both elevator surfaces are flat and even with each other. Add CA glue into holes and into slot so the wire does not stick out and interfere with the elevator movement.
** Be sure the "U" wire is inserted parallel to the moving elevator surface and does not penetrate the elevator surfaces **

Place elevator assembly again on fuselage, add rudder temporarily and temporarily and mark on fuselage where the control wires will enter the fuse for both rudder and elevator. Cut thin long cutouts for the control wire tubes to lay into the fuselage without bending too much. Cut control wires about 1/2inch longer than needed to reach the position of the appropriate servo, previously mounted in fuselage.

Let's look at the wing and the wing re-inforcements next. this is one wing half with the plastic wing re-inforcement removed.

Place small graphite rod on one half of the wing and put a drop of foam safe CA on it to hold in place. I used .040 rod. Press the rod firmly down into the slot from the old wing stiffener and place one or 2 dots of foam safe glue on top and around the sides of the rod to hold it in place. Make a dam at the center of the wing half with paper tape to keep epoxy from running over the end, mix a medium size batch of epoxy thoroughly and add to the space between the graphite rod and the wing slot. Use just enough epoxy to come even with the bottom side of the wing, (NOTE: wing is now upside down). Let the epoxy harden. The wing should now look like this.

that's all i have time for right now. we still need to mount the elevator and rudder assemblies onto the fuselage and figure out exactly where tthe servos need to sit to have the correct CG for this small plane. hd


Last edited by happydad on Sat Jul 12, 2014 6:48 pm; edited 1 time in total (Reason for editing : to clarify how to add the)

happydad- Rest In Peace

- Posts : 1592
Join date : 2012-05-28
Age : 79
Location : Escondido, CA
 Re: Cox Sky Cruisers Viper RC conversion build
Coming along HD, what size servo's?

Cribbs74- Moderator


Posts : 11907
Join date : 2011-10-24
Age : 50
Location : Tuttle, OK
 Re: Cox Sky Cruisers Viper RC conversion build
thanks for the feedback Ron. the servos are 3.7gram. plenty of torque for this small plane. about $3.00 in 4x quantity from China. i had to wait 3 1/2 weeks this time. normally only 10 days. hdcribbs74 wrote:Coming along HD, what size servo's?


happydad- Rest In Peace

- Posts : 1592
Join date : 2012-05-28
Age : 79
Location : Escondido, CA
 re: Viper conversion
microflitedude wrote:I may have missed it, but is this glow or electric?
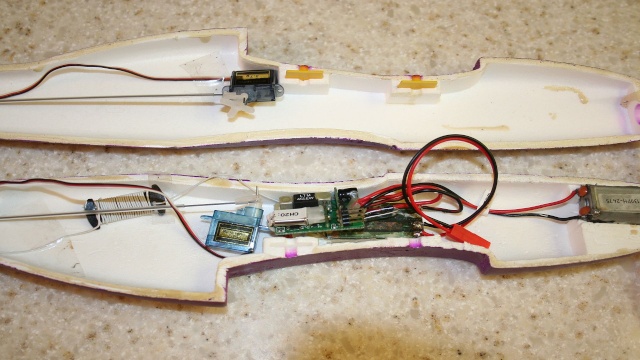
the Cox Sky Cruiser Viper was originally an electric free-flight and i am converting it to a 3 channel RC electric plane. elevator, rudder and speed control. the Cox Warbird F4-U Corsair i'm not sure what it was originally, but i am converting it also to 3 channel RC electric. both planes come with a small electric motor capable of flying the plane and doing many stunts. some guys on other forums have converted these planes using brushless motors and the planes are much faster and capable of more 3D stunts.
here's a pic of tenative layout of the charge connector, receiver/ESC, servos and motor in the fuselage.
happydad


happydad- Rest In Peace

- Posts : 1592
Join date : 2012-05-28
Age : 79
Location : Escondido, CA
 Re: cox Electric Viper RC conversion
Well, it has taken me 8 years, 2 hip replacements and lots of other stuff happening, but I finally did the maiden flight of the RC version of the Cox Electric Flyer Viper free flight version.
It was fun, typical as a maiden flight fraught with mishaps. Trims were way, way off, elevator and rudder throws too sensitive, but the majority of the plane survived.
Since it was a maiden glider I chose to NOT completely glue the plane together, thinking that something major would go wrong internally and I would have to cut the fuselage in half to replace or repair something. WRONG. The electronics, battery, radio and servos worked perfectly. The eleva5or and rudder didn’t work right because the fuselage wasn’t glued together completely and the rudder and elevator weren’t glued to the fuselage and flopped around under flight. My bad.
Over all, good maiden flight.
Pictures to follow soon.
Happier happydad


happydad- Rest In Peace

- Posts : 1592
Join date : 2012-05-28
Age : 79
Location : Escondido, CA
 Re: Cox Sky Cruisers Viper RC conversion build
Cool did convert couple foam glider m'y self is Not so easy result can be surprising

davidll1984- Diamond Member

- Posts : 2327
Join date : 2020-02-12
Age : 39
Location : shawinigan
 I bought a series
davidll1984 wrote:Cool did convert couple foam glider m'y self is Not so easy result can be surprising
davidll1984: I bought several. The Corsair (3), and the Spitfire MK XIV. And I wanted to get the Zero, but $99 was way too expensive when I paid a lot less 8 years ago. These have a 19 to 21 inch wingspan depending on the model. And a 5 ounce total weight goal, including battery.
BTW I purchased an exhaust recovery system, EGR valve, (?), like you are using. Some guy on eBay was selling them and offered it at a price much less than I expected.
Happydad


happydad- Rest In Peace

- Posts : 1592
Join date : 2012-05-28
Age : 79
Location : Escondido, CA
 Re: Cox Sky Cruisers Viper RC conversion build
The egr valve from gtp is very presise part once tuned correct on plane is litle heavy tink but wil provide Good low rpm To use wit cylinder wit no spi tink its the best way of rc cox engine without négatif effet of carburateur y have found carb on flyweel is bad suction in crankcase it make crankchaft To get suck in crankcase casing Front end wil get in contacts wit drive plate after couple time engine on low rpm for long time make back crankchaft in crankcase To back plate gap wil reduce making the conecting rod toutch inside crankcase track y have picturs of wat hapen wit Reed engine wit carb mod y do use trust wacher now To help wit that trouble tee dee last longer befor change drive plate and trust washer wit egr valve is no bad effect just litle bit heavy for smal plane tink wit ez bee size its ok y hope cox did consider the need of that setup for ther engine last longer if cox or ex modèle engines did Not considérer like a valuable part y wil build m'y own desing of egr valve now smaler light and précise just saying befor y dit it dont want for losing m'y time wit is valuable part very hard To Find in large amount if can Find 100 of the ....wil but right now for cars gen .2. ... 1\12 ... Just m'y efort To Front new stuf for modeler like me ask cox for the rebrand of that part 

davidll1984- Diamond Member

- Posts : 2327
Join date : 2020-02-12
Age : 39
Location : shawinigan
 I do have a Cox GTP Stocker ...
davidll1984 wrote:The egr valve from gtp is very presise part once tuned correct on plane is litle heavy tink but wil provide Good low rpm To use wit cylinder wit no spi tink its the best way of rc cox engine without négatif effet of carburateur y have found carb on flyweel is bad suction in crankcase it make crankchaft To get suck in crankcase casing Front end wil get in contacts wit drive plate after couple time engine on low rpm for long time make back crankchaft in crankcase To back plate gap wil reduce making the conecting rod toutch inside crankcase track y have picturs of wat hapen wit Reed engine wit carb mod y do use trust wacher now To help wit that trouble tee dee last longer befor change drive plate and trust washer wit egr valve is no bad effect just litle bit heavy for smal plane tink wit ez bee size its ok y hope cox did consider the need of that setup for ther engine last longer if cox or ex modèle engines did Not considérer like a valuable part y wil build m'y own desing of egr valve now smaler light and précise just saying befor y dit it dont want for losing m'y time wit is valuable part very hard To Find in large amount if can Find 100 of the ....wil but right now for cars gen .2. ... 1\12 ... Just m'y efort To Front new stuf for modeler like me ask cox for the rebrand of that part
davidll1984: I do have most of the pieces for a Cox GTP Stocker car. I just haven’t figured out exactly how I want to mount my pull-start engine. Everything else is done. Radio, fuel tank, a little large for my choice, wheels, etc. I just can’t decide how to mount the engine exactly. I am close, very close. But too many other projects right now. Cleaning out my garage is most important to make room for a micro lathe for making my own parts for Cox engines and carburetors.
Thanks for your advice.
Happydad.


happydad- Rest In Peace

- Posts : 1592
Join date : 2012-05-28
Age : 79
Location : Escondido, CA

davidll1984- Diamond Member

- Posts : 2327
Join date : 2020-02-12
Age : 39
Location : shawinigan
 Gorilla 4 to 6 inch
davidll1984: I am looking at a gorilla 4 to 6 inch micro lathe to make parts for small cox engines.
Maybe Hercules, I’m old. Short term memory loss.

Happydad


happydad- Rest In Peace

- Posts : 1592
Join date : 2012-05-28
Age : 79
Location : Escondido, CA
 Re: Cox Sky Cruisers Viper RC conversion build
Happydad if nead inspiration folow m'y new build project is using al new part avalible now wit jerobee 350_4pul start is posible now wit the new frame setup just change drive chaft position or just use électrique start as the pul start work clock wise m'y self want the pul start but want the cylinder in vertical positions not simple stuf tink tee dee is simple design wil also convert oem gtp frame To tee dee wit m'y new engine mount its possible now

davidll1984- Diamond Member

- Posts : 2327
Join date : 2020-02-12
Age : 39
Location : shawinigan
 My problem exactly...
davidll1984 wrote:Happydad if nead inspiration folow m'y new build project is using al new part avalible now wit jerobee 350_4pul start is posible now wit the new frame setup just change drive chaft position or just use électrique start as the pul start work clock wise m'y self want the pul start but want the cylinder in vertical positions not simple stuf tink tee dee is simple design wil also convert oem gtp frame To tee dee wit m'y new engine mount its possible now
davidll1984: With a killer bee type engine rotating cylinder-piston is easy. Having the pull-start come out on the back side and the cylinder-piston vertical was a challenge. I had to use the dremel too on the engine mount-pull start. I still need to make the spacer behind the KB fuel input and make sure the engine is rock solidly mounted. I don’t want to end up with the pull-start engine in one hand and the rest of the car in the other hand.
Happydad


happydad- Rest In Peace

- Posts : 1592
Join date : 2012-05-28
Age : 79
Location : Escondido, CA
 Re: Cox Sky Cruisers Viper RC conversion build
For try To place the cylinder in up positions m'y atempt was for engine wit strap starter want the exaust To fit wit the egr now want To reverse direction of pul start 


davidll1984- Diamond Member

- Posts : 2327
Join date : 2020-02-12
Age : 39
Location : shawinigan
 Re: Cox Sky Cruisers Viper RC conversion build
How the sky cruisers progres?? Wit the egr setup sur u wil get Good result

davidll1984- Diamond Member

- Posts : 2327
Join date : 2020-02-12
Age : 39
Location : shawinigan
 Sky Cruisers are Electric ONLY.
davidll1984 wrote:How the sky cruisers progres?? Wit the egr setup sur u wil get Good result
davidll1984: sky cruisers going well. After maiden flight of the Viper/P-51 I like the performance of the small electric motor, 2S LiPo battery and 5ounce total weight.
I have 1 of the Corsair planes almost finished. I just have to connect the small ESC to the motor. I also have the Spitfire MK XIV almost finished. I also have 2 - extra Corsairs and an extra fuselage and wing somewhere.
The EGR should be here this week. I will see if I can fit it into my Cox Kyosho Stocker Car. Not the airplane. The airplane only has a 21inch wingspan and total goal weight of under 5ounces. The car , ?? I have no idea what it weighs. I wish the fuel tank was smaller to make room for other thing. Radio installed, steering, everything except the engine. Some day.
Off to cleaning garage. Some progress on the fuselage for .020 All Star BiPlane.
Happydad


happydad- Rest In Peace

- Posts : 1592
Join date : 2012-05-28
Age : 79
Location : Escondido, CA
 Similar topics
» My Southridge CNC Hyper Viper build
» Hybrid-Profile Flite Streak/Cox Hyper Viper scratch build
» Guillows Cessna 150 build circa 1970 (Build Log)
» vintage cox .049 VIPER! "NEW" never ran!
» Cox me-109 stunt measures - for a friend - he wants to build one again !
» Hybrid-Profile Flite Streak/Cox Hyper Viper scratch build
» Guillows Cessna 150 build circa 1970 (Build Log)
» vintage cox .049 VIPER! "NEW" never ran!
» Cox me-109 stunt measures - for a friend - he wants to build one again !
Page 1 of 1
Permissions in this forum:
You cannot reply to topics in this forum

 Rules
Rules


