Log in
Search
Latest topics
» My N-1R build logby KariFS Today at 1:56 pm
» New Model Build
by bsadonkill Today at 11:31 am
» Project Cox .049 r/c & Citabrian Champion
by MauricioB Today at 10:49 am
» Octura engines?
by UncleLumpy Today at 8:16 am
» Tatone EM-7
by sosam117 Today at 7:50 am
» Honoring All Who Served
by roddie Yesterday at 8:59 pm
» Cox NaBOO - Just in time for Halloween
by rsv1cox Yesterday at 3:30 pm
» Free Flight Radio Assist
by TD ABUSER Yesterday at 1:41 pm
» Cox 020 PeeWee rebuild questions
by balogh Yesterday at 1:36 pm
» K&B .09 Torpedo Engine
by LooseSpinner99 Yesterday at 12:01 pm
» 3D printing of parts?
by UncleLumpy Yesterday at 9:08 am
» L4 Grasshopper
by bottomgun Yesterday at 7:58 am
Cox Engine of The Month
Revivng Some Childhood Classics
Page 1 of 2
Page 1 of 2 • 1, 2 
 Revivng Some Childhood Classics
Hello Everyone,
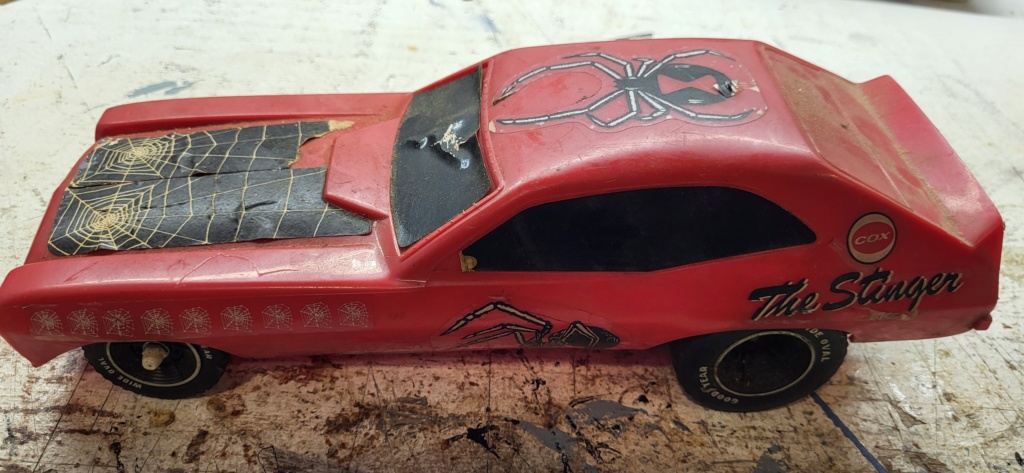
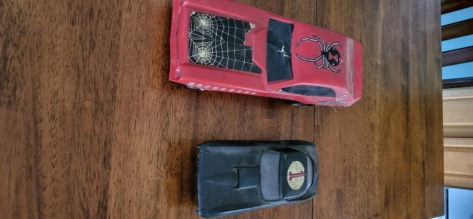
New to CEF. I just pulled my Cox cars out from the attic. I have had both of these for over 45 years. Here is a couple of pics...
The funny car I remember getting brand new as a kid, and the Vette was given to me by a neighbor right around the same time I got the funny car.
The are currently in pretty rough shape, but I intend to clean these up and display them in my family room. I am starting with the funny car, but I do have few questions.
Currently both engines are seized, and they are pretty sticky from old fuel. I was able to remove engine assembly from the frame, followed by the tank. Then I managed to remove the needle/spring successfully. I have sprayed around the cylinder area and in the gas inlet with Gumout and PB Blaster, currently letting it sit and hoping they will free up.
Now for a couple of questions...
Am I approaching this process correctly?
Should I get the cylinder head tool for each engine? What sizes do I need and where is the best place to get them?
That's it for now. Thanks in advance for all of your responses!
1
2

3

New to CEF. I just pulled my Cox cars out from the attic. I have had both of these for over 45 years. Here is a couple of pics...
The funny car I remember getting brand new as a kid, and the Vette was given to me by a neighbor right around the same time I got the funny car.
The are currently in pretty rough shape, but I intend to clean these up and display them in my family room. I am starting with the funny car, but I do have few questions.
Currently both engines are seized, and they are pretty sticky from old fuel. I was able to remove engine assembly from the frame, followed by the tank. Then I managed to remove the needle/spring successfully. I have sprayed around the cylinder area and in the gas inlet with Gumout and PB Blaster, currently letting it sit and hoping they will free up.
Now for a couple of questions...
Am I approaching this process correctly?
Should I get the cylinder head tool for each engine? What sizes do I need and where is the best place to get them?
That's it for now. Thanks in advance for all of your responses!
1

2

3

Last edited by GTO455 on Mon Apr 22, 2024 7:35 pm; edited 1 time in total

GTO455- Moderate Poster

- Posts : 12
Join date : 2024-04-22
 Re: Revivng Some Childhood Classics
Hello GTO455. Nice cars. Looking forward to your progress. What cylinder head tools are you talking about ? Perhaps glow head and cylinder wrenches. EBay has them as well as Exengines and Cox international. Both are on EBay as well. If PB blaster does not free them up you can try a little heat from a heat gun. Mark

Greenman38633- Gold Member

- Posts : 151
Join date : 2024-02-05
 Re: Revivng Some Childhood Classics
I would encourage the engine backplate removal too. The beryllium reed in the backplate is producing a blueish corrosion layer if kept gummed in castor, that is eating it away beyond repair...once the backplate is removed, the engine sunk in alcohol will get flushed in its internal too and will be easier to free up from gumming, even if the cylinder is not removed (removal is also not recommended unless the user is familiar with the correct use of wrenches)

balogh- Top Poster


Posts : 4951
Join date : 2011-11-06
Age : 66
Location : Budapest Hungary
 Re: Revivng Some Childhood Classics
Hi GTO455 You got some nice old cars there the pinto funny car 1972-76 and the Vette 1965-70
https://www.mh-aerotools.de/airfoils/cox_frameset.htm I would suggest taking the engine apart as needed and put a tune up kit in it the wrench you need for the glow plug > https://coxengines.ca/back-end/cox--049-babe-bee-overhaul-kit.htmlhttps://coxengines.ca/tooling/cox--049-wrench.html Bee careful with the wrench don't put in cly or could dent it there is plenty of stuff here in search for cleaning engines here is one https://www.coxengineforum.com/t15171-engine-cleaning?highlight=cleaning+babe+bee+engines If you need more help just ask ! Welcome to the forum
https://www.mh-aerotools.de/airfoils/cox_frameset.htm I would suggest taking the engine apart as needed and put a tune up kit in it the wrench you need for the glow plug > https://coxengines.ca/back-end/cox--049-babe-bee-overhaul-kit.htmlhttps://coxengines.ca/tooling/cox--049-wrench.html Bee careful with the wrench don't put in cly or could dent it there is plenty of stuff here in search for cleaning engines here is one https://www.coxengineforum.com/t15171-engine-cleaning?highlight=cleaning+babe+bee+engines If you need more help just ask ! Welcome to the forum

getback- Top Poster


Posts : 10428
Join date : 2013-01-18
Age : 67
Location : julian , NC
 Re: Revivng Some Childhood Classics
It's nice that you kept some of your childhood treasures.
Be careful if you disassemble, parts can be broken. Two times these are at greatest risk, first and greatest is when a novice "takes one apart" second is when it's running.
I would not attempt a thing on the engine before a Berrymans or alcohol soak, not even a turning of the crankshaft. Then only with heat combined with Marvel Myster oil.
As Eric mentioned, do a search here, lot's of information regarding engine cleaning and the Pinto Funny car.
There are many, here's one of mine. Good luck with yours.
https://www.coxengineforum.com/t12544-cox-pinto-funny-car-almost-to-easy?highlight=cox+funny+car

rsv1cox- Top Poster


Posts : 11214
Join date : 2014-08-18
Location : West Virginia
 Re: Revivng Some Childhood Classics
The Stinger is a simplified version of the Pinto dragster. No dummy engine and parachute. The parts look the same although have deferent part numbers. If you want to clean for display leave the cylinder, flywheel and glow head alone. Remove backplate and a few drops of solvent on the crank and cylinder should free it up followed by light oil. Glow head removal is difficult cause cylinder has no provisions for wrench, I use a leather strap around cylinder some use pliers. For body try dish soap and brush careful of the decals cause you will not find replacements. The fuel tank is rare part always asked for. Your model Stinger looks to be in very good condition.
If you're looking to run it that's a different story.
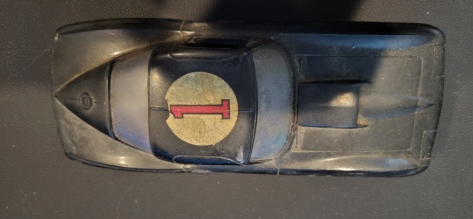
Photos of Corvette?
If you're looking to run it that's a different story.

Photos of Corvette?

crankbndr- Top Poster

- Posts : 3109
Join date : 2011-12-10
Location : Homestead FL
 Re: Revivng Some Childhood Classics
I had many Stinger funny cars. My dad's drag racing buddies got a kick out of seeing me use mine and they all bought them. I would receive the wrecks from them. These were essentially the last of the funny cars. Early versions shared the same wheels as the Eliminator and Pinto.White center wheels and rubber tires. Later versions were the hard plastic you have on your model. The hex molded into the wheel is problematic and splits which allows the axle to spin inside. So don't try and free the engine by rotation of the wheels, use heat.

Ken Cook- Top Poster

- Posts : 5633
Join date : 2012-03-27
Location : pennsylvania
 Re: Revivng Some Childhood Classics
Thanks for the welcomes, the responses, and especially the tips everyone. I really do appreciate it!
I do plan on taking my time on these, so it might be a while until I add progress pics, and adult car-toy season is starting here soon, so its time to get that going first!
Greenman38633- I was talking about the glow head and cylinder wrenches. I did a quick search of wrenches last night and I saw a couple of different sizes, so I want sure which one to get. I think the ones GetBack posted is the one I need.
Balogh - I am assuming the backplate is the "L" shaped metal piece holding the engine to the axle. I will make sure I remove that and clean it. I did notice some blue residue on the needle when I removed it. Hopefully things won't be too far gone once I get things apart. Great idea on soaking the engine too, thank you!
GetBack - Thanks for the links! I will place the orders as soon as I can. I am assuming the Babe Bee engine is installed in the Vette, and the overhaul kit is for that. At least it looks similar to the link you provided on the engine rebuild. I am planning on doing only one car at a time. I want to take my time and not rush. If there is anything else you think I'll need please let me know.
Rsv1cox - Thank you. You're right, these things are brittle, especially after sitting in an attic for over 40 years. While the Vette is mostly metal, the Stinger is plastic, and brittle, although not as brittle as I thought it would be.
Crankbndr - I did see the post on the Pinto rebuild on the forum and was totally confused. I didn't think I had a dummy engine or parachute, but then my mind started playing tricks on me, thinking I must of had them at one point and threw them out. I also saw a lot of comments about the tank. Its a shame they aren't reproduced, it seems they would be easy enough to recreate with a 3D printer.
My plan was to remove some of the decals, and least the black paper ones on the hood and windows since they were bubbling and torn. is it best to leave them on? My intent was to replace them with a vinyl product that is used to make sign letters (a former occupation of mine). BTW, Vette photos are forthcoming for you.
Ken Cook - Thanks for the tips. I thought to myself last night while trying to free things up that using the wheels might not be the best method. Thoughts confirmed. Thank you.
So are you all saying these things can still run? How can that be? I remember buying the kits as a kid that included the battery, wires and can of fuel and wrenches many years ago, but I thought they stopped making them. Wasn't the fuel something like a derivative of Nitro Methane? I can still smell that smell. It's amazing what we were allowed to do as kids!
Thanks again everyone! Keeps the tips coming!
Charlie

GTO455- Moderate Poster

- Posts : 12
Join date : 2024-04-22
 Re: Revivng Some Childhood Classics
Hi Charlie , there are a few things repo'ed out there > https://www.ebay.com/sch/i.html?_from=R40&_trksid=p4432023.m570.l1313&_nkw=cox+funny+car+repo+fuel+tanks&_sacat=0 Are you thinking of running it ? The stuff to do this is still available . After getting it cleaned and all parts will probable run you 50- to get you up and going after a good cleaning I don't see why it wouldn't unless you have lost compression and that can bee fixed too LOL . 


getback- Top Poster


Posts : 10428
Join date : 2013-01-18
Age : 67
Location : julian , NC
 Re: Revivng Some Childhood Classics
Welcome Charlie, Your post revived some memories in me too…I had a few Cox cars as a kid, Including the Vette….Quite an eye opener to about a twelve year old with all the noise and smoke!!
Yep, The engines can be rebuilt and ran, Parts and support supplies are available…. Many able mechanics on this forum to help it along… Good luck and enjoy your projects
Robert
Yep, The engines can be rebuilt and ran, Parts and support supplies are available…. Many able mechanics on this forum to help it along… Good luck and enjoy your projects
Robert

rdw777- Diamond Member


Posts : 1688
Join date : 2021-03-11
Location : West Texas
 Re: Revivng Some Childhood Classics
You're doing fine Charlie, you have the right attitude. Once you get to know your models (again) and get them cleaned up and running you may want more. They are addictive. When I first joined this forum I had a couple of airplanes and a few engines, no cars etc. Now I have lost count. Not that I'm complaining.
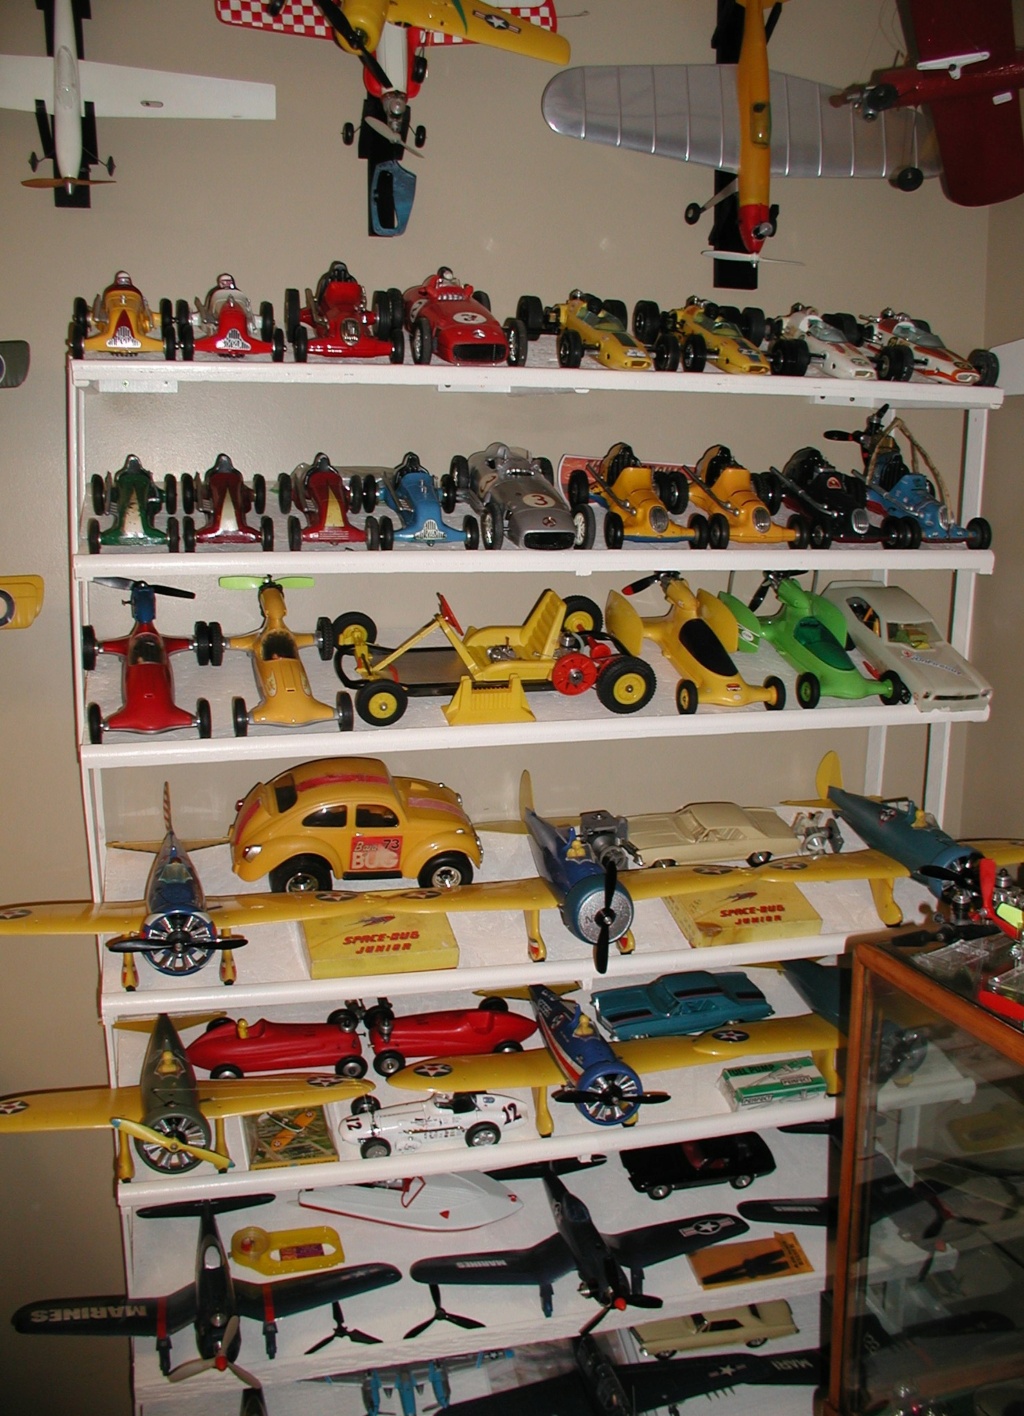
The good news is - most are priced pretty reasonable. Unless you get into the more rare and desirable models "New in the Box" etc. I got around that by buying the worst examples I could find then "fixing them up." Holy Grails are the early Roy Cox Cast models with the Cammeron and .045 engines. Then the Cox Mercedes Benz which I find to be the most interestering of all the Cox models.
Good luck with your models and engines. Post regarding them often.
Bob

rsv1cox- Top Poster


Posts : 11214
Join date : 2014-08-18
Location : West Virginia
 Re: Revivng Some Childhood Classics
WHOA, that's impressive!
4th shelf down, to the right between the 2 blue planes. Is that a 66-67 GTO? It looks like there is a similar one on the bottom shelf too.
4th shelf down, to the right between the 2 blue planes. Is that a 66-67 GTO? It looks like there is a similar one on the bottom shelf too.
rsv1cox wrote:You're doing fine Charlie, you have the right attitude. Once you get to know your models (again) and get them cleaned up and running you may want more. They are addictive. When I first joined this forum I had a couple of airplanes and a few engines, no cars etc. Now I have lost count. Not that I'm complaining.
The good news is - most are priced pretty reasonable. Unless you get into the more rare and desirable models "New in the Box" etc. I got around that by buying the worst examples I could find then "fixing them up." Holy Grails are the early Roy Cox Cast models with the Cammeron and .045 engines. Then the Cox Mercedes Benz which I find to be the most interestering of all the Cox models.
Good luck with your models and engines. Post regarding them often.
Bob

GTO455- Moderate Poster

- Posts : 12
Join date : 2024-04-22
 Re: Revivng Some Childhood Classics
Photos as requested.crankbndr wrote:The Stinger is a simplified version of the Pinto dragster. No dummy engine and parachute. The parts look the same although have deferent part numbers. If you want to clean for display leave the cylinder, flywheel and glow head alone. Remove backplate and a few drops of solvent on the crank and cylinder should free it up followed by light oil. Glow head removal is difficult cause cylinder has no provisions for wrench, I use a leather strap around cylinder some use pliers. For body try dish soap and brush careful of the decals cause you will not find replacements. The fuel tank is rare part always asked for. Your model Stinger looks to be in very good condition.
If you're looking to run it that's a different story.
Photos of Corvette?
1
2

3


GTO455- Moderate Poster

- Posts : 12
Join date : 2024-04-22
 Re: Revivng Some Childhood Classics
One moreGTO455 wrote:Photos as requested.crankbndr wrote:The Stinger is a simplified version of the Pinto dragster. No dummy engine and parachute. The parts look the same although have deferent part numbers. If you want to clean for display leave the cylinder, flywheel and glow head alone. Remove backplate and a few drops of solvent on the crank and cylinder should free it up followed by light oil. Glow head removal is difficult cause cylinder has no provisions for wrench, I use a leather strap around cylinder some use pliers. For body try dish soap and brush careful of the decals cause you will not find replacements. The fuel tank is rare part always asked for. Your model Stinger looks to be in very good condition.
If you're looking to run it that's a different story.
Photos of Corvette?
1
2
3


GTO455- Moderate Poster

- Posts : 12
Join date : 2024-04-22
 Re: Revivng Some Childhood Classics
"4th shelf down, to the right between the 2 blue planes. Is that a 66-67 GTO?"
Buick Rivieras Charlie, '64 and '65 model years. Only difference was the headlights. I had a blue '64, fastest I have ever driven any car. Straight line string tether (see eyelets) or you could build a bridle, there are holes in the frame for this. Got a 64 Corvette, beat to death when I got it. Fun stuff.


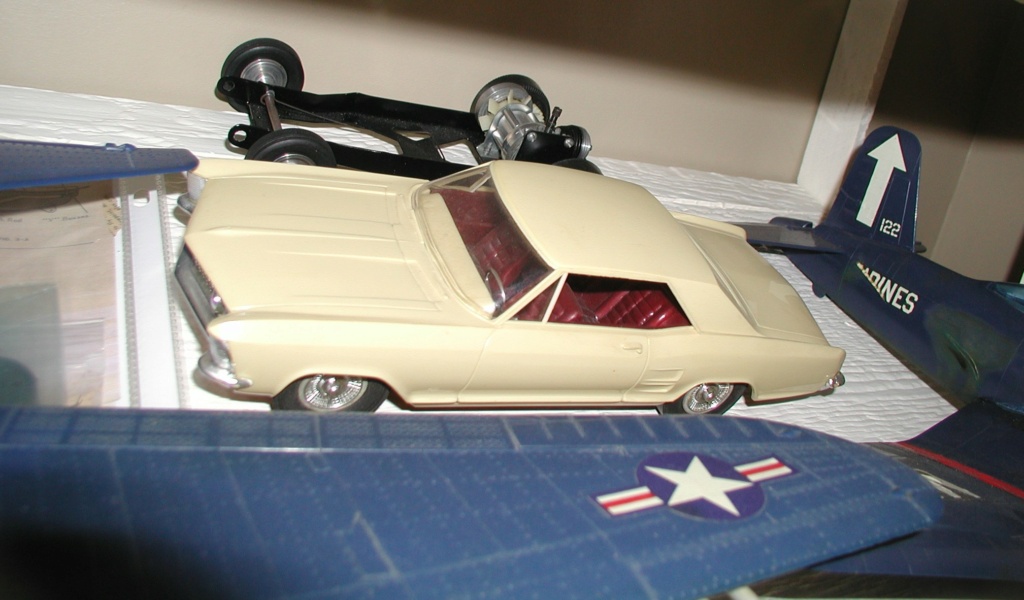
Buick Rivieras Charlie, '64 and '65 model years. Only difference was the headlights. I had a blue '64, fastest I have ever driven any car. Straight line string tether (see eyelets) or you could build a bridle, there are holes in the frame for this. Got a 64 Corvette, beat to death when I got it. Fun stuff.


rsv1cox- Top Poster


Posts : 11214
Join date : 2014-08-18
Location : West Virginia
 Re: Revivng Some Childhood Classics
Nice ! Those 4 screws at the Babe Bee back plate will get the engine out to work on // you will need to take that wheel off i am pretty sure !?

getback- Top Poster


Posts : 10428
Join date : 2013-01-18
Age : 67
Location : julian , NC
 Re: Revivng Some Childhood Classics
As Eric says, remove those four screws on the backplate and a couple form the bottom gets the engine out. They are self-tappers into the metal backplate. You may notice that I had to use machine screws on the Corvette as the backplate holes were hogged out. Then remove the slotted head screw holding the gear on and carefully pry the flywheel and cooling fan off. Rest is easy. I'm showing the three basic styles that Cox offered, similiar but not exactly the same.
Pictures are worth many words but they do take time to load.

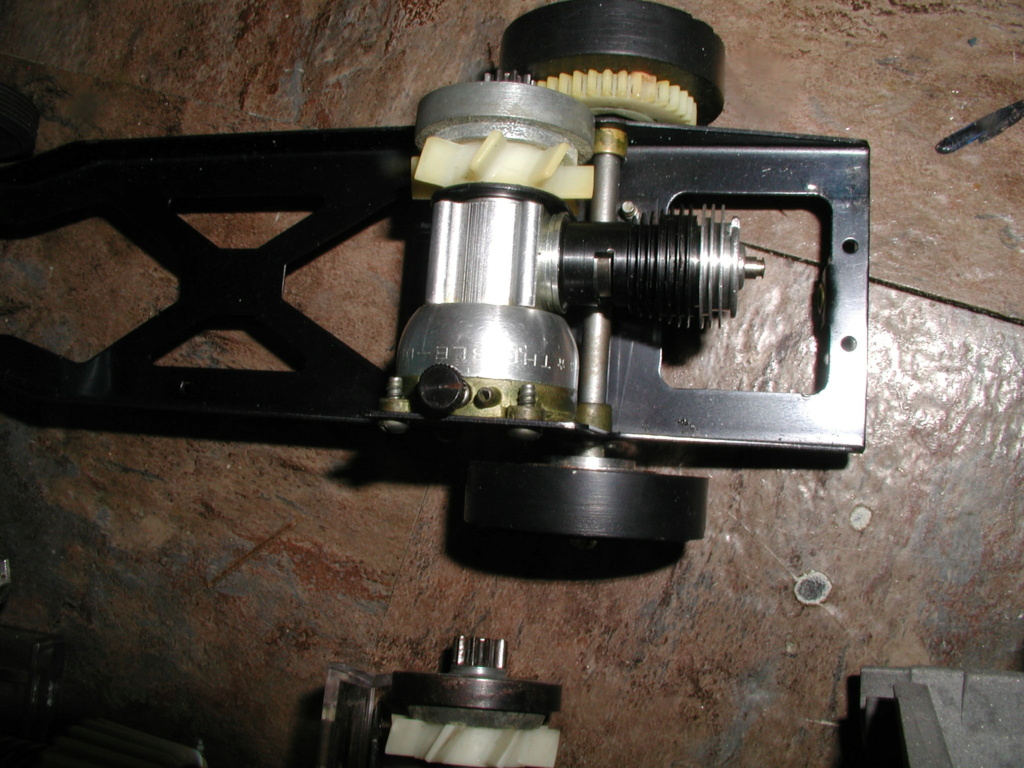


Wen Mac can be even more crazy. Check the belt drive Cart on the middle shelf above.

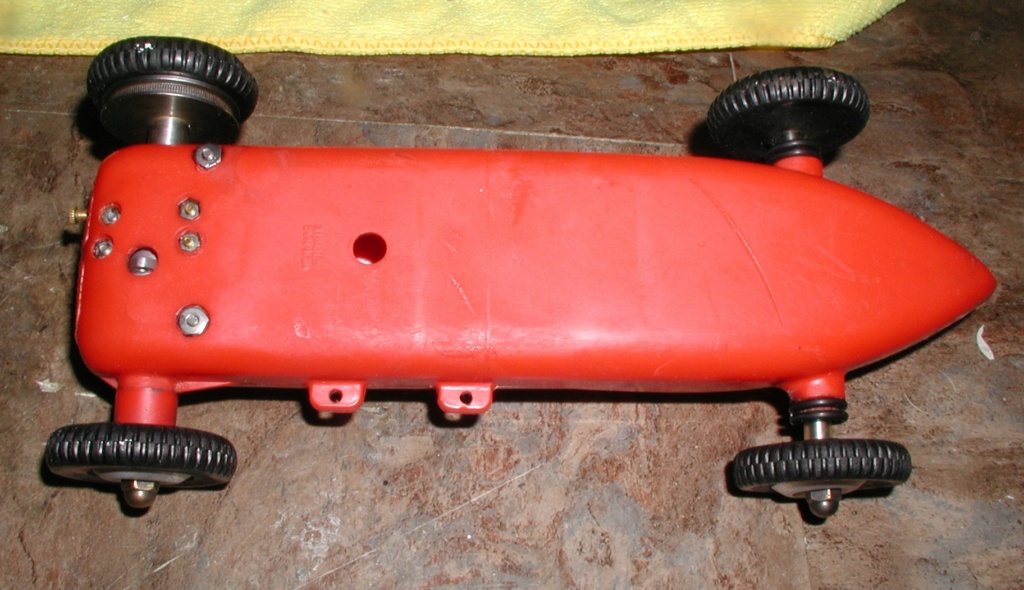

Pictures are worth many words but they do take time to load.


Wen Mac can be even more crazy. Check the belt drive Cart on the middle shelf above.


rsv1cox- Top Poster


Posts : 11214
Join date : 2014-08-18
Location : West Virginia
 Re: Revivng Some Childhood Classics
rsv1cox wrote:As Eric says, remove those four screws on the backplate and a couple form the bottom gets the engine out. They are self-tappers into the metal backplate. You may notice that I had to use machine screws on the Corvette as the backplate holes were hogged out. Then remove the slotted head screw holding the gear on and carefully pry the flywheel and cooling fan off. Rest is easy. I'm showing the three basic styles that Cox offered, similiar but not exactly the same.
Pictures are worth many words but they do take time to load.
Thank you!. I am focusing on the dragster first, so it doesnt have the 4 backplate screws.
I was able to remove the self-tapping machine screws from the backplate on the dragster, but there isn't enough clearance for the gear with the screw in it to move past the larger gear. I tried loosening the slotted screw in the smaller gear but it wouldn't budge. I will try again tonight now that I know it can be removed. I am hesitant to use heat here because its mostly plastic.
edit: Oh my God is that a pull start on that one motor in the center? Amazing!

GTO455- Moderate Poster

- Posts : 12
Join date : 2024-04-22
 Re: Revivng Some Childhood Classics
To answer your first question:
Should I get the cylinder head tool for each engine? What sizes do I need and where is the best place to get them?
Best place to get them? ebay, or maybe some one will send you some. PM me your address.
But.....use them correctly. The encompassing round cylinder head tool is the best. The forked part is used to hold or remove the cylinder. BUT only before heat is applied first and the engine is clean. If the cylinder comes off while removing the head, insert the fork fully into the exhaust ports heat and turn the head tool. I usually buffer the forks with masking tape first but that may be over-kill. Cox also made a "short fork" tool that I never use for this.
Screwdrivers- a good nicely chisled 1/8" only on the back plate screws, HEAT! Anything else is to big. Angers me to see buggered case screws and hogged out holes.
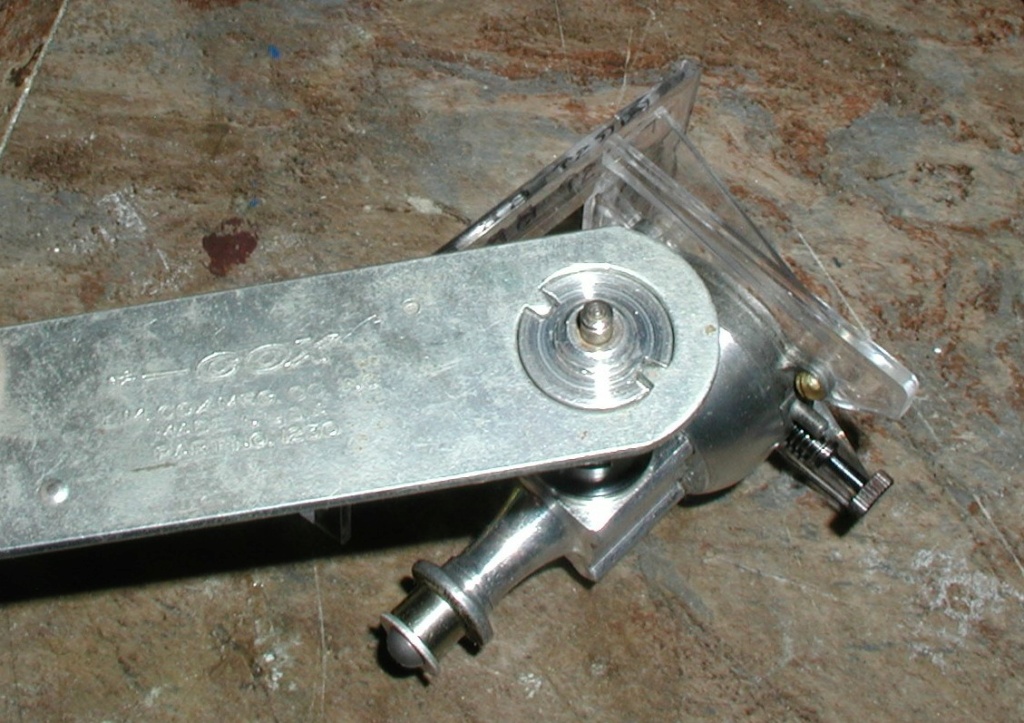


Localized heat on that retaining machine screw. A good pencil iron works well. Works even better on Phillips head screws.
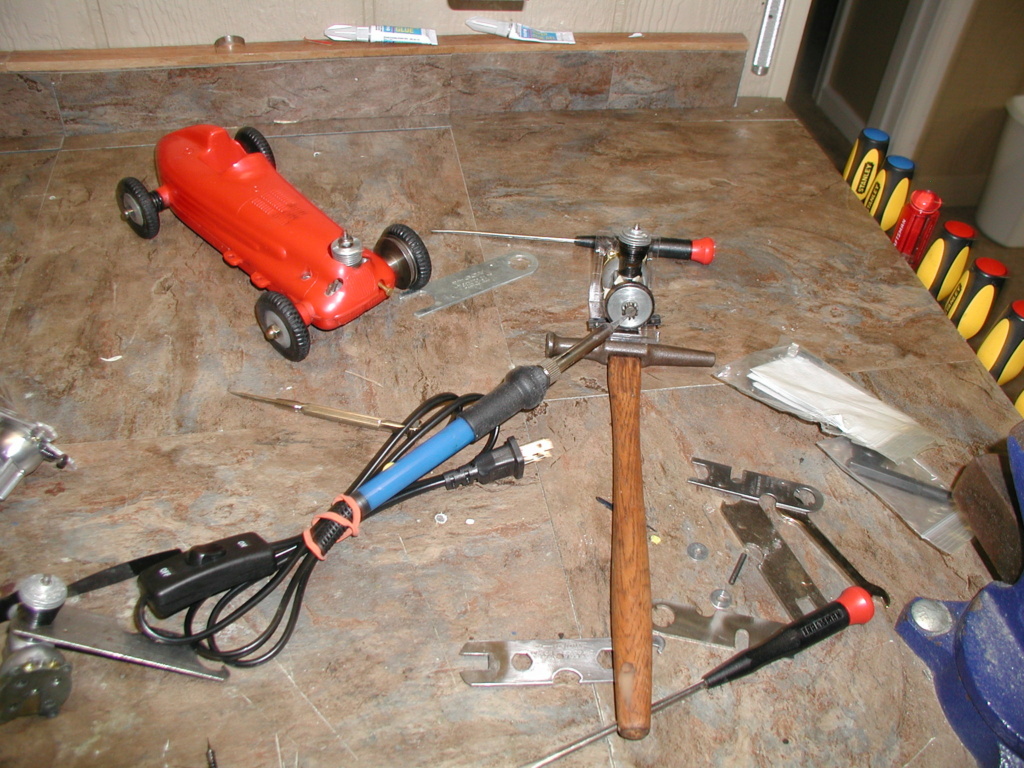
Should I get the cylinder head tool for each engine? What sizes do I need and where is the best place to get them?
Best place to get them? ebay, or maybe some one will send you some. PM me your address.
But.....use them correctly. The encompassing round cylinder head tool is the best. The forked part is used to hold or remove the cylinder. BUT only before heat is applied first and the engine is clean. If the cylinder comes off while removing the head, insert the fork fully into the exhaust ports heat and turn the head tool. I usually buffer the forks with masking tape first but that may be over-kill. Cox also made a "short fork" tool that I never use for this.
Screwdrivers- a good nicely chisled 1/8" only on the back plate screws, HEAT! Anything else is to big. Angers me to see buggered case screws and hogged out holes.


Localized heat on that retaining machine screw. A good pencil iron works well. Works even better on Phillips head screws.


rsv1cox- Top Poster


Posts : 11214
Join date : 2014-08-18
Location : West Virginia
 Re: Revivng Some Childhood Classics
GTO455 wrote:
Oh my God is that a pull start on that one motor in the center? Amazing!
Hi Charlie, Yes.. Cox put recoil/pull-start systems in a few of their models..
Their "Sea Bee" boat..
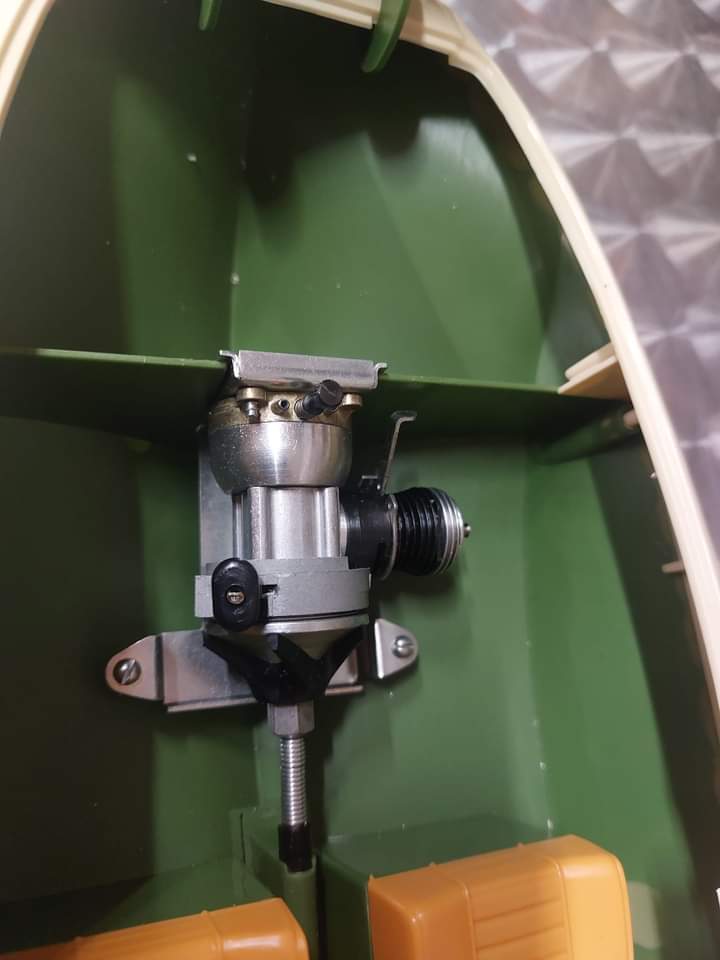
"Sandblaster"

"Ski-Doo" Snowmobile

"Command Jeep"
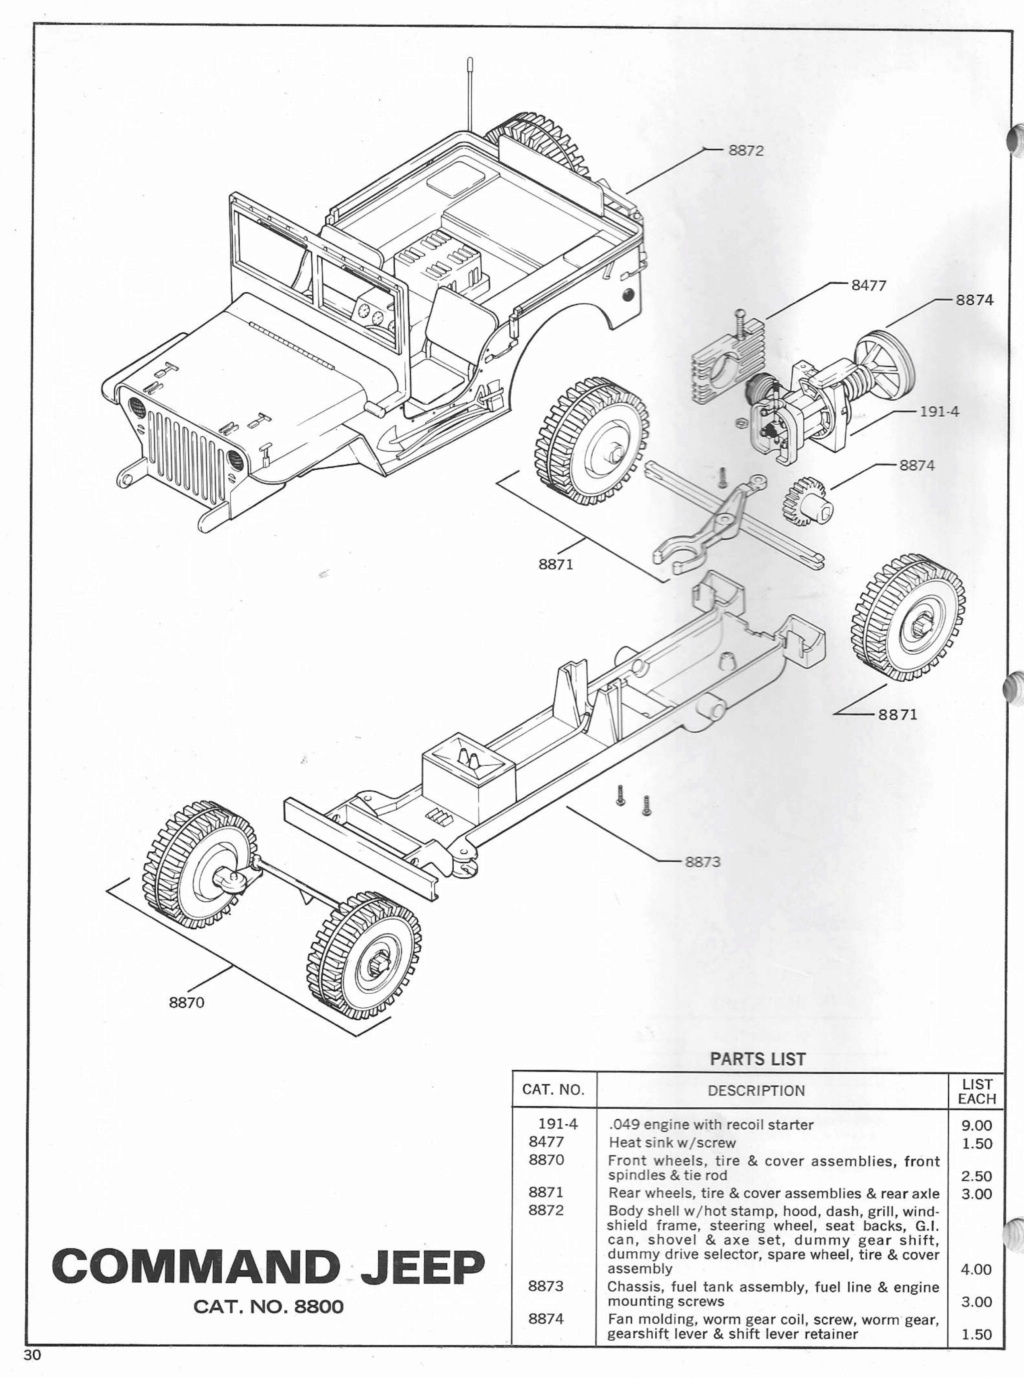
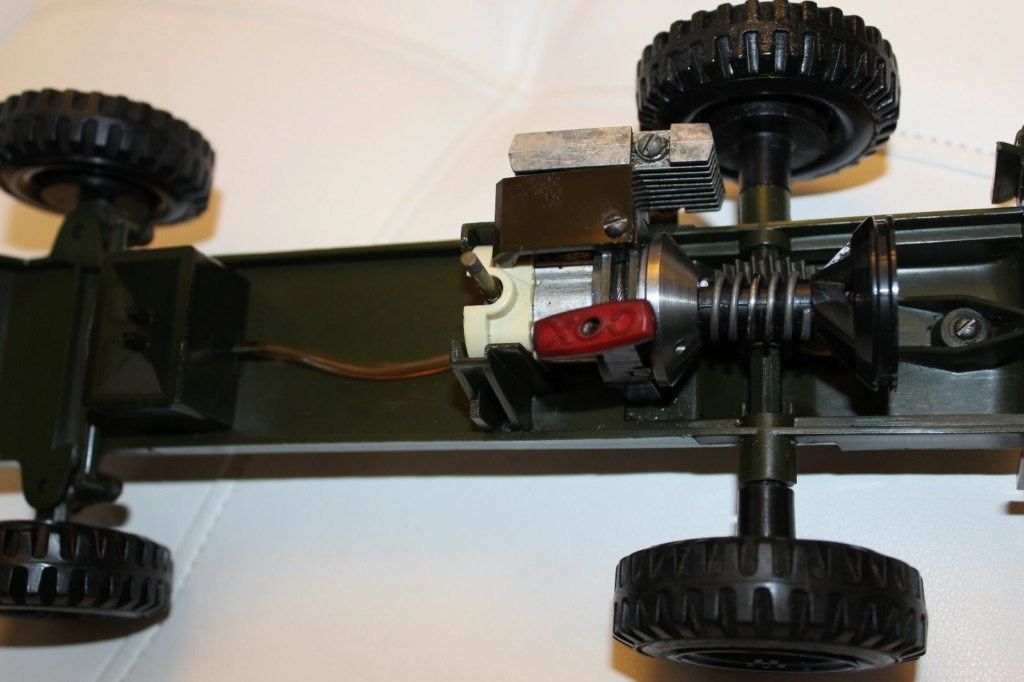
and many others..
Incidentally.. not sure if you knew; Cox made a Pontiac GTO tether car.


I'm thinking that you might want to find one of those......
 Re: Revivng Some Childhood Classics
Incidentally.. not sure if you knew; Cox made a Pontiac GTO tether car.
I'm thinking that you might want to find one of those......
I just recently (as in 2 days ago) found that out. There is one of those currently on ebay for $450. A little too rich for my blood. Have a real one anyway, and that is expensive enough maintain.


GTO455- Moderate Poster

- Posts : 12
Join date : 2024-04-22
 Re: Revivng Some Childhood Classics
The flywheel, fan and gear are one piece pressed onto the crankshaft. The crank has to be driven out the flywheel with a punch on a completely dissembled engine. Removing that screw won't help. There has to be another way. I don't have one in my hands to look at.

crankbndr- Top Poster

- Posts : 3109
Join date : 2011-12-10
Location : Homestead FL
Page 1 of 2 • 1, 2 
 Similar topics
» Air Classics May 2023
» A Plug for Air Classics Magazine
» Found an Ad for this in Air Classics this morning.
» February Issue "Air Classics" Magazine
» Air Classics Magazine, never ceases to amaze
» A Plug for Air Classics Magazine
» Found an Ad for this in Air Classics this morning.
» February Issue "Air Classics" Magazine
» Air Classics Magazine, never ceases to amaze
Page 1 of 2
Permissions in this forum:
You cannot reply to topics in this forum

 Rules
Rules


