Log in
Search
Latest topics
» Roger Harris revisitedby rsv1cox Today at 3:38 pm
» My N-1R build log
by GallopingGhostler Today at 3:04 pm
» Tee Dee .020 combat model
by 1/2A Nut Today at 2:43 pm
» Chocolate chip cookie dough.........
by roddie Today at 1:13 pm
» Purchased the last of any bult engines from Ken Enya
by sosam117 Today at 11:32 am
» Free Flight Radio Assist
by rdw777 Today at 9:24 am
» My latest doodle...
by batjac Yesterday at 9:47 pm
» Funny what you find when you go looking
by rsv1cox Wed Nov 20, 2024 3:21 pm
» Landing-gear tips
by 1975 control line guy Wed Nov 20, 2024 8:17 am
» Cox NaBOO - Just in time for Halloween
by rsv1cox Tue Nov 19, 2024 6:35 pm
» Canada Post strike - We are still shipping :)
by Cox International Tue Nov 19, 2024 12:01 pm
» Duende V model from RC Model magazine 1983.
by getback Tue Nov 19, 2024 6:08 am
Cox Engine of The Month
Cox powered jet-pump for model Sprint Boat
Page 2 of 4
Page 2 of 4 •  1, 2, 3, 4
 Re: Cox powered jet-pump for model Sprint Boat
Mike1484 wrote:I like the boat Rodie looks fast just siting there. The exhaust trottles work pretty good and don't take up much room.
Mike1484
Thanks again Mike, Yea... I have one cylinder/ring set but I've never tried it. Yes; they work very well and have fast throttle-response. When compared to the Ace venturi throttle; the Cox exhaust-throttle is like a supercharger compared to a turbocharger.
There's another reason why I wouldn't use the exhaust-throttle in this particular application.. and that's because I'm using one of my mufflers; equipped with a full-flow header-pipe and tubing... to route the exhaust through the transom.
 engine-pump alignment
I took some measurements from the bilge (technically) to the center of the drive-coupling on the pump.. to compare with the engine (a Cox Babe Bee) to see if they were close enough to connect to each other via a straight-shaft. To be possible; this would require the Cox engine to be mounted at 90 degrees to the flat-bottomed bilge on my proposed hull-design.
Here's a few photos of my findings..
Bilge to pump-coupling distance..

Bilge to engine-coupling distance..

YES! I didn't want to "have to" use a flexible union between the two.. and now I know that I won't need to.
I'll be routing the fuel pick-up through the side of a 5cc tank-bowl.. in order to use my homemade 15cc clunk-style fuel tank. This would allow rotating the Bee's tank-backplate horizontal to the vertically-oriented engine-cylinder. (are you getting all of this? )
)
Doing so would allow a tad more clearance for the bottom-two mounting-screws in a bulkhead.

Here's a few photos of my findings..
Bilge to pump-coupling distance..

Bilge to engine-coupling distance..

YES! I didn't want to "have to" use a flexible union between the two.. and now I know that I won't need to.
I'll be routing the fuel pick-up through the side of a 5cc tank-bowl.. in order to use my homemade 15cc clunk-style fuel tank. This would allow rotating the Bee's tank-backplate horizontal to the vertically-oriented engine-cylinder. (are you getting all of this?
Doing so would allow a tad more clearance for the bottom-two mounting-screws in a bulkhead.

 Re: Cox powered jet-pump for model Sprint Boat
Well, isn't this interesting! Hopefully I will be able to come around a bit more often now and keep up with all I have been missing, and missing I was!

NEW222- Top Poster

- Posts : 3896
Join date : 2011-08-13
Age : 46
Location : oakbank, mb
 Re: Cox powered jet-pump for model Sprint Boat
All of my #6 cylinders have a anemic run to them. I had these and was wondering of their whereabouts. I discovered they were from the later 1970's introduced QZ engines my dad purchased back in the day. I have the mufflers for them as well and I always questioned where they came from. These are non spi cylinders made for working with mufflers as the exhaust cutout in the cylinder has been narrowed and raised to prevent exhaust back into the cylinders. The high comp 1702 head was also used with them. They run fine with the standard head but my examples never achieved the rpm's that my #1 cylinders offer. Both are dual bypass cylinders. Run time is considerably short with a honkin #1 using a standard Babe Bee tank. When muffled, mine barely break into the mid 13K range whereas a standard single ported Bee is offering 1000 more rpm's if not more.

Ken Cook- Top Poster

- Posts : 5637
Join date : 2012-03-27
Location : pennsylvania
 Re: Cox powered jet-pump for model Sprint Boat
Ken Cook wrote: All of my #6 cylinders have a anemic run to them. I had these and was wondering of their whereabouts. I discovered they were from the later 1970's introduced QZ engines my dad purchased back in the day. I have the mufflers for them as well and I always questioned where they came from. These are non spi cylinders made for working with mufflers as the exhaust cutout in the cylinder has been narrowed and raised to prevent exhaust back into the cylinders. The high comp 1702 head was also used with them. They run fine with the standard head but my examples never achieved the rpm's that my #1 cylinders offer. Both are dual bypass cylinders. Run time is considerably short with a honkin #1 using a standard Babe Bee tank. When muffled, mine barely break into the mid 13K range whereas a standard single ported Bee is offering 1000 more rpm's if not more.
Hey Ken, Good to share some intel on the QZ engine.
 I haven't completely configured the engine for this jet-pump drive yet.. but it will use my muffler design. I intend to set it up with a single; minimally-restrictive (full-flowing) header-pipe.. enabling me to route the exhaust/oil-mist out through the transom.. sorta like "scale".. but also keeping waste-oil out of the bilge.
My muffler design could be called a "baffle"... or an "expansion-chamber".. (insert option)... but it is in no way comparable to any Cox OEM muffler. The back-pressure of my design is infinitely-adjustable. That said; will it allow an SPI cylinder to "breathe" enough.. to make it worth using one?
Higher-performance comes after reliability is achieved.
 Re: Cox powered jet-pump for model Sprint Boat
The new pump-coupling hasn't come yet. The weather has been extreme.. and may have played a part in my parcel's delay. 
This coupling could possibly eliminate the need for other one.. but it depends on how much clearance is needed to swap an engine.. if I had to.
The new coupling's O.D. should clear the opening on the drive's face-plate with room to spare. Not easy to describe without a photo for perspective.
This coupling could possibly eliminate the need for other one.. but it depends on how much clearance is needed to swap an engine.. if I had to.
The new coupling's O.D. should clear the opening on the drive's face-plate with room to spare. Not easy to describe without a photo for perspective.
 adaptive pump couplings received
I received the "pump-side" adaptive-couplings this past week. To recap; the OEM coupling had a 3mm bore/side to fit the pump's impeller-shaft.. and a 2.3mm bore/side to accept the output-shaft of an RS380 series electric can-motor for input-power to the pump.
I ordered/received adapter couplings having a 3mm/3.17mm to receive a 1/8" diameter flex/drive-shaft from my Cox .049 engine.
Some images...


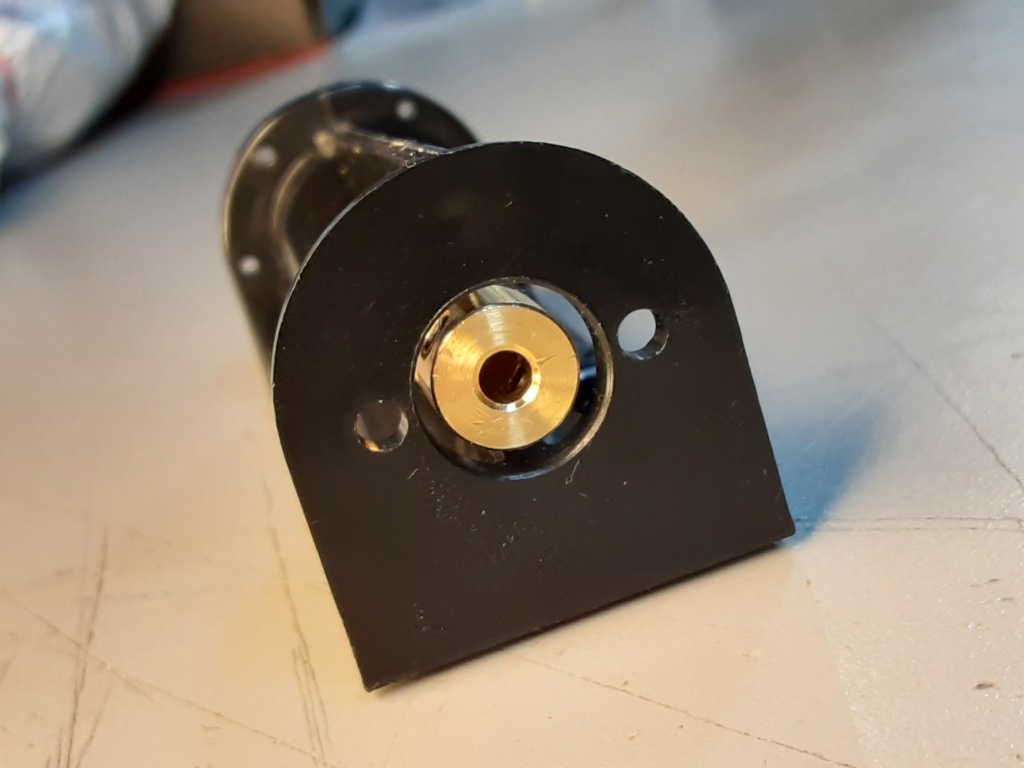
So.. there it is; utilizing the smaller set-screws.. (unfortunately..) but I can overlook that. It's the coupling that I needed. What's more; I'll have spares to adapt conventional marine inboard shaft-drives for my Cox .049/.051 glow-engines to metric if need be.
I ordered/received adapter couplings having a 3mm/3.17mm to receive a 1/8" diameter flex/drive-shaft from my Cox .049 engine.
Some images...


So.. there it is; utilizing the smaller set-screws.. (unfortunately..) but I can overlook that. It's the coupling that I needed. What's more; I'll have spares to adapt conventional marine inboard shaft-drives for my Cox .049/.051 glow-engines to metric if need be.
 Cox Jet-Pump summary (WIP)
I have some intel on the jet-pumps.. (not that it will help any of you..) The pump-assemblies that I sourced.. are likely an over-run.. (production-run).
They may have failed inspection.. been sorted as "seconds"... what ever.
Spare parts are not available through my source.. and I can't seem to find further intel.
What we don't know; is for what model(s) this little drive was designed for. Not that it's a must know thing.. but might help in scope.
stay tuned...
 Re: Cox powered jet-pump for model Sprint Boat
Hi roddie,
I made an R/C Jeep from the 'Cox Sandblaster' power unit. (wore out the wheels)
Also a Cox.049 Boat that went good.
That Cox Heatsink works very well.
As long it it gets some airflow around it....
Thanks for sharing your cool project.
Take care,
Have fun,
Dave
I made an R/C Jeep from the 'Cox Sandblaster' power unit. (wore out the wheels)
Also a Cox.049 Boat that went good.
That Cox Heatsink works very well.
As long it it gets some airflow around it....
Thanks for sharing your cool project.
Take care,
Have fun,
Dave

HalfaDave- Platinum Member

- Posts : 615
Join date : 2022-12-06
Location : Oakville, Ontario
 Re: Cox powered jet-pump for model Sprint Boat
HalfaDave wrote:Hi roddie,
I made an R/C Jeep from the 'Cox Sandblaster' power unit. (wore out the wheels)
Also a Cox.049 Boat that went good.
That Cox Heatsink works very well.
As long it it gets some airflow around it....
Thanks for sharing your cool project.
Take care,
Have fun,
Dave
Thanks for your interest Dave. I like the Cox heatsinks (#1970) and utilized one on my Rodd-E-Liminator (thread) tether-car.
 more OCD tinkering..
I found an o-ring in my stock that should work well for starting the engine. I had to reconfigure my flywheel; widening the groove to prevent the o-ring from binding.
The small-diameter disc is 3mm PVC (.118") and replaces the .080" thickness aluminum one.


I made-up another identical flywheel assy. to "retro-fit" my homemade electric starter.

I'm kinda' stuck on how to mount the engine and pump into the prospective hull. I don't have access to a CNC mill any more.. which would make things a little easier.
The front of the pump-housing has a flange for mounting a 380 class brushed-elec. motor which I hope to tie-into with a bulkhead to help support both; the pump and engine when engaging the elec. starter.
I'd also like to be able to remove the engine separately if need be.
The small-diameter disc is 3mm PVC (.118") and replaces the .080" thickness aluminum one.


I made-up another identical flywheel assy. to "retro-fit" my homemade electric starter.

I'm kinda' stuck on how to mount the engine and pump into the prospective hull.
 I don't have access to a CNC mill any more.. which would make things a little easier.
 The front of the pump-housing has a flange for mounting a 380 class brushed-elec. motor which I hope to tie-into with a bulkhead to help support both; the pump and engine when engaging the elec. starter.

I'd also like to be able to remove the engine separately if need be.
Last edited by roddie on Tue Jan 23, 2024 3:39 am; edited 1 time in total (Reason for editing : added a photo)
 Re: Cox powered jet-pump for model Sprint Boat
This has been an interesting thread roddie … Quite mechanical in nature and you have already worked thru getting the pump and motor coupled together well  …
…
On mounting in the boat, Maybe consider a modular approach?… From what I can see in the photos the pump’s inlet screen and nozzle is bolted on from the outside?…. Maybe the motor and pump as a unit can go on a “mount” that bolts to hard points in the boat, Then screen and nozzle added in place……Might help with alignments as well between pump and motor…... You may already have a plan, But just thinkin’ …. Neat project
 …
…On mounting in the boat, Maybe consider a modular approach?… From what I can see in the photos the pump’s inlet screen and nozzle is bolted on from the outside?…. Maybe the motor and pump as a unit can go on a “mount” that bolts to hard points in the boat, Then screen and nozzle added in place……Might help with alignments as well between pump and motor…... You may already have a plan, But just thinkin’ …. Neat project

rdw777- Diamond Member


Posts : 1718
Join date : 2021-03-11
Location : West Texas
 Re: Cox powered jet-pump for model Sprint Boat
rdw777 wrote:This has been an interesting thread roddie … Quite mechanical in nature and you have already worked thru getting the pump and motor coupled together well…
On mounting in the boat, Maybe consider a modular approach?… From what I can see in the photos the pump’s inlet screen and nozzle is bolted on from the outside?…. Maybe the motor and pump as a unit can go on a “mount” that bolts to hard points in the boat, Then screen and nozzle added in place……Might help with alignments as well between pump and motor…... You may already have a plan, But just thinkin’ …. Neat project
Hi Robert, Yes.. getting the coupling figured out will definitely help with any future models that may require utilizing an extended output-shaft from the engine.
Yes; the inlet screen and output nozzle are "flanged" and are both external parts. More on that below..
I'm particularly thankful that CEF member gkamysz (Greg) pointed me in the right direction regarding the "size" of the pump vs. the output of the engine being used. I was ready to source a pump that would have required more power than my engine was capable of. That's not to say that this smaller pump will work, but it should put me in the ball park as far as engine-loading.
On mounting in the boat; yes.. I was thinking along those lines. The boat's construction (shell) is dictating how to proceed. The shell (bottom) is made from a piece of .040" Styrene sheet which wraps around the two "sides". The sides are made from .500" Ultraboard; a foam core.. that's double-sided with .015" styrene facers. I decided to go with that design partly because of its buoyancy characteristics. Adapting a transom will be challenging. It will need to be a thin-wall where the nozzle flange fits together.
The pumps' "inlet screen" is separated by the .040" Styrene bottom and a .031" silicone sheet gasket.. which is pretty much ultimate. I may elect to fab. the transom using the same material. The nozzle (outer transom) contains the Brass bushing for the impeller-shaft; making a thin-wall imperative.

below images show the .040" Styrene (white) against the pump's output and inlet flanges. (note that the impeller-shaft will move rearward slightly once assembled)


So.. regarding modular; I think I'll need to fab. the .040" Styrene around those two points on the pump.. before I go any further.
 Re: Cox powered jet-pump for model Sprint Boat
some progress... FF10 (FF=fudge factor..  ) Not an easy layout. I knew it wouldn't be..


The inlet and nozzle cut-outs are pretty close to being precise.. but the screw-hole patterns are "off a bit". I can make them work though.. I think..
I made a drawing that shows the "stern" with the transom outline, for my notes. As usual; I'll make a master-drawing later on.


The inlet and nozzle cut-outs are pretty close to being precise.. but the screw-hole patterns are "off a bit". I can make them work though.. I think..
I made a drawing that shows the "stern" with the transom outline, for my notes. As usual; I'll make a master-drawing later on.

 Re: Cox powered jet-pump for model Sprint Boat
I am so looking forward to the tests

robot797- Platinum Member

- Posts : 787
Join date : 2013-07-28
Age : 34
 Re: Cox powered jet-pump for model Sprint Boat
robot797 wrote:I am so looking forward to the tests
Hi Peter, I'm going to work on a fixture to test the pump with the engine. The shaft alignment is very close to being straight.. surprisingly. So much so; that I'm considering a rigid shaft.. (.125" piano-wire with flats filed for the coupling's set-screws) What I have "currently" is a semi-rigid piece of "Ace EZ" Nylon glow fuel tubing. Will it have a TF (twist-factor)
I have concerns about the integrity of the pump bushings for this application. I can assure a dead-straight coupling for a test-fixture.. but any slight mis-alignments in the "boat" could be trouble.
The 380 series motor for which this unit was designed.. faces-up directly to the pump housing.. dead-straight. This would be the control element in testing the pump with an alternate input source.
I'm as excited as you are.. and I hope to at least be able to prove-out the viability of a Cox reed-valve .049 glow engine for powering this drive.
 Re: Cox powered jet-pump for model Sprint Boat
well if you need somone to test it
I would not mind XD
I have a nice water cooled propain powered cox engine that wants something to do here
I would not mind XD
I have a nice water cooled propain powered cox engine that wants something to do here

robot797- Platinum Member

- Posts : 787
Join date : 2013-07-28
Age : 34
 Re: Cox powered jet-pump for model Sprint Boat
Getting a feel for a technique.. and choosing tooling for installing the pump. The screws are small.. and care must be taken to avoid losing any of them.
I noticed early on after 1st inspection of the parts; that some of the receiver points for the screws were not drilled-through... on both; the inlet and outlet side of the pump-housing. A #54 (.055") drill was the correct size to use for this.


Today I used the prospective boat's "bottom" (.040" Styrene) to test-fit the pump.


The screw pattern that I drilled in the transom for the nozzle.. just didn't line-up. I'll need to revisit that.
I installed the nozzle directly to the pump to facilitate a possible test-run.

I only installed 4 of the 6 screws for the nozzle.

Below image shows how thin the .040" Styrene bottom is...

I noticed early on after 1st inspection of the parts; that some of the receiver points for the screws were not drilled-through... on both; the inlet and outlet side of the pump-housing. A #54 (.055") drill was the correct size to use for this.


Today I used the prospective boat's "bottom" (.040" Styrene) to test-fit the pump.


The screw pattern that I drilled in the transom for the nozzle.. just didn't line-up. I'll need to revisit that.
I installed the nozzle directly to the pump to facilitate a possible test-run.

I only installed 4 of the 6 screws for the nozzle.

Below image shows how thin the .040" Styrene bottom is...

 Re: Cox powered jet-pump for model Sprint Boat
Got behind , looks like you have it going on over here with the fitting process / good to hear that the drive system is lining up straight for you . This should bee good hope to see some testing action soon I know you are excited about it and I am too .. How does it feel to get up and not have to go in to a work force anymore ?? Time for me to get back on some engine cleaning today got a couple giving me a hard time I need to decide what to do try and fix or sale as is ! Friend want me to take his front seat out today so his Big ass German Shepperd can ride up front LOL 


getback- Top Poster


Posts : 10441
Join date : 2013-01-18
Age : 67
Location : julian , NC
 Re: Cox powered jet-pump for model Sprint Boat
I like the planning and notes roddie ….I do similar but my notes are not nearly as organized and neat lol!!…. Seriously, They are helpful in building and also to go back to for future reference …. 


rdw777- Diamond Member


Posts : 1718
Join date : 2021-03-11
Location : West Texas
 Re: Cox powered jet-pump for model Sprint Boat
getback wrote:Got behind , looks like you have it going on over here with the fitting process / good to hear that the drive system is lining up straight for you . This should bee good hope to see some testing action soon I know you are excited about it and I am too .. How does it feel to get up and not have to go in to a work force anymore ?? Time for me to get back on some engine cleaning today got a couple giving me a hard time I need to decide what to do try and fix or sale as is ! Friend want me to take his front seat out today so his Big ass German Shepperd can ride up front LOL
Well Eric... you may have "Got behind".. but as of this post today; you're caught-up..
Retirement for me has been strange. I don't feel the way I thought I might. Coming up on a year now.. and I clearly need to make some adjustments; mainly for my physical well-being.
Did you get those engines cleaned up.. or just sell them as-is? I don't think I've ever sold anything... (just ask Lynne)
 Re: Cox powered jet-pump for model Sprint Boat
rdw777 wrote:I like the planning and notes roddie ….I do similar but my notes are not nearly as organized and neat lol!!…. Seriously, They are helpful in building and also to go back to for future reference ….
Hi Robert.
I'd been wanting to take the "back-end" off the engine to inspect. Just to recap; this is an older Babe Bee that was given to me by rsv1cox (Robert V.) several years ago.

The "larger-knob" needle and THIMBLE DROME on the tank-bowl are two back-end component indications.

I'm a fan of the copper/star-shape reed. They've always been reliable runners for me. The fuel pick-up is petrified.. Note the presence of an internal spring. The vinyl outer-tube is hardened and cloudy from age. I guess it could be as old as I am.. and I'm a bit brittle and cloudy myself.

I plan to remove it and replace it with silicone tubing. The tank-bowl might (will likely) be swapped-out for one that utilizes a remote fuel-line/cell. I'd been recently building some small (10cc) clunk-tanks. One of them would fit nicely. Their being transparent is another plus.
 Re: Cox powered jet-pump for model Sprint Boat
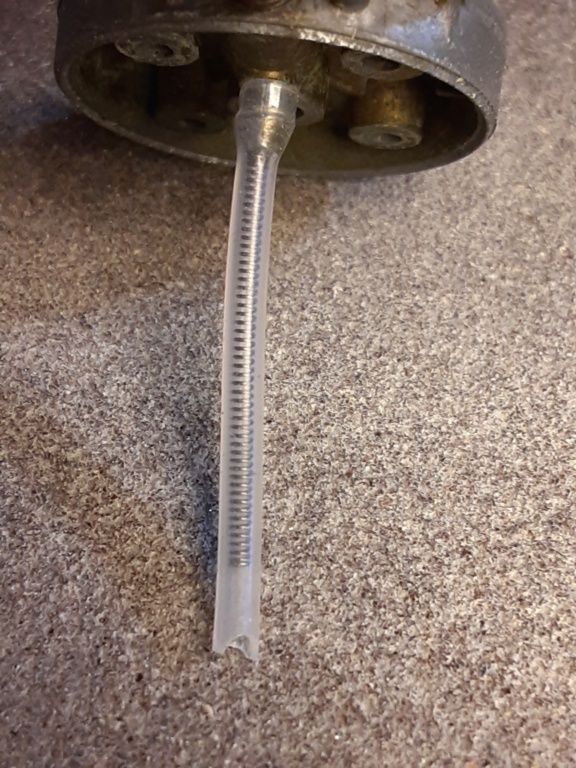
I finally got back to doing some work on this project. I replaced the fuel pick-up with some silicone tubing that I'd sourced recently. It has a .062" ID and .093" OD. I opted to install an OEM coil-spring; not something I usually do... but this tubing has a thin (.015") wall-thickness. The spring is being used as a safeguard against kinking.
I've always saved them.. and now I'm finally putting one to use.

Note below image; I "nibbled" a radius into the end of the fuel pick-up to prevent blockage.

Below image shows the installation of a venturi-tube gasket. I make them with a hole-punch using kitchen-glove material for the gasket. The thin sponge-rubber compresses nicely when when installing the tank assy. to the crankcase.
The glowhead's coil looked a little sketchy.. so I swapped it out. I like the "full circle" head-wrench. It's the only one I have with that feature.

I made a short vid; demonstrating the belt-start system. (thread HERE) I used a different engine; one that had been on my test-stand for a while. It was easier to install the flywheel on "it".. rather than doing an engine-swap. It was also a known-runner.
One of my other Cox wrenches has a "fork" which fits my supply of 5-40 hex-nuts.

There's an ample number of threads that screw-into the crankshaft. To install the flywheel assy.; I simply screw it in.. and tighten the hex-nut.

I made a stub-shaft from a 1" length of .125" (1/8") music-wire.. and filed rude-looking flats for the coupling's grub-screws to bear-on.

Just about ready for a "wet-test" with my fixture.
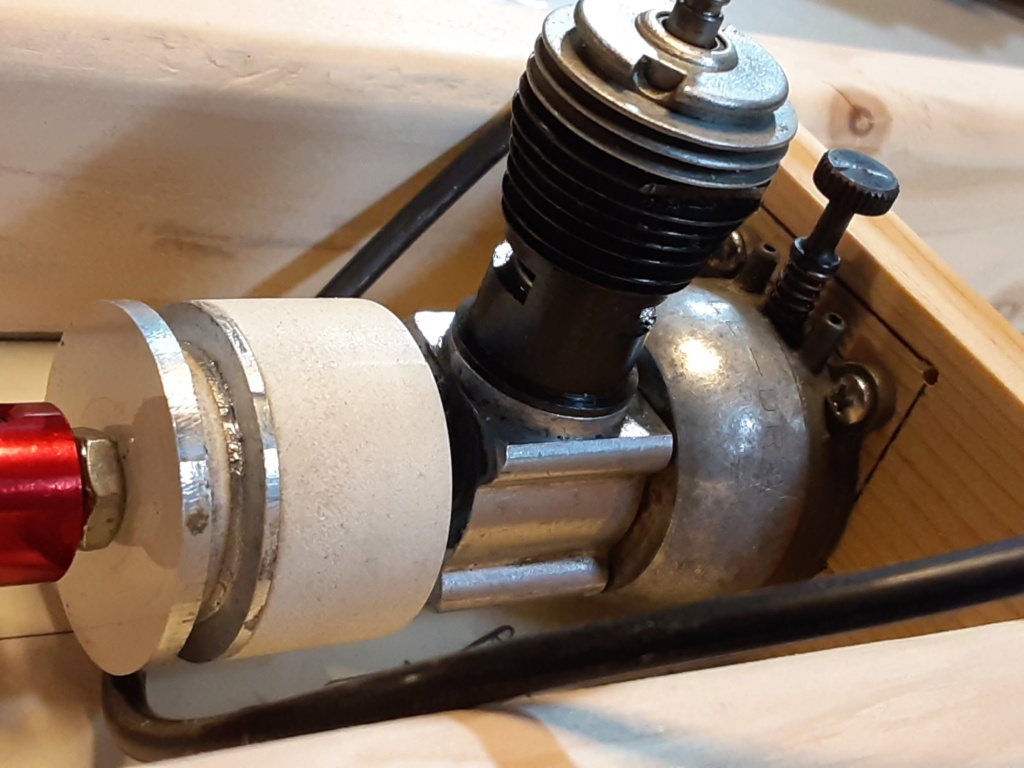

I've always saved them.. and now I'm finally putting one to use.

Note below image; I "nibbled" a radius into the end of the fuel pick-up to prevent blockage.


Below image shows the installation of a venturi-tube gasket. I make them with a hole-punch using kitchen-glove material for the gasket. The thin sponge-rubber compresses nicely when when installing the tank assy. to the crankcase.
The glowhead's coil looked a little sketchy.. so I swapped it out. I like the "full circle" head-wrench. It's the only one I have with that feature.

I made a short vid; demonstrating the belt-start system. (thread HERE) I used a different engine; one that had been on my test-stand for a while. It was easier to install the flywheel on "it".. rather than doing an engine-swap. It was also a known-runner.
One of my other Cox wrenches has a "fork" which fits my supply of 5-40 hex-nuts.

There's an ample number of threads that screw-into the crankshaft. To install the flywheel assy.; I simply screw it in.. and tighten the hex-nut.

I made a stub-shaft from a 1" length of .125" (1/8") music-wire.. and filed rude-looking flats for the coupling's grub-screws to bear-on.

Just about ready for a "wet-test" with my fixture.


Page 2 of 4 •  1, 2, 3, 4
 Similar topics
» WL917 mini RC Sprint Boat
» Cox powered boat litle shrimp hidroplane
» TIEBREAKER-POLL **COX-ENGINE-OF-THE-MONTH** (December 2022)
» Cox 049 powered race boat
» .049 cox powered rc boat Convert to nitro
» Cox powered boat litle shrimp hidroplane
» TIEBREAKER-POLL **COX-ENGINE-OF-THE-MONTH** (December 2022)
» Cox 049 powered race boat
» .049 cox powered rc boat Convert to nitro
Page 2 of 4
Permissions in this forum:
You cannot reply to topics in this forum

 Rules
Rules


