Log in
Search
Latest topics
» Roger Harris revisitedby rsv1cox Today at 3:38 pm
» My N-1R build log
by GallopingGhostler Today at 3:04 pm
» Tee Dee .020 combat model
by 1/2A Nut Today at 2:43 pm
» Chocolate chip cookie dough.........
by roddie Today at 1:13 pm
» Purchased the last of any bult engines from Ken Enya
by sosam117 Today at 11:32 am
» Free Flight Radio Assist
by rdw777 Today at 9:24 am
» My latest doodle...
by batjac Yesterday at 9:47 pm
» Funny what you find when you go looking
by rsv1cox Wed Nov 20, 2024 3:21 pm
» Landing-gear tips
by 1975 control line guy Wed Nov 20, 2024 8:17 am
» Cox NaBOO - Just in time for Halloween
by rsv1cox Tue Nov 19, 2024 6:35 pm
» Canada Post strike - We are still shipping :)
by Cox International Tue Nov 19, 2024 12:01 pm
» Duende V model from RC Model magazine 1983.
by getback Tue Nov 19, 2024 6:08 am
Cox Engine of The Month
Part ID: Back Plate Extension?
Page 1 of 1
 Part ID: Back Plate Extension?
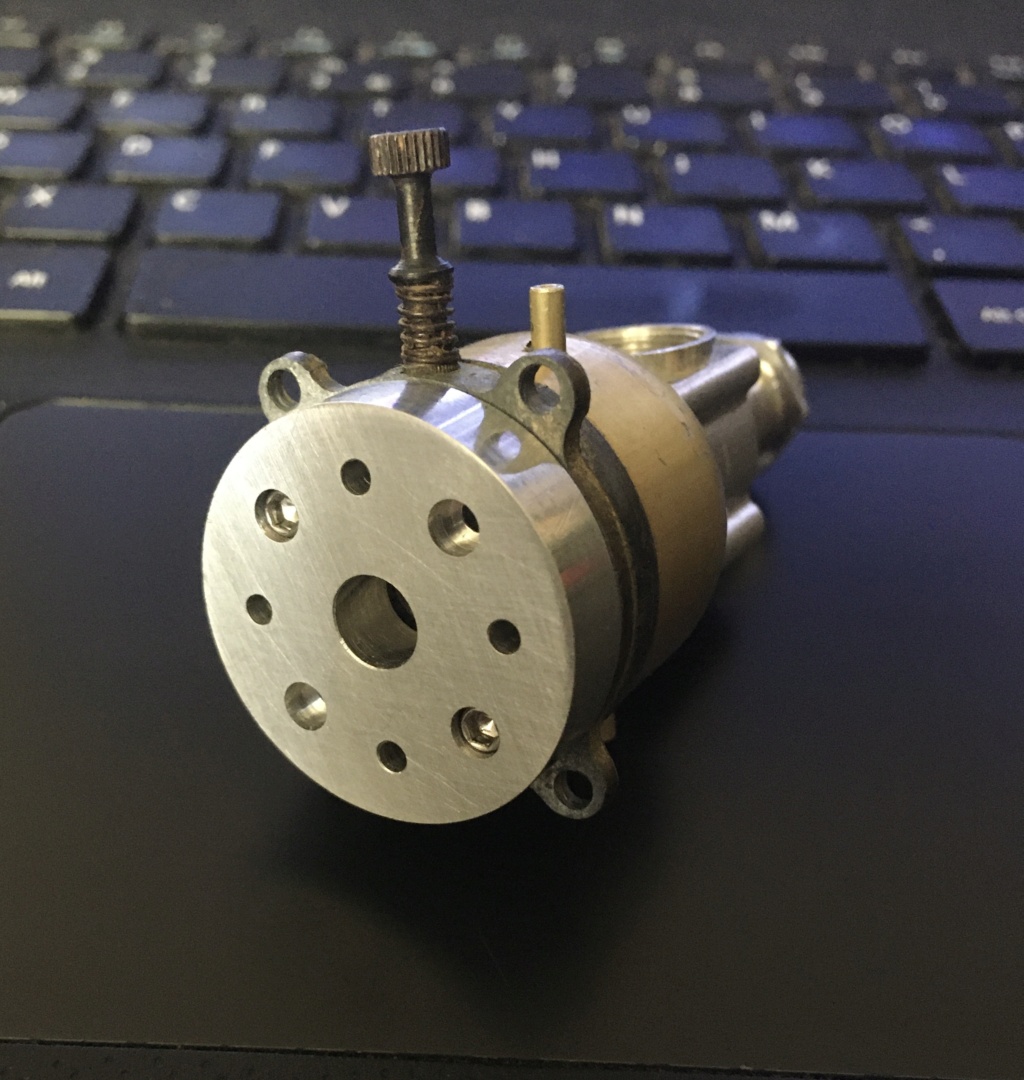
I bought a lot of various model airplane engine parts, and included was this Cox .049 crankcase/tank/backplate that has some sort of extension.
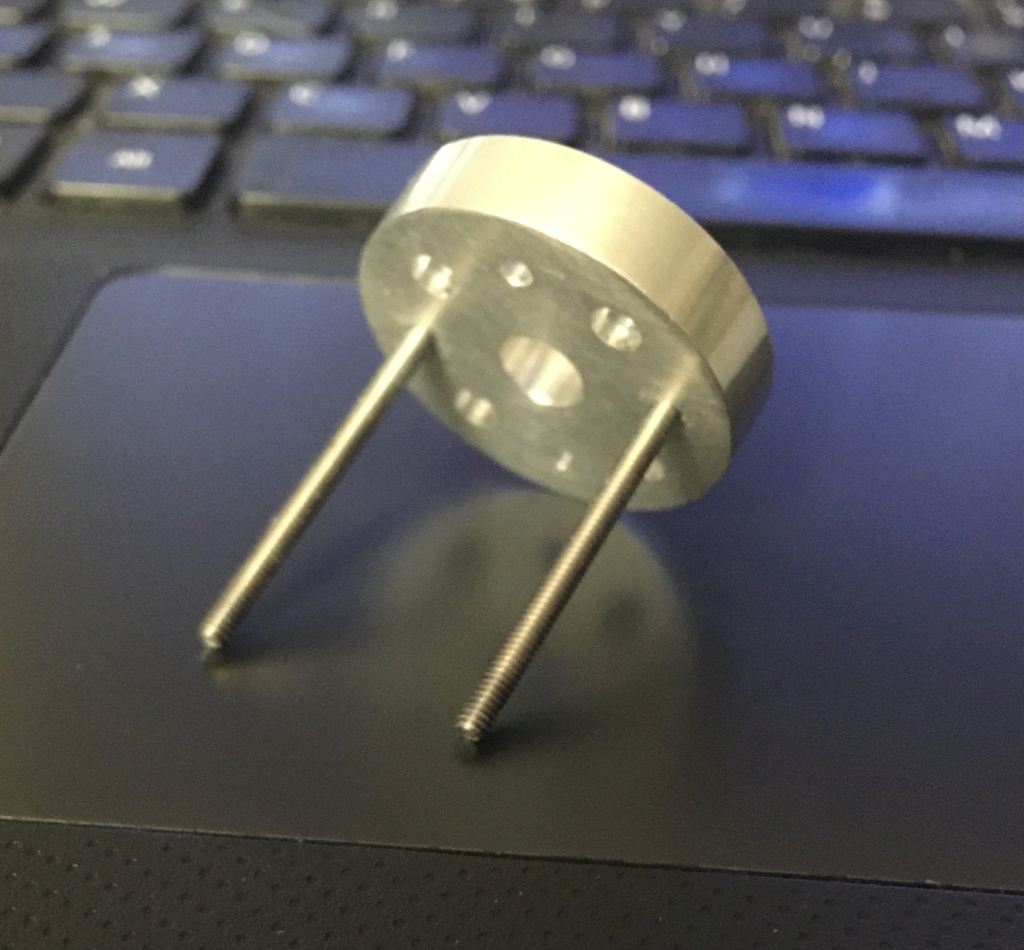
It is made of aluminum and is 1/4" thick. Appears to be missing two of the screws.
Can anyone tell me what company made this and what its purpose was (other than just an extension of some sort)?. Additional
nose weight maybe?
Thanks in advance!
John


It is made of aluminum and is 1/4" thick. Appears to be missing two of the screws.
Can anyone tell me what company made this and what its purpose was (other than just an extension of some sort)?. Additional
nose weight maybe?
Thanks in advance!
John


JohnRTSE- Beginner Poster

- Posts : 7
Join date : 2020-09-07
 Re: Part ID: Back Plate Extension?
Hello John and welcome.
First thing first. The missing screws you can replace.
If the plate is 1/4" thick, then all you'll need is to find 1¼ long socket head (Allen) screw that has 2/56" threads.
(2-56 x 1¼ long Allen head screw).
Now for the backplate extension.
This looks like it made by an individual at home on their lathe.
Four screws would stick out the back of the 1/4" plate and those screws would then screw into the bulkhead on the airplane.
I think the originator of this backplate didn't like the original mounting holes on the Cox back plate and made this as an alternative?
As for the center hole for the venturi. The bulkhead would have a hole in the same location for clean air to be pulled in from the planes fuselage.
Years ago, some guys would mount their Cox engines about 1/8" off the bulkhead believing that "if" the engine was mounted exactly onto the firewall (bulkhead) it would suck up caster oil into the venturi opening below?
It is interesting? but I don't think Cox ever made it.

sosam117- Diamond Member

- Posts : 1350
Join date : 2016-03-23
Location : Suburb of Chicago, Illinois
 Re: Part ID: Back Plate Extension?
Hi JohnRTSE,
I do a lot of experimenting on my lathe and mill trying to come up with useful parts. Not knowing the intended use for this part I can see a few drawbacks from the design. The original back plate uses the screw heads to seal the tank holes. By using longer screws there is no way to seal the openings other than installing a gasket between the parts. It would be very interesting to find a way to actually mount the engine from my point of view. On the other hand this design could be used to repair back plates with broken mounting ears if the part had a larger outside diameter. Now you've got me thinking.
I do a lot of experimenting on my lathe and mill trying to come up with useful parts. Not knowing the intended use for this part I can see a few drawbacks from the design. The original back plate uses the screw heads to seal the tank holes. By using longer screws there is no way to seal the openings other than installing a gasket between the parts. It would be very interesting to find a way to actually mount the engine from my point of view. On the other hand this design could be used to repair back plates with broken mounting ears if the part had a larger outside diameter. Now you've got me thinking.

coxaddict- Gold Member

- Posts : 429
Join date : 2013-01-27
Location : north shore oahu, Hawaii
 Re: Part ID: Back Plate Extension?
coxaddict wrote:Hi JohnRTSE,
I do a lot of experimenting on my lathe and mill trying to come up with useful parts. Not knowing the intended use for this part I can see a few drawbacks from the design. The original back plate uses the screw heads to seal the tank holes. By using longer screws there is no way to seal the openings other than installing a gasket between the parts. It would be very interesting to find a way to actually mount the engine from my point of view. On the other hand this design could be used to repair back plates with broken mounting ears if the part had a larger outside diameter. Now you've got me thinking.
Maybe to seal the tank holes you could slip on a short piece of Tee Dee 020 /010 size fuel tubing over the screws?
So when the backplate adapter gets screwed to the Cox backplate the tubing fills the screw head hole and forms a gasket, simular to the gasket on the intake venturi?
It's an idea?
The other four holes are for mounting the engine to the firewall, with screws sticking out the back?
I would tap those holes so I could lock in 4 screws to use as mounting screws into the firewall.

sosam117- Diamond Member

- Posts : 1350
Join date : 2016-03-23
Location : Suburb of Chicago, Illinois
 Re: Part ID: Back Plate Extension?
Yes, good idea on the seals. I tried doing something similar by filling the holes with epoxy and re-drilling the holes. It still leaked.  By using screws that are partially threaded I think I can create a good seal. I'll start a new thread when I come up with a new design. Now to find the proper screws, button head type?

coxaddict- Gold Member

- Posts : 429
Join date : 2013-01-27
Location : north shore oahu, Hawaii
 Re: Part ID: Back Plate Extension?
I'm not sure how this would be mounted on a plane. I have thought about something like this, but with ears on. I have a backplate where one bolt pulled through the backplate hole. I was going to epoxy it on. It should not leak too much if the counterbore is made well. A countersink would likely leak. Maybe a nylon washer or tubing as mentioned. I was at a Mouse race a long time ago and a guy had a backplate adaptor bolted on like that, and then he fastened it on to the plane somehow. I figured it out back then but can't now. He removed the ears on the backplate for the extra 110% speed.

aspeed- Platinum Member

- Posts : 796
Join date : 2013-01-18
Location : Leamington Ont. Can.
 Re: Part ID: Back Plate Extension?
aspeed wrote:I'm not sure how this would be mounted on a plane. I have thought about something like this, but with ears on. I have a backplate where one bolt pulled through the backplate hole. I was going to epoxy it on. It should not leak too much if the counterbore is made well. A countersink would likely leak. Maybe a nylon washer or tubing as mentioned. I was at a Mouse race a long time ago and a guy had a backplate adaptor bolted on like that, and then he fastened it on to the plane somehow. I figured it out back then but can't now. He removed the ears on the backplate for the extra 110% speed.
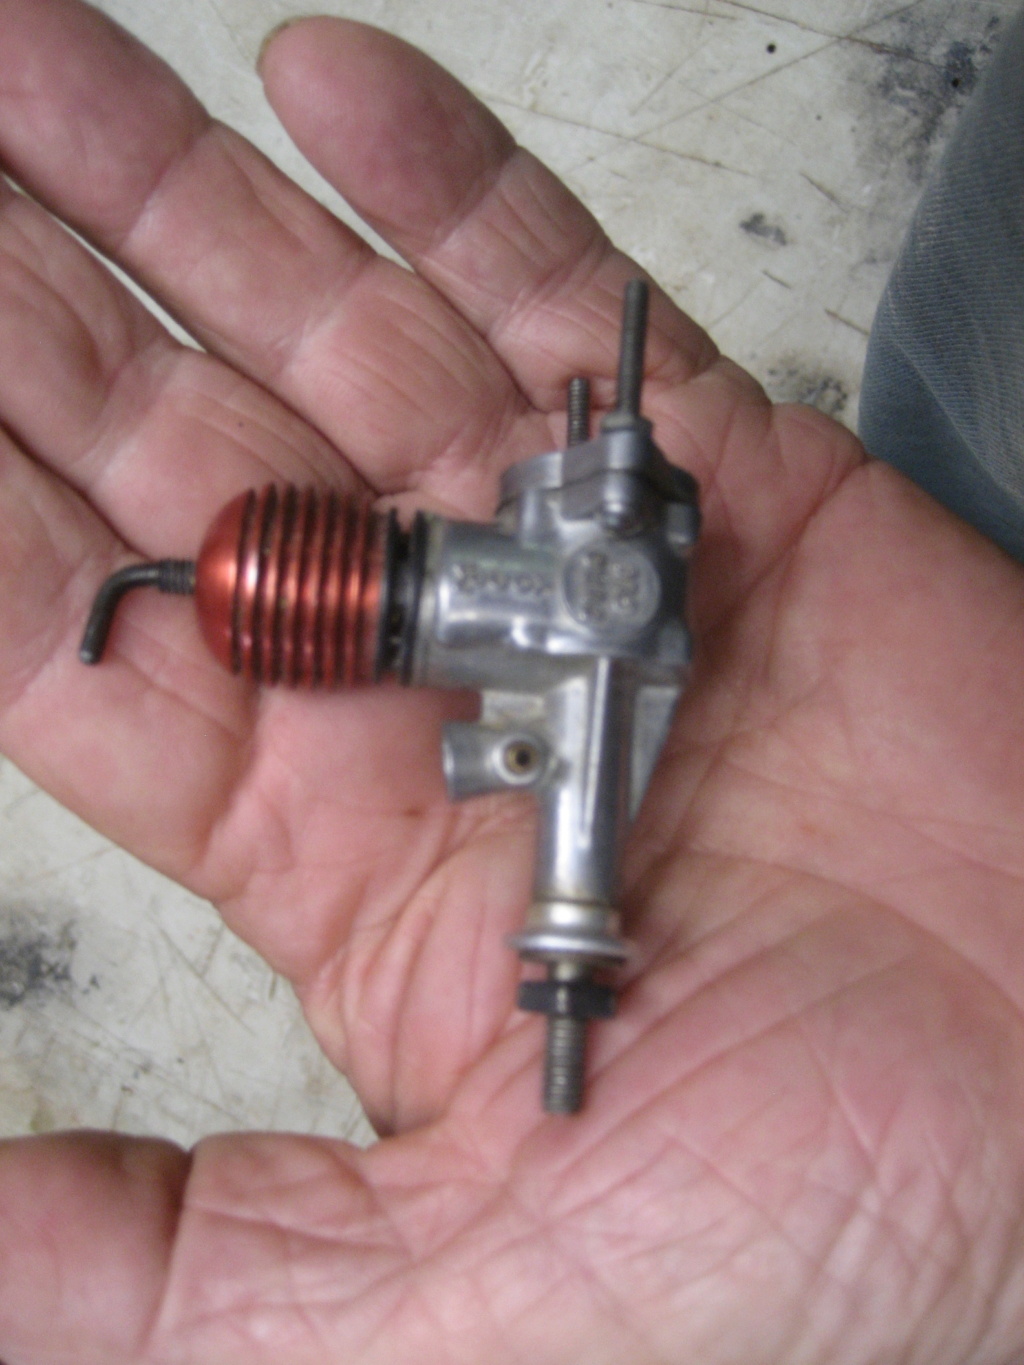
Have the 4 bolts stick out like this McCoy 049 on that back plate extension.

I know, the screws clamp the back plate together. But, the additional holes in the 1/4" back plate could have screws sticking out the back like that? Just thread the holes so when the screw bottoms out it will stay tightened to the back plate.
Then you can use those four screws to bolt the engine to the firewall (bulkhead). Nuts inside the fuselage.

sosam117- Diamond Member

- Posts : 1350
Join date : 2016-03-23
Location : Suburb of Chicago, Illinois
 Re: Part ID: Back Plate Extension?
Hi John, I can't see any practical use for that extension. Mounting that engine to a model's firewall would be more difficult.. and it's a simple matter to extend a Cox Bee-type engine forward 1/4".. if that was the intention.. but I don't think it was. The piece looks to be made with precision. Someone knew what it was made for. I have noticed some Facebook pages that deal with Cox engines. Maybe try posting the photos there.. to see if someone recognizes that part.. and knows why it was made.
 Re: Part ID: Back Plate Extension?
Thank you for all the input on this guys- I had no idea of its purpose. It is very well made and I assumed it was made by a company. It's an interesting piece and I wish I knew who made it and why?
I have parts coming in tomorrows mail that will make this engine into a runner from EX, but I'm not sure if I want to leave the spacer off or reinstall it as it's a part of the engines history.
Thanks again,
John
I have parts coming in tomorrows mail that will make this engine into a runner from EX, but I'm not sure if I want to leave the spacer off or reinstall it as it's a part of the engines history.
Thanks again,
John

JohnRTSE- Beginner Poster

- Posts : 7
Join date : 2020-09-07
 Re: Part ID: Back Plate Extension?
Hi again John, If you want to run that engine with that.. let's call it aftermarket spacer, You will need to source two more screws to mount it to the engine. They're size 2-56 but need to be longer than the OEM screws for the 8cc tank that's on there now. Maybe you can source two more of the two that you have there?
In any case; there's the need to have the tank seal properly. I think you'll need to make a gasket for in-between. The longer 2-56 screws need to seal under their heads. If not; fuel will leak there. Maybe the rubber from an inner-tube (bicycle type) could be used. The extension could be used as a template for cutting the outer diameter, piercing the four screw-holes.. and then the center (venturi) hole can be punched-out to approximately 5/16" diameter. This should provide an effective seal between the backplate and the extension. It also may provide for the proper clearance; so that the screws do not bottom-out in the case prior to pulling all the parts together snug.. you know? That's a concern even with the OEM parts being used. It will be even more important when installing the four screws, that they be alternately snugged/tightened.. so as to seat the whole assembly evenly.
A built-up fuselage would provide more options.. especially if you're going for a scale/semi-scale appearance.
Mounting the engine in a model can be done by utilizing the four Cox back-plate "ears".. but it will require a firewall with an opening just big enough for the extension to fit through.. and have the means to anchor four screws just outside of that opening. Aircraft birch plywood would be my choice. The thickness depends on what you intend to use for fasteners. Wood-screws (size #3) would need to bite-into solid (not balsa) wood. You may prefer to source #3-48 machine-screws.. and backing-nuts. DuBro used to sell #3-48 hardware. If you ever see some.. consider a purchase. It's a common size to American-made model IC engines as well. The Cox .020 engines utilize a 3-48 propeller-screw. Their .049's incidentally use a size 5-40 prop-screw.
The nose could be designed to receive the firewall as a modular component.. which could influence your choice of fasteners for mounting the engine.
 Similar topics
» new 2.0 rc 1/16 049 powered bugy upgrade tee dee
» Cox Kyosho GTP #2 chassis group manual
» Cox PT-19 part
» Guilow edge g-540 rc
» cox pee wee .020 back plate or fuel tank with back plate
» Cox Kyosho GTP #2 chassis group manual
» Cox PT-19 part
» Guilow edge g-540 rc
» cox pee wee .020 back plate or fuel tank with back plate
Page 1 of 1
Permissions in this forum:
You cannot reply to topics in this forum

 Rules
Rules


