Log in
Search
Latest topics
» My latest doodle...by batjac Today at 10:05 pm
» Retail price mark-up.. how much is enough?
by gkamysz Today at 9:29 pm
» Happy 77th birthday Andrew!
by roddie Today at 9:22 pm
» Roger Harris revisited
by rsv1cox Today at 3:38 pm
» My N-1R build log
by GallopingGhostler Today at 3:04 pm
» Tee Dee .020 combat model
by 1/2A Nut Today at 2:43 pm
» Chocolate chip cookie dough.........
by roddie Today at 1:13 pm
» Purchased the last of any bult engines from Ken Enya
by sosam117 Today at 11:32 am
» Free Flight Radio Assist
by rdw777 Today at 9:24 am
» Funny what you find when you go looking
by rsv1cox Wed Nov 20, 2024 3:21 pm
» Landing-gear tips
by 1975 control line guy Wed Nov 20, 2024 8:17 am
» Cox NaBOO - Just in time for Halloween
by rsv1cox Tue Nov 19, 2024 6:35 pm
Cox Engine of The Month
Prop flange removal
Page 1 of 1
 Prop flange removal
Hi, I'm wondering how to remove the prop backing plate on a Cox .049 engine without hurting anything. My first post. Rosco from N. Florida. Nice to be here. Thanks in advance!

Rosco- Moderate Poster

- Posts : 26
Join date : 2019-12-19
 Re: Prop flange removal
Hi,
Welcome to the best small engine forum on the planet! Oh, and we like other things that vroom, vroom, or Ding-Ding, or Eeeeow!
Remove the propeller.
Remove the tank or back plate.
Remove the cylinder and piston.
Reinstall the prop screw.
Set the block backside down on a piece of wood.
Tap the screw gently driving the crank down into the block.
Check often...continue driving the crank down as the block "drives" the prop backplate off the crank.
Alternatively, use a vise with wood between a jaw and block, and a piece of hardwood between the prop screw and block.
Use the vise to press the crank in.
Be careful not to drive the crank so hard and fast that:
You bend the prop screw
You smash the conrod pin into the block of wood backing the engine block.
I hope that helps.
944_Jim- Diamond Member


Posts : 2022
Join date : 2017-02-08
Age : 59
Location : NE MS
 Re: Prop flange removal
First and foremost, for the love of the engine remove the piston! Don't have to ask me how I know.... Anyways, I have done this a couple of ways many times, and both with good results.
I remove the backplate, or backplate and tank assembly if so equipped first. Second, I remove both the piston and cylinder. Then I put the prop screw back in as far as it will go. Then this is where I have two choices. Then I either put the back of the crankcase down on a block of wood and give it a good, quick tap on the head of the screw. It should then seperate itself from the crankshaft. Or option 'B'. Using a small block of wood against the rear of the crankcase, put it into a vice and rest the block of wood against the jaw of the vice. Then I just simply 'press' it off using the vice while tightening.
Now for reinstallation....
Simply put the crank back into the crankcase. Grab your driveplate, a propeller, and the prop screw. Carefully line up teh splines of the crank and the driveplate. You will feel them 'index' themselves, but will not seat fully, just a tiny bit. Then screw on the propeller and tighten it up good. It will pull itself back into place as you tighten it.
Hope this helps you out some.

NEW222- Top Poster

- Posts : 3896
Join date : 2011-08-13
Age : 46
Location : oakbank, mb
 Re: Prop flange removal
D'oh. Thanks Jim. You definately posted while I was typing a book about it. I like your simplified version.

NEW222- Top Poster

- Posts : 3896
Join date : 2011-08-13
Age : 46
Location : oakbank, mb
 Re: Prop flange removal
We really need a good step by step video detailing
how it's done. I know we all mean well, but some
of the steps to remove the drive plate can be a little
daunting(not to menton harmful to the engine). For
example, removal of the cylinder, if you've never done
it, can turn into an ugly scene.
The best advice I can offer, Rosco, is glean as much
info, using the search feature, and use(safely) plenty
of heat. Also, chime in and keep us posted on your
progress. Hang out and ask questions as you go, and
WELCOME TO THE FORUM
Bob
dckrsn- Diamond Member

- Posts : 2750
Join date : 2010-10-21
Age : 71
Location : Long Island, New York
 Re: Prop flange removal
DITTO What they said, and...
WELCOME TO THE CEF ROSCO !!!!!!!!!!!!!!!!!!
WELCOME TO THE CEF ROSCO !!!!!!!!!!!!!!!!!!

Kim- Top Poster


Posts : 8625
Join date : 2011-09-06
Location : South East Missouri
 Re: Prop flange removal
Wait until the flange has to go in...that'll be a book!
I prefer a stud all the way in the crank, and a nut to pull the prop and backplate on. If the stud gets ruined over time, toss it an get a new one.
I'd rather wreck a stud than wreck a crank. Using a short screw would only engage a few threads until the plate and crank are really coming together. Those threads in the crank can't be repaired easilly (well, you could get a new crank).

944_Jim- Diamond Member


Posts : 2022
Join date : 2017-02-08
Age : 59
Location : NE MS
 Re: Prop flange removal
Removing the prop drive plate is easy once you get the top end off.
Follow the instructions given here. You can get a removal tool from Cox International or EX Model Engines that's made for the task if you intend to get into the hobby more seriously. It's nothing more than a stud with a threaded, knurled nut, but it's cheap and works well.
As Chancey (NEW222) said, to remove the drive plate you first have to remove the cylinder, piston and rod. Removing the cylinder is the tricky part and the one most likely to cause irreparable damage. You can still buy new crankshafts, drive plates and crankcases (until they're all gone too), but new-old stock cylinders, especially to replace the older ones is much more of a challenge. Your choices are limited to the very last production types. So don't just grab it with a pair of slip-joint pliers like I did the first couple times. You'll really wish you hadn't.
Like Bob said, search the forum for cylinder removal and figure that out first. There's lots of good folks that love to help here so don't hesitate to ask.
Welcome to the Forum!


Dave P.- Gold Member

- Posts : 477
Join date : 2017-07-31
Age : 67
Location : Durham, NC
 Re: Prop flange removal
I thank all of for your responses. I wanted to ask the pro's before I dived in. Don't want to bend anything. I acquired a red tank and flange for my p w .020 So I can pretty it up a bit. A good job for today. A cold front is coming are way (N. FL.) Going to play with my engine today. Thanks all again!

Rosco- Moderate Poster

- Posts : 26
Join date : 2019-12-19
 Re: Prop flange removal
Here is a link to our online instructions, as they relate to charging a carb body on Tee Dee engines but the principle applies to some degree to reedies as well:
https://coxengines.ca/files/carb%20body.pdf
https://coxengines.ca/files/carb%20body.pdf
 Re: Prop flange removal
Thanks all for the replies. I Got it apart, Went to install my red prop flange on my .020 and discovered it was for an .010. Turned out to be a learning curve! Anyway good practice. I did make some oak wood cylinder clamps For my .049 & .020 engines. I did fall victim to using the Cox wrench to removing .049 cylinder. Not a good outcome. Live and learn the hard way. All is good now. Sorry for taking so long to get back. Had a bunch of snow birds down (sunny Florida) Plus I forgot. Getting into tether cars now, Fun.

Rosco- Moderate Poster

- Posts : 26
Join date : 2019-12-19
 Re: Prop flange removal
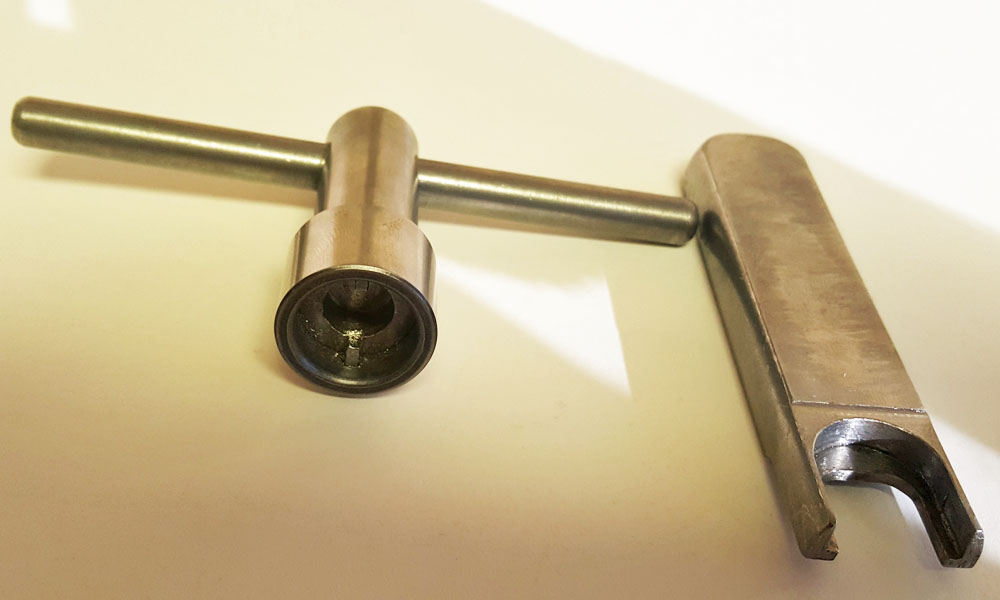
OK Bernie, tell me you have those beautiful top-end tools for sale. I'll take one of each if you do!
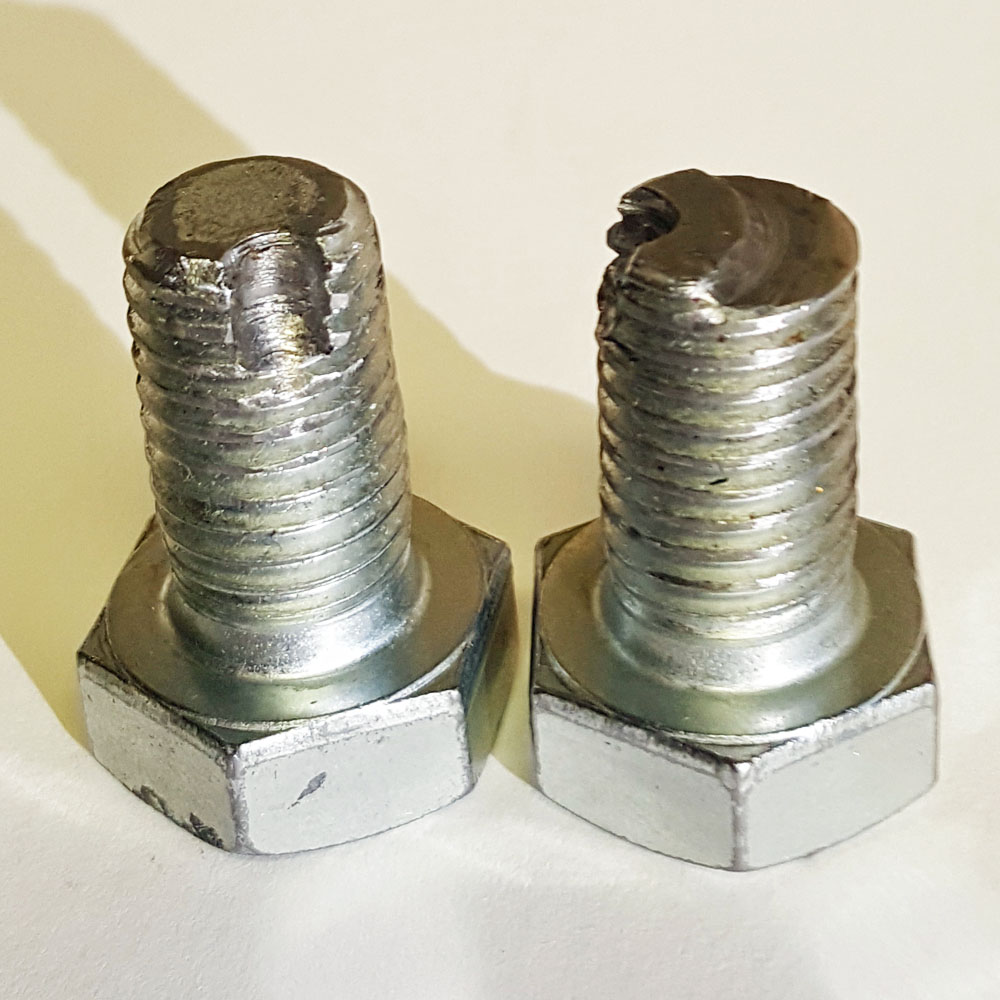
I'm kind of thick sometimes, can you explain the size and purpose of the notched and machined bolts for the regular and Killer Bee cranks?
I'm kind of thick sometimes, can you explain the size and purpose of the notched and machined bolts for the regular and Killer Bee cranks?

Dave P.- Gold Member

- Posts : 477
Join date : 2017-07-31
Age : 67
Location : Durham, NC
 Re: Prop flange removal
Wow! Now I too want a set of Cox heavy duty tools!! I’m still watching e bay for those tools made to remove the Venturi on the TD style engines.
I guessing those bolts are “modified” to fit the back face of the two different styles of crankshafts and pins. The flat (flush) one is for the Killer bee crank, the one with the raised crescent fits the curved space on the standard crank. Imagine pushing play dough or modeling clay inside the crankcase and making a impression of the crankshaft, then duplicate that shape on the end of the bolt.
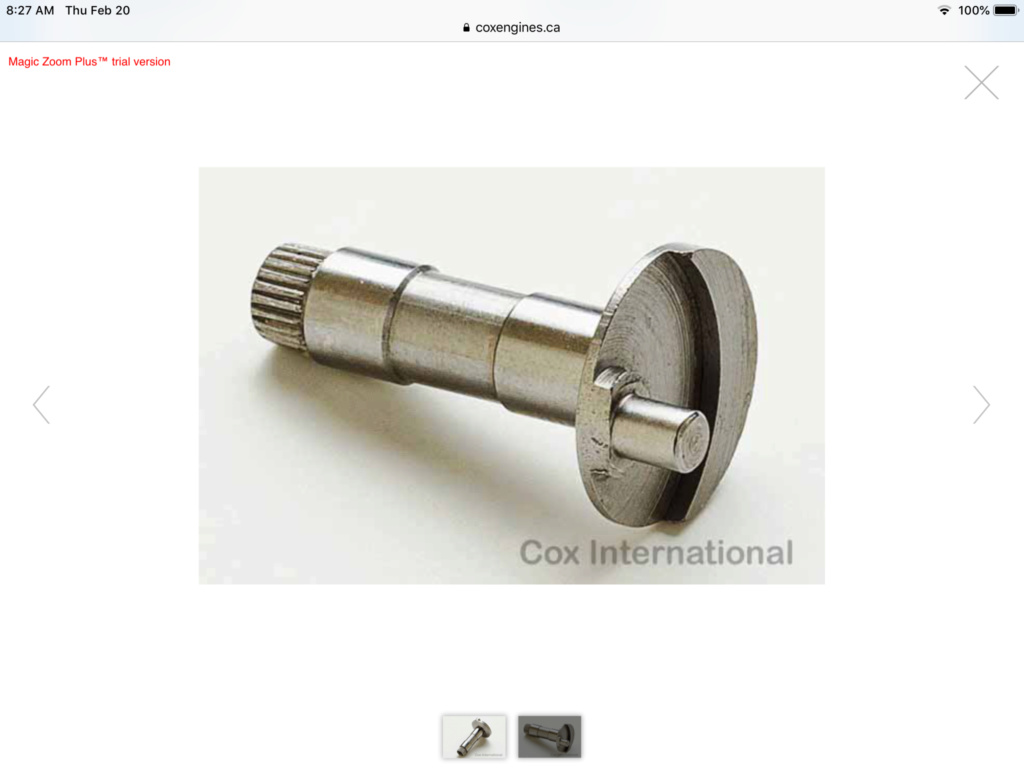
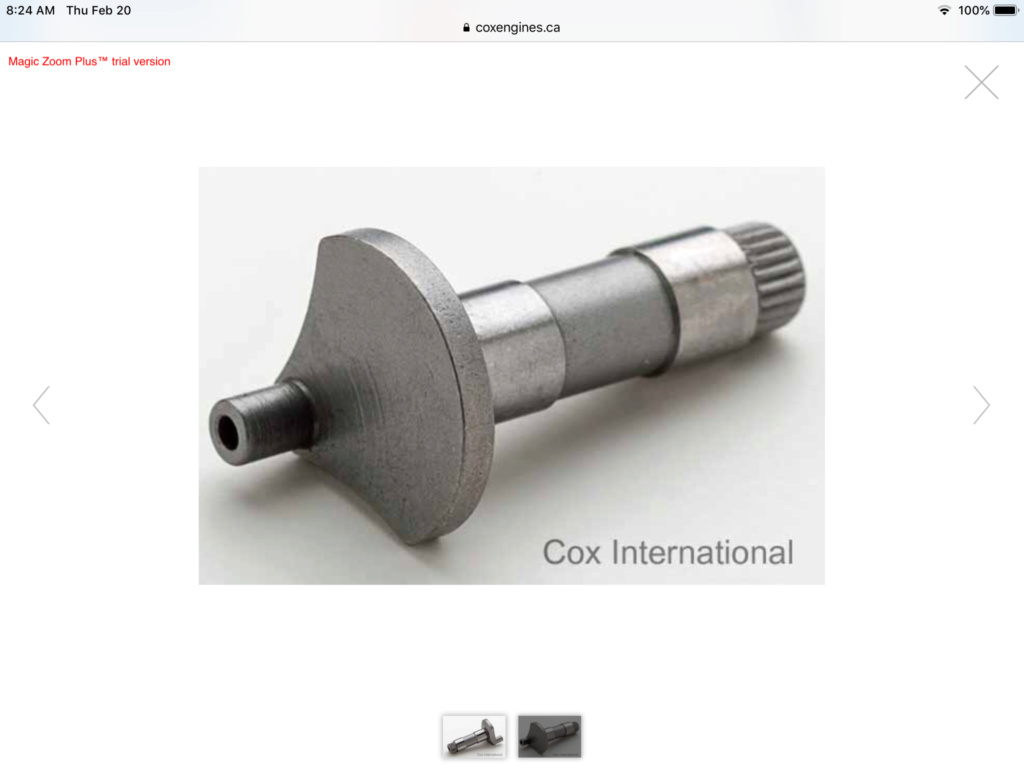
I guessing those bolts are “modified” to fit the back face of the two different styles of crankshafts and pins. The flat (flush) one is for the Killer bee crank, the one with the raised crescent fits the curved space on the standard crank. Imagine pushing play dough or modeling clay inside the crankcase and making a impression of the crankshaft, then duplicate that shape on the end of the bolt.


Marleysky- Top Poster


Posts : 3618
Join date : 2014-09-28
Age : 72
Location : Grand Rapids, MI
 Re: Prop flange removal
Basically a 13.5mm (0.53") bolt that was cut down to shortest length possible but still clearing the crankcase and, with a Dremel tool, a roove cut to accommodate the crankpin. Another groove cut to accommodate the shape of the crank face and left plat for Killer Bee / Venom cranks. These "tools" are to press the drive-plate back onto the crank, using a vise.
As to the cylinder / glow head tool set; they would cost around CA$ 300 / set to make and that would be our cost, not resale price. We had the set made a decade ago by a local machine shop but they would cost less if made on a CNC machine and in quantities.
As to the cylinder / glow head tool set; they would cost around CA$ 300 / set to make and that would be our cost, not resale price. We had the set made a decade ago by a local machine shop but they would cost less if made on a CNC machine and in quantities.
 Re: Prop flange removal
Hey Now! Those are SnapOn prices!!
Was looking for more of a Tool-Time, Binford Tool price!! Arr, Arr, Arrrr.

Was looking for more of a Tool-Time, Binford Tool price!! Arr, Arr, Arrrr.

Marleysky- Top Poster


Posts : 3618
Join date : 2014-09-28
Age : 72
Location : Grand Rapids, MI
 Re: Prop flange removal
So the bolt is actually used as a backing buck for pressing the drive plate with a press or vise, the threads aren't used at all. I get it now. I said I was a little thick sometimes.

Dave P.- Gold Member

- Posts : 477
Join date : 2017-07-31
Age : 67
Location : Durham, NC
 Re: Prop flange removal
Cox International wrote:As to the cylinder / glow head tool set; they would cost around CA$ 300 / set to make and that would be our cost, not resale price. We had the set made a decade ago by a local machine shop but they would cost less if made on a CNC machine and in quantities.
Bernie, how much the set would cost if made in quantities? I mean retail price.

Levent Suberk- Diamond Member

- Posts : 2265
Join date : 2017-12-24
Location : Türkiye
 Re: Prop flange removal
Marleysky wrote:Hey Now! Those are SnapOn prices!!
Was looking for more of a Tool-Time, Binford Tool price!! Arr, Arr, Arrrr.

See the wooden one i made above, its 20-25 years old and still works.
 Re: Prop flange removal
Dave P. wrote:So the bolt is actually used as a backing buck for pressing the drive plate with a press or vise, the threads aren't used at all. I get it now. I said I was a little thick sometimes.
We just happened to find bolts with a suitable diameter and the threads have no bearing, correct. To be able to press the parts together in a vise, one needs something to push against the crank face and it has to be something that fits inside the crankcase but is as wide as possible.
 Re: Prop flange removal
Removing the prop drive is easy and a snap, putting it back on is more difficult and cheap tools are readily available for this to get it on straight. If reusing the same drive plate align the splines first.
It's the cylinder that presents the most problems and invites damage due to twisting (thin walls) and burrs. Heat here helps along with a buffered Cox cylinder removal tool.
It's the cylinder that presents the most problems and invites damage due to twisting (thin walls) and burrs. Heat here helps along with a buffered Cox cylinder removal tool.

rsv1cox- Top Poster


Posts : 11248
Join date : 2014-08-18
Location : West Virginia
 Re: Prop flange removal
Levent Suberk wrote:Cox International wrote:As to the cylinder / glow head tool set; they would cost around CA$ 300 / set to make and that would be our cost, not resale price. We had the set made a decade ago by a local machine shop but they would cost less if made on a CNC machine and in quantities.
Bernie, how much the set would cost if made in quantities? I mean retail price.
No idea but a wild guesstimate would be $100 if we had 100 units made. However, there is little appetite to bankroll $5,000 for something that may or may not sell and, if it sells, may take years to sell the stock.
They are made of very expensive tool steel by hand from an old-school toolmaker.
 Similar topics
» [The Traveling Prop] Who wants to be the one to send the prop overseas?
» Removing QRC muffler
» NO pliers, but how do I get it off?
» Cox 010 TeeDee crankshaft removal
» Tee Dee .020 Drive Plate Removal
» Removing QRC muffler
» NO pliers, but how do I get it off?
» Cox 010 TeeDee crankshaft removal
» Tee Dee .020 Drive Plate Removal
Page 1 of 1
Permissions in this forum:
You cannot reply to topics in this forum

 Rules
Rules


