Log in
Search
Latest topics
» Did you spot the Cox engine in this NASA research video?by balogh Today at 5:08 pm
» Roger Harris revisited
by rsv1cox Today at 3:44 pm
» Retail price mark-up.. how much is enough?
by Ken Cook Today at 2:54 pm
» Happy 77th birthday Andrew!
by Admin Today at 12:34 pm
» Tee Dee .020 combat model
by 1/2A Nut Today at 10:34 am
» Purchased the last of any bult engines from Ken Enya
by sosam117 Today at 8:15 am
» TEE DEE Having issues
by balogh Today at 7:42 am
» Cox films/videos...
by Coxfledgling Today at 4:46 am
» My N-1R build log
by roddie Today at 12:32 am
» Landing-gear tips
by roddie Yesterday at 6:17 pm
» My latest doodle...
by roddie Yesterday at 10:43 am
» Chocolate chip cookie dough.........
by roddie Fri Nov 22, 2024 1:13 pm
Cox Engine of The Month
New Quickie 100 micro pylon racer project
Page 3 of 4
Page 3 of 4 •  1, 2, 3, 4
 Assembling the Quickie
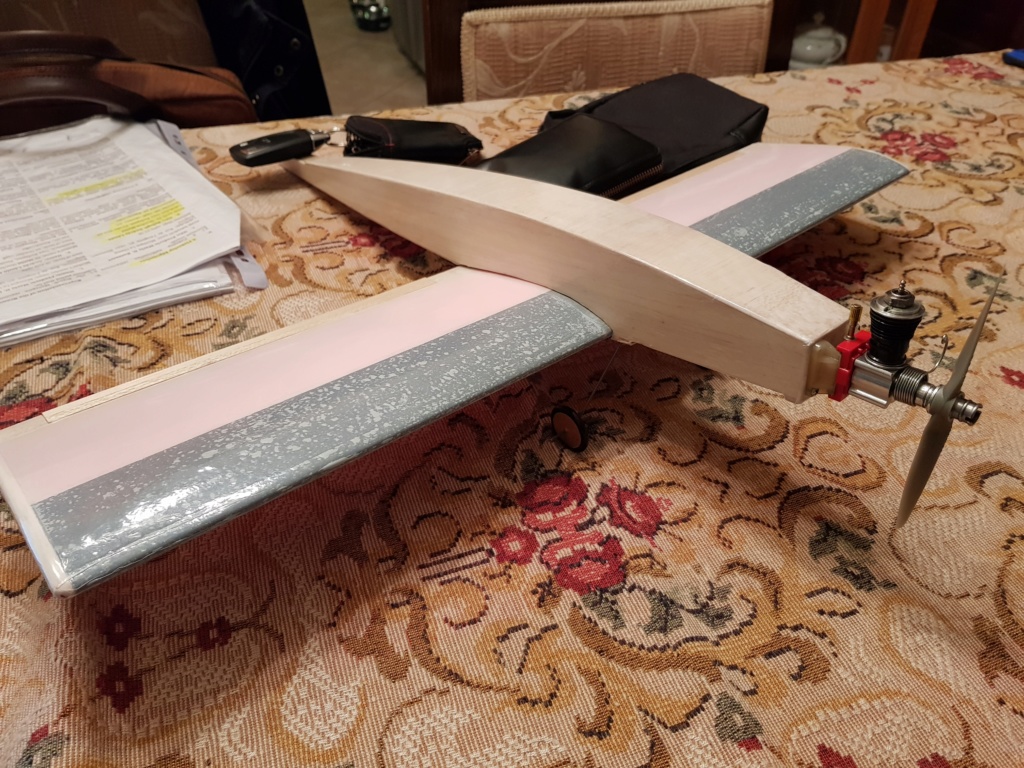
The professionally packed, beautiful Quickie kit has arrived to my door today. I decided to start the assembly beginning with the covering of the wing which, being made of foam, for me was a relatively novel material to handle.
Tasos was kind enough to send me also 3 samples of the wing foam material which I first covered in polyurethane spray. The foam material was not solved by the spray, but upon drying, the surface became susceptible to denting easily, as the spray took away the flexibility of the foam to some extent.
I tried another sample with Oracover light film at about 40% heat set on my filming iron. Results were quite good, so I decided to cover the wing with Oralight transparent white film. The front part of the wing made of carbon shield did not allow a bubble-free coverage, and remained a bit spotty, but it does not disturb me and I may decide later to cover this part in a non-transparent, additional Oracover color scheme. I will cover the fuselage and tail section in the same transparent white Oralight, because it allows the nice balsa wood grains to remain visible.
The foam body of the wing itself allowed a smooth coverage, and ended up a shiny surface. Again, the temperature setting of the iron should not exceed IMHO about 40% which is warm enough to anchor the film on the balsa side and rear parts of the wing as well as to the carbon traveling edge, and shrink it tight, but is not too hot to damage the foam.

I will post further milestones of the assembly later.
Tasos was kind enough to send me also 3 samples of the wing foam material which I first covered in polyurethane spray. The foam material was not solved by the spray, but upon drying, the surface became susceptible to denting easily, as the spray took away the flexibility of the foam to some extent.
I tried another sample with Oracover light film at about 40% heat set on my filming iron. Results were quite good, so I decided to cover the wing with Oralight transparent white film. The front part of the wing made of carbon shield did not allow a bubble-free coverage, and remained a bit spotty, but it does not disturb me and I may decide later to cover this part in a non-transparent, additional Oracover color scheme. I will cover the fuselage and tail section in the same transparent white Oralight, because it allows the nice balsa wood grains to remain visible.
The foam body of the wing itself allowed a smooth coverage, and ended up a shiny surface. Again, the temperature setting of the iron should not exceed IMHO about 40% which is warm enough to anchor the film on the balsa side and rear parts of the wing as well as to the carbon traveling edge, and shrink it tight, but is not too hot to damage the foam.

I will post further milestones of the assembly later.

balogh- Top Poster


Posts : 4960
Join date : 2011-11-06
Age : 66
Location : Budapest Hungary
 Re: New Quickie 100 micro pylon racer project
Hello Andras,
Thank you for the kind words and sharing your Quickie 100…you are really a fast man!
Regards,
Tasos.
Thank you for the kind words and sharing your Quickie 100…you are really a fast man!
Regards,
Tasos.

kazaklisglider- Bronze Member

- Posts : 45
Join date : 2019-09-13
Age : 59
Location : Greece
 Re: New Quickie 100 micro pylon racer project
Thanks Tasos...I want it in the air with my 46 y.o. red postage stamp 049 reedy a.s.a.p! Even when starting from scratch I usually complete my planes in a few days, working on them till the small hours in the morning. 

balogh- Top Poster


Posts : 4960
Join date : 2011-11-06
Age : 66
Location : Budapest Hungary
 Re: New Quickie 100 micro pylon racer project
Deleted because if repeated post..

balogh- Top Poster


Posts : 4960
Join date : 2011-11-06
Age : 66
Location : Budapest Hungary
 Re: New Quickie 100 micro pylon racer project
Thanks for the review. 


Levent Suberk- Diamond Member

- Posts : 2265
Join date : 2017-12-24
Location : Türkiye

balogh- Top Poster


Posts : 4960
Join date : 2011-11-06
Age : 66
Location : Budapest Hungary
 Re: New Quickie 100 micro pylon racer project
I have completed the assembly of the Quickie.
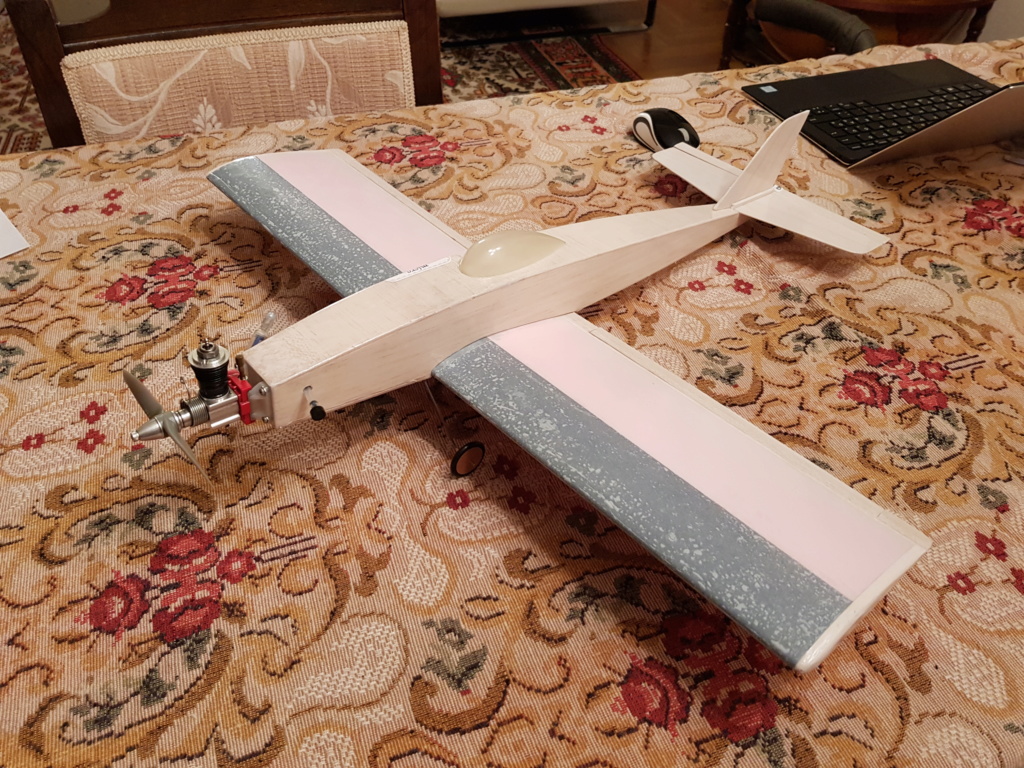
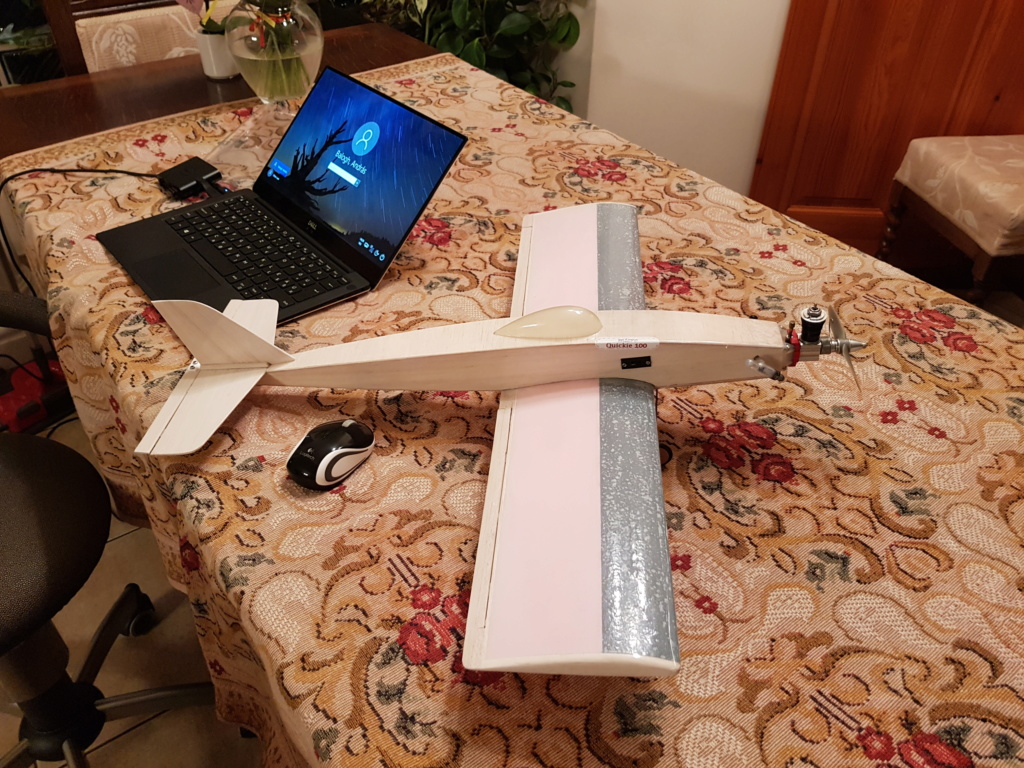
All-up dry weight is 266 grams. The guts include a 400mAh NiMH battery, a Futaba RX and 2 servos, plus space for a third one that will activate the throttle.

I use a balloon tank that holds around 40ccm fuel - enough for a 8...10 minutes flight - and filter. My default power plant is my favorit red postage stamp reedie from 1974.
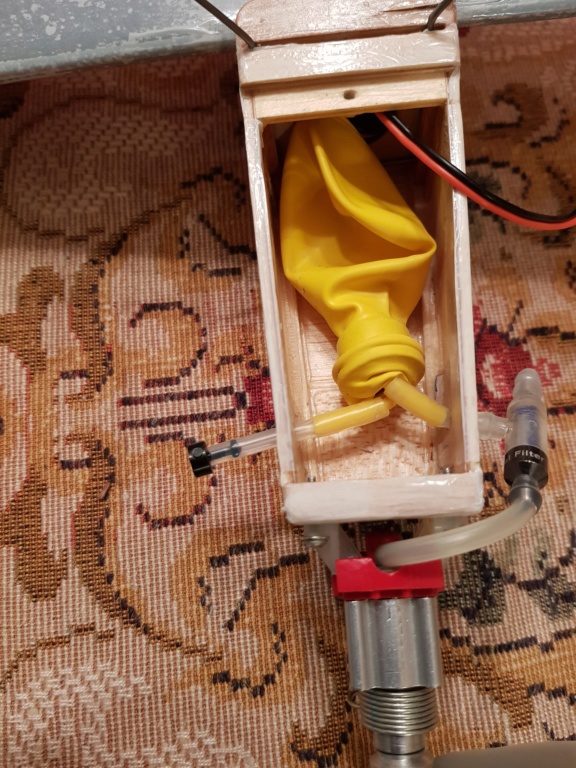
The assembly was quick, the most difficult part was to find out where to put the elevator servo, because I did not dig the aileron servo deep in the wing center, so the push rods run relatively high above the wing and take up precious space. Anyway, I was begging to find place for the elevator servo only at the beginning, and ended up with a spare position for the throttle servo as well.
I will maiden it tomorrow, weather permitting.


All-up dry weight is 266 grams. The guts include a 400mAh NiMH battery, a Futaba RX and 2 servos, plus space for a third one that will activate the throttle.

I use a balloon tank that holds around 40ccm fuel - enough for a 8...10 minutes flight - and filter. My default power plant is my favorit red postage stamp reedie from 1974.

The assembly was quick, the most difficult part was to find out where to put the elevator servo, because I did not dig the aileron servo deep in the wing center, so the push rods run relatively high above the wing and take up precious space. Anyway, I was begging to find place for the elevator servo only at the beginning, and ended up with a spare position for the throttle servo as well.
I will maiden it tomorrow, weather permitting.

balogh- Top Poster


Posts : 4960
Join date : 2011-11-06
Age : 66
Location : Budapest Hungary
 Re: New Quickie 100 micro pylon racer project
9.38oz is not bad considering the wing loading. 
I have a plane at 10.3oz with 85 sq. in / 28" span.
Did 163 mph PS and floats in nice and steady around
15 mph.
Best wishes on the maiden flight, I hope you enjoy it!
Vid that puppy so we can see the plane flying not the
engine running lol. Bring it in closer so we can see it
tooooooo.


I have a plane at 10.3oz with 85 sq. in / 28" span.
Did 163 mph PS and floats in nice and steady around
15 mph.
Best wishes on the maiden flight, I hope you enjoy it!
Vid that puppy so we can see the plane flying not the
engine running lol. Bring it in closer so we can see it
tooooooo.


1/2A Nut- Top Poster

- Posts : 3539
Join date : 2013-10-20
Age : 61
Location : Brad in Texas
 Re: New Quickie 100 micro pylon racer project
Thank you Brad. With the tank in the nose, and given the low wing design, all hardware like battery and servos had to be fixed on the fuselage ceiling, and the CG is thus located in a rather high point. I hope this will not cause instability.

balogh- Top Poster


Posts : 4960
Join date : 2011-11-06
Age : 66
Location : Budapest Hungary
 Re: New Quickie 100 micro pylon racer project
...it is a helluva lil basterd and lives up to its name...I maidened it today in strong winds and was relieved to see it fly so straight that no trimming was needed, despite it is nose heavy when fueled, and having its CG well above the wind thanks to the gear attached to the ceiling of the fuselage.
Will charge my camera and try to do a video tomorrow, although weather forecasts are not quite reassuring for tomorrow..anyways, as long as rain does not fall, no matter what winds, I can fly the Quickie with total confidence, thanks to its superb aerodynamic design. The red backplate 049 reedy with turbo head and the 4.5 x 3.5 APC prop unloaded well over 20k, (but I will audiotach the video to make sure) and pulls the Quickie very strong even in headwinds...
Will charge my camera and try to do a video tomorrow, although weather forecasts are not quite reassuring for tomorrow..anyways, as long as rain does not fall, no matter what winds, I can fly the Quickie with total confidence, thanks to its superb aerodynamic design. The red backplate 049 reedy with turbo head and the 4.5 x 3.5 APC prop unloaded well over 20k, (but I will audiotach the video to make sure) and pulls the Quickie very strong even in headwinds...

balogh- Top Poster


Posts : 4960
Join date : 2011-11-06
Age : 66
Location : Budapest Hungary
 Re: New Quickie 100 micro pylon racer project
Congratulations I am happy you had no trouble with the trim flight! Yes vid vid..
The airfoil helps it track in the wind, power to weight is good. I bet it is rather fast.


The airfoil helps it track in the wind, power to weight is good. I bet it is rather fast.


1/2A Nut- Top Poster

- Posts : 3539
Join date : 2013-10-20
Age : 61
Location : Brad in Texas
 Re: New Quickie 100 micro pylon racer project
Hello,
Andras, you did a fine job on finishing and preparing the model… first trim flight is successful so a well-deserved thumbs up!
As for actual flight performance I will just repeat the old but always true adage: accurately constructed/rigged airframes fly “straight” right of the building board.
Looking forward for subsequent flights!
PS1: Finished AUW could be even less if a smaller battery was used and placed in the forward hatch area… elevator servo can alternatively be positioned on its side rather than vertical to save space.
PS2: I want to publically thank but also apologize to Andras for his patience on receiving the manual for the model… I had to send it to him via email at last days of his model preparation as it took me quite some time to properly write its full ten pages.
Regards Tasos.

kazaklisglider- Bronze Member

- Posts : 45
Join date : 2019-09-13
Age : 59
Location : Greece

Levent Suberk- Diamond Member

- Posts : 2265
Join date : 2017-12-24
Location : Türkiye
 Re: New Quickie 100 micro pylon racer project
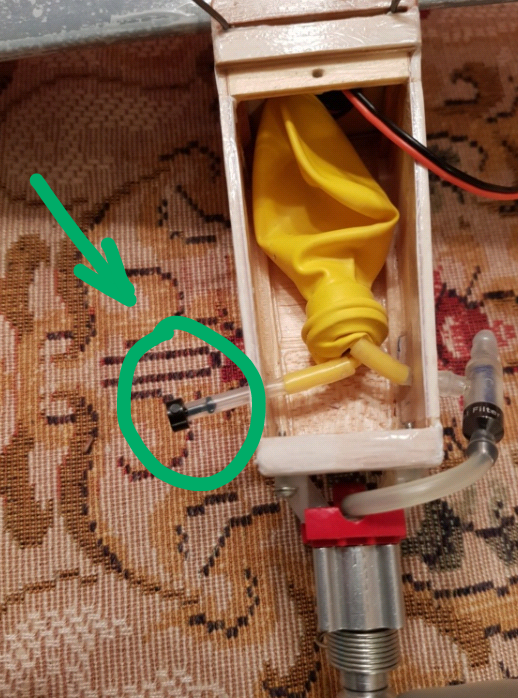
Hi Levent. This plug came together as accessory to the Proportional Exhaust Throttle or PET system, a unique exhaust throttle patented by the late and great Richard Freiheit when I bought the PET from him for my TeeDee 010 engines. I am not sure where he got it or repurposed it from.

balogh- Top Poster


Posts : 4960
Join date : 2011-11-06
Age : 66
Location : Budapest Hungary

Levent Suberk- Diamond Member

- Posts : 2265
Join date : 2017-12-24
Location : Türkiye
 Re: New Quickie 100 micro pylon racer project
Exactly the stuff I got from Richard..you will find the stoppers on the tank filler lines...where did you get yours, or this is just a link on worthpoint?

balogh- Top Poster


Posts : 4960
Join date : 2011-11-06
Age : 66
Location : Budapest Hungary
 Re: New Quickie 100 micro pylon racer project
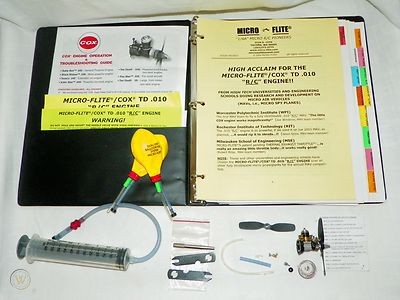
It is from worthpoint web site:
https://www.worthpoint.com/worthopedia/cox-td-010-c-engine-world-smallest-309132424
https://www.worthpoint.com/worthopedia/cox-td-010-c-engine-world-smallest-309132424

Levent Suberk- Diamond Member

- Posts : 2265
Join date : 2017-12-24
Location : Türkiye
 Re: New Quickie 100 micro pylon racer project
Here is the patent of this throttle:
https://patents.google.com/patent/US6748908B2/en
Pdf version:
https://patentimages.storage.googleapis.com/08/91/23/5b2780e28f5666/US6748908.pdf
https://patents.google.com/patent/US6748908B2/en
Pdf version:
https://patentimages.storage.googleapis.com/08/91/23/5b2780e28f5666/US6748908.pdf

Levent Suberk- Diamond Member

- Posts : 2265
Join date : 2017-12-24
Location : Türkiye
 Re: New Quickie 100 micro pylon racer project
kazaklisglider wrote:Hello,
Andras, you did a fine job on finishing and preparing the model… first trim flight is successful so a well-deserved thumbs up!
As for actual flight performance I will just repeat the old but always true adage: accurately constructed/rigged airframes fly “straight” right of the building board.
Looking forward for subsequent flights!
PS1: Finished AUW could be even less if a smaller battery was used and placed in the forward hatch area… elevator servo can alternatively be positioned on its side rather than vertical to save space.
PS2: I want to publically thank but also apologize to Andras for his patience on receiving the manual for the model… I had to send it to him via email at last days of his model preparation as it took me quite some time to properly write its full ten pages.
Regards Tasos.
Thanks Tasos. I did not want to compromise on battery capacity. Once in the field I like to stay long and fly several 8..10 minutes runs and unfortunately saw before one of my planes fly away and lost eternally when the RX battery ran short on juice. For fears of a nose heavy balance I had to move the battery towards the aft because putting it into the nose would allow less fuel in the tank due to the added nose weight and imbalance.
Yes I was contemplating the elevator servo to lay rather than standing erect but then the servo mounting bolts would be difficult to access.
I spent almost a day in figuring out how best to fill the bird's belly but finally managed to even allocate room for an extra throttle servo in the same servo frame as the elevator servo, but on the other side. This is yet to be installed.
Please do not apologise for the manual, you did an excellent job, and assembling the plane following my humble experience and instincts just added fun to the build. I wish many other users should enjoy the Quickie 100.

balogh- Top Poster


Posts : 4960
Join date : 2011-11-06
Age : 66
Location : Budapest Hungary
 Re: New Quickie 100 micro pylon racer project
1/2A Nut wrote:Congratulations I am happy you had no trouble with the trim flight! Yes vid vid..
The airfoil helps it track in the wind, power to weight is good. I bet it is rather fast.

Thanks Brad. I will try to video near passes but this bird us pretty fast and the fields I fly has trees and bush on its fringes..I wish I had a better headcam than this Sony...my next investment in the hobby


balogh- Top Poster


Posts : 4960
Join date : 2011-11-06
Age : 66
Location : Budapest Hungary
 Re: New Quickie 100 micro pylon racer project
I got bhine on this thread LOL Glad to hear you got a Quickie 100 and the flight went well !! 


getback- Top Poster


Posts : 10443
Join date : 2013-01-18
Age : 67
Location : julian , NC
 Re: New Quickie 100 micro pylon racer project
Thanks Eric, managed to shot a vid today and will post it soon.

balogh- Top Poster


Posts : 4960
Join date : 2011-11-06
Age : 66
Location : Budapest Hungary
 Re: New Quickie 100 micro pylon racer project
I have enjoyed this thread, enough to send Tasos some $$$. 


Tee Bee- Platinum Member

- Posts : 764
Join date : 2011-08-25
Location : Angleton, TX
 Re: New Quickie 100 micro pylon racer project
Well, I'm happy to report that, even in the midst of a worldwide pandemic, my Quickie 100 has made the trip from Greece to Texas, USA unscathed! That was quite a journey for a model airplane. The safe arrival was mostly possible because Tasos spent as much attention to detail on the packaging as on the model itself. His attention to detail on his builds is in a much higher league than my skills allow!


Tee Bee- Platinum Member

- Posts : 764
Join date : 2011-08-25
Location : Angleton, TX
 Re: New Quickie 100 micro pylon racer project
Way to go Troy..looking forward to your posts on completing the plane..what engine will you try it first with?
Andras
Andras

balogh- Top Poster


Posts : 4960
Join date : 2011-11-06
Age : 66
Location : Budapest Hungary
Page 3 of 4 •  1, 2, 3, 4
 Similar topics
» Willy Nillie's Shoestring micro racer powered by COX TeeDee010
» Tigercat RC pylon racer build project
» 1959 Berkeley Impulse Single Channel Pylon Racer Build
» TD .010 Micro Cam Racer
» Micro CAM Racer TD .010 Video
» Tigercat RC pylon racer build project
» 1959 Berkeley Impulse Single Channel Pylon Racer Build
» TD .010 Micro Cam Racer
» Micro CAM Racer TD .010 Video
Page 3 of 4
Permissions in this forum:
You cannot reply to topics in this forum

 Rules
Rules


