Log in
Search
Latest topics
» Roger Harris revisitedby rsv1cox Today at 3:38 pm
» My N-1R build log
by GallopingGhostler Today at 3:04 pm
» Tee Dee .020 combat model
by 1/2A Nut Today at 2:43 pm
» Chocolate chip cookie dough.........
by roddie Today at 1:13 pm
» Purchased the last of any bult engines from Ken Enya
by sosam117 Today at 11:32 am
» Free Flight Radio Assist
by rdw777 Today at 9:24 am
» My latest doodle...
by batjac Yesterday at 9:47 pm
» Funny what you find when you go looking
by rsv1cox Wed Nov 20, 2024 3:21 pm
» Landing-gear tips
by 1975 control line guy Wed Nov 20, 2024 8:17 am
» Cox NaBOO - Just in time for Halloween
by rsv1cox Tue Nov 19, 2024 6:35 pm
» Canada Post strike - We are still shipping :)
by Cox International Tue Nov 19, 2024 12:01 pm
» Duende V model from RC Model magazine 1983.
by getback Tue Nov 19, 2024 6:08 am
Cox Engine of The Month
Roddie runs a reedie..
Page 1 of 1
 Roddie runs a reedie..
I ran one of two Cox .049 reed-valve engines with #1 cylinders this afternoon. Both cylinders had nasty burrs that I removed earlier this past week. These two engines are two of "six" that I rebuilt/assembled with sure-start back-plates. I was eager to see if/how they would run.. so today was the day to test one.
Let me bore you to death with details... First.. I got some gear together. My newly designed red-neck bench-mount, the engine with a Cox black 6 x 2 L/H prop mounted, fuel and a fuel-bulb, a 3/8oz. wedge fuel-tank, my little panel-box with x2 6V lantern-batteries and jumper-wire, glow-clip, tachometer and drill-driver to mount it all to the deck-railing.


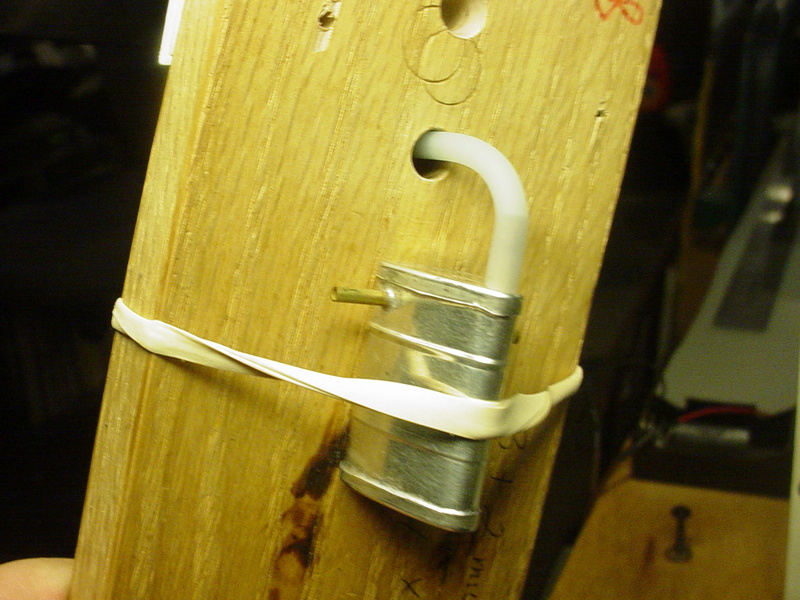

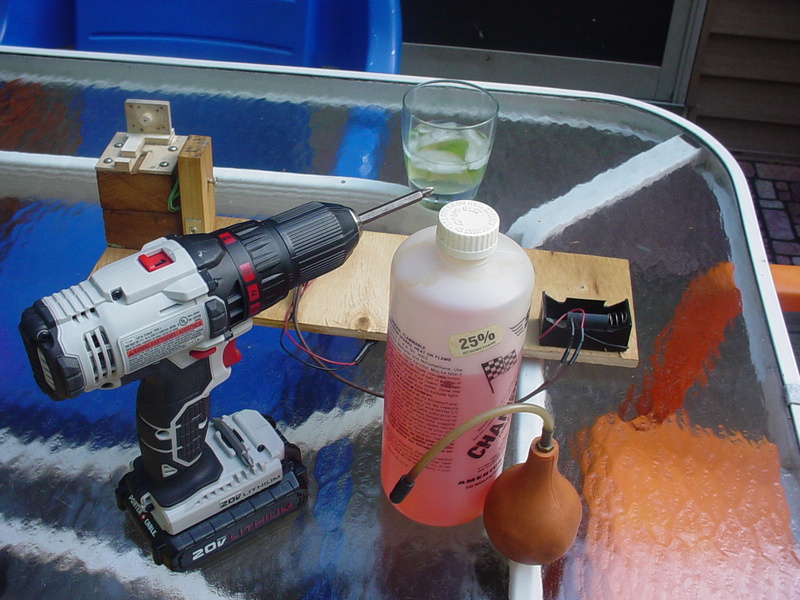
Notice my fuel-bulb.. I always keep it capped. When the activities are over, I squirt any remaining fuel back-into the bottle... but I also pinch near the end of the line after it empties.. and squeeze the bulb while releasing pressure. This really evacuates the bulb of vapor. You'd be surprised at just how much comes out. I then cap-off the bulb for storage. So far.. this bulb has not cracked/dried-out.. and I've had it for a VERY long time. I also keep my fuel-bottle capped.. unless I'm filling my bulb.
So... with an inverted-cylinder; I initially had a little flooding-problem after an exhaust-prime. crap.. The engine locked right up.. and I couldn't turn the prop through a compression-stroke. I thought for a moment.. and positioned the piston at BTC and blew through the exhaust-port which cleared it. Subsequent exhaust-primes were done with the exhaust ports CLOSED.. which solved that problem.
I got the engine running after a few more primes.. and ran two full 3/8oz. tanks of Sig "25" with a slobbering-rich needle-setting. The 3rd tank was ran with alternating rich to lean settings.
My redneck test-stand worked very well. It held the engine secure.. and the wedge-tank position worked-out well also.. with its pick-up at the bottom and feed/vents at the top.
I ran a 4th tank.. and noticed some erratic behavior. The needling had become inconsistent. I then noticed during that run; that the engine's cylinder had loosened and was turning while running. I pinched-off the fuel-line to stop the engine. I hadn't tightened it enough during assembly. I was concerned when I assembled the engine.. because the cylinder has no flats for a wrench. I installed the glow-head to secure both it "and" the cylinder.. and didn't really tighten it too much. I figured that it was enough.. but it wasn't.
The engine ran very well though, prior to this. My tachometer gave me a reading of 14K.. but that was on the last run when the cylinder loosened-up. This engine was configured to fly one of my two P-51's.. and I think that it's up to the task. The second engine with its #1 cylinder will be test-run tomorrow.. with the same 6 x 2 L/h prop. I'll be sure to tighten its cylinder a little more. Stay tuned..
Let me bore you to death with details...


Notice my fuel-bulb.. I always keep it capped. When the activities are over, I squirt any remaining fuel back-into the bottle... but I also pinch near the end of the line after it empties.. and squeeze the bulb while releasing pressure. This really evacuates the bulb of vapor. You'd be surprised at just how much comes out. I then cap-off the bulb for storage. So far.. this bulb has not cracked/dried-out.. and I've had it for a VERY long time. I also keep my fuel-bottle capped.. unless I'm filling my bulb.
So... with an inverted-cylinder; I initially had a little flooding-problem after an exhaust-prime.
I got the engine running after a few more primes.. and ran two full 3/8oz. tanks of Sig "25" with a slobbering-rich needle-setting. The 3rd tank was ran with alternating rich to lean settings.
My redneck test-stand worked very well. It held the engine secure.. and the wedge-tank position worked-out well also.. with its pick-up at the bottom and feed/vents at the top.
I ran a 4th tank.. and noticed some erratic behavior. The needling had become inconsistent. I then noticed during that run; that the engine's cylinder had loosened and was turning while running. I pinched-off the fuel-line to stop the engine. I hadn't tightened it enough during assembly. I was concerned when I assembled the engine.. because the cylinder has no flats for a wrench. I installed the glow-head to secure both it "and" the cylinder.. and didn't really tighten it too much. I figured that it was enough.. but it wasn't.
The engine ran very well though, prior to this. My tachometer gave me a reading of 14K.. but that was on the last run when the cylinder loosened-up. This engine was configured to fly one of my two P-51's.. and I think that it's up to the task. The second engine with its #1 cylinder will be test-run tomorrow.. with the same 6 x 2 L/h prop. I'll be sure to tighten its cylinder a little more. Stay tuned..

Last edited by roddie on Thu Jul 06, 2017 8:04 am; edited 1 time in total
 Re: Roddie runs a reedie..
Roddie, very good!
That fuel you use has castor oil?
Is there any video of the engines running?
What was the design motive for the engine?
I remain attentive to your progress!
That fuel you use has castor oil?
Is there any video of the engines running?
What was the design motive for the engine?
I remain attentive to your progress!

MauricioB- Top Poster

- Posts : 3712
Join date : 2016-02-16
Age : 53
Location : ARG
 Re: Roddie runs a reedie..
AWESOME! It looks like the whole set up and the engine worked very well. It is great to see that everything came together so well for you. I hope these engines and the test stand serve you very well for a long time, congratulations!

fit90- Diamond Member

- Posts : 1341
Join date : 2011-08-11
Location : Naples, Florida
 Re: Roddie runs a reedie..
fit90 wrote:AWESOME! It looks like the whole set up and the engine worked very well. It is great to see that everything came together so well for you. I hope these engines and the test stand serve you very well for a long time, congratulations!
Thanks Bob! I was a little nervous on a few levels beforehand. I'd never attempted to hone the burr from a cylinder before last week. I followed Ken Cook's advice though and it is now something I'll be able to do with confidence.. if needed again. This engine ran strong with the Cox black 6 x 2 prop. Maybe I was lucky. The Sig Champion "25" fuel is at least 12 years old.. but it seemed to run fine. I'm glad because there's better than 2/3qt. remaining in the bottle.
The test-stand works great. I can swap engines literally in seconds. No screws to fuss with..

I simply unlatch the bail-wire from under the screw-head.. and the engine slips right out. When locked; the engine fits tight.. and does not vibrate.
 Re: Roddie runs a reedie..
MauricioB wrote:Roddie, very good!
That fuel you use has castor oil?
Is there any video of the engines running?
What was the design motive for the engine?
I remain attentive to your progress!
Hi Mauricio! Yes; the fuel has a 50/50 blend of castor/synthetic. It meets the specifications for use in Cox engines. It is available from Sig Manufacturing Co. I use 25% nitro (Sig "Champion 25") which runs very well.. even after 12+ years in the bottle!
I didn't shoot a video yesterday.. but I might today. I plan to test-run another engine with a #1 cylinder today. These two #1 cylinders had burrs in their bores, which I gently removed using a piston and polishing-paste last week.
The two engines were assembled/configured to be mounted on a pair of matching self-designed control-line airplanes built many years ago, that have never flown. They are "profile-style" to resemble P-51 Mustangs and will use tin wedge-style fuel tanks of approximately 10-12cc's capacity.


I assembled four additional engines that are configured the same way.. except the cylinders have different porting. All six engines are oriented the same.. with the needle 180 degrees from the cylinder. They mount horizontally to most of my models firewalls.
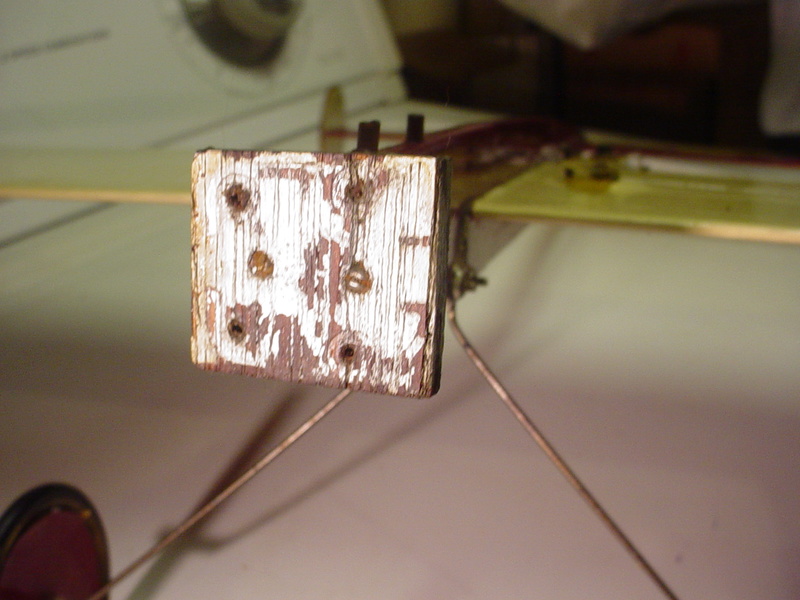
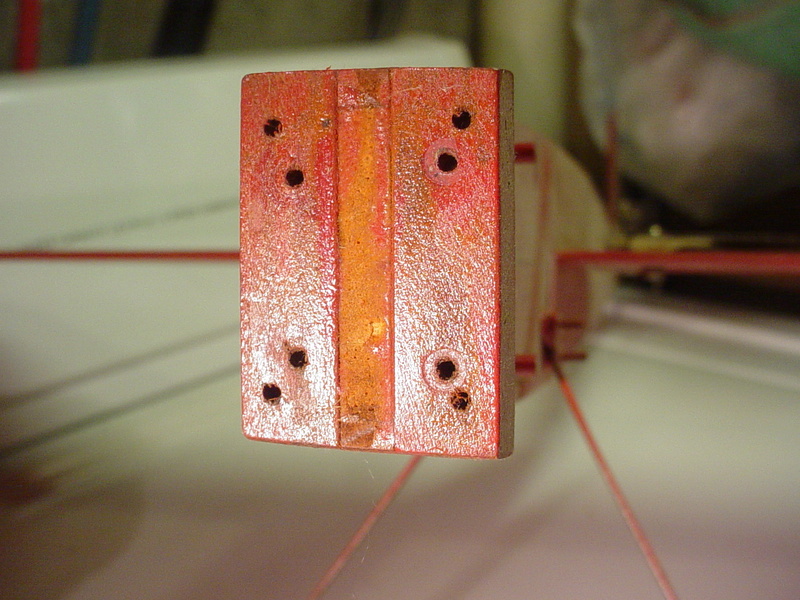
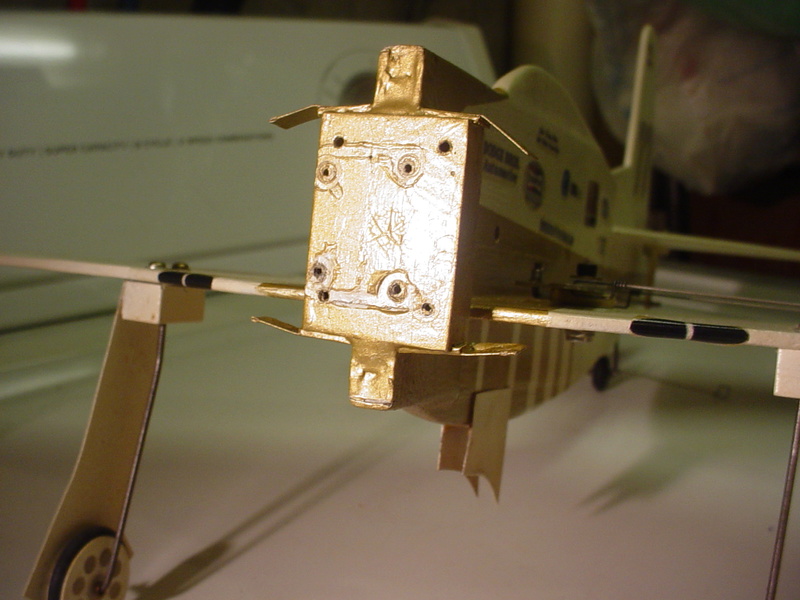
Note the Cox .049 product/horseshoe back-plate mount hole-patterns on these models..




 Re: Roddie runs a reedie..
Nice job Roddie!! I also value the No 1 cylinders very high and have a few reedies with this cylinder in mint condition!
Did your de-burring save the compression? Were the burrs in the exhaust area - a common accident when the fork of the COX wrench slips of simply puts too much force on the mild steel cylinder - or, higher up in the compression zone?
Small scratches left by burrs on COX cylinders are luckily self-healed by the castor varnish depositing in the micro-groove...one reason I use exclusively castor in my fuel.

balogh- Top Poster


Posts : 4958
Join date : 2011-11-06
Age : 66
Location : Budapest Hungary
 Re: Roddie runs a reedie..
balogh wrote:Nice job Roddie!! I also value the No 1 cylinders very high and have a few reedies with this cylinder in mint condition!
Did your de-burring save the compression? Were the burrs in the exhaust area - a common accident when the fork of the COX wrench slips of simply puts too much force on the mild steel cylinder - or, higher up in the compression zone?
Small scratches left by burrs on COX cylinders are luckily self-healed by the castor varnish depositing in the micro-groove...one reason I use exclusively castor in my fuel.
Thank You Andras!!! I'm excited after yesterday's runs of the first engine. The burrs on both #1 cylinders were low in the bore around the exhaust ports.
This is as far as the pistons would fit beforehand..

It took some time and patience.. but I removed the burrs using polishing-paste and a piston turned upside-down inserted through the bottom of the cylinder. I made a tube-fixture to capture the rod and fit snugly inside the piston. The "skirt" is what did the cutting/lapping.. by using an in/out/twirling motion.
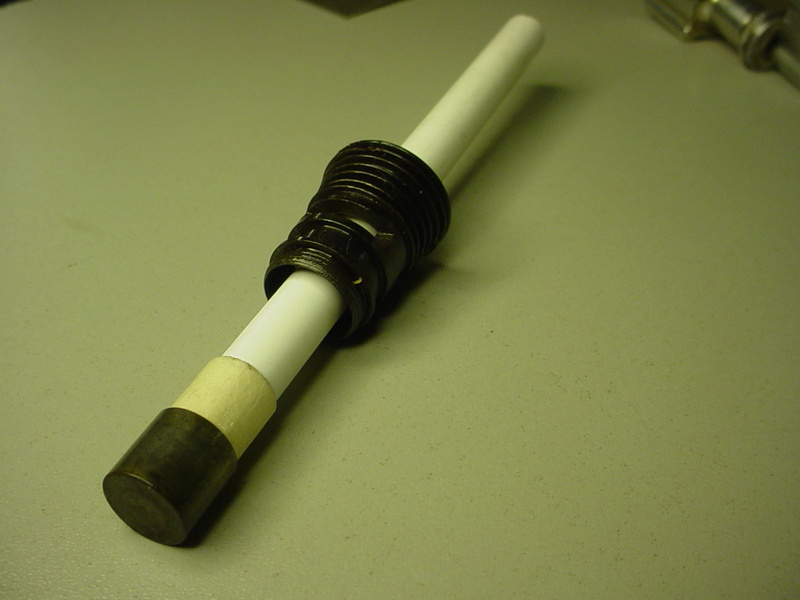

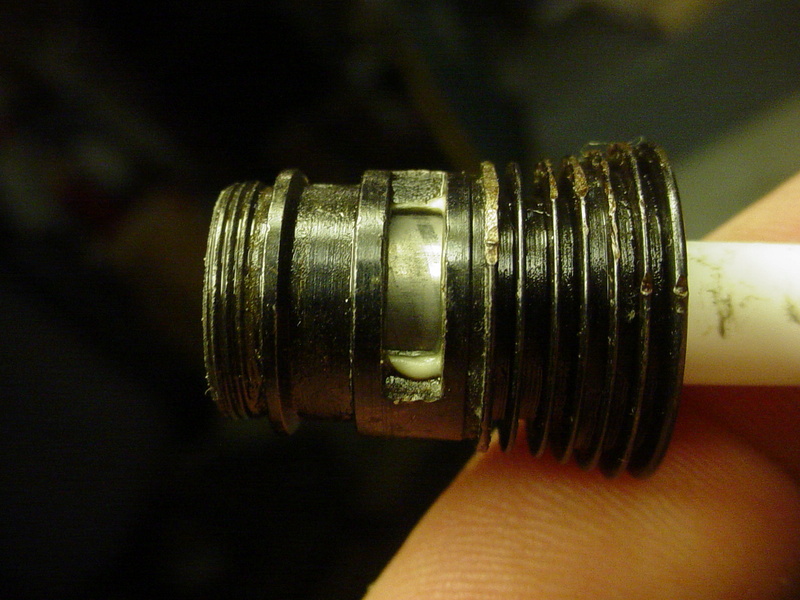
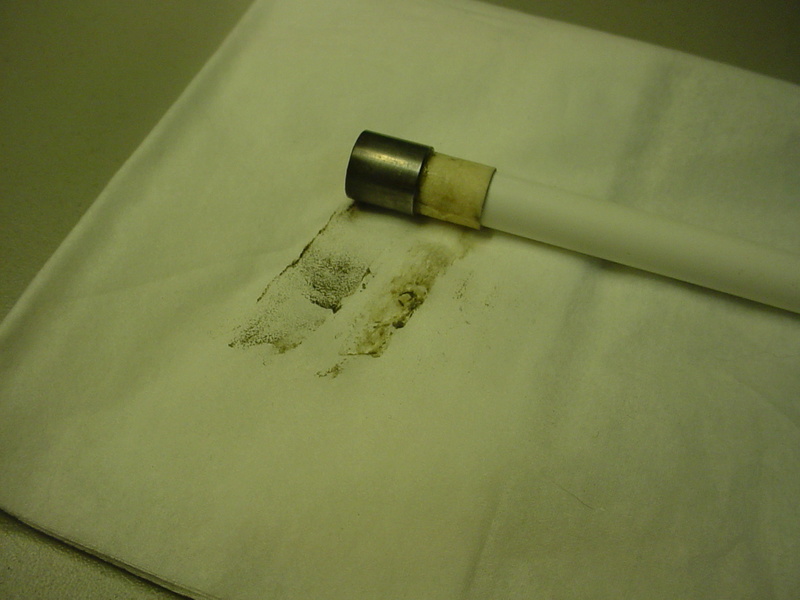
Once the burrs were cleared.. I only went a few mm's higher than the exhaust-port. The first cylinder took about 10 minutes work.. but the second one took a LOT longer.
Once cleaned and assembled with heads/gaskets, the compression of both engines was encouraging.
You likely read about the cylinder loosening during yesterdays fourth/final test-run of the first engine..

I chose this wrench to securely re-tighten both cylinders (via the glow-heads..) this afternoon.

I think this is a better wrench for thin-wall cylinders. I bought the strap-wrench because inevitably; if I need to replace a glow-head, the cylinder is going to loosen before the head does.
 Re: Roddie runs a reedie..
Looks Like A Good Engine of the Month Picture to Me

akjgardner- Diamond Member


Posts : 1601
Join date : 2014-12-28
Age : 65
Location : Greensberg Indiana
 Roddie "tried" to run two reedies..
It was hot today (85+F) and humid. It cooled-down a little, later on in the afternoon.. so I got my gear out to run the second #1 cylinder engine. Things didn't go so well. It popped.. it sputtered.. but just wouldn't "run". My starting battery wasn't putting-out much amperage.. (barely into the green-zone on the panel-meter..) so I swapped-in a freshly charged battery which gave me the 3amps I'm used to setting. Things didn't get much better. After 1/2hr. of this.. I decided to swap engines for another with a #3 cylinder. It took a while to get that one going.. but it did finally start and run very strong.. albeit "backwards"..  That was it though. We were back to popping and sputtering. One time when adjusting the needle, I felt heat. It was a little methanol fire.. but nothing serious.
On the #3's backwards-run, I noticed bubbles/foaming between the backplate and case. This could indicate what oldengineRod warned me about, when omitting the choke-tube on these backplates.. and the screws possibly bottoming in the case. I'm now going to use flat-washers under the screw-heads of all six engines. I don't have many #2 washers though.. and there not the easiest item to find locally. I'll figure something out.
The fuel-tank and its orientation could be causing me trouble, being lower than the venturi. I don't usually experience fuel-draw issues with reed-valve engines.. but if the backplates aren't sealing well.. it could be a compound-problem.
If anyone has anything to add.. feel free.
I honestly can't think of anything else.. except that maybe the cylinders being inverted has been dousing the glow-coil. I can remedy that by simply mounting the test-stand horizontally.
It was a frustrating session today.. but I didn't let it get me down. We'll get these things worked out!
Last edited by roddie on Sat Jul 01, 2017 7:37 pm; edited 1 time in total
 Re: Roddie runs a reedie..
akjgardner wrote:Looks Like A Good Engine of the Month Picture to Me
Maybe Joe.. but the rules say the engine has to run..
 Re: Roddie runs a reedie..
I'll add something, your making it difficult on yourself having the engine inverted. Not only is it flooding, it can ruin the plug. Flipping a flooded engine with an inverted plug can damage it. It's also a strain on your battery. If I'm understanding your tank setup correctly, your engine is higher than your tank. That's another problem which can lead to hard starting. Keep the tank at the same height or above. If the tank is higher, put a Luxon line clip on your fuel line and use it as a pinch off device to prevent siphoning. Let it fill the fuel line and pinch it off. As soon as it starts, slide the clip over and fuel will flow. While running backwards is a common trait on a reed valve engine, flooding promotes a engine to run backwards. Backflip the prop and it can clear the flood without whacking your fingers.

Ken Cook- Top Poster

- Posts : 5637
Join date : 2012-03-27
Location : pennsylvania
 Re: Roddie runs a reedie..
Ken, you gave me a useful tip once for my inverted stunt engines, and it saved me from taking a pass on the starting line one day.:
To purge a flooded cylinder, turn it so the cylinder is upright. Then rock the prop towards TDC but not all the way through it. The compression will force the fuel to flow back down through the bypasses and out of the cylinder, back into the crankcase. Then turn the prop so the valve is open and pour it through the venturi and out of the crankcase.
With a Reedie, the step for pouring out of crankcase won't work too well, but it'll still dry the combustion chamber. But if the case was not already flooded, the engine should be ready to crank with no further priming.
The Late Jim Thomerson designed a very nice pattern plane around an inverted TD .09. It's called "Cheap Thrill," a really nice model. It was published in Model Aviation.
Rusty
_________________
Don't Panic!
...and never Ever think about how good you are at something...
while you're doing it!
My Hot Rock & Blues Playlist
...and never Ever think about how good you are at something...
while you're doing it!
My Hot Rock & Blues Playlist

RknRusty- Rest In Peace

- Posts : 10869
Join date : 2011-08-10
Age : 68
Location : South Carolina, USA
 Re: Roddie runs a reedie..
Roddie, if you don't already have a 2-56 bottoming tap. I suggest you buy one or grind the tip off of a spare taper tap. Then you can extend the threads further into the untapped portion of the hole in the case. Why they drilled a deep hole and only tapped it 5 threads deep is a question I can't answer.roddie wrote:If anyone has anything to add.. feel free.
Rusty
_________________
Don't Panic!
...and never Ever think about how good you are at something...
while you're doing it!
My Hot Rock & Blues Playlist
...and never Ever think about how good you are at something...
while you're doing it!
My Hot Rock & Blues Playlist

RknRusty- Rest In Peace

- Posts : 10869
Join date : 2011-08-10
Age : 68
Location : South Carolina, USA
 Re: Roddie runs a reedie..
Thanks fellas. Suggestions noted.. and will be given consideration. The fuel tank I was using is small.. and was in a precarious position. I know (now...) that was part of my problem.. because the runs that I did get; whether short or running-out the tank were accomplished by priming the feed-line. 
 duhhhh. I like to think I'm pretty smart.. but I can be really stupid.
I do have a 2-56 tap.. but I don't think it's a bottoming type. For that matter.. I could try grinding the screws a tad shorter, but either way I'm afraid I risk buggering the threads in the cases. Looking now at the Sure-Start backplates; I see that there isn't much room for flat-washers that are larger-diameter than the screw-heads.. so I might have to give it a try.
Like myself; my glow-heads are not spring-chickens.. When I assembled the engines, I looked at the coils of all my plugs and picked the best-looking ones to use. They looked pretty good.. but I didn't check their continuity/brightness before installing them. I probably should have done that..
I will re-orient the test-stand so that the engine-cylinders are horizontal. That's a fairly simple matter. I did experience flooding when I ran the 1st engine inverted.. and was priming it with the exhaust-ports open. I cleared the flood by blowing air into the open exhaust-ports. A lot of fuel came out. After that, I made sure to turn the prop to raise the piston; closing the ports. I'd never ran an inverted cylinder before.. and it's obviously a tricky thing. I will heed Ken's advice there though. No sense in making matters more difficult.
I even downloaded an instruction-sheet pdf for the Sure-Start.. to check on how many turns to open the needle..
You'd think I would know how to run an engine by now..
I do have a 2-56 tap.. but I don't think it's a bottoming type. For that matter.. I could try grinding the screws a tad shorter, but either way I'm afraid I risk buggering the threads in the cases. Looking now at the Sure-Start backplates; I see that there isn't much room for flat-washers that are larger-diameter than the screw-heads.. so I might have to give it a try.
Like myself; my glow-heads are not spring-chickens..
I will re-orient the test-stand so that the engine-cylinders are horizontal. That's a fairly simple matter. I did experience flooding when I ran the 1st engine inverted.. and was priming it with the exhaust-ports open. I cleared the flood by blowing air into the open exhaust-ports. A lot of fuel came out. After that, I made sure to turn the prop to raise the piston; closing the ports. I'd never ran an inverted cylinder before.. and it's obviously a tricky thing. I will heed Ken's advice there though. No sense in making matters more difficult.
I even downloaded an instruction-sheet pdf for the Sure-Start.. to check on how many turns to open the needle..
You'd think I would know how to run an engine by now..
 Re: Roddie runs a reedie..
Roddie no need to fiddle with taps and bolt grinding if you tuck an exhaust deflector between the backplate and the crankcase with 1 or 2 extra gaskets ..this will not only help you deflect exhaust gas from behind the cylinder a bit but eat up a few threads worth of bolt length

balogh- Top Poster


Posts : 4958
Join date : 2011-11-06
Age : 66
Location : Budapest Hungary
 Re: Roddie runs a reedie..
balogh wrote:Roddie no need to fiddle with taps and bolt grinding if you tuck an exhaust deflector between the backplate and the crankcase with 1 or 2 extra gaskets ..this will not only help you deflect exhaust gas from behind the cylinder a bit but eat up a few threads worth of bolt length
Thanks Andras. That's another idea that I did not think of. I do have six engines freshly assembled with these backplates though.. and they may all need attention in this area. I might have one exhaust-deflector. I'll be out on errands today.. and there's a hardware store that might possibly have #2 lock-washers that would fit the backplates. It's an old-school store where I found a 5-40 tap and die a few years ago.
If there's room in the backplate for a 1/4" (6.3mm) diameter washer under the screws.. I could make my own from plastic-sheet using a paper hole-punch. I've made washers that way before.
These shown below are cardstock and rubber.. but the process is the same. Drill a hole in the material for the ID.. and sight through the eye of the punch to center the hole and punch-out a 1/4" OD flat-washer


A 1/8" hole-punch can be used with a 1/4" one to make my own venturi-gaskets for tanked Cox Bees.

 Re: Roddie runs a reedie..
(disclaimer..) I wouldn't be "me".. if I didn't post this..  I didn't shop for #2-size flat-washers today.. (couldn't fit that into the schedule..) but I knew that I might be able to make my own.. and I did.
I needed to see if a 1/4" diameter washer would fit into the case-screw area in the Cox Sure-Start (horseshoe) back-plate.. so I punched-out a paper-template to inspect..

I think that'll work.. so I got out my plastic-sheet stock.. and measured the 2-56 case-screw's thread OD.

and then chose a drill.. (Roddie OCD in full-force now..)


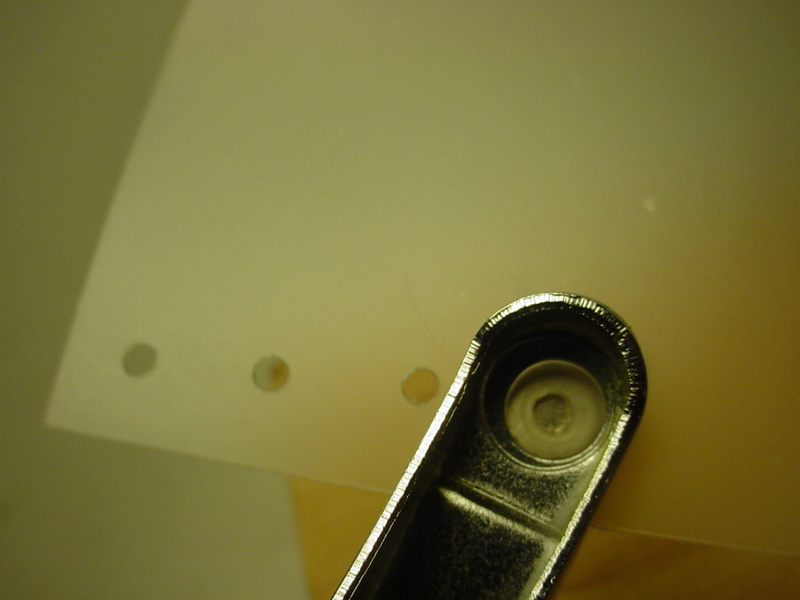


"You" could easily do this.. without being as precise as I was. All that you really need is a standard "hand-type" paper hole-punch and a standard 3/32" (.093") drill-bit. I don't know much about metric drill-sizes.. but 2.2 or 2.3mm would work..
The part the hole-punch that catches the cut-outs can be removed to expose the "eye" for centering the punch on the drilled-hole.

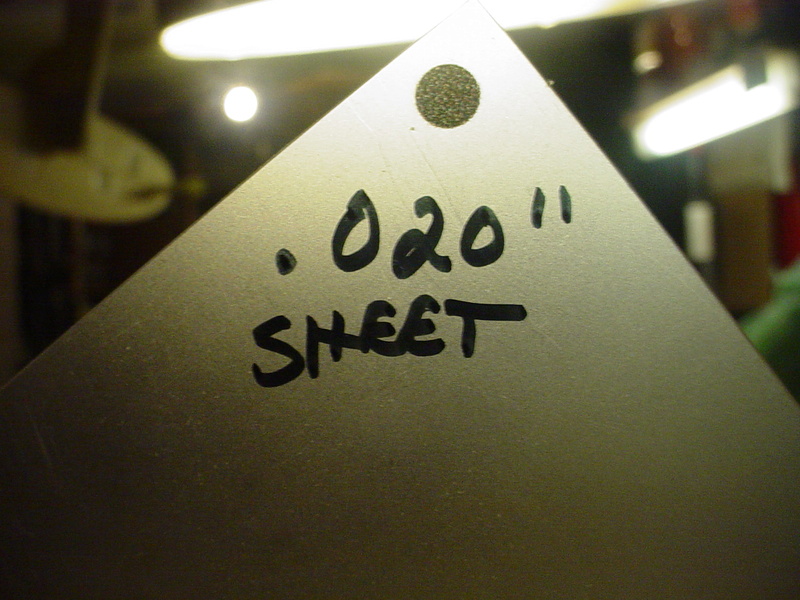
The flange on the omitted choke-tube measures .050" so I may need to double-up on my .020" thick washers.. but I'm going to try a single-thickness first. I think that will be enough.
Performance-reports to follow..
OCD-Roddie.. over and out..
I needed to see if a 1/4" diameter washer would fit into the case-screw area in the Cox Sure-Start (horseshoe) back-plate.. so I punched-out a paper-template to inspect..

I think that'll work.. so I got out my plastic-sheet stock.. and measured the 2-56 case-screw's thread OD.


and then chose a drill.. (Roddie OCD in full-force now..)


"You" could easily do this.. without being as precise as I was. All that you really need is a standard "hand-type" paper hole-punch and a standard 3/32" (.093") drill-bit. I don't know much about metric drill-sizes.. but 2.2 or 2.3mm would work..
The part the hole-punch that catches the cut-outs can be removed to expose the "eye" for centering the punch on the drilled-hole.

The flange on the omitted choke-tube measures .050" so I may need to double-up on my .020" thick washers.. but I'm going to try a single-thickness first. I think that will be enough.
Performance-reports to follow..
OCD-Roddie.. over and out..
 Re: Roddie runs a reedie..
I just made enough plastic flat-washers for my six Sure-Start back-plates.

These were made from a fairly rigid .020" thick plastic sheet. My old hole-punch was "laboring" (high-effort) to punch-out the one's I drilled yesterday.. so this morning I went ISO a new hole-punch. It cost me $1 at Walmart. I realized when I returned home and compared it to my old one, that it's not as robust, but when I tried it out.. it punched all the holes cleanly with little to no effort.
Making these for my back-plate screws was just one of several possible applications. They're not "steel".. but small flat-washers don't necessarily need to be made of steel. They often act as bushings and/or spacers.
We'll soon see if this improves the back-plate sealing on the engines. Stay tuned..
 six for six!
I added the homemade plastic washers under the case-screws to all six engines' Sure-Start back-plates.

Substituted a different glow-clip for one that had a broken wire..


Brought the gear outdoors to resume bench-running..

All six engines were equipped with starter-springs.. but I had my electric-starter on standby. The three engines in the front-row have identical cylinders; dual bypass/slit-exhaust porting. They had not been run for a long time. The prop in the foreground is a 5 x 3 that I would plan to run on those three engines. One of those three engines had a gummed-up crank-journal. I didn't remove/clean any of the cranks in the engines beforehand. Most of them loosened right-up with oil.
My set-up..

A Sullivan 2oz. clunk-tank replaces the small 3/8oz. tin wedge-tank that I used before. I twisty-tied my glow-clip wires safely out of harms way.. and ran the clip up from the bottom. I also routed the fuel-line under a rubber-band to keep it stationary.
Results; All six engines ran STRONG!!!!!
 YAY.. I thought I'd lost my touch.
They all started very easily.. The fuel-line was a good size for quick-swapping between engines. It stayed primed with fuel.. and the quick-change engine-mount allowed me to quickly run all six engines in no time at all.
Although I included my tach with my gear.. I didn't take any readings. I just wanted to see if the engines would run.. and they did! I let them run "rich" for a few seconds.. then peaked them all out for about 10-15 seconds and pinched-off the fuel line to run the next one.
It was frickin' glorious! I needed to use the electric-starter on the engine with the gummy-crank.. but only a few quick "blips".. and it started right-up and ran like a champ!
I apologize that I didn't shoot any video today.. but seeing if these engines would run correctly was more important to me.. after the troubles I've had.
Now I can confidently mount them all on my airplanes and fly them. We'll have some video then!

Substituted a different glow-clip for one that had a broken wire..


Brought the gear outdoors to resume bench-running..

All six engines were equipped with starter-springs.. but I had my electric-starter on standby. The three engines in the front-row have identical cylinders; dual bypass/slit-exhaust porting. They had not been run for a long time. The prop in the foreground is a 5 x 3 that I would plan to run on those three engines. One of those three engines had a gummed-up crank-journal. I didn't remove/clean any of the cranks in the engines beforehand. Most of them loosened right-up with oil.
My set-up..

A Sullivan 2oz. clunk-tank replaces the small 3/8oz. tin wedge-tank that I used before. I twisty-tied my glow-clip wires safely out of harms way.. and ran the clip up from the bottom. I also routed the fuel-line under a rubber-band to keep it stationary.
Results; All six engines ran STRONG!!!!!

 YAY.. I thought I'd lost my touch.
 They all started very easily.. The fuel-line was a good size for quick-swapping between engines. It stayed primed with fuel.. and the quick-change engine-mount allowed me to quickly run all six engines in no time at all.
Although I included my tach with my gear.. I didn't take any readings. I just wanted to see if the engines would run.. and they did! I let them run "rich" for a few seconds.. then peaked them all out for about 10-15 seconds and pinched-off the fuel line to run the next one.
It was frickin' glorious! I needed to use the electric-starter on the engine with the gummy-crank.. but only a few quick "blips".. and it started right-up and ran like a champ!
I apologize that I didn't shoot any video today.. but seeing if these engines would run correctly was more important to me.. after the troubles I've had.
Now I can confidently mount them all on my airplanes and fly them. We'll have some video then!
 Re: Roddie runs a reedie..
OUTSTANDING!! Glad to see that you worked through everything and got six great runners for the effort. I am hoping to see some video of the engines in flight, now. Enjoy them!
Bob
Bob

fit90- Diamond Member

- Posts : 1341
Join date : 2011-08-11
Location : Naples, Florida
 Re: Roddie runs a reedie..
fit90 wrote:OUTSTANDING!! Glad to see that you worked through everything and got six great runners for the effort. I am hoping to see some video of the engines in flight, now. Enjoy them!
Bob
Thanks a lot Bob! I've got a "little" work to do on the airplanes.. but nothing major. Mounting the engines/ fuel-tanks.. checking the balance and controls/throws.. etc. I'll post some pics of the ones that should be flight-ready.
 Similar topics
» IT Runs...IT RUNS!!!!! The Rescue Bug Comes Alive !!
» RR-1 colors on a reedie
» Double-throttled TeeDeeReedie049
» "Reedie" Cox venturi gasket tip
» What makes the BW the strongest stock reedie?
» RR-1 colors on a reedie
» Double-throttled TeeDeeReedie049
» "Reedie" Cox venturi gasket tip
» What makes the BW the strongest stock reedie?
Page 1 of 1
Permissions in this forum:
You cannot reply to topics in this forum

 Rules
Rules


