Log in
Search
Latest topics
» Chocolate chip cookie dough.........by roddie Today at 2:13 pm
» Purchased the last of any bult engines from Ken Enya
by sosam117 Today at 12:32 pm
» Tee Dee .020 combat model
by rsv1cox Today at 11:07 am
» Free Flight Radio Assist
by rdw777 Today at 10:24 am
» My latest doodle...
by batjac Yesterday at 10:47 pm
» My N-1R build log
by roddie Yesterday at 9:50 pm
» Funny what you find when you go looking
by rsv1cox Wed Nov 20, 2024 4:21 pm
» Landing-gear tips
by 1975 control line guy Wed Nov 20, 2024 9:17 am
» Cox NaBOO - Just in time for Halloween
by rsv1cox Tue Nov 19, 2024 7:35 pm
» Canada Post strike - We are still shipping :)
by Cox International Tue Nov 19, 2024 1:01 pm
» Duende V model from RC Model magazine 1983.
by getback Tue Nov 19, 2024 7:08 am
» My current avatar photo
by roddie Mon Nov 18, 2024 10:05 pm
Cox Engine of The Month
PeeWee .020 Repair Tips Needed
Page 1 of 1
 PeeWee .020 Repair Tips Needed
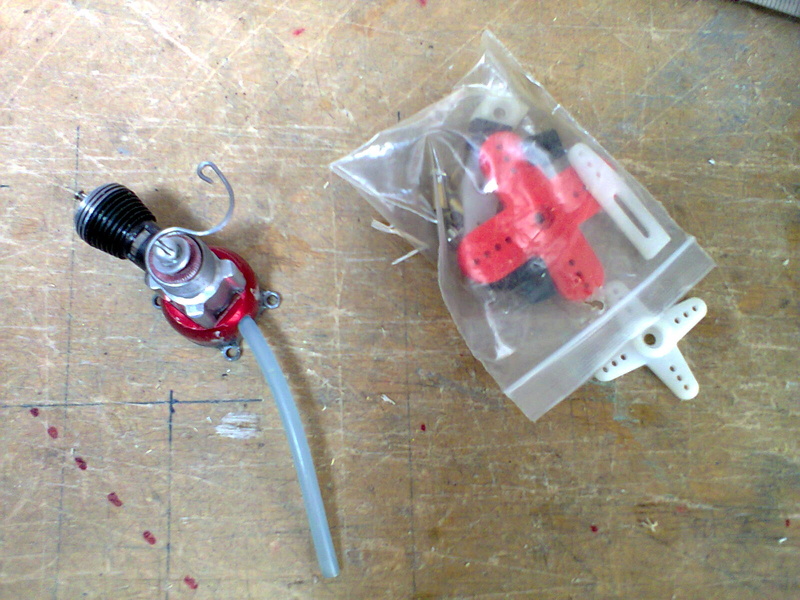
Hi all. I have come into posession of a very well used and abused PeeWee .020. She was ridden very hard, and put away very wet. Anyways, I would like to ask if anybody here would happen to know of a way to repair the backplate to usable condition. Three mounting holes are completely missing and the fourth is there but cracked. Anyways, if you may have any ideas, I would love to hear them. The best I have come up with so far, is gluing it to whatever I mounted it to. BUT, I would also like to find something so I can bench run it. I can't wait to hear this little thing run. Thank you.


NEW222- Top Poster

- Posts : 3896
Join date : 2011-08-13
Age : 46
Location : oakbank, mb
 Re: PeeWee .020 Repair Tips Needed
I forgot to add that it looks like the previous owner had mounted it somehow, or attempted to, as it appears that whatever used had been scraped away. Visible on picture 1.

NEW222- Top Poster

- Posts : 3896
Join date : 2011-08-13
Age : 46
Location : oakbank, mb
 Re: PeeWee .020 Repair Tips Needed
Maybe you could bolt a piece of metal to the back with longer tank screws and then drill with what ever pattern you want on the plate.

chevyiron420- Gold Member

- Posts : 251
Join date : 2015-01-28
Age : 66
Location : Barney Georgia
 Re: PeeWee .020 Repair Tips Needed
Yes that the best fix method. 


1/2A Nut- Top Poster

- Posts : 3536
Join date : 2013-10-20
Age : 61
Location : Brad in Texas
 Re: PeeWee .020 Repair Tips Needed
NEW222 wrote:Hi all. I have come into posession of a very well used and abused PeeWee .020. She was ridden very hard, and put away very wet. Anyways, I would like to ask if anybody here would happen to know of a way to repair the backplate to usable condition. Three mounting holes are completely missing and the fourth is there but cracked. Anyways, if you may have any ideas, I would love to hear them. The best I have come up with so far, is gluing it to whatever I mounted it to. BUT, I would also like to find something so I can bench run it. I can't wait to hear this little thing run. Thank you.
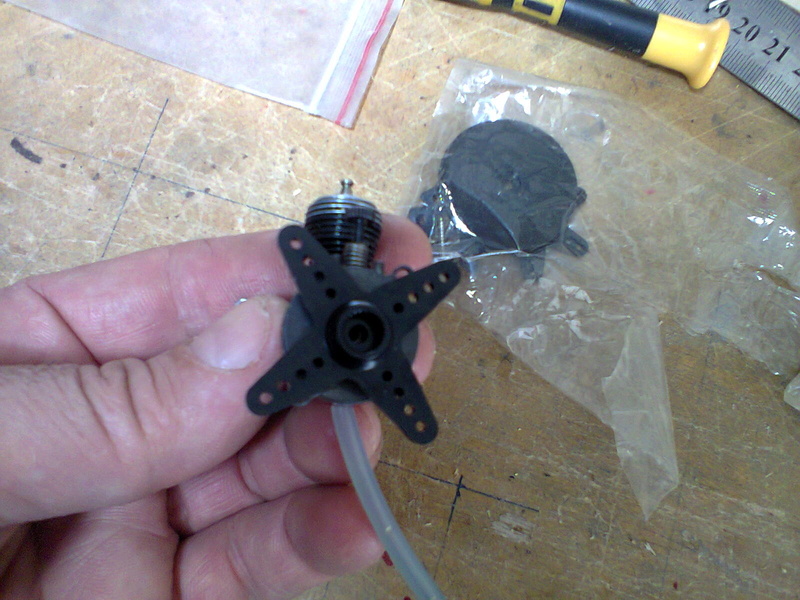
Hi, how are you ?! Look, I give you an idea that works.
Take a tower of a servant, here we call it cam or servant star, control the one that best suits your engine.
With the 4 own screws of the motor, you will hold the star, you have to keep in mind that the screws necessarily have to be longer, just add the thickness of the star.
Between the tank cover and the star, for each screw you have to match an o-ring, in order to avoid the fuel escaping, or you can drill the tank and place a hose with an additional tank of the latter Shape You do not need to place the O'ring. Do you get me?


MauricioB- Top Poster

- Posts : 3712
Join date : 2016-02-16
Age : 53
Location : ARG
 Re: PeeWee .020 Repair Tips Needed
Awesome. Thank you for the tips.
And MauricioB, yes it is clear. I am glad you mentioned it about the o-rings as I did not think of fuel loss. The hole in the tank would also work, just that I have been looking for one of these for a long time and want to TRY to keep it as original as possible. Thank you.
And MauricioB, yes it is clear. I am glad you mentioned it about the o-rings as I did not think of fuel loss. The hole in the tank would also work, just that I have been looking for one of these for a long time and want to TRY to keep it as original as possible. Thank you.

NEW222- Top Poster

- Posts : 3896
Join date : 2011-08-13
Age : 46
Location : oakbank, mb
 Re: PeeWee .020 Repair Tips Needed
Mauricio, you are a Genius 
Very nice and easy way to fix the situation.

Very nice and easy way to fix the situation.

KariFS- Diamond Member

- Posts : 2044
Join date : 2014-10-10
Age : 53
 Re: PeeWee .020 Repair Tips Needed
NEW222 wrote:Awesome. Thank you for the tips.
And MauricioB, yes it is clear. I am glad you mentioned it about the o-rings as I did not think of fuel loss. The hole in the tank would also work, just that I have been looking for one of these for a long time and want to TRY to keep it as original as possible. Thank you.
I'm glad the idea is useful. Keep in mind that it is important that you do not lose fuel, for that reason it is necessary and priority that the whole assembly be well sealed. Also, the connection between the engine housing and the tank, if it is not properly sealed, can draw in additional air and the engine will not operate properly.
I will be attentive to your advances with this engine, a cordial greetings!


MauricioB- Top Poster

- Posts : 3712
Join date : 2016-02-16
Age : 53
Location : ARG
 Re: PeeWee .020 Repair Tips Needed
KariFS wrote:Mauricio, you are a Genius
Very nice and easy way to fix the situation.
Thanks Kari, it's a pleasure for me to share ideas with all of you!


MauricioB- Top Poster

- Posts : 3712
Join date : 2016-02-16
Age : 53
Location : ARG
 Re: PeeWee .020 Repair Tips Needed
I think one obvious answer is to find one or more parts lots on E-bay that include one or more peeWee 20s (hopefully) with good metal back plates
Decades ago, on the island of Formosa (Taiwan) anything from the States was 6 to 12 weeks away
I crashed my .049 Cox model and broke off two of the 4 ears
My Dad traced the outline of the Back plate on a small piece of Teak and carefully carved out the shape a tad oversized
He made 4 ears for the screw holes out of steel wire
WE filed off (no Dremel then) all the cast ears and cleaned up the perimeter from the filler- NVA- vent tube all around the metal back plate
He then set each of the steel wire new ears in the MOLD with small screws loosely
Then we cleaned the back plate with moms nail polish remover...mostly acetone
The Back plate was set in the MOLD and the wire formed ears were jiggered into position
Dad had the two part J&B weld tubes and mixed up a batch
The rest should be obvious
Teak is oily wood so it all came out 24 hours later looking sort of funky.... if you do this in some other hard wood a slathering of car wax will work as MOLD release
He set me to work with small jewelers files and once done it looked very much like original albeit a tad larger outside dimension
I flew and crashed that .049 a lot and never broke off another mounting ear

fredvon4- Top Poster


Posts : 4012
Join date : 2011-08-26
Age : 69
Location : Lampasas Texas
 Re: PeeWee .020 Repair Tips Needed
I was wondering on using JB Weld to make 'ears'. That was the first thing I was going to try, but the tip of fabricating a thin metal backplate came to play. I will be attempting a repair of some kind this coming week. I will post pictures as I go along with it. Thank you as well for the tip, as it would appear to be stronger with a wire insert than just JB Weld alone.

NEW222- Top Poster

- Posts : 3896
Join date : 2011-08-13
Age : 46
Location : oakbank, mb
 Re: PeeWee .020 Repair Tips Needed
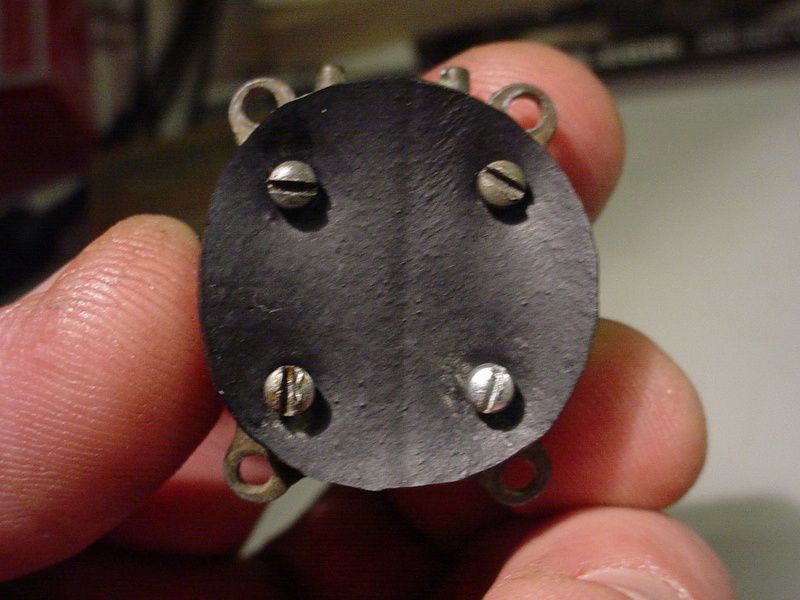
You might try tracing the back-plate onto a sheet of the butyl rubber used for tire inner-tubes (bicycle-type) as a gasket/seal between a mounting-plate.
This is a Bee backplate that I used for an example. I used an awl through the backplate over a pinewood-block to pierce the four holes in the rubber. A small nail would also work.

Naturally, the screws would pass-through the retro-fit mount-plate first.. and then through the rubber gasket.


What do you think? It took 10 min. to make. A mounting-plate would best be made of .060"/.080" thick aluminum.. and could be around the size/footprint of a Bee backplate. You could use a Bee backplate as a template to mark the outer-holes.. and the Pee Wee backplate for the inner ones. You'd then have a Pee Wee that you could mount on a model with its' firewall drilled for a Bee. Might bee useful if you've got a small airplane that's nose-heavy or over-powered with a Bee. Just swap-in the Pee Wee.. and use a shorter set of lines!
This is a Bee backplate that I used for an example. I used an awl through the backplate over a pinewood-block to pierce the four holes in the rubber. A small nail would also work.

Naturally, the screws would pass-through the retro-fit mount-plate first.. and then through the rubber gasket.


What do you think? It took 10 min. to make. A mounting-plate would best be made of .060"/.080" thick aluminum.. and could be around the size/footprint of a Bee backplate. You could use a Bee backplate as a template to mark the outer-holes.. and the Pee Wee backplate for the inner ones. You'd then have a Pee Wee that you could mount on a model with its' firewall drilled for a Bee. Might bee useful if you've got a small airplane that's nose-heavy or over-powered with a Bee. Just swap-in the Pee Wee.. and use a shorter set of lines!
Page 1 of 1
Permissions in this forum:
You cannot reply to topics in this forum

 Rules
Rules


