Log in
Search
Latest topics
» My N-1R build logby roddie Today at 12:32 am
» Happy 77th birthday Andrew!
by akjgardner Today at 12:27 am
» TEE DEE Having issues
by TD ABUSER Yesterday at 9:43 pm
» Landing-gear tips
by roddie Yesterday at 6:17 pm
» Roger Harris revisited
by TD ABUSER Yesterday at 2:13 pm
» Tee Dee .020 combat model
by Ken Cook Yesterday at 1:41 pm
» Retail price mark-up.. how much is enough?
by Ken Cook Yesterday at 1:37 pm
» My latest doodle...
by roddie Yesterday at 10:43 am
» Chocolate chip cookie dough.........
by roddie Fri Nov 22, 2024 1:13 pm
» Purchased the last of any bult engines from Ken Enya
by sosam117 Fri Nov 22, 2024 11:32 am
» Free Flight Radio Assist
by rdw777 Fri Nov 22, 2024 9:24 am
» Funny what you find when you go looking
by rsv1cox Wed Nov 20, 2024 3:21 pm
Cox Engine of The Month
Winging it
Page 1 of 2
Page 1 of 2 • 1, 2 
 Winging it
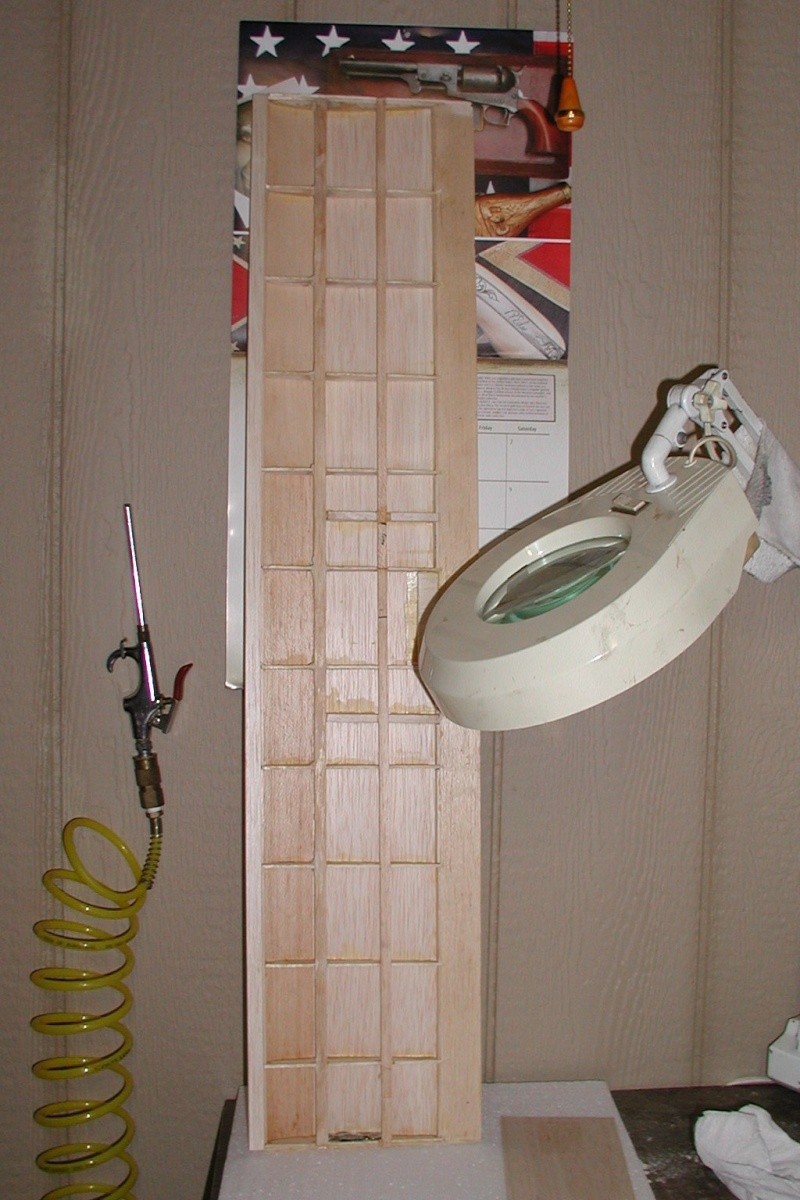
Ya, crazy I know but being on the frugal and waste not want not side I am using this ex R/C half wing to contstuct both top and bottom wings on my ebay purchased and previously discussed Strutz Aircrate.
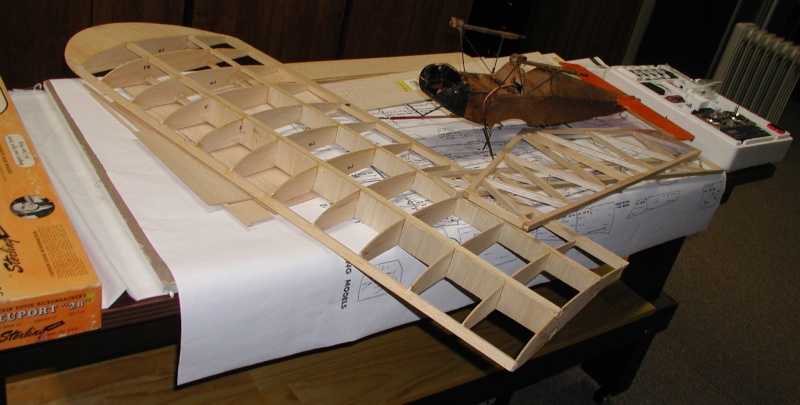
I cut the top wing out of the back section and the bottom wing out of the front.

It would have been easier just to start from scratch, but this wing has been hanging around too long so it has to go.
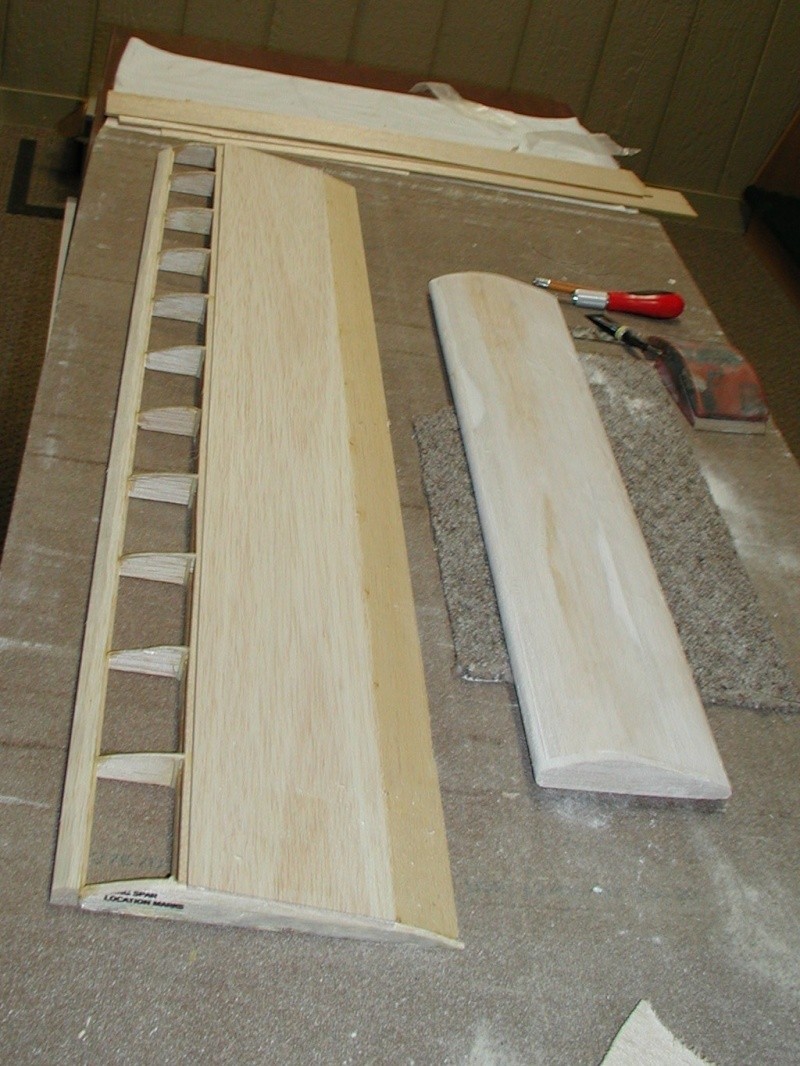
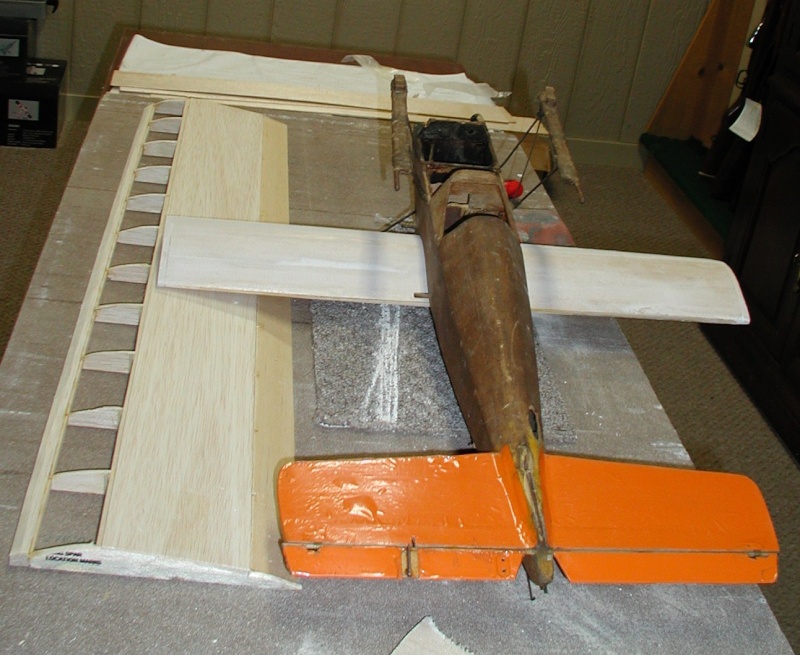

I'm debating whether to build this R/C or control line, probably C/L as it will wind up being way to heavy for R/C.
I just enjoy bringing someone elses disaster back to life and seeing if it will fly or not.

I cut the top wing out of the back section and the bottom wing out of the front.

It would have been easier just to start from scratch, but this wing has been hanging around too long so it has to go.


I'm debating whether to build this R/C or control line, probably C/L as it will wind up being way to heavy for R/C.
I just enjoy bringing someone elses disaster back to life and seeing if it will fly or not.

rsv1cox- Top Poster


Posts : 11250
Join date : 2014-08-18
Location : West Virginia
 Re: Winging it
Off to a good start! How old is that airplane, anyway?

ARUP- Gold Member

- Posts : 179
Join date : 2015-09-13
Location : Kentucky
 Re: Winging it
Goodnight Bob,
That thing was was probably flown by Oba St.Clair.
Looking forward to the finished product.
Ron
That thing was was probably flown by Oba St.Clair.
Looking forward to the finished product.
Ron

Cribbs74- Moderator


Posts : 11907
Join date : 2011-10-24
Age : 50
Location : Tuttle, OK
 Re: Winging it
Looking good man glad your getting some build time on that baby , Yea piecing wings together can bee a pain most time , for me any way . bought time to finish one and start another here . Eric 

getback- Top Poster


Posts : 10442
Join date : 2013-01-18
Age : 67
Location : julian , NC
 Re: Winging it
Cribbs74 wrote:Goodnight Bob,
That thing was was probably flown by Oba St.Clair.
Looking forward to the finished product.
Ron
Thanks for continuing my education Ron, the name sent me to Mr. Google.
http://obastclair.com/
From what little I know it was designed my Ted Strader in 1961 or before. Ted is still active on RC Groups.
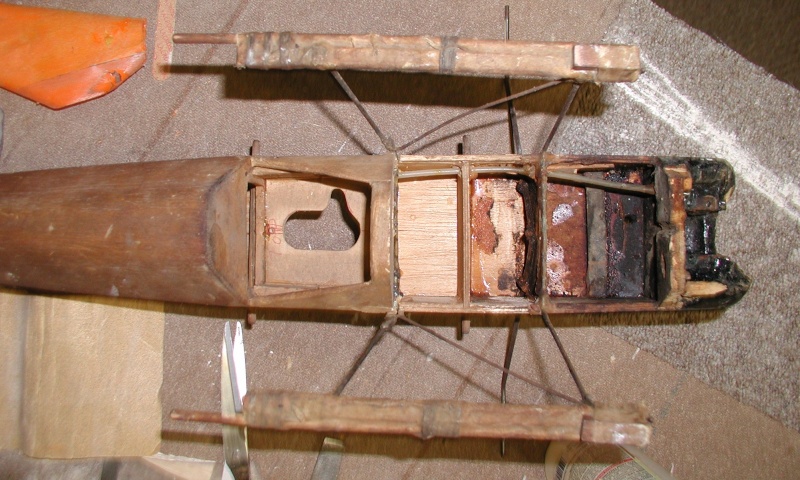
These snow days have me making some progress. I started on the fuselage by removing the orange monocoat, cutting out the vertical stab and rudder and plugging the hole for the rudder control, no longer needed as I'm going to build it as a Ukie. I would LOVE to make it R/C, but to do so I would have to pull a micro R/C system out of one of my "Airfield" Skyraiders and I don't want to do that.
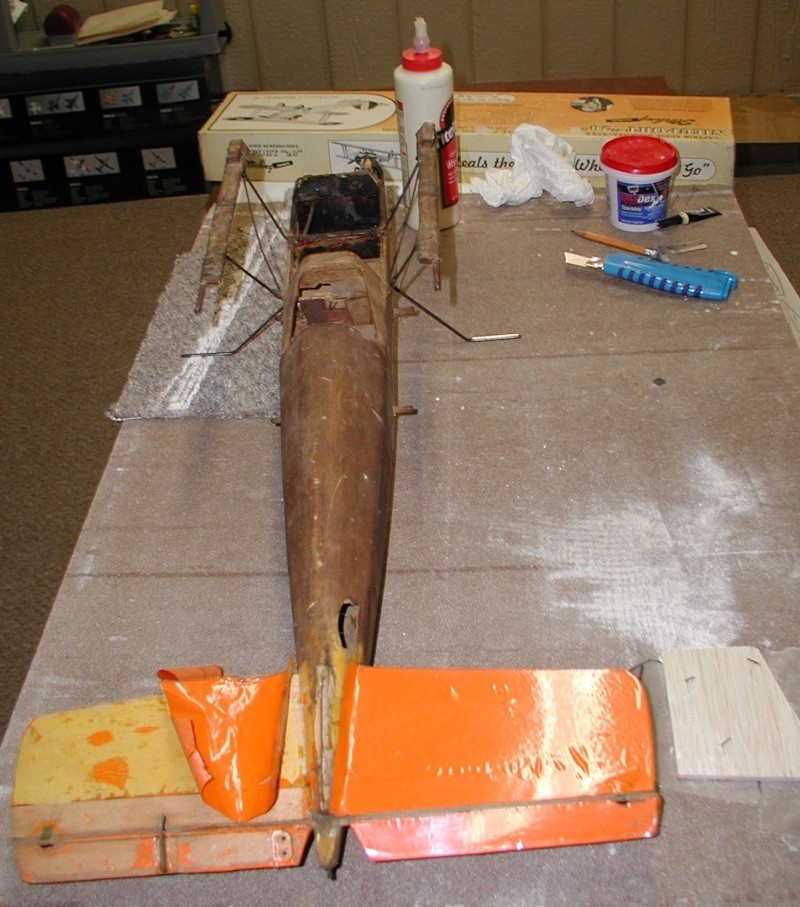
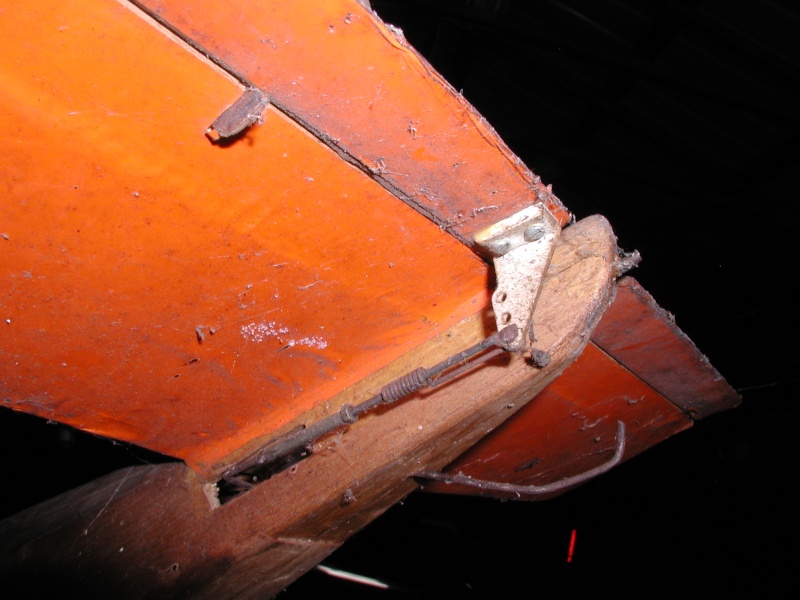
I found some really old controls in this airframe, brass keepers on a dowel holding the elevator on and a built in centering device that looks to be broken.
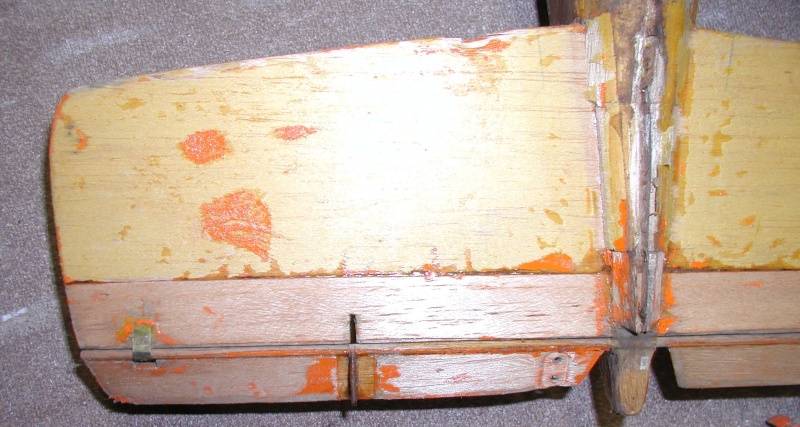
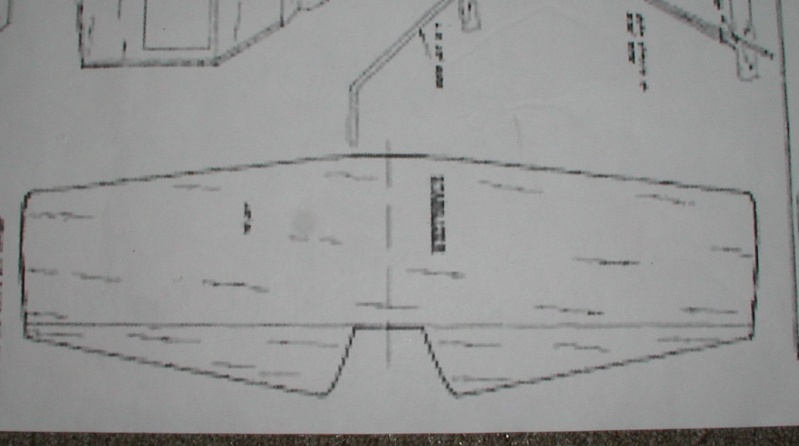
The previous owner must have changed the elevator and horizontal stab around as it does not duplicate the plans. I'm not to pleased with the results. The old monocoat came off easy but left some spots, gotta get all of it off if I'm going to spray dope it.
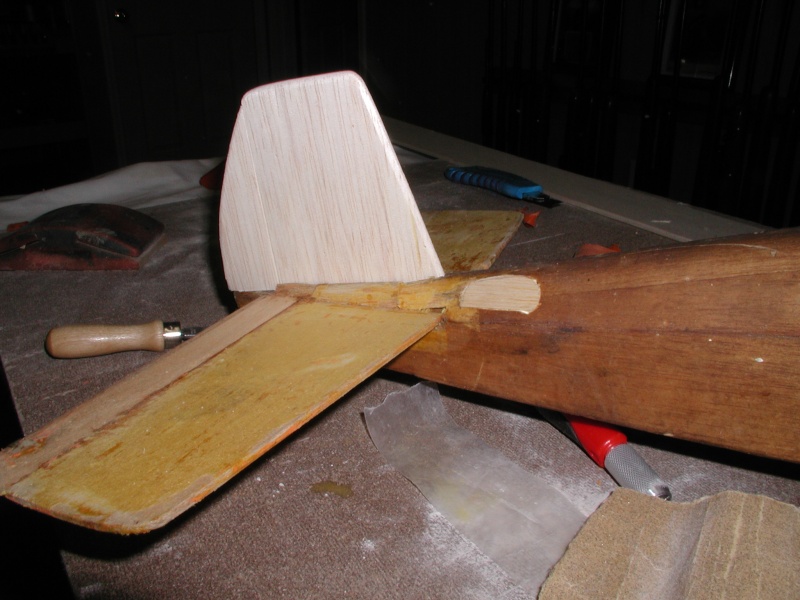
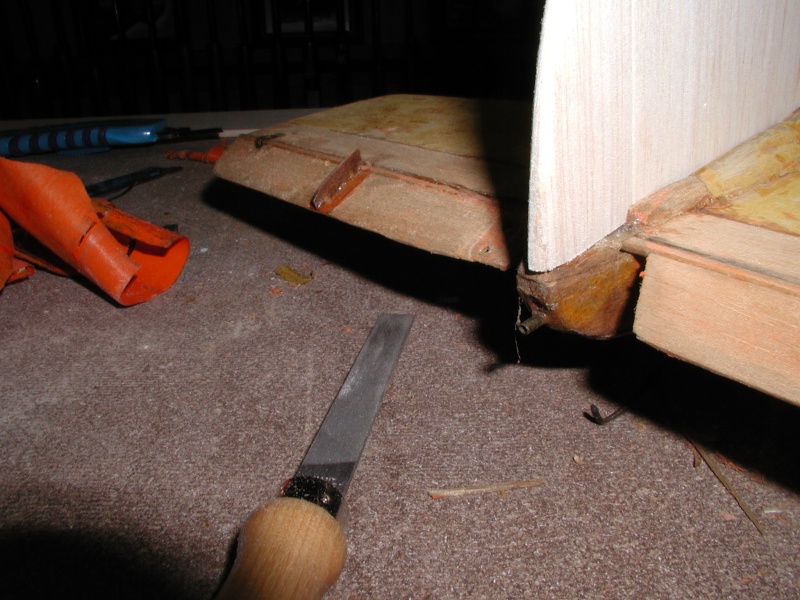
I'm still wondering what this brass tube is sticking out of the tail section. Pull a banner or something?
I burned out the foam that was holding the old GG system. Foam burns quick. I had a spray bottle handy but a good blow got it out. Somehow I have got to stick a bell crank in there. It should be positioned centered on the CG - Right?

rsv1cox- Top Poster


Posts : 11250
Join date : 2014-08-18
Location : West Virginia
 Re: Winging it
If the plane was originally R/C then the brass tube may have been for the antenna to come out through.

fit90- Diamond Member

- Posts : 1341
Join date : 2011-08-11
Location : Naples, Florida
 Re: Winging it
The bell crank doesn't have to be on the cg but should be positioned to not bind at the leadouts,a little behind has worked well for me.IMO 


deanthree5- Moderate Poster

- Posts : 29
Join date : 2012-03-17
Age : 57
Location : Ripley,Oh
 Re: Winging it
Thanks guys, makes sense - a tube for the antenna.
I was just wondering if there was some rule of thumb to position the bell crank. I know that positioning the lead-out guide is quite critical. Making this a U control could be a problem. I would have to place it on the short lower wing which is rubber banded on the fuselage and is located well behind the upper wing.
If I continue down the C/L road I may have to interior block the lower wing for strength and alignment and lock it in with a nylon bolt. According to the designer the lower wing is there mostly to protect the upper wing on hard landings.
I may try installing my Cox Sanwa 3 channel - throttle, elevator, rudder, but with 4 AA batteries for the receiver it is just so darn heavy.
Bob

rsv1cox- Top Poster


Posts : 11250
Join date : 2014-08-18
Location : West Virginia
 Re: Winging it
Bob, could you mount the bellcrank inside the fuselage? It may require some modification but it looks roomy enough. Another alternative could be to build a platform or a bracket on the side of the fuselage. Many biplane designs show the vertical position of the bellcrank to be higher than mounting on the lower wing would allow. Often the lead-out guides are mounted on the wing strut too. If you take a look at this design, for example, you'll see what I am trying to say 
http://www.kotrc.org/events/torquette.pdf
http://www.kotrc.org/events/torquette.pdf

KariFS- Diamond Member

- Posts : 2044
Join date : 2014-10-10
Age : 53
 Re: Winging it
If it had an escapement then the tube is the bearing for the rudder control. A torsion lever was used with a wire loop instead of a push rod and horn.
There should also be a hatch to wind the rubber band to drive the escapement.
http://outerzone.co.uk/plan_details.asp?ID=358
Bootstraps shows good detail.
http://outerzone.co.uk/plan_details.asp?ID=353
http://outerzone.co.uk/plan_details.asp?ID=2166
Phil
There should also be a hatch to wind the rubber band to drive the escapement.
http://outerzone.co.uk/plan_details.asp?ID=358
Bootstraps shows good detail.
http://outerzone.co.uk/plan_details.asp?ID=353
http://outerzone.co.uk/plan_details.asp?ID=2166
Phil

pkrankow- Top Poster

- Posts : 3025
Join date : 2012-10-02
Location : Ohio
 Re: Winging it
Bob, I like your wing modification. It's very creative and makes good use of stuff that is lying around. It would be a challenge to refit the plane with an escapement!!
https://www.youtube.com/watch?v=S4VCPsBGYPE
Lieven
https://www.youtube.com/watch?v=S4VCPsBGYPE
Lieven

OVERLORD- Diamond Member

- Posts : 1807
Join date : 2013-03-19
Age : 58
Location : Normandy, France
 Re: Winging it
Thanks everyone.
Kari, Yes, I plan on mounting the bell crank inside the fuselage, but I'm not sure how to position it and the wing lead outs guide. Got to put everything together first and establish CG.
Phil and Lieven, this was the later Galloping Ghost system, no rubber band. Facinating to watch in operation.
https://www.youtube.com/watch?v=xBSRmlIGSWQ
This one was mostly intact, but no transmitter. We actually got the mechanism to work.
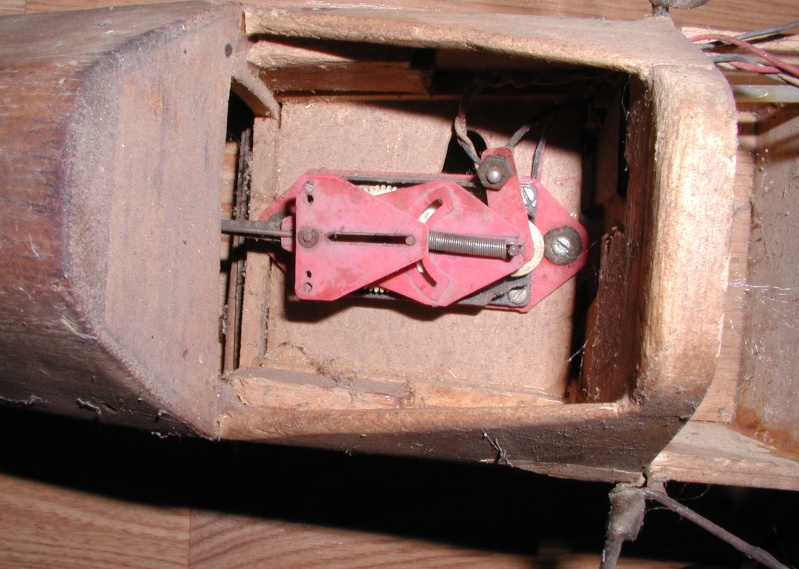
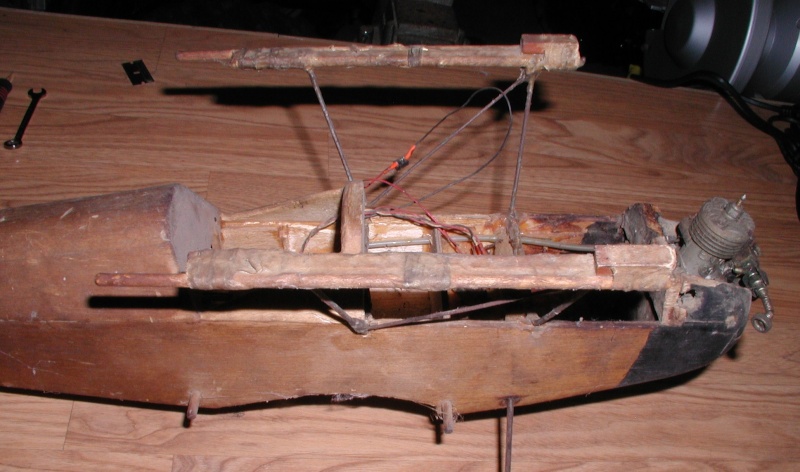
Vintage style connectors found on this old girl.


Kari, Yes, I plan on mounting the bell crank inside the fuselage, but I'm not sure how to position it and the wing lead outs guide. Got to put everything together first and establish CG.
Phil and Lieven, this was the later Galloping Ghost system, no rubber band. Facinating to watch in operation.
https://www.youtube.com/watch?v=xBSRmlIGSWQ
This one was mostly intact, but no transmitter. We actually got the mechanism to work.


Vintage style connectors found on this old girl.


rsv1cox- Top Poster


Posts : 11250
Join date : 2014-08-18
Location : West Virginia
 Re: Winging it
Bell cranks don't care too much about where they are. Having the leads run in a fair manner is more important than the actual bell crank location, and this is not critical since you can use metal tubing to make a smooth run if needed.
Phil
Phil

pkrankow- Top Poster

- Posts : 3025
Join date : 2012-10-02
Location : Ohio
 Re: Winging it
Bob, OK, got it. I am by no means an experienced c/l builder but I would go along the lines described in the following design:
http://www.outerzone.co.uk/plan_files_05/5953/JN4_UC_old.pdf
http://www.outerzone.co.uk/plan_files_05/5953/JN4_UC_old.pdf

KariFS- Diamond Member

- Posts : 2044
Join date : 2014-10-10
Age : 53
 Re: Winging it
Thanks guys... (I do like that old Jenny). I would like to center the bell crank over the lower wing and run the leads out as normal, but that will put the BC well behind the CG, which I guess is ok. I will have to cut that bulkhead to fit or guide the leads. Cut and try I say .... 
This wasn't designed to fly C/L but if you can R/C a dog house and a toliet seat, this isn't much of a streach. But.....I'm still considering a 3 channel R/C unit.
This wasn't designed to fly C/L but if you can R/C a dog house and a toliet seat, this isn't much of a streach. But.....I'm still considering a 3 channel R/C unit.

rsv1cox- Top Poster


Posts : 11250
Join date : 2014-08-18
Location : West Virginia
 Re: Winging it
Keeping on, keeping on, I'm determined to finish this errr...thing. Actually it's the most fun that I have had building a model, making something out of nothing always intrigues me.
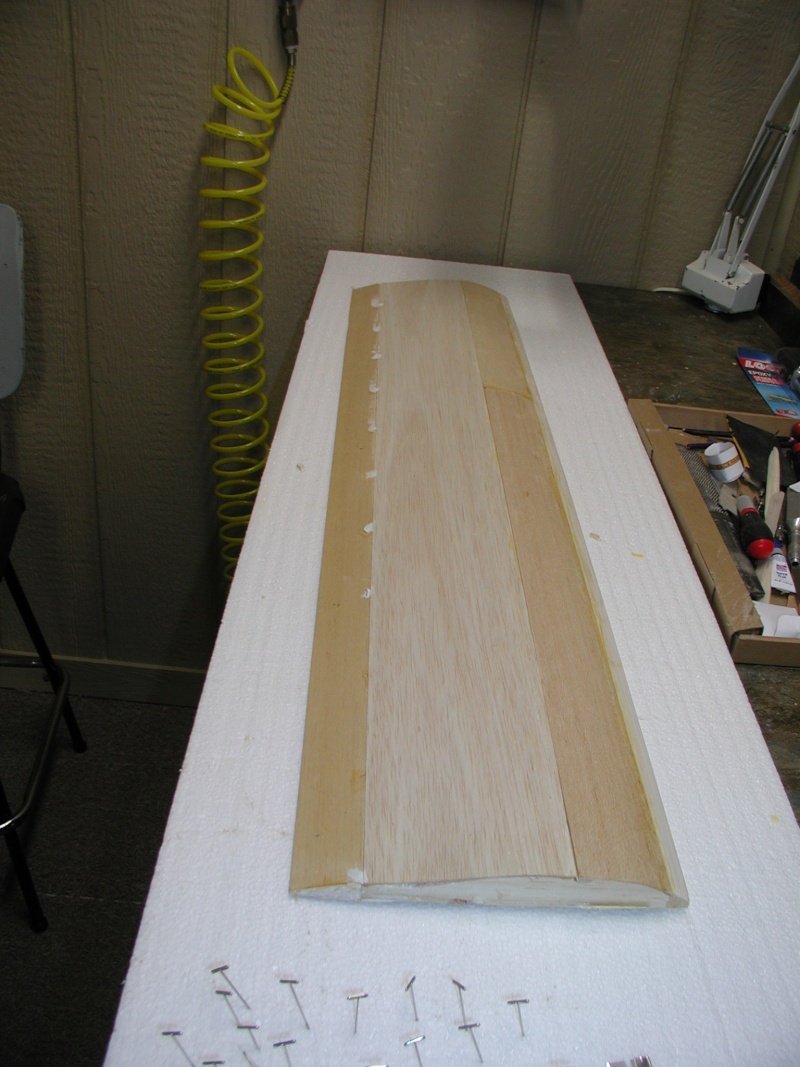
I finished the top wing, added tip weights and sheeted it. It winds up being 37 inches vice 39 inches of the prototype. Sort of a "clipped wing" Cub. I have no idea if it will fly, balance will be the key. I added reenforcements where the rubber bands attached. Probably a heavy wing but eliminating the radio system for a bell crank will more than compensate.
This fuel tank fits well, looks to be about a one ouncer, more fuel than necessary to make me dizzy running an .09.

I made some templates to cut out the balsa for the front cover. I may make it removable but as there is nothing under it other than the tank I may just glue it in.
Still, lot's of work to be done. I may actually finish it by spring.
Bob
I finished the top wing, added tip weights and sheeted it. It winds up being 37 inches vice 39 inches of the prototype. Sort of a "clipped wing" Cub. I have no idea if it will fly, balance will be the key. I added reenforcements where the rubber bands attached. Probably a heavy wing but eliminating the radio system for a bell crank will more than compensate.


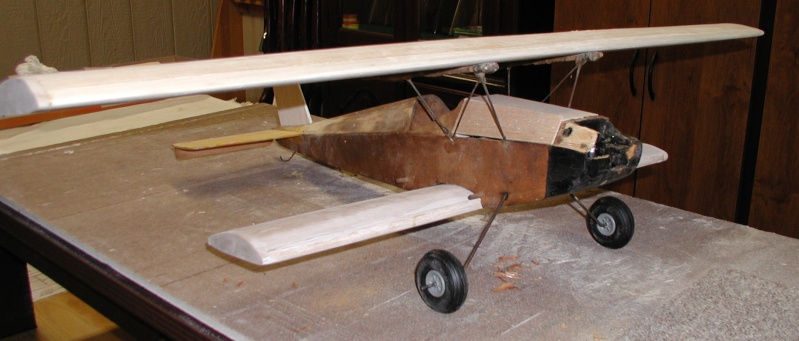
This fuel tank fits well, looks to be about a one ouncer, more fuel than necessary to make me dizzy running an .09.

I made some templates to cut out the balsa for the front cover. I may make it removable but as there is nothing under it other than the tank I may just glue it in.

Still, lot's of work to be done. I may actually finish it by spring.
Bob

rsv1cox- Top Poster


Posts : 11250
Join date : 2014-08-18
Location : West Virginia
 Re: Winging it
Bob, many times when I have a tank in a compartment as you depict, I drill a hole through the center of it and solder a piece of brass tubing or brake line tubing all the way through the tank from top to bottom. I then place a blind nut in the bottom of the fuse. If it's only sheet balsa, I glue a piece of ply on the inside to house the blind nut and I make the top block solid with a screw running all the way through the tank into the blind nut. I can adjust tank height by placing various thickness balsa or foam and use the screw to hold the block and tank in the craft. Gluing it in will work just fine, that's an easy tank to access if the need arises. I have had some real jewels over the years which took some real creative techniques to get at. Ken

Ken Cook- Top Poster

- Posts : 5640
Join date : 2012-03-27
Location : pennsylvania
 Re: Winging it
Removable is a plus. You have all kinds of space around that tank so you have choices.
I would choose to not put a sleeve through the tank, but mostly because I wouldn't want the extra work.
I would create pins on one end of the hatch and use a machine screw on the other end. This way the lid locks in place and is held from both sides.
Phil
I would choose to not put a sleeve through the tank, but mostly because I wouldn't want the extra work.
I would create pins on one end of the hatch and use a machine screw on the other end. This way the lid locks in place and is held from both sides.
Phil

pkrankow- Top Poster

- Posts : 3025
Join date : 2012-10-02
Location : Ohio
 Re: Winging it
So your all sayin' you don't like my high tech pink plastic clip fuel tank retaining system...... 

That is a great idea Ken for fuel tank height adjustment as we all know height is important. But as Phil said for this application it's a lot of work. I have found that these old small displacement Enya's arn't to tempermental in that department.
I did drop the location just a bit, in the photo it's sitting on some tubing that the PO used as a throttle control guide. It came with a TV engine. I would sure like to include that feature as some have here, but still for just the throttle control I would have to load it up with a servo and all the extra stuff necessary to operate it.
Bob

rsv1cox- Top Poster


Posts : 11250
Join date : 2014-08-18
Location : West Virginia
 Re: Winging it
Even though I work on this model everyday, progress is slow. I have had to graft in many patches and add filler to cure the previous builders woes, it really would have been easier and quicker to build it from scratch.
I think I can eliminate the need for rubber bands on the lower wing. I added a blind nut and nylon bolt to attach the wing to the fuselage and keep the wing centered as the U/C wires will exert some pressure on the wing even though the bell crank is secured inside the fuselage.
My problem is...how do solve the problem of the control wires that have to go through the guide and yet allow me to detach the wing? Maybe if I make the end loops small enough to go through the eyelets. If I can’t figure that out I may be forced to glue the lower wing to the fuselage.
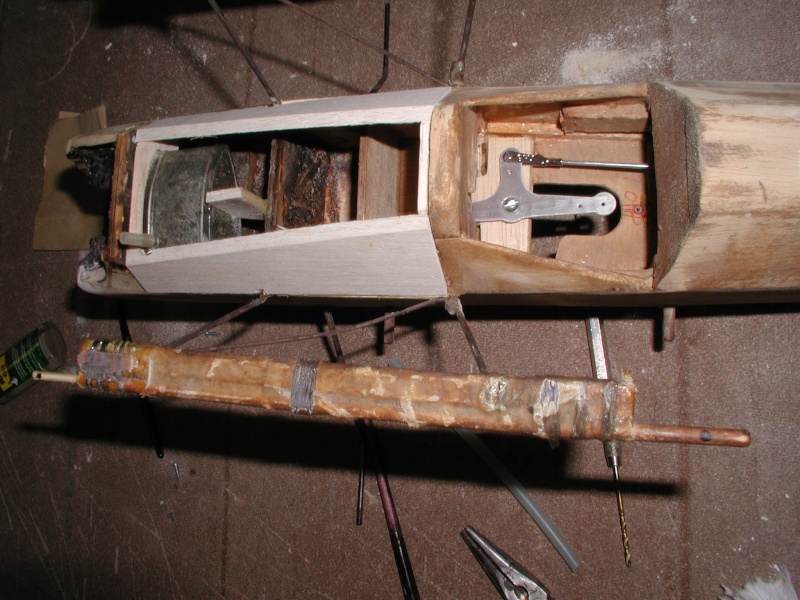

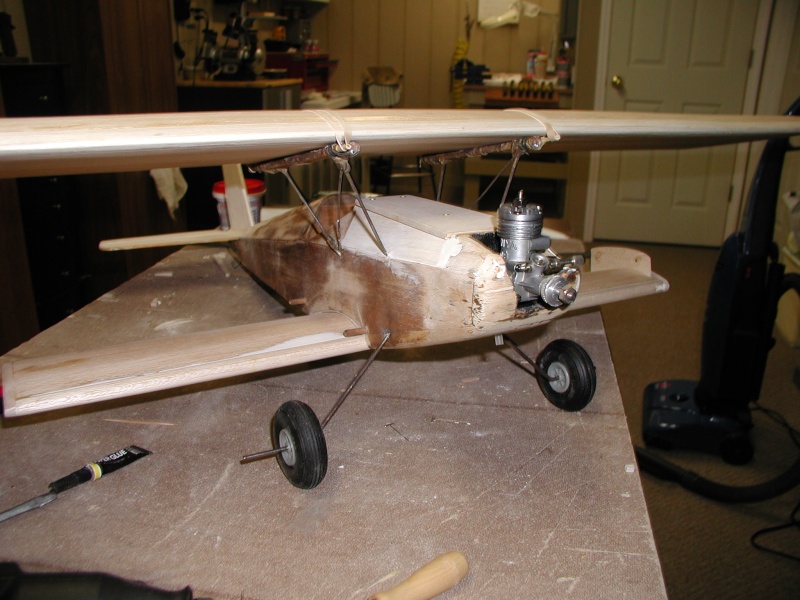
I'm close to a couple of coats of sanding sealer followed by primer and paint. I'm thinking all white with black German crosses and maybe a Jolly Roger decal on the tail. I'm going to use the original Enya .09 that came on it, but it it proves to draggy I have a .15 at the ready.
Still...lot’s to do but I’m having fun doing it.
I think I can eliminate the need for rubber bands on the lower wing. I added a blind nut and nylon bolt to attach the wing to the fuselage and keep the wing centered as the U/C wires will exert some pressure on the wing even though the bell crank is secured inside the fuselage.
My problem is...how do solve the problem of the control wires that have to go through the guide and yet allow me to detach the wing? Maybe if I make the end loops small enough to go through the eyelets. If I can’t figure that out I may be forced to glue the lower wing to the fuselage.


I'm close to a couple of coats of sanding sealer followed by primer and paint. I'm thinking all white with black German crosses and maybe a Jolly Roger decal on the tail. I'm going to use the original Enya .09 that came on it, but it it proves to draggy I have a .15 at the ready.
Still...lot’s to do but I’m having fun doing it.

rsv1cox- Top Poster


Posts : 11250
Join date : 2014-08-18
Location : West Virginia
 Re: Winging it
I have't seen a Galloping Ghost in many years. My dad had one in a plane called a RudderBug built in the 60's. He flew it up til his death in 1986. The guys would scratch their heads and ask my dad why he flew "that old junk", he would say "it still works and it still flies so why not?" He also had a few gliders with the Ace single channel pulse radios. A hard way to fly for sure.rsv1cox wrote:Thanks everyone.
Kari, Yes, I plan on mounting the bell crank inside the fuselage, but I'm not sure how to position it and the wing lead outs guide. Got to put everything together first and establish CG.
Phil and Lieven, this was the later Galloping Ghost system, no rubber band. Facinating to watch in operation.
https://www.youtube.com/watch?v=xBSRmlIGSWQ
This one was mostly intact, but no transmitter. We actually got the mechanism to work.
Vintage style connectors found on this old girl.

londke3- Gold Member

- Posts : 177
Join date : 2011-12-30
Age : 57
Location : nashville TN
 Re: Winging it
rsv1cox wrote:Even though I work on this model everyday, progress is slow. I have had to graft in many patches and add filler to cure the previous builders woes, it really would have been easier and quicker to build it from scratch.
I think I can eliminate the need for rubber bands on the lower wing. I added a blind nut and nylon bolt to attach the wing to the fuselage and keep the wing centered as the U/C wires will exert some pressure on the wing even though the bell crank is secured inside the fuselage.
My problem is...how do solve the problem of the control wires that have to go through the guide and yet allow me to detach the wing? Maybe if I make the end loops small enough to go through the eyelets. If I can’t figure that out I may be forced to glue the lower wing to the fuselage.
I'm close to a couple of coats of sanding sealer followed by primer and paint. I'm thinking all white with black German crosses and maybe a Jolly Roger decal on the tail. I'm going to use the original Enya .09 that came on it, but it it proves to draggy I have a .15 at the ready.
Still...lot’s to do but I’m having fun doing it.
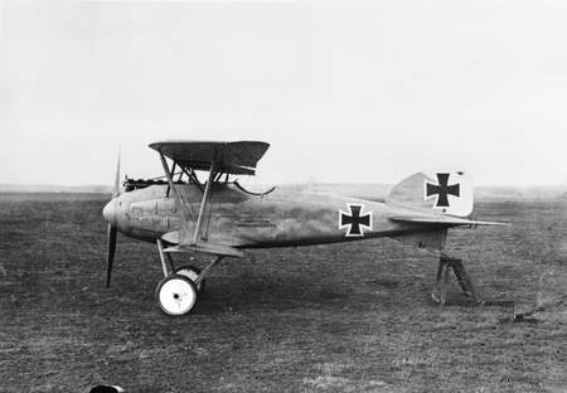
Maybe something like this:



rsv1cox- Top Poster


Posts : 11250
Join date : 2014-08-18
Location : West Virginia
 Re: Winging it
Split lead out guides. They wrap about 3/4 of the way around and have a gap, there is a gap between each pair arranged in the other direction. The LO gets slacked, turned inline with the fuselage, and then can pass out of the gap.
Alternately use the plywood plate and a couple nuts and bolts to hold a second plywood plate with the LO's through it. This allows for LO adjustment in addition to freeing the wing.
Hope I was clear, I can draw some pictures if you need.
Phil
Alternately use the plywood plate and a couple nuts and bolts to hold a second plywood plate with the LO's through it. This allows for LO adjustment in addition to freeing the wing.
Hope I was clear, I can draw some pictures if you need.
Phil

pkrankow- Top Poster

- Posts : 3025
Join date : 2012-10-02
Location : Ohio
 Re: Winging it
I think I can visulaize your meaning Phil, but a picture is worth a thousand words. 
It seems like I still would have wires sticking out of the fuselage. I'm thinking a couple of 2/56 clevises similar to the one I used (first picture above) for the elevator control then just unscrewing and removing the rods when I'm finished flying. But I'm worried about the rods unscrewing in flight.
Bob

rsv1cox- Top Poster


Posts : 11250
Join date : 2014-08-18
Location : West Virginia
 Re: Winging it
Maybe something like this? This is Roddie's pic, hope he doesn't mind me borrowing it 

This is an adjustable guide but with less slots you could make one that can be split when necessary. Maybe that's what Phil meant also?

This is an adjustable guide but with less slots you could make one that can be split when necessary. Maybe that's what Phil meant also?

KariFS- Diamond Member

- Posts : 2044
Join date : 2014-10-10
Age : 53
Page 1 of 2 • 1, 2 
Page 1 of 2
Permissions in this forum:
You cannot reply to topics in this forum

 Rules
Rules


