Log in
Search
Latest topics
» TEE DEE Having issuesby balogh Today at 7:42 am
» Retail price mark-up.. how much is enough?
by rsv1cox Today at 7:36 am
» Cox films/videos...
by Coxfledgling Today at 4:46 am
» Purchased the last of any bult engines from Ken Enya
by Coxfledgling Today at 4:18 am
» My N-1R build log
by roddie Today at 12:32 am
» Happy 77th birthday Andrew!
by akjgardner Today at 12:27 am
» Landing-gear tips
by roddie Yesterday at 6:17 pm
» Roger Harris revisited
by TD ABUSER Yesterday at 2:13 pm
» Tee Dee .020 combat model
by Ken Cook Yesterday at 1:41 pm
» My latest doodle...
by roddie Yesterday at 10:43 am
» Chocolate chip cookie dough.........
by roddie Fri Nov 22, 2024 1:13 pm
» Free Flight Radio Assist
by rdw777 Fri Nov 22, 2024 9:24 am
Cox Engine of The Month
Sandable Filler Material
Page 2 of 2
Page 2 of 2 •  1, 2
1, 2
 Re: Sandable Filler Material
Ken Cook wrote: [Re. the 1/2a Skyray...] It will fly fine just the way you have it, it just might hunt up or down while flying. This plane is certainly a good flying plane and capable of doing pretty much everything.
Your reference above Ken was on the subject of CG and nose weight.
How do you keep a CL plane from hunting?
Rusty mentioned to me, and I think this is accurate from memory... if I build the elevator linkage too tight, the plane will always be hunting. Is that to suggest I engineer in some play into the linkage somehow so neutral has a tiny zone to fly level in? If I have that right, where does the play come from? It's pretty much a direct-connect from the bellcrank to the elevator horn.
Thanks! Greg

Sig Skyray- Gold Member

- Posts : 222
Join date : 2015-04-02
Age : 63
Location : Lake Mary, FL
 Re: Sandable Filler Material
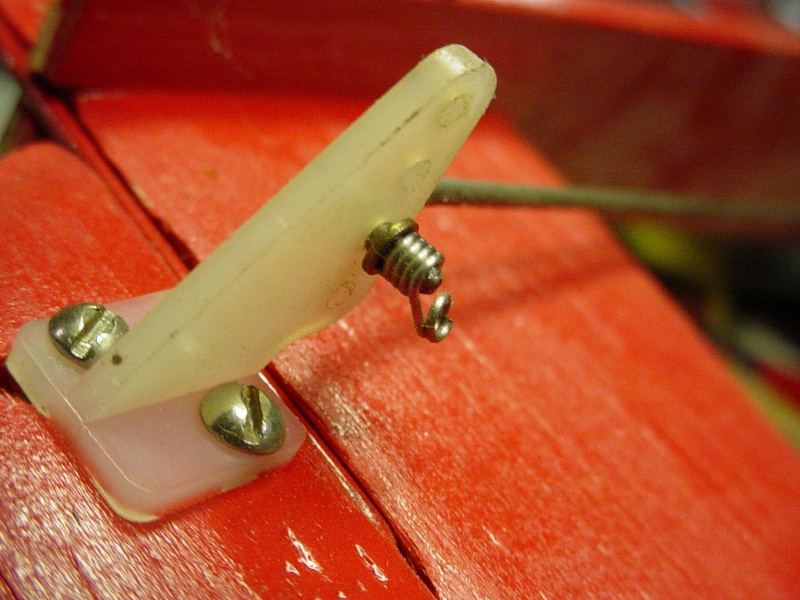
Replace the horn with a two screw type. Save the headache. The other choice is to build up glue around the horn so it can't turn. The nylon is very difficult to bond to.
The linkage is OK, it could be replaced with heavier, but replacement isn't required. Instead clip the head off a safety pin and feed the wire push rod through the circle in the bottom of the safety pin. Bend the wires parallel with each other and near the end of the building process push the cut ends into the fuselage in the correct place with a little epoxy. I usually do this after paint, but that is because I hinge my surfaces after paint. Try to not let the pin through the entire fuselage. If it does seal the ends with epoxy so you don't hurt yourself.
Phil

pkrankow- Top Poster

- Posts : 3025
Join date : 2012-10-02
Location : Ohio
 Re: Sandable Filler Material
pkrankow wrote:Replace the horn with a two screw type. Save the headache. The other choice is to build up glue around the horn so it can't turn. The nylon is very difficult to bond to.
The linkage is OK, it could be replaced with heavier, but replacement isn't required. Instead clip the head off a safety pin and feed the wire push rod through the circle in the bottom of the safety pin. Bend the wires parallel with each other and near the end of the building process push the cut ends into the fuselage in the correct place with a little epoxy. I usually do this after paint, but that is because I hinge my surfaces after paint. Try to not let the pin through the entire fuselage. If it does seal the ends with epoxy so you don't hurt yourself.
Phil
I'll get a 2 screw horn. The kit, as does our Brodak Lil' Wizard, comes with a 3/64" pushrod wire. I have to buy some new wire anyway for another plane so I will have the 1/16" and will use that. Would I still want a guide?

Sig Skyray- Gold Member

- Posts : 222
Join date : 2015-04-02
Age : 63
Location : Lake Mary, FL
 Re: Sandable Filler Material
A guide never hurts! With the heavier wire it might not be necessary though. It can always be added if you find you are loosing control authority on maneuvers.
Phil
Phil

pkrankow- Top Poster

- Posts : 3025
Join date : 2012-10-02
Location : Ohio
 Re: Sandable Filler Material
Greg, between the horn and the bellcrank, there's usually enough play. Don't try to add any before getting the feel of it in flight. Hunting is also a sign of a heavy tail, so address that first if you can't hold a reasonably level lap. As for trimming, it's about the horizontal C/G which is shown in the plans, and vertical CG, which will be dependent on the leadout position and distribution of weight throughout the whole model. In this case, put the leadouts as per the plans. After it's built, confirm the v. C/G by hanging it from the LOs and see that the nose is angled slightly down. Elevator neutral position if centered correctly during the build, will be adjusted at the handle, as will the line spacing for adjusting sensitivity to control inputs.
I always use a control rod guide unless I make the rod with CF tube.
Rusty
I always use a control rod guide unless I make the rod with CF tube.
Rusty
_________________
Don't Panic!
...and never Ever think about how good you are at something...
while you're doing it!
My Hot Rock & Blues Playlist
...and never Ever think about how good you are at something...
while you're doing it!
My Hot Rock & Blues Playlist

RknRusty- Rest In Peace

- Posts : 10869
Join date : 2011-08-10
Age : 68
Location : South Carolina, USA
 Re: Sandable Filler Material
Sig Skyray wrote:Ken Cook wrote: How do you keep a CL plane from hunting?
Thanks! Greg
Greg, Make sure you are not confusing hunting, caused by tail heaviness with "porpoising" or swooping caused by the wing and empennage not being properly aligned with each other.
It is better to start a bit nose heavy and remove some nose weight (or add tail weight) until you get the balance where you want it...fewer crashes.
George

gcb- Platinum Member

- Posts : 908
Join date : 2011-08-11
Location : Port Ewen, NY
 Re: Sandable Filler Material
Thanks all for the great pointers. I'm taking good notes and the next thing obviously on the list is to get out and get some flying time to put all this into practice.
Greg
Greg

Sig Skyray- Gold Member

- Posts : 222
Join date : 2015-04-02
Age : 63
Location : Lake Mary, FL
 Re: Sandable Filler Material
Sig Skyray wrote:Thanks all for the great pointers. I'm taking good notes and the next thing obviously on the list is to get out and get some flying time to put all this into practice.
Greg
What works good for me, is some lite weight Spackle mixed with a little epoxy or a few drops of Canopy glue, the epoxy with lite weight Spackle works great for fillets on the wing to fuselage mount.

CHELLIE- Bronze Member

- Posts : 34
Join date : 2015-04-30
Location : High Desert California
 Re: Sandable Filler Material
1/2A pushrod size.. I guess I go overkill with 1/16" m-wire.. but that's what's on most of my balsa models. I don't use a guide for that size wire.. because I figured I didn't need it.
I almost exclusively use Dubro control horns. I Like them. The two-screw design is sturdy. When I use a 1/16" dia. music-wire pushrod.. I utilize an "L-bend" and install a washer and one of Sig's twist-on wheel retainers. These came in 1/2A Goldberg kits too.. and they're a nice lightweight retainer for the 1/16" wire.

I see it as a strong no-nonsense set-up that's quick to make.
Lately I've been applying thin CA glue "liberally" to the area where the horn will mount. I feel that it adds rigidity to a balsa elevator's business area.. and helps prevent the balsa from squashing-out when the two horn-screws are tightened.
I almost exclusively use Dubro control horns. I Like them. The two-screw design is sturdy. When I use a 1/16" dia. music-wire pushrod.. I utilize an "L-bend" and install a washer and one of Sig's twist-on wheel retainers. These came in 1/2A Goldberg kits too.. and they're a nice lightweight retainer for the 1/16" wire.

I see it as a strong no-nonsense set-up that's quick to make.
Lately I've been applying thin CA glue "liberally" to the area where the horn will mount. I feel that it adds rigidity to a balsa elevator's business area.. and helps prevent the balsa from squashing-out when the two horn-screws are tightened.
 Re: Sandable Filler Material
roddie wrote:1/2A pushrod size.. I guess I go overkill with 1/16" m-wire.. but that's what's on most of my balsa models. I don't use a guide for that size wire.. because I figured I didn't need it.
I almost exclusively use Dubro control horns. I Like them. The two-screw design is sturdy. When I use a 1/16" dia. music-wire pushrod.. I utilize an "L-bend" and install a washer and one of Sig's twist-on wheel retainers. These came in 1/2A Goldberg kits too.. and they're a nice lightweight retainer for the 1/16" wire.
I see it as a strong no-nonsense set-up that's quick to make.
Lately I've been applying thin CA glue "liberally" to the area where the horn will mount. I feel that it adds rigidity to a balsa elevator's business area.. and helps prevent the balsa from squashing-out when the two horn-screws are tightened.
I just got some 1/16" music wire to replace the kit-supplied 3/64" pushrod and heated it with a lighter for my first Z-bend for the bellcrank and the wire snapped. Guess heat isn't needed. But glad you mentioned that because putting in 2 Z bends makes it a bit tricky to get the length on the control rod exactly correct for a plane with the controls mounted already. I cannot move the bellcrank hole because it would be too close to the edge of the ply mount. An L bend in the rear simplifies things a bit, if I can find the spring retainers. When building it seems the technique is to bend the wire first before drilling your bellcrank screw. Is that the method?
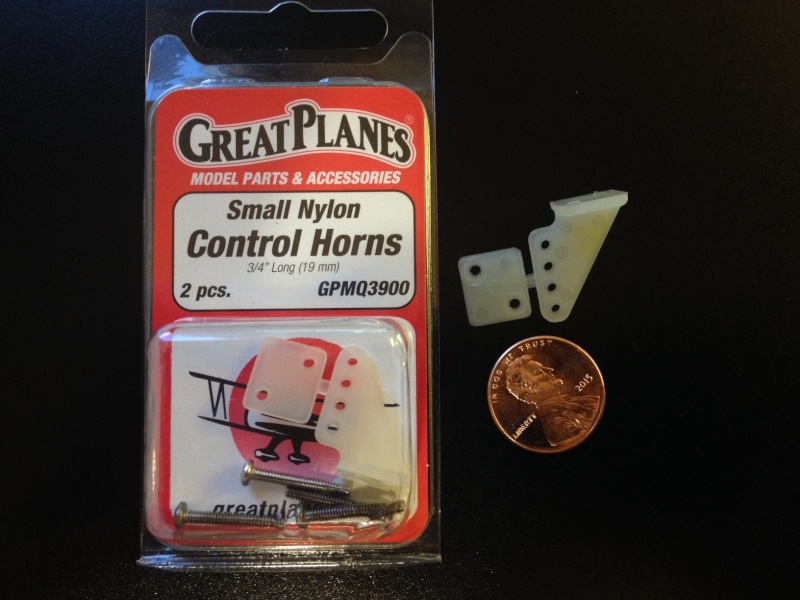
So I picked up these small control horns with the 2 screw mount. This 19mm horn looked a bit big for a 1/2A to me but it's the smallest they had. The long screws will be shortened to reduce tail weight. Comments on horn size?

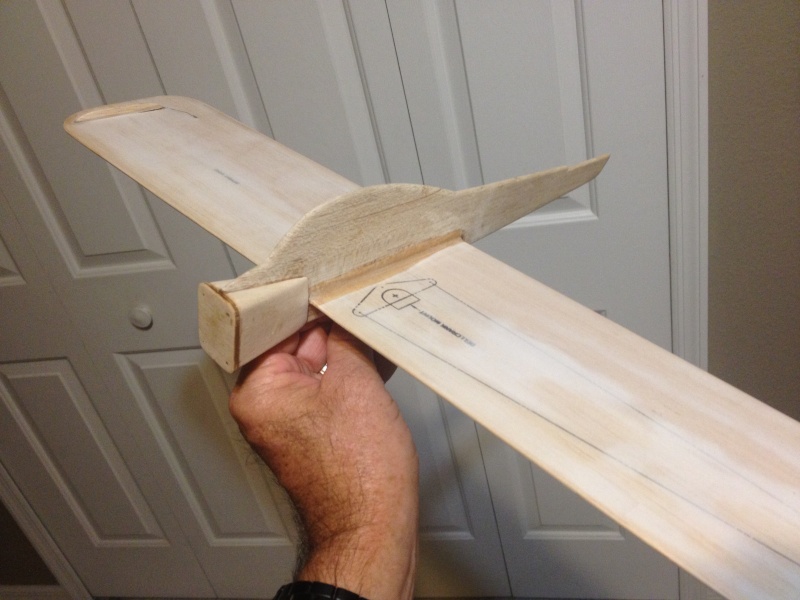
By the way, here's the Skyray build so far... made a rookie mistake of sanding the nose blocks before gluing them on and sanded them a bit smaller than the firewall, reducing the meat on 2 of the (bottom) corners for the engine mount screws. Geez, how did I do that?
Greg

Last edited by Sig Skyray on Wed May 13, 2015 2:10 pm; edited 1 time in total

Sig Skyray- Gold Member

- Posts : 222
Join date : 2015-04-02
Age : 63
Location : Lake Mary, FL
 Re: Sandable Filler Material
Looking good. Good horn choice.
Phil
Phil

pkrankow- Top Poster

- Posts : 3025
Join date : 2012-10-02
Location : Ohio
 Re: Sandable Filler Material
Greg, if your in a bind like that again with the blocks, ca another piece on it and sand away. Don't feel as though you made a mistake. It's a simple fix and it retains it's original size. As for the spring keepers I don't use them. For me, it's solder or a Z-bend. I like the looks and quality of a good soldering job. It takes a little work, but it goes a long way for future builds and tank repairing. Don't use electronic device solder. Just make sure you clean the surfaces thoroughly with lacquer thinner followed by a baking soda wash. Ken

Ken Cook- Top Poster

- Posts : 5641
Join date : 2012-03-27
Location : pennsylvania
 Re: Sandable Filler Material
Ken Cook wrote:Greg, if your in a bind like that again with the blocks, ca another piece on it and sand away. Don't feel as though you made a mistake. It's a simple fix and it retains it's original size. As for the spring keepers I don't use them. For me, it's solder or a Z-bend. I like the looks and quality of a good soldering job. It takes a little work, but it goes a long way for future builds and tank repairing. Don't use electronic device solder. Just make sure you clean the surfaces thoroughly with lacquer thinner followed by a baking soda wash. Ken
I've done this a number of times. Works for chunks removed from plank wings even better than I imagined. If you lack the original pieces don't be afraid to cut out damaged material to make fitting new material easier on a repair.
Phil

pkrankow- Top Poster

- Posts : 3025
Join date : 2012-10-02
Location : Ohio
 Re: Sandable Filler Material
Thanks Phil.pkrankow wrote:Looking good. Good horn choice.
Phil
Greg

Sig Skyray- Gold Member

- Posts : 222
Join date : 2015-04-02
Age : 63
Location : Lake Mary, FL
 Re: Sandable Filler Material
pkrankow wrote:Ken Cook wrote:Greg, if your in a bind like that again with the blocks, ca another piece on it and sand away. Don't feel as though you made a mistake. It's a simple fix and it retains it's original size. As for the spring keepers I don't use them. For me, it's solder or a Z-bend. I like the looks and quality of a good soldering job. It takes a little work, but it goes a long way for future builds and tank repairing. Don't use electronic device solder. Just make sure you clean the surfaces thoroughly with lacquer thinner followed by a baking soda wash. Ken
I've done this a number of times. Works for chunks removed from plank wings even better than I imagined. If you lack the original pieces don't be afraid to cut out damaged material to make fitting new material easier on a repair.
Phil
Thanks Phil and Ken. Learning tons here, I appreciate it. I like the solder idea for a secure connection however it makes field adjustment difficult, no?
Greg

Sig Skyray- Gold Member

- Posts : 222
Join date : 2015-04-02
Age : 63
Location : Lake Mary, FL
 Re: Sandable Filler Material
Putting a generous, slight Z bend in the middle of the wire allows for adjustment by opening or closing the bends. The downside is that column stability of the push rod is compromised, and added spring is introduced too. This is only a concern for pushing hard corners into maneuvers, and high wind days.
Phil
Phil

pkrankow- Top Poster

- Posts : 3025
Join date : 2012-10-02
Location : Ohio
Page 2 of 2 •  1, 2
1, 2
 Similar topics
» Filler and Dope
» Another proposed design by Roddie
» Lightweight Filler Powder Source?
» My Shoestring Stunter is RTF
» (Wanted) Babe Bee black back plates with filler tubes
» Another proposed design by Roddie
» Lightweight Filler Powder Source?
» My Shoestring Stunter is RTF
» (Wanted) Babe Bee black back plates with filler tubes
Page 2 of 2
Permissions in this forum:
You cannot reply to topics in this forum

 Rules
Rules


