Log in
Search
Latest topics
» TEE DEE Having issuesby Ken Cook Today at 7:10 am
» Cox films/videos...
by Coxfledgling Today at 4:46 am
» Purchased the last of any bult engines from Ken Enya
by Coxfledgling Today at 4:18 am
» My N-1R build log
by roddie Today at 12:32 am
» Happy 77th birthday Andrew!
by akjgardner Today at 12:27 am
» Landing-gear tips
by roddie Yesterday at 6:17 pm
» Roger Harris revisited
by TD ABUSER Yesterday at 2:13 pm
» Tee Dee .020 combat model
by Ken Cook Yesterday at 1:41 pm
» Retail price mark-up.. how much is enough?
by Ken Cook Yesterday at 1:37 pm
» My latest doodle...
by roddie Yesterday at 10:43 am
» Chocolate chip cookie dough.........
by roddie Fri Nov 22, 2024 1:13 pm
» Free Flight Radio Assist
by rdw777 Fri Nov 22, 2024 9:24 am
Cox Engine of The Month
Oriental ARF assembly
Page 3 of 5
Page 3 of 5 •  1, 2, 3, 4, 5
 Re: Oriental ARF assembly
The only time you will need that much control is in the event your getting into trouble. Properly balanced, the plane is going to turn faster than you would think for a large plane. Your handle size is certainly relative to your controls in regards to speed and throw as you already know. The overhang of your handle however can have a negative impact on the throw of your controls. I use the Brodak Reyco which is essentially a Hot Rock. That being said, they look good in the pictures and I see no reason for concern. The nose length of this plane is very long. Using a spinner would be strongly discouraged. I know you mentioned trying the metal tank, a plastic tank will save a little weight as well. This plane doesn't usually end up a light weight. Not saying it doesn't happen, many of them end up in the 44 oz. -48 oz. range. This however shouldn't be a concern. I have a real porker here nearing 50 oz's which I use for practice. Dead reliable in the wind as it should be, it's a battleship but they do fly in these heavier weights. Ken

Ken Cook- Top Poster

- Posts : 5641
Join date : 2012-03-27
Location : pennsylvania
 Re: Oriental ARF assembly
That all sounds good, Ken. I've been known to unintentionally build heavy. I use an Allen Brickhaus adjustable cable handle.

Rusty
I've been waiting for 3 years for someone to notice that flounder.Cribbs74 wrote:Looks like more than enough. I don't remember the big steel flounder.

Rusty
_________________
Don't Panic!
...and never Ever think about how good you are at something...
while you're doing it!
My Hot Rock & Blues Playlist
...and never Ever think about how good you are at something...
while you're doing it!
My Hot Rock & Blues Playlist

RknRusty- Rest In Peace

- Posts : 10869
Join date : 2011-08-10
Age : 68
Location : South Carolina, USA
 Re: Oriental ARF assembly
RknRusty wrote:
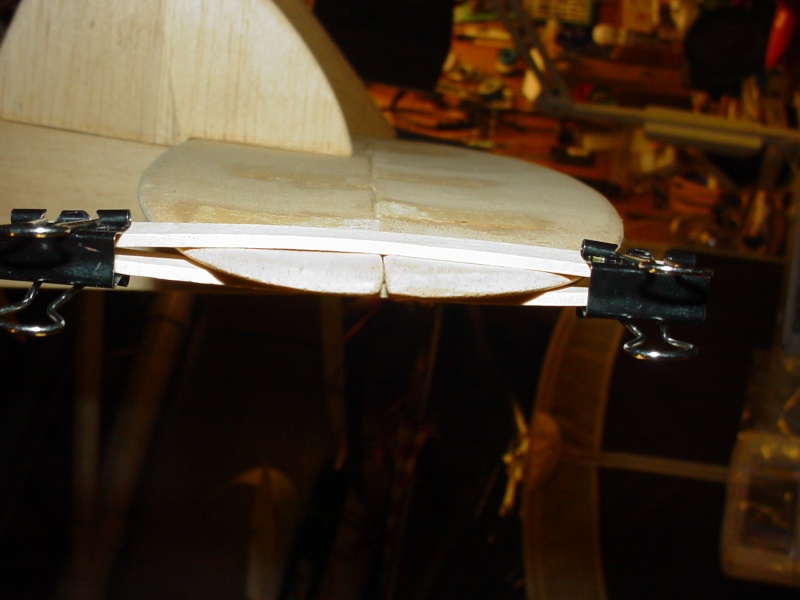
I spent a while trying to decide if I have more flap deflection than elevator. Hard to tell, looks about 1:1.
I also checked the elevator deflection. It's equal in both directions, I hope it's enough.
Full Down
Full Up
Hi Rusty, here's a simple little tool/gage that easy to build for checking deflection angle. Just swivel to form your surface's angle and align it on the protractor to check.

and remember this tool for helping to set "elevator-neutral".. that I posted a while back? It's the ultimate "3rd-hand" for the aero-modeler!

 Re: Oriental ARF assembly
Roddie, that's about how I do it too. Thanks
Rusty
Rusty
_________________
Don't Panic!
...and never Ever think about how good you are at something...
while you're doing it!
My Hot Rock & Blues Playlist
...and never Ever think about how good you are at something...
while you're doing it!
My Hot Rock & Blues Playlist

RknRusty- Rest In Peace

- Posts : 10869
Join date : 2011-08-10
Age : 68
Location : South Carolina, USA
 Re: Oriental ARF assembly
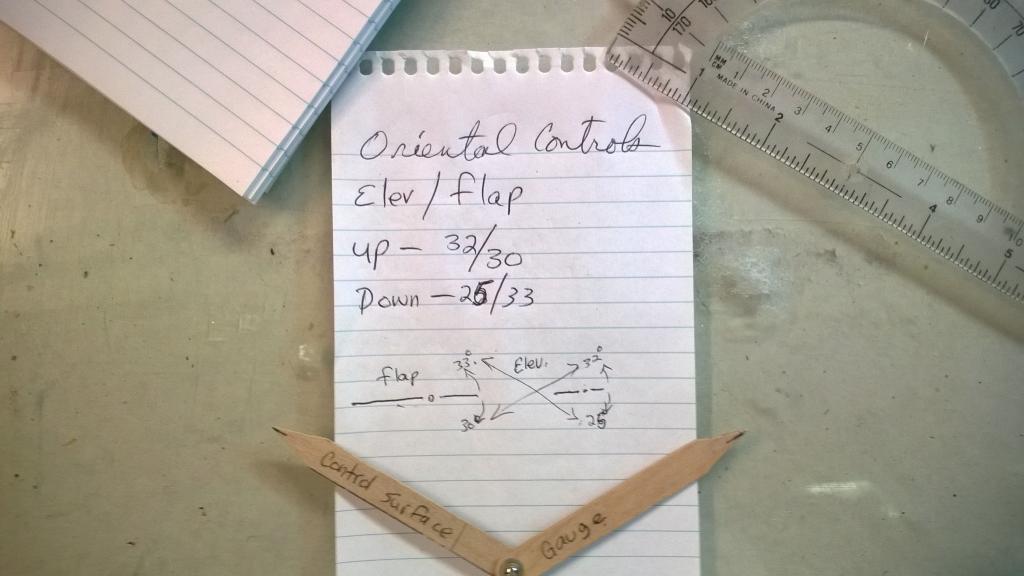
Hey Roddie, I made a tool to transfer throws to the protractorRknRusty wrote:Roddie, that's about how I do it too. Thanks
Rusty
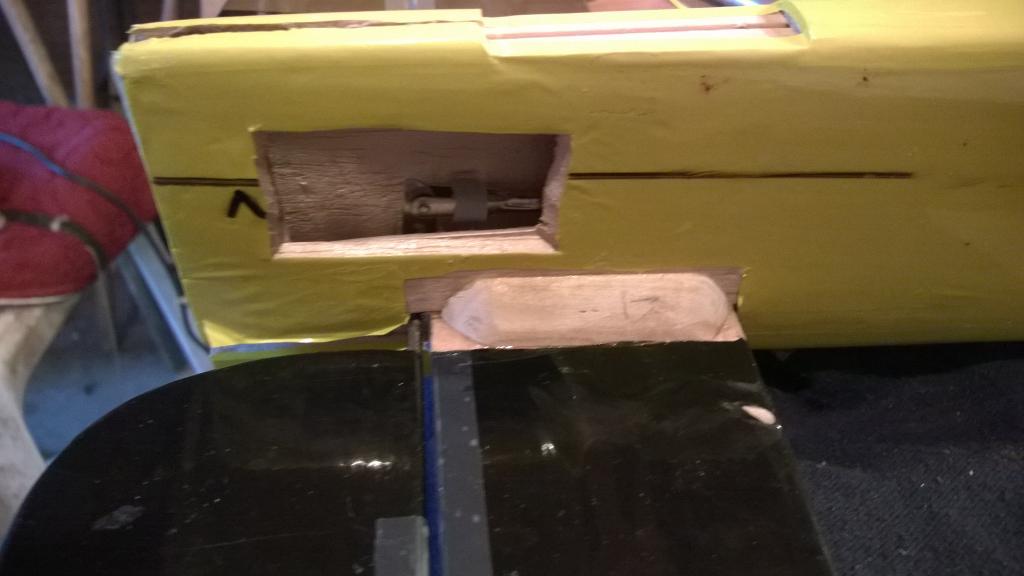
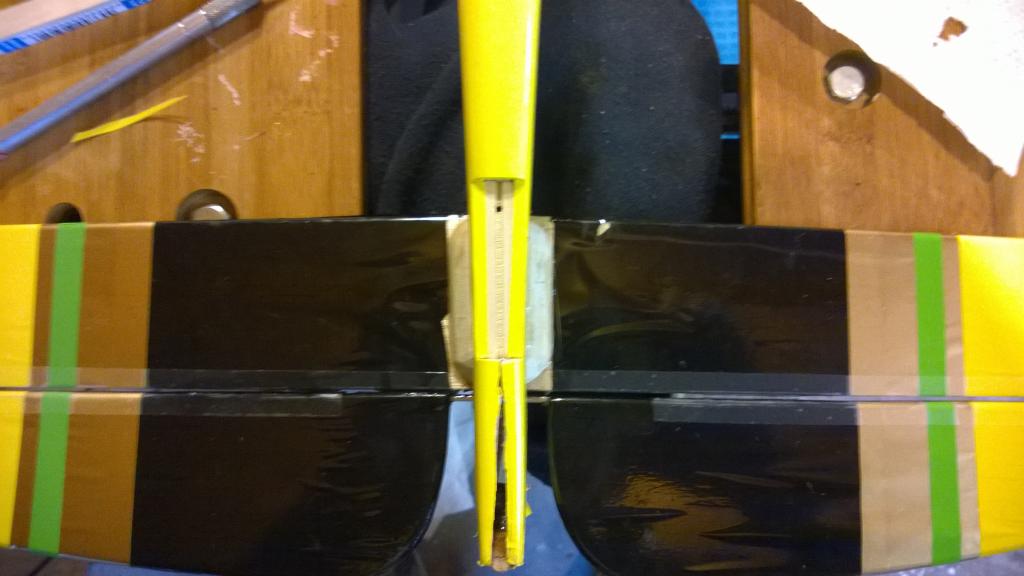
I've pretty much finished the empennage except for gluing the vertical stab/rudder on. Below shows the balsa filets to secure the stab and preventing it from breaking at the root. The camera makes them look ugly, but they're actually pretty neat. The second picture shows the weighted(.9oz) fuse spreader in place, making room for the weights and access to the elevator horn and clevis.
But now look back at the note pad where I recorded the throws. Something strange, The elevator full up is 32 degrees, while the flap moves 30 degrees. That's good, I think the flap throw should be slightly less.
But when I pull full down, the elevator moves 25 degrees while the flap moves a whopping 33 degrees. I don't know how this is possible. I don't think there's any way to fix it. I used the stock controls with a CF sleeve over the long rod, but they are the box stock length. The pushrods are all in the hole they were shown in the book. I'm 100% sure I did not make a mistake. The controls are free, smooth as ice. It looks like inside loops will be easy and outsides, maybe a little strange. It's too late to change anything. Anyone else ever had a setup like this?
Rusty
_________________
Don't Panic!
...and never Ever think about how good you are at something...
while you're doing it!
My Hot Rock & Blues Playlist
...and never Ever think about how good you are at something...
while you're doing it!
My Hot Rock & Blues Playlist

RknRusty- Rest In Peace

- Posts : 10869
Join date : 2011-08-10
Age : 68
Location : South Carolina, USA
 Re: Oriental ARF assembly
Don't worry about elevator throws and flap travels. You need to fly it. Determine if the plane is hunting up and down. Figure out if it's turning tighter one way than the other. In the event that your plane is indeed turning tighter one way or the other you need to determine why. Don't assume it's your controls. I've never seen a ARF fly correctly out of the box. The wings need constant attention initially and the low grade covering doesn't keep them put. This takes repetitive twisting and ironing and heat to keep them straight. When you twist the wing torsionally the flex from doing so can also change the position of the flaps. Eyeball that plane from the rear sighting the flap location to the high point of the airfoil. Make sure you see equal wing panel area when doing so, same goes for the elevator.You don't want to see one wing or the other up or down. The flap wires provided are very low quality and will twist easily. More than likely what has happened here is that the actual arms of the horns are not indexed correctly to one another. It's too late to determine now. It can be twisted carefully if need be but one needs to be reminded of the quality prior to doing so. A twist of the controls could also result in breaking the brazing at the arm. When making trim corrections you do it in a tweak fashion. Don't just grab and apply continuous pressure. I sandwich ply top and bottom and use small vise grips and give a quick springy twist repetitively . This may require more than one set of hands due to the flaps or elevators requiring stabilization.
I mentioned before how tight a Oriental can cut a loop. A good maneuver to make the determination of how your plane is flying insides and outsides is the square eight. Give this airplane a little breathing room in your maneuvers. It can easily be choked and speed will fall rapidly resulting in a lot of bobbling at the end of the lines. You will notice at that point how little your actually moving your handle. The reason I enjoy it so much is due to the way it allows me to relax. I feel as though it gives me time to decide how I'm going to put it through it's paces. I like the way the plane is coming nose down straight towards the ground from the outside square and at no time do I feel as though there will be a recovery problem. Ken
I mentioned before how tight a Oriental can cut a loop. A good maneuver to make the determination of how your plane is flying insides and outsides is the square eight. Give this airplane a little breathing room in your maneuvers. It can easily be choked and speed will fall rapidly resulting in a lot of bobbling at the end of the lines. You will notice at that point how little your actually moving your handle. The reason I enjoy it so much is due to the way it allows me to relax. I feel as though it gives me time to decide how I'm going to put it through it's paces. I like the way the plane is coming nose down straight towards the ground from the outside square and at no time do I feel as though there will be a recovery problem. Ken

Ken Cook- Top Poster

- Posts : 5641
Join date : 2012-03-27
Location : pennsylvania
 Re: Oriental ARF assembly
Thanks Ken, I'll get some eyeballs on it today. I only checked one flap yesterday, so I need to measure everything again. Before I installed the horns, I compared and checked for symmetry. The brazing is lousy one of them, so I put it on the flaps in case it let go in flight. Maybe I should have done it the other way. You know I over-worry about these things.
I have always had better control over my outside maneuvers than my insides, so if one way turns out wonky, i guess it's better for it to be the down control. I bet 90% of ARF builders don't check as closely as I do and aren't aware they have the same things going on, and they all say it flies great. When she maidens, I'll keep in mind that I have less elevator on the outsides.
Rusty
_________________
Don't Panic!
...and never Ever think about how good you are at something...
while you're doing it!
My Hot Rock & Blues Playlist
...and never Ever think about how good you are at something...
while you're doing it!
My Hot Rock & Blues Playlist

RknRusty- Rest In Peace

- Posts : 10869
Join date : 2011-08-10
Age : 68
Location : South Carolina, USA
 Re: Oriental ARF assembly
Upon further investigation, the flaps are the same as each other at full throw both ways, though there is a 2* difference between up and down. Negligible. The elevator is the uneven part. I inspected the horns for parallel levers before assembly, so the holes must have been drilled crooked in the elevator. I'll worry about it later and finish the model.
Just for the heck of it I compared it with the Magnum and all four surfaces agree with each other. I didn't bother to put the protractor on it and measure the degrees.
No further fretting over it until it's time to fly. Continuing on.
Rusty
Just for the heck of it I compared it with the Magnum and all four surfaces agree with each other. I didn't bother to put the protractor on it and measure the degrees.
No further fretting over it until it's time to fly. Continuing on.
Rusty
_________________
Don't Panic!
...and never Ever think about how good you are at something...
while you're doing it!
My Hot Rock & Blues Playlist
...and never Ever think about how good you are at something...
while you're doing it!
My Hot Rock & Blues Playlist

RknRusty- Rest In Peace

- Posts : 10869
Join date : 2011-08-10
Age : 68
Location : South Carolina, USA
 Re: Oriental ARF assembly
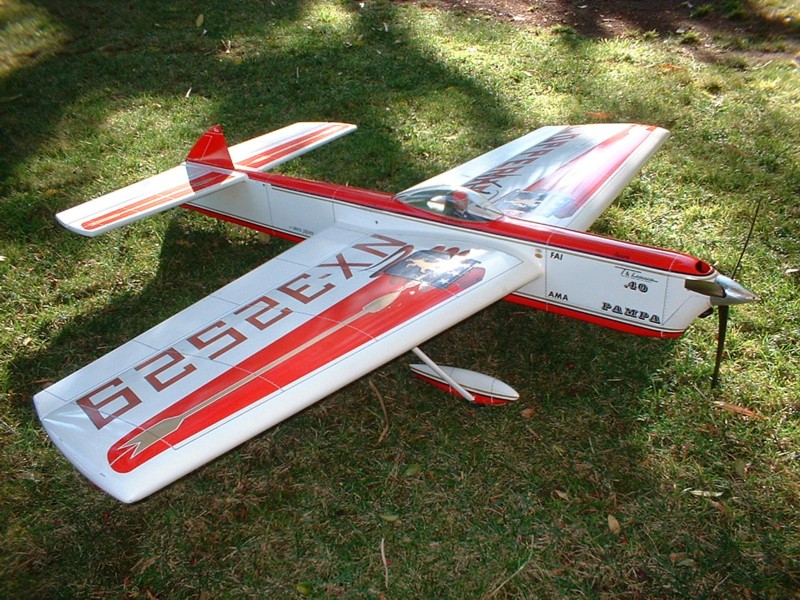
Rusty,
Have you ever considered putting an adjustable ratio control horn on the tail of your Stunter? I use them, available from Tom Morris and there is a link on Stunthangar. That way you can adjust the flap to elevator deflection during trimming flights to get the best corner feel, when changing balance, etc. He also makes pushrod length adjusters so one can make the flap and elevator dead neutral to one another, super for builders like me that sometimes miss during the critical gluing of the stab to the fuselage. These two items make trimming a much easier and more enjoyable time, rather than Xacto and epoxy!
This model has both...
Chris...


stuntflyr- Gold Member

- Posts : 266
Join date : 2012-01-18
Age : 65
Location : Tucson, Arizona
 Re: Oriental ARF assembly
Hi Chris, nice, what is that plane?stuntflyr wrote:Rusty,
Have you ever considered putting an adjustable ratio control horn on the tail of your Stunter? I use them, available from Tom Morris and there is a link on Stunthangar. That way you can adjust the flap to elevator deflection during trimming flights to get the best corner feel, when changing balance, etc. He also makes pushrod length adjusters so one can make the flap and elevator dead neutral to one another, super for builders like me that sometimes miss during the critical gluing of the stab to the fuselage. These two items make trimming a much easier and more enjoyable time, rather than Xacto and epoxy!
This model has both...
Chris...
I guess in the back of my mind I knew there was such a thing. And if I went looking for it, Tom Morris would've come to mind right away. I thought about seeing if he had a pre-made Oriental ARF set. But I just used the box stock and sleeved the long rod with a CF tube. I was worried about the difference in thermal expansion so I wrapped the rod in 4 places with lengths of painters tape until it was a very tight fit to slide the tube onto the rod. Then a good shot of CA in one end of the tube, leaving the two able to contract and expand without bowing. I'm thinking the painters tape will outlive me Lol. Igor Burger makes logarithmic controls. Mercy! He also wins the world championship by a staggering margin.
Wayne and I poked around in the shop all day yesterday and we looked at it. He thinks it looks really good, just need to get the elevator horn lined up. Next good day for working on it, I'll be reinforcing the LG mount... more like creating one. This design wouldn't stand up to any less than a 30 point landing in bumpy grass. He brought his line wrapping jig, what a nice machine. I gotta do a redneck version of that.
Rusty
_________________
Don't Panic!
...and never Ever think about how good you are at something...
while you're doing it!
My Hot Rock & Blues Playlist
...and never Ever think about how good you are at something...
while you're doing it!
My Hot Rock & Blues Playlist

RknRusty- Rest In Peace

- Posts : 10869
Join date : 2011-08-10
Age : 68
Location : South Carolina, USA
 Re: Oriental ARF assembly
You're probably fine, then.
This one is my Copperhead V-10, named after a Chrysler show car engine. It's a copy of Windy Urtnowski's V-Max of 1990. It has a 58 inch span, 4 inch sweep, big flaps that I've since cut off smaller in chord, flat stab and elevator and flaps, 9 inch nose, 18 inch tail, PA 61 rear exhaust with an Aero Pipe, Eather prop. I finished it in the mid 90's and have about 300 flights on it. I haven't flown Stunt in a while, I found a trophy while cleaning out the garage from a contest in Tucson from 2005, so longer than I thought!
Chris...

stuntflyr- Gold Member

- Posts : 266
Join date : 2012-01-18
Age : 65
Location : Tucson, Arizona
 Re: Oriental ARF assembly
Now if we can only get Windy to fly again. Ken

Ken Cook- Top Poster

- Posts : 5641
Join date : 2012-03-27
Location : pennsylvania
 Re: Oriental ARF assembly
Yeah, I gotta get my ass in gear. I spent half the weekend buying a new plane hauler. Got a Hyundai Santa Fe with all the amenities, and some I didn't know existed. Spent the other half getting ready to sell my beloved Mazda P5. A actually shed a couple of tears over the thought of seeing it go. I'll be cleaning it up this week. That was the most fun car I ever had. From 2003 until now, nothing has ever broken or failed. It doesn't even have a single rattle. I put a timing belt kit including the WP, belts, seals, etc in the carport in 2011. Front struts in 2012 woke it up. I'd forgotten how well it handled when new. It corners like it's on rails. 
 Oh well, It's still worth $4k.




_________________
Don't Panic!
...and never Ever think about how good you are at something...
while you're doing it!
My Hot Rock & Blues Playlist
...and never Ever think about how good you are at something...
while you're doing it!
My Hot Rock & Blues Playlist

RknRusty- Rest In Peace

- Posts : 10869
Join date : 2011-08-10
Age : 68
Location : South Carolina, USA
 Re: Oriental ARF assembly
Okay, enough dallying. My Oriental project was derailed by bad weather, car buying, and an unplanned Ukey repair. Busted the nose off of Wayne's... or mine, I'm not sure exactly. But it was my only pattern practice plane, so it came first. Spring has sprung. The grass is getting green and so is the pool. No heater needed in the shop, even for gluing. Today was productive in the shop.
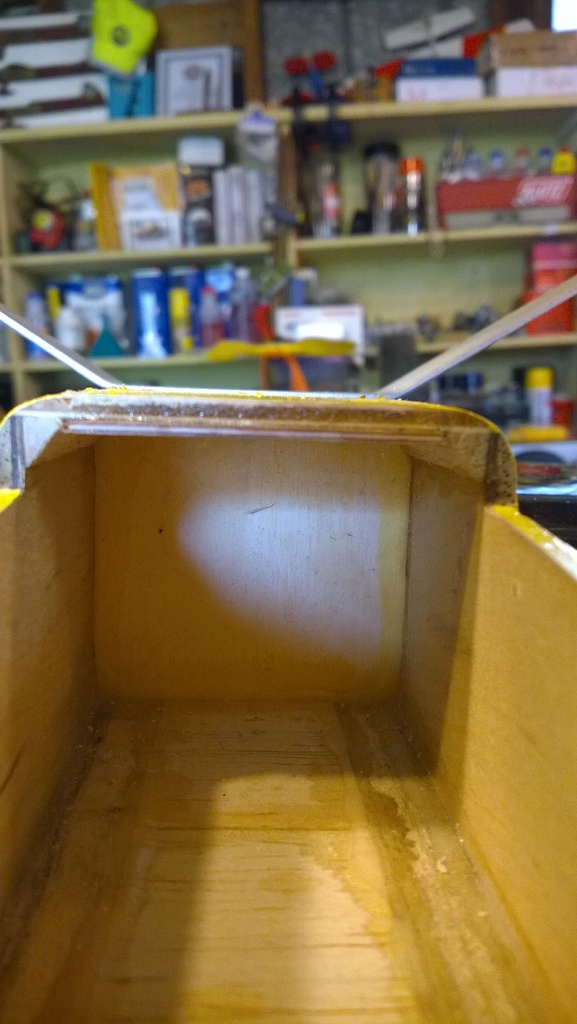
So, here you're looking into the fuel tank compartment with the plane upside down. The LG screws to the fuse on the outside of the rear of the cavity. I cut two squares of 1/16" ply. You can see the edge of one epoxied in place between the two triangular corner blocks.
Below, the second ply plate will have the blind nuts to receive 4-40 bolts and will be glued in place with a strip of fiberglass tape between them. So the gear will be bolted to a ply/fiberglass sandwich. See where I had to re-drill the holes in the gear. If I didn't they would have bitten partly into the triangle corners. I had to make the holes closer together.
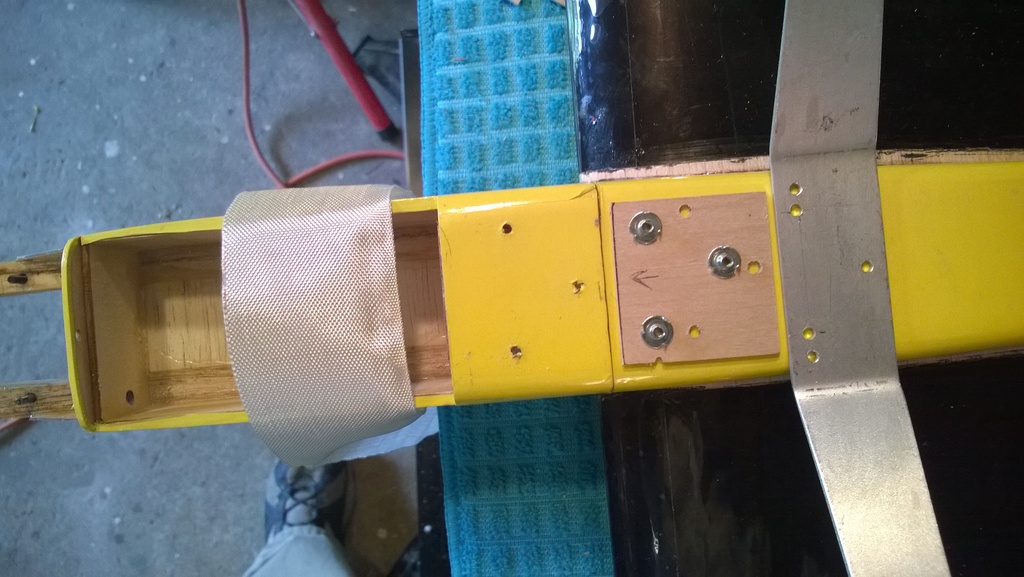
Below, the two ply plates are installed and clamped with the mounting bolts while the glue sets. I removed them when it had set for a while, but still rubbery. I had to heat one of them with amy big Weller soldering gun to release the epoxy so I could unscrew it. Notice the fiberglass tape running all the way down both sides and onto the bottom(actually the top, it's upside down) of the cavity.
And I dipped my brush in acetone and painted epoxy all over the inside of the rest of the compartment. The engine area was already fuel proofed on the first day of the Oriental project.

Here's where I left it. Padding the tank and leveling it with the spraybar.
And Gods of building bless Roddie! I needed the aluminum bearers for the OS 40 to get all the positions right. I dug out my Altoids box and lo and behold, a pack of assorted types of OS 40fp bearers, already drilled. Thank you, thank you, thank you. Now I didn't have to start marking and cutting aluminum, would not have even had the right stuff. Roddie, you bailed my ass out.

Later,
Rusty
So, here you're looking into the fuel tank compartment with the plane upside down. The LG screws to the fuse on the outside of the rear of the cavity. I cut two squares of 1/16" ply. You can see the edge of one epoxied in place between the two triangular corner blocks.

Below, the second ply plate will have the blind nuts to receive 4-40 bolts and will be glued in place with a strip of fiberglass tape between them. So the gear will be bolted to a ply/fiberglass sandwich. See where I had to re-drill the holes in the gear. If I didn't they would have bitten partly into the triangle corners. I had to make the holes closer together.

Below, the two ply plates are installed and clamped with the mounting bolts while the glue sets. I removed them when it had set for a while, but still rubbery. I had to heat one of them with amy big Weller soldering gun to release the epoxy so I could unscrew it. Notice the fiberglass tape running all the way down both sides and onto the bottom(actually the top, it's upside down) of the cavity.
And I dipped my brush in acetone and painted epoxy all over the inside of the rest of the compartment. The engine area was already fuel proofed on the first day of the Oriental project.

Here's where I left it. Padding the tank and leveling it with the spraybar.
And Gods of building bless Roddie! I needed the aluminum bearers for the OS 40 to get all the positions right. I dug out my Altoids box and lo and behold, a pack of assorted types of OS 40fp bearers, already drilled. Thank you, thank you, thank you. Now I didn't have to start marking and cutting aluminum, would not have even had the right stuff. Roddie, you bailed my ass out.

Later,
Rusty
_________________
Don't Panic!
...and never Ever think about how good you are at something...
while you're doing it!
My Hot Rock & Blues Playlist
...and never Ever think about how good you are at something...
while you're doing it!
My Hot Rock & Blues Playlist

RknRusty- Rest In Peace

- Posts : 10869
Join date : 2011-08-10
Age : 68
Location : South Carolina, USA
 Re: Oriental ARF assembly
ARF my foot!
Looks like you are on the home stretch, can't wait to see the video of the first flight.
Ron
Looks like you are on the home stretch, can't wait to see the video of the first flight.
Ron

Cribbs74- Moderator


Posts : 11907
Join date : 2011-10-24
Age : 50
Location : Tuttle, OK
 Re: Oriental ARF assembly
Yeah not much left to do. After I make a new tail fairing, then fillets on the top wing roots where I Gorilla glued it. The kit's tail fairing, just a block that sits on top of the stab that the rudder glues to, is too narrow since I spread the tail of the fuse, I just need to carve one for it. Plumbing, fitting the cowl. I could fly without the cowl at first. Oh yeah and the canopy, never done one before. I found a cool pilot on the field at the fort. He'a a fighter jet pilot with a face mask and all. Pretty cool.Cribbs74 wrote:ARF my foot!
Looks like you are on the home stretch, can't wait to see the video of the first flight.
Ron
I hope to finish it in the coming week so I can start practicing with it. Otherwise I'll be flying the Ukey at Huntersville in May. I hope it flies as well as everyone says. I'm somewhat concerned that I have more flap deflection that elevator throw. I don't want to go up one hole in the elevator horn. I put that 3" bellcrank in it so it's already going to be pretty responsive. I don't really want to make it any more-so. I'm sure it'll be fine, you know how I like to fret over such things.
Rusty
_________________
Don't Panic!
...and never Ever think about how good you are at something...
while you're doing it!
My Hot Rock & Blues Playlist
...and never Ever think about how good you are at something...
while you're doing it!
My Hot Rock & Blues Playlist

RknRusty- Rest In Peace

- Posts : 10869
Join date : 2011-08-10
Age : 68
Location : South Carolina, USA
 Re: Oriental ARF assembly
Looks to be comeing along nicly there Rusty , I know how it is tring to get some things behine myself to get back to building ,, did just get me some free wall board man i hate that stuff so bad i cant even remember the name of it ?? I guess you build on the brown side not the shinnie white ... anyway i'll stick some pins in it to see 

getback- Top Poster


Posts : 10442
Join date : 2013-01-18
Age : 67
Location : julian , NC
 Re: Oriental ARF assembly
Hi Ericgetback wrote:...did just get me some free wall board man i hate that stuff so bad i cant even remember the name of it ?? I guess you build on the brown side not the shinnie white ... anyway i'll stick some pins in it to see
Yeah, lowes sells 24" square slabs of sheetrock drywall. I tape off the raw edges, then tape 4 of them together and it fits pretty well on the center of my 8x4 table. I built that table in 1980 for working on my race car parts and electronic junk, TVs, stereos, etc. Best tool I ever made, 3/4" marine plywood with a beam running wide-ways under the center.
I've tried both sides of the sheetrock. Right now I have the white side up, but I've tried it both ways. Puddles of alcohol and acetone don't bother it if I wipe it up, and I make notes all over it. I have several old squares saved with outlines of airplanes on them Little Devil and Stuntman23. It's hard to stick pins into though, and it leaves some crap on them when you pull them out. I don't have a cutting mat. I always look at them but can't bring myself to spring for the coin. My main work area is covered with a 3/8" polygonal glass from an old TV table. The table is slightly bowed from end to end, so I have to shim the glass to keep it flat. Glass is more flexible that some people realize.
Rusty
_________________
Don't Panic!
...and never Ever think about how good you are at something...
while you're doing it!
My Hot Rock & Blues Playlist
...and never Ever think about how good you are at something...
while you're doing it!
My Hot Rock & Blues Playlist

RknRusty- Rest In Peace

- Posts : 10869
Join date : 2011-08-10
Age : 68
Location : South Carolina, USA
 Re: Oriental ARF assembly
Well Crap , I thought that the drywall was the ticket even the Baby Clown says to use it in the instrustion ??? i guess you need a big cutting mat? mine from HL was not that $$$ and i really like it // i think you would too once U tried one . I made a wind jig that i was not able to try ojn the BC but i am thinking will work for the Akromaster have not got there yet , well it was FREE anyway . Thanks Rusty 

getback- Top Poster


Posts : 10442
Join date : 2013-01-18
Age : 67
Location : julian , NC
 Re: Oriental ARF assembly
I'm hoping to get it finished today. However the day is moving fast and I spent a couple of hours fooling with the OS 40. I ran a whole pint of fuel through it and it runs fine. Unlike my other fp engines, it does not like to be very wet to crank. I lost an OS8 plug in the grass.  The only problem is I need to JB Weld the knob on the needle spring so it will turn the needle. It's soaking in acetone now. And it's too close to the muffler so I'll probably have to get a tongue muffler for it. I'll see if Omnimodels has them. Anyone know of a good supplier of tongue mufflers? I should probably get an RC long plug while I'm ordering. Omni hasa Thunderbolts for $11 bucks.
Rusty
Rusty
_________________
Don't Panic!
...and never Ever think about how good you are at something...
while you're doing it!
My Hot Rock & Blues Playlist
...and never Ever think about how good you are at something...
while you're doing it!
My Hot Rock & Blues Playlist

RknRusty- Rest In Peace

- Posts : 10869
Join date : 2011-08-10
Age : 68
Location : South Carolina, USA
 Re: Oriental ARF assembly
RSM do tongue mufflers
https://www.rsmdistribution.com/engines-06.php?menupage=engines.htm
https://www.rsmdistribution.com/engines-06.php?menupage=engines.htm

ian1954- Diamond Member

- Posts : 2688
Join date : 2011-11-16
Age : 70
Location : England
 Re: Oriental ARF assembly
Great, I just placed an order. Thanks.ian1954 wrote:RSM do tongue mufflers
https://www.rsmdistribution.com/engines-06.php?menupage=engines.htm
Rusty
_________________
Don't Panic!
...and never Ever think about how good you are at something...
while you're doing it!
My Hot Rock & Blues Playlist
...and never Ever think about how good you are at something...
while you're doing it!
My Hot Rock & Blues Playlist

RknRusty- Rest In Peace

- Posts : 10869
Join date : 2011-08-10
Age : 68
Location : South Carolina, USA
 Re: Oriental ARF assembly
Some days ya just need one of these.
http://www.harborfreight.com/long-reach-magnetic-pickup-tool-with-quick-release-93950.html
(I think glow plugs are part steel...I could be wrong.)
Phil
http://www.harborfreight.com/long-reach-magnetic-pickup-tool-with-quick-release-93950.html
(I think glow plugs are part steel...I could be wrong.)
Phil

pkrankow- Top Poster

- Posts : 3025
Join date : 2012-10-02
Location : Ohio
 Re: Oriental ARF assembly
Yeah, that would find it. I tried with my small magnet with no luck.
I ordered a tongue muffler, hope it comes soon.
Rusty
I ordered a tongue muffler, hope it comes soon.
Rusty
_________________
Don't Panic!
...and never Ever think about how good you are at something...
while you're doing it!
My Hot Rock & Blues Playlist
...and never Ever think about how good you are at something...
while you're doing it!
My Hot Rock & Blues Playlist

RknRusty- Rest In Peace

- Posts : 10869
Join date : 2011-08-10
Age : 68
Location : South Carolina, USA
 Re: Oriental ARF assembly
Rusty, the OS FP .40 exceptionally likes this plug. http://www.ebay.com/itm/Enya-3-Hot-Heat-Nitro-Glow-Plug-/271551611962?pt=LH_DefaultDomain_0&hash=item3f39bcc43a This price isn't totally out of line even with shipping. Enya plugs are in my opinion the best quality plug your going to purchase today. The top however doesn't always correspond well to most clips and igniters. Ken

Ken Cook- Top Poster

- Posts : 5641
Join date : 2012-03-27
Location : pennsylvania
Page 3 of 5 •  1, 2, 3, 4, 5
 Similar topics
» 1/2A Nobler & 1/2A Oriental - foam wings, profile
» Skitzoid Phred here with Brodak ARC Oriental addition to the growing fleet
» My Oriental's OS 40fp spraybar
» First patterns with the Oriental - Video
» Another Oriental shakedown flight
» Skitzoid Phred here with Brodak ARC Oriental addition to the growing fleet
» My Oriental's OS 40fp spraybar
» First patterns with the Oriental - Video
» Another Oriental shakedown flight
Page 3 of 5
Permissions in this forum:
You cannot reply to topics in this forum

 Rules
Rules


