Log in
Search
Latest topics
» My N-1R build logby roddie Today at 12:32 am
» Happy 77th birthday Andrew!
by akjgardner Today at 12:27 am
» TEE DEE Having issues
by TD ABUSER Yesterday at 9:43 pm
» Landing-gear tips
by roddie Yesterday at 6:17 pm
» Roger Harris revisited
by TD ABUSER Yesterday at 2:13 pm
» Tee Dee .020 combat model
by Ken Cook Yesterday at 1:41 pm
» Retail price mark-up.. how much is enough?
by Ken Cook Yesterday at 1:37 pm
» My latest doodle...
by roddie Yesterday at 10:43 am
» Chocolate chip cookie dough.........
by roddie Fri Nov 22, 2024 1:13 pm
» Purchased the last of any bult engines from Ken Enya
by sosam117 Fri Nov 22, 2024 11:32 am
» Free Flight Radio Assist
by rdw777 Fri Nov 22, 2024 9:24 am
» Funny what you find when you go looking
by rsv1cox Wed Nov 20, 2024 3:21 pm
Cox Engine of The Month
Building another JR SATAN
Page 1 of 3
Page 1 of 3 • 1, 2, 3 
 Building another JR SATAN
Hello everybody,
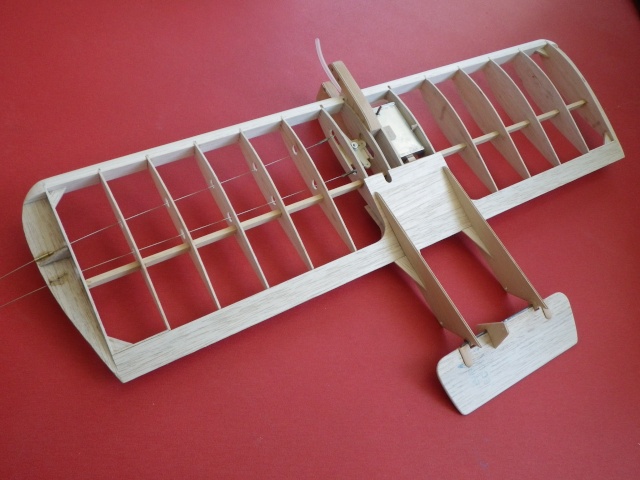
I'm writing you from Normandy, France. At the moment, I'm building a JR SATAN from plans that I found on OUTERZONE. I'm at the stage where I have to fix the bellcrank mount and the fuel tank.
Before this, I still have a few questions I'd like to ask:
Is it preferable to cover the wing first before adding the tail and stabilator? This is the way Riley Wooten describes it for the VOODOO in the MAN issue of '61. If so, how can the CG be set at the right point according to the drawing? I have a Brodak 2 Oz tank that I can move back and forwards to get the CG right.
Is it important and/or necessary to put a washer under the forward part of the engine mount? As ther is not so much space, I think the cylinder will touch the leading edge when adding a normally sized washer. I'm providing an ENYA 19.
As you can see below, the trailing edge is not solid but made up of 2 sheets as for the VOODOO. The spar is a little more square than on the drawings. I also had to convert all dimensions to mm as good as can be.
If you have any suggestions or comments, I'l be glad to hear.
Lieven


OVERLORD- Diamond Member

- Posts : 1807
Join date : 2013-03-19
Age : 58
Location : Normandy, France
 Re: Building another JR SATAN
Lieven, the engine your choosing to use is considerably heavier than the engine the plane was designed for. You may want to extend you tail booms. Your tank is on the CG and it won't do much for shifting the weight needed to balance that engine. I would even extend them as much as a 1 1/2" and mock it up . Another Tip would be to use one continuous wire for the elevator vs two L shaped pieces as this will not only keep things aligned, it will add even a touch more tail weight followed by a wrap in epoxy and fiberglass. For your sheeting, I would also extend it a additional 1/4"-1/2" beyond the booms and this allows for more area to attach the covering onto. A common practice and this usually wasn't an issue in the early days due to most using silk and the adhesives would wick directly through it and adhere the booms. I prefer to install my booms first but this makes things difficult to cover. It does however allow me to provide structural fillets. Ken

Ken Cook- Top Poster

- Posts : 5640
Join date : 2012-03-27
Location : pennsylvania
 Re: Building another JR SATAN
Very interesting user name given your location. I'm assuming that your choice is not by accident.
Welcome to the forum.
andrew
Welcome to the forum.
andrew
 Re: Building another JR SATAN
Thanks Ken for this precious info. I've read your topic on your JR SATAN. You did a wondeful job. I will keep you posted.
Lieven
Lieven

OVERLORD- Diamond Member

- Posts : 1807
Join date : 2013-03-19
Age : 58
Location : Normandy, France
 Re: Building another JR SATAN
Andrew, your spot on. We must not forget.

OVERLORD- Diamond Member

- Posts : 1807
Join date : 2013-03-19
Age : 58
Location : Normandy, France
 Re: Building another JR SATAN
Welcome to CEF, Lieven.
When I built my 1/2A Li'l Satan I covered the whole wing with Ultracote and then used a hot Exacto blade to remove the covering where the booms were to be glued. Like Ken said, extending the sheeting to make the center section wider gives the covering something to adhere to after you make those cuts. Or, if you're using old time silk and dope, it's no problem, as you just glue straight to it and the glue soaks through the covering. I unfortunately realized that was a problem too late, when Andrew pointed out I would have a problem, and I had to cut strips of balsa to widen the center section.
In the first picture you see the part I cut to add onto the width. In the background you can see the original width the plans called for.

Now with the finished addition, when I cut the strips of Ultracote off to glue the booms, there is still plenty of area for my Ultracote to adhere to.

As for the washer, it is necessary to have some outboard thrust angle. There are wedges you can buy from Brodak that do a better job than the washer, as the washers can dig into the wood. The wedges come in a set of 1,2 and 3 degree offset.
http://brodak.com/thrust-wedges-1-2-3-degrees.html
When I built my 1/2A Li'l Satan I covered the whole wing with Ultracote and then used a hot Exacto blade to remove the covering where the booms were to be glued. Like Ken said, extending the sheeting to make the center section wider gives the covering something to adhere to after you make those cuts. Or, if you're using old time silk and dope, it's no problem, as you just glue straight to it and the glue soaks through the covering. I unfortunately realized that was a problem too late, when Andrew pointed out I would have a problem, and I had to cut strips of balsa to widen the center section.
In the first picture you see the part I cut to add onto the width. In the background you can see the original width the plans called for.

Now with the finished addition, when I cut the strips of Ultracote off to glue the booms, there is still plenty of area for my Ultracote to adhere to.

As for the washer, it is necessary to have some outboard thrust angle. There are wedges you can buy from Brodak that do a better job than the washer, as the washers can dig into the wood. The wedges come in a set of 1,2 and 3 degree offset.
http://brodak.com/thrust-wedges-1-2-3-degrees.html
_________________
Don't Panic!
...and never Ever think about how good you are at something...
while you're doing it!
My Hot Rock & Blues Playlist
...and never Ever think about how good you are at something...
while you're doing it!
My Hot Rock & Blues Playlist

RknRusty- Rest In Peace

- Posts : 10869
Join date : 2011-08-10
Age : 68
Location : South Carolina, USA
 Re: Building another JR SATAN
Thank you Rusty. I'll have a look on the Brodak website. I saw your Li'l Satan on Youtube, it goes like the clappers.

OVERLORD- Diamond Member

- Posts : 1807
Join date : 2013-03-19
Age : 58
Location : Normandy, France
 Re: Building another JR SATAN
Hello everybody,
Here are a few more pics. Installed the bellcrank and some part of the sheeting for the mock up with tail booms and elevator.

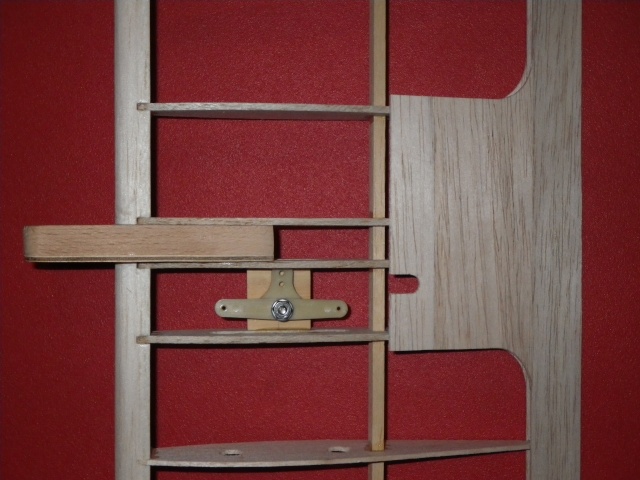
Have a good weekend,
Lieven
Here are a few more pics. Installed the bellcrank and some part of the sheeting for the mock up with tail booms and elevator.


Have a good weekend,
Lieven

OVERLORD- Diamond Member

- Posts : 1807
Join date : 2013-03-19
Age : 58
Location : Normandy, France
 Re: Building another JR SATAN
I really like your work. Very clean job your doing there. I'm pretty sure it will "Haul the mail" as we like to say. Ken

Ken Cook- Top Poster

- Posts : 5640
Join date : 2012-03-27
Location : pennsylvania
 Re: Building another JR SATAN
Thanks Ken for the encouraging comments.
I'm busy making the tail booms. As mentioned above, I made them longer as per Ken's advice to compensate for the engine's weight. One is already finished. Making a second one identical is not so straight forward but we're getting there.
Lieven

I'm busy making the tail booms. As mentioned above, I made them longer as per Ken's advice to compensate for the engine's weight. One is already finished. Making a second one identical is not so straight forward but we're getting there.
Lieven


OVERLORD- Diamond Member

- Posts : 1807
Join date : 2013-03-19
Age : 58
Location : Normandy, France
 Re: Building another JR SATAN
Hello there,
After a lor of sanding and comparing, I finished the tail booms and also glued the plywood doublers in place for the hinge pins. The hinge pin holes still need to be drilled trough. The tail booms wedge on nicely on the wing to get a snug fit. Here are some pics


Lieven
After a lor of sanding and comparing, I finished the tail booms and also glued the plywood doublers in place for the hinge pins. The hinge pin holes still need to be drilled trough. The tail booms wedge on nicely on the wing to get a snug fit. Here are some pics


Lieven

OVERLORD- Diamond Member

- Posts : 1807
Join date : 2013-03-19
Age : 58
Location : Normandy, France
 Re: Building another JR SATAN
Beautiful work AND beautiful photos !!!!
Welcome to the Forum !
Welcome to the Forum !

Kim- Top Poster


Posts : 8625
Join date : 2011-09-06
Location : South East Missouri
 Re: Building another JR SATAN
You do really nice work!

duke.johnson- Diamond Member

- Posts : 1734
Join date : 2012-11-05
Age : 53
Location : Rochester, Washington
 Re: Building another JR SATAN
Thank you for your comments.
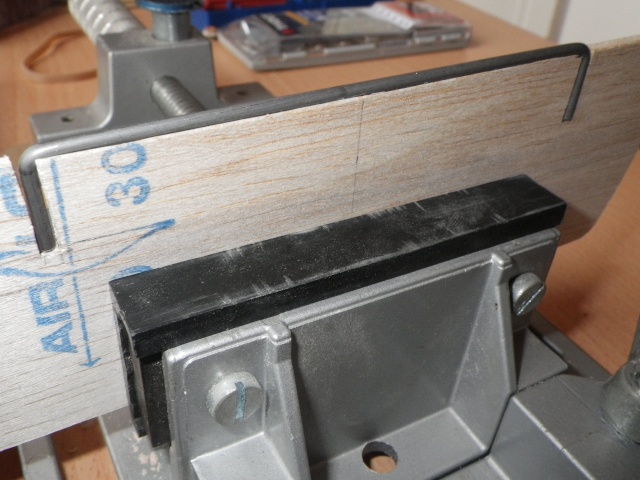
The elevator has been cut out of 3 mm sheet. I use a long hinge pin as Ken said to compensate for the engine's weight. It's a 2,5 mm pin with both ends bent and that goes through both tail boom holes. As it is difficult to drill a 2,5 mm hole into a 3 mm edge - at least for me, it is- I cut slots into the elevator. These will be covered by pieces of shaped hardwood on both sides. In order to locate the hinge pin, I've cut a 90° V groove into the forward edge of the elevator with an Xacto knife.
Unfortunately, I realized too late that now I have to cut the hinge pin in half to slide it through both tail boom holes. But on the other hand, bending the wire in a vice with both tail booms in place would end up in catastrophy.
The next step will be fabricating the control horn and then get on with the mock up. When reading Kim's thread about his Shark, I think I will have to put some lead on the tail as well. We'll see... Here are some pics.
Lieven


OVERLORD- Diamond Member

- Posts : 1807
Join date : 2013-03-19
Age : 58
Location : Normandy, France
 Re: Building another JR SATAN
Hello everybody,
Did the mock up and positioned the plane on a 3mm plywood edge.
Every element was added on except:
part of the sheeting
covering
silicon tube
exhaust
paint
cowling
The CG found is about 6mm in front of the CG indicated on the drawing. Is that all right? What are the differences in flight? The weight at this stage is about 380g.
If you lot see that there's something wrong or it's going the wrong way, don't hesitate,..just shoot!!
Lieven


OVERLORD- Diamond Member

- Posts : 1807
Join date : 2013-03-19
Age : 58
Location : Normandy, France
 Re: Building another JR SATAN
If the CG is still slightly forward, I wouldn't stress over it. My son flew mine and said it was twitchy. I'm inclined to think that the CG stated on the print is either scheduled to the rear too much or the 2" bellcrank is making the controls too sensitive. I have the controls operating with their slowest movements. I'm not sure what the spinner nut weighs compared to the stock nut and the Master Airscrews are a bit on the heavier side. I don't care for woodies on a combat plane but if needed a wood prop could be substituted to try and get some up front weight off the nose. I use golfers lead tape which is really quite thin and this could be used to wrap around the tail boom to give you even a bit more of adjustment. The plane really looks great. This will truly pay off in the finishing. I'm impressed you squeezed that tank in there. Ken

Ken Cook- Top Poster

- Posts : 5640
Join date : 2012-03-27
Location : pennsylvania
 Re: Building another JR SATAN
I've weighed several models at that stage of construction and I always think they are going to be nose heavy. But after adding paint and covering, I've been way off the mark every time. So I wouldn't put too much faith in a pre-finishing guess at its balance point.
You're doing such a beautiful job, I hate to give any opinions. But I can't help but think that most of your tank is going to be behind the preferred CG.
You're doing such a beautiful job, I hate to give any opinions. But I can't help but think that most of your tank is going to be behind the preferred CG.
_________________
Don't Panic!
...and never Ever think about how good you are at something...
while you're doing it!
My Hot Rock & Blues Playlist
...and never Ever think about how good you are at something...
while you're doing it!
My Hot Rock & Blues Playlist

RknRusty- Rest In Peace

- Posts : 10869
Join date : 2011-08-10
Age : 68
Location : South Carolina, USA
 Re: Building another JR SATAN
That's right about that tank position, Rusty, the indicated CG is between the forward bellcrank hole and the forward edge of the belcrank mount. Should I put the tank in the middle between the leading edge and the spar?

OVERLORD- Diamond Member

- Posts : 1807
Join date : 2013-03-19
Age : 58
Location : Normandy, France
 Re: Building another JR SATAN
Here's a small update of the JR Satan's construction. I've been busy working a lot and therefore, it slowed down a bit. I fixed the tank and put the leadouts onto the bellcrank. I put epoxy onto the copper binding wire and hung it up to dry. Should I put shrink wrap on there after drying just to make it more smooth?


OVERLORD- Diamond Member

- Posts : 1807
Join date : 2013-03-19
Age : 58
Location : Normandy, France
 Re: Building another JR SATAN
I usually put some shrink tube on mine. It helps keep the edges from catching on the hole in the rib where it passes through.
_________________
Don't Panic!
...and never Ever think about how good you are at something...
while you're doing it!
My Hot Rock & Blues Playlist
...and never Ever think about how good you are at something...
while you're doing it!
My Hot Rock & Blues Playlist

RknRusty- Rest In Peace

- Posts : 10869
Join date : 2011-08-10
Age : 68
Location : South Carolina, USA
 Re: Building another JR SATAN
While mounting the Brodak 2" bellcrank and doing up the nut, I found that the bellcrank itself became more stiff in turning. The pedestal protrudes the bellcrank surface, so I thought that the washer edges might touch the bellcrank surface. I replaced the 1/8 washer by a 3 mm one (small washer on the picture) with an enlarged hole but I didn't gave any difference. Could it be that the force needed to squeeze the spring washer between the washer and the nut crushes the pedestal slightly making it to expand? In that case I'll remove the spring washer and use Loctite for securing. A nyloc washer would be ideal but finding a 1/8 UNC over here is almost impossible. The smallest one you can find is 1/4.
Did anybody encountered similar problems with this type of bellcrank?
Lieven
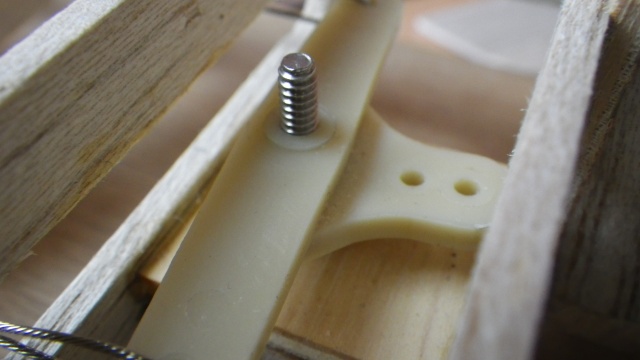
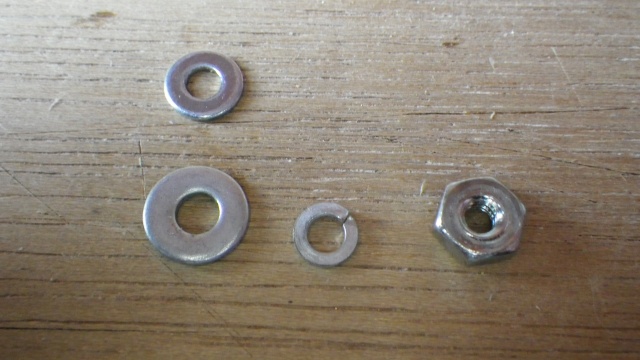
Did anybody encountered similar problems with this type of bellcrank?
Lieven


OVERLORD- Diamond Member

- Posts : 1807
Join date : 2013-03-19
Age : 58
Location : Normandy, France
 Re: Building another JR SATAN
Lieven, here is what I discovered. Washers are stamped, this means that one side is slightly concaved. Place the convex side of the washer towards your bellcrank. It would also help to sand the bellcrank itself, either the bottom or the top. What's happening is the slight crush your providing is squeezing down on the bushing. It would be a benefit to use Nyloc nuts opposed to a regular nut. Only make it tight enough so there is no bind. I've used two nuts together using them as jam nuts and providing Loc-tite on the threads. In addition, the steel machine screws your using will work, but they are susceptible to bending. A socket head allen screw would provide far superior strength. Screws just aren't what they used to be. I say this in regards to if the plane was to lose line tension and fly out with a jerk. Wings like the JR somewhat fly on their own until they get up to speed and during takeoff, it can be a little eye popping at times. Yes to the above concerns you experienced as I've experienced the same. Just tighten the bellcrank enough and all will be good. Ken

Ken Cook- Top Poster

- Posts : 5640
Join date : 2012-03-27
Location : pennsylvania
 Re: Building another JR SATAN
Hello Ken,
After reading your advice, I had a look again. I noticed that without the nut mounted, the bushing turned with the bellcrank. When everything was done up, the bellcrank turned with a greasy feel on the immobilized bushing. I passed over it quickly with fine sand paper and the problem was solved. Proof that Brodak parts are manufactured with precision (except for the stamped washer?).
Lieven

OVERLORD- Diamond Member

- Posts : 1807
Join date : 2013-03-19
Age : 58
Location : Normandy, France
 Re: Building another JR SATAN
This is how the plane looks today with finished aft part:

To get the fairings aligned with the horizontal centre line if the rib, I drew the bisector of the trailing edge angle on the inside of each inner tail boom before assembly. In order to get exactly the same marking on the other side, I drilled a small hole to indicate the alignment. This hole is covered when the fairings are glued on.

Lieven


To get the fairings aligned with the horizontal centre line if the rib, I drew the bisector of the trailing edge angle on the inside of each inner tail boom before assembly. In order to get exactly the same marking on the other side, I drilled a small hole to indicate the alignment. This hole is covered when the fairings are glued on.

Lieven

OVERLORD- Diamond Member

- Posts : 1807
Join date : 2013-03-19
Age : 58
Location : Normandy, France
Page 1 of 3 • 1, 2, 3 
 Similar topics
» Li'l Satan Question
» Li'l Satan CG
» Another model ready for the flying season
» I put a Tee Dee on my Lil' Satan
» Lil' Satan and friends
» Li'l Satan CG
» Another model ready for the flying season
» I put a Tee Dee on my Lil' Satan
» Lil' Satan and friends
Page 1 of 3
Permissions in this forum:
You cannot reply to topics in this forum

 Rules
Rules


